Benefits administration system and methods of use and doing business
US20060064313A1
2006-03-23
11/006,278
2004-12-06
✅ Patent granted
US 8,078,481 B2
2011-12-13
-
-
Kirsten Apple | Scott Trotter
2028-03-12
Abstract:
An automated benefit administration system and methods of use and doing business. The full system includes a wide range of features including application of business rules to enrollment, eligibility, and maintenance data input, making of business decisions based on the specific data entered, and issuing of notices based on business rule discrepancies including notices to third parties when deemed appropriate. The full system also is secure while providing remote access, including through the Internet, limits access based on user hierarchy, allows user customization of various features including communications vehicles (e-mail, letter correspondence, or facsimile) and of the format of certain communications, provides automatic enrollment in Cobra without re-entry of beneficiary data, accomplishes various types of financial reconciliation, accommodates differing organizational structures and groupings of entities, provides business rule over-ride capability for certain users, and provides robust information about carriers and their services.
Inventors:
- John Steinbarth 1 🇺🇸 Auburn, CA, United States
- Patricia A. Steinbarth 1 🇺🇸 Auburn, CA, United States
- Patricia Steinbarth 1 🇺🇸 Auburn, CA, United States
Interested in similar patents?
Get notified when new applications in this technology area are published.
Classification:
G06Q10/10 » CPC main
Administration; Management Office automation, e.g. computer aided management of electronic mail or groupware ; Time management, e.g. calendars, reminders, meetings or time accounting
G06Q10/1057 » CPC further
Administration; Management; Office automation, e.g. computer aided management of electronic mail or groupware ; Time management, e.g. calendars, reminders, meetings or time accounting; Human resources Benefits package
G06Q40/08 » CPC further
Finance; Insurance; Tax strategies; Processing of corporate or income taxes Insurance, e.g. risk analysis or pensions
G06Q10/00 IPC
Administration; Management
Description
CROSS REFERENCE TO RELATED APPLICATIONSThis application claims priority through, and hereby incorporates by reference in its entirety, U.S. Provisional Patent Application Ser. No. 60/526,961, filed Dec. 5, 2003, entitled Benefit Administration System and Methods of Use and Doing Business.
The following document is a copyrighted text. All copyrights are reserved as allowed by law.
BACKGROUNDThe present invention relates to benefits administration systems and methods of use and doing business. The present invention also relates to automated systems for administering benefits.
In business and industry, benefits plans are common. They often include health care, savings or retirement plan, insurance, and other funding or services for employees. Administration of benefits has long presented a substantial challenge for business and industry.
One prior art automated system designed for administration of benefits has been known as the “Phoenix” system. The Phoenix system automated certain benefits administration tasks and included features such as:
-
- a. enrollment of beneficiaries through a limited-access, private computer network such as an business's internal computer network;
- b. automated but limited application of certain basic business rules to inform the user, at the time of entry on-screen only, of certain limited missing information such as a beneficiary's address, birthdate dependents, or benefits plan choice;
- c. automated reconciliation of payments provided they exactly match the amount invoiced to the customer;
- d. limited automation of physical letter generation such as generation of a welcome letter to a new customer setting forth little more than the effective date of initiation of plan coverage for the customer;
- e. automated maintenance of certain limited carrier data, including certain carrier rates and rating areas;
- f. limited automation of Cobra enrollment by re-keying data for the Cobra enrollment into the system;
- g. limited automation of open enrollment and re-qualification by automated sending out of notices and issuance of failure to re-qualify reports, allowing manual entry of termination if desired by the administrator;
- h. automated termination and issuance of termination notice to the carrier upon first termination of a customer and thus well prior to conclusion of the re-instatement option period; and
- i. limited periodic reconciling of payments actually received in-house by receipt at the system administrator's mailroom, routing to the finance department for entry into the system; if the payments matched exactly the amount of their respective invoices, the finance department would initiate a program through that would reconcile the cash received against the invoice; non-matching payments would require substantial manual involvement in the reconciliation process
- j. The Phoenix system included numerous limitations and issues, however, including:
- k. limited carrier data such as not including data (only zip codes and rates);
- l. lack of automated creation of a Cobra record from information already in the system for a given beneficiary;
- m. with regard to issuance of notices for enrollment or re-qualification, lacked ability select sub-groups (e.g., groups under 5 employees) for issuance of notices only to them, and also lacked automatic termination of groups that do not re-qualify;
- n. providing notice of termination of a group to a carrier prior to expiration of a re-qualification period for the group including Cobra members of the group;
- o. lack of automatic changing of employee status upon change of employee coverage (e.g., by changing from employee-only coverage to employee and spouse coverage), along with lack of automated corrected billing as a result of the change;
- p. lack of automated reconciliation of cash upon closing of a batch of inputted premium checks, and automatic reconciling of premium notices with payments provided by multiple payments (e.g., multiple checks providing payment for a particular premium amount);
- q. limited application of business rules to ensure correct data entry and limiting of enrollment as allowed by the rules, and relatedly, no ability to issue notices other than on-screen notices of certain limited types of information that may be missing;
- r. limited ability to generate required notices, and limited or no ability to send notices through differing media (e-mail, mail, fax);
- s. no ability to allow system access through remote or separate networks, such as via the Internet;
- t. no ability to reconcile payments that do not exactly match invoice amounts, and no ability to issue notices based on matching discrepancies; and
- u. limited data handling capacity, requiring periodic purge data to run the system.
Certain embodiments of the benefits administration system may (i) apply rules to enrollment, eligibility, and/or group maintenance data input, preferably all such input, and (ii) make business rule decisions based on the specific data entered, preferably including automatic actions related to correct business rules as well as issuance of notices for business rule discrepancies. These capabilities can, in certain embodiments, include business rule over-rides based on user authority level.
For example, in the insurance industry, an enrollment application is required for enrollment into any insurance plan. Enrollment rules may pertain to the input of data from this application into the benefits administration system. An example of an enrollment rule may include inputting a Social Security number (SSN) that has been assigned to another member previously. In certain embodiments, the benefits administration system can produce a notification of a duplicate SSN and may not allow the completion of the member's enrollment utilizing the duplicate SSN.
Another example of an enrollment business rule is the entry of information for a new member who requests family health coverage but does not list any dependents on the new member's enrollment application in the system. In certain embodiments, the business rules within and automatically applied by benefits administration system can require the data entry of one spouse and at least one child in order to comply with family coverage. Without this dependent information, the system may refrain from allowing finalization of the enrollment. In certain embodiments, the system can then automatically designate the member's application as pending and generate one or more notices (such as letters) advising of the need for, or requesting, the missing information.
Eligibility rules may pertain to the specific business rules set up by the insurance companies. For example, to be eligible for a certain type of insurance, an employer group may require at least two employees; or in order for an employee to be eligible, the employee may have to work at least thirty hours per week. In certain embodiments, the benefits administration system may implement these types of specific rules.
For example, if a user seeks to enter an employer group with only one employee, in certain embodiments the system can thus refuse to finalize the enrollment unless another employee's information is entered. As another example, if user enters hours-work-per week for an employee less than the business rule of 30 hours, in certain embodiments, the system will not allow finalization of the enrollment. In certain embodiments, the system may accommodate exceptions such as when a user with a pre-determined authority level, such as a manager, desires to over-ride the eligibility business rule. In certain embodiments, the system can allow the exception based on pre-arranged authority levels within the system.
Group maintenance may pertain to enrollment/eligibility activities that occur after the finalization of a group's enrollment. One example may be the addition a newly hired employee to the employer group's plan. In certain embodiments, once the new employee application is received and data is entered, the system may apply one or more business rules for the waiting period for the new hire within the group within which the new hire is hired. Based on this comparison, the system may either assign a correct effective date or deny the enrollment because the employee has not properly satisfied the waiting period. In additional embodiments, if the employee is enrolled, the system may automatically issue an enrollment letter; or if denied, the system may automatically issue a denial letter.
Yet another group maintenance example may be the receipt of monthly insurance premium payments. In certain embodiments, the system may automatically issue an invoice outlining activity affecting the premium for a given period of time, such as the past month. Such activity may include adding a newly hired employee or dis-enrolling a terminated employee. In certain embodiments, the system may implement business rules to provide automatic reconciliation of the premium to the amount of an invoice.
In certain embodiments, the system may also be flexible enough to take into consideration activity that occurred after the creation of the invoice in reconciling the premium. For example, the monthly invoice to a given customer may total a particular amount. By the due date of the invoice, the employer may have sent notification of an employee disenrollment. The employer may have only sent a payment that deducts the premium for the disenrolled employee. In certain embodiments, the system can automatically reconcile the received payment against the invoice amount and the termination credit for the disenrolled employee.
In certain embodiments, the benefits administration system may implement varying authority levels for data entry and system operation. For example, the system may provide that (i) a data entry position may have authority to enter data but not to finalize enrollment even if all business rules are met; (ii) yet another position may have authority to finalize enrollment if all business rules have been satisfied; (iii) a supervisor may have authority to finalize enrollment with, as possible examples, minor premium shortages or non-eligibility-related missing enrollment information; (iv) managers may have authority to finalize enrollments with significant premium shortages or non-eligibility issues; and (v) a system administrator may have authority to over-ride any business rule.
Certain embodiments may also provide remote access through disparate networks, such as, for example, through the Internet, for enrollment, eligibility, or group maintenance data input. In certain embodiments, the system may then make business rule decisions based on the specific data entered. In certain embodiments, the system also may automatically perform actions related to the business rules. In certain embodiments, the system also may automatically issue notices, including on-line notice in certain embodiments, for business rule discrepancies. In certain embodiments, the system may include business rule over-rides based on the authority level of user.
In certain embodiments, the system can allow an external business customer to process enrollment, eligibility, or group maintenance via the Internet. For example, in the insurance industry, an enrollment application typically is required for enrollment into an insurance plan. In certain embodiments, the benefits administration system may allow this application to be entered remotely through a, preferably secure, Web site.
For example, an employer may request enrollment in a health insurance plan. In certain embodiments, the employer then may access the Web site provided by the system and enter the employer's current employees' demographic and health carrier information. The employer also may pay the first month's premium on-line through the Web site.
Preferably, the system prompts the on-line user for information. While the data is being entertained, in certain embodiments the system may compare the data to the business rules associated with each field. Once the input is completed properly, in certain embodiments the system may present an enrollment summary sheet summarizing enrollment information for the on-line user. For example, in certain embodiments implementing the a wage and tax form requirement for new group enrollments, the system may present the on-line user with the completed form and instructions to return the form to, for example, the insurance company for further processing. In certain embodiments, once the insurer approves enrollment, the system may automatically e-mail or otherwise forward an enrollment acceptance form to the user.
In certain embodiments, business rules remain identical whether for in-network or remote on-line transactions such as, for example, through the Internet.
Group maintenance may involve enrollment/eligibility activity occurring after the finalization of a group's enrollment. For example, if an employer or designated contact person is attempting to enroll a newly hired employee on-line, the employee is hired to work twenty hours per week, and the business rule set up for this particular group is that all employee's must work forty hours per week, in certain embodiments the system may dis-allow the finalization of the enrollment. In certain embodiments, the system may automatically issue a notice informing the group of the non-enrollment and, preferably, the reason(s) for the non-enrollment.
Another group maintenance activity can be employee or dependent disenrollments. In certain embodiments, the employer or designated person may access the appropriate group information on-line and enter the requested termination date. If the requested termination date complies with the business rule, in certain embodiments the system may immediately process the termination, preferably including the sending of a termination notice and COBRA information to the disenrolled employee, adjusting the applicable premium invoice, and notifying the appropriate insurance carrier. If the requested termination date is not within the pertinent business rules, in certain embodiments the system may calculate the termination date and display the date to the on-line user. If the user were to accept this date, in certain embodiments the system may complete the termination and, preferably, issue a notification to the user, such as by e-mail. If the user were to decline the system's proposed termination date, in certain embodiments the system may place the requested employee termination on hold and, preferably automatically, issue a notice of the situation to an appropriate representative.
In certain embodiments, the system may limit the capability to over-ride business rules to in-house personnel (e.g., the personnel of the entity that administers the system).
In certain embodiments, the system can provide a security application or process in order to control access to the system. In certain embodiments, the security framework includes a security information database as well as an administrator login capability. In certain embodiments, the system can allow the administrator to create users, modules, groups, applications, and assign user roles and access control lists (ACLs), etc. Preferably, the system significantly restricts access to the core administrative system.
In certain embodiments, the system generates an ACL for each user at the time the user logs into the system. Access to any resource in the core administrative system may be determined by the ACL, and the determination may be stored in, e.g., a user profile object, which may be stored into the session. A user can include a person working in any of the departments in a company, Internet users, or persons accessing an in-house system from an external location. In certain embodiments, individual user permissions take precedence over group permissions. In certain embodiments, even if the group permission is less restrictive than the user permission, the user permission overrides the group permission.
For example, the agent/broker of a large association group may want to allow the members of the association to enroll through the Internet but to also provide for agent/broker review of applications prior to actual enrollment. In certain embodiments, the system, through its security system, can allow such members to enroll through the Internet (with the application being processed through the enrollment/eligibility business rules), then route the completed application to the agent/broker (versus directly into the system after passing all the business rules), in order to allow the agent/broker to review the application. In certain embodiments, upon completion of such review and approval by the agent/broker, the system can automatically finalize the enrollment.
In certain embodiments, the benefits administration system may also provide the automatic generation of documents and other communications, customizable to the desires of the users. In this regard, the system may provide a flexible mail merge system for handling external business correspondence. In certain embodiments, the merge templates are basically RTF files with placeholders for dynamic data to be merged into them. In certain embodiments, the output is either a RTF file or a PostScript or a PDF document.
In certain embodiments, the system can also maintain a log of mail merge letters generated. The log information may include the template identification, a timestamp, the triggering application, and identification of the user generating the letter and to whom the letter is addressed (i.e., which group or member or agent). In certain embodiments, the templates are readily available, and the system may accommodate a virtually unlimited number of templates.
For example, when the agent/broker provides final approval for association member enrollment, in certain embodiments the system may issue enrollment approval and related correspondence. In certain embodiments, such correspondence or other documentation may be customized through the system to issue on the agent/broker's letterhead.
In certain embodiments, the system may provide for customizable work groups. Workgroups may define the broad categorization of a group of agents, internal working personnel, external working personnel, and mailing groups. In certain embodiments, the workgroup customization process includes creating a hierarchy of one or more parent entities and defining other workgroups under the parent(s).
In this event, a parent may be the highest in the hierarchy of a workgroup. Examples of parent work groups may include agent work groups or internal work groups. Examples of workgroups under the parent group may include groups of agents of differing authority levels within a given agent work group. In certain embodiments, further sub-groups or child groups may be established within the system. An example may include may include agents in a given geographical area or a customer group that has been enrolled in the system. In certain embodiments, the system includes the ability to exchange workgroup members or duplicate workgroup members in whole or in part.
In certain embodiments, the benefits administration system provides automatic but flexible account reconciliation. Cash reconciliation can provide a process of reconciling the cash receipts to individual invoices and reconciling the amount paid by the group. In certain embodiments, the system may provide a rule for reconciliation such as, for example:
-
- a. determine if negative cash is available and reconcile it with the positive cash (e.g., for NSF checks); and
- b. identify the oldest unreconciled invoice and reconcile it with the oldest cash.
- c. The reconciliation process may include automatic review of all invoices that have not been reconciled for a specific group and reconciling the invoice that has the earliest date with the cash received. It also may match the cash receipt with the invoice amount.
- d. In certain embodiments, the reconciliation process can be started automatically when a cash receipt batch is closed to reconcile cash received with invoices.
- e. Other functions that may be automatically performed in cash reconciliation may include one or more of the following:
- f. Billed amounts and cash receipt: this reconciliation process may reconcile an invoice that has not yet been reconciled for a specific group, determine if the invoice is the earliest unreconciled invoice for the specific group, and reconcile the invoice with the cash received from the group/member;
- g. Cash to negative cash: this process may reconcile negative cash with the positive cash received from the group. This may arise from receipt of a NSF (Non-Sufficient Funds) check after the applicable group's invoice has been reconciled. Upon receipt of notification of the NSF check, the NSF cash receipt entry may be created in the system. Upon receipt of a replacement check for the NSF check, the NSF check may be automatically reconciled with the replacement check provided the amount of the replacement check is the same as the amount of the NSF check.
Adjustments to cash: this process may include reconciling a cash receipt with the adjustment that may be available in the next invoice. For example, if the group has received the invoice for the next month and an employee has been terminated during the month but after the generation of invoice, the generated invoice may not identify this adjustment for the termed employees. The applicable group may deduct the adjustments for the terminated employee and forward the cash that does not match the original invoice. In certain embodiments, the system can automatically identify the discrepancy and adjust the cash receipt for the invoice with the termination adjustment taken in to account. In certain embodiments, the next invoice may identify the cash receipt and the adjustment for employee termination.
Adjustment to billed amounts: this process can identify previously billed invoices for the group provide adjustment as needed to the next invoice.
Billed amount to itself if no payment is due: this process can identify if the group has been terminated after the invoice for the group has been created. In certain embodiments, the system automatically creates an invoice for the terminated group and adjusts the amount due based on the previous invoice. In certain embodiments, the system issues a final invoice for the terminated group showing net amount due, if any, or refunded.
Adjustment to adjustment: this process may reconcile invoice adjustments against each other. For example, if a payment late fee accrues but is later waived, in certain embodiments the system may automatically adjust (eliminate) the late fee. Another may involve reinstatement of an employer group termination and associated charging of a reinstatement fee. If such a fee were to then be waived, in certain embodiments the system may automatically reconcile the waived fee.
Certain embodiments of the benefits administration system provide a substantially improved ability to handle much larger data sets and to handle data more efficiently. In addition, certain embodiments utilize an independent platform and portable programming language such as Java. Preferably, the system components are built using object oriented programming concepts. Preferably, these object-oriented components can be reused in other applications with similar requirements or extended further with additional features when and wherever required. Preferably, the system is developed using scalable J2EE standards.
In certain embodiments, the system may allow a given user to work with the system in differing roles or capacities. For example, a manager may seek to perform the role of data entry as well as that of a manager or authorizing entity. In certain embodiments, the system allows modification or addition of user roles as desired. In certain embodiments, the CAS (Core Administration System) system is, however, pre-configured for a basic set of predefined roles.
In certain embodiments, the benefits administration may further provide one or more of the following aspects:
-
- a. selective issuance of notices to sub-groups meeting certain criteria;
- b. automated creation of a Cobra record from information in the system for a given beneficiary;
- c. automatic issuance of notice to a member prior to termination of the re-qualification period;
- d. automatic revision of employee status upon change of employee coverage;
- e. automatic issuance of notices when data is not entered correctly or completely, including issuance of other than on-screen notices to one or more system administrators or other entity;
- f. ability of a user to customize how the user may be provide notices or correspondence, such as by e-mail, mail, or facsimile; and
- g. enhanced carrier data maintenance within the system.
The system may be utilized by a benefits provider as part of it business and operation. Alternatively, the system may be utilized by a service provider, such as for or in connection with remuneration provided to the service provider by customers. For example, user fees may be provided by the users of the system, such as benefits providers or employers.
The system may also be utilized by an employer or group of employers, and their employees, to provide automated benefits administration for the employer or group of employers.
In certain embodiments, all features identified above may be provided by the system. The system may thereby provide an automated benefits administration and method of use of the system and doing business in conjunction with it.
There are many other novel aspects and aspects of embodiments of the present invention. They will become apparent as the specification proceeds. In this regard, it is to be understood that the scope of the invention is not be determined by whether given subject matter addresses all or particular issues in the prior art noted above or provides all or particular features identified in this brief summary.
Benefit Partners Inc. BPI-Software Architecture Document Architectural Design Specification Document Document Id: BPI_CAS_ADS Version:<1.0> Revision History
| Change Record |
| Date | Author | Version | Change Reference |
| Sept 17th, 2001 | Amit Ambardekar | 1.0 | Baseline Release |
| Reviewers |
| Date | Name | Position | |
| Sept 17th, 2001 | Sakthivel K S | PM | |
| Sept 17th, 2001 | L Chandrasekar | TL | |
| Sept 17th, 2001 | Deivasigamani K | TL | |
| Approver |
| Date | Name | Position | |
| 17/Dec/2002 | Sakthivel K S | PM | |
1. Introduction 4
1.1 Purpose 4
2.1 Definitions, Acronyms and Abbreviations 4
1. Introduction
The Software Architecture Document will provide an overview of the entire “Software Architecture” that will be used to develop Web Interface Module for BPI.
1.1. Purpose
This document provides a comprehensive architectural overview of the system, using a number of different architectural views to depict different aspects of the system. It is intended to capture and convey the significant architectural decisions that have been made on the system.
1.2. Definitions, Acronyms and Abbreviations
Some of the common acronyms used in this document are as follows:
| Abbreviations | Description | |
| EJB | Enterprise Java Beans | |
| HTML | Hypertext Markup Language | |
| J2EE | Java 2 Enterprise Edition | |
| JMS | Java Messaging Services | |
| JNDI | Java Naming and Directory Interface | |
| JSP | Java Server Pages | |
| MVC | Model View Controller | |
| W3C | World Wide Web Consortium | |
| XML | Extensible Markup Language | |
| BPI | Benefit Partners Inc | |
1.3. Overview
This Software Architecture Document, at high level, will contain:
-
- a. Architectural representation of proposed system
- b. Architectural goals
- c. Software requirement
- d. Software selection for the proposed system
- e. Standards and methodologies that will be adopted for the proposed system
2. Architectural Goals
These guidelines will lay a foundation for the design and implementation strategy, selection of development tools, application software, and testing tools. The basic goals of the architectural design are discussed below.
2.1. Portability
Java is a platform independent and portable language. Applications developed in Java are proven to be portable across popular platforms.
2.2. Distribution
The J2EE Standards will be adopted to develop the new application. J2EE standards demonstrate consistency of distributed applications that access various data sources.
2.3. Reusability
The components will be built using Object Oriented concepts. These object-oriented components can be reused in other applications with similar requirements or extended further with additional features when and wherever required.
2.4. Scalability
Applications developed using the J2EE Standards are proven to be scalable. Therefore, the system will be built in conformance with the J2EE Standards.
2.5. Performance
Identifying the latencies within the system and outside the system boundaries enables us to increase the performance of the application. Since most of the threading issues that lower the performance of an application are well handled within the Websphere application server, Websphere server's features and resources will be effectively utilized to achieve performance.
3. Architectural Representation of the Proposed System
The System will be developed based on the J2EE specification and follow the N-tier MVC architecture.
A tier is a logical partition of the separation of concerns in the system. Each tier is assigned its unique responsibility in the system.
J2EE specifications are multi tiered consisting of the Client Tier, Middle Tier (Presentation Layer, Business Layer, and Integration Layer), and the Data source. The J2EE architecture diagram is described below. (See Figure A-1)
3.1. Client Tier
This tier represents all devices or system clients accessing the system or the application. In this case, the client would be a web browser or other application.
3.2. Middle Tier
The middle tier can be classified into multiple logical layers depending upon the business requirements and programming model. Three basic classifications are discussed below.
3.2.1. Presentation Layer
This tier encapsulates all presentation logic required to service the clients that access the system. The presentation tier intercepts the client requests, provides single sign-on, session management and accesses business services, constructs the response, and delivers the response to the client. Servlets, JSP, HTML reside in this tier.
3.2.2. Business Layer
This tier provides the business services required by the application clients. The tier contains the business data and business logic. All business processing for the application is centralized into this tier. The enterprise bean components are the choice for implementing the business objects in the business tier.
3.2.3. Integration Layer
This tier is responsible for communicating with external resources and systems, such as data stores and legacy applications. The business tier is coupled with the integration tier whenever the business objects require data or services that reside in the resource tier. The components in this tier can use JDBC, J2EE connector technology, or some proprietary middleware to work with the resource tier.
3.3. Data Source
This is the tier that contains the database and external resources such as legacy systems, business-to-business (B2B) systems, and services, such as, credit card authorization and EFT.
3.4. Framework
The following figure depicts the interaction model of a typical Model View Controller or the JSP Model 2 Architecture that is adopted in the Framework. (See Figure A-2)
Here, the servlet acts as the controller and is in charge of processing the request and creating any objects of the beans used by the JSP. It also redirects, to the respective JSP, based on the Browser's request. There will be very minimal logic present in the JSP regarding the presentation. All the database access and program business logic will be processed within the bean.
There will be different beans for data source access (database, enterprise systems, queue, XML, etc.), error handling, access logging, and module wise application business logic processing. This clearly separates the presentation from the content and enables easy maintenance and scalability.
This model is the widely used and accepted model for application development in Java. This model is also adopted by Apache Struts framework for Java application development.
4. Software Selection for the Proposed System
This section provides an insight on the software selection for the various tiers depicted in this document.
4.1. Software Selection
| Component | Software Name and Version |
| Operating System | Server/Client - Win NT/Win 2000 |
| Browser | IE 5.5 and above |
| Client Side Scripting | HTML 4.0, Java Script 1.2 |
| Server Side Programming | JSP 1.1, Java Servlets 2.2, JDK 1.3 |
| Database Server | DB2 UBD Version V 7.3 |
| Web Server | IBM HTTP Server V 1.3.19 |
| Application Server | Websphere Application Server Advanced |
| Edition Version 4.0 | |
| Report Server | Seagate Crystal Reports 8.5 |
| Office Tools | Microsoft Office 2000 (select Word 2000, |
| Excel 2000 and Outlook 2000 and | |
| Access 2000), Post Script Printer, | |
| Adobe Acrobat 5.0 | |
| Servlet, Bean | Visual Age 4.0 |
| Development | |
| HTML, JSP, XML, etc. | Dream Weaver 4.0 |
| Testing | JTest 4.5 |
| Data Flow and Class | UML Studio |
| Design | |
4.2. API Versions
| API Name | Version | Remarks | |
| J2EE | Specification 1.2 | Supported by Websphere | |
| 4.0 | |||
| EJB | Specification 1.2 | Supported by Websphere | |
| 4.0 | |||
| JDK | JDK 1.2.2 | Supported by Websphere | |
| 4.0 | |||
| Servlet | Servlet 2.2 | Supported by Websphere | |
| 4.0 | |||
| JSP | JSP 1.1 | Supported by Websphere | |
| 4.0 | |||
| HTTP | HTTP/1.1 | Stable W3C Specification | |
5. Standards and Methodologies
The standards and methodologies that will be followed for the application development are discussed below.
5.1. Design Document
Detailed design document will be prepared based on the scope of the application prior to the development. This document will contain the details on graphic user interface, navigation, class diagrams, data dictionary, field validation criteria, and program logic.
5.2. Bean Classification
The types of Java beans that will be used to perform different business logics will be decided during the design stage. The bean types will be classified based on the complexity of the business logic and the scalability.
5.3. Coding
A separate document will be prepared outlining the coding standards that will be adopted in the application development. The document will contain details on program naming conventions to be used while coding. All programs developed will follow this standard.
5.4. Testing
Test plan and test case documents will be prepared for unit and integration testing of the application. The test cases will be used to test the application modules and integration. JTest will be used for testing code construction (white-box testing), code functionality (black-box testing), and code integrity (regression testing).
5.5. Error Handling
All error messages and error codes for the application will be stored in the database. Run time errors will be logged to text files that will be generated periodically by the system. Input validations will occur in both the client tier and the middle tier. The input validation error messages captured in the client tier will be displayed using JavaScript alerts. The input validation error messages captured in the middle tier will be displayed in HTML format, on the same page on which the error has occurred, in a different color.
5.6. Page Design
A Page Design Guidelines document will be created by Mascon, and approved by BPI, prior to the development. All pages in the application will conform to the standards depicted in this document. This document will contain the specifications for fonts, layouts, images, and other relevant details.
5.7. Parameterization
Custom JSP tag libraries will be created for all initial values and parameters used in the application. JSP tag libraries define declarative, modular functionality that can be reused by any JSP page. Tag libraries reduce the necessity to embed large amounts of Java code in JSP pages by moving the functionality provided by the tags into tag implementation classes. In doing so, tag libraries make authoring JSP pages easier and modular.
6. System Architecture and Hardware Selection
This section provides the details of the system architecture with nodes, terminals and their placement within the respective zones.
6.1. Physical Architecture (See Figure A-3)
6.2. Hardware Selection
| # | Server | Base | Current Configuration | Software/Hardware |
| 1 | Database | Intel Pentium | Intel XEO | 1. Windows 2000 |
| Server | Processor, 2 | Processor | Advanced Server | |
| CPU, | 1 CPU | 2. IE 5.5 and above | ||
| HD 104 GB, 2 GB | HDD 34 GB | 3. IBM DB2 UDB | ||
| RAM, Raid 5 | 2 GB RAM | version 7.2.x | ||
| CPU 2.4 Ghz. | ||||
| 2 | Application | Intel Pentium | Intel XEO | 1. Windows 2000 |
| Server - | Processor, CPU | Processor | Advanced Server | |
| Intranet | 1, HD 18 GB, 2 GB | 1 CPU | 2. IE 5.5 and above | |
| RAM | HDD 200 GB | 3. Websphere | ||
| 2 GB RAM | Application Server | |||
| CPU 2.4 Ghz. | Advanced Edition | |||
| Version 4.0 | ||||
| 4. IBM DB2 UDB | ||||
| version 7.2.x (For | ||||
| WAS Repository) | ||||
| 5. IBM HTTP Server | ||||
| 1.3.19 | ||||
| 6. Microsoft Office | ||||
| 2000 (select Word | ||||
| 2000, Excel 2000 | ||||
| and Outlook 2000 | ||||
| and Access 2000), | ||||
| Post Script Printer, | ||||
| Adobe Acrobat 5.0 | ||||
| 3 | Application | Intel Pentium | Not Available | 1. Windows 2000 |
| Server - | Processor, CPU | Advanced Server | ||
| Internet | 1, HD 18 GB, 2 GB | 2. IE 5.5 and | ||
| RAM | Netscape 4.7 and | |||
| above | ||||
| 3. Websphere | ||||
| Application Server | ||||
| Advanced Edition | ||||
| Version 4.0 | ||||
| 4. IBM DB2 UDB | ||||
| version 7.2.x (For | ||||
| WAS Repository) | ||||
| 5. Microsoft Office | ||||
| 2000 (select Word | ||||
| 2000, Excel 2000 | ||||
| and Outlook 2000 | ||||
| and Access 2000), | ||||
| Post Script Printer, | ||||
| Adobe Acrobat 5.0 | ||||
| 4 | Report Server - | Intel Pentium | Intel Processor | 1. Windows 2000 |
| Crystal Reports | Processor, CPU | 1 CPU | Advanced Server | |
| 1, HD 18 GB, 2 GB | HDD 17 GB | 2. IE 5.5 and above | ||
| RAM | 2.3 GB RAM | 3. Seagate Crystal | ||
| CPU 1266 Mhz. | Reports 8.5 | |||
| 4. Microsoft Office | ||||
| 2000 (select Word | ||||
| 2000, Excel 2000 | ||||
| and Outlook 2000 | ||||
| and Access 2000), | ||||
| Post Script Printer, | ||||
| Adobe Acrobat 5.0 | ||||
| 5. IIS for Crystal | ||||
| reports | ||||
| 5 | Web Server - | Intel Pentium | Not Available | 1. Windows 2000 |
| Internet | Processor, CPU | Advanced Server | ||
| 1, HD 18 GB, 2 GB | 2. IE 5.5 and above | |||
| RAM | 3. IBM HTTP Server | |||
| 1.3.19 | ||||
| 4. Microsoft Office | ||||
| 2000 (select Word | ||||
| 2000, Excel 2000 | ||||
| and Outlook 2000 | ||||
| and Access 2000), | ||||
| Post Script Printer, | ||||
| Adobe Acrobat 5.0 | ||||
7. Browser Client Application Limitations and Work Around Solutions
The limitations of the Web Browser (thin client) based application, when compared to thick clients, are as follows:
-
- a. Input field masking, such as automatic date formatting and phone number formatting, are not easily handled in this environment. The thin client user interface is not as easy and robust as the thick client user interface. A work around must be designed to force the user to enter values in the required format.
- b. Due to the limitations of different browsers, a common methodology will be adopted that will work for all indicated browsers. This narrows down the user interface implementation features in a browser.
- c. Because of the lower level on interactivity, some actions that are presented entirely on one screen in the thick client may span multiple screens. Since each screen presentation involves a round trip to the server, this will result in slightly slower screen response when compared to the single screen approach. This can be minimized with some re-design of the user interface workflow, but overall, thin clients require more “clicks” than thick clients.
- d. Hot-keys validation scripts are cumbersome and take longer to download. Thus, hot-key functionality will be limited.
| Contents |
| Introduction | 1-1 | |
| The Applications | 1-1 | |
| Master Plan | 2-1 | |
| Access | 2-1 | |
| Pre-requisites | 2-1 | |
| Application Functions | 2-1 | |
| Line of Coverage | 2-1 | |
| Plan Type | 2-4 | |
| Benefit Level | 2-7 | |
| Related Applications | 2-10 | |
| Carrier Master | 3-1 | |
| Access | 3-1 | |
| Pre-requisites | 3-1 | |
| Application Functions | 3-1 | |
| Create Carrier Master | 3-1 | |
| Search Carrier | 3-5 | |
| Related Applications | 3-11 | |
| Product Profile | 4-1 | |
| Access | 4-1 | |
| Pre-requisites | 4-1 | |
| Application Functions | 4-1 | |
| Create Product Profile | 4-1 | |
| Search Product | 4-7 | |
| Related Applications | 4-9 | |
| Rate Administration | 5-1 | |
| Access | 5-1 | |
| Pre-requisites | 5-1 | |
| Application Functions | 5-2 | |
| Admin Fees | 5-3 | |
| Admin Fees Search | 5-6 | |
| Agent Fees | 5-9 | |
| Agent Fees Search | 5-12 | |
| Additional Fees | 5-17 | |
| Additional Fees Search | 5-19 | |
| Rate Differential | 5-23 | |
| Rate Differential Search | 5-25 | |
| Related Applications | 5-30 | |
| Import Zip Codes | 6-1 | |
| Access | 6-1 | |
| Pre-requisites | 6-1 | |
| Application Functions | 6-1 | |
| Import Zip | 6-1 | |
| Commit Import Zip Codes | 6-5 | |
| Related Applications | 6-8 | |
| Rate Files | 7-1 | |
| Access | 7-1 | |
| Pre-requisites | 7-1 | |
| Application Functions | 7-2 | |
| Import Rate Files | 7-2 | |
| Export Rate Files | 7-6 | |
| Related Applications | 7-9 | |
| Plan Availability Files | 8-1 | |
| Access | 8-1 | |
| Pre-requisites | 8-1 | |
| Application Functions | 8-2 | |
| Import Plan Availability | 8-2 | |
| Export Plan Availability | 8-5 | |
| Related Applications | 8-7 | |
1 Introduction
Carrier Maintenance is the master module that encompasses the process of creating and maintaining all master information that is required for the PX2 System like Master Plan, Carrier Master, Product Profile, Rate Administration and Carrier Maintenance operations like import and export utilities.
The Applications
The above-mentioned processes are accomplished in several applications embedded into the Carrier Maintenance Module. These applications steer the tasks of creating, and maintaining master information for the PX2 entities, thereby helping achieve the goals of the Carrier Maintenance.
Master Plan—Master plan is to setup high-level information from a broad spectrum of coverages, plan and benefits offered by PacAdvantage. This includes line of coverage like Medical, Dental Vision and Chiropractic, plan type like HMO, PPO, POS, indemnity etc. and benefit level like Standard, Preferred Plus etc.
Carrier Master—Carrier Master is to setup information on the carriers. This provides demographic information about the carrier.
Product Profile—Product Profile is the product or the plan offered by each carrier based on the broad spectrum of master plan provided by PacAdvantage. The product includes wide range of benefits provide by the carriers. For example Blue Shield—HMO, American Specialty Health Plan etc. This also includes information about premium and enrollment data transmission profiles of each carrier for the specific plan.
Rate Administration—Rate administration is to administer various rate and fees to calculate the premium amount. These different fees structures are classified as admin fees, agent fees, additional fees and differential factor.
Carrier Maintenance Operations—Various utility operations are performed for the maintenance of the Carrier Master Module. These utilities include import and export of data into or from the PX2 System. Various Carrier Maintenance operations are.
Import Zip Codes—is to upload all zip codes in the state of California or USA. This information would be used for rates calculation based on employee's zip code of residence.
Import and Export Rates—is to upload raw rates for all the plans and export the rates in the given formats.
Import and Export Plan Availability—is to upload the Plans available for the specific carrier in the specific service area/county/zip and export the plans available for the specific carrier in the specific Service area/county/zip in a given format.
2 Master Plan
MPlan (Master Plan) is to setup basic information like Line of Coverage, Plan Type, Benefit Level offered through PACAdvantage. All Benefit Level, Plan type and the line of coverage offered by PACAdvantage is available in the Master Plan.
Access
The application can be accessed from the main menu as follows:
-
- Carrier Maintenance->Master Plan->Line of Coverage.
- Carrier Maintenance->Master Plan->Plan Type.
- Carrier Maintenance->Master Plan->Benefit Level.
Pre-requisites.
There are no pre-requisites for using this application.
Application Functions
This application has the following functions:
-
- Line of Coverage—to create, edit and delete Line of Coverage.
- Plan Type—to create, edit and delete Plan Type.
- Benefit Level—to create, edit and delete Benefit Level.
Line of Coverage
The line of coverage screen is to enter the details of line of coverage (LOC). The screen provides functionality to add, modify, view, and delete line of coverage.
The sequential steps involved in the creation of a line of coverage are listed below.
-
- Step-1: After successful logon, click the menu Carrier Maintenance. Select Master Plan and then Line of Coverage. (See Figure B-1)
- Step-2: Enter the values in the respective field, as per the format briefed in field's explanation section. (See Figure B-2)
- Step-3: Click Add button to have a temporary storage.
- Step-4: Also Edit button can be clicked for any modifications.
- Step-5: Change the contents to be modified and click Update. (See Figure B-3)
- Step-6: Click Save button to save the contents.
Fields Explanation
| Element | Description | |
| Line of | The text for line of coverage. Accepts | |
| coverage | alphabets and numeric values of length not | |
| exceeding 20 characters. Entry to this | ||
| field is mandatory. Line of coverage does | ||
| not accept duplicate values. | ||
| Add | Add the name of line of coverage. It is | |
| only a temporary addition. Becomes | ||
| permanent record only after saving | ||
| Edit | Edit button will allow for editing a | |
| specific record in the table. | ||
| Update | Update the contents of line of coverage. | |
| It is only a temporary updation. Becomes | ||
| permanent record only after saving | ||
| Delete | Delete button will delete the records in | |
| the table checked for deletion. It is only | ||
| a temporary deletion. Only the records | ||
| that does not have reference elsewhere can | ||
| be deleted. Becomes permanent record only | ||
| after saving | ||
| The Print will pops up a screen displaying | ||
| the content of the table created and | ||
| enables the user to have print out of the | ||
| same. | ||
| Check Box | Check box will be disabled which has any | |
| reference to other fields. Otherwise the | ||
| checkbox will be enabled to have the | ||
| utility of check all/clear all. | ||
| Check All | The “Check All” Link will check all the | |
| enabled records in the table | ||
| Clear All | The “Clear All” Link will uncheck all the | |
| enabled records in the table that are | ||
| checked. | ||
| Save | Saves the entered line of coverage in the | |
| database. The page gets refreshed and the | ||
| contents entered in the fields are | ||
| cleared. | ||
| Cancel | Clears the contents entered in the fields | |
| and restore to the previous state as was | ||
| before saving the changes. | ||
Button Functionality
Plan Type
The plan type screen is to enter the details of plan type. The screen provides functionality to add, modify, view, and delete plan type.
The sequential steps involved in the creation of a plan type are listed below.
-
- Step-1: After successful logon, click the menu Carrier Maintenance. Select Master Plan and then Plan Type. (See Figure B-4)
- Step-2: Enter the values in the respective fields, as per the format briefed in fields' explanation section
- Step-3: Click Add button to have a temporary storage. (See Figure B-5)
- Step-4: Also Edit button can be clicked for any modifications.
- Step-5: Change the contents to be modified and click update. (See Figure B-6)
- Step-6: Click Save button to save the contents
Fields Explanation
| Element | Description | |
| The text for plan type. Accepts alphabets | |
| and numeric values of length not exceeding | |
| 25 characters. Entry to this field is | |
| mandatory. Does not accept duplicate | |
| values | |
Button Functionality
| Element | Description | |
| Add | Add the name of plan. It is only a | |
| temporary addition. Becomes permanent | ||
| record only after saving | ||
| Edit | Edit button will allow for editing a | |
| specific record in the table. | ||
| Update | Update the contents of Plan Type. It is | |
| only a temporary update. Becomes permanent | ||
| record only after saving | ||
| Check Box | Check box will be disabled which has any | |
| reference to other fields. Otherwise the | ||
| checkbox will be enabled to have the | ||
| utility of check all/clear all. | ||
| Delete | Delete button will delete the records in | |
| the table checked for deletion. It is only | ||
| a temporary deletion. Only the records | ||
| that does not have reference elsewhere can | ||
| be deleted. Becomes permanent record only | ||
| after saving | ||
| The Print will pops up a screen displaying | ||
| the content of the table created and | ||
| enables the user to have print out of the | ||
| same. | ||
| Check All | The “Check All” Link will check all the | |
| enabled records in the table | ||
| Clear All | The “Clear All” Link will uncheck all the | |
| enabled records in the table that are | ||
| checked. | ||
| Save | Saves the entered plan type in the | |
| database. The page gets refreshed and the | ||
| contents entered in the fields are | ||
| cleared. | ||
| Cancel | Clears the contents entered in the fields | |
| and restore to the previous state as was | ||
| before saving the changes. | ||
Benefit Level
The Benefit Level screen is to enter the details of benefit level. The screen provides functionality to add, modify, view, and delete benefit level.
The sequential steps involved in the creation of a benefit level are listed below.
-
- Step-1: After successful logon, click the menu Carrier Maintenance. Select Master Plan and then Benefit Level. (See Figure B-7)
- Step-2: Enter the values in the respective fields, as per the format briefed in fields' explanation section. (See Figure B-8)
- Step-3: Click Add button to have a temporary storage.
- Step-4: Also Edit button can be clicked for any modifications.
- Step-5: Change the contents to be modified and click Update. (See Figure B-9)
- Step-6: Click Save button to save the contents
Fields Explanation
| Element | Description |
| Benefit level | The text for benefit level. Accepts alphabets and |
| numeric values of length not exceeding 255 characters. | |
| Entry to this field is mandatory. Does not accept | |
| duplicate values | |
Button Functionality
| Element | Description |
| Add | Add the name of benefit level. It is only a temporary |
| addition. Becomes permanent record only after saving | |
| Save | Saves the entered benefit level in the database. The |
| page gets refreshed. | |
| Edit | Edit button will allow for editing a specific record in |
| the table. | |
| Update | Update the contents of Benefit Level. It is only a |
| temporary update. Becomes permanent record only | |
| after saving | |
| Delete | Delete button will delete the records in the table |
| checked for deletion. It is only a temporary deletion. | |
| Only the records that does not have reference | |
| elsewhere can be deleted. Becomes permanent record | |
| only after saving | |
| The Print will pops up a screen displaying the content | |
| of the table created and enables the user to have print | |
| out of the same. | |
| Check Box | Check box will be disabled which has any reference to |
| other fields. Otherwise the checkbox will be enabled to | |
| have the utility of check all/clear all. | |
| Check All | The “Check All” Link will check all the enabled records |
| in the table | |
| Clear All | The “Clear All” Link will uncheck all the enabled |
| records in the table that are checked. | |
| Cancel | Clears the contents entered in the fields and restore to |
| the previous state as was before saving the changes. | |
Related Applications
There are no related applications.
3 Carrier Master
Carrier Master is to setup basic information about carriers who provide coverage to plans offered through PACAdvantage. This holds master record for the carriers alternatively called “Health Insurance Service provider” and provides facility to create/edit or modify/inactivate the Carrier Master records.
Access
The application can be accessed from the main menu as follows:
-
- Carrier Maintenance->Carrier Master->Create Carrier Master
- Carrier Maintenance->Carrier Master->Search Carrier Master
Pre-Requisites
There are no pre-requisites for using this application.
Application Functions
This application has the following functions:
-
- Carrier Information—to input details of a carrier
- Search Carrier—to search a specific carrier record
Create Carrier Master
The carrier information screen is to enter details of a carrier. The screen provides functionality to add, modify, view, and delete carrier details.
The sequential steps involved in the creation of a new module are listed below.
-
- Step-1: After successful logon, click the menu Carrier Maintenance. Select Carrier Master and then Create Carrier Master. (See Figure B-10)
- Step-2: Enter the values in the respective field, as per the format briefed in fields explanation section Field Explanation, and click Save button. (See Figure B-11)
Fields Explanation
The following table provides explanations for each of the screen fields.
| Element | Description |
| General Information |
| Company Name | The text for company name. Accepts alphabets, |
| numeric and special characters except double quotes | |
| with values not exceeding 50 characters. Entry to this | |
| field is mandatory. Company Name does not accept | |
| duplicate values | |
| Address | The text for company address. Accepts alphabets, |
| numeric and special characters except double quotes | |
| with values not exceeding 35 characters. Entry to this | |
| field is mandatory. | |
| Suite | The text for company suite. Accepts alphabets, |
| numeric and special characters except double quotes | |
| with values not exceeding 35 characters. | |
| City | The text for city. Accepts alphabets not exceeding 30 |
| characters. Entry to this field is mandatory. | |
| State | Choose the name of the state from the drop down list |
| of States available in United States of America Entry | |
| to this field is mandatory. | |
| Zip | The text for zip. Accepts numeric of exactly 5 digits. |
| Entry to this field is mandatory. |
| Department Information |
| Contact | Choose the name of the contact department from the |
| Department | drop down list of contact departments available. Entry |
| to this field is mandatory | |
| Salutation | Choose the salutation from the drop down list of |
| salutations available. | |
| First Name | The text for contact first name. Accepts alphabets, |
| numeric and special characters except double quotes | |
| with values not exceeding 25 characters. | |
| Middle Initial | The text for middle initial. Accepts alphabets not |
| exceeding 1 character. | |
| Last Name | The text for contact last name. Accepts alphabets, |
| numeric and special characters except double quotes | |
| with values not exceeding 35 characters. | |
| Suffix | Choose the suffix from the drop down list of suffixes |
| available. | |
| Title | The text for title. Accepts alphabets, numeric, and |
| special characters except double quotes with values not | |
| exceeding 255 characters. | |
| Address | The text for company address. Accepts alphabets, |
| numeric and special characters except double quotes | |
| with values not exceeding 35 characters. Entry to this | |
| field is mandatory. | |
| Suite | The text for company suite. Accepts alphabets, |
| numeric and special characters except double quotes | |
| with values not exceeding 35 characters. | |
| City | The text for city. Accepts alphabets not exceeding 30 |
| characters. Entry to this field is mandatory. | |
| State | Choose the name of the state from the drop down list |
| of States available in United States of America Entry | |
| to this field is mandatory. | |
| Zip | The text for zip. Accepts numeric of exactly 5 digits. |
| Entry to this field is mandatory. | |
| Mode of | Choose the mode of communication from the drop |
| Communication | down list of modes available. Based on the selection, |
| the respective fields are mandatory. | |
| Phone | The text for telephone number of the contact person. |
| Accepts numeric values not exceeding 10 digits. The | |
| format is (999) 999-9999. | |
| Fax | The text for fax number of the contact person. Accepts |
| numeric values not exceeding 10 digits. The format is | |
| (999) 999-9999. | |
| The text for email of the contact person. Accepts | |
| alphabets, numeric and special characters in the | |
| standard email format with length not exceeding 100 | |
| characters. | |
Button Functionality
The following table provides explanation for each button in the screen.
| Element | Description |
| Save | Saves the carrier information, department information |
| if any that has been added to the table, into the | |
| database. The page gets refreshed and the contents | |
| entered in the general Information fields are shown. | |
| Add | Add the contents of department information. It is only |
| a temporary addition. Becomes permanent record only | |
| after saving | |
| Edit | Edit button will allow for editing a specific record in |
| the table. | |
| Delete | Delete button will delete the records in the table |
| checked for deletion. It is only a temporary deletion. | |
| Becomes permanent record only after saving | |
| Update | Update the contents of department information. It is |
| only a temporary update. Becomes permanent record | |
| only after saving | |
| The Print will pops up a screen displaying the content | |
| of the table created and enables the user to have print | |
| out of the same. | |
| Check All | The “Check All” Link will check all the records in the |
| table | |
| Clear All | The “Clear All” Link will uncheck all the records in the |
| table that are checked. | |
| New | New button will create a new carrier general info page |
| for entering the new set of data for the carrier. | |
| Cancel | Clears the contents entered in the fields and restore to |
| the previous state as was before saving the changes. | |
Search Carrier
The search carrier screen displays the available carrier names. The screen provides the option to view, edit and delete the contents of Carrier Information.
The sequential steps involved in searching an existing carrier are listed below.
-
- Step-1: After successful logon, click the menu Carrier Maintenance. Select Carrier Master and then Search Carrier. (See Figure B-12)
- Step-2: Company name has to be selected from the drop down list (See Figure B-13)
- Step-3: Select either View/Delete or Edit to display the contents of selected company name. If the selected option is View/Delete, Displays the contents for viewing or deleting. (See Figure B-14)
- Step-4: To go back again to search screen, click Back.
- Step-5: If the selected option is Edit, displays the contents and allows to modify.
- Step-6: Modifications can be made for both the general information, as well as department information. Also choosing a record by clicking Edit button can modify department information. (See Figure B-15)
- Step-7: Change the contents to be modified and click Update.
- Step-8: Click Save button to save the contents.
Fields Explanation
The following table provides explanations for each of the screen fields.
| Element | Description |
| General Information |
| Company Name | The text for company name. Accepts alphabets, |
| numeric and special characters except double quotes | |
| with values not exceeding 50 characters. Entry to this | |
| field is mandatory. Company Name does not accept | |
| duplicate values | |
| Address | The text for company address. Accepts alphabets, |
| numeric and special characters except double quotes | |
| with values not exceeding 35 characters. Entry to this | |
| field is mandatory. | |
| Suite | The text for company suite Accepts alphabets, |
| numeric and special characters except double quotes | |
| with values not exceeding 35 characters. | |
| City | The text for city. Accepts alphabets not exceeding 30 |
| characters. Entry to this field is mandatory. | |
| State | Choose the name of the state from the drop down list |
| of States available in United States of America. | |
| Zip | The text for zip. Accepts numeric of exactly 5 digits. |
| Entry to this field is mandatory. |
| Department Information |
| Contact | Choose the name of the contact department from the |
| Department | drop down list of contact departments available. |
| Salutation | Choose the salutation from the drop down list of |
| salutations available. | |
| First Name | The text for contact first name. Accepts alphabets, |
| numeric and special characters except double quotes | |
| with values not exceeding 25 characters. | |
| Middle Initial | The text for middle initial. Accepts alphabets not |
| exceeding 1 character. | |
| Last Name | The text for contact last name. Accepts alphabets, |
| numeric and special characters except double quotes | |
| with values not exceeding 35 characters. | |
| Suffix | Choose the suffix from the drop down list of suffixes |
| available. | |
| Title | The text for title. Accepts alphabets, numeric and |
| special characters except double quotes with values not | |
| exceeding 255 characters. | |
| Address | The text for company address. Accepts alphabets, |
| numeric and special characters except double quotes | |
| with values not exceeding 35 characters. Entry to this | |
| field is mandatory. | |
| Suite | The text for company suite. Accepts alphabets, |
| numeric and special characters except double quotes | |
| with values not exceeding 35 characters. | |
| City | The text for city. Accepts alphabets not exceeding 30 |
| characters. Entry to this field is mandatory. | |
| State | Choose the name of the state from the drop down list |
| of States available in United States of America Entry | |
| to this field is mandatory. | |
| Zip | The text for zip. Accepts numeric of exactly 5 digits. |
| Entry to this field is mandatory. | |
| Mode of | Choose the mode of communication from the drop |
| Communication | down list of modes available. |
| Phone | The text for telephone number of the contact person. |
| Accepts numeric values not exceeding 10 digits. The | |
| format is (999) 999-9999. | |
| Fax | The text for fax number of the contact person. Accepts |
| numeric values not exceeding 10 digits. The format is | |
| (999) 999-9999. | |
| The text for email of the contact person. Accepts | |
| alphabets, numeric and special characters in the | |
| standard email format with length not exceeding | |
| characters. | |
Button Functionality
The following table provides explanation for each button in the screen.
| Element | Description |
| Save | Saves the carrier information, department information |
| if any that has been added to the table, into the | |
| database. The page gets refreshed and the contents | |
| entered in the general Information fields are shown. | |
| Add | Add the contents of department information. It is only |
| a temporary addition. Becomes permanent record only | |
| after saving | |
| Edit | Edit button will allow for editing a specific record in |
| the table. | |
| Delete | Delete button will delete the records in the table |
| checked for deletion. It is only a temporary deletion. | |
| Becomes permanent record only after saving | |
| Update | Update the contents of department information. It is |
| only a temporary update. Becomes permanent record | |
| only after saving | |
| The Print will pops up a screen displaying the content | |
| of the table created and enables the user to have print | |
| out of the same. | |
| Check All | The “Check All” Link will check all the records in the |
| table | |
| Clear All | The “Clear All” Link will uncheck all the records in the |
| table that are checked. | |
| New | New button will create a new carrier general info page |
| for entering the new set of data for the carrier. | |
| Cancel | Clears the contents entered in the fields and restore to |
| the previous state as was before saving the changes. | |
Related Applications
There are no related applications.
4 Product Profile
Product Profile is to create information on Product and Plan pertaining to a carrier. This is also used to create transmission profiles for Enrollment and Premium. It facilities to create/Edit or modify carrier product information.
Access
The application can be accessed from the main menu as follows:
-
- Carrier Maintenance->Product Profile->Create Product Profile
- Carrier Maintenance->Product Profile->Search Product Profile
Pre-Requisites
Master Plan records must be available in the system.
Carrier Master records must be available in the system.
Application Functions
This application has the following functions:
-
- Create Product Profile—to enter the information pertaining to a product and plan
- Search Product—to search a product and plan
Create Product Profile
The carrier product info screen is to add the information pertaining to a product and plan.
The sequential steps involved in the creation of carrier product information are listed below.
-
- Step-1: After successful logon, click Carrier Maintenance. Select Product Profile and then Create Product Profile. (See Figure B-16)
- Step-2: Enter the values in the respective fields, as per the format briefed in field's explanation section. (See Figure B-17)
- Step-3: The enrollment transmission is mainly meant for entering information and schedule for a transmission for a plan. Also Premium Transmission can be navigated from this screen. (See Figure B-18)
- Step-4: The premium transmission is mainly meant for entering information and schedule for a transmission for a plan. Also Enrollment Transmission can be navigated from this screen (See Figure B-19)
- Step-5: Click Save button to save the contents
Fields Explanation
| Element | Description |
| Trans Id | Enter the value of trans id. Accepts numeric value of |
| exactly 3 digits. Once clicking save button creates a | |
| trans id, it gets disabled not to modify the trans id. | |
| This is mandatory field | |
| Plan Name | Enter the text for plan name. Plan name accepts |
| alphanumeric and special characters except double | |
| quotes with values not exceeding 50 characters. This is | |
| mandatory field | |
| Carrier Name | Choose the name of the carrier from the drop down list |
| of carrier names available. This is mandatory field | |
| Plan ID | System generated field with Plan ID. This is a read |
| only field. | |
| Line of coverage | Choose a name from the drop down list of line of |
| coverage available. This is mandatory field | |
| Plan Type | Choose a name from the drop down list of plan type |
| available. This is mandatory field | |
| Product Required | Click the check box to enter the details of information |
| pertaining to a product. By default, it will be | |
| unchecked state. If this is unchecked then default | |
| Benefit will be added in to the Product Info table | |
| below. | |
| Benefit level | Choose a name from the drop down list of benefit |
| levels available. This is mandatory field | |
| if Product Required option is checked. | |
| Product Name | Enter the text for product name. The field is alphabets, |
| numeric and special character except double quotes | |
| with values not exceeding 60 characters. This is | |
| mandatory field if Product Required option is checked. | |
| Alternate Name | Enter the text for product name. The field is alphabets, |
| numeric and special character except double quotes | |
| with values not exceeding 255 characters. |
| Enrollment Transmission |
| Plan Id | Read only field. System generated Plan ID. |
| Plan Name | Read only field. Displays the Plan Name. |
| Carrier requires | Choose an option from the check box to have |
| Enrollment | enrollment transmission. Upon selection of this, will |
| transmission | enable to enter details for transmission information |
| and transmission schedule. The field is mandatory | |
| Data format | Choose a format from the drop down list of data |
| formats available. | |
| Mode of | Choose a mode from the drop down list of modes |
| transmission | available. Upon selecting the mode, will enable the |
| carrier profile id for entering data. Only when the | |
| selection is carrier's ftp, carrier URL, user id, | |
| password fields will be enabled for entry. | |
| Carrier profile id | Enter the text for carrier profile id. Accepts |
| alphanumeric of 10 digits only | |
| Carrier URL | Enter the text for URL. Accepts a valid URL not |
| exceeding 60 characters. | |
| Carrier User Id | Enter the text for user id. Accepts alphanumeric value |
| not exceeding 20 characters. | |
| Carrier Password | Enter the text for password. Accepts alphanumeric |
| character not exceeding 20 characters. | |
| Confirm file | Choose an option from the check box to have |
| required | confirmation file |
| Transmission | Choose a type of transmission from the drop down list |
| periodicity | for transmission periodicity. Upon the selecting the |
| value namely, hourly, daily, weekly, monthly | |
| corresponding field will only be enabled for entry | |
| others will get disabled. | |
| Start time | Enter the time for start time in the format HH: MM. |
| Accepts only numeric values of 5 digits. | |
| Days | Choose the days from the available checkboxes for the |
| days required for transmission. This field will be | |
| enabled only upon if the selection is daily in the | |
| transmission periodicity field. | |
| Week day | Choose a weekday from the drop down list of |
| weekdays available. This field will be enabled | |
| only upon if the selection is daily in the | |
| transmission periodicity field. | |
| Day of month | Choose a day from the drop down list of days in a |
| month available. This field will be enabled only upon | |
| if the selection is daily in the | |
| transmission periodicity field. | |
| Disable | Choose an option from the check box to have |
| transmission | transmission disabled. |
| Premium Transmission |
| Plan Id | Read only field. System generated Plan ID. |
| Plan Name | Read only field. Displays the Plan Name |
| Carrier requires | Choose an option from the check box to have |
| Enrollment | enrollment transmission. Upon selection of this, will |
| transmission | enable to enter details for transmission information |
| and transmission schedule. The field is mandatory | |
| Mode of | Choose a mode from the drop down list of modes |
| transmission | available. Upon selecting the mode, will enable the |
| carrier profile id for entering data. Only when the | |
| selection is carrier's ftp, carrier URL, user id, | |
| password fields will be enabled for entry. | |
| Carrier profile id | Enter the text for carrier profile id. Accepts |
| alphanumeric of 10 digits only | |
| Carrier URL | Enter the text for URL. Accepts a valid URL not |
| exceeding 60 characters. | |
| Carrier User Id | Enter the text for user id. Accepts alphanumeric value |
| not exceeding 20 characters. | |
| Carrier Password | Enter the text for password. Accepts alphanumeric |
| character not exceeding 20 characters. | |
| Confirm file | Choose an option from the check box to have |
| required | confirmation file |
| Transmission | Choose a type of transmission from the drop down list |
| periodicity | for transmission periodicity. Upon the selecting the |
| value namely, hourly, daily, weekly, monthly | |
| corresponding field will only be enabled for entry | |
| others will get disabled. | |
| Start time | Enter the time for start time in the format HH: MM. |
| Accepts only numeric values of 5 digits. | |
| Days | Choose the days from the available checkboxes for the |
| days required for transmission. This field will be | |
| enabled only upon if the selection is daily in the | |
| transmission periodicity field. | |
| Week day | Choose a weekday from the drop down list of |
| weekdays available. This field will be enabled only | |
| upon if the selection is daily in the | |
| transmission periodicity field. | |
| Day of month | Choose a day from the drop down list of days in a |
| month available. This field will be enabled only upon | |
| if the selection is daily in the transmission | |
| periodicity field. | |
| Disable | Choose an option from the check box to have |
| transmission | transmission disabled. |
Button Functionality
| Element | Description |
| Save | Click on save button to save contents of product |
| information and plan information. | |
| Edit | Edit button will allow for editing a specific record in |
| the table. | |
| Update | Update the contents of Product. It is only a temporary |
| update. Becomes permanent record only after saving | |
| Delete | Delete button will delete the records in the table |
| checked for deletion. It is only a temporary deletion. | |
| Only the records that does not have reference | |
| elsewhere can be deleted. Becomes permanent record | |
| only after saving | |
| Check All | The “Check All” Link will check all the records in the |
| table | |
| Clear All | The “Clear All” Link will uncheck all the records in the |
| table that are checked. | |
| New | Click on new button to add a new product and plan |
| information. | |
| Cancel | Click on the cancel button to clear the data entered on |
| the screen and returns the same screen to proceed. |
| Enrollment and Premium Transmissions |
| Save | Click on save button to save contents of transmission |
| information. | |
| Back | Click on back button will navigate back to carrier |
| product info screen. | |
Search Product
The search product screen is to view and edit/modify the information in an existing plan name. Choosing a plan name from the drop down list of plan names available can carry out the search.
The sequential steps involved in searching an existing product are listed below.
-
- Step-1: After successful logon, click the menu Carrier Maintenance. Select Product Profile and then Search Product. (See Figure B-20)
- Step-2: Plan name has to be selected from the drop down list (See Figure B-21)
- Step-3: Select either View/Delete or Edit to display the contents of selected plan name.
- If the selected option is View/Delete, displays the contents for viewing and deleting. (See FIG. 22) (See Figure
- Step-4: To go back again to search screen, click Back.
- Step-5: If the selected option is Edit, displays the contents and allows to have modifications. Click Save. (See Figure B-23)
Fields Explanation
Refer field explanations provided for Create Product Profile
Button Functionality
Refer Button Functionality explanations provided for Create Product Profile
Related Applications
Related applications are:
-
- Carrier Master
- Master Plan
5 Rate Administration
Rate Master is to setup basic information about various types of rates offered through PACAdvantage. Rates are the rates for the products offered by each carrier and their classification into various fee structures. The rates are classified as Admin Fees, Agent fees, Additional Fees and Rate Differential. These classifications are applied to the raw rate to arrive to the actual premium payable by group/member.
Access
The application can be accessed from the main menu as follows:
-
- Carrier Maintenance->Rate Administration->Admin Fees
- Carrier Maintenance->Rate Administration->Admin Fees Search
- Carrier Maintenance->Rate Administration->Agent Fees
- Carrier Maintenance->Rate Administration->Agent Fees Search
- Carrier Maintenance->Rate Administration->Additional Fees
- Carrier Maintenance->Rate Administration->Additional Fees Search
- Carrier Maintenance->Rate Administration->Rate Differential
- Carrier Maintenance->Rate Administration->Rate Differential Search
Pre-Requisites
Pre requisites for Rate Administrations are following:
-
- Association Master—Association master must be created and available in the system for assigning the rate for association groups.
- Association Acronym—Association acronym is to display the association name in an abbreviated form inside the table for display. A mapping file has to be configured to ensure that each Association ID/Association name is mapped with the Acronym name in the mapping file as in PX2 system.
The mapping file can usually be located in the following path:
-
- <config_root>/bpicas/assacyronym.xml
Sample mapping
-
- <asst id=“0000000001”> Here goes the acronym name as defined by user</asst>
- asst id=Should have a valid association ID from the PX2 System.
Acronym name should be edited in area shown in bold not exceeding 25 characters.
Application Functions
This application has the following functions:
-
- Admin Fees—to create/edit details of Admin Fees
- Admin Fees Search—to search the details of admin fee for view, modification or deletion
- Agent Fees—to create/edit details of Agent Fees
- Agent Fees Search—to search the details of Agent Fees for view, modification or deletion
- Additional Fees—to create/edit details of Additional Fees
- Additional Fees Search—to search the details of Additional Fees for view, modification or deletion
- Rate Differential—to create/edit details of Rate Differential
- Rate Differential Search—to search the details of Rate Differential for view, modification or deletion
Admin Fees
The admin fees screen is to enter the details of rate type, whether the rate classification is for enrollment or renewal, group type, association Ids for a chosen association only, Individual Member or Association Group for a guaranteed association, percentage premium, effective date, group level fees, and member level fees. The screen provides functionality to save, edit or add new admin fees. Admin fees is broadly defined for two types of rates, namely consolidated [blended] and unconsolidated [non-blended].
The sequential steps involved in the creation of admin fees are listed below.
-
- Step-1: After successful logon, click menu Carrier Maintenance. Select Rate Administration and then Admin Fees. (See Figure B-24)
- Step-2: Enter the values in the respective fields, as per the format briefed in field's explanation section. (See Figure B-25)
- Step-3: Click Save button to save the contents. (See Figure B-26)
Fields Explanation
| Element | Description |
| Rate Type | Choose the rate type from the option button. Rate type |
| can be either blended or non-blended. Blended rates | |
| will allow for entering only percent premium based on | |
| effective date for a specific group type. Non-blended | |
| rates will allow for entering group level fees which | |
| includes flat $ amount and member level fees which | |
| includes flat $ amount for medical and dental, percent | |
| premium for vision and cam [lines of coverage]. | |
| Enroll/Renew | Choose this option to create the admin fee for groups |
| during enrollment or renewal. | |
| Group Type | Choose the group type from the drop down list of group |
| types available. Only group type of guaranteed | |
| association would allow choosing individual member or | |
| association groups. | |
| Association | Choose the association name from the drop down list of |
| Name | ids for the association available. Association name |
| would be enabled only if the group type has | |
| guaranteed, endorsed, PEO's and chambers. | |
| Member type | Choose the member type from the option buttons. Only |
| group type of guaranteed association would allow | |
| choosing individual member or association groups | |
| [member type]. | |
| Percentage | Enter the value for percentage premium. Accepts |
| Premium | numeric value in the range of 0 to 100 with decimal |
| points (example 99.99) | |
| Effective Date | Enter the date or choose from the calendar icon. Date |
| accepts the format in MM/DD/YYYY. | |
| Group Level | Enter the value for group level fees. Accepts value in |
| Fees | the format of currency (example 999999999.99 or |
| 99999999999) | |
| Member | Enter the value for member level fees. Accepts value in |
| Level Fees | the format of currency (example 999999999.99 or |
| 99999999999) for fees in $ and accepts numeric value | |
| in the range of 0 to 100 for fees in percentage. | |
Button Functionality
| Element | Description |
| Save | Saves the entered admin fees in the database and |
| navigates to the confirmation page. | |
| Cancel | Clears the contents entered in the fields and restore to |
| the previous state as was before saving the changes. | |
| New Admin Fee | Navigates to admin fee screen for creating a new one |
Admin Fees Search
The admin fees search screen displays the available admin fees. The screen provides the option to view, edit and delete the contents of Admin Fee
The sequential steps involved in the Searching for admin fees are listed below.
-
- Step-1: After successful logon, click menu Carrier Maintenance. Select Rate Administration and then Admin Fees Search. (See Figure B-27)
- Step-2: Choose a rate type, Enrolled/Renew Status, group type, association name and effective date to have a search option. (See Figure B-28)
- Step-3: This displays a screen with search result. (See Figure B-29)
- Step-4: Choose a Rate type either to Modify or View/Delete.
- Step-5: If the option is Modify the following will be the screen to have any modifications. (See Figure B-30)
- Step-6: Update the contents and click Save. Navigates to confirmation Screen (See Figure B-31)
- Step-7: If the option is View/Delete the contents are displayed to view and delete (See Figure B-32)
- Step-8: Clicking Delete will have the confirmation screen as follows. (See Figure B-33)
Fields Explanation
Refer field explanations provided for Admin Fees
Button Functionality
Refer button functionality provided for Admin Fees
Agent Fees
The agent fees screen is to enter the details of rate type, group type, percentage of premium, effective date, group size like lower limit and upper limit with Amount and member level fees. The screen provides functionality to save, edit or add new admin fees. Agent fees is broadly defined for two types of rates, namely consolidated [blended] and unconsolidated [non-blended].
The sequential steps involved in the creation of agent fees are listed below.
-
- Step-1: After successful logon, click Carrier Maintenance. Select Rate Administration and then Agent Fees. (See Figure B-34)
- Step-2: Enter the values in the respective fields, as per the format briefed in field's explanation section. (See Figure B-35)
- Step-3: Click Save button to save the contents. (See Figure B-36)
Fields Explanation
| Element | Description |
| Rate Type | Choose the rate type from the option button. Rate type |
| can be either blended or non-blended. Blended rates | |
| will allow for entering only percent premium based on | |
| effective date for a specific group type. Non-blended | |
| rates will allow for entering group level fees which | |
| includes group size lower limit, group size upper limit | |
| flat $ amount and member level fees which includes | |
| flat $ amount for medical and dental, percent premium | |
| for vision and cam [lines of coverage]. Group size | |
| lower limit should not be greater than the group size | |
| upper limit. | |
| Enroll/Renew | Choose this option to create the admin fee for groups |
| during enrollment or renewal. | |
| Enrolled before | Check this field if the agent fees is for the groups |
| 1997 | enrolled before 1997. |
| Group Type | Choose the group type from the drop down list of group |
| types available. Only group type of guaranteed | |
| association would allow choosing individual member or | |
| association groups. | |
| Association | Choose the association name from the drop down list of |
| Name | names for the association available. Association name |
| would be enabled only if the group type has | |
| guaranteed, endorsed PEO's and chambers. | |
| Member type | Choose the member type from the option buttons. Only |
| group type of guaranteed association would allow | |
| choosing individual member or association groups | |
| [member type]. | |
| Percentage | Enter the value for percentage premium. Accepts |
| Premium | numeric value in the range of 0 to 100 |
| Effective Date | Enter the date or choose from the calendar icon. Date |
| accepts the format in MM/DD/YYYY. | |
| Group size | Enter the value for group size lower limit. Accepts |
| lower limit | numeric values of maximum 3 digits. Lower limit |
| value should be less than the value of upper limit. | |
| Group size | Enter the value for group size upper limit. Accepts |
| upper limit | numeric values of maximum 3 digits. Upper limit |
| value should not be less than lower limit value. | |
| Amount | Enter the value for group level fees. Enter the value |
| for group level fees. Accepts value in the format of | |
| currency (example 999999999.99 or 99999999999) | |
| Member Level | Enter the value for member level fees. Accepts value in |
| Fees | the format of currency (example 999999999.99 or |
| 99999999999) for fees in $ and accepts numeric value | |
| in the range of 0 to 100 for fees in percentage. | |
Button Functionality
| Element | Description |
| Save | Saves the entered agent fees in the database and |
| navigates to confirmation screen | |
| Cancel | Clears the contents entered in the fields and restore to |
| the previous state as was before saving the changes. | |
| New Agent Fee | Navigates to agent fee screen for creating a new one |
Agent Fees Search
The agent fees search screen displays the available agent fees. The screen provides the option to view, edit and delete the contents of agent fee
The sequential steps involved in the searching admin fees are listed below.
-
- Step-1: After successful logon, click menu Carrier Maintenance. Select Rate Administration and then Agent Fees Search. (See Figure B-37)
- Step-2: Choose a rate type, enroll/renew option, group type, association name and effective date to have a search operation. (See Figure B-38)
- Step-3: This displays a screen with search result. (See Figure B-39)
- Step-4: Choose a Rate type either to Modify or View/Delete.
- Step-5: If the option is Modify the following will be the screen to have any modifications. (See Figure B-40)
- Step-6: Update the contents and click Save. On saving displays the confirmation screen. (See Figure B-41)
- Step-7: If the option is View/Delete the contents are displayed to view and delete (See Figure B-42)
- Step-8: Clicking Delete will have the confirmation screen as follows. (See Figure B-43)
Fields Explanation
Refer field explanations provided for Agent Fees
Button Functionality
Refer button functionality provided for Agent Fees
Additional Fees
The additional fees screen is to enter the details of COBRA type, percentage of additional fees, effective date. The screen provides functionality to save, edit or add new additional fees. Additional fees is broadly defined for two types namely Cal COBRA and Federal COBRA.
The sequential steps involved in the creation of additional fees are listed below.
-
- Step-1: After successful logon, click Carrier Maintenance. Select Rate Administration and then Additional Fees. (See Figure B-44)
- Step-2: Enter the values in the respective fields, as per the format briefed in field's explanation section. (See Figure B-45)
- Step-3: Click Save button to save the contents. (See Figure B-46)
Fields Explanation
| Element | Description |
| Rate Type | Choose the rate type from the option button. Rate type |
| can be either Cal COBRA or Federal COBRA. | |
| Percentage of | Enter the value for percentage premium. Accepts |
| Additional Fees | numeric value in the range 0 to 100. |
| Effective Date | Enter the date or choose from the calendar icon. Date |
| accepts the format in MM/DD/YYYY. | |
Button Functionality
| Element | Description |
| Save | Saves the entered additional fees in the database and |
| navigates to confirmation screen. | |
| Cancel | Clears the contents entered in the fields and restore to |
| the previous state as was before saving the changes. | |
| New Additional | Navigates to additional fee screen for creating a new |
| Fee | one |
Additional Fees Search
The additional fees search screen displays the available additional fees. The screen provides the option to view, edit and delete the contents of additional fee
The sequential steps involved in the Searching additional fees are listed below.
-
- Step-1: After successful logon, click menu Carrier Maintenance. Select Rate Administration and then Additional Fees Search. (See Figure B-47)
- Step-2: Choose Cal Cobra or Federal Cobra and enter Additional Fee % and Effective Date to have a search operation. (See Figure B-48)
- Step-3: This displays a screen with search result. (See Figure B-49)
- Step-4: Choose a Rate type either to have Modify or View/Delete.
- Step-5: If the option is Modify the following will be the screen to have any modifications. (See Figure B-50)
- Step-6: Update the contents and click Save. Displays the confirmation screen (See Figure B-51)
- Step-7: If the option is View/Delete the contents are displayed to view and delete (See Figure B-52)
- Step-8: Clicking Delete will have the confirmation screen as follows. (See Figure B-53)
Fields Explanation
Refer field explanations provided for Additional Fees
Button Functionality
Refer button functionality provided for Additional Fees
Rate Differential
The Rate Differential screen is to enter the details of New Business Enrollment or New Business Enrollment & Renewal, Group Size criteria, group size lower limit, group size upper limit, differential factor, and effective date. The screen provides functionality to save, edit or add new Rate Differential.
The sequential steps involved in the creation of Rate Differential are listed below
-
- Step-1: After successful logon, click Carrier Maintenance. Select Rate Administration and then Rate Differential. (See Figure B-54)
- Step-2: Enter the values in the respective fields, as per the format briefed in field's explanation section. (See Figure B-55)
- Step-3: Click Save button to save the contents. (See Figure B-56)
Fields Explanation
| Element | Description |
| Line of | The field is a read only and will always have the value |
| coverage | as Medical. |
| Group size | Enter the value for group size lower limit. Accepts |
| lower limit | numeric values of maximum 3 digits. Lower limit |
| value should be less than the value of upper limit. | |
| Entry to this field is mandatory | |
| Group size | Enter the value for group size upper limit. Accepts |
| upper limit | numeric values of maximum 3 digits. Upper limit |
| value should not be less than lower limit value. Entry | |
| to this field is mandatory | |
| Differential | Enter the value for differential factor. Accepts decimal |
| factor | values of positive integer with max of 6 digits, example |
| 99.999. Differential factor cannot have zero or | |
| negative values. Entry to this field is mandatory | |
| Effective Date | Enter the date or choose from the calendar icon. Date |
| accepts the format in MM/DD/YYYY. Entry to this | |
| field is mandatory | |
| Applied For | Choose the option as new business enrollment or new |
| business enrollment and renewal | |
| Group Size | Choose the option as enrolled employee or eligible |
| Criteria | employee |
Button Functionality
| Element | Description |
| Save | Saves the entered Rate Differential in the database |
| and navigates to confirmation screen | |
| Cancel | Clears the contents entered in the fields and restore to |
| the previous state as was before saving the changes. | |
| New Rate | Navigates to rate differential fee screen for creating a |
| Differential Fee | new one |
Rate Differential Search
The rate differential search screen displays the available Rate Differential. The screen provides the option to view, edit and delete the contents of Rate Differential
The sequential steps involved in the creation of Rate Differential are listed below.
-
- Step-1: After successful logon, click menu Carrier Maintenance. Select Rate Administration and then Rate Differential Search. (See Figure B-57)
- Step-2: Choose the option for applicable for, group size criteria, group size lower and upper limit, differential factor and effective date to have a search operation. (See Figure B-58)
- Step-3: This displays a screen with search result. (See Figure B-59)
- Step-4: Choose a Rate type either to have Modify or View/Delete.
- Step-5: If the option is Modify the following will be the screen to have any modifications. (See Figure B-60)
- Step-6: Update the contents and click Save. Displays confirmation screen (See Figure B-61)
- Step-7: If the option is View/Delete the contents are displayed only to have view and delete can be done. (See Figure B-62)
- Step-8: Clicking Delete will have the confirmation screen as follows. (See Figure B-63)
Fields Explanation
Refer field explanations provided for Rate Differential
Button Functionality
Refer button functionality provided for Rate Differential
Related Applications
Related applications are as follows.
-
- Association Master—Refer User manual for Association Master.
6 Import Zip Codes
Import Zip Codes is the functionality to provide for import of zip code data and any updates of the same.
Access
The application can be accessed from the main menu as follows:
-
- Carrier Maintenance->CM Operations->Import Zip
Pre-Requisites
The latest zip code and zip code with multiple counties database from TPS Products and Services, Inc should be available for import. The format of the database files has to be either Comma Delimited ASCII (CSV) or Fixed Column ASCII, the 2 formats currently supported by PX2.
Application Functions
This application has the following functions:
-
- Import Zip Codes
- Commit Import of Zip Codes
Import Zip
Zip import will enable to bring the zip codes and zip counties in a specified format namely CSV ASCI [comma separated value] and Fixed position ASCII, which will transform the data in other format to these formats and will ease to read and store the data in database.
The sequential steps involved in importing a zip code are listed below.
-
- Step-1: After successful logon, click the menu Carrier Maintenance. Select CM Operations and then Import Zip. (See Figure B-64)
- Step-2: Enter the values in the respective fields, as per the format briefed in field's explanation section. (See Figure B-65)
- Step-3: Click Import button. (See Figure B-66)
- Step-4: Click Commit button. (See Figure B-67)
Fields Explanation
| Element | Description |
| Import Id | Read only field to display import id value |
| Status | Read only field to display the status of import |
| Imported By | Read only field to display the user who imported the |
| files | |
| Import Date | Read only field to display the import date |
| Committed By | Read only field. |
| Committed | Read only field to display the commit date. |
| Date | |
| Zip File Path | Enter the file path of zip file or select the path by |
| clicking browse button. The field is mandatory. | |
| Zip File Format | Choose a format from drop down list for zip file format, |
| which should match with selection of zip file. The field | |
| is mandatory. | |
| Zip Counties | Enter the file path of zip county or select the path by |
| File Path | clicking browse button. The field is mandatory. |
| Zip Counties | Choose a format from drop down list for zip county |
| File Format | format, which should match with selection of zip |
| county. The field is mandatory | |
Button Functionality
| Element | Description |
| New | Click on new button enables to have a new import of |
| files. | |
| Import | Click on import button will perform the action of |
| importing the selected valid files temporally. Once an | |
| import action is carried out, will enable the commit | |
| button. | |
| Search | Click on search button navigates to a screen to have a |
| search on entering Import id. | |
| Commit | Initially commit button will be in disabled state. Once |
| an import activity is carried out, commit button will be | |
| enabled to have a permanent storage in the selected | |
| file formats. | |
| View Import Log | Click on view import log to have a pop up display |
| showing the status of imported files | |
| Hide Import Log | Click on hide import log to hide the pop up display |
| message. | |
Commit Import Zip Codes
Commit zip codes can also be done by searching an import id.
The sequential steps involved in committing an import id are listed below.
-
- Step-1: Click Search button to search an import id.
- Step-2: This opens up a new screen to displaying import id to search. (See Figure B-68)
- Step-3: Import ids can be selected by either entering import id and clicking search button or Click an import id, which are imported and are not committed. Back button is to go back to search screen without selecting an import id for commit.
- Step-4: Screen navigates displaying the selected import id, enabling commit button. (See Figure B-69)
- Step-5: Click Commit button.
- Step-6: Screen gets refreshed and displays the confirmation as committed in the status field. (See Figure B-70)
Fields Explanation
| Element | Description |
| Import Id | Read only field to display import id value |
| Status | Read only field to display the status of import |
| Imported By | Read only field to display the user who imported the |
| files | |
| Import Date | Read only field to display the import date |
| Committed By | Read only field. |
| Committed | Read only field to display the commit date. |
| Date | |
| Zip File Path | Enter the file path of zip file or select the path by |
| clicking browse button. The field is mandatory. | |
| Zip File Format | Choose a format from drop down list for zip file format, |
| which should match with selection of zip file. The field | |
| is mandatory. | |
| Zip Counties | Enter the file path of zip county or select the path by |
| File Path | clicking browse button. The field is mandatory. |
| Zip Counties | Choose a format from drop down list for zip county |
| File Format | format, which should match with selection of zip |
| county. The field is mandatory | |
Button Functionality
| Element | Description |
| New | Click on new button enables to have a new import of |
| files. | |
| Import | Click on import button will perform the action of |
| importing the selected valid files temporally. Once an | |
| import action is carried out, will enable the commit | |
| button. | |
| Search | Click on search button navigates to a screen to have a |
| search on entering Import id. | |
| Commit | Initially commit button will be in disabled state. Once |
| an import activity is carried out, commit button will be | |
| enabled to have a permanent storage in the selected | |
| file formats. | |
| View Import Log | Click on view import log to have a pop up display |
| showing the status of imported files | |
| Hide Import Log | Click on hide import log to hide the pop up display |
| message. | |
| Back | Click back button to go back to the search screen. |
Related Applications
There is no related application.
7 Rate Files
Import Rates provides for import of rates information received from PacAdvantage and export of rates information to carriers for verification.
Access
The application can be accessed from the main menu as follows:
-
- Carrier Maintenance->CM Operations->Import Rate Files
- Carrier Maintenance->CM Operations->Export Rate Files
Pre-Requisites
Before importing rate files, a mapping file has to be configured to ensure that each plan/product listed in the rate file has an entry in the mapping file and is mapped to the corresponding plan id/product id as in PX2 system.
The mapping file can usually be located in the following path:
-
- <config_root>/bpicas/ec/conf/DataMap.xml
Here <config_root> refers to the root directory where all configuration files required for PX2 system are placed. Ask for your System Administrator's assistance in locating the configuration root in the system in which PX2 is installed.
Open the mapping file using any standard text editors (e.g. Notepad). In the file you will be able to locate entries like
-
- <productId keyName=“1,AETNA,HMO,PLUS” keyValue=“PL001-02,PL001”/>
These are the entries that establish the mapping between plan/product listed in the rate file and the corresponding plan id/product id as in PX2 system.
The entries have a format like this
-
- <productId keyName=
- “<LOC_CODE>,<PLAN_NAME,<PLAN_TYPE>,<COPAY>” keyValue=
- “<PX2_PRODUCT_ID>,PX2_PLAN_ID”/>
- where
LOC CODE is a codification for the line of coverage; 1 stands for Medical, 2 for Dental, 3 for Vision and 4 for CAM
PLAN_NAME is the name of the plan as in the Excel file; this usually corresponds to the value of the 1 st column in the Excel sheet
PLAN_TYPE is the type of plan; whether HMO, PPO, POS etc; this usually corresponds to the value of the 2nd column in the Excel sheet; an exception is the worksheet for CAM which doesn't have a plan type
COPAY is the copay option of the plan; whether Standard, Plus or Preferred; this usually corresponds to the value of the 3rd column in the Excel sheet; an exception is the worksheet for CAM which has this information in the 2nd column
PX2_PRODUCT_ID is the product id that corresponds to the product id in the excel sheet
PX2_PLAN_ID is the plan id that corresponds to the plan id in the excel sheet
If required, suitably modify these entries to ensure that a correct mapping has been established between the plan/products in the Excel sheet to the plans/products in PX2 system. After modifying, save and close the mapping file.
Application Functions
This application has the following functions:
-
- Import Rates
- Export Rates
Import Rate
Rate import will enable to import the files pertaining to medical, dental, vision, CAM with effective date. Rate export can also be navigated from this screen.
The sequential steps involved in importing a rate are listed below.
-
- Step-1: Before start of importing, open the rates file (.xls) in Microsoft Excel. Rates for all the 4 line of coverage, namely Medical, Dental, Vision and CAM would be available in the Excel as 4 separate worksheets. Switch to Medical worksheet. Save the work sheet in “Comma-delimited” format using the File, Save As menu. Repeat this procedure for Dental, Vision and CAM worksheets. All these 4 CSV files will be used for rates import.
- Step-2: After successful logon, click the menu Carrier Maintenance. Select CM Operations and then Import Rate Files. (See Figure B-71)
- Step-3: Enter the values in the respective fields, as per the format briefed in field's explanation section. (See Figure B-72)
- Step-4: Import ids can be either entered directly or can be chosen by clicking search button. Respective file paths can be selected by clicking browse button. Click import button. Following is the screen shot showing the status after entering all the fields (See Figure B-73)
Fields Explanation
| Element | Description |
| Import Id | Read only field to display import id value |
| Status | Read only field to display the status of import |
| Imported By | Read only field to display the user who imported the |
| files | |
| Import Date | Read only field to display the import date |
| Medical file path | Enter the file path of medical file or select the path by |
| clicking browse button. If the status is imported or not | |
| imported this fields would not be editable. At least one | |
| file path is required | |
| Dental file path | Enter the file path of dental file or select the path by |
| clicking browse button. If the status is imported or not | |
| imported this fields would not be editable. At least one | |
| file path is required | |
| CAM file path | Enter the file path of CAM file or select the path by |
| clicking browse button. If the status is imported or not | |
| imported this fields would not be editable At least one | |
| file path is required. | |
| Vision file path | Enter the file path of vision file or select the path by |
| clicking browse button. If the status is imported or not | |
| imported this fields would not be editable. At least one | |
| file path is required | |
| Effective Date | Enter the date or choose from the calendar icon. Date |
| accepts the format in MM/DD/YYYY. The field is | |
| mandatory | |
Button Functionality
| Element | Description |
| New | Click on new button enables to have a new import of |
| files. | |
| Import | Click on import button will perform the action of |
| importing the selected valid files to have a permanent | |
| storage in the selected file formats. | |
| Search | Click on search button navigates to a screen to have a |
| search on entering Import id. | |
| View Import Log | Click on view import log to have a pop up display |
| showing the status of imported files | |
| Hide Import Log | Click on hide import log to hide the pop up display |
| message. | |
| Back | Click back button to go back to the import screen |
Export Rate Files
Rate export will enable to export a product from selecting a product id by clicking product search icon. Rate import can also be navigated from this screen.
The sequential steps involved in rates export are listed below.
-
- Step-1: After successful logon, click the menu Carrier Maintenance. Select CM Operations and then Export Rate Files (See Figure B-74)
- Step-2: Enter the values in the respective fields, as per the format briefed in field's explanation section. (See Figure B-75)
- Step-3: Export ids can be selected by either entering export id and clicking search button or Click an export id. Back button is to go back to export screen without selecting an export id for commit (See Figure B-76)
- Step-4: Click Export button. (See Figure B-77)
- Step-5: Click Ok to download the file. (See Figure B-78)
Fields Explanation
| Element | Description |
| Export Id | Read only field to display export id value |
| Status | Read only field to display the status of export |
| Exported By | Read only field to display the user who exported the |
| files | |
| Export Date | Read only field to display the export date |
| Product Id | Read only field. Choose a product id by clicking the |
| product id search icon | |
| Product Name | Read only field. Displays the corresponding value of |
| the product id selected. | |
| Effective Date | Enter the date for effective date or select a date by |
| clicking calendar icon. The field is mandatory. Date | |
| accepts the format in MM/DD/YYYY | |
Button Functionality
| Element | Description |
| New | Click on new button enables to have a new export of a |
| product id. | |
| Export | Click on export button will perform the action of |
| exporting the selected product id. Once it is exported, | |
| export button will be in a disabled state. For any | |
| further export of files, click on new button | |
| View Export Log | Click on view export log to have a pop up display |
| showing the status of exported files | |
| Hide Export Log | Click on hide export log to hide the pop up display |
| message. | |
| Search | Click on search button navigates to a screen to have a |
| search on entering product id. | |
| Back | Click back button to go back to the search screen |
Export Loaded Rate Files
Export loaded rate files will enable to know the status of the selected files for export.
The sequential steps involved in export loaded rate files are listed below.
-
- Step-1: After successful logon, click the menu Carrier Maintenance. Select CM Operations and then Export Rate Files (See Figure B-79)
- Step-2: Screen navigates to Export Loaded Rates. (See Figure B-80)
- Step-3: Enter Effective date and other related fields as per the format briefed in fields' explanation table
- Step-4: Click Export button.
- Step-5: Click Search to know the status of the export id generated. (See Figure B-81)
- Step-6: Click back to go back to Export Imported Rate File screen.
Fields Explanation
| Element | Description |
| Export Id | Read only field to display export id value |
| Status | Read only field to display the status of export |
| Exported By | Read only field to display the user who exported the |
| files | |
| Export Date | Read only field to display the export date |
| Effective Date | Enter the date for effective date or select a date by |
| clicking calendar icon. The field is mandatory. Date | |
| accepts the format in MM/DD/YYYY | |
| Product Id | Read only field. Choose a product id by clicking the |
| product id search icon | |
| Line of Coverage | Choose a line of coverage from the drop down list |
| available | |
| Rate Type | Choose a rate type either from the available option say |
| Blended or Non-Blended | |
| RAF | Based on the selected value, RAF will be enabled for |
| entering. Accepts numeric value. | |
| Agent Fee | Text for agent fee. Accepts numeric values ranging |
| from the values of 0-100 | |
| Admin Fee | Text for admin fee. Accepts numeric values ranging |
| from the values of 0-100 | |
| CAL Cobra Fee | Text for CAL Cobra fee. Accepts numeric values |
| ranging from the values of 0-100 | |
| Product Name | Read only field. Displays the corresponding value of |
| the product id selected. | |
Button Functionality
| Element | Description |
| New | Click on new button enables to have a new export of a |
| product id. | |
| Export | Click on export button will perform the action of |
| exporting the selected product id. Once it is exported, | |
| export button will be in a disabled state. For any | |
| further export of files, click on new button | |
| View Export Log | Click on view export log to have a pop up display |
| showing the status of exported files | |
| Hide Export Log | Click on hide export log to hide the pop up display |
| message. | |
| Search | Click on search button navigates to a screen to have a |
| search on entering product id. | |
| Back | Click back button to go back to the search screen |
Related Applications
Related applications are:
-
- Product Profile
8 Plan Availability Files
Plan Availability is to provide for export & import of existing plan availability data to carriers and import of plan availability data received from carriers.
Access
The application can be accessed from the main menu as follows:
-
- Carrier Maintenance->CM Operations->Import Plan Availability
- Carrier Maintenance->CM Operations->Export Plan Availability
Pre-Requisites
The plan for which data has to be imported/exported should have already been defined in the PX2 system.
The format for records in the import file is shown below:
-
- <COUNTY_NAME><TAB><COUNTY_CODE><TAB><ZIP_C ODE><TAB>
- <RATING_REGION><TAB><AVAILABLE_FLAG>
- where
- TAB denotes a single TAB character
- COUNTY_NAME is county name
- COUNTY_CODE is the 5-character county code comprising 2-character state+3-character county code (FIPS code)
- ZIP_CODE is the 5-digit zip code
- RATING_REGION is the 2-character rating region
- AVAIL_FL indicates whether the plan is available at the specific zip code (and county) or not; a value of X indicates availability and a blank value indicates non-availability
Application Functions
This application has the following functions:
-
- Import Plan Availability
- Export Plan Availability
Import Plan Availability
Plan availability import will enable to import a file under a plan type. Also Plan availability export can be navigated from this screen.
The sequential steps involved in importing plan availability data are listed below.
-
- Step-1: After successful logon, click the menu Carrier Maintenance. Select CM Operations and then Import Plan Availability. (See Figure B-82)
- Step-2: Enter the values in the respective fields, as per the format briefed in field's explanation section. (See Figure B-83)
- Step-3: Click Import button
- Step-4: Also import id for plan availability can be selected by clicking search button. This leads to a screen displaying import ids. Click it to select an id (See Figure B-84)
Fields Explanation
| Element | Description |
| Import Id | Read only field to display import id value |
| Status | Read only field to display the status of import |
| Imported By | Read only field to display the user who imported the |
| files | |
| Import Date | Read only field to display the import date |
| Plan | Choose a plan from the drop down list from the plan |
| name available | |
| Import File | Enter the file path or select the path by clicking |
| browse button. The field is mandatory | |
| Effective Date | Enter the date for effective date or select a date by |
| clicking calendar icon. The field is mandatory. Date | |
| accepts the format MM/DD/YYYY | |
Button Functionality
| Element | Description |
| New | Click on new button enables to have a new import of |
| plan availability. | |
| Import | Click on import button will perform the action of |
| importing the selected valid to have a permanent | |
| storage in the selected file formats. | |
| Search | Click on search button navigates to a screen to have a |
| search on entering Import id. | |
| View Import Log | Click on view import log to have a pop up display |
| showing the status of imported files | |
| Hide Import Log | Click on hide import log to hide the pop up display |
| message. | |
| Back | Click back button to go back to the import screen |
Export Plan Availability
Plan availability export will enable to import a file under a plan type. Also Plan availability import can be navigated from this screen.
The sequential steps involved in exporting plan availability are listed below.
-
- Step-1: After successful logon, click the menu Carrier Maintenance. Select CM Operations and then Export Plan Availability (See Figure B-85)
- Step-2: Enter the values in the respective fields, as per the format briefed in field's explanation section. (See Figure B-86)
- Step-3 Also export id for plan availability can be selected by clicking search button. This leads to a screen displaying export ids. Click an id to select (See Figure B-87)
- Step-4: Click Export button.
- Step-5: Click Ok to download the file. (See Figure B-88)
Fields Explanation
| Element | Description |
| Export Id | Read only field to display export id value |
| Status | Read only field to display the status of export |
| Exported By | Read only field to display the user who exported the |
| files | |
| Export Date | Read only field to display the export date |
| Plan | Choose a plan from the drop down list from the plan |
| name available | |
| Effective Date | Enter the date or choose from the calendar icon. Date |
| accepts the format in MM/DD/YYYY. | |
| Field is mandatory | |
Button Functionality
| Element | Description |
| New | Click on new button enables to have a new export of |
| plan availability. | |
| Export | Click on export button will perform the action of |
| importing the selected valid plans. Once it is exported, | |
| export button will be in a disabled state. For any | |
| further export of plans, click on new button | |
| View Export Log | Click on view export log to have a pop up display |
| showing the status of exported plans | |
| Hide Export Log | Click on hide export log to hide the pop up display |
| message. | |
| Search | Click on search button navigates to a screen to have a |
| search on entering export id. | |
| Back | Click back button to go back to the search screen |
Related Applications
Related applications are:
-
- Product Profile
| Contents |
| Introduction | 1-1 | |
| The Applications | 1-1 | |
| Association | 2-1 | |
| Access | 2-1 | |
| Pre-requisites | 2-1 | |
| Application Functions | 2-1 | |
| Create Association | 2-1 | |
| Modify Association | 2-7 | |
| Related Applications | 2-11 | |
| New Business Enrollment Group Enrollment | 3-1 | |
| Access | 3-1 | |
| Pre-requisites | 3-2 | |
| Application Functions | 3-2 | |
| Create Group [Small Employer Group] | 3-4 | |
| Create Group [Alternate Group - Individual | 3-54 | |
| Members] | ||
| Create Group [Alternate Group - Group] | 3-82 | |
| Modify Group [Small Employer Group] | 3-98 | |
| Inactivate Group | 3-100 | |
| Create Employee | 3-102 | |
| Modify Employee | 3-104 | |
| Inactivate Employee | 3-106 | |
| Create Dependent | 3-109 | |
| Modify Dependent | 3-111 | |
| Inactivate Dependent | 3-113 | |
| Individual Member [Modify Individual | 3-115 | |
| Member] | ||
| Individual Member [Inactivate Individual | 3-117 | |
| Member] | ||
| Individual Member Dependent[Create | 3-119 | |
| Dependent] | ||
| Individual Member Dependent[Modify | 3-121 | |
| Dependent] | ||
| Individual Member Dependent[Inactivate | 3-123 | |
| Dependent] | ||
| New Business Enrollment [COBRA Enrollment] | 4-1 | |
| Access | 4-1 | |
| Pre-requisites | 4-1 | |
| Pre-requisites | 4-1 | |
| New COBRA [Create Cobra] | 4-2 | |
| New COBRA [Modify Cobra] | 4-26 | |
| New COBRA[Inactivate Dependent] | 4-28 | |
| Existing COBRA [Create Cobra] | 4-30 | |
| Modify COBRA[Modify COBRA] | 4-45 | |
| Existing COBRA [Inactivate Cobra] | 4-46 | |
| Termination] | 5-1 | |
| Access | 5-1 | |
| Pre-requisites | 5-1 | |
| Application Functions | 5-1 | |
| Termination [Group] | 5-2 | |
| Termination [Employee] | 5-6 | |
| Termination [Dependent] | 5-10 | |
| Termination [Multiple Group] | 5-14 | |
| Reinstatement] | 6-1 | |
| Access | 6-1 | |
| Pre-requisites | 6-1 | |
| Application Functions | 6-1 | |
| Reinstatement [Group] | 6-2 | |
| Reinstatement [Employee] | 6-6 | |
| Reinstatement [Dependent] | 6-10 | |
| Appeals & Grievances] | 7-1 | |
| Access | 7-1 | |
| Pre-requisites | 7-1 | |
| Application Functions | 7-1 | |
| Appeals & Grievance [Create] | 7-2 | |
| Appeals & Grievance [Modify] | 7-5 | |
| Appeals & Grievance [Close] | 7-8 | |
| Carrier Issues] | 8-1 | |
| Access | 8-1 | |
| Pre-requisites | 8-1 | |
| Application Functions | 8-1 | |
| Carrier Issues [Create] | 8-2 | |
| Carrier Issues [Modify] | 8-5 | |
| Appeals & Grievance [Close] | 8-7 | |
| Add On | 9-1 | |
| Access | 9-1 | |
| Pre-requisites | 9-1 | |
| Application Functions | 9-1 | |
| Add On [Add Employee] | 9-2 | |
| Add On [Modify Employee] | 9-21 | |
| Add On [Modify Dependent] | 9-23 | |
| Add On [Inactivate Dependent] | 9-24 | |
| Add On [Add Dependent] | 9-27 | |
| Add On [Modify Dependent] | 9-32 | |
| En-Operations | 10-1 | |
| Access | 10-1 | |
| Pre-requisites | 10-1 | |
| Application Functions | 10-1 | |
| Export Membership Data] | 10-2 | |
| Export PacAdvantage Data] | 10-6 | |
| Export Transmission Data] | 10-8 | |
| ROE Process] | 10-11 | |
| ROE Packet Generation] | 10-14 | |
| Change | 11-1 | |
| Access | 11-1 | |
| Pre-requisites | 11-1 | |
| Application Functions | 11-1 | |
| Group Change Create | 11-2 | |
| Group Change Modify | 11-23 | |
| COBRA Change Create | 11-27 | |
| COBRA Change Modify | 11-44 | |
| Individual Member Change Create] | 11-48 | |
| Individual Member Change Modify | 11-65 | |
| Employee Change Create | 11-69 | |
| Employee Change Modify | 11-83 | |
| Dependent Change Create | 11-87 | |
| Dependent Change Modify | 11-98 | |
| ROE/OE | 105 | |
| Access | 105 | |
| Pre-requisites | 105 | |
| Application Functions | 106 | |
| ROE [Group Enrollment] | 107 | |
| ROE [Employee Enrollment] | 128 | |
| ROE [Dependent Enrollment] | 144 | |
| ROE [COBRA] | 159 | |
| ROE [Manual ROE] | 177 | |
| Individual Member Modify | 179 | |
| Individual Dependent Modify | 198 | |
| View] | 211 | |
| Access | 211 | |
| Pre-requisites | 211 | |
| Application Functions | 211 | |
| View [Group] | 212 | |
| View [Employee] | 215 | |
| View [Dependent] | 218 | |
1 Introduction
Enrollment is the transaction module that encompasses the process of creating and maintaining all information about the groups and Members who participate in the PacAdvantage program. The enrollment module within PX2 system is classified broadly into following transactions to accommodate the business rules. They are New Business Enrollment, COBRA enrollment, Add-On and Changes, ROE/OE, Termination and Reinstatement, Appeals and Grievance and Carrier Issues and Enrollment Operations.
The Applications
The above-mentioned processes are accomplished in several applications embedded into the Enrollment Module. These applications steer the tasks of creating, and maintaining operational information for the small employer groups, employee, dependent and members like individual association member, COBRA member etc in the PX2 entities, thereby helping achieve the goals of the Enrollment.
The basic process of enrollment can be sub divided into following applications.
Association—Association is to setup high-level information associations within the State of California who can participate in the PacAdvantage program. They are classified as Guaranteed, Endorsed, PEO's or Chambers with each association having a set of business rules to participate in the PacAdvantage program.
New Business Enrollment—New Business Enrollment is the process of Enrolling the Employer Group and members to the PacAdvantage program. The groups and members who can participate in the program are Small Employer Group with employees and dependent, Association Groups with employees and dependents and individual members with dependents. Each group and member must qualify the eligibility rules as applicable to participate in the PacAdvantage program.
COBRA Enrollment—COBRA enrollment is the process of enrolling the members for COBRA coverage. California State laws and federal laws govern COBRA Rules based on whether it is Cal COBRA or Federal COBRA. COBRA eligibility and the coverage are governed by set of California State laws and federal laws. COBRA enrollment can be further sub divided into two streams. Namely, Enrollment of New Business COBRA wherein the Group enrolling with the program bring in their COBRA members also to participate in the program. Existing COBRA Enrollment wherein the members terminated from the existing groups are enrolled as COBRA group/member.
Add-On—Add-On is the process of adding new members like employee and dependents to the existing groups and employees respectively. Add-On process has business rules attached based on which the Add-On process is either accepted or denied.
Changes—Changes are the process of accommodating the changes that the group and or member sought during their participation in the PacAdvantage program. Change process has business rules attached based on which the Change process is either accepted or denied.
ROE/OE—ROE (Re-qualification and open enrollment) is the process of Re-qualifying the Group and Members on their anniversary. Once a year, on the anniversary date of a group's enrollment in PacAdvantage, the group's participation, contribution and qualification is reviewed. This review is to ensure that the group meets the qualification requirement. The main objective of this process is to review these criteria and re qualify as needed, notify them of rate changes and provide an opportunity for employees of the group to make changes to their enrollment.
OE (Open Enrollment) is the process during the anniversary of the group wherein the group has the privilege to make the changes to the plan, waiting period etc that were earlier not open for changes.
Termination and Reinstatement—Termination is the process of terminating the Groups and or members from the PacAdvantage program due to various reasons governed by business rules. The reasons for termination can be non-payment of premium, group's request for termination etc. Reinstatement is the process of revoking the terminated groups and or members based on the reasons governed by business rules. The reasons for reinstatement can be Premium paid through, processing error etc.
Appeals and Grievances—Appeals and Grievance is the process of maintaining a status for all Appeals and Grievances received from the customer and follow up with the decision made either by PacAdvantage-Roseville or PacAdvantage-SF.
Carrier Issues—Carrier Issues is the process of maintaining a status for all Carrier Issues received from the customer and follow up with the carrier for resolution and inform the customer of resolution.
Enrollment Operation—Enrollment operation is the process of generating out data for transmission of enrollment date. This consists of Member Data Transmission, Enrollment Data Transmission, PacAdvantage Transmission, ROE/OE Transmission
2 Association
Association is the master module that encompasses the process of creating and maintaining all master information that is required for maintaining the Association information in the PX2 System.
Associations are basically a body of groups/members representing certain types of associations within the State of California. Association Groups and Association Members can participate in the PacAdvantage program similar to small employer groups or members. Associations are classified as Guaranteed, Endorsed, PEO's or Chambers. Each of the associations classified have specific business rules when participating in PacAdvantage program
Access
The application can be accessed from the main menu as follows:
-
- Enrollment->Association->Create Association
- Enrollment->Association->Modify Association
Pre-Requisites
There are no pre-requisites for using this application.
Application Functions
This application has the following functions:
-
- Create Association—to input details of a association
- Modify Association—to search a specific association record
Create Association
The create association screen is to enter details of an association. The screen provides functionality to save, edit or add new association details.
The sequential steps involved in the creation of a new association are listed below.
-
- Step-1: After successful logon, click the menu Enrollment. Select Association and select the option Create Association. (See Figure C-1)
- Step-2: Enter the values in the respective field, as per the format briefed in fields' explanation section Field Explanation, and click Continue button. (See Figure C-2)
- Step-3: Screen navigates to coverage information with auto generated association id. Choose relevant information pertaining to coverage and click Continue button. (See Figure C-3)
- Step-4: Screen navigates to other information. (See Figure C-4)
- Step-5: For internal work group click search icon. This pops up a screen to select internal work group.
- Step-6: Click on any internal work group for selection. (See Figure C-5)
- Step-7: After filling the relevant information for other information and special handling as per the format briefed in fields' explanation section, click Continue button
- Step-8: Screen navigates to confirming successful creation of an association. (See Figure C-6)
Fields Explanation
The following table provides explanations for each of the screen fields.
| Element | Description |
| General Info Tab |
| Association Name | The text for association name. Accepts alphanumeric |
| and special characters not exceeding 60 characters.. | |
| Entry to this field is mandatory. | |
| Association Type | Choose a type of association from the drop down list. |
| Entry to this field is mandatory | |
| Street Address | The text for association address. Accepts alphanumeric |
| and special characters not exceeding 35 characters. | |
| Entry to this field is mandatory | |
| Suite # | The text for suite #. Accepts alphanumeric and special |
| characters not exceeding 35 characters. Entry to this | |
| field is mandatory | |
| City | The text for city. Accepts alphabets and space between |
| two words not exceeding 30 characters. Entry to this | |
| field is mandatory | |
| State | Choose the name of the state from the drop down list |
| of States available in United States of America. Entry | |
| to this field is mandatory | |
| Zip | The text for zip. Accepts numeric of either 5 or 9 |
| digits. Entry to this field is mandatory | |
| Salutation | Choose the salutation from the drop down list of |
| salutations available. Entry to this field is mandatory | |
| First Name | The text for first name. Accepts alphabets and special |
| character like hyphen and single quotes not exceeding | |
| 25 characters. Entry to this field is mandatory | |
| Middle Initial | The text for middle initial. Accepts alphabets not |
| exceeding 1 character. | |
| Last Name | The text for Last name. Accepts alphabets and special |
| character like hyphen and single quotes not exceeding | |
| 35 characters. Entry to this field is mandatory | |
| Suffix | Choose the suffix from the drop down list of suffixes |
| available. | |
| Phone | The text for telephone number of the contact name. |
| Accepts numeric values not exceeding 10 digits. The | |
| format is (999) 999-9999. Entry to this field is | |
| mandatory | |
| Extension | The text for telephone extension number. Accepts |
| numeric values not exceeding 5 digits. The format is | |
| 9999 | |
| Fax | The text for fax number of the contact name. Accepts |
| numeric values not exceeding 10 digits. The format is | |
| (999) 999-9999. Entry to this field is mandatory | |
| The text for email of the contact name. Accepts | |
| alphabets, numeric and special characters in the | |
| standard email format of length not exceeding 100 | |
| characters. |
| Coverage Info Tab |
| Association ID | Text for association id. This is a read only field |
| Association Name | Text for association name. This is a read only field |
| Line of Coverage | Choose the line of coverage offered by the association |
| by checking the check box/boxes. | |
| Domestic Partner | Choose yes or no to state if domestic partner coverage |
| is offered. | |
| Coverage Rate | Choose yes or no to state the rate type (Blended or |
| Type | Non Blended) |
| Other Info |
| Association ID | Text for association id. This is a read only field |
| Association Name | Text for association name. This is a read only field |
| Internal Work | Choose a internal work group by clicking search icon |
| Group | |
| Membership | Select a value for membership status from the drop |
| Status | down list Values can be active, closed, frozen. |
| Contract Date | Choose a date of contract by clicking calendar icon. |
| The date can be in the format MM/DD/YYYY | |
| Association Re- | The text for re-qualification period. Accepts numeric |
| qualification | values not exceeding 2 digits. The value states number |
| Period | of months for Association Re-qualification Period |
| Batch Billing | Choose the option of batch billing if the association if |
| preferred by association. | |
| Desired | Choose the option to have name of association on the |
| Association | bill if preferred by association. |
| Name on the Bill | |
Button Functionality
The following table provides explanation for each button in the screen.
| Element | Description |
| Continue | Saves the entered information and navigates to next |
| level. The flow screen is from general info to coverage | |
| info then to other info. Screen flow should start from | |
| general info. Switchover in between the screens is | |
| possible only if clicking the Continue button saves the | |
| first screen “General Info”. | |
| Cancel | Cancel the contents entered in the fields and restore |
| to the previous state as was before saving the changes. | |
Modify Association
The modify association enables to modify the contents of an existing association. Alternatively you can also modify the record for the association by clicking the “Search Icon” for selecting the Association name or ID for modification when in create mode.
The sequential steps involved in modifying an existing association are listed below.
-
- Step-1: After successful logon, click the menu Enrollment. Select Association and select the option Modify Association. (See Figure C-7)
- Step-2: Association name has to be selected from the drop down list or association id has to be entered for selecting an association. (See Figure C-8)
- Step-3: Modify the values in the respective field, as per the format briefed in fields explanation section Field Explanation, and click Continue button. (See Figure C-9)
- Step-4: Screen navigates to coverage information for any modifications. Modify relevant information pertaining to coverage and click Continue button. (See Figure C-10)
- Step-5: Screen navigates to other information. (See Figure C-11)
- Step-6: For internal work group click search icon. This pops up a screen to select internal work group. (See Figure C-12)
- Step-7: Click on any internal work group for selection.
- Step-8: After modifying the information of other information and special handling as per the format briefed in field's explanation section, click Continue button
- Step-9: Screen navigates to confirming successful creation of an association. (See Figure C-13)
- Step-10: If the option is Inactivate and confirming the inactivation, the following screen appears. (See Figure C-14)
Fields Explanation
Refer field explanation provided for create association. In case of modify association, either association id can be entered or association name can be selected from the drop down list. In case of association id, it accepts alphanumeric values. The difference in modify mode the data available is populated for making modifications, if required.
Button Functionality
The following table provides explanation for each button in the screen.
| Element | Description |
| Modify | Clicking the Modify Button navigates to the General |
| Info screen populating the records for the association | |
| name selected or association ID entered. | |
| Inactivate | Clicking the Inactivate button would inactivate the |
| records for the association name selected or association | |
| ID entered. | |
| Continue | Saves the entered information and navigates to next |
| level. The flow from general info to coverage info then | |
| to other info. Screen flow should start from general | |
| info. Switchover in between the screens is possible only | |
| if the first screen “General Info” is saved by clicking | |
| the Continue button or if the mode is Modify. | |
| Cancel | Cancel the contents entered in the fields or restore to |
| the previous state as was before saving the changes. | |
Related Applications
There is no related application.
3 New Business Enrollment
New Business Enrollment is the transaction module that encompasses the process of enrolling and maintaining all information that is required for various entities that are eligible to participate in the PacAdvantage program in the PX2 System. This module captures all the relevant information required to enroll a group and members to the program. The group and member must satisfy certain eligibility criteria to enroll themselves.
Various groups and members are classified as “Small Employer Group with employees and their dependents, Association Group (Groups affiliated to an associations) with employees and their dependents, Individual Member (Members affiliated to an association) with or without dependents.
Access
The application can be accessed from the main menu as follows:
-
- Enrollment->New Business Enrollment
- ->Group Enrollment
- ->Create New Group
- ->Modify Group
- ->Inactivate Group
- ->Employee Enrollment
- ->Create Employee
- ->Modify Employee
- ->Inactivate Employee
- ->Dependent Enrollment
- ->Create Dependent
- ->Modify Dependent
- ->Inactivate Dependent
- ->Individual Member
- ->Individual Member
- ->Modify Individual Member
- ->Inactivate Individual Member
- Individual Member Dependent
- ->Create Dependent
- ->Modify Dependent
- ->Inactivate Dependent
Pre-Requisites
All master records must be available in the system for a successful enrollment. Master Records are as follows:
-
- Carrier Maintenance—Refer “User Manual for Carrier Maintenance” for further information on the master records.
- Agent/Agency—Refer “User Manual for Sales and Marketing” for further information on the Agent/Agency records.
- Work Group—Refer “User Manual for Sales and Marketing” for further information on the Work Group records.
- Internal Associates—Refer “User Manual for Sales and Marketing” for further information on the Internal Associates records.
- Association Master—Association Master must be available in the system. Refer Section 2 of this document on “Association Master”.
- Eligibility Criteria—Business rules identifies the eligibility criteria for the Groups and member for participating in the PacAdvantage Program. For a successful enrollment the business rules must be met with.
- For entering Employee records the group must be available in the system and the enrolled status must be “Enroll Pend”.
- For entering Dependent records the Employee must be available in the system and the enrolled status must be “Enroll Pend”.
Application Functions
This application can be sub divided into following major functions:
-
- Group Enrollment—Group Enrollment consist of the following operations:
- Create Small Employer Group—to input details of a Small Employer Group.
- Create Alternate Group—to input details of an Alternate Group
- Create Individual Association Member—to input details of an Individual Association Member.
- Modify Group—to search a specific group for modification prior to enrollment. This search feature would allow searching for Small Employer Group or Association Group.
- Inactivate Group—to search a specific Small Employer Group or Association Group and make inactive.
Employee Enrollment—Employee Enrollment consist of the following operations:
-
- Create Employee—to input details of an Employee for a specific group.
- Modify Employee—to search a specific employee for modification prior to enrollment. This search feature would allow searching employees attached to Small Employer Group or Association Group.
- Inactivate Employee—to search a specific Employee attached to Small Employer Group or Association—Group and make inactive.
Dependent Enrollment—Dependent Enrollment consist of the following operations:
-
- Create Dependent—to input details of a Dependent of a specific employee.
- Modify Dependent—to search a specific dependent for modification prior to enrollment. This search feature would allow searching for dependent attached to an employee of a Small Employer Group or Association Group.
- Inactivate Dependent—to search a specific Dependent attached to an employee of Small Employer Group or Association Group and make inactive.
Individual Member Enrollment—Individual Member Enrollment consist of the following operations:
-
- Modify Individual member—to search a specific member for modification prior to enrollment. This search feature would allow searching only for individual member who are attached to a guaranteed association.
- Inactivate Individual Member—to search a specific member those attached to a guaranteed association and make inactive.
- Create Individual Member Dependent—to input details of a Dependent of a specific individual member.
- Modify Individual Member Dependent member—to search a dependent of a specific individual member for modification prior to enrollment. This search feature would allow searching only for dependent of an individual member who is attached to a guaranteed association.
- Inactivate Dependent of Individual Member—to search a dependent of a specific individual member who are attached to a guaranteed association and make inactive.
Create Group (Small Employer Group)
The create group screen is to enter details of a group. The screen provides functionality to save, edit or add new group details.
The sequential steps involved in the creation of a new group by selecting small employer group are listed below.
-
- Step-1: After successful logon, click the menu Enrollment and select New Business Enrollment. Then select the option Group Enrollment and Create Group. (See Figure C-15)
- Step-2: Screen displays with the option of selecting a group hierarchy. (See Figure C-16)
- Step-3: On choosing Small Employer Group and Clicking continue button screen navigates to General Info. Enter the values in the respective field, as per the format briefed in fields explanation section Field Explanation, and click Continue. (See Figure C-17)
Field Explanation
The following table provides explanation for each button in the screen.
| Element | Description |
| Post Mark Date | Text for post mark date. Choose a date by clicking |
| calendar icon. Accepts in the format | |
| MM/DD/YYYY | |
| Received Date | Text for received date. Choose a date by clicking |
| calendar icon. Accepts in the format | |
| MM/DD/YYYY |
| Company Information |
| Legal Name | The text for name of the group. Accepts |
| alphanumeric and special characters not exceeding | |
| 60 characters. Field is mandatory | |
| Doing Business As | The text for business nature. Accepts alphanumeric |
| and special characters not exceeding 60 characters. | |
| Field is optional | |
| Type of Business | Choose the type of business from the drop down list |
| available | |
| Tax Identification | The text for tax identification. Accepts numeric |
| values of exactly 9 digits |
| Address Information: Physical and Billing Address-Note: Enter Billing |
| Address if different from the Physical Address. |
| Street Address | The text for company address. Accepts |
| alphanumeric and special characters not exceeding | |
| 35 characters | |
| Suite | The text for company suite/apt# Accepts |
| alphanumeric and special characters not exceeding | |
| 35 characters | |
| Zip | The text for zip. Accepts numeric value of either |
| 5 or 9 digits. City, State and County are populated | |
| automatically on entering the correct zip code and | |
| entering the tab key. | |
| City | The text for city. Accepts alphabets and space |
| between two words not exceeding 30 characters. | |
| State | Choose the name of the state from the drop down |
| list of States available in United States of America | |
| County | Choose the name of the county from the drop down |
| list of counties available for the ZIP Code entered. |
| Contact Information |
| Mode of | Choose the mode of correspondence from the drop |
| Correspondence | down list available. |
| Contact 1 and Contact 2 - Fill in the relevant for Contact 1 and 2. |
| Salutation | Choose the salutation from the drop down list of |
| salutations available. | |
| First Name | The text for contact name. Accepts alphabets and |
| special characters like hyphen and single quotes not | |
| exceeding 25 characters. | |
| Middle Initial | The text for middle initial. Accepts alphabets not |
| exceeding 1 character. | |
| Last Name | The text for contact name. Accepts alphabets and |
| special characters like hyphen and single quotes not | |
| exceeding 35 characters. | |
| Suffix | Choose the suffix from the drop down list of |
| suffixes available. | |
| Phone Number | The text for telephone number of the contact person. |
| Accepts numeric values of exactly 10 digits. | |
| The format is (999) 999-9999 | |
| Extension | The text for extension number of the contact person. |
| Accepts numeric values not exceeding 5 digits. | |
| Fax | The text for fax number of the contact person. |
| Accepts numeric values of exactly 10 digits. | |
| The format is (999) 999-9999 | |
| The text for email of the contact person. Accepts | |
| alphabets, numeric and special characters in the | |
| standard email format of length not exceeding 100 | |
| characters | |
| Contact Comments | The text for comments. Accepts alphabets, numeric |
| and special characters. Field is optional | |
Button Functionality
The following table provides explanation for each button in the screen.
| Element | Description |
| Continue | Saves the data and navigates to Billing Information |
| screen and the system generates Group ID. | |
| Cancel | Clears the contents entered in the fields or restore to |
| the previous state as was before saving the changes | |
| Tabs | General Info, Billing Info, Agent Info, Coverage Info |
| and Add Employees are the tabs visible on this screen. | |
| The navigation between tabs is possible only if there is | |
| a valid group ID generated and assigned to the group. | |
| Also while navigating through the tab the content that | |
| are changed on the screen are not saved unless | |
| explicitly saved by other operations on the screen. | |
-
- Step-4: Screen navigates to billing information. Enter the values in the respective fields, as per the format briefed in field's explanation section and click Continue. (See Figure C-18)
Field Explanation
The following table provides explanation for each button in the screen.
| Element | Description |
| Mode of payment | Choose a mode of payment from the drop down list |
| available. Based on selection corresponding fields | |
| will enable to enter the values. For e.g. if the value | |
| selected is card payment, EFT will be disabled and | |
| allows only entering card details and vice versa. |
| Credit Card Information |
| Cardholder's | The text for cardholder's name. |
| Names | Accepts alphabets and space between two words. |
| Credit Card Type | Choose the type of credit card from the drop down |
| list available. | |
| Credit Card No | The text for credit card number. Accepts numeric |
| values not exceeding 30 digits | |
| Expiration Date | Choose a month of expiration from the drop down |
| list available | |
| Expiration Year | The text for expiration year. Accepts numeric values |
| of exactly 4. Example 2002. |
| Billing Address As it appears on the credit Card |
| Street Address | The text for company address. Accepts |
| alphanumeric and special characters not exceeding | |
| 35 characters. | |
| ZIP | The text for zip. Accepts numeric value of either |
| 5 or 9 digits. | |
| State | The text for city. Accepts alphabets and space |
| between two words not exceeding 30 characters. | |
| City | Choose the name of the state from the drop down |
| list of States available in United States of America |
| EFT Information |
| Bank Name | The text for bank name. Accepts alphabets and |
| space between two words. | |
| Routing Number | The text for routing number. Accepts numeric |
| values not exceeding 9 digits. | |
| Account Number | The text for account number. Accepts numeric |
| values not exceeding 9 digits. | |
| Account Type | Choose the type of account from the drop down list |
| available. | |
| Depositor's Name | The text for depositor's name. Accepts |
| alphabets and space between two words. |
| Initial Payment Information |
| Amount Received | The text for amount received. Accepts only numeric |
| values in the format 999999999.99 | |
| Date Receive | The text for date received. Choose from the calendar |
| icon in the format MM/DD/YYYY. | |
| Check # | The text for check number. Accepts numeric values |
| not exceeding 9 digits. | |
| No Check Received | Check the option of no checks received for any non- |
| receipt of checks. | |
Button Functionality
The following table provides explanation for each button in the screen.
| Element | Description |
| Continue | Saves the data and Navigates to Agent Information |
| screen. | |
| Cancel | Clears the contents entered in the fields or restore to |
| the previous state as was before saving the changes | |
| Enrollment | Click enrollment summary refreshes the screen and |
| Summary | display the summary of information entered for group. |
| Missing | Click missing information refreshes the screen and |
| Information | displays the missed information for the group. |
| Tabs | General Info, Billing Info, Agent Info, Coverage Info |
| and Add Employees are the tabs visible on this screen. | |
| The navigation between tabs is possible only if there is | |
| a valid group ID generated and assigned to the group. | |
| Also while navigating through the tab the content that | |
| are changed on the screen are not saved unless | |
| explicitly saved by other operations on the screen. | |
-
- Step-5: Screen navigates to Agent Info screen. Agent/Agency ID is selected by clicking search icon. (See Figure C-19)
- Step-6: This pops up a screen to select agent/agency id. Enter value in any one of the fields, or simply click search button to perform search operation. (See Figure C-20)
- Step-7: Click on agent/agency id for selection. (See Figure C-21)
- Step-8: Add the Agent information to the table for temporary storage. After filling other relevant information in agent info screen, as per the format briefed in field's explanation section and click Continue
Field Explanation
The following table provides explanation for each button in the screen.
| Element | Description |
| Agent ID | Choose an agent id by clicking search icon |
| Agent Type | Choose an agent type from the drop down list |
| available. Based on the selection of the agent type | |
| the percent commission split entry and the Receive | |
| ROE packets option would be available. | |
| Percent commission | The text for percent commission. Accepts numeric |
| split | values in the range of 1-100 (Example 100.00). This |
| will be enabled only if the Agent type selected is | |
| “Agent Of Record” | |
| Sum of the percentage for all the Agent of Record | |
| added should be equal to 100.00. | |
| Receive ROE/OE | Click the check box to receive ROE/OE packets for |
| packets | agent. This option will not be available for |
| Agent Type “General Agent”. | |
| Agent Commission | The text for agent commission. Defaults the value |
| defined in CM—rate Administration for Agent | |
| Commission. Accepts numeric values less than or | |
| equal to the defaulted value in the in the range of | |
| 1-100 (Example 4.45) | |
| Check the box if the | Click the check box for a group with out an agent. |
| group is without an | This option will be available only for the Agent |
| agent | Type, “Agent of Record and Writing Agent”. |
Button Functionality
The following table provides explanation for each button in the screen.
| Element | Description |
| Add | Add the contents of agent information. It is only a |
| temporary addition. Becomes permanent only on | |
| saving the record. | |
| Edit | Edit button will allow for editing a specific record in |
| the table. | |
| Update | Update the contents of agent information. It is only a |
| temporary update. Becomes permanent only on saving | |
| the record | |
| Delete | Delete button will delete the records in the table |
| checked for deletion. It is only a temporary deletion. | |
| Becomes permanent only on saving the record | |
| Check All | The “Check All” Link will check all the records in the |
| table | |
| Clear All | The “Clear All” Link will uncheck all the records in the |
| table that are checked. | |
| Enrollment | Click enrollment summary refreshes the screen and |
| Summary | display the summary of information entered for group |
| creation | |
| Missing | Click missing information refreshes the screen and |
| Information | displays the missed information. For a successful |
| creation of a group, there should be no missing | |
| information | |
| Continue | Saves the data and navigates to Coverage Information |
| screen. | |
| Cancel | Clears the contents entered in the fields or restore to |
| the previous state as was before saving the changes | |
| Tab | General Info, Billing Info, Agent Info, Coverage Info |
| and Add Employees are the tabs visible on this screen. | |
| The navigation between tabs is possible only if there is | |
| a valid group ID generated and assigned to the group. | |
| Also while navigating through the tab the content that | |
| are changed on the screen are not saved unless | |
| explicitly saved by other operations on the screen | |
-
- Step-9: Screen navigates to coverage information. Enter the values in the respective fields, as per the format briefed in field's explanation section and click Continue. (See Figure C-22)
Field Explanation
The following table provides explanation for each button in the screen.
| Element | Description |
| Waiting Period Information |
| Employee Type | Choose an Employee Type from the drop down list |
| available | |
| Waiting Period | Choose a waiting period from the drop down list |
| available |
| RAF Discounting |
| RAF | List the RAF tier applicable for the group based on |
| the RAF tier available on group's effective date. |
| Contribution |
| Line of Coverage | Choose a line of coverage from the drop down list |
| elected | available |
| Contribution For | Choose a contribution for from the drop down list |
| available. Contribution can be for an employee or | |
| dependent. | |
| Contribution Type | Choose a contribution type from the drop down list |
| available. List the contribution type “% Lowest Cost | |
| HMO”, “% Lowest Cost Plan”, “% Specified Plan”, | |
| “Flat $ Amount”. On Selecting % Specified Plan | |
| the page would get refreshed and the Plan Name | |
| for the Specified LOC would be populated in the | |
| Drop Down List “Plan Name” | |
| Contribution | The text for contribution amount. Accepts numeric |
| Amount | values in the format 99999999.99 for flat $ amount |
| and for the rest of the option it accepts as % value | |
| say 100.00 | |
| Plan Name | Choose a plan name from the drop down list |
| available if the Contribution Type selected is | |
| “% Specified Plan”. | |
| Current Group | Choose a group insurer from the drop down list |
| Insurer | available |
| Whether group | Click the option yes or no |
| legally required to | |
| provide workers | |
| compensation | |
| coverage | |
| Workers | Choose a compensation carrier name from the drop |
| compensation | down list available |
| carrier name | |
| Number of | The text for total number of employees including |
| Employees (Full | full time and part time. Accepts numeric values |
| time and part time) | |
| Number of full time | The text for number of full time employees at the |
| employees at the | time of applying. Accepts numeric values |
| time of application | |
| Number of eligible | The text for number of eligible employees at the |
| employees at the | time of applying. Accepts numeric values |
| time of application | |
| Number of | The text for number of employees at the time of |
| employee applying | applying. Accepts numeric values |
| Have you employed | Click the option yes or no |
| 20 or more | |
| employees for 20 or | |
| more weeks during | |
| the current or | |
| preceding year | |
| (TEFRA) | |
| Have you employed | Click the option yes or no |
| 20 or more | |
| employees during | |
| at least 50% of the | |
| preceding calendar | |
| year (COBRA) | |
| Are you offering | Click the option yes or no |
| coverage to | |
| employees working | |
| more 20-29 hours | |
| per week | |
| Are you offering | Click the option yes or no |
| coverage to | |
| domestic partners | |
| Are you offering | Click the option yes or no |
| coverage to 1099 | |
| Employer's | Check this Check box if Employer's signature is |
| Signature | verified. |
| Date Signed | The text for Date Signed. Choose a date by clicking |
| calendar icon. Date accepts the format | |
| MM/DD/YYYY. | |
Button Functionality
The following table provides explanation for each button in the screen.
| Element | Description |
| Add (Waiting | Add the contents of Waiting Period information. |
| Period Information) | It is only a temporary addition. Becomes permanent |
| only on saving the record. | |
| Add (Contribution) | Add the contents of Contribution and Coverage |
| elected. It is only a temporary addition. Becomes | |
| permanent only on saving the record. | |
| Update (Waiting | Updates the contents of Waiting Period information. |
| Period Information) | It is only a temporary update. Becomes permanent |
| only on saving the record. | |
| Update | Update the contents of Contribution and Coverage |
| (Contribution) | elected. It is only a temporary update. Becomes |
| permanent only on saving the record. | |
| Cancel | Cancels the operation that was currently performed |
| prior to saving the record. | |
| Edit | Edit button will allow for editing a specific record in |
| the table. | |
| Delete | Delete button will delete the records in the table |
| checked for deletion. It is only a temporary deletion. | |
| Becomes permanent only on saving the record. | |
| Check All | The “Check All” Link will check all the records |
| in the table | |
| Clear All | The “Clear All” Link will uncheck all the records |
| in the table that are checked. | |
| Enrollment | Click enrollment summary refreshes the screen and |
| Summary [Link] | display the summary information entered for group |
| creation | |
| Missing | Click missing information refreshes the screen and |
| Information [Link] | displays the missed information. For a successful |
| creation of a group, there should be no missing | |
| information | |
| Missing Info | Saves the data and navigates to Missing Information |
| Page | |
| Continue/Add EE | Saves the data and navigates to Add Employee |
| screen. | |
| Create New Group | Saves the data entered and navigates to the screen |
| Group Hierarchy for creating New Group. | |
| Cancel | Clears or restores the content entered in the fields |
| only prior to saving the records. | |
| Tab | General Info, Billing Info, Agent Info, Coverage |
| info and Add Employees are the tabs visible on this | |
| screen. The navigation between tabs is possible only | |
| if there is a valid group ID generated and assigned | |
| to the group. Also while navigating through the tab | |
| the content that are changed on the screen are not | |
| saved unless explicitly saved by other operations | |
| on the screen | |
-
- Step-10: Screen navigates to add employee general information. Enter the values in the respective fields, as per the format briefed in field's explanation section. (See Figure C-23)
Field Explanation
The following table provides explanation for each button in the screen.
| Element | Description |
| Employee Information |
| Salutation | Choose the salutation from the drop down list of |
| salutations available. | |
| First Name | The text for first name. Accepts alphabets and special |
| character like hyphen and single quotes not exceeding | |
| 25 characters. First name is mandatory. | |
| Middle Initial | The text for middle initial. Accepts alphabets not |
| exceeding 1 character. | |
| Last Name | The text for last name Accepts alphabets and special |
| character like hyphen and single quotes not exceeding | |
| 35 characters. Last name is mandatory. | |
| Suffix | Choose the suffix from the drop down list of suffixes |
| available. | |
| Date of Birth | The text for date of birth. Choose a date by clicking |
| calendar icon. Date accepts the format | |
| MM/DD/YYYY. Birth date cannot be later than the | |
| current date. | |
| Social Security | The text for social security number for every |
| Number | individual. This can also be auto generated by |
| clicking auto generate link. | |
| Accepts numeric value of exactly 9 digits. Users with | |
| User Role as Level 2 and above can only auto | |
| generate SSN. | |
| Gender | Choose a gender from the drop down list available. |
| Address Information: Physical and Alternate Address-Note: Enter |
| Alternate Address if different from the Physical Address. |
| Street Address | The text for address. Accepts alphanumeric and special |
| characters with values not exceeding 35 characters | |
| Apt | The text for suite/apt#. . . Accepts alphanumeric and |
| special characters with values not exceeding 35 | |
| characters | |
| Zip | The text for zip. Accepts numeric value of either 5 or 9 |
| digits. City, State and County are populated | |
| automatically on entering the correct zip code and | |
| entering the tab key. | |
| City | The text for city. Accepts alphabets and space between |
| two words not exceeding 30 characters. | |
| State | Choose the name of the state from the drop down list |
| of States available in United States of America | |
| County | Choose the name of the county from the drop down list |
| of States available in United States of America | |
| Mode of | Choose the mode of correspondence from the drop |
| Correspondence | down list available |
| Phone Number | The text for telephone number of the employee. |
| Accepts numeric values not exceeding 10 digits. The | |
| format is (999) 999-9999 | |
| Extension | The text for extension number of the employee. |
| Accepts numeric values not exceeding 5 digits | |
| Fax | The text for fax number of the employee. Accepts |
| numeric values not exceeding 10 digits. The format is | |
| (999) 999-9999 | |
| The text for email of the employee. Accepts alphabets, | |
| numeric and special characters in the standard email | |
| format of length not exceeding 100 characters | |
Button Functionality
The following table provides explanation for each button in the screen.
| Element | Description |
| Continue | Saves the data and navigates to coverage information |
| for employees. | |
| Cancel | Clears the contents entered in the fields or restore to |
| the previous state as was before saving the changes | |
| Enrollment | Click enrollment summary refreshes the screen and |
| Summary | display the summary information entered for group |
| creation | |
| Missing | Click missing information refreshes the screen and |
| Information | displays the missed information. For a successful |
| creation of a group, there should be no missing | |
| information | |
| Group ID | Click Group ID to navigates to the Group's general info |
| screen. | |
| Tab | General Info, Coverage Info, Add Dependent are the |
| tabs visible on this screen. The navigation between the | |
| tabs is possible only if there is a valid Employee ID | |
| generated and assigned to the employee. Also while | |
| navigating through the tab the content that are | |
| changed on the screen are not saved unless explicitly | |
| saved by other operations on the screen | |
-
- Step-11: Screen navigates to coverage information. Enter the values in the respective fields, as per the format briefed in field's explanation section and click Continue. (See Figure C-24)
Field Explanation
The following table provides explanation for each button in the screen.
| Element | Description |
| Employee Information |
| Hours worked per | The text for worked hours per week. Accepts |
| week | numeric values not exceeding 2 digits. |
| Date of employment | The text for date of employment. Choose a date by |
| clicking calendar icon. Date accepts the format | |
| MM/DD/YYYY. | |
| Employee type | Choose an employee type from the drop down list |
| available |
| Plan Information |
| Line of coverage | Choose a line of coverage from the drop down list |
| available | |
| Medical waived | Click the check box for medical waive if the |
| employee is waiving medical. | |
| Carrier selection | Choose a carrier selection from the drop down list |
| (Benefit level) | available |
| Coverage choice | Choose a coverage from the drop down list available |
| PCP ID/Medical | The text for PCP ID. Accepts alphabets and numeric |
| group ID | values not exceeding 10 characters. |
| Are you an existing | Click the check box if you are an existing patient |
| patient | |
| PCP last name | The text for PCP last name. Accepts alphabets and |
| special character like hyphen and single quotes not | |
| exceeding 35 characters. | |
| PCP first name | The text for PCP first name. Accepts alphabets and |
| special character like hyphen and single quotes not | |
| exceeding 25 characters. | |
| Prior plan type | Choose a plan type from the drop down list |
| available | |
| Prior plan name | Choose a plan name from the drop down list |
| available | |
| Prior insurance | The text for insurance start date. Choose a date by |
| start date | clicking calendar icon. Date accepts the format |
| MM/DD/YYYY. | |
| Prior insurance end | The text for insurance end date. Choose a date by |
| date | clicking calendar icon. Date accepts the format |
| MM/DD/YYYY. | |
| Other coverage kept | The text for other coverage. Accepts alphabets with |
| values not exceeding 50 characters. | |
| Employee signature | Click the check box, to have employee signature |
| Date signed | The text for date signed. Choose a date by clicking |
| calendar icon. Date accepts the format | |
| MM/DD/YYYY. Date cannot accept future date. | |
Button Functionality
The following table provides explanation for each button in the screen.
| Element | Description |
| Add | Add the contents of employee coverage information. |
| It is only a temporary addition. Becomes permanent | |
| only on saving the record. | |
| Edit | Edit button will allow for editing a specific record in |
| the table. | |
| Update | Update the contents of Plan Information. It is only a |
| temporary update. Becomes permanent only on | |
| saving the record. | |
| Cancel | Cancels the operation that was currently performed |
| prior to saving the record. | |
| Delete | Delete button will delete the records in the table |
| checked for deletion. It is only a temporary deletion. | |
| Becomes permanent only on saving the record. | |
| Check All | The “Check All” Link will check all the records in the |
| table | |
| Clear All | The “Clear All” Link will uncheck all the records in |
| the table that are checked. | |
| Enrollment | Click enrollment summary refreshes the screen and |
| Summary [Link] | display the summary of information entered for |
| group creation | |
| Missing | Click missing information refreshes the screen and |
| Information [Link] | displays the missed information. For a successful |
| creation of a group, there should be no missing | |
| information | |
| Group ID | Click Group ID to navigates to the Group's general |
| info screen. | |
| Continue | Saves the data and navigates to Coverage |
| information screen. | |
| Enrollment | Click enrollment summary refreshes the screen and |
| Summary | display the summary of information entered for |
| group creation | |
| Cancel | Clears the contents entered in the fields or restore to |
| the previous state as was before saving the changes | |
| Tab | General Info, Coverage Info, Add Dependent are the |
| tabs visible on this screen. The navigation between | |
| the tabs are possible only if there is a valid | |
| Employee ID generated and assigned to the | |
| employee Also while navigating through the tab | |
| the content that are changed on the screen are not | |
| saved unless explicitly saved by other operations | |
| on the screen | |
-
- Step-12: Screen navigates to add dependent information. Enter the values in the respective fields, as per the format briefed in field's explanation section and click anyone of the button shown for subsequent operation. (See Figure C-25)
Field Explanation
The following table provides explanation for each button in the screen.
| Element | Description |
| Dependent Information |
| First Name | The text for first name. Accepts alphabets and |
| special character like hyphen and single quotes not | |
| exceeding 25 characters. First name is mandatory. | |
| Middle Initial | The text for middle initial. Accepts alphabets not |
| exceeding 1 character. | |
| Last Name | The text for last name. Accepts alphabets and |
| special characters like hyphen and single quotes not | |
| exceeding 35 characters. Last name is mandatory. | |
| Suffix | Choose the suffix from the drop down list of |
| suffixes available. | |
| Date of Birth | The text for date of birth. Choose a date by clicking |
| calendar icon.. Date accepts the format | |
| MM/DD/YYYY. Birth date cannot be later than the | |
| current date. | |
| Social Security | The text for social security number for every |
| Number | individual. This can also be auto generated by |
| clicking auto generate link. Accepts numeric value | |
| of exactly 9 digits. Users with User Role as Level 2 | |
| and above can only auto generate SSN. | |
| Gender | Choose a gender from the drop down list available. |
| Relationship | Choose the relationship from the drop down list |
| available. | |
| Street Address | The text for address. Accepts alphanumeric and |
| special characters with values not exceeding 35 | |
| characters | |
| Suite | The text for suite/apt#. . . Accepts alphanumeric and |
| special characters with values not exceeding 35 | |
| characters | |
| Zip | The text for zip. Accepts numeric value of either 5 |
| or 9 digits. City, and State are populated | |
| automatically on entering the correct zip code and | |
| entering the tab key. | |
| City | The text for city. Accepts alphabets not exceeding |
| 30 characters. | |
| State | Choose the name of the state from the drop down |
| list of States available in United States of America |
| Line of Coverage |
| Selected carrier | The text for selected carrier. It is a read only field |
| Coverage choice | The text for coverage. It is a read only field |
| Service area | The text for service area. It is a read only field |
| Prior plan type | Choose a plan type from the drop down list |
| available | |
| Prior plan | The text for plan name. Accepts alphabets |
| Waived | Click the check box if Line of Coverage is waived. |
| Start date | The text for insurance start date. Choose a date by |
| clicking calendar icon. Date accepts the format | |
| MM/DD/YYYY. | |
| End date | The text for insurance end date. Choose a date by |
| clicking calendar icon. Date accepts the format | |
| MM/DD/YYYY. | |
| PCP ID/ | The text for PCP ID. Accepts alphabets and numeric |
| values not exceeding 10 characters. | |
| PCP last name | The text for PCP last name. Accepts alphabets and |
| special character like hyphen and single quotes not | |
| exceeding 35 characters. | |
| PCP first name | The text for PCP first name. Accepts alphabets and |
| special character like hyphen and single quotes not | |
| exceeding 25 characters. | |
| Disabled dependent | Click the option of temporary or permanent. This is |
| enable if the relationship opted is child | |
| Domestic partner | Click the option for domestic partner. It depends on |
| the value selected in relationship | |
| Legal guardian | Click the option for legal guardian. It depends on |
| the value selected in relationship | |
| Signature | Click the check box if the signature is opted |
Button Functionality
The following table provides explanation for each button in the screen.
| Element | Description |
| Add Employee | Saves the data and navigates to the screen for adding |
| employees. | |
| Add Dependent | Saves the data and navigates to the screen for adding |
| dependent | |
| Enrollment | Click enrollment summary refreshes the screen and |
| Summary | display the summary of information entered for group |
| creation | |
| Missing | Click missing information refreshes the screen and |
| Information | displays the missed information. For a successful |
| creation of a group, there should be no missing | |
| information | |
| Cancel | Clears the contents entered in the fields or restore to |
| the previous state as was before saving the changes | |
| Tab | General Info, Coverage Info, Add Dependent are the |
| tabs visible on this screen. The navigation between the | |
| tabs are possible only if there is a valid Employee ID | |
| generated and assigned to the employee Also while | |
| navigating through the tab the content that are | |
| changed on the screen are not saved unless explicitly | |
| saved by other operations on the screen | |
-
- Step-13: Clicking enrollment summary button screen navigates to enrollment summary. This screen shows the overall information that is entered. Enter the values in the respective fields, as per the format briefed in field's explanation section and click Pre Enrollment button for checking the eligibility criteria for the Group and Members. (See Figure C-26)
Field Explanation
The following table provides explanation for each element in the screen.
| Element | Description |
| Group | Contains header information of the Group |
| Information | |
| Header | |
| Name of the Group | Text for the Name of the Group |
| Group ID | Text and Link for the Group ID to navigate to the |
| Group General Info screen | |
| Group Type | Specifies the Type of the Group like Small |
| Employer Group | |
| Proposed Effective | The text for Proposed Effective Date. Choose a |
| Date | date by clicking calendar icon. Date accepts the |
| format MM/DD/YYYY. Default effective date is | |
| first of the following month. Effective date cannot | |
| be past date | |
| Status | Text to specify the status of the group. |
| Work Group | Text for Work Group. This specifies the internal |
| work group attached to the Group. This is based on | |
| the writing agent's work group. | |
| Enrollment | Enrollment Summary Information is broken down |
| Summary | into tree structure. The tree can by expanded or |
| collapsed. | |
| Information | The level of the tree is as per the example given |
| below: | |
| −Employee | |
| −Dependent | |
| −Dependent | |
| −Employee | |
| −Dependent | |
| −Employee | |
| +Employee | |
| −Employee | |
| +Dependent | |
| +−Employee | |
| Where (−) signifies expanded view and (+) signifies | |
| collapsed view. | |
| Employee ID | Text for Employee ID |
| Employee SSN | Text for Employee SSN |
| Employee Name | Text for employee Name (First Name and Last |
| Name) | |
| Effective Date | Text for Employee Effective date. Choose a date by |
| clicking calendar icon. Date accepts the format | |
| MM/DD/YYYY. Defaults effective date of the | |
| Group. Effective date cannot be past date | |
| Status | Text to specify the status of the employee. |
| Dependent ID | Text for Dependent ID |
| Dependent SSN | Text for Dependent SSN |
| Dependent Name | Text for Dependent Name (First Name and Last |
| Name) | |
| Effective Date | Text for Dependent Effective date. Choose a date by |
| clicking calendar icon. Date accepts the format | |
| MM/DD/YYYY. Defaults effective date of the | |
| Employee. Effective date cannot be past date | |
| Status | Text to specify the status of the Dependent. |
| Enrollment | There are two part of this information: |
| Information | 1) Entered based on verification |
| 2) Based on the information provide on the | |
| Coverage Info screen |
| Entered based on verification |
| Total Full Time | Value is shown based on the actual full time |
| Applied (A) | employee applied (System Identified) |
| Total part Time | Value is shown based on the actual part time |
| Applied (B) | employee applied (System Identified) |
| Employee Waived | Text to enter Employee Waived. Contains only |
| (C) | whole number. Accepts numbers not exceeding |
| 5 digits. Manually entered based on verification. | |
| Employee Declined | Text to enter Employee Declined. Contains only |
| (D) | whole number. Accepts numbers not exceeding |
| 5 digits. Manually entered based on verification. | |
| Total Eligible | Text to display total eligible employee. Employee |
| Employee (E)= | Applying is sum total of A + B + D. |
| Total Employee | Text to display total employee applying. Employee |
| Applying (F) | Applying is sum total of A + B. |
| % Participation | Test to display % participation. Participation is % of |
| E/F |
| Based on Info Provided |
| Total Full Time | Text for Total Full Time Applied. Based on the |
| Applied (A) | information provide on the Coverage Info screen |
| Total part Time | Text for Total Part Time Applied. Based on the |
| Applied (B) | information provide on the Coverage Info screen |
| Total Employees | Text to display total employee applied. Employee |
| Applied | Applied is sum total of A + B |
Button Functionality
The following table provides explanation for each button in the screen.
| Element | Description |
| Missing | Click missing information refreshes the screen and |
| Information | displays the missed information. For a successful |
| creation of a group, there should be no missing | |
| information | |
| Cancel | Clears the contents entered in the fields or restore to |
| the previous state as was before saving the changes | |
| <<, <, >, >> | The enrollment summary shows record for 5 employees |
| on single screen. If the employee size increases more | |
| than 5. These buttons are used for navigating to the | |
| next and previous records for viewing. | |
| <<—Show first record (s) | |
| <—Show previous record (s) | |
| >—Show next record (s) | |
| >>—Show last record (s) | |
| Group ID | Click Group ID to navigates to the Group's general info |
| screen. | |
-
- Step-14: Clicking pre enrollment navigates to missing info screen. Missing information screen provide information on the data that is required to complete an enrollment process. This also checks for the eligibility of the group and member for enrolling into PacAdvantage Program. For a successful creation of a group the missing information should be empty. The user role and authority can overrule certain missing information.
Enter the values in the respective fields, as per the format briefed in field's explanation section and click Enroll button for enrolling the Group and Members. (See Figure C-27)
Field Explanation
The following table provides explanation for each element in the screen.
| Element | Description |
| Group | Contains header information of the Group |
| Information | |
| Header | |
| Name of the Group | Text for the Name of the Group |
| Group ID | Text and Link for the Group ID to navigate to the |
| Group General Info screen | |
| Group Type | Specifies the Type of the Group like Small |
| Employer Group | |
| Proposed Effective | The text for Proposed Effective Date. Choose a |
| Date | date by clicking calendar icon. Date accepts the |
| format MM/DD/YYYY. Default effective date is | |
| first of the following month. Effective date cannot | |
| be past date | |
| Status | Text to specify the status of the group. |
| Work Group | Text for Work Group. This specifies the internal |
| work group attached to the Group. Internal is based | |
| on the writing agent's work group. | |
| Tree | Enrollment Missing Information is broken down |
| Structure | into tree structure. The tree can by expanded or |
| collapsed. | |
| The level of the tree is as per the example given | |
| below: | |
| −Employee | |
| −Dependent | |
| −Dependent | |
| −Employee | |
| −Dependent | |
| −Employee | |
| +Employee | |
| −Employee | |
| +Dependent | |
| +−Employee | |
| Where (−) signifies expanded view and (+) signifies | |
| collapsed view. | |
| Group Missing | This identifies all the eligibility rules and the |
| Info | information that are incomplete on Group level for |
| completeing the enrollment process | |
| Missing Entities | List the missing entities for the group. Provides |
| a link to go to the respective screen to fill in the | |
| relevant information to complete all the required | |
| entries. | |
| Message | List the message against each missing entities. |
| Employee | This identifies all the eligibility rules and the |
| Missing Info | information that are incomplete on Employee level |
| for completing the enrollment process. | |
| Missing Entities | List the missing entities for the employee. Provides |
| a link to go to the respective screen to fill in the | |
| relevant information to complete all the required | |
| entries. | |
| Message | List the message against each missing entities. |
| Dependent | This identifies all the eligibility rules and the |
| Missing Info | information that are incomplete on dependent level |
| for completing the enrollment process. | |
| Missing Entities | List the missing entities for the dependent. Provides |
| a link to go to the respective screen to fill in the | |
| relevant information to complete all the required | |
| entries. | |
| Message | List the message against each missing entities. |
| Enrollment Action | Choose from the drop down list the action to be |
| performed for enrollment. Enroll/Decline | |
| Remarks | Text for remarks if any. |
| Reasons for Decline | Choose from the drop down list the reason for |
| decline. | |
| Reasons for Other | Text for other reason. If the reason for decline is |
| other than the reasons available. | |
Button Functionality
The following table provides explanation for each button in the screen.
| Element | Description |
| Send mail | Click this link to send missing information to the |
| Internal Work Group (GMS representatives) attached | |
| to this Group. | |
| Preview Invoice | Click this Link to preview the Invoice details prior to |
| generation of invoice. | |
| Enroll | Saves the data if there are no missing information and |
| navigates to enrollment confirmation page. | |
| Cancel | Clears the contents entered in the fields or restore to |
| the previous state as was before saving the changes | |
| <<, <, >, >> | The enrollment missing information shows record for |
| 5 employees on single screen. If the employee size | |
| increases more than 5. These buttons are used for | |
| navigating to the next and previous records for | |
| viewing. | |
| <<—Show first record (s) | |
| <—Show previous record (s) | |
| >—Show next record (s) | |
| >>—Show last record (s) | |
| Group ID | Click Group ID to navigates to the Group's general |
| info screen. | |
| Preview Invoice | Click Preview Invoice to pop up a new browser |
| window to preview the invoice for the group | |
Missing Information
The following table provides explanation for each missing information and what needs to be done to remove missing information from the screen
| Missing Entity | Message | Reasons/Remedy |
| Group Level |
| General | These are missing information pertains to the |
| Information | Group Level information required in the Group |
| General Information Screen |
| Employer | Employer Tax ID is not | Fill in the Employer tax |
| Tax ID | specified | ID in the Group General |
| Info Screen | ||
| Type of | Type of Business is not | Choose the Type of |
| Business | specified | Business Listed from the |
| list in Group General Info | ||
| Screen | ||
| Address | Address information is | Fill in the address |
| not specified | information in the Group | |
| General Info Screen | ||
| ZIP | ZIP Code is not specified | Fill in the zip code in the |
| Group General Info | ||
| Screen | ||
| City | City name is not specified | Fill in the City name in |
| the Group General Info | ||
| Screen | ||
| County | County is not specified | Choose County for Group |
| from the list in group | ||
| general info screen | ||
| State | State name is not | Choose the State from the |
| specified | list in group general info | |
| screen | ||
| Mode of | Mode of Correspondence | Choose the Mode of |
| Correspon- | is not specified | Correspondence for |
| dence | Contact 1 from the list in | |
| group general info screen | ||
| Contact First | Contact first name for | Fill in the Contact first in |
| Name | Contact 1 is not specified | the Group General Info |
| Screen | ||
| Contact Last | Contact last name for | Fill in the Contact last in |
| name | Contact 1 is not specified | the Group General Info |
| Screen | ||
| Phone | Phone for Contact 1 is not | Fill in the Contact Phone |
| specified | in the Group General Info | |
| Screen | ||
| Email for Contact 1 is not | This is required if the | |
| specified | mode of correspondence | |
| selected is Email. Fill in | ||
| the Contact Email in the | ||
| Group General Info | ||
| Screen |
| Billing | These missing information pertains to the Group |
| Information | Level information required in the Billing |
| Information Screen |
| Mode of | Mode of payment is not | Choose the Mode of |
| payment | specified | Payment for the group |
| from the list in Group | ||
| Billing Info Screen | ||
| Check Number | Check Number is not | Fill in the Check number |
| specified. | in the Group Billing Info | |
| Screen | ||
| Check Date | Date Check received is | Fill in the Date received |
| not specified | in the Group Billing Info | |
| Screen | ||
| Check Number | Check Number received is | Fill in the Check Number |
| not specified | in the Group Billing Info | |
| Screen | ||
| Initial Payment | Initial payment not | If initial payment check is |
| received | received then uncheck the | |
| box “No Check Received” | ||
| in the Group Biliing Info | ||
| Screen | ||
| Initial Payment | Initial Payment is not | If initial payment check is |
| sufficient to get enrolled | received but there is a | |
| shortfall in the amount | ||
| this message would be | ||
| shown. Check the short | ||
| fall by previewing the | ||
| invoice with the amount | ||
| received. | ||
| The variation in amount | ||
| received by more than (−) | ||
| $2 will allow user with | ||
| level II and above only to | ||
| enroll. | ||
| The variation in amount | ||
| received by more than (−) | ||
| $50 will allowing user | ||
| with level III and above | ||
| only to enroll | ||
| The variation in amount | ||
| received by more than (−) | ||
| $100 will allow user with | ||
| level IV and above only to | ||
| enroll | ||
| Cardholder's | Cardholder's name is not | This is required if the |
| Name | specified | mode of payment opted by |
| group is Credit Card. Fill | ||
| in the Cardholder's name | ||
| in the Group Billing Info | ||
| Screen. | ||
| Credit Card | Credit Card Type is not | This is required if the |
| Type | specified. | mode of payment opted by |
| group is Credit Card | ||
| Choose the Credit Card | ||
| Type for the group from | ||
| the list in Group Billing | ||
| Info Screen | ||
| Credit Card | Credit Card Number is | This is required if the |
| Number | not specified | mode of payment opted by |
| group is Credit Card. Fill | ||
| in the Credit Card | ||
| Number in the Group | ||
| Billing Info Screen. | ||
| Expiration Date | Credit Card Expiration | This is required if the |
| Date is not specified | mode of payment opted by | |
| group is Credit Card. Fill | ||
| in the Credit Card | ||
| Expiration Date in the | ||
| Group Billing Info Screen. | ||
| Bank Name | Bank name is not | This is required if the |
| specified | mode of payment opted by | |
| group is EFT. Fill in the | ||
| Bank Name in the Group | ||
| Billing Info Screen. | ||
| Routing | Routing Number is not | This is required if the |
| Number | specified | mode of payment opted by |
| group is EFT. Fill in the | ||
| Routing Number in the | ||
| Group Billing Info Screen. | ||
| Account Type | Account Type is not | This is required if the |
| specified | mode of payment opted by | |
| group is EFT. Fill in the | ||
| Account Type in the | ||
| Group Billing Info Screen | ||
| Depositor's | Depositor's Name is not | This is required if the |
| Name | specified | mode of payment opted by |
| group is EFT. Fill in the | ||
| Depositor's Name in the | ||
| Group Billing Info Screen |
| Agent | These missing information pertains to the Group |
| Information | Level information required in the Agent |
| Information Screen |
| Writing Agent | Writing Agent is not | Choose the Writing Agent |
| specified | for the Group in the | |
| Group Agent Info Screen | ||
| Agent of | Agent of Record is not | This is required if |
| Record | specified | commission for the agent |
| exists. Choose the Agent | ||
| of Record for the Group in | ||
| the Group Agent Info | ||
| Screen | ||
| Agent License | Agent License Number is | Go to Agent/Agency |
| Number | not specified | Master Screen, search for |
| the agent/ agency | ||
| attached with group and | ||
| fill in the License | ||
| information. | ||
| License Expiry | License Expiry Date is | Go to Agent/Agency |
| Date | not specified | Master Screen, search for |
| the agent/agency | ||
| attached with group and | ||
| fill in the License | ||
| information. | ||
| License Expiry | Agent License Number is | Go to Agent/Agency |
| Date | expired | Master Screen, search for |
| the agent/agency | ||
| attached with group and | ||
| modify the license expiry | ||
| date. | ||
| Commission | % Commission split is not | Check if the commission |
| specified | split for the agent of | |
| record exists. If not edit | ||
| the corresponding agent | ||
| of record and enter % | ||
| commission split for the | ||
| Agent of Record in the | ||
| Group Agent Info Screen | ||
| Total | % Split in commission is | Check if the total of the |
| Commission | less than 100% | commission split's for the |
| Split | agent of record is 100. If | |
| not edit the corresponding | ||
| agent of record and make | ||
| changes to make | ||
| commission split total to | ||
| 100% in the Group Agent | ||
| Info Screen |
| Coverage | These missing information pertains to the Group |
| Information | Level information required in the Coverage |
| Information Screen |
| RAF | Rate Differential factor is | This is required to arrive |
| not specified | to the Premium | |
| Calculation for the Group. | ||
| Select the RAF from the | ||
| list in Group Coverage | ||
| Info Screen | ||
| Workers | Is your Group legally | Choose the Option Yes or |
| compensation | required to provide | No in Group Coverage |
| coverage | workers compensation | Info Screen |
| coverage? | ||
| Worker | Worker Compensation | This is required if the |
| Compensation | Carrier Name is not | Workers compensation |
| Carrier Name | specified | coverage opted is yes. |
| Choose the Worker | ||
| Compensation Carrier | ||
| Name from the list in | ||
| Group Coverage Info | ||
| Screen | ||
| Total | How many employees (full | Fill in the “How many |
| Employee | time and part time) | employees (full time and |
| available with the Group | part time)” available with | |
| the Group in the Group | ||
| Coverage Info Screen | ||
| Full Time | How many full time | Fill in the “How many full |
| Employee | employees available with | with time employees” |
| the Group | available with the | |
| Group in the Group | ||
| Coverage Info Screen | ||
| Eligible | How many eligible | Fill in the “How many |
| Employee | employees at the time of | eligible employees at the |
| application | time of application” | |
| available with the Group | ||
| in the Group Coverage | ||
| Info Screen | ||
| Employees | How many employees | Fill in the “How many |
| Applying | applying | employees applying” in |
| the Group Coverage Info | ||
| Screen | ||
| TEFRA | Have you employed 20 or | Choose the Option Yes or |
| more employees for 20 or | No in Group Coverage | |
| more weeks during the | Info Screen | |
| current or preceding year | ||
| (TEFRA) | ||
| COBRA | Have you employed 20 or | Choose the Option Yes or |
| more employees during at | No in Group Coverage | |
| least 50% of the preceding | Info Screen | |
| calendar year (COBRA) | ||
| Part time | Are you offering coverage | Choose the Option Yes or |
| Coverage | to permanent employee | No in Group Coverage |
| working 20-29 hours per | Info Screen | |
| week? | ||
| Domestic | Are you offering coverage | Choose the Option Yes or |
| Partner | to domestic partners? | No in Group Coverage |
| Coverage | Info Screen | |
| Waiting Period | Waiting Period for the | Add waiting period for the |
| employees is not specified | employee based on the | |
| employee type in Group | ||
| Coverage Info Screen | ||
| Waiting Period | Managerial Employee | Edit the waiting period |
| Waiting period not | information and update | |
| specified | the waiting period for the | |
| employee type in Group | ||
| Coverage Info Screen | ||
| Waiting Period | Non-Managerial | Edit the waiting period |
| Employee Waiting period | information and update | |
| not specified | the waiting period for the | |
| employee type in Group | ||
| Coverage Info Screen | ||
| Waiting Period | Exempt Employee | Edit the waiting period |
| Waiting period not | information and update | |
| specified | the waiting period for the | |
| employee type in Group | ||
| Coverage Info Screen | ||
| Waiting Period | Non-Exempt Employee | Edit the waiting period |
| Waiting period not | information and update | |
| specified | the waiting period for the | |
| employee type in Group | ||
| Coverage Info Screen | ||
| Waiting Period | Union Employee Waiting | Edit the waiting period |
| period not specified | information and update | |
| the waiting period for the | ||
| employee type in Group | ||
| Coverage Info Screen | ||
| Waiting Period | Non-Union Employee | Edit the waiting period |
| Waiting period not | information and update | |
| specified | the waiting period for the | |
| employee type in Group | ||
| Coverage Info Screen | ||
| Waiting Period | Full-Time Employee | Edit the waiting period |
| Waiting period not | information and update | |
| specified | the waiting period for the | |
| employee type in Group | ||
| Coverage Info Screen | ||
| Waiting Period | Part-Time Employee | Edit the waiting period |
| Waiting period not | information and update | |
| specified | the waiting period for the | |
| employee type in Group | ||
| Coverage Info Screen | ||
| Line of | Line of coverage not | Add Line of Coverage in |
| Coverage | specified | Group Coverage Info |
| Screen | ||
| Contribution | Employee Contribution | Edit the Line of coverage |
| Type | type not specified | wherein the Contribution |
| Type is not specified and | ||
| update the Contribution | ||
| Type in Group Coverage | ||
| Info Screen | ||
| Contribution | Employee Contribution | Edit the Line of coverage |
| Amount | Amount not specified | wherein the Contribution |
| Amount is not specified | ||
| and update the | ||
| Contribution Amount in | ||
| Group Coverage Info | ||
| Screen | ||
| Contribution | Dependent Contribution | Edit the Line of coverage |
| Type | type not specified | wherein the Contribution |
| Type is not specified and | ||
| update the Contribution | ||
| Type in Group Coverage | ||
| Info Screen | ||
| Contribution | Dependent Contribution | Edit the Line of coverage |
| Amount | Amount not specified | wherein the Contribution |
| Amount is not specified | ||
| and update the | ||
| Contribution Amount in | ||
| Group Coverage Info | ||
| Screen | ||
| Contribution | Contribution Type for | Employee and Dependent |
| Type | Employee and Dependent | must have same |
| Variation | differs. | Contribution Type. |
| Edit the Line of coverage | ||
| wherein the Contribution | ||
| Type varies and update | ||
| the Contribution Type in | ||
| Group Coverage Info | ||
| Screen | ||
| Plan Name | Plan not selected for | Edit the Line of coverage |
| Contribution Type “% | wherein the Plan Name is | |
| Specified Plan” | not specified and update | |
| the Plan Name in Group | ||
| Coverage Info Screen |
| Employee | These missing information pertains to the |
| General | Employee Level information required in the |
| Information | Employee General Information Screen |
| Address | Address information is | Fill in the address |
| not specified | information in the | |
| Employee General Info | ||
| Screen | ||
| City | City is not specified | Fill in the City in the |
| Employee General Info | ||
| Screen | ||
| State | State is not specified | Fill in the City in the |
| Employee General Info | ||
| Screen | ||
| ZIP Code | ZIP Code is not specified | Fill in the ZIP Code in the |
| Employee General Info | ||
| Screen | ||
| Date of Birth | Date of Birth is not | Fill in the Date of Birth in |
| specified | the Employee General | |
| Info Screen | ||
| Gender | Gender is not specified | Choose the Gender in the |
| Employee General Info | ||
| Screen | ||
| SSN | SSN is not specified | Fill in the SSN in the |
| Employee General Info | ||
| Screen. If the employee | ||
| refuse to provide SSN | ||
| then click auto generate | ||
| SSN/Unique ID in the | ||
| Employee General Info | ||
| Screen. Auto generation | ||
| of SSN/Unique ID will be | ||
| available only for the user | ||
| with role as level II and | ||
| above | ||
| Mode of | Mode of Correspondence | Choose the Mode of |
| Correspon- | is not specified | Correspondence for |
| dence | Employee from the list in | |
| Employee general info | ||
| screen | ||
| Email for Employee is not | This is required if the | |
| specified | mode of correspondence | |
| selected is Email. Fill in | ||
| the Email in the | ||
| Employee general info | ||
| screen |
| Employee | These missing information pertains to the |
| Coverage | Employee Level information required in the |
| Information | Employee Coverage Information Screen |
| Hours Worked | Hours worked per week | Fill in the Hours worked |
| not specified | per week in the Employee | |
| Coverage Info Screen | ||
| Date of | Date of employment not | Fill in the Date of |
| Employment | specified | Employment in the |
| Employee Coverage Info | ||
| Screen | ||
| Employee | Employee signature is | Verify employee's |
| Signature | missing | signature and check |
| Employee Signature | ||
| checkbox in the Employee | ||
| Coverage Info Screen | ||
| Date Signed | Date Signed is missing | Verify Date signed and fill |
| in the Date Signed in the | ||
| Employee Coverage Info | ||
| Screen | ||
| Employee Type | Employee Type not | Choose the Employee |
| specified | Type for Employee Type | |
| from list in Employee | ||
| Coverage info screen | ||
| Employee | Variation in Employee | Check for the Employee |
| Type- | Type at Group and | Type specified in the |
| Waiting Period | Employee Level | Group Coverage Info and |
| the Employee Coverage | ||
| Info. Employee Type | ||
| specified in The Group | ||
| Level and the Employee | ||
| Level can have variation. | ||
| Either change the | ||
| Employee Type in | ||
| Employee Coverage Info | ||
| screen or add the | ||
| Employee Type in the | ||
| Group Coverage Info. | ||
| Employee | Employee's Line of | Choose the Line of |
| Coverage | Coverage not specified | Coverage for the |
| Employee in Employee | ||
| Coverage info screen | ||
| Medical | Medical Line of Coverage | Choose the Line of |
| Coverage | not specified | Coverage for the |
| Employee in Employee | ||
| Coverage info screen. If | ||
| the employee waives | ||
| medical coverage check | ||
| the checkbox Medical | ||
| Waived. | ||
| Dental | Dental Line of Coverage | This is required if the |
| Coverage | not specified | Group offers optional |
| benefits. Choose the Line | ||
| of Coverage for the | ||
| Employee in Employee | ||
| Coverage info screen | ||
| Vision | Vision Line of Coverage | This is required if the |
| Coverage | not specified | Group offers optional |
| benefits. Choose the Line | ||
| of Coverage for the | ||
| Employee in Employee | ||
| Coverage info screen | ||
| CAM Coverage | CAM Line of Coverage not | This is required if the |
| specified | Group offers optional | |
| benefits. Choose the Line | ||
| of Coverage for the | ||
| Employee in Employee | ||
| Coverage info screen | ||
| Coverage | Coverage Choice between | Choose the appropriate |
| Choice | the Line of Coverage | coverage choices as per |
| differs | the illustration provided | |
| in the column below and | ||
| edit the coverage choice | ||
| for the specific Line of | ||
| Coverage and update in | ||
| Employee Coverage info | ||
| screen. Or In dependent | ||
| Info Screen waive the | ||
| Optional coverage choice | ||
| for dependent under 2 by | ||
| checking the check box | ||
| Waive. |
| Coverage | Coverage choice for the Medical should have highest |
| Choice | precedence. There are Four Coverage Choices |
| Illustration | 1-Employee Family |
| 2-Employee Child | |
| 3-Employee Spouse | |
| 4-Employee Only | |
| Case 1: | |
| If coverage choice for medical is Employee Child, | |
| Optional benefit cannot have employee spouse. It | |
| should be Employee Child or Employee Only provided | |
| child is under 2 | |
| Case 2: | |
| If Coverage Choice for Medical is Employee Spouse | |
| optional benefits cannot have employee child. It should | |
| also be Employee Spouse | |
| Case 3: | |
| If Coverage Choice for Medical is Employee Child | |
| optional benefits cannot have employee only if at least | |
| one child is above 2 years of age. It should also be | |
| Employee child |
| Dependent | Number of Dependents is | This would be the case |
| Count | not sufficient to satisfy | when the dependent |
| Coverage Choice. | information is not entered | |
| into the system. Add | ||
| Dependent. | ||
| This can also occur if the | ||
| number of dependent as | ||
| specified in coverage | ||
| choice does not match | ||
| with the dependents | ||
| available. Add or | ||
| Inactivate dependent as | ||
| applicable. | ||
| Dependent | Dependent information is | This would occur if the |
| not specified | Coverage choice specified | |
| is other than employee | ||
| only and depended record | ||
| is not entered. Add | ||
| Dependent |
| Dependent | These missing information pertains to the |
| Information | Dependent Level information required in the |
| Dependent Information Screen |
| Date of Birth | Date of Birth is not | Fill in the Date of Birth in |
| specified | the Dependent General | |
| Info Screen | ||
| Gender | Gender is not specified | Choose the Gender in the |
| Dependent General Info | ||
| Screen | ||
| SSN | SSN is not specified | Fill in the SSN in the |
| Dependent General Info | ||
| Screen. If the dependent | ||
| refuse to provide SSN | ||
| then click auto generate | ||
| SSN/Unique ID in the | ||
| Dependent General Info | ||
| Screen. Auto generation | ||
| of SSN/Unique ID will be | ||
| available only for the user | ||
| with role as level II and | ||
| above | ||
| Relationship | Relationship of the | Choose the dependent |
| dependent with the | relationship from the | |
| employee not specified | Dependent Info Screen | |
| Relationship- | Relationship, child is | Verify if the child is |
| Child | specified for child above | disabled and choose if |
| 23 years of age | Disabled Permanent or | |
| Temporary. | ||
| Signature | Dependent signature is | This is required if the |
| missing | dependent age is above | |
| 18. Verify the signature | ||
| for the dependent and | ||
| check the checkbox | ||
| Signature in the | ||
| dependent info screen | ||
| Relationship | Number of spouse is more | Check for the relationship |
| than one | in the dependent info | |
| screen. There can only be | ||
| one of the following | ||
| relationship for the | ||
| dependent: | ||
| Spouse or Ex-Spouse or | ||
| domestic partner. | ||
| Choose different | ||
| relationship for the other | ||
| dependent in the | ||
| dependent info screen or | ||
| inactivate the other | ||
| dependent |
| General | This missing information pertains to the All |
| Missing | Level of information. This may be due to non |
| Information on | availability of sufficient master record to |
| All Level | process enrollment or may require business |
| decisions or administrative changes in the | |
| system to overcome this missing information |
| Employee | Employee Record Does | Probably the entries for |
| Record | not exist | the employees are not |
| made. Add employees to | ||
| satisfy this eligibility rule. | ||
| Group Size | Group Size cannot be less | Probably the entries for |
| than 2 Employees | the employees are not | |
| made or less that two | ||
| employee records only | ||
| exist in the system. Add | ||
| at least 2 employees to | ||
| satisfy this eligibility rule. | ||
| Group Size | Group Size cannot be | Probably the entries for |
| greater than 50 | the employees are more | |
| Employees | than 50 records. This does | |
| not satisfy eligibility | ||
| criteria rule for Small | ||
| Employer Group. Group | ||
| cannot be enrolled. | ||
| Participation | Participation Rule is not | Participation rule states |
| Rule | satisfied | that 65% of the eligible |
| employees need to enroll | ||
| if the group size is >3 and | ||
| 100% of the eligible | ||
| employees need to enroll | ||
| if the group size is <=3. | ||
| Check if this is met with. | ||
| If not then the group does | ||
| not satisfy the eligibility | ||
| rule. Group cannot be | ||
| enrolled. Check this in | ||
| Group Summary Screen. | ||
| Contribution | Contribution Rule for | The employer |
| Rule | Medical is not satisfied | contribution for the |
| Medical Line of Coverage | ||
| is not satisfied. Check the | ||
| Contribution Amount. | ||
| Edit the Line of coverage | ||
| and change the | ||
| contribution Amount and | ||
| update in the Group | ||
| Coverage Info Screen. | ||
| Contribution | Contribution Rule for | The employer |
| Rule | Dental is not satisfied | contribution for the Line |
| of Coverage is not | ||
| satisfied. Check the | ||
| Contribution Amount. | ||
| Edit the Line of coverage | ||
| and change the | ||
| contribution Amount and | ||
| update in the Group | ||
| Coverage Info Screen. | ||
| Contribution | Contribution Rule for | The employer |
| Rule | Vision is not satisfied | contribution for the Line |
| of Coverage is not | ||
| satisfied. Check the | ||
| Contribution Amount. | ||
| Edit the Line of coverage | ||
| and change the | ||
| contribution Amount and | ||
| update in the Group | ||
| Coverage Info Screen. | ||
| Contribution | Contribution Rule for | The employer |
| Rule | CAM is not satisfied | contribution for the Line |
| of Coverage is not | ||
| satisfied. Check the | ||
| Contribution Amount. | ||
| Edit the Line of coverage | ||
| and change the | ||
| contribution Amount and | ||
| update in the Group | ||
| Coverage Info Screen. | ||
| Rate | Rate is not available for | This is possible if the |
| Availability | the Plan opted by the | Rates are not loaded for |
| Employee | the Group's effective date | |
| of enrollment. Load the | ||
| rates for the specific plan | ||
| from the Carrier | ||
| Maintenance-Rate | ||
| Import utility. | ||
| Admin Fees | Admin Fees for the Small | This is possible if the |
| Employer Group is not | Admin Fees is not | |
| specified | specified for the Group's | |
| Effective date. Add Admin | ||
| fees from the Carrier | ||
| Maintenance-Rate | ||
| Administration | ||
| Agent | Agent Commission for the | This is possible if the |
| Commission | Small Employer Group is | Agent Commission is not |
| not specified | specified for the Group's | |
| Effective date. Add Agent | ||
| Commission from the | ||
| Carrier Maintenance- | ||
| Rate Administration | ||
| Rate | Rate Differential Factor | This is possible if the Rate |
| Differential | for the Small Employer | Differential Factor is not |
| Factor | Group is not specified | specified for the Group's |
| Effective date. Add Rate | ||
| Differential Factor from | ||
| the Carrier Maintenance- | ||
| Rate Administration | ||
| Plan | Medical Plan selected by | Normally the Plan for the |
| availability | the Employees not | employee is listed based |
| available in the service | on the Plan available in | |
| area. | the employees Service | |
| Area. Rare cases if the | ||
| User Modifies the ZIP | ||
| Code in the Employee | ||
| General Info Screen and | ||
| fails to update the Plan | ||
| for the specific ZIP code, | ||
| Service Area combination | ||
| this message would be | ||
| shown. Pick the plans | ||
| that are available for the | ||
| Employee in the | ||
| Employee Coverage Info | ||
| screen. | ||
| Plan | Dental Plan selected by | Normally the Plan for the |
| availability | the Employees not | employee is listed based |
| available in the service | on the Plan available in | |
| area. | the employees Service | |
| Area. Rare cases if the | ||
| User Modifies the ZIP | ||
| Code in the Employee | ||
| General Info Screen and | ||
| fails to update the Plan | ||
| for the specific ZIP code, | ||
| Service Area combination | ||
| this message would be | ||
| shown. Pick the plans | ||
| that are available for the | ||
| Employee in the | ||
| Employee Coverage Info | ||
| screen. | ||
| Plan | Vision Plan selected by | Normally the Plan for the |
| availability | the Employees not | employee is listed based |
| available in the service | on the Plan available in | |
| area. | the employees Service | |
| Area. Rare cases if the | ||
| User Modifies the ZIP | ||
| Code in the Employee | ||
| General Info Screen and | ||
| fails to update the Plan | ||
| for the specific ZIP code, | ||
| Service Area combination | ||
| this message would be | ||
| shown. Pick the plans | ||
| that are available for the | ||
| Employee in the | ||
| Employee Coverage Info | ||
| screen. | ||
| Plan | CAM Plan selected by the | Normally the Plan for the |
| availability | Employees not available | employee is listed based |
| in the service area. | on the Plan available in | |
| the employees Service | ||
| Area. Rare cases if the | ||
| User Modifies the ZIP | ||
| Code in the Employee | ||
| General Info Screen and | ||
| fails to update the Plan | ||
| for the specific ZIP code, | ||
| Service Area combination | ||
| this message would be | ||
| shown. Pick the plans | ||
| that are available for the | ||
| Employee in the | ||
| Employee Coverage Info | ||
| screen. | ||
-
- Step-15: On completing all the relevant information that is required for a successful enrollment of a group, the following is the sample screen for a successful enrollment of a group. (See Figure C-28)
Create Group (Alternate Group—Individual Member)
The create group screen is to enter details of a group. The screen provides functionality to save, edit or add new group details.
The sequential steps involved in the creation of a new group by selecting group under alternate group are listed below.
-
- Step-1: After successful logon, click the menu Enrollment and select New Business Enrollment. Then select the option Group Enrollment and Create Group. (See Figure C-29)
- Step-2: Screen displays with the option of selecting a group hierarchy. (See Figure C-30)
- Step-3: Screen navigates select an alternate group. Enter a 10-digit number or choose an association name. (See Figure C-31)
- Step-4: Choose the option of individual member and click Continue. (See Figure C-32)
- Step-5: Clicking continue button screen navigates to general info. Enter the values in the respective field, as per the format briefed in fields explanation section Field Explanation, and click Continue. (See Figure C-33)
Field Explanation
The following table provides explanation for each button in the screen.
| Element | Description |
| Post Mark Date | Text for post mark date. Choose a date by clicking |
| calendar icon. Accepts in the format MM/DD/YYYY | |
| Received Date | Text for received date. Choose a date by clicking |
| calendar icon. Accepts in the format MM/DD/YYYY |
| Employee Information |
| Salutation | Choose the salutation from the drop down list of |
| salutations available. | |
| First Name | The text for first name. Accepts alphabets and special |
| character like hyphen and single quotes not exceeding | |
| 25 characters. First name is mandatory. | |
| Middle Initial | The text for middle initial. Accepts alphabets not |
| exceeding 1 character. | |
| Last Name | The text for contact name. Accepts alphabets and |
| special character like hyphen and single quotes not | |
| exceeding 35 characters. Last name is mandatory | |
| Suffix | Choose the suffix from the drop down list of suffixes |
| available. | |
| Date of Birth | The text for date of birth. Choose a date by clicking |
| calendar icon | |
| Social Security | The text for social security number for every |
| Number | individual. This can also be auto generated by clicking |
| auto generate link. Accepts numeric value of exactly 9 | |
| digits. Users with User Role as Level 2 and above can | |
| only auto generate SSN. | |
| Gender | Choose a gender from the drop down list available. |
| Address | Physical and Alternate Address- Note: Enter |
| Information; | Alternate Address if different from the |
| Physical Address. | |
| Street Address | The text for address. Accepts alphanumeric and special |
| characters not exceeding 35 characters | |
| Suite | The text for suite/apt # Accepts alphanumeric and |
| special characters not exceeding 35 characters | |
| Zip | The text for zip. Accepts numeric value of either 5 or 9 |
| digits. City, State and County are populated | |
| automatically on entering the correct zip code and | |
| entering the tab key. | |
| City | The text for city. Accepts alphabets and space between |
| two words not exceeding 30 characters. | |
| State | Choose the name of the state from the drop down list |
| of States available in United States of America | |
| County | Choose the name of the county from the drop down list |
| of counties available for the ZIP Code entered. | |
| Mode of | Choose the mode of correspondence from the drop |
| Correspondence | down list available. |
| Phone Number | The text for telephone number of the contact person. |
| Accepts numeric values not exceeding 10 digits. The | |
| format is (999) 999-9999 | |
| Extension | The text for extension number of the contact person. |
| Accepts numeric values not exceeding 5 digits. | |
| Fax | The text for fax number of the contact person Accepts |
| numeric values not exceeding 10 digits. The format is | |
| (999) 999-9999 | |
| The text for email of the contact person. Accepts | |
| alphabets, numeric and special characters in the | |
| standard email format of length not exceeding 100 | |
| characters | |
Button Functionality
The following table provides explanation for each button in the screen.
| Element | Description | |
| Continue | Navigates to Billing Information screen.. | |
| Cancel | Clears the contents entered in the fields or restore to | |
| the previous state as was before saving the changes | ||
| Tabs | General Info, Billing Info, Agent Info, Coverage Info | |
| and Add Employees are the tabs visible on this screen. | ||
| The navigation between tabs is possible only if there is | ||
| a valid group ID generated and assigned to the group. | ||
| Also while navigating through the tab the content that | ||
| are changed on the screen are not saved unless | ||
| explicitly saved by other operations on the screen. | ||
-
- Step-6: Screen navigates to billing information. Enter the values in the respective fields, as per the format briefed in field's explanation section and click Continue. (See Figure C-34)
Field Explanation
Refer field explanation provided for Small Employer Group—Billing Info.
Button Functionality
Refer button functionality provided for Small Employer Group—Billing Info
-
- Step-7: Screen navigates to Agent Info screen. Agent/Agency ID is selected by clicking search icon. (See Figure C-35)
- Step-8: This pops up a screen to select agency id Enter value in any one of the field or simply click Search button to perform search operation. (See Figure C-36)
- Step-9: Click on agency id for selection. (See Figure C-37)
- Step-10: After filling other relevant information in agent info screen, as per the format briefed in field's explanation section and click Continue
Field Explanation
Refer field explanation provided for Small Employer Group—Agent Info.
Button Functionality
Refer button functionality provided for Small Employer Group—Agent Info.
-
- Step-11: Screen navigates to coverage information. Enter the values in the respective fields, as per the format briefed in field's explanation section and click Continue. (See Figure C-38)
Field Explanation
The following table provides explanation for each button in the screen.
| Element | Description |
| Hours worked per | The text for worked hours per week. Accepts numeric |
| week | values. |
| Date of hire | The text for date of employment. Choose a date by |
| clicking calendar icon. Date accepts the format | |
| MM/DD/YYYY. | |
| Employee type | Choose an employee type from the drop down list |
| available | |
| Pay Roll | Check box for Pay Roll verification. Check this if pay |
| roll is verified. | |
| RAF | Text to display the RAF applicable for the Individual |
| Association Member. | |
| Line of coverage | Choose a line of coverage from the drop down list |
| available | |
| Medical waived | Click the check box for medical waive if the employee |
| is waiving medical. | |
| Carrier selection | Choose a carrier selection from the drop down list |
| (Benefit level) | available |
| Coverage choice | Choose a coverage from the drop down list available |
| PCP ID/Medical | The text for PCP ID. Accepts alphabets and numeric |
| group ID | values not exceeding 10 characters. |
| Are you an | Click the check box if you are an existing patient |
| existing patient | |
| PCP last name | The text for PCP last name. Accepts alphabets and |
| special character like hyphen and single quotes not | |
| exceeding 35 characters. | |
| PCP first name | The text for PCP first name. Accepts alphabets and |
| special character like hyphen and single quotes not | |
| exceeding 25 characters. | |
| Prior plan type | Choose a plan type from the drop down list available |
| Prior plan name | Choose a plan name from the drop down list available |
| Prior insurance | The text for insurance start date. Choose a date by |
| start date | clicking calendar icon. Date accepts the format |
| MM/DD/YYYY. | |
| Prior insurance | The text for insurance end date. Choose a date by |
| end date | clicking calendar icon. Date accepts the format |
| MM/DD/YYYY. | |
| Other coverage | The text for other coverage. Accepts alphabets with |
| kept | values not exceeding 50 characters. |
| Employee | Click the check box, to have employee signature |
| signature | |
| Additional | The text for any additional coverage. Accepts |
| coverage | |
| alphabets with values not exceeding 50 characters. | |
| Date signed | The text for date signed. Choose a date by clicking |
| calendar icon. Date accepts the format | |
| MM/DD/YYYY. | |
| Date cannot accept future date. | |
Button Functionality
The following table provides explanation for each button in the screen.
| Element | Description |
| Add | Add the contents of employee coverage information. It |
| is only a temporary addition. Becomes permanent only | |
| on saving. | |
| Edit | Edit button will allow for editing a specific record in |
| the table. | |
| Update | Update the contents of Plan Information. It is only a |
| temporary update. Becomes permanent only on saving. | |
| Cancel | Cancels the operation that was currently performed |
| prior to saving the record. | |
| Delete | Delete button will delete the records in the table |
| checked for deletion. It is only a temporary deletion. | |
| Becomes permanent only on saving. | |
| Check All | The “Check All” Link will check all the records in the |
| table | |
| Clear All | The “Clear All” Link will uncheck all the records in the |
| table that are checked. | |
| Enrollment | Click enrollment summary refreshes the screen and |
| Summary | display the summary of information entered for group |
| creation | |
| Missing | Click missing information refreshes the screen and |
| Information | displays the missed information. For a successful |
| creation of a group, there should be no missing | |
| information | |
| Group ID | Click Group ID to navigates to the Group's general info |
| screen. | |
| Continue | Saves the data and navigates to Coverage Information |
| screen. | |
| Cancel | Clears the contents entered in the fields or restore to |
| the previous state as was before saving the changes | |
| Tab | General Info, Billing Info, Agent Info, Coverage Info |
| and Add Employees are the tabs visible on this screen. | |
| The navigation between tabs is possible only if there is | |
| a valid group ID generated and assigned to the group. | |
| Also while navigating through the tab the content that | |
| are changed on the screen are not saved unless | |
| explicitly saved by other operations on the screen | |
-
- Step-12: Screen navigates to add dependent information. First name and last name fields are mandatory and other fields are optional. Enter the values in the respective fields, as per the format briefed in field's explanation section and click Continue. (See Figure C-39)
Field Explanation
Refer field explanation provided for Small Employer Group—Add Dependent.
Button Functionality
The following table provides explanation for each button in the screen.
| Element | Description |
| Add Dependent | Saves the data and navigates to the screen for adding |
| dependent | |
| Enrollment | Click enrollment summary refreshes the screen and |
| Summary | display the summary of information entered for group |
| creation | |
| Missing | Click missing information refreshes the screen and |
| Information | displays the missed information. For a successful |
| creation of a group, there should be no missing | |
| information | |
| Cancel | Clears the contents entered in the fields or restore to |
| the previous state as was before saving the changes | |
| Tabs | General Info, Coverage Info, Add Dependent are the |
| tabs visible on this screen. The navigation between the | |
| tabs are possible only if there is a valid Employee ID | |
| generated and assigned to the employee Also while | |
| navigating through the tab the content that are | |
| changed on the screen are not saved unless explicitly | |
| saved by other operations on the screen | |
-
- Step-13: Clicking enrollment summary button screen navigates to enrollment summary. This screen shows the overall information that are entered will be shown. (See Figure C-40)
Field Explanation
The following table provides explanation for each element in the screen.
| Element | Description |
| Group | Contains header information of the Group |
| Information | |
| Header | |
| Name of the | Text for the Name of the Group |
| Group | |
| Group ID | Text and Link for the Group ID to navigate to the |
| Group General Info screen | |
| Group Type | Specifies the Type of the Group like Small Employer |
| Group | |
| Proposed | The text for Proposed Effective Date. Choose a date by |
| Effective Date | clicking calendar icon. Date accepts the format |
| MM/DD/YYYY. Default effective date is first of the | |
| following month. Effective date cannot be past date | |
| Status | Text to specify the status of the group. |
| Work Group | Text for Work Group. This specifies the internal work |
| group attached to the Group. Internal is based on the | |
| writing agent's work group. | |
| Association ID | Text to specify the Association ID |
| Association Name | Text to specify the Association Name |
| Enrollment | Enrollment Summary Information is broken down into |
| Summary | tree structure. The tree can by expanded or collapsed. |
| Information | The level of the tree is as per the example |
| given below: | |
| −Employee | |
| −Dependent | |
| −Dependent | |
| +Dependent | |
| Where (−) signifies expanded view and (+) signifies | |
| collapsed view. | |
| Employee ID | Text for Employee ID |
| Employee SSN | Text for Employee SSN |
| Employee Name | Text for employee Name (First Name and Last Name) |
| Effective Date | Text for Employee Effective date. Choose a date by |
| clicking calendar icon. Date accepts the format | |
| MM/DD/YYYY. Defaults effective date of the Group. | |
| Effective date cannot be past date | |
| Status | Text to specify the status of the employee. |
| Dependent ID | Text for Dependent ID |
| Dependent SSN | Text for Dependent SSN |
| Dependent Name | Text for Dependent Name (First Name and Last |
| Name) | |
| Effective Date | Text for Dependent Effective date. Choose a date by |
| clicking calendar icon. Date accepts the format | |
| MM/DD/YYYY. Defaults effective date of the | |
| Employee. Effective date cannot be past date | |
| Status | Text to specify the status of the Dependent. |
Button Functionality
The following table provides explanation for each button in the screen.
| Element | Description |
| Missing | Click missing information refreshes the screen and |
| Information | displays the missed information. For a successful |
| creation of a group, there should be no missing | |
| information | |
| Cancel | Clears the contents entered in the fields or restore to |
| the previous state as was before saving the changes | |
| Group ID | Click Group ID to navigates to the Group's general info |
| screen. | |
-
- Step-14: Clicking pre enrollment navigates to missing info screen. It gives the information that is left out while entering input for creating a group. For a successful creation of a group the missing information should be empty. (See Figure C-41)
Field Explanation
The following table provides explanation for each element in the screen.
| Element | Description |
| Group | Contains header information of the Group |
| Information | |
| Header | |
| Name of the | Text for the Name of the Group |
| Group | |
| Group ID | Text and Link for the Group ID to navigate to the |
| Group General Info screen | |
| Group Type | Specifies the Type of the Group like Small Employer |
| Group | |
| Proposed | The text for Proposed Effective Date. Choose a date by |
| Effective | |
| Date | clicking calendar icon. Date accepts the format |
| MM/DD/YYYY. Default effective date is first of the | |
| following month. Effective date cannot be past date | |
| Status | Text to specify the status of the group. |
| Work Group | Text for Work Group. This specifies the internal work |
| group attached to the Group. Internal is based on the | |
| writing agent's work group. | |
| Association ID | Text to specify the Association ID |
| Association Name | Text to specify the Association Name |
| Tree Structure | Enrollment Missing Information is broken down into |
| tree structure. The tree can by expanded or collapsed. | |
| The level of the tree is as per the example given | |
| below: | |
| −Employee | |
| −Dependent | |
| −Dependent | |
| Where (−) signifies expanded view and (+) signifies | |
| collapsed view. | |
| Group Missing | This identifies all the eligibility rules and the |
| Info | information that are incomplete on Group level for |
| completing the enrollment process. | |
| Missing Entities | List the missing entities for the group. Provides a link |
| to go to the respective screen to fill in the relevant | |
| information to complete all the required entries. | |
| Message | List the message against each missing entities. |
| Employee | This identifies all the eligibility rules and the |
| Missing Info | information that are incomplete on Employee level for |
| completing the enrollment process. | |
| Missing Entities | List the missing entities for the employee. Provides a |
| link to go to the respective screen to fill in the relevant | |
| information to complete all the required entries. | |
| Message | List the message against each missing entities. |
| Dependent | This identifies all the eligibility rules and the |
| Missing Info | information that are incomplete on dependent level for |
| completing the enrollment process. | |
| Missing Entities | List the missing entities for the dependent. Provides a |
| link to go to the respective screen to fill in the relevant | |
| information to complete all the required entries. | |
| Message | List the message against each missing entities. |
| Enrollment | Choose from the drop down list the action to be |
| Action | performed for enrollment. Enroll/Decline |
| Remarks | Text for remarks if any. |
| Reasons for | Choose from the drop down list the reasons for |
| Decline | decline. |
| Reasons for Other | Text for other reason. If the reason for decline is other |
| enter the reasons here. | |
Button Functionality
The following table provides explanation for each button in the screen.
| Element | Description |
| Enroll | Saves the data if there are no missing information and |
| navigates to enrollment confirmation page. | |
| Cancel | Clears the contents entered in the fields or restore to |
| the previous state as was before saving the changes | |
| Group ID | Click Group ID to navigates to the Group's general info |
| screen. | |
Missing Information
The following table provides explanation for each missing information and what needs to be done to remove missing information from the screen
| Missing Entity | Message | Reasons/Remedy |
| Member Level |
| Employee | These missing information pertains to the |
| General | Member Level information required in the |
| Information | General Information Screen |
| Address | Address information is | Fill in the address |
| not specified | information in the | |
| Employee General Info | ||
| Screen | ||
| City | City is not specified | Fill in the City in the |
| Employee General Info | ||
| Screen | ||
| State | State is not specified | Fill in the City in the |
| Employee General Info | ||
| Screen | ||
| ZIP Code | ZIP Code is not specified | Fill in the ZIP Code in the |
| Employee General Info | ||
| Screen | ||
| Date of Birth | Date of Birth is not | Fill in the Date of Birth in |
| specified | the Employee General | |
| Info Screen | ||
| Gender | Gender is not specified | Choose the Gender in the |
| Employee General Info | ||
| Screen | ||
| SSN | SSN is not specified | Fill in the SSN in the |
| Employee General Info | ||
| Screen. If the employee | ||
| refuse to provide SSN | ||
| then click auto generate | ||
| SSN/Unique ID in the | ||
| Employee General Info | ||
| Screen. Auto generation | ||
| of SSN/Unique ID will be | ||
| available only for the user | ||
| with role as level II and | ||
| above | ||
| Mode of | Mode of Correspondence | Choose the Mode of |
| Correspondence | is not specified | Correspondence for |
| Employee from the list in | ||
| Employee general info | ||
| screen | ||
| Email for Employee is | This is required if the | |
| not specified | mode of correspondence | |
| selected is Email. Fill in | ||
| the Email in the | ||
| Employee general info | ||
| screen |
| Billing | These missing information pertains to the |
| Information | Member Level information required in the |
| Billing Information Screen |
| Mode of payment | Mode of payment is not | Choose the Mode of |
| specified | Payment for the group | |
| from the list in Group | ||
| Billing Info Screen | ||
| Check Number | Check Number is not | Fill in the Check number |
| specified. | in the Group Billing Info | |
| Screen | ||
| Check Date | Date Check is received is | Fill in the Date received |
| not specified | in the Group Billing Info | |
| Screen | ||
| Check Number | Check Number is | Fill in the Check Number |
| received is not specified | in the Group Billing Info | |
| Screen | ||
| Initial Payment | Initial payment not | If initial payment check is |
| received | received then uncheck the | |
| box “No Check Received” | ||
| in the Group Billing Info | ||
| Screen | ||
| Initial Payment | Initial Payment is not | If initial payment check is |
| sufficient to get enrolled | received but there is a | |
| shortfall in the amount | ||
| this message would be | ||
| shown. Check the short | ||
| fall by previewing the | ||
| invoice with the amount | ||
| received. | ||
| The variation in amount | ||
| received by more than (−) | ||
| $2 will allow user with | ||
| level II and above only to | ||
| enroll. | ||
| The variation in amount | ||
| received by more than (−) | ||
| $50 will allowing user | ||
| with level III and above | ||
| only to enroll | ||
| The variation in amount | ||
| received by more than (−) | ||
| $100 will allow user with | ||
| level IV and above only to | ||
| enroll | ||
| Cardholder's | Cardholder's name is | This is required if the |
| Name | not specified | mode of payment opted by |
| group is Credit Card. Fill | ||
| in the Cardholder's name | ||
| in the Group Billing Info | ||
| Screen. | ||
| Credit Card Type | Credit Card Type is not | This is required if the |
| specified. | mode of payment opted by | |
| group is Credit Card | ||
| Choose the Credit Card | ||
| Type for the group from | ||
| the list in Group Billing | ||
| Info Screen | ||
| Credit Card | Credit Card Number is | This is required if the |
| Number | not specified | mode of payment opted by |
| group is Credit Card. Fill | ||
| in the Credit Card | ||
| Number in the Group | ||
| Billing Info Screen. | ||
| Expiration Date | Credit Card Expiration | This is required if the |
| Date is not specified | mode of payment opted by | |
| group is Credit Card. Fill | ||
| in the Credit Card | ||
| Expiration Date in the | ||
| Group Billing Info Screen. | ||
| Bank Name | Bank name is not | This is required if the |
| specified | mode of payment opted by | |
| group is EFT. Fill in the | ||
| Bank Name in the Group | ||
| Billing Info Screen. | ||
| Routing Number | Routing Number is not | This is required if the |
| specified | mode of payment opted by | |
| group is EFT. Fill in the | ||
| Routing Number in the | ||
| Group Billing Info Screen. | ||
| Account Type | Account Type is not | This is required if the |
| specified | mode of payment opted by | |
| group is EFT. Fill in the | ||
| Account Type in the | ||
| Group Billing Info Screen | ||
| Depositor's Name | Depositor's Name is not | This is required if the |
| specified | mode of payment opted by | |
| group is EFT. Fill in the | ||
| Depositor's Name in the | ||
| Group Billing Info Screen |
| Agent | These missing information pertains to the |
| Information | Member Level information required in the Agent |
| Information Screen |
| Writing Agent | Writing Agent is not | Choose the Writing Agent |
| specified | for the Group in the | |
| Group Agent Info Screen | ||
| Agent of Record | Agent of Record is not | This is required if |
| specified | commission for the agent | |
| exists. Choose the Agent | ||
| of Record for the Group in | ||
| the Group Agent Info | ||
| Screen | ||
| Agent License | Agent License Number is | Go to Agent/Agency |
| Number | not specified | Master Screen, search for |
| the agent/agency | ||
| attached with group and | ||
| fill in the License | ||
| information. | ||
| License Expiry | License Expiry Date is | Go to Agent/Agency |
| Date | not specified | Master Screen, search for |
| the agent/agency | ||
| attached with group and | ||
| fill in the License | ||
| information. | ||
| License Expiry | Agent License Number is | Go to Agent/Agency |
| Date | expired | Master Screen, search for |
| the agent/agency | ||
| attached with group and | ||
| modify the license expiry | ||
| date. | ||
| Commission | % Commission is split is | Check if the commission |
| not specified | split for the agent of | |
| record exists. If not edit | ||
| the corresponding agent | ||
| of record and enter % | ||
| commission split for the | ||
| Agent of Record in the | ||
| Group Agent Info Screen | ||
| Total | % Split in commission is | Check if the total of the |
| Commission Split | less than 100% | commission split's for the |
| agent of record is 100. If | ||
| not edit the corresponding | ||
| agent of record and make | ||
| changes to make | ||
| commission split total to | ||
| 100% in the Group Agent | ||
| Info Screen |
| Coverage | These missing information pertains to the |
| Information | Member Level information required in the |
| Coverage Information Screen |
| Hours Worked | Hours worked per week | Fill in the Hours worked |
| not specified | per week in the Employee | |
| Coverage Info Screen | ||
| Date of | Date of employment not | Fill in the Date of |
| Employment | specified | Employment in the |
| Employee Coverage Info | ||
| Screen | ||
| Employee | Employee signature is | Verify employee's |
| Signature | missing | signature and check |
| Employee Signature | ||
| checkbox in the Employee | ||
| Coverage Info Screen | ||
| Date Signed | Date Signed is missing | Verify Date signed and fill |
| in the Date Signed in the | ||
| Employee Coverage Info | ||
| Screen | ||
| Employee Type | Employee Type not | Choose the Employee |
| specified | Type for Employee Type | |
| from list in Employee | ||
| Coverage info screen | ||
| Employee | Employee's Line of | Choose the Line of |
| Coverage | Coverage not specified | Coverage for the |
| Employee in Employee | ||
| Coverage info screen | ||
| Medical Coverage | Medical Line of | Choose the Line of |
| Coverage not specified | Coverage for the | |
| Employee in Employee | ||
| Coverage info screen. If | ||
| the employee waives | ||
| medical coverage check | ||
| the checkbox Medical | ||
| Waived. | ||
| Dental Coverage | Dental Line of Coverage | This is required if the |
| not specified | Association offers optional | |
| benefits. Choose the Line | ||
| of Coverage for the | ||
| Employee in Employee | ||
| Coverage info screen | ||
| Vision Coverage | Vision Line of Coverage | This is required if the |
| not specified | Association offers optional | |
| benefits. Choose the Line | ||
| of Coverage for the | ||
| Employee in Employee | ||
| Coverage info screen | ||
| CAM Coverage | CAM Line of Coverage | This is required if the |
| not specified | Association offers optional | |
| benefits. Choose the Line | ||
| of Coverage for the | ||
| Employee in Employee | ||
| Coverage info screen | ||
| Coverage Choice | Coverage Choice | Choose the appropriate |
| between the Line of | coverage choices as per | |
| Coverage differs | the illustration provided | |
| in the column below and | ||
| edit the coverage choice | ||
| for the specific Line of | ||
| Coverage and update in | ||
| Employee Coverage info | ||
| screen. Or In dependent | ||
| Info Screen waive the | ||
| Optional coverage choice | ||
| for dependent under 2 by | ||
| checking the check box | ||
| Waive. |
| Coverage Choice | Coverage choice for the Medical should have highest |
| Illustration | precedence. There are Four Coverage Choices |
| 1 - Employee Family | |
| 2 - Employee Child | |
| 3 - Employee Spouse | |
| 4 - Employee Only | |
| Case 1: | |
| If coverage choice for medical is Employee Child, | |
| Optional benefit cannot have employee spouse. It | |
| should be Employee Child or Employee Only provided | |
| child is under 2 | |
| Case 2: | |
| If Coverage Choice for Medical is Employee Spouse | |
| optional benefits cannot have employee child. It should | |
| also be Employee Spouse | |
| Case 3: | |
| If Coverage Choice for Medical is Employee Child | |
| optional benefits cannot have employee only if at least | |
| one child his above 2. It should also be | |
| Employee child |
| Dependent Count | Number of Dependents is | This would be the case |
| not sufficient to satisfy | when the dependent | |
| Coverage Choice. | information is not entered | |
| into the system. Add | ||
| Dependent. | ||
| This can also occur if the | ||
| number of dependent as | ||
| specified in coverage | ||
| choice does not match | ||
| with the dependents | ||
| available. Add Dependent. | ||
| Dependent | Dependent information is | This would occur if the |
| not specified | Coverage choice specified | |
| is other than employee | ||
| and depended record is | ||
| not entered. Add | ||
| Dependent | ||
| 1099's | 1099 not provided for | Manually verify 1099 for |
| verification | the employee and check | |
| the 1099's Flag in the | ||
| Enrollment summary for | ||
| the specific employee. | ||
| DE6 | DE6 not provided for | Manually verify DE6 for |
| verification | the employee and check | |
| the DE6 Flag in the | ||
| Enrollment summary for | ||
| the specific employee. |
| Dependent | These missing information pertains to the |
| Information | Dependent Level information required in the |
| Dependent Information Screen |
| Date of Birth | Date of Birth is not | Fill in the Date of Birth in |
| specified | the Dependent General | |
| Info Screen | ||
| Gender | Gender is not specified | Choose the Gender in the |
| Dependent General Info | ||
| Screen | ||
| SSN | SSN is not specified | Fill in the SSN in the |
| Dependent General Info | ||
| Screen. If the dependent | ||
| refuse to provide SSN | ||
| then click auto generate | ||
| SSN/Unique ID in the | ||
| Dependent General Info | ||
| Screen. Auto generation | ||
| of SSN/Unique ID will be | ||
| available only for the user | ||
| with role as level II and | ||
| above | ||
| Relationship | Relationship of the | Choose the dependent |
| dependent with the | relationship from the | |
| employee not specified | Dependent Info Screen | |
| Relationship - | Relationship, child is | Verify if the child is |
| Child | specified for child above | disabled and choose if |
| 23 years of age | Disabled Permanent or | |
| Temporary. | ||
| Signature | Dependent signature is | This is required if the |
| missing | dependent age is above | |
| 18. Verify the signature | ||
| for the dependent and | ||
| check the checkbox | ||
| Signature in the | ||
| dependent info screen | ||
| Relationship | Number of spouse is | Check for the relationship |
| more than one | in the dependent info | |
| screen. There can only be | ||
| one of the following | ||
| relationship for the | ||
| dependent: | ||
| Spouse or Ex - Spouse or | ||
| domestic partner. | ||
| Choose different | ||
| relationship for the other | ||
| dependent in the | ||
| dependent info screen |
| General Missing | These are missing information pertains to the all |
| Information on | level of information. This may be due to non |
| All Level | availability of sufficient master record to |
| process enrollment or may require business | |
| decisions or administrative changes in the | |
| system to overcome this missing information |
| Employee Record | Employee Record Does | Probably the entries for |
| not exist | the employees are not | |
| made. Add employees to | ||
| satisfy this eligibility rule. | ||
| Rate Availability | Rate is not available for | This is possible if the |
| the Plan opted by the | Rates are not loaded for | |
| Employee | the Individual Member's | |
| effective date of | ||
| enrollment. Load the | ||
| rates for the specific plan | ||
| from the Carrier | ||
| Maintenance - Rate | ||
| Import utility. | ||
| Admin Fees | Admin Fees for the | This is possible if the |
| Small Employer Group is | Admin Fees is not | |
| not specified | specified for the | |
| Individual Member's | ||
| Effective date. Add Admin | ||
| fees from the Carrier | ||
| Maintenance - Rate | ||
| Administration | ||
| Agent | Agent Commission for | This is possible if the |
| Commission | the Small Employer | Agent Commission is not |
| Group is not specified | specified for the | |
| Individual Member's | ||
| Effective date. Add Agent | ||
| Commission from the | ||
| Carrier Maintenance - | ||
| Rate Administration | ||
| Rate Differential | Rate Differential Factor | This is possible if the Rate |
| Factor | for the Small Employer | Differential Factor is not |
| Group is not specified | specified for the Agent | |
| Commission Effective | ||
| date. Add Rate | ||
| Differential Factor from | ||
| the Carrier Maintenance - | ||
| Rate Administration | ||
| Plan availability | Medical Plan selected by | Normally the Plan for the |
| the Employees not | employee is listed based | |
| available in the service | on the Plan available in | |
| area. | the employees Service | |
| Area. Rare cases if the | ||
| User Modifies the ZIP | ||
| Code in the Employee | ||
| General Info Screen and | ||
| fails to update the Plan | ||
| for the specific ZIP code, | ||
| Service Area combination | ||
| this message would be | ||
| shown. Pick the plans | ||
| that are available for the | ||
| Employee in the | ||
| Employee Coverage Info | ||
| screen. | ||
| Plan availability | Dental Plan selected by | Normally the Plan for the |
| the Employees not | employee is listed based | |
| available in the service | on the Plan available in | |
| area. | the employees Service | |
| Area. Rare cases if the | ||
| User Modifies the ZIP | ||
| Code in the Employee | ||
| General Info Screen and | ||
| fails to update the Plan | ||
| for the specific ZIP code, | ||
| Service Area combination | ||
| this message would be | ||
| shown. Pick the plans | ||
| that are available for the | ||
| Employee in the | ||
| Employee Coverage Info | ||
| screen. | ||
| Plan availability | Vision Plan selected by | Normally the Plan for the |
| the Employees not | employee is listed based | |
| available in the service | on the Plan available in | |
| area. | the employees Service | |
| Area. Rare cases if the | ||
| User Modifies the ZIP | ||
| Code in the Employee | ||
| General Info Screen and | ||
| fails to update the Plan | ||
| for the specific ZIP code, | ||
| Service Area combination | ||
| this message would be | ||
| shown. Pick the plans | ||
| that are available for the | ||
| Employee in the | ||
| Employee Coverage Info | ||
| screen. | ||
| Plan availability | CAM Plan selected by | Normally the Plan for the |
| the Employees not | employee is listed based | |
| available in the service | on the Plan available in | |
| area. | the employees Service | |
| Area. Rare cases if the | ||
| User Modifies the ZIP | ||
| Code in the Employee | ||
| General Info Screen and | ||
| fails to update the Plan | ||
| for the specific ZIP code, | ||
| Service Area combination | ||
| this message would be | ||
| shown. Pick the plans | ||
| that are available for the | ||
| Employee in the | ||
| Employee Coverage Info | ||
| screen. | ||
-
- Step-15: On completing all the relevant information that is required for a successful enrollment of a group, the following is the sample screen for a successful enrollment of an individual association member. (See Figure C-42)
Create Group (Alternate Group—Small Employer Group)
The create group screen is to enter details of a group The screen provides functionality to save, edit or add new group details.
There are three different ways of creation, namely creating a group, through small employer group, alternate group that has again two methods namely individual member and group.
The sequential steps involved in the creation of a new group by selecting group under alternate group are listed below.
-
- Step-1: After successful logon, click the menu Enrollment and select New Business Enrollment. Then select the option Group Enrollment and Create Group. (See Figure C-43)
- Step-2: Screen displays with the option of selecting a group hierarchy. (See Figure C-44)
- Step-3: Screen navigates select an alternate group. Enter a 10digit number or choose an association. (See Figure C-45)
- Step-4: Choose the option of group and click Continue. (See Figure C-46)
- Step-5: Clicking continue button screen navigates to general info. Enter the values in the respective field, as per the format briefed in fields explanation section Field Explanation, and click Continue. (See Figure C-47)
Field Explanation
Refer field explanation provided for Small Employer Group—General Info.
Button Functionality
Refer button functionality provided for Small Employer Group—General Info.
-
- Step-6: Screen navigates to billing information. Enter the values in the respective fields, as per the format briefed in field's explanation section and click Continue. (See Figure C-48)
Field Explanation
Refer field explanation provided for Small Employer Group—Billing Info.
Button Functionality
Refer button functionality provided for Small Employer Group—Billing Info.
-
- Step-7: Screen navigates to Agent Info screen. Agent/Agency ID is selected by clicking search icon. (See Figure C-49)
- Step-8: This pops up a screen to select agency id Enter the first letter of agent name or first digit of agent id to perform search operation. (See Figure C-50)
- Step-9: Click on agency id for selection. (See Figure C-51)
- Step-10: After filling other relevant information in agent info screen, as per the format briefed in field's explanation section and click Continue
Field Explanation
Refer field explanation provided for Small Employer Group—Agent Info.
Button Functionality
Refer button functionality provided for Small Employer Group—Agent Info.
-
- Step-11: Screen navigates to coverage information. Even though the fields are optional, enter the values in the respective fields, as per the format briefed in field's explanation section and click Continue. (See Figure C-52)
Field Explanation
Refer field explanation provided for Small Employer Group—Coverage Info.
Button Functionality
Refer button functionality provided for Small Employer Group—Coverage Info.
-
- Step-12: Screen navigates to add employee general information. First and Last name are mandatory other fields are optional. Enter the values in the respective fields, as per the format briefed in field's explanation section. (See Figure C-53)
Field Explanation
Refer field explanation provided for Small Employer Group—Add Employee General Info.
Button Functionality
Refer button functionality provided for Small Employer Group—Add Employee General Info.
-
- Step-13: Screen navigates to coverage information. Even though the fields are optional, enter the values in the respective fields, as per the format briefed in field's explanation section and click Continue. (See Figure C-54)
Field Explanation
Refer field explanation provided for Small Employer Group—Add Employee Coverage Info.
Button Functionality
Refer button functionality provided for Small Employer Group—Add Employee Coverage Info.
-
- Step-14: Screen navigates to add dependent information. Enter the values in the respective fields, as per the format briefed in field's explanation section and click anyone of the button shown for subsequent operation. (See Figure C-55)
Field Explanation
Refer field explanation provided for Small Employer Group—Add Dependent
Button Functionality
Refer button functionality provided for Small Employer Group—Add Employee Add Dependent.
-
- Step-15: Clicking enrollment summary button screen navigates to enrollment summary. This screen shows the overall information that is entered. Enter the values in the respective fields, as per the format briefed in field's explanation section and click Pre Enrollment button for checking the eligibility criteria for the Group and Members. (See Figure C-56)
Field Explanation
Refer field explanation provided for Small Employer Group—Enrollment Summary.
Button Functionality
Refer button functionality provided for Small Employer Group—Enrollment Summary.
-
- Step-16: Clicking pre enrollment navigates to missing info screen. Missing information screen provide information on the data that is required to complete an enrollment process. This also checks for the eligibility of the group and member for enrolling into PacAdvantage Program. For a successful creation of a group the missing information should be empty. The user role and authority can overrule certain missing information.
Enter the values in the respective fields, as per the format briefed in field's explanation section and click Enroll button for enrolling the Group and Members. (See Figure C-57)
Field Explanation
Refer field explanation provided for Small Employer Group—Enrollment Missing Info
Button Functionality
Refer button functionality provided for Small Employer Group—Enrollment Missing Info
Missing Information
Refer missing information provided for Small Employer Group—Missing Information
-
- Step-17: On completing all the relevant information that is required for a successful enrollment of a group, the following is the sample screen for a successful enrollment of a group. (See Figure C-58)
Modify Group (Small Employer Group)
The modify group screen is to modify details of a group for the existing groups. The screen provides functionality to save, edit or add new group details.
The sequential steps involved in the modify group are listed below.
-
- Step-1: After successful logon, click the menu Enrollment and select New Business Enrollment. Then select the option Group Enrollment and Modify Group. (See Figure C-59)
- Step-2: Navigates to search screen. Enter value in any one of the field or simply click search button to perform search operation. (See Figure C-60)
- Step-3: This pop ups a screen with the search result. (See Figure C-61)
- Step-4: Click on any group id for selection This navigates to general information of the group. The process of modification is similar to the process of flow as explained in Creation of Group. Refer Section Create Group (Small Employer Group)
Inactivate Group
The inactivate group screen is to make a group from activate state to inactivate.
The sequential steps involved in the inactivate group are listed below.
-
- Step-1: After successful logon, click the menu Enrollment and select New Business Enrollment. Then select the option Group Enrollment and Inactivate Group. (See Figure C-62)
- Step-2: Navigates to search screen. Enter value in any one of the fields or simply click search button to perform search operation. (See Figure C-63)
- Step-3: This pop ups a screen with the search result. (See Figure C-64)
- Step-4: Click on any group id for selection. This navigates to a screen confirming for the selected group to make inactivate. Click Inactivate button. (See Figure C-65)
- Step-5: Confirms the status Click Search to navigate back to Group Search screen. (See Figure C-66)
Create Employee
The create employee screen is to enter details of a employee The screen provides functionality to save, edit or add new employee details.
The sequential steps involved in the creation of an employee are listed below.
-
- Step-1: After successful logon, click the menu Enrollment and select New Business Enrollment. Then select the option Employee Enrollment and Create Employee. (See Figure C-67)
- Step-2: This navigates to group search screen, to create an employee for an employer Enter value in any one of the fields, or simply click search button to perform search operation. (See Figure C-68)
- Step-3: This pops up a screen with the search result. (See Figure C-69)
- Step-4: Click on any employer/group id for selection.
- Step-5: This navigates to general information screen pertaining to an employee. The process of creating an employee is similar to the process explained for Small Employer Group
Modify Employee
The modify employee screen is to modify details of a employee The screen provides functionality to save, edit or add new employee details.
The sequential steps involved for modifying an employee are listed below.
-
- Step-1: After successful logon, click the menu Enrollment and select New Business Enrollment. Then select the option Employee Enrollment and Modify Employee. (See Figure C-70)
- Step-2: This navigates to employee search screen. (See Figure C-71)
- Step-3: Enter value in any one of the fields or simply click search button to perform search operation. Navigates to Search result screen. (See Figure C-72)
- Step-4: Click on any employee id for selection
- Step-5: This displays General Info screen of an employee with contents ready for any modification. The procedure and flow of modification are similar to the procedures explained for Small Employer Group
Inactivate Employee
The inactivate employee screen is to make a employee from activate state to inactivate.
The sequential steps involved in the inactivate employee are listed below.
-
- Step-1: After successful logon, click the menu Enrollment and select New Business Enrollment. Then select the option Employee Enrollment and Inactivate Employee. (See Figure C-73)
- Step-2: Navigates to search screen for employees. Either enters the id or first letter of employee name to perform search. Click search button. (See Figure C-74)
- Step-3: This pop ups a screen with the search result. (See Figure C-75)
- Step-4: Click on any employee id for selection. This navigates to a screen confirming for the selected employee to make inactivate. Click Inactivate button. (See Figure C-75)
- Step-5: Confirms the status Click Search to navigate back to Employee search screen. (See Figure C-76)
Create Dependent
The create dependent screen is to enter details of a employee The screen provides functionality to save, edit or add new dependent details.
The sequential steps involved in the creation of an dependent are listed below.
-
- Step-1: After successful logon, click the menu Enrollment and select New Business Enrollment. Then select the option Dependent Enrollment and Create Dependent. (See Figure C-77)
- Step-2: Navigates to search screen for employees. Either enters the id or first letter of employee name to perform search operation. Click search button. (See Figure C-78)
- Step-3: This pops up a screen with the search result. (See Figure C-79)
- Step-4: Click on any employee id for selection
- Step-5: This navigates to add dependent screen pertaining to an employee. The process of creating a dependent is similar to the process explained for Small Employer Group
Modify Dependent
The modify dependent screen is to modify details of a dependent.
The screen provides functionality to save, edit or add new dependent details.
The sequential steps involved in the modify dependent are listed below.
-
- Step-1: After successful logon, click the menu Enrollment and select New Business Enrollment. Then select the option Dependent Enrollment and Modify Dependent. (See Figure C-80)
- Step-2: This navigates to dependent search screen. (See Figure C-81)
- Step-3: Enter value in any one of the fields or simply click search button to perform search operation. (See Figure C-82)
- Step-4: Click on any dependent id for selection
- Step-5: This displays a screen with contents ready for any modification. The procedure and flow of modification are similar to the procedures explained for Small Employer Group
Inactivate Dependent
The inactivate dependent screen is to make a employee from activate state to inactivate.
The sequential steps involved in the inactivate dependent are listed below.
-
- Step-1: After successful logon, click the menu Enrollment and select New Business Enrollment. Then select the option Dependent Enrollment and Inactivate Dependent. (See Figure C-83)
- Step-2: This navigates to dependent search screen. (See Figure C-84)
- Step-3: This pop ups a screen with the search result. (See Figure C-85)
- Step-4: Click on any dependent id for selection. This navigates to a screen confirming for the selected employee to make inactivate. Click Inactivate button. (See Figure C-86)
- Step-5: Confirms the status Click search button navigates to Dependent search screen. (See Figure C-87)
Modify Individual Member
The screen is to have modification of details pertaining to an individual member. The screen provides functionality to save, edit or add new individual member details.
The sequential steps involved in modify individual member are listed below.
-
- Step-1: After successful logon, click the menu Enrollment and select New Business Enrollment. Select the option Individual Member. Then Select Individual member and modify individual member. (See Figure C-88)
- Step-2: Navigates to search screen individual employee. Either enters the id or first letter of employee name to perform search operation. Click search button. (See Figure C-89)
- Step-3: This pops up a screen with the search result. (See Figure C-90)
- Step-4: Click on any employee id for selection
- Step-5: This navigates to general information pertaining to individual employee screen. The process of modifying individual member is similar to the process explained for Individual Member.
Inactivate Individual Member
The screen is to inactivate individual member from active state.
The sequential steps involved in inactivate individual member are listed below.
-
- Step-1: After successful logon, click the menu Enrollment and select New Business Enrollment. Select the option Individual Member. Then Select Individual member and inactivate individual member. (See Figure C-91)
- Step-2: Navigates to search screen individual employee. Enter value in any one of the fields or simply click search button to perform search operation.
- Step-3: This pops up a screen with the search result. (See Figure C-92)
- Step-4: Click on any employee id for selection. This navigates to a screen confirming for the selected employee to make inactivate. Click Inactivate button. (See Figure C-93)
- Step-5: Confirms the status. Click search to navigate back to Group search screen. (See Figure C-94)
Create Dependent
The screen is to create a dependent for an individual employee member.
The sequential steps involved in creating a dependent for an individual member are listed below.
-
- Step-1: After successful logon, click the menu Enrollment and select New Business Enrollment. Select the option Individual Member. Then Select Individual member dependent and create dependent. (See Figure C-95)
- Step-2: Navigates to search screen individual employee. Enter value in any one of the field. (See Figure C-96)
- Step-3: This pops up a screen with the search result. (See Figure C-97)
- Step-4: Click on any employee id for selection. This navigates to add dependent screen. The process of creating a dependent is similar to the process explained for Individual Member creating a group by alternate with option.
Modify Dependent
The screen is to create a dependent for an individual member.
The sequential steps involved in creating a dependent for an individual member are listed below.
-
- Step-1: After successful logon, click the menu Enrollment and select New Business Enrollment. Select the option Individual Member. Then Select Individual member dependent and modify dependent. (See Figure C-98)
- Step-2: Navigates to search screen individual dependent. Either enters the id or first letter of employee name to perform search operation. Click search button. (See Figure C-99)
- Step-3: This pops up a screen with the search result. (See Figure C-100)
- Step-4: Click on any dependent id for selection. This navigates to add dependent screen. The process of creating a dependent is similar to the process explained for Individual Member creating a group by alternate with option
Inactivate Dependent
The screen is to inactivate a dependent for an individual member.
The sequential steps involved in creating a dependent for an individual member are listed below.
-
- Step-1: After successful logon, click the menu Enrollment and select New Business Enrollment. Select the option Individual Member. Then Select Individual member dependent and inactivate dependent. (See Figure C-101)
- Step-2: Navigates to search screen individual dependent. Either enters the id or first letter of employee name to perform search operation. Click search button. (See Figure C-102)
- Step-3: This pops up a screen with the search result. (See Figure C-103)
- Step-4: Click on any employee id for selection. This navigates to a screen confirming for the selected employee to make inactivate. Click Inactivate button. (See Figure C-104)
- Step-5: Confirms the status of inactivation. Click search button to navigate back to dependent search. (See Figure C-105)
4 COBRA Enrollment
Access
The application can be accessed from the main menu as follows:
-
- Enrollment->COBRA Enrollment->New COBRA to Existing COBRA
Pre-Requisites
All master records must be available in the system for a successful enrollment. Master Records are as follows:
-
- Carrier Maintenance—Refer “User Manual for Carrier Maintenance” for further information on the master records.
- Work Group—Refer “User Manual for Sales and Marketing” for further information on the Work Group records.
- Internal Associates—Refer “User Manual for Sales and Marketing” for further information on the Internal Associates records.
- Association Master—Refer Section 2 of this document on “Association”.
- Eligibility Criteria (New Business COBRA)—members must satisfy eligibility rule for COBRA.
Member for existing COBRA Enrollment must be in termed status.
Application Functions
This application can be sub divided into following major functions:
-
- New COBRA Enrollment—New COBRA Enrollment for the Group who bring in their existing COBRA members into the PacAdvantage consist of the following operations:
- Create New COBRA—to input details of a COBRA members is for a specific group.
- Modify New COBRA—to search a COBRA prior to enrollment for making modifications.
- Inactivate New COBRA—to search a COBRA prior to enrollment for making inactive.
- Existing COBRA Enrollment—Existing COBRA Enrollment is for those employee and or dependents that have terminated from the existing group due to various reasons. This consist of the following operations:
- Create Existing COBRA—to input details of a COBRA members for a specific group wherein the members are terminated.
- Modify Existing COBRA—to search a COBRA Group of the termed members for making modifications prior to enrollment.
- Inactivate Existing COBRA—to search a COBRA Group of the termed members for inactivating prior to enrollment.
- New COBRA Enrollment—New COBRA Enrollment for the Group who bring in their existing COBRA members into the PacAdvantage consist of the following operations:
Create COBRA (New Business)
The screen is to create new COBRA. The screen provides functionality to save, edit or add new COBRA.
The sequential steps involved in create new COBRA are listed below.
-
- Step-1: After successful logon, click the menu Enrollment and select COBRA Enrollment. Select the New COBRA and then select Create COBRA. (See Figure C-106)
- Step-2: The screen navigates to group search for adding COBRA. Enter value in any one of the fields, or simply click Search to perform search operation. (See Figure C-107)
- Step-3: The screen displays the search result. (See Figure C-108)
- Step-4: Choose a group id.
- Step-5: Choose the option of enrolling as single or member with dependents. If the option is with dependents, enter number of dependents.
- Step-6: Click continue button
- Step-7: Screen navigates to general info for new business COBRA group. First name and last name are mandatory and other fields are optional. Enter the values in the respective field as per the format briefed in field's explanation section. Click continue button. (See Figure C-109)
Field Explanation
The following table provides explanation for each button in the screen.
| Element | Description |
| Parent Group ID | Text to display the Parent Group ID. |
| Parent Group | Text to display the Parent Group Name. |
| Name | |
| COBRA Group | Text to display the COBRA Group ID. |
| ID | |
| COBRA Type | Text to display the COBRA Group Type whether Cal |
| COBRA or Federal COBRA. | |
| Group Effective | Text to display effective date of the parent group. |
| Date | |
| Work Group | Text to Display the internal Work group associated |
| with the Parent Group | |
| Status | Text to display status of the group. |
| Post Mark Date | Text for post mark date. Choose a date by clicking |
| calendar icon. Accepts in the format MM/DD/YYYY | |
| Received Date | Text for received date. Choose a date by clicking |
| calendar icon. Accepts in the format MM/DD/YYYY | |
| Salutation | Choose the salutation from the drop down list of |
| salutations available. | |
| First Name | The text for first name. Accepts alphabets and special |
| character like hyphen and single quotes not exceeding | |
| 25 characters. First name is mandatory. | |
| Middle Initial | The text for middle initial. Accepts alphabets not |
| exceeding 1 character. | |
| Last Name | The text for last name. Accepts alphabets and special |
| characters like hyphen and single quotes not exceeding | |
| 35 characters. Last name is mandatory. | |
| Suffix | Choose the Suffix from the drop down list of |
| salutations available. | |
| Date of Birth | The text for date of birth. Choose a date by clicking |
| calendar icon | |
| Social Security | The text for social security number for every |
| Number | individual. This can also be auto generated by clicking |
| auto generate link. Accepts numeric value of exactly 9 | |
| digits. Users with User Role as Level 2 and above can | |
| only auto generate SSN. | |
| Gender | Choose a gender from the drop down list available. |
| Address | Physical Home Address or Mailing Address |
| Information: | |
| Address | The text for company address. Accepts alphabets and |
| numeric values not exceeding 35 characters | |
| Apt | The text for company suite/apt # Accepts alphabets |
| and numeric values of not exceeding 35 characters | |
| Zip | The text for zip. Accepts numeric of either 5 or 9 |
| digits. City, State and County are populated | |
| automatically for the correct zip code. | |
| City | The text for city. Accepts alphabets of not exceeding |
| 30 characters. | |
| State | Choose the name of the state from the drop down list |
| of States available in United States of America | |
| County | Choose the name of the county from the drop down list |
| of States available in United States of America | |
| Mode of | Choose the mode of correspondence from the drop |
| Correspondence | down list available |
| Phone Number | The text for telephone number of the contact person. |
| Accepts numeric values of not exceeding 10 digits. | |
| The format is (999) 999-9999 | |
| Extension | The text for telephone number of the contact person. |
| Accepts numeric values of not exceeding 5 digits. The | |
| format is (999) 999-9999 | |
| Fax | The text for fax number of the contact person. Accepts |
| numeric values of not exceeding 10 digits. The format | |
| is 9999 | |
| The text for email of the contact person. Accepts | |
| alphabets, numeric and special characters in the | |
| standard email format of length not exceeding 100 | |
| characters | |
Button Functionality
The following table provides explanation for each button in the screen.
| Element | Description | |
| Continue | Saves the data and navigates to Billing Information | |
| screen and the system generates Group ID. | ||
| Clear | Clears the contents entered in the fields or restore to | |
| the previous state as was before saving the changes | ||
| Tabs | General Info, Billing Info, Coverage Info and Add | |
| Employees are the tabs visible on this screen. The | ||
| navigation between is tabs are possible only if there is | ||
| a valid group ID generated and assigned to the group. | ||
| Also while navigating through the tab the content that | ||
| are changed on the screen are not saved unless | ||
| explicitly saved by other operations on the screen. | ||
-
- Step-8: Screen navigates billing info of group. Enter the values in the respective field as per the format briefed in field's explanation section. Click continue. (See Figure C-110)
Field Explanation
The following table provides explanation for each button in the screen.
| Element | Description |
| Mode of payment | Choose a mode of payment from the drop down list |
| available. Based on selection corresponding fields will | |
| enable to enter the values. For e.g. if the value selected | |
| is card payment, EFT will be disabled and allows only | |
| entering card details and vice versa. |
| Credit Card Information |
| Cardholder's | The text for cardholder's name. Accepts alphabets and |
| Names | space between two words. |
| Credit Card Type | Choose the type of credit card from the drop down list |
| available. | |
| Credit Card No | The text for credit card number. Accepts numeric |
| values not exceeding 30 digits | |
| Expiration Date | Choose a month of expiration from the drop down list |
| available | |
| Expiration Year | The text for expiration year. Accepts numeric values |
| of exactly 4. Example 2002. |
| Billing Address As it appears on the credit Card |
| Street Address | The text for company address. Accepts alphanumeric |
| and special characters not exceeding 35 characters. | |
| ZIP | The text for zip. Accepts numeric value of either 5 or 9 |
| digits. | |
| State | The text for city. Accepts alphabets and space between |
| two words not exceeding 30 characters. | |
| City | Choose the name of the state from the drop down list |
| of States available in United States of America |
| EFT Information |
| Bank Name | The text for bank name. Accepts alphabets and space |
| between two words. | |
| Routing Number | The text for routing number. Accepts numeric values |
| not exceeding 9 digits. | |
| Account Number | The text for account number. Accepts numeric values |
| not exceeding 9 digits. | |
| Account Type | Choose the type of account from the drop down list |
| available. | |
| Depositor's Name | The text for depositor's name. Accepts alphabets and |
| space between two words. |
| Initial Payment Information |
| Amount Received | The text for amount received. Accepts only numeric |
| values in the format 999999999.99 | |
| Date Receive | The text for date received. Choose from the calendar |
| icon in the format MM/DD/YYYY. | |
| Check # | The text for check number. Accepts numeric values |
| not exceeding 9 digits. | |
| No Check | Check the option of no checks received for any non- |
| Received | receipt of checks. |
Button Functionality
The following table provides explanation for each button in the screen.
| Element | Description | |
| Continue | Saves the data and Navigates to coverage Information | |
| screen. | ||
| Cancel | Clears the contents entered in the fields or restore to | |
| the previous state as was before saving the changes | ||
| Tabs | General Info, Billing Info, Coverage Info and Add | |
| Employees are the tabs visible on this screen. The | ||
| navigation between is tabs are possible only if there is | ||
| a valid group ID generated and assigned to the group. | ||
| Also while navigating through the tab the content that | ||
| are changed on the screen are not saved unless | ||
| explicitly saved by other operations on the screen. | ||
-
- Step-9: Screen navigates coverage info of group. Enter the values in the respective field as per the format briefed in field's explanation section. Click continue. (See Figure C-111)
Field Explanation
The following table provides explanation for each button in the screen.
| Element | Description |
| COBRA effective | The text for COBRA effective date. Choose a date by |
| date | clicking calendar icon |
| Qualifying event | Choose a qualifying even from the drop down list |
| available | |
| COBRA end date | The text for COBRA end date. Choose a date by |
| clicking calendar icon | |
| Send bill to | Choose the option of sending the bills either to group |
| or self (individual) |
| Plan Information |
| Line of coverage | Choose a line of coverage from the drop down list |
| available | |
| Medical waived | Click the check box for medical waive if the employee |
| is waiving medical. | |
| Carrier selection | Choose a carrier selection from the drop down list |
| (Benefit level) | available |
| Coverage choice | Choose a coverage from the drop down list available |
| PCP ID/Medical | The text for PCP ID. Accepts alphabets and numeric |
| group ID | values not exceeding 10 characters. |
| Are you an | Click the check box if you are an existing patient |
| existing patient | |
| PCP last name | The text for PCP last name. Accepts alphabets and |
| special character like hyphen and single quotes not | |
| exceeding 35 characters. | |
| PCP first name | The text for PCP first name. Accepts alphabets and |
| special character like hyphen and single quotes not | |
| exceeding 25 characters. | |
| Prior plan type | Choose a plan type from the drop down list available |
| Prior plan name | Choose a plan name from the drop down list available |
| Prior insurance | The text for insurance start date. Choose a date by |
| start date | clicking calendar icon. Date accepts the format |
| MM/DD/YYYY. | |
| Prior insurance | The text for insurance end date. Choose a date by |
| end date | clicking calendar icon. Date accepts the format |
| MM/DD/YYYY. | |
| Other coverage | The text for other coverage. Accepts alphabets with |
| kept | values not exceeding 50 characters. |
| RAF | The text to display RAF applicable for the Primary |
| Group. | |
| Employee | Click the check box, to have employee signature |
| signature | |
| Date signed | The text for date signed. Choose a date by clicking |
| calendar icon. Date accepts the format | |
| MM/DD/YYYY. | |
| Date cannot accept future date. | |
Button Functionality
The following table provides explanation for each button in the screen.
| Element | Description |
| Add | Add the contents of employee coverage information. It |
| is only a temporary addition. Becomes permanent only | |
| on saving the record. | |
| Edit | Edit button will allow for editing a specific record in |
| the table. | |
| Delete | Delete button will delete the records in the table |
| checked for deletion. It is only a temporary deletion. | |
| Becomes permanent only on saving the record. | |
| Check All | The “Check All” Link will check all the records in the |
| table | |
| Clear All | The “Clear All” Link will uncheck all the records in the |
| table that are checked. | |
| COBRA | Click COBRA summary refreshes the screen and |
| Summary | display the summary of information entered for |
| COBRA creation | |
| Continue | Navigates add dependent screen. |
| Cancel | Clears the contents entered in the fields or restore to |
| the previous state as was before saving the changes | |
| Tabs | General Info, Billing Info, Coverage Info and Add |
| Employees are the tabs visible on this screen. The | |
| navigation between is tabs are possible only if there is | |
| a valid group ID generated and assigned to the group. | |
| Also while navigating through the tab the content that | |
| are changed on the screen are not saved unless | |
| explicitly saved by other operations on the screen. | |
-
- Step-10: Screen navigates to add dependent screen. Enter the values in the respective field as per the format briefed in field's explanation section. Click. Continue. (See Figure C-112)
Field Explanation
The following table provides explanation for each button in the screen.
| Element | Description |
| First Name | The text for first name. Accepts alphabets and special |
| character like hyphen and single quotes not exceeding | |
| 25 characters. First name is mandatory. | |
| Middle Initial | The text for middle initial. Accepts alphabets not |
| exceeding 1 character. | |
| Last Name | The text for last name. Accepts alphabets and special |
| characters like hyphen and single quotes not exceeding | |
| 35 characters. Last name is mandatory. | |
| Suffix | Choose the suffix from the drop down list of suffixes |
| available. | |
| Date of Birth | The text for date of birth. Choose a date by clicking |
| calendar icon.. Date accepts the format | |
| MM/DD/YYYY. Birth date cannot be later than the | |
| current date. | |
| Social Security | The text for social security number for every |
| Number | individual. This can also be auto generated by clicking |
| auto generate link. Accepts numeric value of exactly 9 | |
| digits. Users with User Role as Level 2 and above can | |
| only auto generate SSN. | |
| Gender | Choose a gender from the drop down list available. |
| Relationship | Choose the relationship from the drop down list |
| available. | |
| Street Address | The text for address. Accepts alphanumeric and special |
| characters with values not exceeding 35 characters | |
| Suite | The text for suite/apt #.. Accepts alphanumeric and |
| special characters with values not exceeding 35 | |
| characters | |
| Zip | The text for zip. Accepts numeric value of either 5 or |
| 9 digits. City, and State are populated automatically | |
| on entering the correct zip code and entering the tab | |
| key. | |
| City | The text for city. Accepts alphabets not exceeding 30 |
| characters. | |
| State | Choose the name of the state from the drop down list |
| of States available in United States of America | |
| Selected carrier | The text for selected carrier. It is a read only field |
| Coverage choice | The text for coverage. It is a read only field |
| Service area | The text for service area. It is a read only field |
| Prior plan type | Choose a plan type from the drop down list available |
| Prior plan | The text for plan name. Accepts alphabets |
| Waived | Click the check box if medical is waived |
| Start date | The text for start date. Choose a date by clicking |
| calendar icon | |
| End date | The text for end date. Choose a date by clicking |
| calendar icon | |
| PCP ID/ | The text for PCP ID. Accepts alphabets |
| PCP last name | The text for PCP last name. Accepts alphabets and |
| special character like hyphen and single quotes | |
| PCP first name | The text for PCP first name. Accepts alphabets and |
| special character like hyphen and single quotes | |
| Disabled | Click the option of temporary or permanent. This is |
| dependent | enable if the relationship opted is child |
| Domestic partner | Click the option for domestic partner. It depends on |
| the value selected in relationship | |
| Legal guardian | Click the option for legal guardian. It depends on the |
| value selected in relationship | |
| Signature | Click the check box if the signature is opted |
Button Functionality
The following table provides explanation for each button in the screen.
| Element | Description |
| Add | Add the contents of dependent information. It is only a |
| temporary addition. | |
| Edit | Edit button will allow for editing a specific record in |
| the table. | |
| Delete | Delete button will delete the records in the table |
| checked for deletion. It is only a temporary deletion. | |
| Check All | The “Check All” Link will check all the records in the |
| table | |
| Clear All | The “Clear All” Link will uncheck all the records in the |
| table that are checked. | |
| Clear | Clears the contents entered in the fields or restore to |
| the previous state as was before saving the changes | |
| Continue | Screen navigates to Missing info. |
| Tabs | General Info, Billing Info, Coverage Info and Add |
| Employees are the tabs visible on this screen. The | |
| navigation between is tabs are possible only if there is | |
| a valid group ID generated and assigned to the group. | |
| Also while navigating through the tab the content that | |
| are changed on the screen are not saved unless | |
| explicitly saved by other operations on the screen. | |
-
- Step-11: Missing info screen displays the information that is left out while creating a COBRA. Enter the values in the respective field as per the format briefed in field's explanation section. Click Enroll. (See Figure C-114)
Field Explanation
The following table provides explanation for each button in the screen.
| Element | Description |
| Group | Contains header information of the Group |
| Information | |
| Header | |
| Name of the | Text for the Name of the Group |
| Group | |
| Group ID | Text and Link for the Group ID to navigate to the |
| Group General Info screen | |
| Group Type | Specifies the Type of the Group like Small Employer |
| Group | |
| Proposed | The text for Proposed Effective Date. Choose a date by |
| Effective Date | clicking calendar icon. Date accepts the format |
| MM/DD/YYYY. Default effective date is first of the | |
| following month. Effective date cannot be past date | |
| Status | Text to specify the status of the group. |
| Work Group | Text for Work Group. This specifies the internal work |
| group attached to the Group. Internal is based on the | |
| writing agent's work group. | |
| Tree Structure | Enrollment Missing Information is broken down into |
| tree structure. The tree can by expanded or collapsed. | |
| The level of the tree is as per the example given | |
| below: | |
| − Employee | |
| − Dependent | |
| − Dependent | |
| Where (−) signifies expanded view and (+) signifies | |
| collapsed view. | |
| Group Missing | This identifies all the eligibility rules and the |
| Info | information that are incomplete on Group level for |
| completing the enrollment process. | |
| Missing Entities | List the missing entities for the group. Provides a link |
| to go to the respective screen to fill in the relevant | |
| information to complete all the required entries. | |
| Message | List the message against each missing entities. |
| Employee | This identifies all the eligibility rules and the |
| Missing Info | information that are incomplete on Employee level for |
| completing the enrollment process. | |
| Missing Entities | List the missing entities for the employee. Provides a |
| link to go to the respective screen to fill in the relevant | |
| information to complete all the required entries. | |
| Message | List the message against each missing entities. |
| Dependent | This identifies all the eligibility rules and the |
| information that are incomplete on dependent level for | |
| Missing Info | completing the enrollment process. |
| Missing Entities | List the missing entities for the dependent. Provides a |
| link to go to the respective screen to fill in the relevant | |
| information to complete all the required entries. | |
| Message | List the message against each missing entities. |
| Enrollment | Choose from the drop down list the action to be |
| Action | performed for enrollment. Enroll/Decline |
| Remarks | Text for remarks if any. |
| Reasons for | Choose from the drop down list the reasons for |
| Decline | decline. |
| Reasons for Other | Text for other reason. If the reason for decline is other |
| than the reasons available. | |
Button Functionality
The following table provides explanation for each button in the screen.
| Element | Description |
| Enroll | Saves the data if there are no missing information and |
| navigates to enrollment confirmation page. | |
| Clear | Clears the contents entered in the fields or restore to |
| the previous state as was before saving the changes | |
| <<, <, >, >> | The enrollment missing information shows record for 5 |
| employees on single screen. If the employee size | |
| increases more than 5. These buttons are used for | |
| navigating to the next and previous records for | |
| viewing. | |
| << - Show first record (s) | |
| < - Show previous record (s) | |
| > - Show next record (s) | |
| >> - Show last record (s) | |
| Group ID | Click Group ID to navigates to the Group's general info |
| screen. | |
| Preview | Click Preview Invoice to pop up a new browser window |
| Invoice | to preview the invoice for the group |
Missing Information
The following table provides explanation for each missing information and what needs to be done to remove missing information from the screen
| Missing Entity | Message | Reasons/Remedy |
| Member Level |
| General | These are missing information pertains to the |
| Information | Member Level information required in the |
| COBRA Member General Information Screen |
| Address | Address information is | Fill in the address |
| not specified | information in the | |
| Employee General Info | ||
| Screen | ||
| City | City is not specified | Fill in the City in the |
| Employee General Info | ||
| Screen | ||
| State | State is not specified | Fill in the City in the |
| Employee General Info | ||
| Screen | ||
| ZIP Code | ZIP Code is not specified | Fill in the ZIP Code in the |
| Employee General Info | ||
| Screen | ||
| Date of Birth | Date of Birth is not | Fill in the Date of Birth in |
| specified | the Employee General | |
| Info Screen | ||
| Gender | Gender is not specified | Choose the Gender in the |
| Employee General Info | ||
| Screen | ||
| SSN | SSN is not specified | Fill in the SSN in the |
| Employee General Info | ||
| Screen. If the employee | ||
| refuse to provide SSN | ||
| then click auto generate | ||
| SSN/Unique ID in the | ||
| Employee General Info | ||
| Screen. Auto generation | ||
| of SSN/Unique ID will be | ||
| available only for the user | ||
| with role as level II and | ||
| above | ||
| Mode of | Mode of Correspondence | Choose the Mode of |
| Correspondence | is not specified | Correspondence for |
| Employee from the list in | ||
| Employee general info | ||
| screen | ||
| Email for Employee is | This is required if the | |
| not specified | mode of correspondence | |
| selected is Email. Fill in | ||
| the Email in the | ||
| Employee general info | ||
| screen |
| Billing | These missing information pertains to the Group |
| Information | Level information required in the Billing |
| Information Screen |
| Mode of payment | Mode of payment is not | Choose the Mode of |
| specified | Payment for the group | |
| from the list in Group | ||
| Billing Info Screen | ||
| Check Number | Check Number is not | Fill in the Check number |
| specified. | in the Group Billing Info | |
| Screen | ||
| Check Date | Date Check received is | Fill in the Date received |
| not specified | in the Group Billing Info | |
| Screen | ||
| Check Number | Check Number received | Fill in the Check Number |
| is not specified | in the Group Billing Info | |
| Screen | ||
| Cardholder's | Cardholder's name is not | This is required if the |
| Name | specified | mode of payment opted by |
| group is Credit Card. Fill | ||
| in the Cardholder's name | ||
| in the Group Billing Info | ||
| Screen. | ||
| Credit Card Type | Credit Card Type is not | This is required if the |
| specified. | mode of payment opted by | |
| group is Credit Card | ||
| Choose the Credit Card | ||
| Type for the group from | ||
| the list in Group Billing | ||
| Info Screen | ||
| Credit Card | Credit Card Number is | This is required if the |
| Number | not specified | mode of payment opted by |
| group is Credit Card. Fill | ||
| in the Credit Card | ||
| Number in the Group | ||
| Billing Info Screen. | ||
| Expiration Date | Credit Card Expiration | This is required if the |
| Date is not specified | mode of payment opted by | |
| group is Credit Card. Fill | ||
| in the Credit Card | ||
| Expiration Date in the | ||
| Group Billing Info Screen. | ||
| Bank Name | Bank name is not | This is required if the |
| specified | mode of payment opted by | |
| group is EFT. Fill in the | ||
| Bank Name in the Group | ||
| Billing Info Screen. | ||
| Routing Number | Routing Number is not | This is required if the |
| specified | mode of payment opted by | |
| group is EFT. Fill in the | ||
| Routing Number in the | ||
| Group Billing Info Screen. | ||
| Account Type | Account Type is not | This is required if the |
| specified | mode of payment opted by | |
| group is EFT. Fill in the | ||
| Account Type in the | ||
| Group Billing Info Screen | ||
| Depositor's Name | Depositor's Name is not | This is required if the |
| specified | mode of payment opted by | |
| group is EFT. Fill in the | ||
| Depositor's Name in the | ||
| Group Billing Info Screen |
| Coverage | These missing information pertains to the Group |
| Information | Level information required in the Coverage |
| Information Screen |
| COBRA | Qualifying Event is not | Choose the Qualifying |
| Qualifying | specified | Event for the group from |
| Event | the list in Coverage | |
| Information Screen | ||
| COBRA End | COBRA End Date not | Choose the Qualifying |
| Date | specified | Event for the group from |
| the list in Coverage | ||
| Information Screen to | ||
| automatically calculate | ||
| the COBRA end date | ||
| based on the Qualifying | ||
| event | ||
| Send Bill To | Where COBRA bill | Choose one of the option |
| needs to be sent is not | specified (Group or Self) | |
| specified | in Coverage Information | |
| Screen | ||
| Line of Coverage | No line of Coverage is | Choose one of the line of |
| opted by the member | coverage in Coverage | |
| Information Screen | ||
| Plan Selection | No Plan is elected by the | Choose one of the plan in |
| member | Coverage Information | |
| Screen | ||
| Medical LOC | Medical Line of coverage | Medical line of coverage is |
| not elected by Member | required to decide the | |
| Coverage Choice. Choose | ||
| Medical line of coverage | ||
| in Coverage Information | ||
| Screen | ||
| Coverage Choice | No coverage choice | Medical line of coverage is |
| specified for Medical | required to decide the | |
| Line of coverage | Coverage Choice. Choose | |
| coverage choice in | ||
| Coverage Information | ||
| Screen | ||
| Coverage | No coverage choice | This is required if the |
| Choice - | specified for Dental Line | member opts for Dental |
| Dental | of coverage | Plan. Choose coverage |
| choice in Coverage | ||
| Information Screen | ||
| Coverage | No coverage choice | This is required if the |
| Choice - | specified for Vision Line | member opts for Vision |
| Vision | of coverage | Plan. Choose coverage |
| choice in Coverage | ||
| Information Screen | ||
| Coverage Choice- | No coverage choice | This is required if the |
| CAM | specified for CAM | member opts for CAM |
| Line of coverage | Plan. Choose coverage | |
| choice in Coverage. | ||
| Information Screen | ||
| Dependent Count | Number of Dependents is | This would be the case |
| not sufficient to satisfy | when the dependent | |
| Coverage Choice. | information is not entered | |
| into the system. Add | ||
| Dependent. | ||
| This can also occur if the | ||
| number of dependent as | ||
| specified in coverage | ||
| choice does not match | ||
| with the dependents | ||
| available. Add Dependent. | ||
| Employee | Employee signature is | Verify employee's |
| Signature | missing | signature and check |
| Employee Signature | ||
| checkbox in the Employee | ||
| Coverage Info Screen | ||
| Date Signed | Date Signed is missing | Verify Date signed and fill |
| in the Date Signed in the | ||
| Employee Coverage Info | ||
| Screen | ||
| Plan availability | Medical Plan selected by | Normally the Plan for the |
| the Employees not | employee is listed based | |
| available in the service | on the Plan available in | |
| area. | the employees Service | |
| Area. Rare cases if the | ||
| User Modifies the ZIP | ||
| Code in the Employee | ||
| General Info Screen and | ||
| fails to update the Plan | ||
| for the specific ZIP code, | ||
| Service Area combination | ||
| this message would be | ||
| shown. Pick the plans | ||
| that are available for the | ||
| Employee in the | ||
| Employee Coverage Info | ||
| screen. | ||
| Plan availability | Dental Plan selected by | Normally the Plan for the |
| the Employees not | employee is listed based | |
| available in the service | on the Plan available in | |
| area. | the employees Service | |
| Area. Rare cases if the | ||
| User Modifies the ZIP | ||
| Code in the Employee | ||
| General Info Screen and | ||
| fails to update the Plan | ||
| for the specific ZIP code, | ||
| Service Area combination | ||
| this message would be | ||
| shown. Pick the plans | ||
| that are available for the | ||
| Employee in the | ||
| Employee Coverage Info | ||
| screen. | ||
| Plan availability | Vision Plan selected by | Normally the Plan for the |
| the Employees not | employee is listed based | |
| available in the service | on the Plan available in | |
| area. | the employees Service | |
| Area. Rare cases if the | ||
| User Modifies the ZIP | ||
| Code in the Employee | ||
| General Info Screen and | ||
| fails to update the Plan | ||
| for the specific ZIP code, | ||
| Service Area combination | ||
| this message would be | ||
| shown. Pick the plans | ||
| that are available for the | ||
| Employee in the | ||
| Employee Coverage Info | ||
| screen. | ||
| Plan availability | CAM Plan selected by | Normally the Plan for the |
| the Employees not | employee is listed based | |
| available in the | on the Plan available in | |
| service area. | the employees Service | |
| Area. Rare cases if the | ||
| User Modifies the ZIP | ||
| Code in the Employee | ||
| General Info Screen and | ||
| fails to update the Plan | ||
| for the specific ZIP code, | ||
| Service Area combination | ||
| this message would be | ||
| shown. Pick the plans | ||
| that are available for the | ||
| Employee in the | ||
| Employee Coverage Info | ||
| screen. |
| Dependent | These missing information pertains to the |
| Information | Dependent Level information required in the |
| Dependent Information Screen |
| Date of Birth | Date of Birth is not | Fill in the Date of Birth in |
| specified | the Dependent General | |
| Info Screen | ||
| Gender | Gender is not specified | Choose the Gender in the |
| Dependent General Info | ||
| Screen | ||
| SSN | SSN is not specified | Fill in the SSN in the |
| Dependent General Info | ||
| Screen. If the dependent | ||
| refuse to provide SSN | ||
| then click auto generate | ||
| SSN/Unique ID in the | ||
| Dependent General Info | ||
| Screen. Auto generation | ||
| of SSN/Unique ID will be | ||
| available only for the user | ||
| with role as level II and | ||
| above | ||
| Relationship | Relationship of the | Choose the dependent |
| dependent with the | relationship from the | |
| employee not specified | Dependent Info Screen | |
| Relationship - | Relationship, child is | Verify if the child is |
| Child | specified for child above | disabled and choose if |
| 23 years of age | Disabled Permanent or | |
| Temporary. | ||
| Signature | Dependent signature is | This is required if the |
| missing | dependent age is above | |
| 18. Verify the signature | ||
| for the dependent and | ||
| check the checkbox | ||
| Signature in the | ||
| dependent info screen | ||
| Relationship | Number of spouse | Check for the relationship |
| is more than one | in the dependent info | |
| screen. There can only be | ||
| one of the following | ||
| relationship for the | ||
| dependent: | ||
| Spouse or Ex - Spouse or | ||
| domestic partner. | ||
| Choose different | ||
| relationship for the other | ||
| dependent in the | ||
| dependent info screen | ||
-
- Step-12: On clicking enroll button, screen navigates to confirmation screen, for having created a group under COBRA Enrollment. Click search button to navigate back to Group Search screen. (See Figure C-115)
Modify COBRA
The screen is to have modification of details pertaining to a COBRA member. The screen provides functionality to save, edit or add new member details.
The sequential steps involved in modify COBRA are listed below.
-
- Step-1: After successful logon, click the menu Enrollment and select New Business Enrollment. Select the option COBRA Enrollment. Then New COBRA and modify COBRA. (See Figure C-116)
- Step-2: Navigates to group COBRA search screen. Enter value in any one of the fields, or simply click Search to perform search operation. (See Figure C-117)
- Step-3: This pops up a screen with the search result. (See Figure C-118)
- Step-4: Click on any group id for selection
- Step-5: This navigates to general information pertaining to group screen. The process of modifying group is similar to the process explained vide from step 7 through step 12 of creating a COBRA group
Inactivate COBRA
The screen is to inactivate a COBRA from the active status.
The sequential steps involved in inactivate a COBRA are listed below.
-
- Step-1: After successful logon, click the menu Enrollment and select New Business Enrollment. Select the option COBRA Enrollment. Then select New COBRA and inactivate COBRA. (See Figure C-119)
- Step-2: Navigates to group COBRA screen. Enter value in any one of the fields, or simply click Search to perform search operation. (See Figure C-120)
- Step-3: This pops up a screen with the search result. (See Figure C-21)
- Step-4: Click on any group id for selection. This navigates to a screen confirming for the selected group to make inactivate. Click Inactivate button. (See Figure C-122)
- Step-5: Confirms the status. (See Figure C-123)
Existing COBRA—Create COBRA
The screen is to create COBRA for existing type. The screen provides functionality to save, edit or add new COBRA.
The sequential steps involved in create new COBRA are listed below.
-
- Step-1: After successful logon, click the menu Enrollment and select COBRA Enrollment. Select the Existing COBRA and then select Create COBRA. (See Figure C-124)
- Step-2: The screen navigates to employee search for adding COBRA. Enter employee id or enter first letter of employee name for search. Click Search button. (See Figure C-125)
- Step-3: The screen displays the search result. (See Figure C-126)
- Step-4: Click on employee id.
- Step-5: Choose the option of sending bill either to group or self. Enter the date by clicking calendar icon, provided if the check box is clicked for verified member signature. (See Figure C-127)
- Step-6: Choose the Member and state COBRA Election options for each member from the table and clicks continue.
- Step-7: Screen navigates to general info of group. First name and last name are mandatory and other fields are optional. Enter the values in the respective field, as per the format briefed in field's explanation section. (See Figure C-128)
Field Explanation
The following table provides explanation for each button in the screen.
| Element | Description |
| Parent Group ID | Text to display the Parent Group ID. |
| Parent Group | Text to display the Parent Group Name. |
| Name | |
| COBRA Group | Text to display the COBRA Group ID. |
| ID | |
| COBRA Type | Text to display the COBRA Group Type whether Cal |
| COBRA or Federal COBRA. | |
| Group Effective | Text to display effective date of the parent group. |
| Date | |
| Work Group | Text to Display the internal Work group associated |
| with the Parent Group | |
| Status | Text to display status of the group. |
| Post Mark Date | Text for post mark date. Choose a date by clicking |
| calendar icon. Accepts in the format MM/DD/YYYY | |
| Received Date | Text for received date. Choose a date by clicking |
| calendar icon. Accepts in the format MM/DD/YYYY | |
| Salutation | Choose the salutation from the drop down list of |
| salutations available. | |
| First Name | The text for first name. Accepts alphabets and special |
| character like hyphen and single quotes not exceeding | |
| 25 characters. First name is mandatory. | |
| Middle Initial | The text for middle initial. Accepts alphabets not |
| exceeding 1 character. | |
| Last Name | The text for last name. Accepts alphabets and special |
| characters like hyphen and single quotes not exceeding | |
| 35 characters. Last name is mandatory. | |
| Suffix | Choose the Suffix from the drop down list of |
| salutations available. | |
| Date of Birth | The text for date of birth. Choose a date by clicking |
| calendar icon | |
| Social Security | The text for social security number for every |
| Number | individual. This can also be auto generated by clicking |
| auto generate link. Accepts numeric value of exactly 9 | |
| digits. Users with User Role as Level 2 and above can | |
| only auto generate SSN. | |
| Gender | Choose a gender from the drop down list available. |
| Address | Physical Home Address or Mailing Address |
| Information: | |
| Address | The text for company address. Accepts alphabets and |
| numeric values not exceeding 35 characters | |
| Apt | The text for company suite/apt # Accepts alphabets |
| and numeric values of not exceeding 35 characters | |
| Zip | The text for zip. Accepts numeric of either 5 or 9 |
| digits. City, State and County are populated | |
| automatically for the correct zip code. | |
| City | The text for city. Accepts alphabets of not exceeding |
| 30 characters. | |
| State | Choose the name of the state from the drop down list |
| of States available in United States of America | |
| County | Choose the name of the county from the drop down list |
| of States available in United States of America | |
| Mode of | Choose the mode of correspondence from the drop |
| Correspondence | down list available |
| Phone Number | The text for telephone number of the contact person. |
| Accepts numeric values of not exceeding 10 digits. | |
| The format is (999) 999-9999 | |
| Extension | The text for telephone number of the contact person. |
| Accepts numeric values of not exceeding 5 digits. The | |
| format is (999) 999-9999 | |
| Fax | The text for fax number of the contact person. Accepts |
| numeric values of not exceeding 10 digits. The format | |
| is 9999 | |
| The text for email of the contact person. Accepts | |
| alphabets, numeric and special characters in the | |
| standard email format of length not exceeding 100 | |
| characters | |
Button Functionality
The following table provides explanation for each button in the screen.
| Element | Description | |
| Continue | Saves the data and navigates to Billing Information | |
| screen and the system generates Group ID. | ||
| Cancel | Clears the contents entered in the fields or restore to | |
| the previous state as was before saving the changes | ||
| Tabs | General Info, Billing Info, Coverage Info and Add | |
| Employees are the tabs visible on this screen. The | ||
| navigation between is tabs are possible only if there is | ||
| a valid group ID generated and assigned to the group. | ||
| Also while navigating through the tab the content that | ||
| are changed on the screen are not saved unless | ||
| explicitly saved by other operations on the screen. | ||
-
- Step-8: Enter the values in the respective field, as per the format briefed in field's explanation section. Screen can be navigated to Billing Info by either clicking continue button or through other respective tabs. (See Figure C-129)
Field Explanation
The following table provides explanation for each button in the screen.
| Element | Description |
| Mode of payment | Choose a mode of payment from the drop down list |
| available. Based on selection corresponding fields will | |
| enable to enter the values. For e.g. if the value selected | |
| is card payment, EFT will be disabled and allows only | |
| entering card details and vice versa. |
| Credit Card Information |
| Cardholder's | The text for cardholder's name. Accepts alphabets and |
| Names | space between two words. |
| Credit Card Type | Choose the type of credit card from the drop down list |
| available. | |
| Credit Card No | The text for credit card number. Accepts numeric |
| values not exceeding 30 digits | |
| Expiration Date | Choose a month of expiration from the drop down list |
| available | |
| Expiration Year | The text for expiration year. Accepts numeric values |
| of exactly 4. Example 2002. |
| Billing Address As it appears on the credit Card |
| Street Address | The text for company address. Accepts alphanumeric |
| and special characters not exceeding 35 characters. | |
| ZIP | The text for zip. Accepts numeric value of either 5 or |
| 9 digits. | |
| State | The text for city. Accepts alphabets and space between |
| two words not exceeding 30 characters. | |
| City | Choose the name of the state from the drop down list |
| of States available in United States of America |
| EFT Information |
| Bank Name | The text for bank name. Accepts alphabets and space |
| between two words. | |
| Routing Number | The text for routing number. Accepts numeric values |
| not exceeding 9 digits. | |
| Account Number | The text for account number. Accepts numeric values |
| not exceeding 9 digits. | |
| Account Type | Choose the type of account from the drop down list |
| available. | |
| Depositor's Name | The text for depositor's name. Accepts alphabets and |
| space between two words. |
| Initial Payment Information |
| Amount Received | The text for amount received. Accepts only numeric |
| values in the format 999999999.99 | |
| Date Receive | The text for date received. Choose from the calendar |
| icon in the format MM/DD/YYYY. | |
| Check # | The text for check number. Accepts numeric |
| values not exceeding 9 digits. | |
| No Check | Check the option of no checks received for any non- |
| Received | receipt of checks. |
Button Functionality
The following table provides explanation for each button in the screen.
| Element | Description | |
| Continue | Saves the data and Navigates to coverage Information | |
| screen. | ||
| Clear | Clears the contents entered in the fields or restore to | |
| the previous state as was before saving the changes | ||
| Tabs | General Info, Billing Info, Coverage Info and Add | |
| Employees are the tabs visible on this screen. The | ||
| navigation between is tabs are possible only if there is | ||
| a valid group ID generated and assigned to the group. | ||
| Also while navigating through the tab the content that | ||
| are changed on the screen are not saved unless | ||
| explicitly saved by other operations on the screen. | ||
-
- Step-9: Screen can be navigated to Coverage Info by either clicking continue button or through other respective tabs. Enter the values in the respective field, as per the format briefed in field's explanation section. (See Figure C-130)
Fields Explanation
The following table provides explanation for each button in the screen.
| Element | Description |
| Plan Election |
| Choose Plan | Click on the check box to select the plan. |
| Send bills to | Choose the Option Group or Self for “Send bill to”. |
| Member Signature | Check this if member signature is verified |
| Date Signed | The text for Date Signed. Choose a date by clicking |
| calendar icon. Date accepts the format | |
| MM/DD/YYYY. | |
Button Functionality
The following table provides explanation for each button in the screen.
| Element | Description |
| Continue | Saves the data and Navigates to either Dependent Info |
| Screen or COBRA Summary screen. | |
| Cobra Summary | Saves the data and Navigates COBRA Summary |
| screen. | |
| Clear | Clears the contents entered in the fields or restore to |
| the previous state as was before saving the changes | |
| Tabs | General Info, Billing Info, Coverage Info and Add |
| Employees are the tabs visible on this screen. The | |
| navigation between is tabs are possible only if there is | |
| a valid group ID generated and assigned to the group. | |
| Also while navigating through the tab the content that | |
| are changed on the screen are not saved unless | |
| explicitly saved by other operations on the screen. | |
-
- Step-10: Screen can be navigated to Dependent Info by either clicking continue button or through other respective tabs. (See Figure C-131)
- Step-11: Dependent Screen for COBRA is Display only screen. Click continue to navigate to COBRA Missing Info screen. (See Figure C-132)
Field Explanation
The following table provides explanation for each button in the screen.
| Element | Description |
| Group | Contains header information of the Group |
| Information | |
| Header | |
| Name of the | Text for the Name of the Group |
| Group | |
| Group ID | Text and Link for the Group ID to navigate to the |
| Group General Info screen | |
| Group Type | Specifies the Type of the Group like Small Employer |
| Group | |
| Proposed | The text for Proposed Effective Date. Choose a date by |
| Effective Date | clicking calendar icon. Date accepts the format |
| MM/DD/YYYY. Default effective date is first of the | |
| following month. Effective date cannot be past date | |
| Status | Text to specify the status of the group. |
| Pend Date | |
| Date Finalized | |
| Work Group | Text for Work Group. This specifies the internal work |
| group attached to the Group. Internal is based on the | |
| writing agent's work group. | |
| Tree Structure | Enrollment Missing Information is broken down into |
| tree structure. The tree can by expanded or collapsed. | |
| The level of the tree is as per the example given | |
| below: | |
| − Employee | |
| − Dependent | |
| − Dependent | |
| Where (−) signifies expanded view and (+) signifies | |
| collapsed view. | |
| Group Missing | This identifies all the eligibility rules and the |
| Info | information that are incomplete on Group level for |
| completing the enrollment process. | |
| Missing Entities | List the missing entities for the group. Provides a link |
| to go to the respective screen to fill in the relevant | |
| information to complete all the required entries. | |
| Message | List the message against each missing entities. |
| Employee | This identifies all the eligibility rules and the |
| Missing Info | information that are incomplete on Employee level for |
| completing the enrollment process. | |
| Missing Entities | List the missing entities for the employee. Provides a |
| link to go to the respective screen to fill in the relevant | |
| information to complete all the required entries. | |
| Message | List the message against each missing entities. |
| Dependent | This identifies all the eligibility rules and the |
| Missing Info | information that are incomplete on dependent level for |
| completing the enrollment process. | |
| Missing Entities | List the missing entities for the dependent. Provides a |
| link to go to the respective screen to fill in the relevant | |
| information to complete all the required entries. | |
| Message | List the message against each missing entities. |
| Enrollment | Choose from the drop down list the action to be |
| Action | performed for enrollment. Enroll/Decline |
| Remarks | Text for remarks if any. |
| Reasons for | Choose from the drop down list the reasons for |
| Decline | decline. |
| Reasons for Other | Text for other reason. If the reason for decline is other |
| than the reasons available. | |
Button Functionality
The following table provides explanation for each button in the screen.
| Element | Description |
| Enroll | Saves the data if there are no missing information and |
| navigates to enrollment confirmation page. | |
| Clear | Clears the contents entered in the fields or restore to |
| the previous state as was before saving the changes | |
| <<, <, >, >> | The enrollment missing information shows record for 5 |
| employees on single screen. If the employee size | |
| increases more than 5. These buttons are used for | |
| navigating to the next and previous records for | |
| viewing. | |
| << - Show first record (s) | |
| < - Show previous record (s) | |
| > - Show next record (s) | |
| >> - Show last record (s) | |
| Group ID | Click Group ID to navigates to the Group's general info |
| screen. | |
| Preview | Click Preview Invoice to pop up a new browser window |
| Invoice | to preview the invoice for the group |
-
- Step-12: On clicking enroll button, screen navigates to confirmation screen, for having created a group under COBRA Enrollment. Click search button to navigate back to Group Search screen. (See Figure C-133)
Modify COBRA
The screen is to modify COBRA details for existing type. The screen provides functionality to save, edit or add new COBRA.
The sequential steps involved in modify COBRA are listed below.
-
- Step-1: After successful logon, click the menu Enrollment and select New Business Enrollment. Select the Existing COBRA and then select New COBRA. (See Figure C-134)
- Step-2: The screen navigates to group search for adding COBRA. Enter group id or enter first letter of group name for search. Click Search button. (See Figure C-135)
- Step-3: This pops up a screen with the search result.
- Step-4: Click on any group id for selection. Screen navigates to general info screen pertaining to group. The process and flow for modification are similar to that of creating a group, which are explained vide step 7 through step 11
Inactivate COBRA
The screen is to inactivate a COBRA details from its active in existing type. (See Figure C-136)
The sequential steps involved in inactivating COBRA are listed below.
-
- Step-1: After successful logon, click the menu Enrollment and select New Business Enrollment. Select the Existing COBRA and then select Inactivate COBRA. (See Figure C-137)
- Step-2: The screen navigates to group search for COBRA. Enter group id or enter first letter of group name for search. Click Search button. (See Figure C-138)
- Step-3: This pops up a screen with the search result.
- Step-4: Click on any group id for selection. This navigates to a screen confirming for the selected group to make inactivate. Click Inactivate button. (See Figure C-139)
- Step-5: Confirms the status. Click Search navigates employee search screen. (See Figure C-140)
5 Termination
Termination is the transaction module that encompasses the process of terminating the group and member enrolled with PacAdvantage in the PX2 System. This process allows terminating Groups, Members and dependent from the PacAdvantage program.
Access
The application can be accessed from the main menu as follows:
-
- Enrollment->Termination->Group Termination
- ->Employee Termination
- ->Dependent Termination
- ->Multiple Group Termination
- Enrollment->Termination->Group Termination
Pre-Requisites
The groups and member must exist in the system for the termination process to occur.
Application Functions
This application has the following functions for termination:
-
- Group Termination—to terminate a group
- Employee Termination—to terminate an employee
- Dependent Termination—to terminate a dependent
- Multiple Group Termination—to terminate multiple groups
Group Termination
The screen is to terminate a group.
The sequential steps involved in terminating a group are listed below.
-
- Step-1: After successful logon, click the menu Enrollment and select Termination. Then select Group Termination. (See Figure C-141)
- Step-2: The screen navigates to group search to select a group. Enter value in any one of the field or simply click Search button to perform search operation. (See Figure C-142)
- Step-3: This pops up a screen with search result. (See Figure C-143)
- Step-4: Click on any group id for selection. The screen navigates to term request (See Figure C-144)
- Step-5: Enter the fields with appropriate values as per the format briefed in field's explanation. Click continue.
- Step-6: Screen navigates to process term. Enter the details of effective term date and change term status and click Continue. (See Figure C-145)
- Step-7: Confirms the termination of a group. (See Figure C-146)
- Step-8: Click Search button to go back to Group Search screen.
Field Explanation
The following table provides explanation for each button in the screen.
| Element | Description |
| Request for Term |
| Mode of | Choose a mode of request from the drop down list |
| Request | available. The field is mandatory. |
| Post Mark Date | The text for post mark date. Choose a date in the |
| format MM/DD/YYYY by clicking calendar icon. The | |
| postmark date cannot be greater than system date. | |
| The field is mandatory. | |
| Date Received | The text for received date. Choose a date in the format |
| MM/DD/YYYY by clicking calendar icon. The received | |
| date cannot be greater than system date. The field is | |
| mandatory. | |
| Request Term | The text for request term date. Choose a date in the |
| Date | format MM/DD/YYYY by clicking calendar icon. The |
| request term date should be the last day of that | |
| particular month except in case of death. The field is | |
| mandatory. | |
| Reason for | Choose a reason from the drop down list The field is |
| Term | mandatory. |
| Others | The text for narrating other info, provided the option |
| for reason for terms is others | |
| Authorized | Choose Authorized contact from the list. The field is |
| contact | mandatory. |
| Process Term |
| Effective Term | The text for request term date. Choose a date in the |
| Date | format MM/DD/YYYY by clicking calendar icon. |
| Change Term | Choose a status from the drop down list for change |
| Status | term |
Button Functionality
The following table provides explanation for each button in the screen.
| Element | Description | |
| Search | Search is performed based on the input | |
| Continue | Saves the data and navigates to next screen in the flow | |
| of termination. | ||
| Clear | Clears the contents entered in the fields or restore to | |
| the previous state as was before saving the changes | ||
Employee Termination
The screen is to terminate an employee.
The sequential steps involved in terminating an employee are listed below.
-
- Step-1: After successful logon, click the menu Enrollment and select Termination. Then select Employee Termination. (See Figure C-147)
- Step-2: The screen navigates to employee search to select a group. Enter value in any of the field or simply click Search button to perform. search operation. (See Figure C-148)
- Step-3: This pops a screen with search result.
- Step-4: Click on any employee id for selection. The screen navigates to term request. (See Figure C-149)
- Step-5: Enter the fields with appropriate values as per the format briefed in field's explanation. Click continue.
- Step-6: Screen navigates to process term. Enter the details of effective term date and change term status and click Continue. (See Figure C-150)
- Step-7: Confirms the termination of a employee. (See Figure C-151)
- Step-8: Clicking Search button leads to Employee search screen.
Field Explanation
The following table provides explanation for each button in the screen.
| Element | Description |
| Request for Term |
| Mode of Request | Choose a mode of request from the drop down list |
| available. This field is mandatory. | |
| Post Mark Date | The text for post mark date. Choose a date in the |
| format MM/DD/YYYY by clicking calendar icon. The | |
| postmark date cannot be greater than system date | |
| This field is mandatory. | |
| Date Received | The text for received date. Choose a date in the format |
| MM/DD/YYYY by clicking calendar icon. The Date | |
| received cannot be greater than system date. This field | |
| is mandatory. | |
| Request Term | The text for request term date. Choose a date in the |
| Date | format MM/DD/YYYY by clicking calendar icon. The |
| request term date should be the last day of that | |
| particular month. This field is mandatory. | |
| Reason for Term | Choose a reason from the drop down list |
| Others | The text for narrating other info, provided the option |
| for reason for terms is others | |
| Authorized | The text for authorized contact. The field is |
| contact | mandatory. |
| Process Term |
| Effective Term | The text for request term date. Choose a date in the |
| Date | format MM/DD/YYYY by clicking calendar icon. |
| Change Term | Choose a status from the drop down list for change |
| Status | term |
Button Functionality
The following table provides explanation for each button in the screen.
| Element | Description | |
| Search | Search is performed based on the input | |
| Continue | Saves the data and navigates to next screen in the flow | |
| of termination. | ||
| Clear | Clears the contents entered in the fields or restore to | |
| the previous state as was before saving the changes | ||
Dependent Termination
The screen is to terminate a dependent.
The sequential steps involved in terminating a dependent are listed below.
-
- Step-1: After successful logon, click the menu Enrollment and select Termination. Then select Dependent Termination. (See Figure C-152)
- Step-2: The screen navigates to dependent search to select a group. Enter value in any one of the field or simply click Search button to perform search operation. (See Figure C-153)
- Step-3: This pops a screen with search result. (See Figure C-154)
- Step-4: Click on any dependent id for selection. The screen navigates to term request. (See Figure C-155)
- Step-5: Enter the fields with appropriate values as per the format briefed in field's explanation. Click continue.
- Step-6: Screen navigates to process term. Enter the details of effective term date and change term status and click Continue. (See Figure C-156)
- Step-7: Confirms the termination of a dependent. (See Figure C-157)
- Step-8: Click Search button to navigate back to Dependent Search screen.
Field Explanation
The following table provides explanation for each button in the screen.
| Element | Description |
| Request for Term |
| Mode of Request | Choose a mode of request from the drop down list |
| available. The field is mandatory. | |
| Post Mark Date | The text for postmark date. Choose a date in the |
| format MM/DD/YYYY by clicking calendar icon. The | |
| postmark date cannot be greater than system date. | |
| The field is mandatory. | |
| Date Received | The text for received date. Choose a date in the format |
| MM/DD/YYYY by clicking calendar icon. The Date | |
| Received cannot be greater than system date. The field | |
| is mandatory. | |
| Request Term | The text for request term date. Choose a date in the |
| Date | format MM/DD/YYYY by clicking calendar icon. The |
| request term date should be the last day of that | |
| particular month. The field is mandatory. | |
| Reason for Term | Choose a reason from the drop down list. The field is |
| mandatory. | |
| Others | The text for narrating other info, provided if the option |
| for reason for terms is others | |
| Authorized | The text for authorized contact. The field is |
| contact | mandatory. |
| Process Term |
| Effective Term | The text for request term date. Choose a date in the |
| Date | format MM/DD/YYYY by clicking calendar icon. |
| Change Term | Choose a status from the drop down list for change |
| Status | term |
Button Functionality
The following table provides explanation for each button in the screen.
| Element | Description | |
| Search | Search is performed based on the input | |
| Continue | Saves the data and navigates to next screen in the flow | |
| of termination. | ||
| Clear | Clears the contents entered in the fields or restore to | |
| the previous state as was before saving the changes | ||
Multiple Group Termination
The screen is to terminate multiple groups.
The sequential steps involved in terminating multiple groups are listed below.
-
- Step-1: After successful logon, click the menu Enrollment and select Termination. Then select Multiple Group Termination. (See Figure C-158)
- Step-2: The screen navigates to term request Enter the fields with appropriate values as per the format briefed in field's explanation. Click continue. (See Figure C-159)
- Step-3: Confirms the termination of a groups. (See Figure C-160)
- Step-4: Click search button to navigate back to Group Termination screen.
Field Explanation
The following table provides explanation for each button in the screen.
| Element | Description |
| Request for Term |
| Mode of Request | Choose a mode of request from the drop down list |
| available | |
| Post Mark Date | The text for post mark date. Choose a date in the |
| format MM/DD/YYYY by clicking calendar icon. The | |
| post mark date cannot be greater than system date | |
| Date Received | The text for received date. Choose a date in the format |
| MM/DD/YYYY by clicking calendar icon. The post | |
| mark date cannot be greater than system date | |
| Request Term | The text for request term date. Choose a date in the |
| Date | format MM/DD/YYYY by clicking calendar icon. The |
| request term date should be the last day of that | |
| particular month | |
| Reason for Term | Choose a reason from the drop down list |
| Others | The text for narrating other info, provided if the option |
| for reason for terms is others | |
Button Functionality
The following table provides explanation for each button in the screen.
| Element | Description | |
| Search | Search is performed based on the input | |
| Continue | Saves the data and navigates to next screen in the flow | |
| of termination. | ||
| Clear | Clears the contents entered in the fields or restore to | |
| the previous state as was before saving the changes | ||
6 Reinstatement
Reinstatement is the transaction module that encompasses the process of reinstating the group and member enrolled with PacAdvantage in the PX2 System. This process allows reinstating Groups, Members and dependent to the PacAdvantage program.
Access
The application can be accessed from the main menu as follows:
-
- Enrollment->Reinstatement->Group Reinstatement
- ->Employee Reinstatement
- ->Dependent Reinstatement
- Enrollment->Reinstatement->Group Reinstatement
Pre-Requisites
The groups and member must exist in the system and also terminated for processing reinstatement.
Application Functions
This application has the following functions for reinstatement:
-
- Group Reinstatement—to reinstate a group
- Employee Reinstatement—to reinstate an employee
- Dependent Reinstatement—to reinstate a dependent
Group Reinstatement
The screen is to reinstate a group.
The sequential steps involved in reinstating a group are listed below.
-
- Step-1: After successful logon, click the menu Enrollment and select Reinstatement. Then select Group Reinstatement. (See Figure C-161)
- Step-2: The screen navigates to group search to select a group. Enter value in any one of the fields, or simply click search button to perform search operation. (See Figure C-162)
- Step-3: This pops up a screen with search result. (See Figure C-163)
- Step-4: Click on any group id for selection. The screen navigates to reinstate request. (See Figure C-164)
- Step-5: Enter the fields with appropriate values as per the format briefed in field's explanation. Click continue
- Step-6: Screen navigates to process reinstate. Enter the details of effective term date and change term status and click Continue. (See Figure C-165)
- Step-7: Confirms the reinstatement of a group. (See Figure C-166)
- Step-8: Click Search button to go back to Group Search screen.
Field Explanation
The following table provides explanation for each button in the screen.
| Element | Description |
| Initiate Group Reinstatement |
| Mode of Request | Choose a mode of request from the drop down list |
| available. The field is mandatory. | |
| Post Mark Date | The text for post mark date. Choose a date in the |
| format MM/DD/YYYY by clicking calendar icon. The | |
| postmark date cannot be greater than system date. | |
| The field is mandatory. | |
| Date Received | The text for received date. Choose a date in the format |
| MM/DD/YYYY by clicking calendar icon. The Date | |
| Received cannot be greater than system date. The field | |
| is mandatory. | |
| Request Reinstate | The text for request term date. Choose a date in the |
| Date | format MM/DD/YYYY by clicking calendar icon. The |
| request reinstate date should be the first day of next | |
| month. The field is mandatory. | |
| Reason for | Choose a reason from the drop down list. The field is |
| Reinstate | mandatory. |
| Others | The text for narrating other info, provided the option |
| for reason for reinstate is others | |
| Authorized | The text for authorized contact. The field is |
| contact | mandatory. |
| Process Reinstatement |
| Effective Term | The text for request term date. Choose a date in the |
| Date | format MM/DD/YYYY by clicking calendar icon. |
| Change Reinstate | Choose a status from the drop down list for change |
| Status | reinstate |
Button Functionality
The following table provides explanation for each button in the screen.
| Element | Description | |
| Search | Search is performed based on the input | |
| Continue | Saves the data and navigates to next screen in the flow | |
| of reinstatement. | ||
| Clear | Clears the contents entered in the fields or restore to | |
| the previous state as was before saving the changes | ||
Employee Reinstatement
The screen is to reinstate an employee.
The sequential steps involved in reinstating an employee are listed below.
-
- Step-1: After successful logon, click the menu Enrollment and select Reinstatement. Then select Employee Reinstatement. (See Figure C-167)
- Step-2: The screen navigates to employee search to select a group. Enter value in any one of the fields, or simply click search button to perform search operation. (See Figure C-168)
- Step-3: This pops a screen with search result. (See Figure C-169)
- Step-4: Click on any employee id for selection. The screen navigates to reinstate request. (See Figure C-170)
- Step-5: Enter the fields with appropriate values as per the format briefed in field's explanation. Click continue.
- Step-6: Screen navigates to process reinstate. Enter the details of effective term date and change status and click Continue. (See Figure C-171)
- Step-7: Confirms the reinstate of an employee. (See Figure C-172)
- Step-8: Click Search button to navigate back to Employee Search screen.
Field Explanation
The following table provides explanation for each button in the screen.
| Element | Description |
| Initiate Employee Reinstatement |
| Reason for Term | Text for reason for term. The field is read only |
| Term Date | Text for termination date. Field is read only. |
| Mode of Request | Choose a mode of request from the drop down list |
| available. The field is mandatory. | |
| Post Mark Date | The text for post mark date. Choose a date in the |
| format MM/DD/YYYY by clicking calendar icon. The | |
| postmark date cannot be greater than system date. | |
| The field is mandatory. | |
| Date Received | The text for received date. Choose a date in the format |
| MM/DD/YYYY by clicking calendar icon. The Date | |
| Received cannot be greater than system date. The field | |
| is mandatory. | |
| Request Reinstate | The text for request term date. Choose a date in the |
| Date | format MM/DD/YYYY by clicking calendar icon. The |
| request reinstate date should be the first day of next | |
| month. The field is mandatory. | |
| Reason for | Choose a reason from the drop down list. The field is |
| Reinstate | mandatory. |
| Others | The text for narrating other info, provided the option |
| for reason for reinstate is others | |
| Authorized | The text for authorized contact. The field is |
| contact | mandatory. |
| Process Reinstatement |
| Effective Term | The text for request term date. Choose a date in the |
| Date | format MM/DD/YYYY by clicking calendar icon. |
| Change Reinstate | Choose a status from the drop down list for change |
| Status | reinstate |
Button Functionality
The following table provides explanation for each button in the screen.
| Element | Description | |
| Search | Search is performed based on the input | |
| Continue | Saves the data and navigates to next screen in the flow | |
| of termination. | ||
| Clear | Clears the contents entered in the fields or restore to | |
| the previous state as was before saving the changes | ||
Dependent Reinstatement
The screen is to reinstate a dependent.
The sequential steps involved in reinstating a dependent are listed below.
-
- Step-1: After successful logon, click the menu Enrollment and select Reinstatement. Then select Dependent Reinstatement. (See Figure C-173)
- Step-2: The screen navigates to dependent search to select a group. Enter dependent id or enter first letter of dependent name for search. Click Search button. (See Figure C-174)
- Step-3: This pops a screen with search result. (See FIG. 175)
- Step-4: Click on any dependent id for selection. The screen navigates to reinstate request. (See Figure C-176)
- Step-5: Enter the fields with appropriate values as per the format briefed in field's explanation. Click continue.
- Step-6: Screen navigates to process reinstate. Enter the details of effective term date and change term status and click Continue. (See Figure C-177)
- Step-7: Confirms the reinstatement of a dependent. (See Figure C-178)
- Step-8: Click search button to go back to Dependent Search screen.
Field Explanation
The following table provides explanation for each button in the screen.
| Element | Description |
| Initiate Dependent Reinstatement |
| Mode of Request | Choose a mode of request from the drop down list |
| available. The field is mandatory. | |
| Post Mark Date | The text for post mark date. Choose a date in the |
| format MM/DD/YYYY by clicking calendar icon. The | |
| postmark date cannot be greater than system date. | |
| The field is mandatory. | |
| Date Received | The text for received date. Choose a date in the format |
| MM/DD/YYYY by clicking calendar icon. The Date | |
| Received cannot be greater than system date. The field | |
| is mandatory. | |
| Request Reinstate | The text for request term date. Choose a date in the |
| Date | format MM/DD/YYYY by clicking calendar icon. The |
| request reinstate date should be the first day of next | |
| month. The field is mandatory. | |
| Reason for | Choose a reason from the drop down list. The field is |
| Reinstate | mandatory. |
| Others | The text for narrating other info, provided the option |
| for reason for reinstate is others | |
| Authorized | The text for authorized contact. The field is |
| contact | mandatory. |
| Process Reinstatement |
| Effective Term | The text for request term date. Choose a date in the |
| Date | format MM/DD/YYYY by clicking calendar icon. |
| Change Reinstate | Choose a status from the drop down list for change |
| Status | reinstate |
Button Functionality
The following table provides explanation for each button in the screen.
| Element | Description | |
| Search | Search is performed based on the input | |
| Continue | Saves the data and navigates to next screen in the flow | |
| of termination. | ||
| Clear | Clears the contents entered in the fields or restore to | |
| the previous state as was before saving the changes | ||
7 Appeals & Grievances
Appeals and grievance is the transaction module that encompasses the process for the groups and members enrolled with PacAdvantage in the PX2 System to raise appeals and grievance. Appeals and Grievance is the process of maintaining a status for all Appeals and Grievances received from the customer and follow up with the decision made either by PacAdvantage-Roseville or PacAdvantage-SF.
Access
The application can be accessed from the main menu as follows:
-
- Enrollment->Appeals and Grievances->Create
- ->Modify
- ->Close
- Enrollment->Appeals and Grievances->Create
Pre-Requisites
Group and member information must be available in the system for making an appeal or grievance.
Application Functions
This application has the following functions for reinstatement:
-
- Create—to create an appeal & grievance
- Modify—to modify an appeal & grievance
- Close—to close an appeal & grievance
Create
The screen is to create an appeal and grievance.
The sequential steps involved in creating an appeal & grievance are listed below.
-
- Step-1: After successful logon, click the menu Enrollment and select Appeals & Grievances. Then select Create. (See Figure C-179)
- Step-2: The screen navigates search to select a group or member. Based on the selection the information of group/member will be displayed. Enter value in any one of the fields, or simply click search button to perform search operation. (See Figure C-180)
- Step-3: This pops a screen with search result. (See Figure C-181)
- Step-4: Click on any group/member id for selection. The screen navigates to create grievance. (See Figure C-182)
- Step-5: Enter the fields with appropriate values as per the format briefed in field's explanation. Click continue
- Step-6: Screen navigates to confirming create grievance. (See Figure C-183)
Field Explanation
The following table provides explanation for each button in the screen.
| Element | Description |
| Grievance Information |
| Post Mark Date | The text for post mark date. Choose a date in the |
| format MM/DD/YYYY by clicking calendar icon. The | |
| post mark date cannot be greater than system date | |
| Date Received | The text for received date. Choose a date in the format |
| MM/DD/YYYY by clicking calendar icon. The post | |
| mark date cannot be greater than system date | |
| Nature of | The text for nature of grievance. Choose a type from |
| Grievance | the drop down list available |
| Subject of | The text for subject of grievance. Choose a type from |
| Grievance | the drop down list available |
| Remarks | The text for remarks. Accepts alphabets, numeric and |
| special characters | |
Button Functionality
The following table provides explanation for each button in the screen.
| Element | Description | |
| Search | Search is performed based on the input | |
| Save | Saves the data and navigates to next screen in the flow | |
| of creating a grievance | ||
| Cancel | Clears the contents entered in the fields or restore to | |
| the previous state as was before saving the changes | ||
Modify
The screen is to modify an appeal and grievance.
The sequential steps involved in modifying an appeal & grievance are listed below.
-
- Step-1: After successful logon, click the menu Enrollment and select Appeals & Grievances. Then select Modify. (See Figure C-184)
- Step-2: The screen navigates search to select either by complainant or by grievance. Based on the selection the information of group/member with grievance details will be displayed. Enter group/member/grievance id o for search. Click Search button. (See Figure C-185)
- Step-3: The screen navigates to process grievance Enter the fields with appropriate values as per the format briefed in field's explanation. (See Figure C-186)
- Step-4: Click Save.
- Step-5: The screen confirms the modification of grievance. (See Figure C-187)
Field Explanation
The following table provides explanation for each button in the screen.
| Element | Description |
| Process Grievance |
| Search by | Choose the option to search by complainant or search |
| by grievance. Based on this option the Either | |
| Grievance ID or Complainant ID field will be enabled. | |
| Complainant | Choose a type of complainant from either group or |
| Type | member |
| Complainant ID | The text for complainant id. Accepts numeric values. |
| Forward for | Click this option to have approval |
| approval | |
| Forward To | The text for the person to whom it has to be forwarded |
| Forward Date | The text for forward date. Choose a date in the format |
| MM/DD/YYYY by clicking calendar icon | |
| Batch Date | The text for batch date. Choose a date in the format |
| MM/DD/YYYY by clicking calendar icon | |
| Additional | The text for additional remarks. Accepts alphabets, |
| Remarks | numeric and special characters |
Button Functionality
The following table provides explanation for each button in the screen.
| Element | Description | |
| Search | Search is performed based on the input | |
| Save | Saves the data and navigates to next screen in the flow | |
| of creating a grievance | ||
| Cancel | Clears the contents entered in the fields or restore to | |
| the previous state as was before saving the changes | ||
Close
The screen is to close an appeal and grievance.
The sequential steps involved in closing an appeal & grievance are listed below.
-
- Step-1: After successful logon, click the menu Enrollment and select Appeals & Grievances. Then select Close. (See Figure C-188)
- Step-2: The screen navigates search to select either by complainant or by grievance. Based on the selection the information of group/member with grievance details will be displayed. Enter group/member/grievance id o or enter first letter of group/member's name for search. Click Search. (See Figure C-189)
- Step-3: The screen navigates to close grievance Enter the fields with appropriate values as per the format briefed in field's explanation. (See Figure C-190)
- Step-4: Click Save.
- Step-5: The screen confirms the close of grievance. (See Figure C-191)
Field Explanation
The following table provides explanation for each button in the screen.
| Element | Description |
| Complainant | Choose a type of complainant from either group or |
| Type | member |
| Complainant | The text for complainant id. Accepts numeric values |
| ID | |
| Conclusion | Choose a conclusion from the drop down list available |
| Reason | The text for reason. If the reason is others, it will |
| enable the field other reason for entry | |
| Other Reason | The text for other reason. Field is enabled only if the |
| option under reasons is others | |
| Batch Date | The text for batch date. Choose a date in the format |
| MM/DD/YYYY by clicking calendar icon | |
Button Functionality
The following table provides explanation for each button in the screen.
| Element | Description | |
| Search | Search is performed based on the input | |
| Save | Saves the data and navigates to next screen in the flow | |
| of creating a grievance | ||
| Cancel | Clears the contents entered in the fields or restore to | |
| the previous state as was before saving the changes | ||
8 Carrier Issues
Carrier Issues is the transaction module that encompasses the process for the groups and members enrolled with PacAdvantage in the PX2 System to raise issues with the carriers. Carrier Issues is the process of maintaining a status for all Carrier Issues received from the customer and follow up with the carrier for resolution and inform the customer of resolution.
Access
The application can be accessed from the main menu as follows:
-
- Enrollment->Carrier Issues->Create
- ->Modify
- ->Close
- Enrollment->Carrier Issues->Create
Pre-Requisites
There are no pre-requisites for using this application.
Application Functions
This application has the following functions for reinstatement:
-
- Create—to create carrier issue
- Modify—to modify carrier issue
- Close—to close carrier issue
Create
The screen is to create carrier issue.
The sequential steps involved in creating carrier issue are listed below.
-
- Step-1: After successful logon, click the menu Enrollment and select Carrier Issues. Then select Create. (See Figure C-192)
- Step-2: The screen navigates search to select a group or member. Based on the selection the information of group/member will be displayed. Enter value in any one of the field or simply click search button to perform search operation. (See Figure C-193)
- Step-3: This pops a screen with search result. (See Figure C-194)
- Step-4: Click on any group/member id for selection. The screen navigates to create carrier issue. (See Figure C-195)
- Step-5: Enter the fields with appropriate values as per the format briefed in field's explanation.
- Step-6: Click Save
- Step-7: Screen navigates to confirming create carrier issues. (See Figure C-196)
Field Explanation
The following table provides explanation for each button in the screen.
| Element | Description |
| Carrier Issue Information |
| Received Date | The text for received date. Choose a date in the format |
| MM/DD/YYYY by clicking calendar icon. | |
| Urgent | Click the check box, if it is urgent |
| Carrier | Choose a carrier from the drop down list available |
| Reported Issue | Choose a reported issue from the drop down list |
| available | |
| Remarks | The text for remarks. Accepts alphabets, numeric and |
| special characters | |
Button Functionality
The following table provides explanation for each button in the screen.
| Element | Description | |
| Search | Search is performed based on the input | |
| Save | Saves the data and navigates to next screen in the flow | |
| of creating carrier issue | ||
| Cancel | Clears the contents entered in the fields or restore to | |
| the previous state as was before saving the changes | ||
Modify
The screen is to modify carrier issue.
The sequential steps involved in modifying a carrier issue are listed below.
-
- Step-1: After successful logon, click the menu Enrollment and select Carrier Issues. Then select Modify. (See Figure C-197)
- Step-2: The screen navigates search to select either by complainant or by carrier issue. Based on the selection the information of group/member with grievance details will be displayed. Enter the value for either customer id or carrier issue id. The field is mandatory. (See Figure C-198)
- Step-3: Click search. The screen navigates to process carrier issue to modify. (See Figure C-199)
- Step-4: Enter the fields with appropriate values as per the format briefed in field's explanation
- Step-5: Click Save.
- Step-6: The screen confirms the modification of carrier issues. (See Figure C-200)
Field Explanation
The following table provides explanation for each button in the screen.
| Element | Description |
| Search by | Select search either by client type or by carrier issue |
| type | |
| Customer Type | Choose a Customer Type from either group |
| or member. The field is enabled only if the search is | |
| selected as client type | |
| Customer ID | The text for customer id. Accepts numeric values |
| Carrier Issue ID | The text for carrier issue id. Accepts numeric values. |
| The field is enabled only if the selected type is carrier | |
| issue type | |
| Notify carrier | Choose an option as yes or no for notifying a carrier |
| Mode of | Choose a mode from the drop down list available |
| Notification | |
| Date Notified | The text for notification date. Choose a date in the |
| format MM/DD/YYYY by clicking calendar icon | |
| Batch Date | The text for batch date. Choose a date in the format |
| MM/DD/YYYY by clicking calendar icon | |
| Additional | The text for remarks. Accepts alphabets, numeric and |
| Remarks | special characters |
Button Functionality
The following table provides explanation for each button in the screen.
| Element | Description | |
| Search | Search is performed based on the input | |
| Save | Saves the data and navigates to next screen in the flow | |
| of creating a grievance | ||
| Cancel | Clears the contents entered in the fields or restore to | |
| the previous state as was before saving the changes | ||
Close
The screen is to close carrier issue.
The sequential steps involved in closing carrier issue are listed below.
-
- Step-1: After successful logon, click the menu Enrollment and select Carrier Issues. Then select Close. (See Figure C-201)
- Step-2: The screen navigates search to select either by customer or by carrier issue. Based on the selection the information of group/member with carrier issue details will be displayed. Enter group/member/carrier issue id for search. The field is mandatory. Click Search. (See Figure C-202)
- Step-3: The screen navigates to close carrier issue Enter the fields with appropriate values as per the format briefed in field's explanation. (See Figure C-203)
- Step-4: Click Save.
- Step-5: The screen confirms the close of carrier issue. (See Figure C-204)
Field Explanation
The following table provides explanation for each button in the screen.
| Element | Description |
| Search by | Select search either by client type or by carrier issue |
| type | |
| Customer Type | Choose a Customer Type from either group or |
| member. The field is enabled only if the search is | |
| selected as client type | |
| Customer ID | The text for customer id. Accepts numeric values with |
| exactly 9 digits | |
| Carrier Issue ID | The text for carrier issue id. Accepts numeric values |
| with exactly 9 digits. The field is enabled only if the | |
| selected type is carrier issue type | |
| Actual Issue | Choose an issue for actual issue from the drop down |
| list available | |
| Resolution | Choose a resolution from the drop down list available |
| Retransmission | Click yes or no for retransmission |
| Date Carrier | The text for carrier received date. Choose a date in the |
| Received | format MM/DD/YYYY by clicking calendar icon |
| Notify Originator | Click yes or no for notifying originator |
| Batch Date | The text for batch date. Choose a date in the format |
| MM/DD/YYYY by clicking calendar icon | |
| Resolution | The text for resolution comments. Accepts alphabets, |
| comments | numeric and special characters |
Button Functionality
The following table provides explanation for each button in the screen.
| Element | Description | |
| Search | Search is performed based on the input | |
| Save | Saves the data and navigates to next screen in the flow | |
| of creating a grievance | ||
| Cancel | Clears the contents entered in the fields or restore to | |
| the previous state as was before saving the changes | ||
9 Add On
Add On is the transaction module that encompasses the process of Adding New Employee or Dependent to the group and or member enrolled with PacAdvantage in the PX2 System.
Access
The application can be accessed from the main menu as follows:
-
- Enrollment->Add On->Employee Add On
- ->Dependent Add On
- Enrollment->Add On->Employee Add On
Pre-Requisites
Group and the member must be enroll and all their relevant information must be available in the system to Add On Employee and or dependent.
Application Functions
This application has the following functions for reinstatement:
-
- Add Employee—to add employee
- Add Dependent—to add dependent
- Modify Dependent—to modify employee
- Modify Dependent—to modify dependent
Add Employee
The screen is to add an employee.
The sequential steps involved in adding an employee are listed below.
-
- Step-1: After successful logon, click the menu Enrollment and select Add On. Select Employee Add On. Then click Add Employee. (See Figure C-205)
- Step-2: The screen navigates search to select a group. Enter value in any one of the fields, or simply click search button to perform search operation. (See Figure C-206)
- Step-3: This pops up a screen with search result. (See Figure C-207)
- Step-4: Click on any group id for selection. Screen navigates to change request screen for adding an employee.
Field Explanation
The following table provides explanation for each button in the screen.
| Element | Description |
| Group Information |
| Name of the | Text for the Name of the Group. Read Only field |
| group | |
| Effective Date | Text for Employee Effective date. Choose a date by |
| clicking calendar icon. Date accepts the format | |
| MM/DD/YYYY. Defaults effective date of the Group. | |
| Effective date cannot be past date Read only field | |
| Group ID | Text for Group ID. Read only field. |
| Status | Text for status. Read only field |
| Group Type | Text for group type. Read only field. |
| Work Group | Text for work group. Read only field. |
| Group Information |
| Mode of Request | Choose a mode of request from the drop down list |
| available | |
| Post Mark Date | Text for post mark date. Choose a date by clicking |
| calendar icon. Accepts in the format MM/DD/YYYY | |
| Entry to this field is mandatory | |
| Received Date | Text for received date. Choose a date by clicking |
| calendar icon. Accepts in the format MM/DD/YYYY. | |
| Entry to this field is mandatory. | |
| Reasons for | Choose a reason for add on from the drop down list |
| Add On | available |
| Others | Text for others. This field is enabled only if the option |
| for reasons for add on is others | |
Button Functionality
The following table provides explanation for each button in the screen.
| Element | Description | |
| Continue | Saves the entered information and navigates to next | |
| screen Employee General Info. | ||
| Cancel | Clears or restores the content entered in the fields only | |
| prior to saving the records | ||
-
- Step-5: Enter the fields with appropriate values as per the format briefed in field's explanation
- Step-6: Screen navigates to add employee general information. First and Last name are mandatory other fields are optional. Enter the values in the respective fields, as per the format briefed in field's explanation section. (See Figure C-209)
Field Explanation
The following table provides explanation for each button in the screen.
| Element | Description |
| Employee Information |
| Salutation | Choose the salutation from the drop down list of |
| salutations available. | |
| First Name | The text for first name. Accepts alphabets and special |
| character like hyphen and single quotes not exceeding | |
| 25 characters. First name is mandatory. | |
| Middle Initial | The text for middle initial. Accepts alphabets not |
| exceeding 1 character. | |
| Last Name | The text for last name Accepts alphabets and special |
| character like hyphen and single quotes not exceeding | |
| 35 characters. Last name is mandatory. | |
| Suffix | Choose the suffix from the drop down list of suffixes |
| available. | |
| Date of Birth | The text for date of birth. Choose a date by clicking |
| calendar icon. Date accepts the format MM/DD/YYYY. | |
| Birth date cannot be later than the current date. | |
| Social Security | The text for social security number for every |
| Number | individual. This can also be auto generated by clicking |
| auto generate link. Accepts numeric value of exactly 9 | |
| digits. Users with User Role as Level 2 and above can | |
| only auto generate SSN. | |
| Gender | Choose a gender from the drop down list available. |
| Address Information: Physical and Alternate Address-Note: Enter |
| Alternate Address if different from the Physical Address. |
| Street Address | The text for address. Accepts alphanumeric and special |
| characters with values not exceeding 35 characters | |
| Apt | The text for suite/apt #.. Accepts alphanumeric and |
| special characters with values not exceeding 35 | |
| characters | |
| Zip | The text for zip. Accepts numeric value of either 5 or 9 |
| digits. City, State and County are populated | |
| automatically on entering the correct zip code and | |
| entering the tab key. | |
| City | The text for city. Accepts alphabets and space between |
| two words not exceeding 30 characters. | |
| State | Choose the name of the state from the drop down list |
| of States available in United States of America | |
| County | Choose the name of the county from the drop down list |
| of States available in United States of America | |
| Mode of | Choose the mode of correspondence from the drop |
| Correspon- | down list available |
| dence | |
| Phone Number | The text for telephone number of the employee. |
| Accepts numeric values not exceeding 10 digits. The | |
| format is (999) 999-9999 | |
| Extension | The text for extension number of the employee. |
| Accepts numeric values not exceeding 5 digits | |
| Fax | The text for fax number of the employee. Accepts |
| numeric values not exceeding 10 digits. The format is | |
| (999) 999-9999 | |
| The text for email of the employee. Accepts alphabets, | |
| numeric and special characters in the standard email | |
| format of length not exceeding 100 characters | |
Button Functionality
The following table provides explanation for each button in the screen.
| Element | Description |
| Continue | Saves the data and navigates to coverage information |
| for employees. | |
| Cancel | Clears the contents entered in the fields or restore to |
| the previous state as was before saving the changes | |
| Enrollment | Click enrollment summary refreshes the screen and |
| Summary | display the summary information entered for group |
| creation | |
| Missing | Click missing information refreshes the screen and |
| Information | displays the missed information. For a successful |
| creation of a group, there should be no missing | |
| information | |
| Group ID | Click Group ID to navigates to the Group's general info |
| screen. | |
| Tab | General Info, Coverage Info, Add Dependent are the |
| tabs visible on this screen. The navigation between the | |
| tabs is possible only if there is a valid Employee ID | |
| generated and assigned to the employee. Also while | |
| navigating through the tab the content that are | |
| changed on the screen are not saved unless explicitly | |
| saved by other operations on the screen | |
-
- Step-7: Screen navigates to coverage information. Even though the fields are optional, enter the values in the respective fields, as per the format briefed in field's explanation section and click Continue. (See Figure C-210)
Field Explanation
The following table provides explanation for each button in the screen.
| Element | Description |
| Employee Information |
| Hours worked per | The text for worked hours per week. Accepts numeric |
| week | values not exceeding 2 digits. |
| Date of | The text for date of employment. Choose a date by |
| employment | clicking calendar icon. Date accepts the format |
| MM/DD/YYYY. | |
| Employee type | Choose an employee type from the drop down list |
| available | |
| Pay Roll | Check box for Pay Roll verification. Check this if pay |
| roll is verified |
| Plan Information |
| Line of coverage | Choose a line of coverage from the drop down list |
| available | |
| Medical waived | Click the check box for medical waive if the employee |
| is waiving medical. | |
| Carrier selection | Choose a carrier selection from the drop down list |
| (Benefit level) | available |
| Coverage choice | Choose a coverage from the drop down list available |
| PCP ID/Medical | The text for PCP ID. Accepts alphabets and numeric |
| group ID | values not exceeding 10 characters. |
| Are you an | Click the check box if you are an existing patient |
| existing | |
| patient | |
| PCP last name | The text for PCP last name. Accepts alphabets and |
| special character like hyphen and single quotes not | |
| exceeding 35 characters. | |
| PCP first name | The text for PCP first name. Accepts alphabets and |
| special character like hyphen and single quotes not | |
| exceeding 25 characters. | |
| Prior plan type | Choose a plan type from the drop down list available |
| Prior plan name | Choose a plan name from the drop down list available |
| Prior insurance | The text for insurance start date. Choose a date by |
| start date | clicking calendar icon. Date accepts the format |
| MM/DD/YYYY. | |
| Prior insurance | The text for insurance end date. Choose a date by |
| end date | clicking calendar icon. Date accepts the format |
| MM/DD/YYYY. | |
| Other coverage | The text for other coverage. Accepts alphabets with |
| kept | values not exceeding 50 characters. |
| Employee | Click the check box, to have employee signature |
| signature | |
| Date signed | The text for date signed. Choose a date by clicking |
| calendar icon. Date accepts the format | |
| MM/DD/YYYY. Date cannot accept future date. | |
Button Functionality
The following table provides explanation for each button in the screen.
| Element | Description |
| Add | Add the contents of employee coverage information. It |
| is only a temporary addition. Becomes permanent only | |
| on saving the record. | |
| Edit | Edit button will allow for editing a specific record in |
| the table. | |
| Update | Update the contents of Plan Information. It is only a |
| temporary update. Becomes permanent only on saving | |
| the record. | |
| Cancel | Cancels the operation that was currently performed |
| prior to saving the record. | |
| Delete | Delete button will delete the records in the table |
| checked for deletion. It is only a temporary deletion. | |
| Becomes permanent only on saving the record. | |
| Check All | The “Check All” Link will check all the records in the |
| table | |
| Clear All | The “Clear All” Link will uncheck all the records in the |
| table that are checked. | |
| Enrollment | Click enrollment summary refreshes the screen and |
| Summary | display the summary of information entered for group |
| creation | |
| Missing | Click missing information refreshes the screen and |
| Information | displays the missed information. For a successful |
| creation of a group, there should be no missing | |
| information | |
| Group ID | Click Group ID to navigates to the Group's general info |
| screen. | |
| Continue | Saves the data and navigates to Coverage Information |
| screen.. | |
| Clear | Clears the contents entered in the fields or restore to |
| the previous state as was before saving the changes | |
| Tab | General Info, Coverage Info, Add Dependent are the |
| tabs visible on this screen. The navigation between the | |
| tabs are possible only if there is a valid Employee ID | |
| generated and assigned to the employee Also while | |
| navigating through the tab the content that are | |
| changed on the screen are not saved unless explicitly | |
| saved by other operations on the screen | |
-
- Step-8: Screen navigates to add dependent information. First name and last name fields are mandatory and other fields are optional. Enter the values in the respective fields, as per the format briefed in field's explanation section and click either Enrollment Summary or Add dependent. (See Figure C-211)
Field Explanation
The following table provides explanation for each button in the screen.
| Element | Description |
| Dependent Information |
| First Name | The text for first name. Accepts alphabets and special |
| character like hyphen and single quotes not exceeding | |
| 25 characters. First name is mandatory. | |
| Middle Initial | The text for middle initial. Accepts alphabets not |
| exceeding 1 character. | |
| Last Name | The text for last name. Accepts alphabets and special |
| characters like hyphen and single quotes not exceeding | |
| 35 characters. Last name is mandatory. | |
| Suffix | Choose the suffix from the drop down list of suffixes |
| available. | |
| Date of Birth | The text for date of birth. Choose a date by clicking |
| calendar icon.. Date accepts the format | |
| MM/DD/YYYY. Birth date cannot be later than the | |
| current date. | |
| Social Security | The text for social security number for every |
| Number | individual. This can also be auto generated by clicking |
| auto generate link. Accepts numeric value of exactly 9 | |
| digits. Users with User Role as Level 2 and above can | |
| only auto generate SSN. | |
| Gender | Choose a gender from the drop down list available. |
| Relationship | Choose the relationship from the drop down list |
| available. | |
| Street Address | The text for address. Accepts alphanumeric and special |
| characters with values not exceeding 35 characters | |
| Suite | The text for suite/apt #.. Accepts alphanumeric and |
| special characters with values not exceeding 35 | |
| characters | |
| Zip | The text for zip. Accepts numeric value of either 5 or 9 |
| digits. City, and State are populated automatically on | |
| entering the correct zip code and entering the tab key. | |
| City | The text for city. Accepts alphabets not exceeding 30 |
| characters. | |
| State | Choose the name of the state from the drop down list |
| of States available in United States of America |
| Line of Coverage |
| Selected carrier | The text for selected carrier. It is a read only field |
| Coverage choice | The text for coverage. It is a read only field |
| Service area | The text for service area. It is a read only field |
| Prior plan type | Choose a plan type from the drop down list available |
| Prior plan | The text for plan name. Accepts alphabets |
| Waived | Click the check box if Line of Coverage is waived. |
| Start date | The text for insurance start date. Choose a date by |
| clicking calendar icon. Date accepts the format | |
| MM/DD/YYYY. | |
| End date | The text for insurance end date. Choose a date by |
| clicking calendar icon. Date accepts the format | |
| MM/DD/YYYY. | |
| PCP ID/ | The text for PCP ID. Accepts alphabets and numeric |
| values not exceeding 10 characters. | |
| PCP last name | The text for PCP last name. Accepts alphabets and |
| special character like hyphen and single quotes not | |
| exceeding 35 characters. | |
| PCP first name | The text for PCP first name. Accepts alphabets and |
| special character like hyphen and single quotes not | |
| exceeding 25 characters. | |
| Disabled | Click the option of temporary or permanent. This is |
| dependent | enable if the relationship opted is child |
| Domestic partner | Click the option for domestic partner. It depends on |
| the value selected in relationship | |
| Legal guardian | Click the option for legal guardian. It depends on the |
| value selected in relationship | |
| Signature | Click the check box if the signature is opted |
Button Functionality
The following table provides explanation for each button in the screen.
| Element | Description |
| Add Employee | Saves the data and navigates to the screen for adding |
| employees. | |
| Add Dependent | Saves the data and navigates to the screen for adding |
| dependent | |
| Enrollment | Click enrollment summary refreshes the screen and |
| Summary | display the summary of information entered for group |
| creation | |
| Missing | Click missing information refreshes the screen and |
| Information | displays the missed information. For a successful |
| creation of a group, there should be no missing | |
| information | |
| Clear | Clears the contents entered in the fields or restore to |
| the previous state as was before saving the changes | |
| Tab | General Info, Coverage Info, Add Dependent are the |
| tabs visible on this screen. The navigation between the | |
| tabs are possible only if there is a valid Employee ID | |
| generated and assigned to the employee Also while | |
| navigating through the tab the content that are | |
| changed on the screen are not saved unless explicitly | |
| saved by other operations on the screen | |
-
- Step-9: Clicking enrollment summary button screen navigates to enrollment summary. This screen shows the overall information that is entered will be shown. (See Figure C-212)
Field Explanation
The following table provides explanation for each element in the screen.
| Element | Description |
| Group | Contains header information of the Group |
| Information | |
| Header | |
| Name of | Text for the Name of the Group |
| the Group | |
| Group ID | Text and Link for the Group ID to navigate to the |
| Group General Info screen | |
| Group Type | Specifies the Type of the Group like Small Employer |
| Group | |
| Status | Text to specify the status of the group. |
| Work Group | Text for Work Group. This specifies the internal work |
| group attached to the Group. This is based on the | |
| writing agent's work group. | |
| Enrollment | Enrollment Summary Information is broken down into |
| Summary | tree structure. The tree can by expanded or collapsed. |
| Information | The level of the tree is as per the example |
| given below: | |
| − Employee | |
| − Dependent | |
| − Dependent | |
| Where (−) signifies expanded view and (+) signifies | |
| collapsed view. | |
| Employee ID | Text for Employee ID |
| Employee SSN | Text for Employee SSN |
| Employee Name | Text for employee Name (First Name and Last Name) |
| Effective Date | Text for Employee Effective date. Choose a date by |
| clicking calendar icon. Date accepts the format | |
| MM/DD/YYYY. Defaults effective date of the | |
| Employee. Effective date cannot be past date | |
| Status | Text to specify the status of the employee. |
| Dependent ID | Text for Dependent ID |
| Dependent SSN | Text for Dependent SSN |
| Dependent Name | Text for Dependent Name (First Name and Last |
| Name) | |
| Effective Date | Text for Dependent Effective date. Choose a date by |
| clicking calendar icon. Date accepts the format | |
| MM/DD/YYYY. Defaults effective date of the | |
| Employee. Effective date cannot be past date | |
| Status | Text to specify the status of the Dependent. |
Button Functionality
The following table provides explanation for each button in the screen.
| Element | Description |
| Pre Enrollment | Saves the data and performs validation and eligibility |
| checks against the information required for enrollment | |
| and navigates to the screen Missing Information. | |
| Cancel | Clears the contents entered in the fields or restore to |
| the previous state as was before saving the changes | |
-
- Step-10: Clicking pre enrollment navigates to missing info screen. It gives the information that is left out while entering input for creating a group. For a successful creation of a group the missing information should be empty. (See Figure C-213)
Field Explanation
The following table provides explanation for each element in the screen.
| Element | Description |
| Group | Contains header information of the Group |
| Information | |
| Header | |
| Name of | Text for the Name of the Group |
| the Group | |
| Group ID | Text and Link for the Group ID to navigate to the |
| Group General Info screen | |
| Group Type | Specifies the Type of the Group like Small Employer |
| Group | |
| Effective Date | The text for Effective Date. |
| Status | Text to specify the status of the group. |
| Work Group | Text for Work Group. This specifies the internal work |
| group attached to the Group. Internal is based on the | |
| writing agent's work group. | |
| Tree Structure | Enrollment Missing Information is broken down into |
| tree structure. The tree can by expanded or collapsed. | |
| The level of the tree is as per the example given | |
| below: | |
| − Employee | |
| − Dependent | |
| − Dependent | |
| Where (−) signifies expanded view and (+) signifies | |
| collapsed view. | |
| Employee | This identifies all the eligibility rules and the |
| Missing Info | information that are incomplete on Employee level for |
| completing the enrollment process. | |
| Missing Entities | List the missing entities for the employee. Provides a |
| link to go to the respective screen to fill in the relevant | |
| information to complete all the required entries. | |
| Message | List the message against each missing entities. |
| Dependent | This identifies all the eligibility rules and the |
| Missing Info | information that are incomplete on dependent level for |
| completing the enrollment process. | |
| Missing Entities | List the missing entities for the dependent. Provides a |
| link to go to the respective screen to fill in the relevant | |
| information to complete all the required entries. | |
| Message | List the message against each missing entities. |
| Enrollment | Choose from the drop down list the action to be |
| Action | performed for enrollment. Enroll/Decline |
| Remarks | Text for remarks if any. |
| Reasons | Choose from the drop down list the reasons for |
| for Decline | decline. |
| Reasons for | Text for other reason. If the reason for decline is other |
| Other | than the reasons available. |
Button Functionality
The following table provides explanation for each button in the screen.
| Element | Description |
| Send mail | Click this link to send missing information to the |
| Internal Work Group (GMS representatives) attached | |
| to this Group. | |
| Preview Invoice | Click this Link to preview the Invoice details prior to |
| generation of invoice. | |
| Enroll | Saves the data if there are no missing information and |
| navigates to enrollment confirmation page. | |
| Clear | Clears the contents entered in the fields or restore to |
| the previous state as was before saving the changes | |
| <<, <, >, >> | The enrollment missing information shows record for 5 |
| employees on single screen. If the employee size | |
| increases more than 5. These buttons are used for | |
| navigating to the next and previous records for | |
| viewing. | |
| << - Show first record (s) | |
| < - Show previous record (s) | |
| > - Show next record (s) | |
| >> - Show last record (s) | |
| Employee ID | Click Employee ID to navigates to the Employee's |
| general info screen. | |
| Preview Invoice | Click Preview Invoice to pop up a new browser |
| window to preview the invoice for the group | |
-
- Step-11: On completing all the relevant information that is required for a successful addition of an employee, the following is the sample screen for a successful creation. (See Figure C-214)
- Step-12: Click Search employee to navigate back to Search Employee screen.
Modify Employee
The screen is to modify an employee.
The sequential steps involved in modifying an employee are listed below.
-
- Step-1: After successful logon, click the menu Enrollment and select Add On. Select Employee Add On. Then click Modify Employee. (See Figure C-215)
- Step-2: The screen navigates search to select a group. Enter value in any one of the field or simply click Search button to perform search operation. (See Figure C-216)
- Step-3: This pops up a screen with search result. (See Figure C-217)
- Step-4: Click on any employee id for selection. This navigates to General info of employees. The flow and method of modifying are similar to that of creation, which is explained in Add Employee, vide step 6 through step 11.
Modify Dependent
The screen is to modify a dependent. Here an employee can be added to a group and a dependent to that employee can be modified. The sequential steps involved in modifying dependent are listed below.
-
- Step-1: After successful logon, click the menu Enrollment and select Add On. Select Employee Add On. Then click Modify Dependent. (See Figure C-218)
- Step-2: The screen navigates search to select a dependent Enter value in any one of the field or simply click Search button to perform search operation. (See Figure C-219)
- Step-3: This pops up a screen with search result. (See Figure C-220)
- Step-4: Click on any employee id for selection. This navigates to Add Dependent of an employee. The flow and method of modifying are similar to that of creation, which is explained in Add Employee, vide step 8 through step 11.
Inactivate Dependent
The screen is to inactivate a dependent.
The sequential steps involved in inactivating dependent are listed below.
-
- Step-1: After successful logon, click the menu Enrollment and select Add On. Select Employee Add On. Then click Inactivate Dependent. (See Figure C-221)
- Step-2: The screen navigates search to select a dependent. Enter value in any one of the field or simply click search button to perform search operation. (See Figure C-222)
- Step-3: This pops up a screen with search result. (See Figure C-223)
- Step-4: Click on any Dependent ID for selection. Screen navigates to Inactivate. (See Figure C-224)
- Step-5 Click Inactivate button, leads to confirmation screen. (See Figure C-225)
Add Dependent
The screen is to add a dependent.
The sequential steps involved in adding a dependent are listed below.
-
- Step-1: After successful logon, click the menu Enrollment and select Add On. Select Dependent Add On. Then click Add Dependent. (See Figure C-226)
- Step-2: The screen navigates search to select a group/employee Enter value in any one of the field, or simply click search button, to perform search operation. (See Figure C-227)
- Step-3: This pops up a screen with search result. (See Figure C-228)
- Step-4: Click on any employee id for selection. This navigates to change request for add on dependent screen. Enter the fields with appropriate values as per the format briefed in field's explanation. Click Continue. (See Figure C-229)
- Step-5: Screen navigates to Add on Dependent screen. Enter the fields with appropriate values as per the format briefed in field's explanation. Click Enrollment summary. Enrollment summary and missing information are similar to Add Dependent and it is explained under Add Employee vide step 8 through step 11. (See Figure C-230)
Field Explanation
Refer for field explanations explained in Add Employee
Button Functionality
Refer for field explanations explained in Add Employee
Modify Dependent
The screen is to modify a dependent, where a dependent is added to an already enrolled employee. The process and flow are similar to that of modify dependent under Employee Add on.
The sequential steps involved in modifying dependent are listed below.
-
- Step-1: After successful logon, click the menu Enrollment and select Add On. Select Employee Add On. Then click Modify Dependent. (See Figure C-231)
- Step-2: The screen navigates search to select a dependent Enter value in any one of the field or simply click Search button to perform search operation. (See Figure C-232)
- Step-3: This pops up a screen with search result. (See Figure C-233)
- Step-4: Click on any employee id for selection. This navigates to Add Dependent of an employee. The flow and method of modifying are similar to that of creation, which is explained in Add Employee, vide step 8 through step 11.
10 En-Operations
Enrollment Operation is a utility process for generation various file in the specified output format for transmission to the Carrier, PacAdvantage and Mail House. These operations are Export Membership Data, Export PacAdvantage Data, Export Transmission Data, ROE Process, and ROE Packet Generation.
Access
The application can be accessed from the main menu as follows:
-
- Enrollment->En-Operations->Export Membership Data
- ->Export PacAdvantage Data
- ->Export Transmission Data
- ->ROE Process
- ->ROE Packet Generation
- Enrollment->En-Operations->Export Membership Data
Pre-Requisites
All master and transaction records must be available in the system for Enrollment Operation.
Output file format and information for each carrier must be available in the system. Refer “User Manual for Carrier Maintenance” for further information on the output file formats for Carriers (Enrollment Transmission)
Application Functions
This application has the following functions for reinstatement:
-
- Export Membership Data
- Export PacAdvantage Data
- Export Transmission Data
- ROE Process
- ROE Packet Generation
Export Membership Data
The screen is to export membership data.
The sequential steps involved in exporting membership data are listed below.
-
- Step-1: After successful logon, click the menu Enrollment and select EN-Operations. Select Export Membership Data. (See Figure C-234)
- Step-2: The screen navigates to Export Membership Data. (See Figure C-235)
- Step-3: Choose the option of carrier or plan, member status, term effective date and file format and click Export
- Step-4: Initially the status will be not exported. Once the export button is clicked after filling necessary fields, a new browser window open for downloading the file. (See Figure C-236)
- Step-5: Click “Click here to download” link and then click Ok to download the file
- Step-6: Click on the Search button navigates to the screen shown below. Enter Export ID and search for the export status. Click on the Export ID link to show the screen with export details or Click back to go back to the export screen. (See Figure C-237)
Field Explanation
The following table provides explanation for each button in the screen.
| Element | Description |
| Export ID | Read only field to display export id value |
| Status | Read only field to display the status of export. |
| Exported By | Read only field to display the user who exported the |
| files | |
| Export Date | Read only field to display the export date |
| Carrier | Choose this option and select from the list if the data |
| export is based on the Carrier | |
| Plan | Choose this option and select from the list if the data |
| export is based on the Plan | |
| Member Status | Choose from the List the Member status. Member |
| Status can be Active, Termed or Both. The field is | |
| mandatory | |
| Term Effective | Enter the date for Term Effective Date or select a date |
| Date | by clicking calendar icon. The field is mandatory if the |
| Member status option is Termed or Both. | |
| File Format | Choose a format from drop down list for output format |
| that should be generated. The field is mandatory | |
Button Functionality
The following table provides explanation for each button in the screen.
| Element | Description |
| New | Click on new button enables to have a new Export of |
| files. | |
| Export | Click on Export button will perform the action of |
| exporting the files based on selection criteria | |
| Search | Click on search button navigates to a screen to have a |
| search on entering Export ID. | |
| View Export Log | Click on view export log to have a pop up display |
| showing the status of exported files | |
| Hide Export Log | Click on hide export log to hide the pop up display |
| message. | |
| Clear | Clears the content and restore the operation that was |
| currently performed prior to saving the record | |
| Back | Goes back to Export screen. |
Export PacAdvantage Data
The screen is to export PacAdvantage Data.
The sequential steps involved in exporting PacAdvantage data are listed below.
-
- Step-1: After successful logon, click the menu Enrollment and select EN-Operations. Select Export PacAdvantage Data. (See Figure C-238)
- Step-2: The screen navigates to Export PacAdvantage Data. (See Figure C-239)
- Step-3: Click Export
- Step-4: Initially the status will be not exported. Once the export button is clicked, the user has an option to view the status of export process by clicking Search.
- Step-5: Click back button to go back to Export. PacAdvantage Data Screen. (See Figure C-240)
Field Explanation
The following table provides explanation for each button in the screen.
| Element | Description |
| Export ID | Read only field to display export id value |
| Status | Read only field to display the status of export. |
| Exported By | Read only field to display the user who exported the |
| files | |
| Export Date | Read only field to display the export date |
Button Functionality
The following table provides explanation for each button in the screen.
| Element | Description |
| New | Click on new button enables to have a new Export of |
| files. | |
| Export | Click on Export button will perform the action of |
| exporting the files based on selection criteria | |
| Search | Click on search button navigates to a screen to have a |
| search on entering Export ID. | |
| View Export Log | Click on view export log to have a pop up display |
| showing the status of exported files | |
| Hide Export Log | Click on hide export log to hide the pop up display |
| message. | |
| Clear | Clears the content and restore the operation that was |
| currently performed prior to saving the record | |
| Back | Goes back to Export PacAdvantage Data screen. |
Export Transmission Data
The screen is to export transmission data.
The sequential steps involved in exporting transmission data are listed below.
-
- Step-1: After successful logon, click the menu Enrollment and select EN-Operations. Select Export Transmission Data. (See Figure C-241)
- Step-2: The screen navigates to Export Transmission Data. (See Figure C-242)
- Step-3: Click Export
- Step-4: Initially the status will be not exported. Once the export button is clicked after filling necessary fields, the user has an option to view the status of export process by clicking Search. (See Figure C-243)
Field Explanation
The following table provides explanation for each button in the screen.
| Element | Description |
| Export ID | Read only field to display export id value |
| Status | Read only field to display the status of export. |
| Exported By | Read only field to display the user who exported the |
| files | |
| Export Date | Read only field to display the export date |
| Transmit for the | Enter the date for Transmit for the following Date |
| following Date | From or select a date by clicking calendar icon. The |
| From | field is mandatory. |
| Transmit for the | Enter the date for Transmit for the following Date To |
| following | or select a date by clicking calendar icon. The field is |
| Date To | mandatory. |
| Comments | Text to enter Comments if any. |
Button Functionality
The following table provides explanation for each button in the screen.
| Element | Description | |
| New | Click on new button enables to have a new Export of | |
| files. | ||
| Export | Click on Export button will perform the action of | |
| exporting the files based on selection criteria | ||
| Search | Click on search button navigates to a screen to have a | |
| search on entering Export ID. | ||
| Back | Goes back to Export Transmission Data screen. | |
ROE Process
The screen is to process ROE data.
The sequential steps involved in processing ROE are listed below.
-
- Step-1: After successful logon, click the menu Enrollment and select EN-Operations. Select ROE Process. (See Figure C-244)
- Step-2: The screen navigates to ROE Process. (See Figure C-245)
- Step-3: Click Generate
Field Explanation
The following table provides explanation for each button in the screen.
| Element | Description |
| Run ID | The text for sequential number of Run ID. It is a read |
| only field and is auto generated | |
| Renewal Date | The text for Renewal Date during which the ROE/OE |
| process is to be initiated. | |
| Run By | The text for name of the user who initiates ROE |
| process. It is a read only field. | |
Button Functionality
The following table provides explanation for each button in the screen.
| Element | Description |
| New | Click on New button to start new ROE Process. |
| Generate | Click Generate to Initiate ROE Process. ROE process |
| once initiated for a specific period cannot be reinitiated | |
| once again. | |
| Cancel | Click cancel to reset the fields. |
ROE Packet Generation
The screen is to process ROE Packet Generation.
The sequential steps involved in generating ROE Packets are listed below.
-
- Step-1: After successful logon, click the menu Enrollment and select EN-Operations. Select ROE Packet Generation. (See Figure C-246)
- Step-2: The screen navigates to ROE Packet Generation. Select ROE cycle period and apply filter conditions for Generating ROE/OE packets. (See Figure C-247)
- Step-3: Click Generate
- Step-4: Initially the status will be not imported. Once the export button is clicked after filling necessary fields, the user has an option to view the status of export process by clicking Search. (See Figure C-248)
- Step 5: Click Back button to go back to ROE
Field Explanation
The following table provides explanation for each button in the screen.
| Element | Description |
| Export ID | The text for Export ID. This is auto generated by the |
| system | |
| Status | The text for Export Status. This is a read only field. |
| The system shows the Export status based on data | |
| exported | |
| Exported By | The text for Exported By. This is a read only field. |
| Export Date | The text for Export date. This is a read only field. |
| ROE Cycle | Choose the ROE Cycle period for which the ROE/OE |
| packet are to be generated. | |
| Post Mark Date | The text for post mark date. Choose a date in the |
| format MM/DD/YYYY by clicking calendar icon. The | |
| postmark date cannot be greater than system date. | |
| The field is mandatory. | |
| Comments | Text to specify comments if any. |
| Selected Groups | The text displays the selected group count based on the |
| ROE Cycle period. Example 0 to 100. It is a read only | |
| field | |
| Group ID | The text for Group ID. Accepts numeric values only. |
| Group Name | The text for group name. Accepts any characters. |
| Group Type | Choose the group type from the list. |
| Group Size From | The text for group size and specifies the starting |
| range. Accepts numeric values only. | |
| Group Size To | The text for group size and specifies the ending range. |
| Accepts numeric values only. | |
| View Selected | Check the View Selected Check Box to view only |
| selected groups. | |
Button Functionality
The following table provides explanation for each button in the screen.
| Element | Description |
| Filter | Click the Filter to display the Group based on the |
| search criteria/filter conditions provided. | |
| Clear Filter | Clear the Content of the fields. |
| Check All | The “Check All” Link will check all the records in the |
| table | |
| Clear All | The “Clear All” Link will uncheck all the records |
| in the table that are checked. | |
| Check All on this | The “Check All on this Page” Link will check all the |
| Page | records in the table on this Page |
| Clear All on this | The “Clear All on this Page” Link will uncheck all the |
| Page | records in the table that are checked on this Page. |
| Invert Selection | The Invert Selection Link will invert the selection |
| criteria for the check boxes. I.e. All Check Groups | |
| would be unchecked and vice versa. | |
| <<, <, >, >> | These buttons are used for navigating to the next and |
| previous records for viewing. | |
| << - Show first record (s) | |
| < - Show previous record (s) | |
| > - Show next record (s) | |
| >> - Show last record (s) | |
| New | Click New to start new operation on this screen |
| Generate | Click Generate to generate ROE/OE packets for Mail |
| House Transmission. | |
| Search | Click Search Button to search the Status of the ROE/ |
| OE Packet generation | |
| Cancel | Cancels the operation that was currently performed |
| prior to saving the record. | |
| Back | Goes back to ROE Transmission screen. |
11 Change
Changes is the transaction module that encompasses the process of accommodating and maintaining all information that is required for Groups ad Members. Change can be done for Groups, COBRA Members, Individual Member, Employee and Dependent.
Access
The application can be accessed from the main menu as follows:
-
- Enrollment->En-Operations->Group Change
- ->COBRA Change
- ->Individual Employee Change
- ->Employee Change
- ->Dependent Change
- Enrollment->En-Operations->Group Change
Pre-Requisites
Groups and Members must be enrolled and all the relevant information must be available in the system for making changes.
Application Functions
This application has the following functions for reinstatement:
-
- Create New Change Request
- Modify Change Request
Group Change Create New Request
The screen is to have an request for any change in Group
The sequential steps involved in change request for group are listed below.
-
- Step-1: After successful logon, click the menu Enrollment and select Change. Select Group change and Create Change Request. (See Figure C-249)
- Step-2: The screen navigates to Group Search screen. Enter any value in one of the field to perform search operation. (See Figure C-250)
- Step-3: This pops up a screen with search result. (See Figure C-251)
- Step-4: Click on any group id for selection the screen navigates to Group Change Request. (See Figure C-252)
Field Explanation
The following table provides explanation for each button in the screen.
| Element | Description |
| Group Information |
| Name of the | Text for the Name of the Group. This is read |
| group | only field. |
| Effective Date | Text for Effective date. This is read only field. |
| Group ID | Text for Group ID. This is read only field.. |
| Status | Text for status. This is read only field. |
| Group Type | Text for group type. This is read only field.. |
| Work Group | Text for work group. This is read only field.. |
| General Information |
| Mode of Request | Choose a mode of request from the drop down list |
| available | |
| Post Mark Date | Text for post mark date. Choose a date by clicking |
| calendar icon. Accepts in the format MM/DD/YYYY | |
| Entry to this field is mandatory | |
| Received Date | Text for received date. Choose a date by clicking |
| calendar icon. Accepts in the format MM/DD/YYYY. | |
| Entry to this field is mandatory. | |
| Reasons for | Choose a reason for change from the drop down list |
| Change | available |
| Others | Text for others. This field is enabled only if the option |
| for reasons for change is others | |
Button Functionality
The following table provides explanation for each button in the screen.
| Element | Description |
| Continue | Saves the entered information and navigates to next |
| level, which show the pick list for the changes that are | |
| sought. | |
| Clear | Clears or restores the content entered in the fields as |
| was prior to saving the records. | |
-
- Step-5: Choose mode of request, Post mark date, date received and reason for change. Clicks continue. This screen would be available only if there are no change requests pending for the group.
- Step-6: Navigates to group changes, which allows the option to pick the changes sought. Check the items that need to be change and click on continue button. This screen is dynamically built to display only those changes that can be performed on the specific group selected. (See Figure C-253)
Field Explanation
The following table provides explanation for each button in the screen.
| Element | Description |
| Group Information |
| Name of the group | Text for the Name of the Group. Read Only field |
| Effective Date | Text for Effective date. This is read only field. |
| Group ID | Text for Group ID. This is read only field. |
| Status | Text for status. This is read only field. |
| Group Type | Text for group type. This is read only field. |
| Work Group | Text for work group. This is read only field. |
| General Information |
| Contact | Selecting this option will enable to allow for any modifications |
| Information1 | |
| Contact | Selecting this option will enable to allow for any modifications |
| Information2 | |
| Physical Address | Selecting this option will enable to allow for any modifications |
| Billing Address | Selecting this option will enable to allow for any modifications |
| Tax Identification | Selecting this option will enable to allow for any modifications |
| Billing Address | Selecting this option will enable to allow for any modifications |
| Billing Information |
| Payment information | Selecting this option will enable to allow for any |
| modifications |
| Agent Information |
| Writing Agent | Selecting this option will enable to allow for any modifications |
| Agent of Record | Selecting this option will enable to allow for any modifications |
| General Agency | Selecting this option will enable to allow for any modifications |
| Coverage Information |
| RAF | Selecting this option will enable to allow for any modifications |
| Waiting Period | Selecting this option will enable to allow for any modifications |
| Medical LOC | Selecting this option will enable to allow for any modifications |
| Vision LOC | Selecting this option will enable to allow for any modifications |
| Dental LOC | Selecting this option will enable to allow for any modifications |
| CAM LOC | Selecting this option will enable to allow for any modifications |
| Others | Selecting this option will enable to allow for any modifications |
Button Functionality
The following table provides explanation for each button in the screen.
| Element | Description | |
| Continue | Saves the data and navigates to General information | |
| for groups. | ||
| Clear | Clears the contents entered in the fields or restore to | |
| the previous state as was before saving the changes | ||
-
- Step-7: On clicking continue, navigates to General Information of group Respective tabs can also clicked to navigate to corresponding screens. Continue would be enabled only if the changes are sought on this screen, else use tab to navigate to the next screen. (See Figure C-254)
Field Explanation
The following table provides explanation for each button in the screen.
| Element | Description |
| Company Information |
| Legal Name | The text for name of the group. Accepts alphanumeric |
| and special characters not exceeding 60 characters. | |
| Field is mandatory | |
| Doing Business As | The text for business nature. Accepts alphanumeric |
| and special characters not exceeding 60 characters. | |
| Field is optional | |
| Type of Business | Choose the type of business from the drop down list |
| available | |
| Tax Identification | The text for tax identification. Accepts numeric values |
| of exactly 9 digits | |
| Address Information: | Physical and Billing Address-Note: Enter Billing |
| Address if different from the Physical Address. | |
| Street Address | The text for company address. Accepts alphanumeric |
| and special characters not exceeding 35 characters | |
| Suite | The text for company suite/apt # Accepts |
| alphanumeric and special characters not exceeding 35 characters | |
| Zip | The text for zip. Accepts numeric value of either 5 or 9 |
| digits. City, State and County are populated | |
| automatically on entering the correct zip code and | |
| entering the tab key. | |
| City | The text for city. Accepts alphabets and space between |
| two words not exceeding 30 characters. | |
| State | Choose the name of the state from the drop down list |
| of States available in United States of America | |
| County | Choose the name of the county from the drop down list |
| of counties available for the ZIP Code entered. |
| Contact Information |
| Mode of | Choose the mode of correspondence from the drop |
| Correspondence | down list available. |
| Contact 1 and Contact 2 | Fill in the relevant for Contact 1 and 2. |
| Salutation | Choose the salutation from the drop down list of |
| salutations available. | |
| First Name | The text for contact name. Accepts alphabets and |
| special characters like hyphen and single quotes not | |
| exceeding 25 characters. | |
| Middle Initial | The text for middle initial. Accepts alphabets not |
| exceeding 1 character. | |
| Last Name | The text for contact name. Accepts alphabets and |
| special characters like hyphen and single quotes not | |
| exceeding 35 characters. | |
| Suffix | Choose the suffix from the drop down list of suffixes |
| available. | |
| Phone Number | The text for telephone number of the contact person. |
| Accepts numeric values of exactly 10 digits. The format | |
| is (999) 999-9999 | |
| Extension | The text for extension number of the contact person. |
| Accepts numeric values not exceeding 5 digits. | |
| Fax | The text for fax number of the contact person. Accepts |
| numeric values of exactly 10 digits. The format is | |
| (999) 999-9999 | |
| The text for email of the contact person. Accepts | |
| alphabets, numeric and special characters in the | |
| standard email format of length not exceeding 100 | |
| characters | |
| Contact Comments | The text for comments. Accepts alphabets, numeric |
| and special characters. Field is optional | |
Button Functionality
The following table provides explanation for each button in the screen.
| Element | Description | |
| Continue | Saves the data and navigates to Billing Information | |
| screen and the system generates Group ID. This is | ||
| enabled only if changes are sought on this screen. | ||
| Cancel | Clears the contents entered in the fields or restore to | |
| the previous state as was before saving the changes | ||
| Tabs | General Info, Billing Info, Agent Info, Coverage Info | |
| are the tabs visible on this screen. Navigation to the | ||
| next screen is also possible by using tabs If continue | ||
| button is disabled use this tab to navigate to the next | ||
| screen. Also while navigating through the tab the | ||
| content that are changed on the screen are not saved | ||
| unless explicitly saved by other operations on the | ||
| screen. | ||
-
- Step-8: On clicking continue, navigates to Billing Information Respective tabs can also clicked to navigate corresponding screens. (See Figure C-255)
Field Explanation
The following table provides explanation for each button in the screen.
| Element | Description |
| Mode of | Choose a mode of payment from the drop down list |
| payment | available. Based on selection corresponding fields will |
| enable to enter the values. For e.g. if the value selected | |
| is card payment, EFT will be disabled and allows only | |
| entering card details and vice versa. |
| Credit Card Information |
| Cardholder's | The text for cardholder's name. Accepts alphabets and |
| Names | space between two words. |
| Credit Card | Choose the type of credit card from the drop down list |
| Type | available. |
| Credit Card No | The text for credit card number. Accepts numeric |
| values not exceeding 30 digits | |
| Expiration Date | Choose a month of expiration from the drop down list |
| available | |
| Expiration | The text for expiration year. Accepts numeric values |
| Year | of exactly 4. Example 2002. |
| Billing Address As it appears on the credit Card |
| Street Address | The text for company address. Accepts alphanumeric |
| and special characters not exceeding 35 characters. | |
| ZIP | The text for zip. Accepts numeric value of either 5 or 9 |
| digits. | |
| State | The text for city. Accepts alphabets and space between |
| two words not exceeding 30 characters. | |
| City | Choose the name of the state from the drop down list |
| of States available in United States of America |
| EFT Information |
| Bank Name | The text for bank name. Accepts alphabets and space |
| between two words. | |
| Routing | The text for routing number. Accepts numeric values |
| Number | not exceeding 9 digits. |
| Account | The text for account number. Accepts numeric values |
| Number | not exceeding 9 digits. |
| Account Type | Choose the type of account from the drop down list |
| available. | |
| Depositor's | The text for depositor's name. Accepts alphabets and |
| Name | space between two words. |
| Initial Payment Information |
| Amount | The text for amount received. Accepts only numeric |
| Received | values in the format 999999999.99 |
| Date Receive | The text for date received. Choose from the calendar |
| icon in the format MM/DD/YYYY. | |
| Check # | The text for check number. Accepts numeric values not |
| exceeding 9 digits. | |
| No Check | Check the option of no checks received for any non- |
| Received | receipt of checks. |
Button Functionality
The following table provides explanation for each button in the screen.
| Element | Description |
| Continue | Saves the data and Navigates to Agent Information |
| screen. | |
| Cancel | Clears the contents entered in the fields or restore to |
| the previous state as was before saving the changes | |
| Missing | Click missing information refreshes the screen and |
| Information | displays the missed information for the group. |
| Tabs | General Info, Billing Info, Agent Info, Coverage Info |
| are the tabs visible on this screen. Navigation to the | |
| next screen is also possible by using tabs If continue | |
| button is disabled use this tab to navigate to the next | |
| screen. Also while navigating through the tab the | |
| content that are changed on the screen are not saved | |
| unless explicitly saved by other operations on the | |
| screen. | |
-
- Step-9: On clicking continue, navigates to Agent Information. Respective tabs can also clicked to navigate corresponding screens. (See Figure C-256)
Field Explanation
The following table provides explanation for each button in the screen.
| Element | Description |
| Agent ID | Choose an agent id by clicking search icon |
| Agent Type | Choose an agent type from the drop down list |
| available. Based on the selection of the agent type the | |
| percent commission split entry and the Receive ROE | |
| packets option would be available. | |
| Percent | The text for percent commission. Accepts numeric |
| commission | values in the range of 1-100 (Example 100.00). This |
| split | will be enabled only if the Agent type selected is “Agent |
| Of Record” | |
| Sum of the percentage for all the Agent of Record | |
| added should be equal to 100.00. | |
| Receive | Click the check box to receive ROE/OE packets for |
| ROE/OE | agent. This option will not be available for Agent Type |
| packets | “General Agent”. |
| Agent | The text for agent commission. Defaults the value |
| Commission | defined in CM - rate Administration for Agent |
| Commission. Accepts numeric values less than or | |
| equal to the defaulted value in the in the range of 1-100 | |
| (Example 4.45) | |
| Check the box | Click the check box for a group with out an agent. This |
| if the group is | option will be available only for the Agent Type, “Agent |
| without an | of Record and Writing Agent”. |
| agent | |
Button Functionality
The following table provides explanation for each button in the screen.
| Element | Description |
| Add | Add the contents of agent information. It is only a |
| temporary addition. Becomes permanent only on | |
| saving the record. | |
| Edit | Edit button will allow for editing a specific record in |
| the table. | |
| Clear | Clears the contents entered in the fields |
| Update | Update the contents of agent information. It is only a |
| temporary update. Becomes permanent only on saving | |
| the record | |
| Delete | Delete button will delete the records in the table |
| checked for deletion. It is only a temporary deletion. | |
| Becomes permanent only on saving the record | |
| Check All | The “Check All” Link will check all the records in the |
| table | |
| Clear All | The “Clear All” Link will uncheck all the records in the |
| table that are checked. | |
| Missing | Click missing information refreshes the screen and |
| Information | displays the missed information. For a successful |
| creation of a group, there should be no missing | |
| information | |
| Continue | Saves the data and navigates to Coverage Information |
| screen. | |
| Cancel | Clears the contents entered in the fields or restore to |
| the previous state as was before saving the changes | |
| Tab | General Info, Billing Info, Agent Info, Coverage Info |
| are the tabs visible on this screen. Navigation to the | |
| next screen is also possible by using tabs If continue | |
| button is disabled use this tab to navigate to the next | |
| screen. Also while navigating through the tab the | |
| content that are changed on the screen are not saved | |
| unless explicitly saved by other operations on the | |
| screen | |
-
- Step-10: On clicking continue, navigates to Coverage Information. Respective tabs can also clicked to navigate corresponding screens. (See Figure C-257)
Field Explanation
The following table provides explanation for each button in the screen.
| Element | Description |
| Hours worked per week | The text for worked hours per week. Accepts numeric |
| values. | |
| Date of employment | The text for date of employment. Choose a date by |
| clicking calendar icon. Date accepts the format | |
| MM/DD/YYYY. | |
| Employee type | Choose an employee type from the drop down list available |
| Line of coverage | Choose a line of coverage from the drop down list |
| available | |
| Medical waived | Click the check box for medical waive if the employee |
| is waiving medical. | |
| Carrier selection | Choose a carrier selection from the drop down list |
| (Benefit level) | available |
| Coverage choice | Choose a coverage from the drop down list available |
| PCP ID/Medical | The text for PCP ID. Accepts alphabets and numeric |
| group ID | values not exceeding 10 characters. |
| Are you an existing patient | Click the check box if you are an existing patient |
| PCP last name | The text for PCP last name. Accepts alphabets and |
| special character like hyphen and single quotes not | |
| exceeding 35 characters. | |
| PCP first name | The text for PCP first name. Accepts alphabets and |
| special character like hyphen and single quotes not | |
| exceeding 25 characters. | |
| Prior plan type | Choose a plan type from the drop down list available |
| Prior plan name | Choose a plan name from the drop down list available |
| Prior insurance | The text for insurance start date. Choose a date by |
| start date | clicking calendar icon. Date accepts the format |
| MM/DD/YYYY. | |
| Prior insurance end | The text for insurance end date. Choose a date by |
| date | clicking calendar icon. Date accepts the format |
| MM/DD/YYYY. | |
| Other coverage kept | The text for other coverage. Accepts alphabets with |
| values not exceeding 50 characters. | |
| RAF | Text to display the RAF applicable for the Individual |
| Association Member. | |
| Employee signature | Click the check box, to have employee signature |
| Date signed | The text for date signed. Choose a date by clicking |
| calendar icon. Date accepts the format MM/DD/YYYY. | |
| Date cannot accept future date. | |
Button Functionality
The following table provides explanation for each button in the screen.
| Element | Description |
| Add | Add the contents of employee coverage information. It |
| is only a temporary addition. Becomes permanent only | |
| on saving. | |
| Edit | Edit button will allow for editing a specific record in |
| the table. | |
| Update | Update the contents of Plan Information. It is only a |
| temporary update. Becomes permanent only on saving. | |
| Cancel | Cancels the operation that was currently performed |
| prior to saving the record. | |
| Delete | Delete button will delete the records in the table |
| checked for deletion. It is only a temporary deletion. | |
| Becomes permanent only on saving. | |
| Check All | The “Check All” Link will check all the records in the |
| table | |
| Clear All | The “Clear All” Link will uncheck all the records in the |
| table that are checked. | |
| Missing | Click missing information refreshes the screen and |
| Information | displays the missed information. For a successful |
| creation of a group, there should be no missing | |
| information | |
| Group ID | Click Group ID to navigates to the Group's general info |
| screen. | |
| Continue | Saves the data and navigates to Missing Information |
| screen.. | |
| Clear | Clears the contents entered in the fields or restore to |
| the previous state as was before saving the changes | |
| Tab | General Info, Billing Info, Agent Info, Coverage Info |
| are the tabs visible on this screen. Navigation to the | |
| next screen is also possible by using tabs If continue | |
| button is disabled use this tab to navigate to the next | |
| screen. Also while navigating through the tab the | |
| content that are changed on the screen are not saved | |
| unless explicitly saved by other operations on the | |
| screen | |
-
- Step-11: Clicking change summary button screen navigates to missing info screen. This screen shows the overall information that is entered will be shown. (See Figure C-258)
Field Explanation
The following table provides explanation for each button in the screen.
| Element | Description | |
| Group Missing Information |
| Missing Entity | List the missing entities for the group change | |
| Message | Provides a message for the missing entities |
| Change Information |
| Change Rule | Specifies the pick list for the changes | |
| Change status | Show the change status as incomplete, complete | |
| Change | Choose from the list change status | |
| confirmation | ||
| Change Action | Choose from the list of change action | |
| Remarks | Text for briefing the change action | |
Button Functionality
The following table provides explanation for each button in the screen.
| Element | Description | |
| Confirm | Navigates to confirmation screen by incorporating all | |
| the changes made | ||
| Clear | Clears the contents entered in the fields or restore to | |
| the previous state as was before saving the changes | ||
-
- Step-12: Confirms the changes incorporated in-group request. Click Group Change Search to go back to Group Search screen. (See Figure C-259)
Group Modify Pending Change
The screen is to have an request for any change in Group
The sequential steps involved in change request for group are listed below.
-
- Step-1: After successful logon, click the menu Enrollment and select Change. Select Group change and Modify Pending Change. (See Figure C-260)
- Step-2: The screen navigates to Group Search screen. Enter any value in one of the field to perform search operation. (See Figure C-261)
- Step-3: This pops up a screen with search result. (See Figure C-262)
- Step-4: Navigates to group changes, which allows the option to have changes required. If no option is selected the continue button in respective pages will be disabled and changes cannot be performed. (See Figure C-263)
Field Explanation
Refer field explanations explained in Create New Change Request under Group Change
Button Functionality
Refer button functionality explained in Create New Change Request under Group Change.
-
- Step-5: On clicking continue, navigates to General Information of group Respective tabs can also clicked to navigate to corresponding screens. The process and flow for modifying change request is similar to that of create new change request. (See Figure C-264)
Field Explanation
Refer field explanations explained in Create New Change Request.
Button Functionality
Refer button functionality explained in Create New Change Request.
COBRA Change Create New Request
The screen is to have an request for any change in COBRA
The sequential steps involved in change request for COBRA are listed below.
-
- Step-1: After successful logon, click the menu Enrollment and select Change. Select COBRA change and Create Change Request. (See Figure C-265)
- Step-2: The screen navigates to Employee Search screen. Enter any value in one of the field to perform search operation. (See Figure C-266)
- Step-3: This pops up a screen with search result. (See Figure C-267)
- Step-4: Click on any employee id for selection the screen navigates to Employee change Request. (See Figure C-268)
Field Explanation
Refer field explanations explained in Create New Change Request
Button Functionality
Refer button functionality explained in Create New Change Request.
-
- Step-5: Screen navigates to employee change (pick list). Select the options to have any modifications, so that the selected screen will enable the continue button. This screen is dynamically built to display only those changes that can be performed on the specific group selected. (See Figure C-269)
Field Explanation
The following table provides explanation for each button in the screen.
| Element | Description |
| Group Information |
| Name of the group | Text for the Name of the Group. This is read only field. |
| Effective Date | Text for Effective date. This is read only field. |
| Group ID | Text for Group ID. This is read only field.. |
| Status | Text for status. This is read only field. |
| Group Type | Text for group type. This is read only field. |
| Work Group | Text for work group. This is read only field. |
| Employee ID | Text for employee ID This is read only field. |
| Employee Name | Text for employee name. This is read only field |
| General Information |
| Change in employee | Selecting this option will enable to allow for any |
| address | modifications |
| Change SSN information | Selecting this option will enable to allow for any modifications |
| Employee Date of | Selecting this option will enable to allow for any modifications |
| birth | |
| Change in employee | Selecting this option will enable to allow for any modifications |
| demographic | |
| location |
| Billing Information |
| Payment Instruction | Selecting this option will enable to allow for any |
| modifications |
| Coverage Information |
| Medical LOC | Selecting this option will enable to allow for any modifications |
| Vision LOC | Selecting this option will enable to allow for any modifications |
| Dental LOC | Selecting this option will enable to allow for any modifications |
| CAM LOC | Selecting this option will enable to allow for any modifications |
| Hours worked | Selecting this option will enable to allow for any modifications |
| Employee Type | Selecting this option will enable to allow for any modifications |
| Date of employment | Selecting this option will enable to allow for any modifications |
-
- Step-6: On clicking continue, screen navigates to General Info screen. Make any corrections if previously opted in change request, then only continue button will be enabled. Otherwise navigate screens through tabs. (See Figure C-270)
Field Explanation
The following table provides explanation for each element in the screen.
| Element | Description |
| Group | Contains header information of the Group |
| Information | |
| Header | |
| Name of the | Text for the Name of the Group. This is read only field. |
| group | |
| Effective Date | Text for Effective date. This is read only field. |
| Group ID | Text for Group ID. This is read only field.. |
| Status | Text for status. This is read only field. |
| Group Type | Text for group type. This is read only field. |
| Work Group | Text for work group. This is read only field. |
| Employee ID | Text for employee ID This is read only field. |
| Employee | Text for employee name. This is read only field |
| Name |
| Employee Information |
| Salutation | Choose the salutation from the drop down list of |
| salutations available. This is read only field | |
| First Name | The text for first name. Accepts alphabets and special |
| character like hyphen and single quotes not exceeding | |
| 25 characters. First name is mandatory. This is read | |
| only field | |
| Middle Initial | The text for middle initial. Accepts alphabets not |
| exceeding 1 character. This is read only field | |
| Last Name | The text for last name. Accepts alphabets and special |
| characters like hyphen and single quotes not exceeding | |
| 35 characters. Last name is mandatory. This is read | |
| only field | |
| Suffix | Choose the Suffix from the drop down list of |
| salutations available This is read only field. | |
| Date of Birth | The text for date of birth. Choose a date by clicking |
| calendar icon Allows for modification, as it has | |
| been opted for change from the pick up list. | |
| Social Security | The text for social security number for every |
| Number | individual. This can also be auto generated by clicking |
| auto generate link. Accepts numeric value of exactly 9 | |
| digits. Users with User Role as Level 2 and above can | |
| only auto generate SSN. This is read only field | |
| Gender | Choose a gender from the drop down list available. |
| This is read only field |
| Address Information |
| Street Address | The text for address. Accepts alphanumeric and special |
| characters with values not exceeding 35 characters | |
| Apt | The text for suite/apt #.. Accepts alphanumeric and |
| special characters with values not exceeding 35 | |
| characters This is read only field | |
| Zip | The text for zip. Accepts numeric value of either 5 or 9 |
| digits. City, State and County are populated | |
| automatically on entering the correct zip code and | |
| entering the tab key. This is read only field | |
| City | The text for city. Accepts alphabets and space between |
| two words not exceeding 30 characters. This is read | |
| only field | |
| State | Choose the name of the state from the drop down list |
| of States available in United States of America This is | |
| read only field | |
| County | Choose the name of the county from the drop down list |
| of States available in United States of America This is | |
| read only field | |
| Mode of | Choose the mode of correspondence from the drop |
| Correspon- | down list available This is read only field |
| dence | |
| Phone Number | The text for telephone number of the employee. |
| Accepts numeric values not exceeding 10 digits. The | |
| format is (999) 999-9999 This is read only field | |
| Extension | The text for extension number of the employee. |
| Accepts numeric values not exceeding 5 digits This is | |
| read only field | |
| Fax | The text for fax number of the employee. Accepts |
| numeric values not exceeding 10 digits. The format is | |
| (999) 999-9999 This is read only field | |
| The text for email of the employee. Accepts alphabets, | |
| numeric and special characters in the standard email | |
| format of length not exceeding 100 characters This is | |
| read only field | |
Button Functionality
The following table provides explanation for each button in the screen.
| Element | Description |
| Continue | Saves the data and Navigates to Billing Information |
| screen. This is enabled only if changes are sought on | |
| this screen | |
| Clear | Clears the contents entered in the fields or restore to |
| the previous state as was before saving the changes | |
| Missing | Click missing information refreshes the screen and |
| Information | displays the missed information for the group. |
| Tabs | General Info, Billing Info, Coverage Info are the tabs |
| visible on this screen. Navigation to the next screen is | |
| also possible by using tabs If continue button is | |
| disabled use this tab to navigate to the next screen. | |
| Also while navigating through the tab the content that | |
| are changed on the screen are not saved unless | |
| explicitly saved by other operations on the screen. | |
-
- Step-7: On clicking continue, screen navigates to Billing Info. Make any corrections if previously opted in change request, then only continue button will be enabled. Otherwise navigate screens through tabs. (See Figure C-271)
Field Explanation
The following table provides explanation for each button in the screen.
| Element | Description |
| Mode of payment | Choose a mode of payment from the drop down list |
| available. Based on selection corresponding fields will | |
| enable to enter the values. For e.g. if the value selected | |
| is card payment, EFT will be disabled and allows only | |
| entering card details and vice versa. |
| Credit Card Information |
| Cardholder's | The text for cardholder's name. Accepts alphabets and |
| Names | space between two words. This is read only field |
| Credit Card Type | Choose the type of credit card from the drop down list |
| available. | |
| Credit Card No | The text for credit card number. Accepts numeric |
| values not exceeding 30 digits | |
| Expiration Date | Choose a month of expiration from the drop down list |
| available | |
| Expiration Year | The text for expiration year. Accepts numeric values |
| of exactly 4. Example 2002. |
| Billing Address As it appears on the credit Card |
| Street Address | The text for company address. Accepts alphanumeric |
| and special characters not exceeding 35 characters. | |
| ZIP | The text for zip. Accepts numeric value of either 5 or 9 |
| digits. | |
| State | The text for city. Accepts alphabets and space between |
| two words not exceeding 30 characters. | |
| City | Choose the name of the state from the drop down list |
| of States available in United States of America |
| EFT Information |
| Bank Name | The text for bank name. Accepts alphabets and space |
| between two words. | |
| Routing Number | The text for routing number. Accepts numeric values |
| not exceeding 9 digits. | |
| Account Number | The text for account number. Accepts numeric values |
| not exceeding 9 digits. | |
| Account Type | Choose the type of account from the drop down list |
| available. | |
| Depositor's Name | The text for depositor's name. Accepts alphabets and |
| space between two words. |
| COBRA Billing Information |
| Send Bills to | Choose the option to send the bills to Group or Sel. |
Button Functionality
The following table provides explanation for each button in the screen.
| Element | Description |
| Continue | Saves the data and Navigates to Coverage Information |
| screen. This is enabled only if changes are sought on | |
| this screen | |
| Cancel | Clears the contents entered in the fields or restore to |
| the previous state as was before saving the changes | |
| Missing | Click missing information refreshes the screen and |
| Information | displays the missed information for the group. |
| Tabs | General Info, Billing Info, Coverage Info are the tabs |
| visible on this screen. Navigation to the next screen is | |
| also possible by using tabs If continue button is | |
| disabled use this tab to navigate to the next screen. | |
| Also while navigating through the tab the content that | |
| are changed on the screen are not saved unless | |
| explicitly saved by other operations on the screen. | |
-
- Step-8: On clicking continue, screen navigates to Coverage Info. Make any corrections if previously opted in change request, then only continue button will be enabled. Otherwise navigate screens through tabs. (See Figure C-272)
Field Explanation
The following table provides explanation for each button in the screen.
| Element | Description |
| Plan Information |
| Line of | Choose a line of coverage from the drop down list |
| coverage | available |
| Medical | Click the check box for medical waive if the employee |
| waived | is waiving medical. |
| Carrier | Choose a carrier selection from the drop down list |
| selection | available |
| (Benefit level) | |
| Coverage | Choose a coverage from the drop down list available |
| choice | |
| PCP | The text for PCP ID. Accepts alphabets and numeric |
| ID/Medical | values not exceeding 10 characters. |
| group ID | |
| Are you an | Click the check box if you are an existing patient |
| existing | |
| patient | |
| PCP last name | The text for PCP last name. Accepts alphabets and |
| special character like hyphen and single quotes not | |
| exceeding 35 characters. | |
| PCP first name | The text for PCP first name. Accepts alphabets and |
| special character like hyphen and single quotes not | |
| exceeding 25 characters. | |
| Prior plan type | Choose a plan type from the drop down list available |
| Prior plan | Choose a plan name from the drop down list available |
| name | |
| Prior insurance | The text for insurance start date. Choose a date by |
| start date | clicking calendar icon. Date accepts the format |
| MM/DD/YYYY. | |
| Prior insurance | The text for insurance end date. Choose a date by |
| end date | clicking calendar icon. Date accepts the format |
| MM/DD/YYYY. | |
| Additional | The text for additional coverage. Accepts alphabets |
| Coverage | with values not exceeding 50 characters. |
| Date signed | The text for date signed. Choose a date by clicking |
| calendar icon. Date accepts the format MM/DD/YYYY. | |
| Date cannot accept future date. | |
Button Functionality
The following table provides explanation for each button in the screen.
| Element | Description |
| Add | Add the contents of employee coverage information. It |
| is only a temporary addition. Becomes permanent only | |
| on saving the record. | |
| Edit | Edit button will allow for editing a specific record in |
| the table. | |
| Update | Update the contents of Plan Information. It is only a |
| temporary update. Becomes permanent only on saving | |
| the record. | |
| Cancel | Cancels the operation that was currently performed |
| prior to saving the record. | |
| Delete | Delete button will delete the records in the table |
| checked for deletion. It is only a temporary deletion. | |
| Becomes permanent only on saving the record. | |
| Check All | The “Check All” Link will check all the records in the |
| table | |
| Clear All | The “Clear All” Link will uncheck all the records in the |
| table that are checked. | |
| Missing | Click missing information refreshes the screen and |
| Information | displays the missed information. For a successful |
| creation of a group, there should be no missing | |
| information | |
| Group ID | Click Group ID to navigates to the Group's general info |
| screen. | |
| Continue | Saves the data and navigates to Missing Information |
| screen, if it is enabled... | |
| Clear | Clears the contents entered in the fields or restore to |
| the previous state as was before saving the changes | |
| Tab | General Info, Billing Info, Coverage Info, are the tabs |
| visible on this screen. Navigation to the next screen is | |
| also possible by using tabs If continue button is | |
| disabled use this tab to navigate to the next screen | |
| Also while navigating through the tab the content that | |
| are changed on the screen are not saved unless | |
| explicitly saved by other operations on the screen | |
-
- Step-9: On clicking continue, screen navigates to Missing Info. (See Figure C-273)
Field Explanation
The following table provides explanation for each button in the screen.
| Element | Description | |
| Employee Missing Information |
| Missing Entity | List the missing entities for the group change | |
| Message | Provides a message for the missing entities | |
| Enrollment | Lists all the changes sought in the pick list | |
| Information | ||
| Status | Displaying the status of change. |
| Change Information |
| Change Rule | Specifies the pick list for the changes | |
| Change status | Show the change status as incomplete, complete | |
| Change | Choose from the list change status | |
| confirmation | ||
| Change Action | Choose from the list of change action | |
| Remarks | Text for briefing the change action | |
Button Functionality
The following table provides explanation for each button in the screen.
| Element | Description | |
| Confirm | Navigates to confirmation screen by incorporating all | |
| the corrections made | ||
| Clear | Clears the contents entered in the fields or restore to | |
| the previous state as was before saving the changes | ||
-
- Step-10: After entering the respective fields, click continues, which navigates to confirmation screen. (See Figure C-274)
COBRA Modify Pending Change
The screen is to have an request for any change in COBRA
The sequential steps involved in change request for COBRA are listed below.
-
- Step-1: After successful logon, click the menu Enrollment and select Change. Select COBRA change and Modify Pending Change. (See Figure C-275)
- Step-2: The screen navigates to Employee Search screen. Enter any value in one of the field to perform search operation. (See Figure C-276)
- Step-3: This pops up a screen with search result. (See Figure C-277)
- Step-4: Navigates to employee changes, which allows the option to have changes required. If no option is selected the continue button in respective pages will be disabled and changes cannot be performed. (See Figure C-278)
Field Explanation
Refer field explanations explained in Create New Change Request under COBRA Change
Button Functionality
Refer button functionality explained in Create New Change Request under COBRA Change
-
- Step-5: On clicking continue, navigates to General Information of group Respective tabs can also clicked to navigate to corresponding screens. The process and flow for modifying change request is similar to that of create new change request. (See Figure C-279)
Field Explanation
Refer field explanations explained in Create New Change Request, under COBRA Change
Button Functionality
Refer button functionality explained in Create New Change Request, under COBRA Change.
Individual Member Change Create New Request
The screen is to have a request for any change in Individual Member
The sequential steps involved in change request for Individual Member are listed below.
-
- Step-1: After successful logon, click the menu Enrollment and select Change. Select Individual Member change and Create Change Request. (See Figure C-280)
- Step-2: The screen navigates to Employee Search screen. Enter any value in one of the field to perform search operation. (See Figure C-281)
- Step-3: This pops up a screen with search result. (See Figure C-282)
- Step-4: Click on any employee id for selection the screen navigates to Employee change Request. (See Figure C-283)
Field Explanation
Refer field explanations explained in Create New Change Request
Button Functionality
Refer button functionality explained in Create New Change Request.
-
- Step-5: Screen navigates to employee change (pick list). Select the options to have any modifications, so that the selected screen will enable the continue button. (See Figure C-284)
Field Explanation
The following table provides explanation for each button in the screen.
| Element | Description |
| Group Information |
| Name of the group | Text for the Name of the Group. This is read only field. |
| Effective Date | Text for Effective date. This is read only field. |
| Group ID | Text for Group ID. This is read only field.. |
| Status | Text for status. This is read only field. |
| Group Type | Text for group type. This is read only field. |
| Work Group | Text for work group. This is read only field. |
| Employee ID | Text for employee ID This is read only field. |
| Employee Name | Text for employee name. This is read only field |
| General Information |
| Change in employee | Selecting this option will enable to allow for any |
| address | modifications |
| Change SSN | Selecting this option will enable to allow for any modifications |
| information | |
| Employee Date of birth | Selecting this option will enable to allow for any modifications |
| Change in employee | Selecting this option will enable to allow for any modifications |
| demographic | |
| location |
| Billing Information |
| Payment | Selecting this option will enable to allow for any |
| Instruction | modifications |
| Coverage Information |
| Medical LOC | Selecting this option will enable to allow for any modifications |
| Vision LOC | Selecting this option will enable to allow for any modifications |
| Dental LOC | Selecting this option will enable to allow for any modifications |
| CAM LOC | Selecting this option will enable to allow for any modifications |
| Hours worked | Selecting this option will enable to allow for any modifications |
| Employee Type | Selecting this option will enable to allow for any modifications |
| Date of employment | Selecting this option will enable to allow for any modifications |
-
- Step-6: On clicking continue, screen navigates to General Info screen. Make any corrections if previously opted in change request, then only continue button will be enabled. Otherwise navigate screens through tabs. (See Figure C-285)
Field Explanation
The following table provides explanation for each element in the screen.
| Element | Description |
| Group | Contains header information of the Group |
| Information | |
| Header | |
| Name of the | Text for the Name of the Group. This is read only field. |
| group | |
| Effective Date | Text for Effective date. This is read only field. |
| Group ID | Text for Group ID. This is read only field.. |
| Status | Text for status. This is read only field. |
| Group Type | Text for group type. This is read only field. |
| Work Group | Text for work group. This is read only field. |
| Employee ID | Text for employee ID This is read only field. |
| Employee | Text for employee name. This is read only field |
| Name |
| Employee Information |
| Salutation | Choose the salutation from the drop down list of |
| salutations available. This is read only field | |
| First Name | The text for first name. Accepts alphabets and special |
| character like hyphen and single quotes not exceeding | |
| 25 characters. First name is mandatory. This is read | |
| only field | |
| Middle Initial | The text for middle initial. Accepts alphabets not |
| exceeding 1 character. This is read only field | |
| Last Name | The text for last name. Accepts alphabets and special |
| characters like hyphen and single quotes not exceeding | |
| 35 characters. Last name is mandatory. This is read | |
| only field | |
| Suffix | Choose the Suffix from the drop down list of |
| salutations available This is read only field. | |
| Date of Birth | The text for date of birth. Choose a date by clicking |
| calendar icon Allows for modification, as it has | |
| been opted for change from the pick up list. | |
| Social Security | The text for social security number for every |
| Number | individual. This can also be auto generated by clicking |
| auto generate link. Accepts numeric value of exactly 9 | |
| digits. Users with User Role as Level 2 and above can | |
| only auto generate SSN. This is read only field | |
| Gender | Choose a gender from the drop down list available. |
| This is read only field |
| Address Information |
| Street Address | The text for address. Accepts alphanumeric and special |
| characters with values not exceeding 35 characters | |
| Apt | The text for suite/apt #.. Accepts alphanumeric and |
| special characters with values not exceeding 35 | |
| characters This is read only field | |
| Zip | The text for zip. Accepts numeric value of either 5 or 9 |
| digits. City, State and County are populated | |
| automatically on entering the correct zip code and | |
| entering the tab key. This is read only field | |
| City | The text for city. Accepts alphabets and space between |
| two words not exceeding 30 characters. This is read | |
| only field | |
| State | Choose the name of the state from the drop down list |
| of States available in United States of America This is | |
| read only field | |
| County | Choose the name of the county from the drop down list |
| of States available in United States of America This is | |
| read only field | |
| Mode of | Choose the mode of correspondence from the drop |
| Correspon- | down list available This is read only field |
| dence | |
| Phone Number | The text for telephone number of the employee. |
| Accepts numeric values not exceeding 10 digits. The | |
| format is (999) 999-9999 This is read only field | |
| Extension | The text for extension number of the employee. |
| Accepts numeric values not exceeding 5 digits This is | |
| read only field | |
| Fax | The text for fax number of the employee. Accepts |
| numeric values not exceeding 10 digits. The format is | |
| (999) 999-9999 This is read only field | |
| The text for email of the employee. Accepts alphabets, | |
| numeric and special characters in the standard email | |
| format of length not exceeding 100 characters This is | |
| read only field | |
Button Functionality
The following table provides explanation for each button in the screen.
| Element | Description |
| Continue | Saves the data and Navigates to Billing Information |
| screen. This is enabled only if changes are sought on | |
| this screen | |
| Cancel | Clears the contents entered in the fields or restore to |
| the previous state as was before saving the changes | |
| Missing | Click missing information refreshes the screen and |
| Information | displays the missed information for the group. |
| Tabs | General Info, Billing Info, Coverage Info are the tabs |
| visible on this screen. Navigation to the next screen is | |
| also possible by using tabs If continue button is | |
| disabled use this tab to navigate to the next screen. | |
| Also while navigating through the tab the content that | |
| are changed on the screen are not saved unless | |
| explicitly saved by other operations on the screen. | |
-
- Step-7: On clicking continue, screen navigates to Billing Info. Make any corrections if previously opted in change request, then only continue button will be enabled. Otherwise navigate screens through tabs. (See Figure C-286)
Field Explanation
The following table provides explanation for each button in the screen.
| Element | Description |
| Mode of payment | Choose a mode of payment from the drop down list |
| available. Based on selection corresponding fields will | |
| enable to enter the values. For e.g. if the value selected | |
| is card payment, EFT will be disabled and allows only | |
| entering card details and vice versa. |
| Credit Card Information |
| Cardholder's | The text for cardholder's name. Accepts alphabets and |
| Names | space between two words. This is read only field |
| Credit Card Type | Choose the type of credit card from the drop down list |
| available. | |
| Credit Card No | The text for credit card number. Accepts numeric |
| values not exceeding 30 digits | |
| Expiration Date | Choose a month of expiration from the drop down list |
| available | |
| Expiration Year | The text for expiration year. Accepts numeric values |
| of exactly 4. Example 2002. |
| Billing Address As it appears on the credit Card |
| Street Address | The text for company address. Accepts alphanumeric |
| and special characters not exceeding 35 characters. | |
| ZIP | The text for zip. Accepts numeric value of either 5 or 9 |
| digits. | |
| State | The text for city. Accepts alphabets and space between |
| two words not exceeding 30 characters. | |
| City | Choose the name of the state from the drop down list |
| of States available in United States of America |
| EFT Information |
| Bank Name | The text for bank name. Accepts alphabets and space |
| between two words. | |
| Routing Number | The text for routing number. Accepts numeric values |
| not exceeding 9 digits. | |
| Account Number | The text for account number. Accepts numeric values |
| not exceeding 9 digits. | |
| Account Type | Choose the type of account from the drop down list |
| available. | |
| Depositor's Name | The text for depositor's name. Accepts alphabets and |
| space between two words. | |
Button Functionality
The following table provides explanation for each button in the screen.
| Element | Description |
| Continue | Saves the data and Navigates to Coverage Information |
| screen. This is enabled only if changes are sought on | |
| this screen | |
| Cancel | Clears the contents entered in the fields or restore to |
| the previous state as was before saving the changes | |
| Missing | Click missing information refreshes the screen and |
| Information | displays the missed information for the group. |
| Tabs | General Info, Billing Info, Coverage Info are the tabs |
| visible on this screen. Navigation to the next screen is | |
| also possible by using tabs If continue button is | |
| disabled use this tab to navigate to the next screen. | |
| Also while navigating through the tab the content that | |
| are changed on the screen are not saved unless | |
| explicitly saved by other operations on the screen. | |
-
- Step-8: On clicking continue, screen navigates to Coverage Info. Make any corrections if previously opted in change request, then only continue button will be enabled. Otherwise navigate screens through tabs. (See Figure C-287)
Field Explanation
The following table provides explanation for each button in the screen.
| Element | Description |
| Employee Information |
| Hours worked per | The text for worked hours per week. Accepts numeric |
| week | values not exceeding 2 digits. |
| Date of | The text for date of employment. Choose a date by |
| employment | clicking calendar icon. Date accepts the format |
| MM/DD/YYYY. | |
| Employee Type | Choose an Employee Type from the drop down list |
| available |
| RAF Discounting |
| RAF | List the RAF tier applicable for the group based on the |
| RAF tier available on group's effective date. |
| Plan Information |
| Line of coverage | Choose a line of coverage from the drop down list |
| available | |
| Medical waived | Click the check box for medical waive if the employee |
| is waiving medical. | |
| Carrier selection | Choose a carrier selection from the drop down list |
| (Benefit level) | available |
| Coverage choice | Choose a coverage from the drop down list available |
| PCP ID/Medical | The text for PCP ID. Accepts alphabets and numeric |
| group ID | values not exceeding 10 characters. |
| Are you | Click the check box if you are an existing patient |
| an existing | |
| patient | |
| PCP last name | The text for PCP last name. Accepts alphabets and |
| special character like hyphen and single quotes not | |
| exceeding 35 characters. | |
| PCP first name | The text for PCP first name. Accepts alphabets and |
| special character like hyphen and single quotes not | |
| exceeding 25 characters. | |
| Prior plan type | Choose a plan type from the drop down list available |
| Prior plan name | Choose a plan name from the drop down list available |
| Prior insurance | The text for insurance start date. Choose a date by |
| start date | clicking calendar icon. Date accepts the format |
| MM/DD/YYYY. | |
| Prior insurance | The text for insurance end date. Choose a date by |
| end date | clicking calendar icon. Date accepts the format |
| MM/DD/YYYY. | |
| Additional | The text for additional coverage. Accepts alphabets |
| Coverage | with values not exceeding 50 characters. |
| Date signed | The text for date signed. Choose a date by clicking |
| calendar icon. Date accepts the format | |
| MM/DD/YYYY. Date cannot accept future date. | |
Button Functionality
The following table provides explanation for each button in the screen.
| Element | Description |
| Add | Add the contents of employee coverage information. It |
| is only a temporary addition. Becomes permanent only | |
| on saving the record. | |
| Edit | Edit button will allow for editing a specific record in |
| the table. | |
| Update | Update the contents of Plan Information. It is only a |
| temporary update. Becomes permanent only on saving | |
| the record. | |
| Cancel | Cancels the operation that was currently performed |
| prior to saving the record. | |
| Delete | Delete button will delete the records in the table |
| checked for deletion. It is only a temporary deletion. | |
| Becomes permanent only on saving the record. | |
| Check All | The “Check All” Link will check all the records in the |
| table | |
| Clear All | The “Clear All” Link will uncheck all the records in the |
| table that are checked. | |
| Missing | Click missing information refreshes the screen and |
| Information | displays the missed information. For a successful |
| creation of a group, there should be no missing | |
| information | |
| Group ID | Click Group ID to navigates to the Group's general info |
| screen. | |
| Continue | Saves the data and navigates to Missing Information |
| screen, if it is enabled.. . | |
| Clear | Clears the contents entered in the fields or restore to |
| the previous state as was before saving the changes | |
| Tab | General Info, Billing Info, Coverage Info, are the tabs |
| visible on this screen. Navigation to the next screen is | |
| also possible by using tabs If continue button is | |
| disabled use this tab to navigate to the next screen | |
| Also while navigating through the tab the content that | |
| are changed on the screen are not saved unless | |
| explicitly saved by other operations on the screen | |
-
- Step-9: On clicking continue, screen navigates to Missing Info. (See Figure C-288)
Field Explanation
The following table provides explanation for each button in the screen.
| Element | Description |
| Employee Missing Information |
| Missing Entity | List the missing entities for the group change |
| Message | Provides a message for the missing entities |
| Enrollment | Lists all the changes sought in the pick list |
| Information | |
| Status | Displaying the status of change. |
| Change Information |
| Change Rule | Specifies the pick list for the changes |
| Change status | Show the change status as incomplete, complete |
| Change | Choose from the list change status |
| confirmation | |
| Change Action | Choose from the list of change action |
| Remarks | Text for briefing the change action |
Button Functionality
The following table provides explanation for each button in the screen.
| Element | Description | |
| Confirm | Navigates to confirmation screen by incorporating all | |
| the corrections made | ||
| Clear | Clears the contents entered in the fields or restore to | |
| the previous state as was before saving the changes | ||
-
- Step-10: After entering the respective fields, click continues, which navigates to confirmation screen. (See Figure C-289)
Individual Member Modify Pending Change
The screen is to have a request for any change in Individual Member
The sequential steps involved in change request for Individual Member are listed below.
-
- Step-1: After successful logon, click the menu Enrollment and select Change. Select Individual Member change and Modify Pending Change. (See Figure C-290)
- Step-2: The screen navigates to Employee Search screen. Enter any value in one of the field to perform search operation. (See Figure C-291)
- Step-3: This pops up a screen with search result. (See Figure C-292)
- Step-4: Navigates to employee changes, which allows the option to have changes required. If no option is selected the continue button in respective pages will be disabled and changes cannot be performed. (See Figure C-293)
Field Explanation
Refer field explanations explained in Create New Change Request under Individual Change
Button Functionality
Refer button functionality explained in Create New Change Request under Individual Change
-
- Step-5: On clicking continue, navigates to General Information of group Respective tabs can also clicked to navigate to corresponding screens. The process and flow for modifying change request is similar to that of create new change request. (See Figure C-294)
Field Explanation
Refer field explanations explained in Create New Change Request, under Individual Member Change
Button Functionality
Refer button functionality explained in Create New Change Request, under Individual Member Change.
Employee Change Create New Request
The screen is to have a request for any change in Employee
The sequential steps involved in change request for Employee are listed below.
-
- Step-1: After successful logon, click the menu Enrollment and select Change. Select Employee change and Create Change Request. (See Figure C-295)
- Step-2: The screen navigates to Employee Search screen. Enter any value in one of the field to perform search operation. (See Figure C-296)
- Step-3: This pops up a screen with search result. (See Figure C-297)
- Step-4: Click on any employee id for selection screen navigates to Employee change Request. (See Figure C-298)
Field Explanation
Refer field explanations explained in Create New Change Request
Button Functionality
Refer button functionality explained in Create New Change Request.
-
- Step-5: Screen navigates to employee change (pick list). Select the options to have any modifications, so that the selected screen will enable the continue button. (See Figure C-299)
Field Explanation
The following table provides explanation for each button in the screen.
| Element | Description |
| Group Information |
| Name of the group | Text for the Name of the Group. |
| This is read only field. | |
| Effective Date | Text for Effective date. This is read only field. |
| Group ID | Text for Group ID. This is read only field.. |
| Status | Text for status. This is read only field. |
| Group Type | Text for group type. This is read only field. |
| Work Group | Text for work group. This is read only field. |
| Employee ID | Text for employee ID This is read only field. |
| Employee Name | Text for employee name. This is read only field |
| General Information |
| Change in employee | Selecting this option will enable to allow for any |
| address | modifications |
| Change SSN | Selecting this option will enable to |
| information | allow for any modifications |
| Employee Date of | Selecting this option will enable |
| birth | to allow for any modifications |
| Change in employee | Selecting this option will enable to |
| demographic | allow for any modifications |
| location |
| Billing Information |
| Payment | Selecting this option will enable to allow for any |
| Instruction | modifications |
| Coverage Information |
| Medical LOC | Selecting this option will enable to |
| allow for any modifications | |
| Vision LOC | Selecting this option will enable to |
| allow for any modifications | |
| Dental LOC | Selecting this option will enable to |
| allow for any modifications | |
| CAM LOC | Selecting this option will enable to |
| allow for any modifications | |
| Hours worked | Selecting this option will enable to |
| allow for any modifications | |
| Employee Type | Selecting this option will enable to |
| allow for any modifications | |
| Date of employment | Selecting this option will enable to |
| allow for any modifications | |
-
- Step-6: On clicking continue, screen navigates to General Info screen. Make any corrections if previously opted in change request, then only continue button will be enabled. Otherwise navigate screens through tabs. (See Figure C-300)
Field Explanation
The following table provides explanation for each element in the screen.
| Element | Description |
| Group | Contains header information of the Group |
| Information | |
| Header | |
| Name of | Text for the Name of the Group. This is read only field. |
| the group | |
| Effective Date | Text for Effective date. This is read only field. |
| Group ID | Text for Group ID. This is read only field.. |
| Status | Text for status. This is read only field. |
| Group Type | Text for group type. This is read only field. |
| Work Group | Text for work group. This is read only field. |
| Employee ID | Text for employee ID This is read only field. |
| Employee | Text for employee name. This is read only field |
| Name |
| Employee Information |
| Salutation | Choose the salutation from the drop down list of |
| salutations available. This is read only field | |
| First Name | The text for first name. Accepts alphabets and special |
| character like hyphen and single quotes not exceeding | |
| 25 characters. First name is mandatory. This is read | |
| only field | |
| Middle Initial | The text for middle initial. Accepts alphabets not |
| exceeding 1 character. This is read only field | |
| Last Name | The text for last name. Accepts alphabets and special |
| characters like hyphen and single quotes not exceeding | |
| 35 characters. Last name is mandatory. This is read | |
| only field | |
| Suffix | Choose the Suffix from the drop down list of |
| salutations available This is read only field. | |
| Date of Birth | The text for date of birth. Choose a date by clicking |
| calendar icon Allows for modification, as it has | |
| been opted for change from the pick up list. | |
| Social Security | The text for social security number for every |
| Number | individual. This can also be auto generated by clicking |
| auto generate link. Accepts numeric value of exactly 9 | |
| digits. Users with User Role as Level 2 and above can | |
| only auto generate SSN. This is read only field | |
| Gender | Choose a gender from the drop down list available. |
| This is read only field |
| Address Information |
| Street Address | The text for address. Accepts alphanumeric and special |
| characters with values not exceeding 35 characters | |
| Apt | The text for suite/apt #.. Accepts alphanumeric and |
| special characters with values not exceeding 35 | |
| characters This is read only field | |
| Zip | The text for zip. Accepts numeric value of either 5 or 9 |
| digits. City, State and County are populated | |
| automatically on entering the correct zip code and | |
| entering the tab key. This is read only field | |
| City | The text for city. Accepts alphabets and space between |
| two words not exceeding 30 characters. This is read | |
| only field | |
| State | Choose the name of the state from the drop down list |
| of States available in United States of America This is | |
| read only field | |
| County | Choose the name of the county from the drop down list |
| of States available in United States of America This is | |
| read only field | |
| Mode of | Choose the mode of correspondence from the drop |
| Correspon- | down list available This is read only field |
| dence | |
| Phone Number | The text for telephone number of the employee. |
| Accepts numeric values not exceeding 10 digits. The | |
| format is (999) 999-9999 This is read only field | |
| Extension | The text for extension number of the employee. |
| Accepts numeric values not exceeding 5 digits This is | |
| read only field | |
| Fax | The text for fax number of the employee. Accepts |
| numeric values not exceeding 10 digits. The format is | |
| (999) 999-9999 This is read only field | |
| The text for email of the employee. Accepts alphabets, | |
| numeric and special characters in the standard email | |
| format of length not exceeding 100 characters This is | |
| read only field | |
Button Functionality
The following table provides explanation for each button in the screen.
| Element | Description |
| Continue | Saves the data and Navigates to Coverage Information |
| screen. This is enabled only if changes are sought on | |
| this screen | |
| Cancel | Clears the contents entered in the fields or restore to |
| the previous state as was before saving the changes | |
| Missing | Click missing information refreshes the screen and |
| Information | displays the missed information for the group. |
| Tabs | General Info, Billing Info, Coverage Info are the tabs |
| visible on this screen. Navigation to the next screen is | |
| also possible by using tabs If continue button is | |
| disabled use this tab to navigate to the next screen. | |
| Also while navigating through the tab the content that | |
| are changed on the screen are not saved unless | |
| explicitly saved by other operations on the screen. | |
-
- Step-7: On clicking continue, screen navigates to Coverage Info. Make any corrections if previously opted in change request, then only continue button will be enabled. Otherwise navigate screens through tabs. (See Figure C-301)
Field Explanation
The following table provides explanation for each button in the screen.
| Element | Description |
| Employee Information |
| Hours worked per | The text for worked hours per week. Accepts numeric |
| week | values not exceeding 2 digits. |
| Date of | The text for date of employment. Choose a date by |
| employment | clicking calendar icon. Date accepts the format |
| MM/DD/YYYY. | |
| Employee Type | Choose an Employee Type from the drop down list |
| available |
| Plan Information |
| Line of coverage | Choose a line of coverage from the drop down list |
| available | |
| Medical waived | Click the check box for medical waive if the employee |
| is waiving medical. | |
| Carrier selection | Choose a carrier selection from the drop down list |
| (Benefit level) | available |
| Coverage choice | Choose a coverage from the drop down list available |
| PCP ID/Medical | The text for PCP ID. Accepts alphabets and numeric |
| group ID | values not exceeding 10 characters. |
| Are you an | Click the check box if you are an existing patient |
| existing patient | |
| PCP last name | The text for PCP last name. Accepts alphabets and |
| special character like hyphen and single quotes not | |
| exceeding 35 characters. | |
| PCP first name | The text for PCP first name. Accepts alphabets and |
| special character like hyphen and single quotes not | |
| exceeding 25 characters. | |
| Prior plan type | Choose a plan type from the drop down list available |
| Prior plan name | Choose a plan name from the drop down list available |
| Prior insurance | The text for insurance start date. Choose a date by |
| start date | clicking calendar icon. Date accepts the format |
| MM/DD/YYYY. | |
| Prior insurance | The text for insurance end date. Choose a date by |
| end date | clicking calendar icon. Date accepts the format |
| MM/DD/YYYY. | |
| Additional | The text for additional coverage. Accepts alphabets |
| Coverage | with values not exceeding 50 characters. |
| Date signed | The text for date signed. Choose a date by clicking |
| calendar icon. Date accepts the format | |
| MM/DD/YYYY. Date cannot accept future date. | |
Button Functionality
The following table provides explanation for each button in the screen.
| Element | Description |
| Add | Add the contents of employee coverage information. It |
| is only a temporary addition. Becomes permanent only | |
| on saving the record. | |
| Edit | Edit button will allow for editing a specific record in |
| the table. | |
| Update | Update the contents of Plan Information. It is only a |
| temporary update. Becomes permanent only on saving | |
| the record. | |
| Cancel | Cancels the operation that was currently performed |
| prior to saving the record. | |
| Delete | Delete button will delete the records in the table |
| checked for deletion. It is only a temporary deletion. | |
| Becomes permanent only on saving the record. | |
| Check All | The “Check All” Link will check all the records in the |
| table | |
| Clear All | The “Clear All” Link will uncheck all the records in the |
| table that are checked. | |
| Missing | Click missing information refreshes the screen and |
| Information | displays the missed information. For a successful |
| creation of a group, there should be no missing | |
| information | |
| Group ID | Click Group ID to navigates to the Group's general info |
| screen. | |
| Continue | Saves the data and navigates to Missing Information |
| screen, if it is enabled... | |
| Clear | Clears the contents entered in the fields or restore to |
| the previous state as was before saving the changes | |
| Tab | General Info, Billing Info, Coverage Info, are the tabs |
| visible on this screen. Navigation to the next screen is | |
| also possible by using tabs If continue button is | |
| disabled use this tab to navigate to the next screen | |
| Also while navigating through the tab the content that | |
| are changed on the screen are not saved unless | |
| explicitly saved by other operations on the screen | |
-
- Step-8: On clicking continue, screen navigates to Missing Info. (See Figure C-302)
Field Explanation
The following table provides explanation for each button in the screen.
| Element | Description |
| Employee Missing Information |
| Missing Entity | List the missing entities for the group change |
| Message | Provides a message for the missing entities |
| Enrollment | Lists all the changes sought in the pick list |
| Information | |
| Status | Displaying the status of change. |
| Change Information |
| Change Rule | Specifies the pick list for the changes |
| Change status | Show the change status as incomplete, complete |
| Change | Choose from the list change status |
| confirmation | |
| Change Action | Choose from the list of change action |
| Remarks | Text for briefing the change action |
Button Functionality
The following table provides explanation for each button in the screen.
| Element | Description | |
| Confirm | Navigates to confirmation screen by incorporating all | |
| the corrections made | ||
| Clear | Clears the contents entered in the fields or restore to | |
| the previous state as was before saving the changes | ||
-
- Step-9: After entering the respective fields, click continues, which navigates to confirmation screen. (See Figure C-303)
Employee Modify Pending Change
The screen is to have a request for any change in Employee
The sequential steps involved in change request for Employee are listed below.
-
- Step-1: After successful logon, click the menu Enrollment and select Change. Select Employee change and Modify Pending Change. (See Figure C-304)
- Step-2: The screen navigates to Employee Search screen. Enter any value in one of the field to perform search operation. (See Figure C-305)
- Step-3: This pops up a screen with search result. (See Figure C-306)
- Step-4: Navigates to employee changes, which allows the option to have changes required. If no option is selected the continue button in respective pages will be disabled and changes cannot be performed. (See Figure C-307)
Field Explanation
Refer field explanations explained in Create New Change Request under Employee Change
Button Functionality
Refer button functionality explained in Create New Change Request under Employee Change
-
- Step-5: On clicking continue, navigates to General Information of group Respective tabs can also clicked to navigate to corresponding screens. The process and flow for modifying change request is similar to that of create new change request. (See Figure C-308)
Field Explanation
Refer field explanations explained in Create New Change Request, under Employee Change
Button Functionality
Refer button functionality explained in Create New Change Request, under Employee Change.
Dependent Change Create New Request
The screen is to have a request for any change in Dependent
The sequential steps involved in change request for Dependent are listed below.
-
- Step-1: After successful logon, click the menu Enrollment and select Change. Select Dependent change and Create Change Request. (See Figure C-309)
- Step-2: The screen navigates to Dependent Search screen. Enter any value in one of the field to perform search operation. (See Figure C-310)
- Step-3: This pops up a screen with search result. (See Figure C-311)
- Step-4: Click on any dependent id for selection the screen navigates to Dependent change Request. (See Figure C-312)
Field Explanation
Refer field explanations explained in Create New Change Request
Button Functionality
Refer button functionality explained in Create New Change Request.
-
- Step-5: Screen navigates to employee change (pick list). Select the options to have any modifications, so that the selected screen will enable the continue button. (See Figure C-313)
Field Explanation
The following table provides explanation for each button in the screen.
| Element | Description |
| Group Information |
| Name of the group | Text for the Name of the Group. This is read |
| only field. | |
| Effective Date | Text for Effective date. This is read only field. |
| Group ID | Text for Group ID. This is read only field.. |
| Status | Text for status. This is read only field. |
| Group Type | Text for group type. This is read only field. |
| Work Group | Text for work group. This is read only field. |
| Dependent ID | Text for Dependent ID This is read only field. |
| Dependent Name | Text for Dependent name. This is read only field |
| General Information |
| Change in | Selecting this option will enable to allow for any |
| Dependent address | modifications |
| Change SSN | Selecting this option will enable to allow |
| information | for any modifications |
| Dependent Date of | Selecting this option will enable to |
| birth | allow for any modifications |
| Change in | Selecting this option will enable to |
| Dependent | allow for any modifications |
| demographic | |
| location | |
| Dependent | Selecting this option will enable to |
| Relationship | allow for any modifications |
| Coverage Information |
| Change in Plan | Selecting this option will enable to |
| information | allow for any modifications |
-
- Step-6: On clicking continue, screen navigates to Dependent Change screen. Make any corrections if previously opted in change request, then only continue button will be enabled. Otherwise navigate screens through tabs. (See Figure C-314)
Field Explanation
The following table provides explanation for each element in the screen.
| Element | Description |
| Group | Contains header information of the Group |
| Information | |
| Header | |
| Name of | Text for the Name of the Group. This is read |
| the group | only field. |
| Effective Date | Text for Effective date. This is read only field. |
| Group ID | Text for Group ID. This is read only field.. |
| Status | Text for status. This is read only field. |
| Group Type | Text for group type. This is read only field. |
| Work Group | Text for work group. This is read only field. |
| Dependent ID | Text for Dependent ID This is read only field. |
| Dependent Name | Text for Dependent name. This is read only field |
| Dependent Information |
| First Name | The text for first name. Accepts alphabets and special |
| character like hyphen and single quotes not exceeding | |
| 25 characters. First name is mandatory. This is read | |
| only field | |
| Middle Initial | The text for middle initial. Accepts alphabets not |
| exceeding 1 character. This is read only field | |
| Last Name | The text for last name. Accepts alphabets and special |
| characters like hyphen and single quotes not exceeding | |
| 35 characters. Last name is mandatory. This is read | |
| only field | |
| Suffix | Choose the Suffix from the drop down list of |
| salutations available This is read only field. | |
| Date of Birth | The text for date of birth. Choose a date by clicking |
| calendar icon Allows for modification, as it has | |
| been opted for change from the pick up list. | |
| Social Security | The text for social security number for every |
| Number | individual. This can also be auto generated by clicking |
| auto generate link. Accepts numeric value of exactly 9 | |
| digits. Users with User Role as Level 2 and above can | |
| only auto generate SSN. This is read only field | |
| Gender | Choose a gender from the drop down list available. |
| This is read only field | |
| Street Address | The text for address. Accepts alphanumeric and special |
| characters with values not exceeding 35 characters | |
| Apt | The text for suite/apt #.. Accepts alphanumeric and |
| special characters with values not exceeding 35 | |
| characters This is read only field | |
| Zip | The text for zip. Accepts numeric value of either 5 or 9 |
| digits. City, State and County are populated | |
| automatically on entering the correct zip code and | |
| entering the tab key. This is read only field | |
| City | The text for city. Accepts alphabets and space between |
| two words not exceeding 30 characters. This is read | |
| only field | |
| State | Choose the name of the state from the drop down list |
| of States available in United States of America This is | |
| read only field | |
| Relationship | Choose the relationship from the drop down list |
| available. This is read only field | |
Button Functionality
The following table provides explanation for each button in the screen.
| Element | Description |
| Change Summary | Saves the data and Navigates to Change Summary |
| Information screen. | |
| Cancel | Clears the contents entered in the fields or restore to |
| the previous state as was before saving the changes | |
| Missing | Click missing information refreshes the screen and |
| Information | displays the missed information for the group. |
-
- Step-7: On clicking continue, screen navigates to Missing Info. (See Figure C-315)
Field Explanation
The following table provides explanation for each button in the screen.
| Element | Description |
| Dependent Missing Information |
| Missing Entity | List the missing entities for the group change |
| Message | Provides a message for the missing entities |
| Enrollment | Lists all the changes sought in the pick list |
| Information | |
| Status | Displaying the status of change. |
| Change Information |
| Change Rule | Specifies the pick list for the changes |
| Change status | Show the change status as incomplete, complete |
| Change | Choose from the list change status |
| confirmation | |
| Change Action | Choose from the list of change action |
| Remarks | Text for briefing the change action |
Button Functionality
The following table provides explanation for each button in the screen.
| Element | Description | |
| Confirm | Navigates to confirmation screen by incorporating all | |
| the corrections made | ||
| Cancel | Clears the contents entered in the fields or restore to | |
| the previous state as was before saving the changes | ||
-
- Step-8: after entering the respective fields, click continues, which navigates to confirmation screen. (See Figure C-316)
- Step-9: Click Dependent Search to navigate back to Dependent Search screen.
Dependent Modify Request Change
The screen is to have a request for any change in Dependent
The sequential steps involved in change request for Dependent are listed below.
-
- Step-1: After successful logon, click the menu Enrollment and select Change. Select Dependent change and Modify Change Request. (See Figure C-317)
- Step-2: The screen navigates to Dependent Search screen. Enter any value in one of the field to perform search operation. (See Figure C-318)
- Step-3: This pops up a screen with search result. (See Figure C-319)
- Step-4: Navigates to Dependent changes, which allows the option to have changes required. If no option is selected the continue button in respective pages will be disabled and changes cannot be performed. (See Figure C-320)
- Step-5: On clicking continue, navigates to Dependent Change. The process and flow for modifying change request is similar to that of create new change request. (See Figure C-321)
- Step-6: On clicking continue, screen navigates to Missing Info. (See Figure C-322)
Field Explanation
The following table provides explanation for each button in the screen.
| Element | Description |
| Dependent Missing Information |
| Missing Entity | List the missing entities for the group change |
| Message | Provides a message for the missing entities |
| Enrollment | Lists all the changes sought in the pick list |
| Information | |
| Status | Displaying the status of change. |
| Change Information |
| Change Rule | Specifies the pick list for the changes |
| Change status | Show the change status as incomplete, complete |
| Change | Choose from the list change status |
| confirmation | |
| Change Action | Choose from the list of change action |
| Remarks | Text for briefing the change action |
Button Functionality
The following table provides explanation for each button in the screen.
| Element | Description | |
| Confirm | Navigates to confirmation screen by incorporating all | |
| the corrections made | ||
| Cancel | Clears the contents entered in the fields or restore to | |
| the previous state as was before saving the changes | ||
-
- Step-7: After entering the respective fields, click continues, which navigates to confirmation screen. (See Figure C-323)
- Step-8: Click Dependent Search to navigate back to Dependent Search screen.
Field Explanation
Refer field explanations explained in Create New Change Request, under Dependent Change
Button Functionality
Refer button functionality explained in Create New Change Request, under Dependent Change
12 ROE/OE
ROE is the transaction module that encompasses the process of Re-qualification and open enrollment for Group and Members enrolled with PacAdvantage in the PX2 System. ROE (Re-qualification and open enrollment) is the process of Re-qualifying the Group and Members on their anniversary. Once a year, on the anniversary date of a group's enrollment in PacAdvantage, the group's participation, contribution and qualification is reviewed. This review is to ensure that the group meets the qualification requirement.
OE (Open Enrollment) is the process during the anniversary of the group wherein the group has the privilege to make the changes to the plan, waiting period etc that were earlier not open for changes.
Access
The application can be accessed from the main menu as follows:
-
- Enrollment->ROE->Group Enrollment
- ->Employee Enrollment
- ->Dependent Enrollment
- ->Individual Member
- ->COBRA
- ->Manual ROE
- Enrollment->ROE->Group Enrollment
Pre-Requisites
The Process ROE operation should be initiated prior to making the ROE/OE changes to the Groups and Members.
Group and the member must be enroll and all their relevant information must be available in the system in order to accomplish the task for ROE/OE.
Application Functions
This application has the following functions for reinstatement:
-
- Modify—to modify group, employee, dependent, individual enrollment entries
Group Enrollment
The screen is to modify group enrollment
The sequential steps involved in modifying group enrollment are listed below.
-
- Step-1: After successful logon, click the menu Enrollment and select ROE. Select Group Enrollment. Then click Process Group. (See Figure C-324)
- Step-2: The screen navigates search to select a group. Enter value in any one of the field, or simply click search button to perform search operation. (See Figure C-325)
- Step-3: This pops up a screen with search result. (See Figure C-326)
- Step-4: Click on any Group ID for selection. Screen navigates to change request screen for making ROE/OE changes for a group. (See Figure C-327)
Field Explanation
The following table provides explanation for each button in the screen.
| Element | Description |
| Group General Information |
| Contact | Selecting this option will enable to allow for any modifications |
| Information | |
| Address | Selecting this option will enable to allow for any modifications |
| Information | |
| Tax Identification | Selecting this option will enable to allow for any modifications |
| Demographic | Selecting this option will enable to allow for any modifications |
| location |
| Billing Information |
| Billing Information | Selecting this option will enable to allow for any modifications |
| Agent Information |
| Agent Information | Selecting this option will enable to allow for any modifications |
| Coverage Information |
| RAF Discounting | Selecting this option will enable to allow for any modifications |
| Workers | Selecting this option will enable to allow for any modifications |
| Compensation Flag | |
| TEFRA flag | Selecting this option will enable to allow for any modifications |
| 1099 Flag | Selecting this option will enable to allow for any modifications |
| Domestic Partner | Selecting this option will enable to allow for any modifications |
| Support flag | |
| COBRA Support flag | Selecting this option will enable to allow for any modifications |
| Part time support | Selecting this option will enable to allow for any modifications |
| flag | |
| Waiting period | Selecting this option will enable to allow for any modifications |
| information | |
| Medical LOC | Selecting this option will enable to allow for any modifications |
| Vision LOC | Selecting this option will enable to allow for any modifications |
| Dental LOC | Selecting this option will enable to allow for any modifications |
| CAM LOC | Selecting this option will enable to allow for any modifications |
Button Functionality
The following table provides explanation for, each button in the screen.
| Element | Description | |
| Continue | Saves the data and navigates to General information | |
| for groups. | ||
| Clear | Clears the contents entered in the fields or restore to | |
| the previous state as was before saving the changes | ||
-
- Step-5: On clicking continue, navigates to General Information of group Respective tabs can also clicked to navigate to corresponding screens. Continue would be enabled only if the changes are sought on this screen, else use tab to navigate to the next screen. (See Figure C-328)
Field Explanation
The following table provides explanation for each button in the screen.
| Element | Description |
| Company Information |
| Legal Name | The text for name of the group. Accepts alphanumeric |
| and special characters not exceeding 60 characters. | |
| Field is mandatory | |
| Doing | The text for business nature. Accepts alphanumeric |
| Business As | and special characters not exceeding 60 characters. |
| Field is optional | |
| Type of Business | Choose the type of business from the drop down list |
| available | |
| Tax Identification | The text for tax identification. Accepts numeric values |
| of exactly 9 digits | |
| Address | Physical and Billing Address-Note: |
| Information: | Enter Billing Address if different |
| from the Physical Address. | |
| Street Address | The text for company address. Accepts alphanumeric |
| and special characters not exceeding 35 characters | |
| Suite | The text for company suite/apt # Accepts |
| alphanumeric and special characters not exceeding 35 | |
| characters | |
| Zip | The text for zip. Accepts numeric value of either 5 or 9 |
| digits. City, State and County are populated | |
| automatically on entering the correct zip code and | |
| entering the tab key. | |
| City | The text for city. Accepts alphabets and space between |
| two words not exceeding 30 characters. | |
| State | Choose the name of the state from the drop down list |
| of States available in United States of America | |
| County | Choose the name of the county from the drop down list |
| of counties available for the ZIP Code entered. |
| Contact Information |
| Mode of | Choose the mode of correspondence from the drop |
| Correspondence | down list available. |
| Contact 1 and | Fill in the relevant for Contact 1 and 2. |
| Contact 2 - | |
| Salutation | Choose the salutation from the drop down list of |
| salutations available. | |
| First Name | The text for contact name. Accepts alphabets and |
| special characters like hyphen and single quotes not | |
| exceeding 25 characters. | |
| Middle Initial | The text for middle initial. Accepts alphabets not |
| exceeding 1 character. | |
| Last Name | The text for contact name. Accepts alphabets and |
| special characters like hyphen and single quotes not | |
| exceeding 35 characters. | |
| Suffix | Choose the suffix from the drop down list of suffixes |
| available. | |
| Phone Number | The text for telephone number of the contact person. |
| Accepts numeric values of exactly 10 digits. | |
| The format is (999) 999-9999 | |
| Extension | The text for extension number of the contact person. |
| Accepts numeric values not exceeding 5 digits. | |
| Fax | The text for fax number of the contact person. Accepts |
| numeric values of exactly 10 digits. The format is | |
| (999) 999-9999 | |
| The text for email of the contact person. Accepts | |
| alphabets, numeric and special characters in the | |
| standard email format of length not exceeding 100 | |
| characters | |
| Contact | The text for comments. Accepts alphabets, numeric |
| Comments | and special characters. Field is optional |
Button Functionality
The following table provides explanation for each button in the screen.
| Element | Description |
| Continue | Saves the data and navigates to Billing Information |
| screen and the system generates Group ID. This is | |
| enabled only if changes are sought on this screen | |
| Cancel | Clears the contents entered in the fields or restore to |
| the previous state as was before saving the changes | |
| Tabs | General Info, Billing Info, Agent Info, Coverage Info |
| are the tabs visible on this screen. Navigation to the | |
| next screen is also possible by using tabs If continue | |
| button is disabled use this tab to navigate to the next | |
| screen. Also while navigating through the tab the | |
| content that are changed on the screen are not saved | |
| unless explicitly saved by other operations on the | |
| screen. | |
-
- Step-6: On clicking continue, navigates to Group Billing Information of group Respective tabs can also clicked to navigate to corresponding screens. Continue would be enabled only if the changes are sought on this screen, else use tab to navigate to the next screen. Enter the values in the respective fields, as per the format briefed in field's explanation section and click Continue. (See Figure C-329)
Field Explanation
The following table provides explanation for each button in the screen.
| Element | Description |
| Mode of payment | Choose a mode of payment from the drop down list |
| available. Based on selection corresponding fields will | |
| enable to enter the values. For e.g. if the value selected | |
| is card payment, EFT will be disabled and allows only | |
| entering card details and vice versa. |
| Credit Card Information |
| Cardholder's | The text for cardholder's name. Accepts alphabets and |
| Names | space between two words. |
| Credit Card Type | Choose the type of credit card from the drop down list |
| available. | |
| Credit Card No | The text for credit card number. Accepts numeric |
| values not exceeding 30 digits | |
| Expiration Date | Choose a month of expiration from the drop down list |
| available | |
| Expiration Year | The text for expiration year. Accepts numeric values |
| of exactly 4. Example 2002. | |
| Billing Address | As it appears on the credit Card |
| Street Address | The text for company address. Accepts alphanumeric |
| and special characters not exceeding 35 characters. | |
| ZIP | The text for zip. Accepts numeric value of either 5 or 9 |
| digits. | |
| State | The text for city. Accepts alphabets and space between |
| two words not exceeding 30 characters. | |
| City | Choose the name of the state from the drop down list |
| of States available in United States of America |
| EFT Information |
| Bank Name | The text for bank name. Accepts alphabets and space |
| between two words. | |
| Routing Number | The text for routing number. Accepts numeric values |
| not exceeding 9 digits. | |
| Account Number | The text for account number. Accepts numeric values |
| not exceeding 9 digits. | |
| Account Type | Choose the type of account from the drop down list |
| available. | |
| Depositor's Name | The text for depositor's name. Accepts alphabets and |
| space between two words. |
| Initial Payment Information |
| Amount Received | The text for amount received. Accepts only numeric |
| values in the format 999999999.99 | |
| Date Receive | The text for date received. Choose from the calendar |
| icon in the format MM/DD/YYYY. | |
| Check # | The text for check number. Accepts numeric |
| values not exceeding 9 digits. | |
| No Check | Check the option of no checks received for any non- |
| Received | receipt of checks. |
Button Functionality
The following table provides explanation for each button in the screen.
Element Description
-
- Continue Saves the data and Navigates to Agent Information screen. This is enabled only if changes are sought on this screen
- Cancel Clears the contents entered in the fields or restore to the previous state as was before saving the changes
- Enrollment Summary Click enrollment summary refreshes the screen and display the summary of information entered for group.
- Missing Information Click missing information refreshes the screen and displays the missed information for the group.
- Tabs General Info, Billing Info, Agent Info, Coverage Info are the tabs visible on this screen. Navigation to the next screen is also possible by using tabs If continue button is disabled use this tab to navigate to the next screen. Also while navigating through the tab the content that are changed on the screen are not saved unless explicitly saved by other operations on the screen.
- Step-7: On clicking continue, navigates to Group Agent Information of group Respective tabs can also clicked to navigate to corresponding screens. Continue would be enabled only if the changes are sought on this screen, else use tab to navigate to the next screen. (See Figure C-330)
Field Explanation
The following table provides explanation for each element in the screen.
| Element | Description |
| Agent ID | Choose an agent id by clicking search icon |
| Agent Type | Choose an agent type from the drop down list |
| available. Based on the selection of the agent type the | |
| percent commission split entry and the Receive ROE | |
| packets option would be available. | |
| Percent | The text for percent commission. Accepts numeric |
| commission | values in the range of 1-100 (Example 100.00). This |
| split | will be enabled only if the Agent type selected is “Agent |
| Of Record” | |
| Sum of the percentage for all the Agent of Record | |
| added should be equal to 100.00. | |
| Receive | Click the check box to receive ROE/OE packets for |
| ROE/OE | agent. This option will not be available for Agent Type |
| packets | “General Agent”. |
| Agent | The text for agent commission. Defaults the value |
| Commission | defined in CM - rate Administration for Agent |
| Commission. Accepts numeric values less than or | |
| equal to the defaulted value in the in the range of 1-100 | |
| 100 (Example 4.45) | |
| Check the | Click the check box for a group with out an agent. This |
| box if the | option will be available only for the Agent Type, “Agent |
| group is | of Record and Writing Agent”. |
| without an | |
| agent | |
Button Functionality
The following table provides explanation for each button in the screen.
| Element | Description |
| Add | Add the contents of agent information. It is only a |
| temporary addition. Becomes permanent only on | |
| saving the record. | |
| Edit | Edit button will allow for editing a specific record in |
| the table. | |
| Update | Update the contents of agent information. It is only a |
| temporary update. Becomes permanent only on saving | |
| the record | |
| Delete | Delete button will delete the records in the table |
| checked for deletion. It is only a temporary deletion. | |
| Becomes permanent only on saving the record | |
| Check All | The “Check All” Link will check all the records in the |
| table | |
| Clear All | The “Clear All” Link will uncheck all the records in the |
| table that are checked. | |
| Enrollment | Click enrollment summary refreshes the screen and |
| Summary | display the summary of information entered for group |
| creation | |
| Missing | Click missing information refreshes the screen and |
| Information | displays the missed information. For a successful |
| creation of a group, there should be no missing | |
| information | |
| Continue | Saves the data and navigates to Coverage Information |
| screen. This is enabled only if changes are sought on | |
| this screen | |
| Cancel | Clears the contents entered in the fields or restore to |
| the previous state as was before saving the changes | |
| Tab | General Info, Billing Info, Agent Info, Coverage Info |
| are the tabs visible on this screen. Navigation to the | |
| next screen is also possible by using tabs If continue | |
| button is disabled use this tab to navigate to the next | |
| screen.. Also while navigating through the tab the | |
| content that are changed on the screen are not saved | |
| unless explicitly saved by other operations on the | |
| screen | |
-
- Step-8: On clicking continue, navigates to Group Coverage Information of group Respective tabs can also clicked to navigate to corresponding screens. Continue would be enabled only if the changes are sought on this screen, else use tab to navigate to the next screen. (See Figure C-331)
Field Explanation
The following table provides explanation for each button in the screen
| Element | Description |
| Waiting Period Information |
| Employee Type | Choose an Employee Type from the drop down list |
| available | |
| Waiting Period | Choose a waiting period from the drop down list |
| available |
| RAF Discounting |
| RAF | List the RAF tier applicable for the group based on the |
| RAF tier available on group's effective date. |
| Contribution |
| Line of | Choose a line of coverage from the drop down list |
| Coverage | available |
| elected | |
| Contribution | Choose a contribution for from the drop down list |
| For | available. Contribution can be for an employee or |
| dependent. | |
| Contribution | Choose a contribution type from the drop down list |
| Type | available. List the contribution type “% Lowest Cost |
| HMO”, “% Lowest Cost Plan”, “% Specified Plan”, “Flat | |
| $ Amount”. On Selecting % Specified Plan the page | |
| would get refreshed and the Plan Name for the | |
| Specified LOC would be populated in the Drop Down | |
| List “Plan Name” | |
| Contribution | The text for contribution amount. Accepts numeric |
| Amount | values in the format 99999999.99 for flat $ amount |
| and for the rest of the option it accepts as % value say | |
| 100.00 | |
| Plan Name | Choose a plan name from the drop down list available |
| if the Contribution Type selected is “% Specified Plan” | |
| Current Group | Choose a group insurer from the drop down list |
| Insurer | available |
| Whether group | Click the option yes or no |
| legally required | |
| to provide | |
| workers | |
| compensation | |
| coverage | |
| Workers | Choose a compensation carrier name from the drop |
| compensation | down list available |
| carrier name | |
| Number of | The text for total number of employees including full |
| Employees | time and part time. Accepts numeric values |
| (Full time | |
| and part time) | |
| Number of full | The text for number of full time employees at the time |
| time employees | of applying. Accepts numeric values |
| at the time of | |
| application | |
| Number of | The text for number of eligible employees at the time |
| eligible | of applying. Accepts numeric values |
| employees | |
| at the time | |
| of application | |
| Number of | The text for number of employees at the time of |
| employee | applying. Accepts numeric values |
| applying | |
| Have you | Click the option yes or no |
| employed | |
| 20 or more | |
| employees | |
| for 20 or | |
| more weeks | |
| during the | |
| current or | |
| preceding year | |
| (TEFRA) | |
| Have you | Click the option yes or no |
| employed | |
| 20 or more | |
| employees | |
| during | |
| at least 50% | |
| of the | |
| preceding | |
| calendar year | |
| (COBRA) | |
| Are you | Click the option yes or no |
| offering | |
| coverage to | |
| employees | |
| working | |
| more 20-29 | |
| hours per week | |
| Are you | Click the option yes or no |
| offering | |
| coverage to | |
| domestic | |
| partners | |
Button Functionality
The following table provides explanation for each button in the screen
| Element | Description |
| Add (Waiting | Add the contents of Waiting Period information. It is |
| Period | only a temporary addition. Becomes permanent only |
| Information) | on saving the record. |
| Add | Add the contents of Contribution and Coverage elected. |
| (Contribution) | It is only a temporary addition. Becomes permanent |
| only on saving the record. | |
| Update | Updates the contents of Waiting Period information. It |
| (Waiting | is only a temporary update. Becomes permanent only |
| Period | on saving the record. |
| Information) | |
| Update | Update the contents of Contribution and Coverage |
| (Contribution) | elected. It is only a temporary update. Becomes |
| permanent only on saving the record. | |
| Edit | Edit button will allow for editing a specific record in |
| the table. | |
| Delete | Delete button will delete the records in the table |
| checked for deletion. It is only a temporary deletion. | |
| Becomes permanent only on saving the record. | |
| Check All | The “Check All” Link will check all the records in the |
| table | |
| Clear All | The “Clear All” Link will uncheck all the records in the |
| table that are checked. | |
| Enrollment | Click enrollment summary refreshes the screen and |
| Summary | display the summary information entered for group |
| creation | |
| Missing | Click missing information refreshes the screen and |
| Information | displays the missed information. For a successful |
| creation of a group, there should be no missing | |
| information | |
| View Missing | Saves the data and navigates to Missing Information |
| Info | Page |
| Save & Create | Saves the data entered and navigates to the screen |
| New Group | Group Hierarchy for creating New Group. |
| Cancel | Clears or restores the content entered in the fields only |
| prior to saving the records. | |
| Tab | General Info, Billing Info, Agent Info, Coverage Info |
| are the tabs visible on this screen. The navigation | |
| between tabs is possible only if there is a valid group | |
| ID generated and assigned to the group. Also while | |
| navigating through the tab the content that are | |
| changed on the screen are not saved unless explicitly | |
| saved by other operations on the screen | |
-
- Step-9: On clicking Enrollment Summary, screen navigates to Summary screen. (See Figure C-332)
Field Explanation
The following table provides explanation for each button in the screen.
| Element | Description |
| Total Full Time | Value is shown based on the actual full time employee |
| Applied (A) | applied (System Identified) |
| Total part Time | Value is shown based on the actual part time employee |
| Applied (B) | applied (System Identified) |
| Employee | Text to enter Employee Waived. Contains only whole |
| Waived (C) | number. Accepts numbers not exceeding 5 digits. |
| Manually entered based on verification. | |
| Employee | Text to enter Employee Declined. Contains only whole |
| Declined (D) | number. Accepts numbers not exceeding 5 digits. |
| Manually entered based on verification. | |
| Total Eligible | Text to display total eligible employee. Employee |
| Employee (E) = | Applying is sum total of A + B + D. |
| Total Employee | Text to display total employee applying. Employee |
| Applying (F) | Applying is sum total of A + B. |
| % Participation | Test to display % participation. Participation is % of |
| E/F |
| Based on Info Provided |
| Total Full Time | Text for Total Full Time Applied. Based on the |
| Applied (A) | information provide on the Coverage Info screen |
| Total part Time | Text for Total Part Time Applied. Based on the |
| Applied (B) | information provide on the Coverage Info screen |
| Total Employees | Text to display total employee applied. Employee |
| Applied | Applied is sum total of A + B |
| Total Full Time | Value is shown based on the actual full time employee |
| Applied (A) | applied (System Identified) |
-
- Step-10: On clicking continue, navigates to Missing Info screen. (See Figure C-333)
Field Explanation
The following table provides explanation for each button in the screen.
| Element | Description |
| Employee Missing Information |
| Missing Entity | List the missing entities for the group change |
| Message | Provides a message for the missing entities |
| Enrollment | Lists all the changes sought in the pick list |
| Information | |
| Status | Displaying the status of change. |
| Dependent Missing Information |
| Missing Entity | List the missing entities for the group change |
| Message | Provides a message for the missing entities |
| Enrollment | Lists all the changes sought in the pick list |
| Information | |
| Status | Displaying the status of change. |
| Change Information |
| ROE/OE Status | Specifies the pick list for the changes |
| Remarks | Text for briefing the change action |
| Reason for | Choose from the list of reasons for decline. This field is |
| Decline | enabled only if the status of ROE/OE is opted as |
| decline | |
| Others | Text for briefing the other status and description |
Button Functionality
The following table provides explanation for each button in the screen.
| Element | Description | |
| Finalize | Navigates to confirmation screen by incorporating all | |
| the corrections made | ||
| Clear | Clears the contents entered in the fields or restore to | |
| the previous state as was before saving the changes | ||
-
- Step-11: On clicking Finalize, navigates to confirmation screen. (See Figure C-334)
Employee Enrollment
The screen is to modify employee enrollment
The sequential steps involved in modifying employee enrollment are listed below.
-
- Step-1: After successful logon, click the menu Enrollment and select ROE/OE Select Employee Enrollment. Then click Process Employee. (See Figure C-335)
- Step-2: The screen navigates search to select an employee. Enter value in any one of the field or simply click Search button to perform search operation. (See Figure C-336)
- Step-3: This pops up a screen with search result. (See Figure C-337)
- Step-4: Click on any Employee ID for selection. Screen navigates to change request screen for making ROE/OE changes for an employee. (See Figure C-338)
Field Explanation
The following table provides explanation for each button in the screen.
| Element | Description |
| Group Information |
| Name of the group | Text for the Name of the Group. Read Only field |
| Effective Date | Text for Employee Effective date. This is read only |
| field. | |
| Group ID | Text for Group ID. This is read only field. |
| Status | Text for status. This is read only field. |
| Group Type | Text for group type. This is read only field. |
| Work Group | Text for work group. This is read only field. |
| Employee ID | Text for Employee ID. This is read only field. |
| Employee Name | Text for Employee Name. This is read only field. |
| Employee General Information Changes |
| Employee Date of | Selecting this option will enable to allow for any |
| Birth | modifications. |
| Employee Address | Selecting this option will enable to allow for any |
| modifications | |
| Employee SSN | Selecting this option will enable to allow for any |
| modifications | |
| Employee | Selecting this option will enable to allow for any |
| Demographic | modifications |
| Information |
| Employee Coverage Information Changes |
| Payroll | Selecting this option will enable to allow for any |
| modifications | |
| Employee Type | Selecting this option will enable to allow for any |
| modifications | |
| Medical LOC | Selecting this option will enable to allow for any |
| modifications | |
| Vision LOC | Selecting this option will enable to allow for any |
| modifications | |
| Dental LOC | Selecting this option will enable to allow for any |
| modifications | |
| CAM LOC | Selecting this option will enable to allow for any |
| modifications | |
Button Functionality
The following table provides explanation for each button in the screen.
| Element | Description | |
| Continue | Saves the data and navigates to General information | |
| for employees. This is enabled only if changes are | ||
| sought on this screen | ||
| Cancel | Clears the contents entered in the fields or restore to | |
| the previous state as was before saving the changes | ||
-
- Step-5: On selecting the options for changes click Continue. Screen navigates to Employee General Information screen. (See Figure C-339)
Field Explanation
The following table provides explanation for each button in the screen.
| Element | Description |
| Employee Information |
| Salutation | Choose the salutation from the drop down list of |
| salutations available. | |
| First Name | The text for contact name. Accepts alphabets and |
| special characters like hyphen and single quotes not | |
| exceeding 25 characters. | |
| Middle Initial | The text for middle initial. Accepts alphabets not |
| exceeding 1 character. | |
| Last Name | The text for contact name. Accepts alphabets and |
| special characters like hyphen and single quotes not | |
| exceeding 35 characters. | |
| Suffix | Choose the suffix from the drop down list of suffixes |
| available. | |
| Date of Birth | The text for date of birth. Choose a date by clicking |
| calendar icon. Date accepts the format | |
| MM/DD/YYYY. | |
| Birth date cannot be later than the current date. | |
| Social Security | The text for social security number for every |
| Number | individual. This can also be auto generated by clicking |
| auto generate link. Accepts numeric value of exactly 9 | |
| digits. Users with User Role as Level 2 and above can | |
| only auto generate SSN. | |
| Gender | Choose a gender from the drop down list available. |
| Address Information |
| Street Address | The text for address. Accepts alphanumeric and special |
| characters with values not exceeding 35 characters | |
| Apt | The text for suite/apt #.. Accepts alphanumeric and |
| special characters with values not exceeding 35 | |
| characters | |
| Zip | The text for zip. Accepts numeric value of either 5 or 9 |
| digits. City, State and County are populated | |
| automatically on entering the correct zip code and | |
| entering the tab key. | |
| City | The text for city. Accepts alphabets and space between |
| two words not exceeding 30 characters. | |
| State | Choose the name of the state from the drop down list |
| of States available in United States of America | |
| County | Choose the name of the county from the drop down list |
| of States available in United States of America | |
| Mode of | Choose the mode of correspondence from the drop |
| Correspondence | down list available |
| Phone Number | The text for telephone number of the employee. |
| Accepts numeric values not exceeding 10 digits. The | |
| format is (999) 999-9999 | |
| Extension | The text for extension number of the employee. |
| Accepts numeric values not exceeding 5 digits | |
| Fax | The text for fax number of the employee. Accepts |
| numeric values not exceeding 10 digits. The format is | |
| (999) 999-9999 | |
| The text for email of the employee. Accepts alphabets, | |
| numeric and special characters in the standard email | |
| format of length not exceeding 100 characters | |
Button Functionality
The following table provides explanation for each button in the screen.
| Element | Description | |
| Continue | Saves the data and navigates to Coverage information | |
| for employees. This is enabled only if changes are | ||
| sought on this screen | ||
| Cancel | Clears the contents entered in the fields or restore to | |
| the previous state as was before saving the changes | ||
| Tab | General Info, Coverage Info, are the tabs visible on | |
| this screen. Navigation to the next screen is also | ||
| possible by using tabs If continue button is disabled | ||
| use this tab to navigate to the next screen. Also while | ||
| navigating through the tab the content that are | ||
| changed on the screen are not saved unless explicitly | ||
| saved by other operations on the screen | ||
-
- Step-6: After making any changes in the fields as explained in the field explanation, click Continue. Screen navigates to employee Coverage Info screen. (See Figure C-340)
Field Explanation
The following table provides explanation for each button in the screen.
| Element | Description |
| Employee Information |
| Hours worked per | The text for worked hours per week. Accepts numeric |
| week | values not exceeding 2 digits. |
| Date of | The text for date of employment. Choose a date by |
| employment | clicking calendar icon. Date accepts the format |
| MM/DD/YYYY. | |
| Employee type | Choose an employee type from the drop down list |
| available |
| Plan Information |
| Line of coverage | Choose a line of coverage from the drop down list |
| available | |
| Medical waived | Click the check box for medical waive if the employee |
| is waiving medical. | |
| Carrier selection | Choose a carrier selection from the drop down list |
| (Benefit level) | available |
| Coverage choice | Choose a coverage from the drop down list available |
| PCP ID/Medical | The text for PCP ID. Accepts alphabets and numeric |
| group ID | values not exceeding 10 characters. |
| Are you an | Click the check box if you are an existing patient |
| existing patient | |
| PCP last name | The text for PCP last name. Accepts alphabets and |
| special character like hyphen and single quotes not | |
| exceeding 35 characters. | |
| PCP first name | The text for PCP first name. Accepts alphabets and |
| special character like hyphen and single quotes not | |
| exceeding 25 characters. | |
| Prior plan type | Choose a plan type from the drop down list available |
| Prior plan name | Choose a plan name from the drop down list available |
| Prior insurance | The text for insurance start date. Choose a date by |
| start date | clicking calendar icon. Date accepts the format |
| MM/DD/YYYY. | |
| Prior insurance | The text for insurance end date. Choose a date by |
| end date | clicking calendar icon. Date accepts the format |
| MM/DD/YYYY. | |
| Other coverage | The text for other coverage. Accepts alphabets with |
| kept | values not exceeding 50 characters. |
| Employee | Click the check box, to have employee signature |
| signature | |
| Date signed | The text for date signed. Choose a date by clicking |
| calendar icon. Date accepts the format | |
| MM/DD/YYYY. | |
| Date cannot accept future date. | |
Button Functionality
The following table provides explanation for each button in the screen.
| Element | Description |
| Add | Add the contents of employee coverage information. It |
| is only a temporary addition. Becomes permanent only | |
| on saving the record. | |
| Edit | Edit button will allow for editing a specific record in |
| the table. | |
| Update | Update the contents of Plan Information. It is only a |
| temporary update. Becomes permanent only on saving | |
| the record. | |
| Delete | Delete button will delete the records in the table |
| checked for deletion. It is only a temporary deletion. | |
| Becomes permanent only on saving the record. | |
| Check All | The “Check All” Link will check all the records in the |
| table | |
| Clear All | The “Clear All” Link will uncheck all the records in the |
| table that are checked. | |
| Enrollment | Click enrollment summary refreshes the screen and |
| Summary | display the summary of information entered for group |
| creation | |
| Missing | Click missing information refreshes the screen and |
| Information | displays the missed information. For a successful |
| creation of a group, there should be no missing | |
| information | |
| Group ID | Click Group ID to navigates to the Group's general info |
| screen. | |
| Continue | Saves the data and navigates to Missing Information |
| screen, if it is enabled. | |
| Cancel | Clears the contents entered in the fields or restore to |
| the previous state as was before saving the changes | |
| Tab | General Info, Coverage Info, are the tabs visible on |
| this screen. Navigation to the next screen is also | |
| possible by using tabs If continue button is disabled | |
| use this tab to navigate to the next screen. Also while | |
| navigating through the tab the content that are | |
| changed on the screen are not saved unless explicitly | |
| saved by other operations on the screen | |
-
- Step-7: After entering the fields as per the field details explained in field explanation. Click Continue. Screen navigates to Enrollment Summary. (See Figure C-341)
Field Explanation
The following table provides explanation for each element in the screen.
| Element | Description |
| Group | Contains header information of the Group |
| Information | |
| Header | |
| Name of the | Text for the Name of the Group |
| Group | |
| Group ID | Text and Link for the Group ID to navigate to the |
| Group General Info screen | |
| Group Type | Specifies the Type of the Group like Small Employer |
| Group | |
| Proposed | The text for Proposed Effective Date. Choose a date by |
| Effective | clicking calendar icon. Date accepts the format |
| Date | MM/DD/YYYY. Default effective date is first of the |
| following month. Effective date cannot be past date | |
| Status | Text to specify the status of the group. |
| Work Group | Text for Work Group. This specifies the internal work |
| group attached to the Group. This is based on the | |
| writing agent's work group. | |
| Enrollment | Enrollment Summary Information is broken down into |
| Summary | tree structure. The tree can by expanded or collapsed. |
| Information | The level of the tree is as per the example given |
| below: | |
| −Employee | |
| −Dependent | |
| −Dependent | |
| −Employee | |
| −Dependent | |
| −Employee | |
| +Employee | |
| −Employee | |
| +Dependent | |
| +−Employee | |
| Where (−) signifies expanded view and (+) signifies | |
| collapsed view. | |
| Employee ID | Text for Employee ID |
| Employee SSN | Text for Employee SSN |
| Employee Name | Text for employee Name (First Name and Last Name) |
| Effective Date | Text for Employee Effective date. Choose a date by |
| clicking calendar icon. Date accepts the format | |
| MM/DD/YYYY. Defaults effective date of the Group. | |
| Effective date cannot be past date | |
| Status | Text to specify the status of the employee. |
| Enrollment | There are two part of this information: |
| Information | 3) Entered based on verification |
| 4) Based on the information provide on the | |
| Coverage Info screen |
| Entered based on verification |
| Total Full Time | Value is shown based on the actual full time employee |
| Applied (A) | applied (System Identified) |
| Total part Time | Value is shown based on the actual part time employee |
| Applied (B) | applied (System Identified) |
| Employee | Text to enter Employee Waived. Contains only whole |
| Waived (C) | number. Accepts numbers not exceeding 5 digits. |
| Manually entered based on verification. | |
| Employee | Text to enter Employee Declined. Contains only whole |
| Declined (D) | number. Accepts numbers not exceeding 5 digits. |
| Manually entered based on verification. | |
| Total Eligible | Text to display total eligible employee. Employee |
| Employee (E) = | Applying is sum total of A + B + D. |
| Total Employee | Text to display total employee applying. Employee |
| Applying (F) | Applying is sum total of A + B. |
| % Participation | Test to display % participation. Participation is % of |
| E/F |
| Based on Info Provided |
| Total Full Time | Text for Total Full Time Applied. Based on the |
| Applied (A) | information provide on the Coverage Info screen |
| Total part Time | Text for Total Part Time Applied. Based on the |
| Applied (B) | information provide on the Coverage Info screen |
| Total Employees | Text to display total employee applied. Employee |
| Applied | Applied is sum total of A + B |
Button Functionality
The following table provides explanation for each button in the screen.
| Element | Description |
| Pre Enrollment | Saves the data and performs validation and eligibility |
| checks against the information required for enrollment | |
| and navigates to the screen Missing Information. | |
| Clear | Clears the contents entered in the fields or restore to |
| the previous state as was before saving the changes | |
| <<, <, >, >> | The enrollment summary shows record for 5 employees |
| on single screen. If the employee size increases more | |
| than 5. These buttons are used for navigating to the | |
| next and previous records for viewing. | |
| << - Show first record (s) | |
| < - Show previous record (s) | |
| > - Show next record (s) | |
| >> - Show last record (s) | |
| Group ID | Click Group ID to navigates to the Group's general info |
| screen. | |
-
- Step-8: On clicking Pre-Enrollment, screen navigates to missing info. (See Figure C-342)
Field Explanation
The following table provides explanation for each button in the screen.
| Element | Description |
| Employee Missing Information |
| Missing Entity | List the missing entities for the group change |
| Message | Provides a message for the missing entities |
| Enrollment | Lists all the changes sought in the pick list |
| Information | |
| Status | Displaying the status of change. |
| Dependent Missing Information |
| Missing Entity | List the missing entities for the group change |
| Message | Provides a message for the missing entities |
| Enrollment | Lists all the changes sought in the pick list |
| Information | |
| Status | Displaying the status of change. |
| Change Information |
| ROE/OE Status | Specifies the pick list for the changes |
| Remarks | Text for briefing the change action |
| Reason for | Choose from the list of reasons for decline. This field is |
| Decline | enabled only if the status of ROE/OE is opted as |
| decline | |
| Others | Text for briefing the other status and description |
Button Functionality
The following table provides explanation for each button in the screen.
| Element | Description | |
| Finalize | Navigates to confirmation screen by incorporating all | |
| the corrections made | ||
| Cancel | Clears the contents entered in the fields or restore to | |
| the previous state as was before saving the changes | ||
-
- Step-9: On clicking Finalize, navigates to confirmation screen. Click continue to navigate back to Group search irrespective of process, as the process is being carried out for a group. (See Figure C-343)
Dependent Enrollment
The screen is to modify dependent enrollment
The sequential steps involved in modifying dependent enrollment are listed below.
-
- Step-1: After successful logon, click the menu Enrollment and select ROE. Select Dependent Enrollment. Then click Modify. (See Figure C-344)
- Step-2: The screen navigates search to select an dependent. Enter the search criteria for Searching for the dependent. (See Figure C-345)
- Step-3: This pops up a screen with search result. (See Figure C-346)
- Step-4: Click on any Dependent ID for selection. Screen navigates to change request screen for making ROE/OE changes for an employee. (See Figure C-347)
Field Explanation
The following table provides explanation for each button in the screen.
| Element | Description |
| Dependent General Information Changes |
| Name of the group | Text for the Name of the Group. Read Only field |
| Effective Date | Text for Employee Effective date. This is read only |
| field. | |
| Group ID | Text for Group ID. This is read only field. |
| Status | Text for status. This is read only field. |
| Group Type | Text for group type. This is read only field. |
| Work Group | Text for work group. This is read only field. |
| Employee ID | Text for Employee ID. This is read only field. |
| Employee Name | Text for Employee Name. This is read only field. |
| Dependent ID | Text for Dependent ID. This is read only field. |
| Dependent Name | Text for Dependent Name. This is read only field. |
| Dependent General Information Changes |
| Dependent to waive | Selecting this option will enable to allow for any |
| Vision Plan | modifications. |
| Information | |
| Dependent to waive | Selecting this option will enable to allow for any |
| Dental Plan | modifications |
| Information | |
| Dependent to waive | Selecting this option will enable to allow for any |
| Medical Plan | modifications |
| Information | |
| Prior Plan | Selecting this option will enable to allow for any |
| Information | modifications |
| Dependent Address | Selecting this option will enable to allow for any |
| Information | modifications |
| Dependent SSN | Selecting this option will enable to allow for any |
| modifications | |
| Dependent | Selecting this option will enable to allow for any |
| Relationship | modifications |
| Dependent Date of | Selecting this option will enable to allow for any |
| Birth | modifications |
| Dependent | Selecting this option will enable to allow for any |
| Personal | modifications |
| Information | |
Button Functionality
The following table provides explanation for each button in the screen.
| Element | Description | |
| Continue | Saves the data and navigates to Dependent General | |
| information for employees. | ||
| Cancel | Clears the contents entered in the fields or restore to | |
| the previous state as was before saving the changes | ||
-
- Step-5: On clicking continue, navigates to Dependent General Information screen. Respective tabs can also clicked to navigate to corresponding screens. If any other tabs like Coverage or General Info, or if Enrollment summary, Cancel is disabled, due to non-selection of changes sought, use missing information link to navigate to the missing info screen. (See Figure C-348)
Field Explanation
The following table provides explanation for each button in the screen.
| Element | Description |
| Dependent Information |
| Salutation | Choose the salutation from the drop down list of |
| salutations available. | |
| First Name | The text for contact name. Accepts alphabets and |
| special characters like hyphen and single quotes not | |
| exceeding 25 characters. | |
| Middle Initial | The text for middle initial. Accepts alphabets not |
| exceeding 1 character. | |
| Last Name | The text for contact name. Accepts alphabets and |
| special characters like hyphen and single quotes not | |
| exceeding 35 characters. | |
| Suffix | Choose the suffix from the drop down list of suffixes |
| available. | |
| Date of Birth | The text for date of birth. Choose a date by clicking |
| calendar icon. Date accepts the format | |
| MM/DD/YYYY. | |
| Birth date cannot be later than the current date. | |
| Social Security | The text for social security number for every |
| Number | individual. This can also be auto generated by clicking |
| auto generate link. Accepts numeric value of exactly 9 | |
| digits. Users with User Role as Level 2 and above can | |
| only auto generate SSN. | |
| Gender | Choose a gender from the drop down list available. |
| Address Information |
| Street Address | The text for address. Accepts alphanumeric and special |
| characters with values not exceeding 35 characters | |
| Apt | The text for suite/apt #.. Accepts alphanumeric and |
| special characters with values not exceeding 35 | |
| characters | |
| Zip | The text for zip. Accepts numeric value of either 5 or 9 |
| digits. City, State and County are populated | |
| automatically on entering the correct zip code and | |
| entering the tab key. | |
| City | The text for city. Accepts alphabets and space between |
| two words not exceeding 30 characters. | |
| State | Choose the name of the state from the drop down list |
| of States available in United States of America |
| Line of Coverage Information [For Medical, Vision, Dental] |
| Selected Product | Text for the product selected. It is a read only field. |
| Coverage Choice | Choose a coverage from the drop down list available |
| Waived | Click the check box for any waive. |
| Service Area | The text for service area. |
| PCP ID/Medical | The text for PCP ID. Accepts alphabets and numeric |
| group ID | values not exceeding 10 characters. |
| PCP last name | The text for PCP last name. Accepts alphabets and |
| special character like hyphen and single quotes not | |
| exceeding 35 characters. | |
| PCP first name | The text for PCP first name. Accepts alphabets and |
| special character like hyphen and single quotes not | |
| exceeding 25 characters. | |
| Prior insurance | The text for insurance start date. Choose a date by |
| start date | clicking calendar icon. Date accepts the format |
| MM/DD/YYYY. | |
| Prior insurance | The text for insurance end date. Choose a date by |
| end date | clicking calendar icon. Date accepts the format |
| MM/DD/YYYY. | |
| Other coverage | The text for other coverage. Accepts alphabets with |
| kept | values not exceeding 50 characters. |
| Additional | The text for additional coverage. Accepts alphabets |
| Coverage | with values not exceeding 50 characters. |
| Disabled | Click the option of temporary or permanent. This is |
| dependent | enable if the relationship opted is child |
| Domestic partner | Click the option for domestic partner. It depends on |
| the value selected in relationship | |
| Legal guardian | Click the option for legal guardian. It depends on the |
| value selected in relationship | |
| Signature | Click the check box if the signature is opted |
Button Functionality
The following table provides explanation for each button in the screen.
| Element | Description |
| Enrollment | Saves the data and navigates to Summary screen. This |
| Summary | is enabled only if changes are sought on this screen. |
| Cancel | Clears the contents entered in the fields or restore to |
| the previous state as was before saving the changes | |
| Tab | General Info, Coverage Info, are the tabs visible on |
| this screen. If any other tabs like Coverage or General | |
| Info, or if Enrollment summary, Cancel is disabled, | |
| due to non-selection of changes sought, use missing | |
| information link to navigate to the missing info screen. | |
-
- Step-6: After entering the fields as per the field details explained in field explanation. Click Continue. Screen navigates to Enrollment Summary. (See Figure C-349)
Field Explanation
The following table provides explanation for each element in the screen.
| Element | Description |
| Group | Contains header information of the Group |
| Information | |
| Header | |
| Name of the | Text for the Name of the Group |
| Group | |
| Group ID | Text and Link for the Group ID to navigate to the |
| Group General Info screen | |
| Group Type | Specifies the Type of the Group like Small Employer |
| Group | |
| Proposed | The text for Proposed Effective Date. Choose a date by |
| Effective Date | clicking calendar icon. Date accepts the format |
| MM/DD/YYYY. Default effective date is first of the | |
| following month. Effective date cannot be past date | |
| Status | Text to specify the status of the group. |
| Work Group | Text for Work Group. This specifies the internal work |
| group attached to the Group. This is based on the | |
| writing agent's work group. | |
| Enrollment | Enrollment Summary Information is broken down into |
| Summary | tree structure. The tree can by expanded or collapsed. |
| Information | The level of the tree is as per the example given |
| below: | |
| −Employee | |
| −Dependent | |
| −Dependent | |
| −Employee | |
| −Dependent | |
| −Employee | |
| +Employee | |
| −Employee | |
| +Dependent | |
| +−Employee | |
| Where (−) signifies expanded view and (+) signifies | |
| collapsed view. | |
| Employee ID | Text for Employee ID |
| Employee SSN | Text for Employee SSN |
| Employee Name | Text for employee Name (First Name and Last Name) |
| Effective Date | Text for Employee Effective date. Choose a date by |
| clicking calendar icon. Date accepts the format | |
| MM/DD/YYYY. Defaults effective date of the Group. | |
| Effective date cannot be past date | |
| Status | Text to specify the status of the employee. |
| Enrollment | There are two part of this information: |
| Information | 5) Entered based on verification |
| 6) Based on the information provide on the | |
| Coverage Info screen |
| Entered based on verification |
| Total Full Time | Value is shown based on the actual full time employee |
| Applied (A) | applied (System Identified) |
| Total part Time | Value is shown based on the actual part time employee |
| Applied (B) | applied (System Identified) |
| Employee | Text to enter Employee Waived. Contains only whole |
| Waived (C) | number. Accepts numbers not exceeding 5 digits. |
| Manually entered based on verification. | |
| Employee | Text to enter Employee Declined. Contains only whole |
| Declined (D) | number. Accepts numbers not exceeding 5 digits. |
| Manually entered based on verification. | |
| Total Eligible | Text to display total eligible employee. Employee |
| Employee (E) = | Applying is sum total of A + B + D. |
| Total Employee | Text to display total employee applying. Employee |
| Applying (F) | Applying is sum total of A + B. |
| % Participation | Test to display % participation. Participation is % of |
| E/F |
| Based on Info Provided |
| Total Full Time | Text for Total Full Time Applied. Based on the |
| Applied (A) | information provide on the Coverage Info screen |
| Total part Time | Text for Total Part Time Applied. Based on the |
| Applied (B) | information provide on the Coverage Info screen |
| Total Employees | Text to display total employee applied. Employee |
| Applied | Applied is sum total of A + B |
Button Functionality
The following table provides explanation for each button in the screen.
| Element | Description |
| Pre Enrollment | Saves the data and performs validation and eligibility |
| checks against the information required for enrollment | |
| and navigates to the screen Missing Information. | |
| Cancel | Clears the contents entered in the fields or restore to |
| the previous state as was before saving the changes | |
| <<, <, >, >> | The enrollment summary shows record for 5 employees |
| on single screen. If the employee size increases more | |
| than 5. These buttons are used for navigating to the | |
| next and previous records for viewing. | |
| << - Show first record (s) | |
| < - Show previous record (s) | |
| > - Show next record (s) | |
| >> - Show last record (s) | |
| Group ID | Click Group ID to navigates to the Group's general info |
| screen. | |
-
- Step-7: On clicking Pre-Enrollment, screen navigates to missing info. (See Figure C-350)
Field Explanation
The following table provides explanation for each button in the screen.
| Element | Description |
| Employee Missing Information |
| Missing Entity | List the missing entities for the group change |
| Message | Provides a message for the missing entities |
| Enrollment | Lists all the changes sought in the pick list |
| Information | |
| Status | Displaying the status of change. |
| Dependent Missing Information |
| Missing Entity | List the missing entities for the group change |
| Message | Provides a message for the missing entities |
| Enrollment | Lists all the changes sought in the pick list |
| Information | |
| Status | Displaying the status of change. |
| Change Information |
| ROE/OE Status | Specifies the pick list for the changes |
| Remarks | Text for briefing the change action |
| Reason for | Choose from the list of reasons for decline. This field |
| Decline | is enabled only if the status of ROE/OE is opted as |
| decline | |
| Others | Text for briefing the other status and description |
Button Functionality
The following table provides explanation for each button in the screen.
| Element | Description | |
| Finalize | Navigates to confirmation screen by incorporating all | |
| the corrections made | ||
| Cancel | Clears the contents entered in the fields or restore to | |
| the previous state as was before saving the changes | ||
-
- Step-8: On clicking Finalize, navigates to confirmation screen. Click continue to go back to Group search. (See Figure C-351)
COBRA
The screen is to modify COBRA
The sequential steps involved in modifying COBRA are listed below.
-
- Step-1: After successful logon, click the menu Enrollment and select ROE. Select COBRA. (See Figure C-352)
- Step-2: he screen navigates search to select a group. Enter the search criteria for Searching for the group. (See Figure C-353)
- Step-3: his pops up a screen with search result. (See Figure C-354)
- Step-4: lick on any Group ID for selection. Screen navigates to change request screen for making ROE/OE changes for a group. (See Figure C-355)
Field Explanation
The following table provides explanation for each button in the screen.
| Element | Description |
| Group Information |
| Parent | Text to display the Parent Group ID. This is a read |
| Group ID | only field |
| Parent Group | Text to display the Parent Group Name. This is a read |
| Name | only field |
| COBRA | Text to display the COBRA Group ID. This is a read |
| Group ID | only field |
| COBRA Type | Text to display the COBRA Group Type whether Cal |
| COBRA or Federal COBRA. This is a read only field | |
| Group | Text to display effective date of the parent group. This |
| Effective Date | is a read only field |
| Work Group | Text to Display the internal Work group associated |
| with the Parent Group This is a read only field | |
| Status | Text to display status of the group. This is a read only |
| field | |
| Mode of | Choose a mode of request from the drop down list |
| Request | available. The field is mandatory. |
| Post Mark Date | The text for post mark date. Choose a date in the |
| format MM/DD/YYYY by clicking calendar icon. The | |
| postmark date cannot be greater than system date. | |
| The field is mandatory. | |
| Date Received | The text for received date. Choose a date in the format |
| MM/DD/YYYY by clicking calendar icon. The received | |
| date cannot be greater than system date. The field is | |
| mandatory. | |
| Reason for | Choose a reason from the drop down list The field is |
| Change | mandatory. |
| Others | The text for narrating other info, provided the option |
| for reason for terms is others | |
Button Functionality
The following table provides explanation for each button in the screen.
| Element | Description | |
| Continue | Saves the data and navigates to General information | |
| for groups. | ||
| Clear | Clears the contents entered in the fields or restore to | |
| the previous state as was before saving the changes | ||
-
- Step-5: On clicking continue, navigates to Group General Information of group Respective tabs can also clicked to navigate to corresponding screens. Continue would be enabled only if the changes are sought on this screen, else use tab to navigate to the next screen. (See Figure C-356)
Field Explanation
The following table provides explanation for each button in the screen.
| Element | Description |
| Parent | Text to display the Parent Group ID. |
| Group ID | |
| Parent Group | Text to display the Parent Group Name. |
| Name | |
| COBRA | Text to display the COBRA Group ID. |
| Group ID | |
| COBRA Type | Text to display the COBRA Group Type whether Cal |
| COBRA or Federal COBRA. | |
| Group Effective | Text to display effective date of the parent group. |
| Date | |
| Work Group | Text to Display the internal Work group associated |
| with the Parent Group | |
| Status | Text to display status of the group. |
| Post Mark Date | Text for post mark date. Choose a date by clicking |
| calendar icon. Accepts in the format MM/DD/YYYY | |
| Received Date | Text for received date. Choose a date by clicking |
| calendar icon. Accepts in the format MM/DD/YYYY | |
| Salutation | Choose the salutation from the drop down list of |
| salutations available. | |
| First Name | The text for first name. Accepts alphabets and special |
| character like hyphen and single quotes not exceeding | |
| 25 characters. First name is mandatory. | |
| Middle Initial | The text for middle initial. Accepts alphabets not |
| exceeding 1 character. | |
| Last Name | The text for last name. Accepts alphabets and special |
| characters like hyphen and single quotes not exceeding | |
| 35 characters. Last name is mandatory. | |
| Suffix | Choose the Suffix from the drop down list of |
| salutations available. | |
| Date of Birth | The text for date of birth. Choose a date by clicking |
| calendar icon | |
| Social Security | The text for social security number for every |
| Number | individual. This can also be auto generated by clicking |
| auto generate link. Accepts numeric value of exactly 9 | |
| digits. Users with User Role as Level 2 and above can | |
| only auto generate SSN. | |
| Gender | Choose a gender from the drop down list available. |
| Address | Physical Home Address or Mailing Address |
| Information: | |
| Address | The text for company address. Accepts alphabets and |
| numeric values not exceeding 35 characters | |
| Apt | The text for company suite/apt # Accepts alphabets |
| and numeric values of not exceeding 35 characters | |
| Zip | The text for zip. Accepts numeric of either 5 or 9 |
| digits. City, State and County are populated | |
| automatically for the correct zip code. | |
| City | The text for city. Accepts alphabets of not exceeding |
| 30 characters. | |
| State | Choose the name of the state from the drop down list |
| of States available in United States of America | |
| County | Choose the name of the county from the drop down list |
| of States available in United States of America | |
| Mode of | Choose the mode of correspondence from the drop |
| Correspondence | down list available |
| Phone Number | The text for telephone number of the contact person. |
| Accepts numeric values of not exceeding 10 digits. | |
| The format is (999) 999-9999 | |
| Extension | The text for telephone number of the contact person. |
| Accepts numeric values of not exceeding 5 digits. The | |
| format is (999) 999-9999 | |
| Fax | The text for fax number of the contact person. Accepts |
| numeric values of not exceeding 10 digits. The format | |
| is 9999 | |
| The text for email of the contact person. Accepts | |
| alphabets, numeric and special characters in the | |
| standard email format of length not exceeding 100 | |
| characters | |
Button Functionality
The following table provides explanation for each button in the screen.
| Element | Description | |
| Continue | Saves the data and navigates to Billing Information | |
| screen and the system generates Group ID. This is | ||
| enabled only if changes are sought on this screen | ||
| Cancel | Clears the contents entered in the fields or restore to | |
| the previous state as was before saving the changes | ||
| Tabs | General Info, Billing Info, Coverage Info and Add | |
| Employees are the tabs visible on this screen. | ||
| Navigation to the next screen is also possible by using | ||
| tabs If continue button is disabled use this tab to | ||
| navigate to the next screen Also while navigating | ||
| through the tab the content that are changed on the | ||
| screen are not saved unless explicitly saved by other | ||
| operations on the screen. | ||
-
- Step-6: On clicking continue, navigates to Group Billing Information of group Respective tabs can also clicked to navigate to corresponding screens. Continue would be enabled only if the changes are sought on this screen, else use tab to navigate to the next screen. Enter the values in the respective fields, as per the format briefed in field's explanation section and click Continue. (See Figure C-357)
Field Explanation
The following table provides explanation for each button in the screen.
| Element | Description |
| Mode of payment | Choose a mode of payment from the drop down list |
| available. Based on selection corresponding fields will | |
| enable to enter the values. For e.g. if the value selected | |
| is card payment, EFT will be disabled and allows only | |
| entering card details and vice versa. |
| Credit Card Information |
| Cardholder's | The text for cardholder's name. Accepts alphabets and |
| Names | space between two words. |
| Credit Card Type | Choose the type of credit card from the drop down list |
| available. | |
| Credit Card No | The text for credit card number. Accepts numeric |
| values not exceeding 30 digits | |
| Expiration Date | Choose a month of expiration from the drop down list |
| available | |
| Expiration Year | The text for expiration year. Accepts numeric values |
| of exactly 4. Example 2002. | |
| Billing Address | As it appears on the credit Card |
| Street Address | The text for company address. Accepts alphanumeric |
| and special characters not exceeding 35 characters. | |
| ZIP | The text for zip. Accepts numeric value of either 5 or 9 |
| digits. | |
| State | The text for city. Accepts alphabets and space between |
| two words not exceeding 30 characters. | |
| City | Choose the name of the state from the drop down list |
| of States available in United States of America |
| EFT Information |
| Bank Name | The text for bank name. Accepts alphabets and space |
| between two words. | |
| Routing Number | The text for routing number. Accepts numeric values |
| not exceeding 9 digits. | |
| Account Number | The text for account number. Accepts numeric values |
| not exceeding 9 digits. | |
| Account Type | Choose the type of account from the drop down list |
| available. | |
| Depositor's Name | The text for depositor's name. Accepts alphabets and |
| space between two words. | |
Button Functionality
The following table provides explanation for each button in the screen.
| Element | Description | |
| Continue | Saves the data and Navigates to coverage Information | |
| screen. This is enabled only if changes are sought on | ||
| this screen | ||
| Cancel | Clears the contents entered in the fields or restore to | |
| the previous state as was before saving the changes | ||
| Tabs | General Info, Billing Info, Coverage Info and Add | |
| Employees are the tabs visible on this screen. | ||
| Navigation to the next screen is also possible by using | ||
| tabs If continue button is disabled use this tab to | ||
| navigate to the next screen. Also while navigating | ||
| through the tab the content that are changed on the | ||
| screen are not saved unless explicitly saved by other | ||
| operations on the screen. | ||
-
- Step-7: On clicking continue, navigates to Group Coverage Information of group Respective tabs can also clicked to navigate to corresponding screens. Continue would be enabled only if the changes are sought on this screen, else use tab to navigate to the next screen. (See Figure C-358)
Field Explanation
The following table provides explanation for each button in the screen
| Element | Description |
| COBRA effective | The text for COBRA effective date. Choose a date by |
| date | clicking calendar icon |
| Qualifying event | Choose a qualifying even from the drop down list |
| available | |
| COBRA end date | The text for COBRA end date. Choose a date by |
| clicking calendar icon | |
| Send bill to | Choose the option of sending the bills either to group |
| or self (individual) |
| Plan Information |
| Line of coverage | Choose a line of coverage from the drop down list |
| available | |
| Medical waived | Click the check box for medical waive if the employee |
| is waiving medical. | |
| Carrier selection | Choose a carrier selection from the drop down list |
| (Benefit level) | available |
| Coverage choice | Choose a coverage from the drop down list available |
| PCP ID/Medical | The text for PCP ID. Accepts alphabets and numeric |
| group ID | values not exceeding 10 characters. |
| Are you an | Click the check box if you are an existing patient |
| existing patient | |
| PCP last name | The text for PCP last name. Accepts alphabets and |
| special character like hyphen and single quotes not | |
| exceeding 35 characters. | |
| PCP first name | The text for PCP first name. Accepts alphabets and |
| special character like hyphen and single quotes not | |
| exceeding 25 characters. | |
| Prior plan type | Choose a plan type from the drop down list available |
| Prior plan name | Choose a plan name from the drop down list available |
| Prior insurance | The text for insurance start date. Choose a date by |
| start date | clicking calendar icon. Date accepts the format |
| MM/DD/YYYY. | |
| Prior insurance | The text for insurance end date. Choose a date by |
| end date | clicking calendar icon. Date accepts the format |
| MM/DD/YYYY. | |
| Other coverage | The text for other coverage. Accepts alphabets with |
| kept | values not exceeding 50 characters. |
| RAF | The text to display RAF applicable for the Primary |
| Group. | |
| Employee | Click the check box, to have employee signature |
| signature | |
| Date signed | The text for date signed. Choose a date by clicking |
| calendar icon. Date accepts the format | |
| MM/DD/YYYY. Date cannot accept future date. | |
Button Functionality
The following table provides explanation for each button in the screen.
| Element | Description |
| Add | Add the contents of employee coverage information. It |
| is only a temporary addition. Becomes permanent only | |
| on saving the record. | |
| Edit | Edit button will allow for editing a specific record in |
| the table. | |
| Delete | Delete button will delete the records in the table |
| checked for deletion. It is only a temporary deletion. | |
| Becomes permanent only on saving the record. | |
| Check All | The “Check All” Link will check all the records in the |
| table | |
| Clear All | The “Clear All” Link will uncheck all the records in the |
| table that are checked. | |
| COBRA | Click COBRA summary refreshes the screen and |
| Summary | display the summary of information entered for |
| COBRA creation | |
| Continue | Navigates add dependent screen. |
| Clear | Clears the contents entered in the fields or restore to |
| the previous state as was before saving the changes | |
| Tabs | General Info, Billing Info, Coverage Info and Add |
| Employees are the tabs visible on this screen. The | |
| navigation between is tabs are possible only if there is | |
| a valid group ID generated and assigned to the group. | |
| Also while navigating through the tab the content that | |
| are changed on the screen are not saved unless | |
| explicitly saved by other operations on the screen. | |
-
- Step-8: On clicking continue, navigates to Dependent Information of group Respective tabs can also clicked to navigate to corresponding screens. Continue would be enabled only if the changes are sought on this screen, else use tab to navigate to the next screen. (See Figure C-359)
Field Explanation
The following table provides explanation for each button in the screen.
| Element | Description |
| First Name | The text for first name. Accepts alphabets and special |
| character like hyphen and single quotes not exceeding | |
| 25 characters. First name is mandatory. | |
| Middle Initial | The text for middle initial. Accepts alphabets not |
| exceeding 1 character. | |
| Last Name | The text for last name. Accepts alphabets and special |
| characters like hyphen and single quotes not exceeding | |
| 35 characters. Last name is mandatory. | |
| Suffix | Choose the suffix from the drop down list of suffixes |
| available. | |
| Date of Birth | The text for date of birth. Choose a date by clicking |
| calendar icon.. Date accepts the format | |
| MM/DD/YYYY. Birth date cannot be later than the | |
| current date. | |
| Social Security | The text for social security number for every |
| Number | individual. This can also be auto generated by clicking |
| auto generate link. Accepts numeric value of exactly 9 | |
| digits. Users with User Role as Level 2 and above can | |
| only auto generate SSN. | |
| Gender | Choose a gender from the drop down list available. |
| Relationship | Choose the relationship from the drop down list |
| available. | |
| Street Address | The text for address. Accepts alphanumeric and special |
| characters with values not exceeding 35 characters | |
| Suite | The text for suite/apt # . . . Accepts alphanumeric and |
| special characters with values not exceeding 35 | |
| characters | |
| Zip | The text for zip. Accepts numeric value of either 5 or 9 |
| digits. City, and State are populated automatically on | |
| entering the correct zip code and entering the tab key. | |
| City | The text for city. Accepts alphabets not exceeding 30 |
| characters. | |
| State | Choose the name of the state from the drop down list |
| of States available in United States of America | |
| Selected carrier | The text for selected carrier. It is a read only field |
| Coverage choice | The text for coverage. It is a read only field |
| Service area | The text for service area. It is a read only field |
| Prior plan type | Choose a plan type from the drop down list available |
| Prior plan | The text for plan name. Accepts alphabets |
| Waived | Click the check box if medical is waived |
| Start date | The text for start date. Choose a date by clicking |
| calendar icon | |
| End date | The text for end date. Choose a date by clicking |
| calendar icon | |
| PCP ID/ | The text for PCP ID. Accepts alphabets |
| PCP last name | The text for PCP last name. Accepts alphabets and |
| special character like hyphen and single quotes | |
| PCP first name | The text for PCP first name. Accepts alphabets and |
| special character like hyphen and single quotes | |
| Disabled | Click the option of temporary or permanent. This is |
| dependent | enable if the relationship opted is child |
| Domestic partner | Click the option for domestic partner. It depends on |
| the value selected in relationship | |
| Legal guardian | Click the option for legal guardian. It depends on the |
| value selected in relationship | |
| Signature | Click the check box if the signature is opted |
Button Functionality
The following table provides explanation for each button in the screen.
| Element | Description |
| Add | Add the contents of dependent information. It is only a |
| temporary addition. | |
| Edit | Edit button will allow for editing a specific record in |
| the table. | |
| Delete | Delete button will delete the records in the table |
| checked for deletion. It is only a temporary deletion. | |
| Check All | The “Check All” Link will check all the records in the |
| table | |
| Clear All | The “Clear All” Link will uncheck all the records in the |
| table that are checked. | |
| Clear | Clears the contents entered in the fields or restore to |
| the previous state as was before saving the changes | |
| Continue | Screen navigates to Missing info. |
| Tabs | General Info, Billing Info, Coverage Info and Add |
| Employees are the tabs visible on this screen. The | |
| navigation between is tabs are possible only if there is | |
| a valid group ID generated and assigned to the group. | |
| Also while navigating through the tab the content that | |
| are changed on the screen are not saved unless | |
| explicitly saved by other operations on the screen. | |
-
- Step-9: On clicking continue, navigates to Missing Info screen. (See Figure C-360)
Field Explanation
The following table provides explanation for each button in the screen.
| Element | Description |
| Employee Missing Information |
| Missing Entity | List the missing entities for the group change |
| Message | Provides a message for the missing entities |
| Enrollment | Lists all the changes sought in the pick list |
| Information | |
| Status | Displaying the status of change. |
| Dependent Missing Information |
| Missing Entity | List the missing entities for the group change |
| Message | Provides a message for the missing entities |
| Enrollment | Lists all the changes sought in the pick list |
| Information | |
| Status | Displaying the status of change. |
| Change Information |
| ROE/OE Status | Specifies the pick list for the changes |
| Remarks | Text for briefing the change action |
| Reason for | Choose from the list of reasons for decline. This field is |
| Decline | enabled only if the status of ROE/OE is opted as |
| decline | |
| Others | Text for briefing the other status and description |
Button Functionality
The following table provides explanation for each button in the screen.
| Element | Description | |
| Finalize | Navigates to confirmation screen by incorporating all | |
| the corrections made | ||
| Cancel | Clears the contents entered in the fields or restore to | |
| the previous state as was before saving the changes | ||
-
- Step-10: On clicking Finalize, navigates to confirmation screen. (See Figure C-361)
Manual ROE
The screen is to have manual ROE
The sequential steps involved in having manual ROE are listed below.
-
- Step-1: After successful logon, click the menu Enrollment and select ROE. Select Manual ROE. (See Figure C-362)
- Step-2: The screen navigates search to select a process. Entries to the fields are mandatory. Click Search. (See Figure C-363)
- Step-3: This pops up a screen with search result. (See Figure C-364)
- Step-4: Choose a employee id and click Process Manual. Click Search to navigate back to group search screen. (See Figure C-365)
Individual Member Modify
The screen is to modify Individual Member The sequential steps involved in modifying Individual Member are listed below.
-
- Step-1: After successful logon, click the menu Enrollment and select ROE. Select Individual Member and then Modify Individual Member. (See Figure C-366)
- Step-2: The screen navigates search to select an employee. Enter the search criteria for Searching for the Employee. (See Figure C-367)
- Step-3: This pops up a screen with search result. (See Figure C-368)
- Step-4: Click on any employee id for selection the screen navigates to Individual Employee Change (pick list). (See Figure C-369)
Field Explanation
The following table provides explanation for each button in the screen.
| Element | Description |
| Group Information |
| Name of the group | Text for the Name of the Group. This is read only |
| field. | |
| Effective Date | Text for Effective date. This is read only field. |
| Group ID | Text for Group ID. This is read only field.. |
| Status | Text for status. This is read only field. |
| Group Type | Text for group type. This is read only field. |
| Work Group | Text for work group. This is read only field. |
| Employee ID | Text for employee ID This is read only field. |
| Employee Name | Text for employee name. This is read only field |
| Association ID | Text for Association ID This is read only field. |
| Association Name | Text for Association name. This is read only field |
| Employee General Information |
| Employee address | Selecting this option will enable to allow for any |
| modifications | |
| SSN information | Selecting this option will enable to allow for any |
| modifications | |
| Employee Date of | Selecting this option will enable to allow for any |
| birth | modifications |
| Employee | Selecting this option will enable to allow for any |
| demographic | modifications |
| location |
| Employee Billing Information |
| Billing | Selecting this option will enable to allow for any |
| Information | modifications |
| Employee Agent Information |
| Agent | Selecting this option will enable to allow for any |
| Information | modifications |
| Coverage Information |
| RAF Discounting | Selecting this option will enable to allow for any |
| modifications | |
| Employee Type | Selecting this option will enable to allow for any |
| modifications | |
| Payroll | Selecting this option will enable to allow for any |
| modifications | |
| Medical LOC | Selecting this option will enable to allow for any |
| modifications | |
| Vision LOC | Selecting this option will enable to allow for any |
| modifications | |
| Dental LOC | Selecting this option will enable to allow for any |
| modifications | |
| CAM LOC | Selecting this option will enable to allow for any |
| modifications | |
| Hours worked | Selecting this option will enable to allow for any |
| modifications | |
| Employee Type | Selecting this option will enable to allow for any |
| modifications | |
| Date of | Selecting this option will enable to allow for any |
| employment | modifications |
Button Functionality
The following table provides explanation for each button in the screen.
| Element | Description | |
| Continue | Saves the data and navigates to General information | |
| for groups. | ||
| Cancel | Clears the contents entered in the fields or restore to | |
| the previous state as was before saving the changes | ||
-
- Step-5: On clicking continue, navigates to General Information of group Respective tabs can also clicked to navigate to corresponding screens. Continue would be enabled only if the changes are sought on this screen, else use tab to navigate to the next screen. (See Figure C-370)
Field Explanation
The following table provides explanation for each button in the screen.
| Element | Description |
| Group Information |
| Name of the | Text for the Name of the Group. This is read only |
| group | field. |
| Effective Date | Text for Effective date. This is read only field. |
| Group ID | Text for Group ID. This is read only field.. |
| Status | Text for status. This is read only field. |
| Group Type | Text for group type. This is read only field. |
| Work Group | Text for work group. This is read only field. |
| Employee ID | Text for employee ID This is read only field. |
| Employee Name | Text for employee name. This is read only field |
| Association ID | Text for Association ID This is read only field. |
| Association Name | Text for Association name. This is read only field |
| Employee Information |
| Salutation | Choose the salutation from the drop down list of |
| salutations available. | |
| First Name | The text for first name. Accepts alphabets and special |
| character like hyphen and single quotes not exceeding | |
| 25 characters. First name is mandatory. | |
| Middle Initial | The text for middle initial. Accepts alphabets not |
| exceeding 1 character. | |
| Last Name | The text for contact name. Accepts alphabets and |
| special character like hyphen and single quotes not | |
| exceeding 35 characters. Last name is mandatory | |
| Suffix | Choose the suffix from the drop down list of suffixes |
| available. | |
| Date of Birth | The text for date of birth. Choose a date by clicking |
| calendar icon | |
| Social Security | The text for social security number for every |
| Number | individual. This can also be auto generated by clicking |
| auto generate link. Accepts numeric value of exactly 9 | |
| digits. Users with User Role as Level 2 and above can | |
| only auto generate SSN. | |
| Gender | Choose a gender from the drop down list available. |
| Address | Physical and Alternate Address- Note: Enter |
| Information; | Alternate Address if different from the Physical |
| Address. | |
| Street Address | The text for address. Accepts alphanumeric and special |
| characters not exceeding 35 characters | |
| Suite | The text for suite/apt # Accepts alphanumeric and |
| special characters not exceeding 35 characters | |
| Zip | The text for zip. Accepts numeric value of either 5 or 9 |
| digits. City, State and County are populated | |
| automatically on entering the correct zip code and | |
| entering the tab key. | |
| City | The text for city. Accepts alphabets and space between |
| two words not exceeding 30 characters. | |
| State | Choose the name of the state from the drop down list |
| of States available in United States of America | |
| County | Choose the name of the county from the drop down list |
| of counties available for the ZIP Code entered. | |
| Mode of | Choose the mode of correspondence from the drop |
| Correspondence | down list available. |
| Phone Number | The text for telephone number of the contact person. |
| Accepts numeric values not exceeding 10 digits. The | |
| format is (999) 999-9999 | |
| Extension | The text for extension number of the contact person. |
| Accepts numeric values not exceeding 5 digits. | |
| Fax | The text for fax number of the contact person Accepts |
| numeric values not exceeding 10 digits. The format is | |
| (999) 999-9999 | |
| The text for email of the contact person. Accepts | |
| alphabets, numeric and special characters in the | |
| standard email format of length not exceeding 100 | |
| characters | |
Button Functionality
The following table provides explanation for each button in the screen.
| Element | Description | |
| Continue | Navigates to Billing Information screen.. This is | |
| enabled only if changes are sought on this screen | ||
| Cancel | Clears the contents entered in the fields or restore to | |
| the previous state as was before saving the changes | ||
| Tabs | General Info, Billing Info, Agent Info, Coverage Info | |
| are the tabs visible on this screen. Navigation to the | ||
| next screen is also possible by using tabs If continue | ||
| button is disabled use this tab to navigate to the next | ||
| screen.. Also while navigating through the tab the | ||
| content that are changed on the screen are not saved | ||
| unless explicitly saved by other operations on the | ||
| screen. | ||
-
- Step-6: On clicking continue, navigates to Billing Information of group Respective tabs can also clicked to navigate to corresponding screens. Continue would be enabled only if the changes are sought on this screen, else use tab to navigate to the next screen. (See Figure C-371)
Field Explanation
The following table provides explanation for each button in the screen.
| Element | Description |
| Mode of payment | Choose a mode of payment from the drop down list |
| available. Based on selection corresponding fields will | |
| enable to enter the values. For e.g. if the value selected | |
| is card payment, EFT will be disabled and allows only | |
| entering card details and vice versa. |
| Credit Card Information |
| Cardholder's | The text for cardholder's name. Accepts alphabets and |
| Names | space between two words. |
| Credit Card Type | Choose the type of credit card from the drop down list |
| available. | |
| Credit Card No | The text for credit card number. Accepts numeric |
| values not exceeding 30 digits | |
| Expiration Date | Choose a month of expiration from the drop down list |
| available | |
| Expiration Year | The text for expiration year. Accepts numeric values |
| of exactly 4. Example 2002. | |
| Billing Address | As it appears on the credit Card |
| Street Address | The text for company address. Accepts alphanumeric |
| and special characters not exceeding 35 characters. | |
| ZIP | The text for zip. Accepts numeric value of either 5 or 9 |
| digits. | |
| State | The text for city. Accepts alphabets and space between |
| two words not exceeding 30 characters. | |
| City | Choose the name of the state from the drop down list |
| of States available in United States of America |
| EFT Information |
| Bank Name | The text for bank name. Accepts alphabets and space |
| between two words. | |
| Routing Number | The text for routing number. Accepts numeric values |
| not exceeding 9 digits. | |
| Account Number | The text for account number. Accepts numeric values |
| not exceeding 9 digits. | |
| Account Type | Choose the type of account from the drop down list |
| available. | |
| Depositor's Name | The text for depositor's name. Accepts alphabets and |
| space between two words. | |
Button Functionality
The following table provides explanation for each button in the screen.
| Element | Description |
| Continue | Saves the data and Navigates to Agent Information |
| screen. This is enabled only if changes are sought on | |
| this screen | |
| Cancel | Clears the contents entered in the fields or restore to |
| the previous state as was before saving the changes | |
| Enrollment | Click enrollment summary refreshes the screen and |
| Summary | display the summary of information entered for group. |
| Missing | Click missing information refreshes the screen and |
| Information | displays the missed information for the group. |
| Tabs | General Info, Billing Info, Agent Info, Coverage Info |
| are the tabs visible on this screen. Navigation to the | |
| next screen is also possible by using tabs If continue | |
| button is disabled use this tab to navigate to the next | |
| screen.. Also while navigating through the tab the | |
| content that are changed on the screen are not saved | |
| unless explicitly saved by other operations on the | |
| screen. | |
-
- Step-7: On clicking continue, navigates to Agent Information of group Respective tabs can also clicked to navigate to corresponding screens. Continue would be enabled only if the changes are sought on this screen, else use tab to navigate to the next screen. (See Figure C-372)
Field Explanation
The following table provides explanation for each button in the screen.
| Element | Description |
| Agent ID | Choose an agent id by clicking search icon |
| Agent Type | Choose an agent type from the drop down list |
| available. Based on the selection of the agent type the | |
| percent commission split entry and the Receive ROE | |
| packets option would be available. | |
| Percent | The text for percent commission. Accepts numeric |
| commission | values in the range of 1-100 (Example 100.00). This |
| split | will be enabled only if the Agent type selected is “Agent |
| Of Record” | |
| Sum of the percentage for all the Agent of Record | |
| added should be equal to 100.00. | |
| Receive | Click the check box to receive ROE/OE packets for |
| ROE/OE | agent. This option will not be available for Agent Type |
| packets | “General Agent”. |
| Agent | The text for agent commission. Defaults the value |
| Commission | defined in CM - rate Administration for Agent |
| Commission. Accepts numeric values less than or | |
| equal to the defaulted value in the in the range of 1-100 | |
| (Example 4.45) | |
| Check the box | Click the check box for a group with out an agent. This |
| if the group is | option will be available only for the Agent Type, “Agent |
| without an | of Record and Writing Agent”. |
| agent | |
Button Functionality
The following table provides explanation for each button in the screen.
| Element | Description |
| Add | Add the contents of agent information. It is only a |
| temporary addition. Becomes permanent only on | |
| saving the record. | |
| Edit | Edit button will allow for editing a specific record in |
| the table. | |
| Update | Update the contents of agent information. It is only a |
| temporary update. Becomes permanent only on saving | |
| the record | |
| Delete | Delete button will delete the records in the table |
| checked for deletion. It is only a temporary deletion. | |
| Becomes permanent only on saving the record | |
| Check All | The “Check All” Link will check all the records in the |
| table | |
| Clear All | The “Clear All” Link will uncheck all the records in the |
| table that are checked. | |
| Enrollment | Click enrollment summary refreshes the screen and |
| Summary | display the summary of information entered for group |
| creation | |
| Missing | Click missing information refreshes the screen and |
| Information | displays the missed information. For a successful |
| creation of a group, there should be no missing | |
| information | |
| Continue | Saves the data and navigates to Coverage Information |
| screen. This is enabled only if changes are sought on | |
| this screen | |
| Cancel | Clears the contents entered in the fields or restore to |
| the previous state as was before saving the changes | |
| Tab | General Info, Billing Info, Agent Info, Coverage Info |
| are the tabs visible on this screen. Navigation to the | |
| next screen is also possible by using tabs If continue | |
| button is disabled use this tab to navigate to the next | |
| screen.. Also while navigating through the tab the | |
| content that are changed on the screen are not saved | |
| unless explicitly saved by other operations on the | |
| screen | |
-
- Step-8: On clicking continue, navigates to Coverage Information of group Respective tabs can also clicked to navigate to corresponding screens. Continue would be enabled only if the changes are sought on this screen, else use tab to navigate to the next screen. (See Figure C-373)
Field Explanation
The following table provides explanation for each button in the screen.
| Element | Description |
| Employee Information |
| Hours worked per | The text for worked hours per week. Accepts numeric |
| week | values not exceeding 2 digits. |
| Date of hire | The text for date of hire. Choose a date by clicking |
| calendar icon. Date accepts the format | |
| MM/DD/YYYY. | |
| Employee type | Choose an employee type from the drop down list |
| available | |
| Pay Roll | Check box for Pay Roll verification. Check this if pay |
| roll is verified. |
| RAF Discounting |
| RAF | List the RAF tier applicable for the group based on the |
| RAF tier available on group's effective date. |
| Plan Information |
| Line of coverage | Choose a line of coverage from the drop down list |
| available | |
| Medical waived | Click the check box for medical waive if the employee |
| is waiving medical. | |
| Carrier selection | Choose a carrier selection from the drop down list |
| (Benefit level) | available |
| Coverage choice | Choose a coverage from the drop down list available |
| PCP ID/Medical | The text for PCP ID. Accepts alphabets and numeric |
| group ID | values not exceeding 10 characters. |
| Are you an | Click the check box if you are an existing patient |
| existing patient | |
| PCP last name | The text for PCP last name. Accepts alphabets and |
| special character like hyphen and single quotes not | |
| exceeding 35 characters. | |
| PCP first name | The text for PCP first name. Accepts alphabets and |
| special character like hyphen and single quotes not | |
| exceeding 25 characters. | |
| Prior plan type | Choose a plan type from the drop down list available |
| Prior plan name | Choose a plan name from the drop down list available |
| Prior insurance | The text for insurance start date. Choose a date by |
| start date | clicking calendar icon. Date accepts the format |
| MM/DD/YYYY. | |
| Prior insurance | The text for insurance end date. Choose a date by |
| end date | clicking calendar icon. Date accepts the format |
| MM/DD/YYYY. | |
| Additional | The text for additional coverage. Accepts alphabets |
| Coverage | with values not exceeding 50 characters. |
| Date signed | The text for date signed. Choose a date by clicking |
| calendar icon. Date accepts the format | |
| MM/DD/YYYY. Date cannot accept future date. | |
Button Functionality
The following table provides explanation for each button in the screen
| Element | Description |
| Add (Waiting | Add the contents of Waiting Period information. It is |
| Period | only a temporary addition. Becomes permanent only |
| Information) | on saving the record. |
| Add | Add the contents of Contribution and Coverage |
| (Contribution) | elected. It is only a temporary addition. Becomes |
| permanent only on saving the record. | |
| Update (Waiting | Updates the contents of Waiting Period information. It |
| Period | is only a temporary update. Becomes permanent only |
| Information) | on saving the record. |
| Update | Update the contents of Contribution and Coverage |
| (Contribution) | elected. It is only a temporary update. Becomes |
| permanent only on saving the record. | |
| Cancel | Cancels the operation that was currently performed |
| prior to saving the record. | |
| Edit | Edit button will allow for editing a specific record in |
| the table. | |
| Delete | Delete button will delete the records in the table |
| checked for deletion. It is only a temporary deletion. | |
| Becomes permanent only on saving the record. | |
| Check All | The “Check All” Link will check all the records in the |
| table | |
| Clear All | The “Clear All” Link will uncheck all the records in |
| the table that are checked. | |
| Enrollment | Click enrollment summary refreshes the screen and |
| Summary | display the summary information entered for group |
| creation | |
| Missing | Click missing information refreshes the screen and |
| Information | displays the missed information. For a successful |
| creation of a group, there should be no missing | |
| information | |
| View Missing | Saves the data and navigates to Missing Information |
| Info | Page |
| Save & Create | Saves the data entered and navigates to the screen |
| New Group | Group Hierarchy for creating New Group. |
| Cancel | Clears or restores the content entered in the fields only |
| prior to saving the records. | |
| Tab | General Info, Billing Info, Agent Info, Coverage Info |
| are the tabs visible on this screen. Navigation to the | |
| next screen is also possible by using tabs If continue | |
| button is disabled use this tab to navigate to the next | |
| screen.. Also while navigating through the tab the | |
| content that are changed on the screen are not saved | |
| unless explicitly saved by other operations on the | |
| screen | |
-
- Step-9: Click Enrollment Summary link to have a summary detail. Click Pre Enrollment, which also leads to Missing Info screen. (See Figure C-374)
- Step-10: Clicking change summary button screen navigates to missing info screen. This screen shows the overall information that are entered will be shown. (See Figure C-375)
Field Explanation
The following table provides explanation for each button in the screen.
| Element | Description |
| Employee Missing Information |
| Missing Entity | List the missing entities for the group change |
| Message | Provides a message for the missing entities |
| Enrollment | Lists all the changes sought in the pick list |
| Information | |
| Status | Displaying the status of change. |
| Change Information |
| ROE/OE Status | Specifies the pick list for the changes |
| Remarks | Text for briefing the change action |
| Reason for Decline | Choose from the list of reasons for decline. |
| This field is enabled only if the status of ROE/OE | |
| is opted as decline | |
| Others | Text for briefing the other status and description |
Button Functionality
The following table provides explanation for each button in the screen.
| Element | Description | |
| Finalize | Navigates to confirmation screen by incorporating all | |
| the corrections made | ||
| Cancel | Clears the contents entered in the fields or restore to | |
| the previous state as was before saving the changes | ||
-
- Step-11: On clicking Finalize, navigates to confirmation screen. Click Continue to go back to Group search screen. (See Figure C-376)
Individual Dependent Modify
The screen is to modify Individual Member Dependent
The sequential steps involved in modifying Individual Member Dependent are listed below.
-
- Step-1: After successful logon, click the menu Enrollment and select ROE. Select Individual Member and then Modify Dependent. (See Figure C-377)
- Step-2: The screen navigates search to select an dependent. Enter the search criteria for Searching for the Dependent. (See Figure C-378)
- Step-3: This pops up a screen with search result. (See Figure C-379)
- Step-4: Click on any employee id for selection the screen navigates to Individual Employee Change (pick list). (See Figure C-380)
Field Explanation
The following table provides explanation for each button in the screen.
| Element | Description |
| Group Information |
| Name of the group | Text for the Name of the Group. Read Only field |
| Effective Date | Text for Employee Effective date. This is read only |
| field. | |
| Group ID | Text for Group ID. This is read only field. |
| Status | Text for status. This is read only field. |
| Group Type | Text for group type. This is read only field. |
| Work Group | Text for work group. This is read only field. |
| Employee ID | Text for Employee ID. This is read only field. |
| Employee Name | Text for Employee Name. This is read only field. |
| Dependent ID | Text for Dependent ID. This is read only field. |
| Dependent Name | Text for Dependent Name. This is read only field. |
| Dependent General Information Changes |
| Dependent to waive | Selecting this option will enable to allow for any |
| Vision Plan | modifications. |
| Information | |
| Dependent to waive | Selecting this option will enable to allow for any |
| Dental Plan | modifications |
| Information | |
| Dependent to waive | Selecting this option will enable to allow for any |
| CAM Plan | modifications |
| Information | |
| Dependent to waive | Selecting this option will enable to allow for any |
| Medical Plan | modifications |
| Information | |
| Prior Plan | Selecting this option will enable to allow for any |
| Information | modifications |
| Dependent Address | Selecting this option will enable to allow for any |
| Information | modifications |
| Dependent SSN | Selecting this option will enable to allow for any |
| modifications | |
| Dependent | Selecting this option will enable to allow for any |
| Relationship | modifications |
| Dependent Date of | Selecting this option will enable to allow for any |
| Birth | modifications |
| Dependent | Selecting this option will enable to allow for any |
| Personal | modifications |
| Information | |
Button Functionality
The following table provides explanation for each button in the screen.
| Element | Description | |
| Continue | Saves the data and navigates to Dependent General | |
| information for employees. | ||
| Cancel | Clears the contents entered in the fields or restore to | |
| the previous state as was before saving the changes | ||
-
- Step-5: n clicking continue, navigates to Dependent General Information screen. Respective tabs can also clicked to navigate to corresponding screens. If any other tabs like Coverage or General Info, or if Enrollment summary, Cancel is disabled, due to non-selection of changes sought, use missing information link to navigate to the missing info screen. (See Figure C-381)
Field Explanation
The following table provides explanation for each button in the screen.
| Element | Description |
| Dependent Information |
| First Name | The text for contact name. Accepts alphabets and |
| special characters like hyphen and single quotes not | |
| exceeding 25 characters. | |
| Middle Initial | The text for middle initial. Accepts alphabets not |
| exceeding 1 character. | |
| Last Name | The text for contact name. Accepts alphabets and |
| special characters like hyphen and single quotes not | |
| exceeding 35 characters. | |
| Suffix | Choose the suffix from the drop down list of suffixes |
| available. | |
| Date of Birth | The text for date of birth. Choose a date by clicking |
| calendar icon. Date accepts the format | |
| MM/DD/YYYY. | |
| Birth date cannot be later than the current date. | |
| Social Security | The text for social security number for every |
| Number | individual. This can also be auto generated by clicking |
| auto generate link. Accepts numeric value of exactly 9 | |
| digits. Users with User Role as Level 2 and above can | |
| only auto generate SSN. | |
| Gender | Choose a gender from the drop down list available. |
| Address Information |
| Street Address | The text for address. Accepts alphanumeric and special |
| characters with values not exceeding 35 characters | |
| Apt | The text for suite/apt#.. Accepts alphanumeric and |
| special characters with values not exceeding 35 | |
| characters | |
| Zip | The text for zip. Accepts numeric value of either 5 or 9 |
| digits. City, State and County are populated | |
| automatically on entering the correct zip code and | |
| entering the tab key. | |
| City | The text for city. Accepts alphabets and space between |
| two words not exceeding 30 characters. | |
| State | Choose the name of the state from the drop down list |
| of States available in United States of America |
| Line of Coverage Information [For Medical, Vision, Dental] |
| Selected Product | Text for the product selected. It is a read only field. |
| Coverage Choice | Choose a coverage from the drop down list available |
| Waived | Click the check box for any waive. |
| Service Area | The text for service area. |
| PCP ID/Medical | The text for PCP ID. Accepts alphabets and numeric |
| group ID | values not exceeding 10 characters. |
| PCP last name | The text for PCP last name. Accepts alphabets and |
| special character like hyphen and single quotes not | |
| exceeding 35 characters. | |
| PCP first name | The text for PCP first name. Accepts alphabets and |
| special character like hyphen and single quotes not | |
| exceeding 25 characters. | |
| Prior insurance | The text for insurance start date. Choose a date by |
| start date | clicking calendar icon. Date accepts the format |
| MM/DD/YYYY. | |
| Prior insurance | The text for insurance end date. Choose a date by |
| end date | clicking calendar icon. Date accepts the format |
| MM/DD/YYYY. | |
| Other coverage | The text for other coverage. Accepts alphabets with |
| kept | values not exceeding 50 characters. |
| Additional | The text for additional coverage. Accepts alphabets |
| Coverage | with values not exceeding 50 characters. |
| Disabled | Click the option of temporary or permanent. This is |
| dependent | enable if the relationship opted is child |
| Domestic partner | Click the option for domestic partner. It depends on |
| the value selected in relationship | |
| Legal guardian | Click the option for legal guardian. It depends on the |
| value selected in relationship | |
| Signature | Click the check box if the signature is opted |
Button Functionality
The following table provides explanation for each button in the screen.
| Element | Description |
| Enrollment | Saves the data and navigates to Summary screen. This |
| Summary | is enabled only if changes are sought on this screen. |
| Cancel | Clears the contents entered in the fields or restore to |
| the previous state as was before saving the changes | |
| Tab | General Info, Coverage Info, are the tabs visible on |
| this screen. If any other tabs like Coverage or General | |
| Info, or if Enrollment summary, Cancel is disabled, | |
| due to non-selection of changes sought, use missing | |
| information link to navigate to the missing info screen. | |
-
- Step-6: After entering the fields as per the field details explained in field explanation. Click Continue. Screen navigates to Enrollment Summary. (See Figure C-382)
Field Explanation
The following table provides explanation for each element in the screen.
| Element | Description |
| Group | Contains header information of the Group |
| Information | |
| Header | |
| Name of the | Text for the Name of the Group |
| Group | |
| Group ID | Text and Link for the Group ID to navigate to the |
| Group General Info screen | |
| Group Type | Specifies the Type of the Group like Small Employer |
| Group | |
| Proposed | The text for Proposed Effective Date. Choose a date by |
| Effective Date | clicking calendar icon. Date accepts the format |
| MM/DD/YYYY. Default effective date is first of the | |
| following month. Effective date cannot be past date | |
| Status | Text to specify the status of the group. |
| Work Group | Text for Work Group. This specifies the internal work |
| group attached to the Group. This is based on the | |
| writing agent's work group. | |
| Enrollment | Enrollment Summary Information is broken down into |
| Summary | tree structure. The tree can by expanded or collapsed. |
| Information | The level of the tree is as per the example |
| given below: | |
| − Employee | |
| − Dependent | |
| − Dependent | |
| − Employee | |
| − Dependent | |
| − Employee | |
| + Employee | |
| − Employee | |
| + Dependent | |
| +− Employee | |
| Where (−) signifies expanded view and (+) signifies | |
| collapsed view. | |
| Employee ID | Text for Employee ID |
| Employee SSN | Text for Employee SSN |
| Employee Name | Text for employee Name (First Name and Last Name) |
| Effective Date | Text for Employee Effective date. Choose a date by |
| clicking calendar icon. Date accepts the format | |
| MM/DD/YYYY. Defaults effective date of the Group. | |
| Effective date cannot be past date | |
| Status | Text to specify the status of the employee. |
| Dependent ID | Text for Dependent ID |
| Dependent SSN | Text for Dependent SSN |
| Dependent Name | Text for Dependent Name (First Name and Last |
| Name) | |
| Effective Date | Text for Dependent Effective date. Choose a date by |
| clicking calendar icon. Date accepts the format | |
| MM/DD/YYYY. Defaults effective date of the Group. | |
| Effective date cannot be past date | |
| Status | Text to specify the status of the Dependent. |
Button Functionality
The following table provides explanation for each button in the screen.
| Element | Description |
| Missing | Click missing information refreshes the screen and |
| Information | displays the missed information. For a successful |
| creation of a group, there should be no missing | |
| information | |
| Cancel | Clears the contents entered in the fields or restore to |
| the previous state as was before saving the changes | |
| <<, <, >, >> | The enrollment summary shows record for 5 employees |
| on single screen. If the employee size increases more | |
| than 5. These buttons are used for navigating to the | |
| next and previous records for viewing. | |
| << - Show first record (s) | |
| < - Show previous record (s) | |
| > - Show next record (s) | |
| >> - Show last record (s) | |
| Group ID | Click Group ID to navigates to the Group's general info |
| screen. | |
-
- Step-7: On clicking Pre-Enrollment, screen navigates to missing info. (See Figure C-383)
Field Explanation
The following table provides explanation for each button in the screen.
| Element | Description |
| Employee Missing Information |
| Missing Entity | List the missing entities for the group change |
| Message | Provides a message for the missing entities |
| Enrollment | Lists all the changes sought in the pick list |
| Information | |
| Status | Displaying the status of change. |
| Dependent Missing Information |
| Missing Entity | List the missing entities for the group change |
| Message | Provides a message for the missing entities |
| Enrollment | Lists all the changes sought in the pick list |
| Information | |
| Status | Displaying the status of change. |
| Change Information |
| ROE/OE Status | Specifies the pick list for the changes |
| Remarks | Text for briefing the change action |
| Reason for Decline | Choose from the list of reasons for decline. This |
| field is enabled only if the status of ROE/OE is | |
| opted as decline | |
| Others | Text for briefing the other status and description |
Button Functionality
The following table provides explanation for each button in the screen.
| Element | Description | |
| Finalize | Navigates to confirmation screen by incorporating all | |
| the corrections made | ||
| Cancel | Clears the contents entered in the fields or restore to | |
| the previous state as was before saving the changes | ||
-
- Step-8: On clicking Finalize, navigates to confirmation screen. (See Figure C-384)
13 View
View option is to facilitate to have any change, or to view the contents of Group, Employee and Dependent.
Access
The application can be accessed from the main menu as follows:
-
- Enrollment->View->View Group
- Enrollment->View->View Employee
- Enrollment->View->View Dependent
Pre-Requisites
The groups, employees and dependents must exist in the system.
Application Functions
This application has the following functions for reinstatement:
-
- View Group—to view the contents of group
- View Employee—to view the contents of employee
- View Dependent—to view the contents of dependents
View Group
The screen is to view the contents of a group, for further process like to change, only to view the contents or to create a new group.
The sequential steps involved in viewing the details of a group are listed below.
-
- Step-1: After successful logon, click the menu Enrollment and select View. Then select View Group. (See Figure C-385)
- Step-2: The screen navigates to group search to select a group. Enter value in any one of the fields, or simply click search button to perform search operation. (See Figure C-386)
- Step-3: This pops up a screen with search result. (See Figure C-387)
- Step-4: Choose a group id for selection. On clicking Change button, screen navigates to group change request screen, which is similar to change request for Group explained under CHANGE. The flow and process are same based on the type of group selected. (See Figure C-388)
On clicking View button, screen navigates to group view screen. The screen is to only to have view option. Click Search Group to navigate back to Group search screen (See Figure C-389)
On clicking Create New button, screen navigates to group hierarchy screen which is explained under NEW BUSINESS, to create a new group.
View Employee
The screen is to view the contents of an employee, for further process like to change, only to view the contents or to create a new employee
The sequential steps involved in viewing details of an employee are listed below.
-
- Step-1: After successful logon, click the menu Enrollment and select View. Then select View Employee. (See Figure C-390)
- Step-2: The screen navigates to employee search to select an employee. Enter value in any one of the fields, or simply click search button to perform search operation. (See Figure C-391)
- Step-3: This pops up a screen with search result. (See Figure C-392)
- Step-4: Choose an employee id for selection.
On clicking Change button, screen navigates to employee change request screen, which is similar to change request for Employee explained under CHANGE. The flow and process are same as explained under CHANGE. (See Figure C-FIG. 393)
On clicking View button, screen navigates to employee view screen. The screen is to only to have view option. Click Search employee to navigate back to Employee search screen. (See Figure C-394)
On clicking Create New button, screen navigates to Change request for employee add on screen to add new employees.
View Dependent
The screen is to view the contents of an dependent, for further process like to change, only to view the contents or to create a new dependent
The sequential steps involved in viewing details of a dependent are listed below.
-
- Step-1: After successful logon, click the menu Enrollment and select View. Then select View Dependent. (See Figure C-395)
- Step-2: The screen navigates to employee search to select an employee. Enter value in any one of the fields, or simply click search button to perform search operation. (See Figure C-396)
- Step-3: This pops up a screen with search result. (See Figure C-397)
- Step-4: Choose an dependent id for selection.
On clicking Change button, screen navigates to dependent change request screen, which is similar to change request for Dependent explained under CHANGE. The flow and process are same as explained under CHANGE. (See Figure C-398)
On clicking View button, screen navigates to dependent view screen. The screen is to only to have view option. Click Search employee to navigate back to Dependent search screen. (See Figure C-399)
On clicking Create New button, screen navigates to Change request for dependent add on screen to add new dependents.
PX2 User Manual Finance Version 1.0 August 2 2002 Copyright ©2002 Benefit Partners, Inc.
| Contents |
| Introduction | 1-1 | |
| The Applications | 1-1 | |
| Billing | 2-1 | |
| Access | 2-1 | |
| Pre-requisites | 2-1 | |
| Application Functions | 2-2 | |
| Suppress Batch Billing | 2-3 | |
| Batch Billing | 2-5 | |
| Manual Billing | 2-8 | |
| Billing Adjustments | 2-13 | |
| Dynamic Text | 2-16 | |
| Cash Receipts | 3-1 | |
| Access | 3-1 | |
| Pre-requisites | 3-1 | |
| Application Functions | 3-1 | |
| Manual Batch | 3-2 | |
| Credit Card Over Phone | 3-6 | |
| Cash Reconciliation | 4-1 | |
| Access | 4-1 | |
| Pre-requisites | 4-1 | |
| Application Functions | 4-1 | |
| Manual Reconciliation | 4-2 | |
| Billing & Payments History | 4-4 | |
| Finance Operations | 5-1 | |
| Access | 5-1 | |
| Pre-requisites | 5-1 | |
| Application Functions | 5-1 | |
| Premium Transmission | 5-2 | |
| Mail House Billing Data Export | 5-5 | |
| Lock Box | 5-10 | |
| EFT Data Export | 5-12 | |
| Credit Card Export | 5-16 | |
| Credit Card Import | 5-18 | |
| Mail house commission data export | 5-21 | |
| Risk Adjustment | 5-24 | |
| Cash Disbursement | 6-1 | |
| Access | 6-1 | |
| Pre-requisites | 6-1 | |
| Application Functions | 6-1 | |
| Commission Disbursement | 6-2 | |
| Commission Adjustments | 6-6 | |
1 Introduction
Finance is the transaction module that encompasses the process of Billing, Cash Receipts, Cash Reconciliation and other Finance Operations like Premium Transmission Data Output, Mail House Billing Data Output, Lockbox and EFT Imports, Credit Card Import and export, Commission Check Run and Import Risk Adjustment Factors. These operations are for the various group and members participating in the PacAdvantage program.
The Applications
The above-mentioned processes are accomplished in several applications embedded into the Finance Module. These applications steer the tasks of creating, and maintaining operational information relevant for financial transactions within PX2 entities, thereby helping achieve the goals of the Finance Module.
-
- Billing—Billing is the process of creating invoice for the customers enrolled in the PacAdvantage program. The Invoice on a broad base is classified into two types—First Time Invoice (invoice to the group/member that has enrolled as new business) and Running invoice or periodic invoice (To the existing Group/Members).
- Cash Receipts—. Cash Receipt is the process of entering the cash received by BPI into the system. The cash receipt can be received in various modes as defined by the business process. Cash Receipt includes Lock Box receipts, Check, Credit Card, EFT and Transfer.
- Cash Reconciliation—Cash Reconciliation is the process of reconciling the cash receipts and adjustments to individual invoices and reconciling the amount paid by the group.
- Cash Disbursement—Cash Disbursement is the process of handling commission. It deals with both commission disbursement as well as commission adjustments.
- Finance Operations—Finance Operation consists of the utility operations within the finance module for various processes like Premium Transmission Data Output, Mail House Billing Data Output, Lockbox and EFT Imports, Credit Card Import and export, Commission Check Run and Import Risk Adjustment Factors.
2 Billing
Billing is the transaction module that encompasses the process of creating and maintaining invoices for the group and member enrolled with PacAdvantage in the PX2 System. Billing mainly can be categorized in to two.
First Time invoice, generate first time invoice for the groups/members who have enrolled as new business and Periodic invoice.
Generate running invoice to the existing groups/members.
Billing also has other utility as a support to the billing process viz. Suppress Batch Billing, Batch Bill, Batch Billing Adjustments, Manual Bill and Dynamic Text.
Access
The application can be accessed from the main menu as follows:
-
- Finance->Billing->Suppress Batch Billing
- ->Batch Billing
- ->Manual Billing
- ->Billing Adjustments
- ->Dynamic Text
- Finance->Billing->Suppress Batch Billing
Pre-Requisites
All relevant master and transaction records must be available in the system for a successful billing. Master and transaction records are as follows:
-
- Carrier Maintenance—Refer “User Manual for Carrier Maintenance” for further information on the master records.
- Agent/Agency—Refer “User Manual for Sales and Marketing” for further information on the Agent/Agency records.
- Enrollment—“User Manual for Enrollment” for further information on the enrolled group and member records. All the information about the existing group/members and their real time transaction details are required to invoice correctly.
When bill run is in process there should be no other activities performed on the PX2 System. Bill generation process requires considerable overheads. Probable the best time to start batch billing process is at the end of the day when there would be no user accessing the system.
Application Functions
This application has the following functions:
-
- Suppress Batch Billing—Suppress Batch Billing is the process of suppressing periodic bill for a specific Group/Member or collective group and members
- Batch Billing—Batch billing is the process of generating running invoice for the existing groups/members. To run this process, scheduler must be started.
- Manual Billing—Manual billing is the process of creating the invoice manually for a specific group of members where in some special adjustments needs to be made.
- Billing Adjustments—Billing adjustment is the process of adjusting the bill amount either in full or in part against its value, for a specific group of members where in some special adjustments needs to be made.
- Dynamic Text—This process provides a feature to add dynamic content on the bills sent to the for a specific Group/Member or collective groups and members
Suppress Batch Billing
The sequential steps involved in Suppress Batch Billing are listed below.
-
- Step-1: After successful logon, click the menu Finance and select Billing. Then select Suppress Batch Billing. (See Figure D-1)
- Step-2: The screen navigates to Suppress Batch Billing screen. (See Figure D-2)
- Step-3: Choose the group ids to suppress and click save button. This will disable save, filter and clear filter buttons and will have only new button enabled to proceed further.
Fields Explanation
The following table provides explanations for each of the screen fields.
| Element | Description |
| Bill Period | The text for bill period. Choose from the list the |
| invoice period for suppressing the bill. | |
| Selected Group | The text displays the selected group count based on |
| the invoice period. Example 0 to 100. It is a read | |
| only field | |
| Group Id | The text for group Id. Accepts numeric values not |
| exceeding 7 digits. | |
| Group Name | The text for group name. Accepts alphanumeric and |
| special characters. | |
| Group Type | Choose a group type from the drop down list |
| available | |
| ROE Cycle Date | The text for ROE Cycle Date From. Choose from the |
| From | calendar icon in the format MM/DD/YYYY. |
| ROE Cycle Date | The text for ROE cycle end date. Choose from the |
| To | calendar icon in the format MM/DD/YYYY |
| Effective Date | The text for effective start date. Choose from the |
| From | calendar icon in the format MM/DD/YYYY |
| Effective Date To | The text for effective end date. Choose from the |
| calendar icon in the format MM/DD/YYYY | |
| Group Size From | The text for group size and specifies the starting |
| range. Accepts numeric values not exceeding 3 | |
| digits. | |
| Group Size To | The text for group size and specifies the ending |
| range. Accepts numeric values not exceeding 3 | |
| digits. | |
| Rate Type | Choose the rate type option from either Blended or |
| Non-Blended Rate | |
| View | Choose view option from the available options like |
| All/Suppressed groups/Un-suppressed groups | |
| View Selected | Check the View Selected Check Box to view only |
| selected groups. | |
| Table | Table displays the Groups selected based on the |
| Search and filter conditions. | |
Button Functionality
The following table provides explanation for each button in the screen.
| Element | Description |
| Bill Period | On Selecting the bill period, shows all the groups/ |
| members available for the specific invoice period | |
| Check All | (At Suppress Bill Header) Check All link Checks all |
| the groups from database. | |
| Clear All | (At Suppress Bill Header). Clear All link uncheck all |
| the groups that are checked from database. | |
| Filter | Click the Filter to display the Group based on the |
| search criteria/filter conditions provided. | |
| Clear Filter | Clear the Content of the fields. |
| New | Click New to start new operation on this screen |
| Suppress | Click Suppress to Suppress billing for the groups |
| selected | |
| Save | Click Save to save the content of suppress billing |
| Un-Suppress | Click Un-Suppress to Un-Suppress billing for the |
| groups selected. | |
| Check All | The “Check All” Link will check all the records in |
| the table | |
| Clear All | The “Clear All” Link will uncheck all the records in |
| the table that are checked. | |
| Check All on this | The “Check All on this Page” Link will check all the |
| Page | records in the table on this Page |
| Invert Selection | The Invert Selection Link will invert the selection |
| criteria for the check boxes. I.e. All Check Groups | |
| would be unchecked and vice versa. | |
| <<, <, >, >> | These buttons are used for navigating to the next and |
| previous records for viewing. | |
| << - Show first record (s) | |
| < - Show previous record (s) | |
| > - Show next record (s) | |
| >> - Show last record (s) | |
Batch Billing
The sequential steps involved in Batch Billing are listed below.
-
- Step-1: After successful logon, click the menu Finance and select Billing. Then select Batch Billing. (See Figure D-3)
- Step-2: The screen navigates to batch billing screen. (See Figure D-4)
- Step-3: Select the bill period and click process button to create invoice for all the groups that are un-suppressed for that bill run period.
Fields Explanation
The following table provides explanations for each of the screen fields.
| Element | Description | |
| Run Id | The text for sequential number of Run Id. It is a read | |
| only field and is auto generated | ||
| Bill Period | Choose month and year for bill period from the drop | |
| down list available, during which bills are to be | ||
| generated.. | ||
| Run By | The text for name of the user who generated the bill. | |
| It is a read only field. | ||
Button Functionality
The following table provides explanation for each button in the screen.
| Element | Description | |
| Process | Click Process to start the bill run process for the all | |
| the groups and member for the specified billing | ||
| period selected. | ||
| New | Click New to start new operation for the Bill Run. | |
| View Status | Click view status to navigate to Auto Billing Status | |
| Search | ||
-
- Step-4: On clicking view status button the screen navigates to auto billing status search screen. {See Figure D-5}
- Step-5: Enter the value of any one field or simply click search button to perform Search operation
- Step-6: This pops up a search result screen. (See Figure D-6)
Fields Explanation
The following table provides explanations for each of the screen fields.
| Element | Description | |
| Run Id | The text for run id. It accepts numeric values not | |
| exceeding 10 digits. | ||
| Run Date | The text for run date. Choose from the calendar icon | |
| in the format MM/DD/YYYY | ||
| Run Status | Choose a run status from the drop down list | |
| available. Run Status can be Completed, In Progress | ||
| or Error | ||
Button Functionality
The following table provides explanation for each button in the screen.
| Element | Description | |
| Search | Click Search to search for the Billing Status based | |
| on the search criteria entered. | ||
| Cancel | Clears the contents entered in the editable field. | |
| Back | Navigates back to Auto Billing screen. | |
Manual Billing
The sequential steps involved in Manual Billing
-
- Step-1: After successful logon, click the menu Finance and select Billing. Then select Manual Billing. (See Figure D-7)
- Step-2: The screen navigates to Manual Invoice screen. (See Figure D-8)
- Step-3: Choose period and group id. If the bill for the group id is already generated for the selected month, will display the contents and create button will be disabled. Otherwise, create button will be enabled to generate a bill.
Fields Explanation
The following table provides explanations for each of the screen fields.
| Element | Description |
| Invoice Details |
| Bill # | Shows the Bill #. This is auto generated by the |
| system. | |
| Bill Date | Shows the Bill Date. Show the date when this bill |
| was generated in the format MM/DD/YYYY | |
| Period | The text for invoice period. Choose from the list the |
| invoice period for creating the bill. | |
| Due Date | Shows the Due Date. Show the date when this bill is |
| due in the format MM/DD/YYYY | |
| Status | Shows the status of the Bill. |
| Reconciled Date | Shows the Reconciled Date. Show the date when |
| this bill is reconciled in the format MM/DD/YYYY |
| Group |
| Information |
| Group Id | Text for Group ID. Accepts numeric values not |
| exceeding 7 digits. | |
| Group Type | Text for Group Type. It is a read only field. |
| Group Name | Text for Group Name. It is a read only field |
| Status | Text for Status. It is a read only field |
| Association Name | Text for Association Name. It is a read only field |
| Rate Type | Text for Rate Type. It is a read only field |
| Group Level |
| Adjustment |
| Type | Choose a type of adjustment from the drop down list |
| available | |
| Amount | The text for adjustment amount. Accepts value |
| in the format of currency (example 999999999.99) | |
| Period | The text for the period of adjustment. Choose month |
| and year from the drop down list. | |
| Billing Summary | Displays the bill summary. |
| Prior period billed | Text for Prior period billed amount. It is a read only |
| amount | field |
| Adjustments since | Text for Adjustments since prior period. It is a read |
| prior period | only field |
| Payments | Text for Payments Received. It is a read only field |
| Received | |
| Past Due Amount | Text for Past Due Amount. It is a read only field |
| Current bill | Text for Current bill amount. It is a read only field |
| amount | |
| Total Due | Text for Total Due. It is a read only field |
| Employee Level | Displays Employee Level Adjustments. This can be |
| Adjustments | due to Add On or Termed Employee/Members. |
| Current Premium | Displays current premium due for each employees |
| Due | |
| Bill Summary | Displays the bill summary |
| Sub Total - | Text for Sub Total - Medical Premium. It is a read |
| Medical Premium | only field |
| Sub Total - | Text for Sub Total - Dental Premium. It is a read |
| Dental Premium | only field |
| Sub Total - | Text for Sub Total - Vision Premium. It is a read |
| Vision Premium | only field |
| Sub Total - CAM | Text for Sub Total - CAM Premium. It is a |
| Premium | read only field |
| Administration | Text for Administration member Fees. It is a read |
| member Fees | only field |
| Agent member | Text for Agent member Fees. It is a read only field |
| Fees | |
| Administration | Text for Administration flat Fee. It is a read only |
| flat Fee | field |
| Agent flat Fee | Text for Agent flat Fee. It is a read only field |
| Total due current | Text for Total due current period. It is a read only |
| period | field |
| Add Past Due | Text for Add Past Due Amount. It is a read only |
| Amount | field |
| Total Due | Text for Total Due. It is a read only field |
Button Functionality
The following table provides explanations for each button in the screen.
| Element | Description | |
| New | Click New to create a new manual bill. | |
| Create | Click Create to Creates bill based on the information | |
| provided | ||
| Add | Add the contents of adjustments into the table | |
| below. It is only a temporary addition. Becomes | ||
| permanent only on saving the record. | ||
| Calculate | Click calculate button to calculate the adjustments | |
| based on the adjustment period selected. | ||
| Update | Update the contents of adjustments. It is only a | |
| temporary update. Becomes permanent only on | ||
| saving the record. | ||
| Delete | Delete button will delete the records in the table | |
| checked for deletion. It is only a temporary deletion. | ||
| Becomes permanent only on saving the record. | ||
| Check All | The “Check All” Link will check all the records in | |
| the table | ||
| Clear All | The “Clear All” Link will uncheck all the records in | |
| the table that are checked. | ||
Billing Adjustments
The sequential steps involved in Dynamic Text are listed below.
-
- Step-1: After successful logon, click the menu Finance and select Billing. Then select Billing Adjustments. (See Figure D-9)
- Step-2: The screen navigates to Adjustment Screen. (See Figure D-10)
- Step-3: Enter adjustment date.
- Step-4: Choose a group id by clicking search icon. Corresponding fields are read only and selecting a group id populates the data.
- Step-5: Choose Type of group level adjustment and period. Only if the value of type is Late Fee, Calculate button is enabled to calculate and fetch the value in amount field otherwise calculate button is disabled.
- Step-6: Click Search button lead to have details of adjustment ids, generated. (See Figure D-11)
Fields Explanation
The following table provides explanations for each of the screen fields.
| Element | Description |
| Adjustment |
| Details |
| Adjustment Id | This field is a read only and system generated id of |
| exactly 10 digits. | |
| Adjustment Date | Text for Adjustment Date. Choose a date by |
| clicking calendar icon to have a date in the | |
| MM/DD/YYYY format. | |
| Status | Shows the status of the adjustment. |
| Group |
| Information |
| Group ID | Choose a group ID by clicking search icon. Field is |
| mandatory. | |
| Group Type | Field is read only. Populates data based on the |
| selected group ID | |
| Group Name | Field is read only. Populates data based on the |
| selected group ID | |
| Association Name | Field is read only. Populates data based on the |
| selected group ID | |
| Status | Field is read only. Populates data based on the |
| selected group ID | |
| Rate Type | Field is read only. Populates data based on the |
| selected group ID |
| Group Level |
| Adjustments |
| Type | Choose a type of group level adjustment from the |
| drop down list available. Field is mandatory | |
| Amount | Amount is calculated based on the inputs of type and |
| period. Value gets populated by clicking calculate | |
| button | |
| Period | Choose a period for which group level adjustment is |
| sought. Field is mandatory. | |
Button Functionality
| Element | Description | |
| Calculate | Click calculate button to calculate the adjustments | |
| based on the adjustment period selected. | ||
| New | Click New to create a new group level adjustment | |
| Save | Click Save to save the content of billing adjustment | |
| Search | Click Search to search for the group level adjustment | |
| status based on the search criteria entered. | ||
Dynamic Text
The sequential steps involved in Dynamic Text are listed below.
-
- Step-1: After successful logon, click the menu Finance and select Billing. Then select Dynamic Text. (See Figure D-12)
- Step-2: The screen navigates to dynamic text screen. (See Figure D-13)
- Step-3: Enter the text for dynamic text. This field is mandatory.
- Step-4: Enter the values in the fields as per the format briefed in fields' explanation table. Choose a group id.
- Step-5: On clicking Save button, the assigned dynamic text will be made available for the selected group and disable all the fields except New to continue the flow.
Fields Explanation
The following table provides explanations for each of the screen fields.
| Element | Description |
| Dynamic Text | The text for dynamic text. Accepts all characters. |
| Invoice Period | The text for invoice period. Choose from the list the |
| invoice period for embedding dynamic text on the | |
| bill. | |
| Selected Group | The text displays the selected group count based on |
| the invoice period. Example 0 to 100. It is a read | |
| only field | |
| Group Id | The text for group Id. Accepts numeric values not |
| exceeding 7 digits. | |
| Group Name | The text for group name. Accepts alphanumeric and |
| special characters. | |
| Group Type | Choose a group type from the drop down list |
| available | |
| ROE Cycle Date | The text for ROE Cycle Date From. Choose from the |
| From | calendar icon in the format MM/DD/YYYY. |
| ROE Cycle Date | The text for ROE cycle end date. Choose from the |
| To | calendar icon in the format MM/DD/YYYY |
| Effective Date | The text for effective start date. Choose from the |
| From | calendar icon in the format MM/DD/YYYY |
| Effective Date To | The text for effective end date. Choose from the |
| calendar icon in the format MM/DD/YYYY | |
| Group Size From | The text for group size and specifies the starting |
| range. Accepts numeric values not exceeding 3 | |
| digits. | |
| Group Size To | The text for group size and specifies the ending |
| range. Accepts numeric values not exceeding 3 | |
| digits. | |
| View Selected | Check the View Selected Check Box to view only |
| selected groups. | |
| Table | Table displays the Groups selected based on the |
| Search and filter conditions. | |
Button Functionality
The following table provides explanation for each button in the screen.
| Element | Description |
| Invoice Period | On Selecting the invoice period, shows all the |
| groups/members available for the specific invoice | |
| period | |
| Check All | (At Dynamic Text Header) Check All link Checks |
| all the groups displayed. | |
| Clear All | (At Dynamic Text Header). Clear All link uncheck |
| all the groups that are checked | |
| Filter | Click the Filter to display the Group based on the |
| search criteria/filter conditions provided. | |
| Clear Filter | Clear the Content of the fields. |
| Check All | The “Check All” Link will check all the records in |
| the table | |
| Clear All | The “Clear All” Link will uncheck all the records in |
| the table that are checked. | |
| Check All on this | The “Check All on this Page” Link will check all the |
| Page | records in the table on this Page |
| Invert Selection | The Invert Selection Link will invert the selection |
| criteria for the check boxes. I.e. All Check Groups | |
| would be unchecked and vice versa. | |
| <<, <, >, >> | These buttons are used for navigating to the next and |
| previous records for viewing. | |
| << - Show first record (s) | |
| < - Show previous record (s) | |
| > - Show next record (s) | |
| >> - Show last record (s) | |
| New | Click New to start new operation on this screen |
| Save | Click Save to save the Content of the dynamic text |
3 Cash Receipts
Cash Receipt is the transaction module that encompasses the process of creating and maintaining Cash receipts for the group and member enrolled and invoiced in the PX2 System. Cash Receipt is the process of entering the cash received by BPI into the system. The cash receipt can be received in various modes as defined by the business process. Cash Receipt includes Lock Box receipts, Check, Credit Card, EFT and Transfer. Cash Receipts here identifies the Manual Cash batch and Credit Card over phone.
Access
The application can be accessed from the main menu as follows:
-
- Finance->Cash Receipts->Manual Batch
- ->Credit Card over Phone
- Finance->Cash Receipts->Manual Batch
Pre-Requisites
All relevant transactional data pertaining to the group and member must be available for the Cash receipt process.
Invoice should be generated and available for the Group/Member for cash receipts for existing groups and members.
For new business enrollment the group information must be available in the system to enter the cash batch
All billing information and the mode of payments must be available in the system.
For credit card over phone process, Internet connection is a mandatory.
Application Functions
This application has the following functions:
-
- Manual Batch: Manual batch is the process of entering the payments and receipts into the system manually. The payments and receipts are identified based on the batch type that can be Manual Batch, NSF Batch, Returns Batch, Positive Transfer, Negative Transfer, Direct Deposit and Wire Transfer.
- Credit Card over Phone: Credit Card over phone is a interface built for processing credit card transactions over phone for the Group/Member who opts to pay be credit card.
Manual Batch
The sequential steps involved in Manual Batch are listed below.
-
- Step-1: After successful logon, click the menu Finance and select Cash Receipts. Then select Manual Batch (See Figure D-14)
- Step-2: The screen navigates to Manual Batch screen. (See Figure D-15)
- Step-3: Choose Batch type and enter tape total.
- Step-4: Enter the values in the respective fields as per the format briefed in fields' explanation table.
- Step-5: On clicking add will do the temporary storage and clicking Save will have a permanent storage.
- Step-6: Clicking Search button navigates to search screen to have the details of Batch Ids generated. In the search screen, either value can be entered or simply click search button to perform the search operation.
- Step-7: Following is the search result screen. Click back, to go back to Manual Batch screen. (See Figure D-16)
Fields Explanation
The following table provides explanations for each of the screen fields.
| Element | Description |
| Batch |
| Information |
| Batch Id | The text for Batch ID. This is auto generated by the |
| system | |
| Batch Date | The text for batch date. Batch Date defaults to the |
| current date. Choose a date by clicking calendar | |
| icon. Date accepts the format M/DD/YYYY. | |
| Batch Total | The text for Batch Total. This is dynamically |
| calculated by the system based on the batch entries | |
| Batch Type | Choose the batch type from the list provided. Batch |
| type can be Manual Batch, NSF Batch, Returns | |
| Batch, Positive Transfer, Negative Transfer, Direct | |
| Deposit and Wire Transfer. | |
| Tape Total | The text for Tape Total. Accepts value in the format |
| of currency (example 9999999999.99). This field is | |
| mandatory. | |
| Tape Balance | The text for Tape Balance. This is dynamically |
| calculated by the system based on the batch entries. | |
| Batch Status | The text for Batch Status. Displays the status of the |
| batch. Batch can be Open or Closed |
| Check |
| Information |
| Post Mark Date | The text for Post Mark date. Choose a date by |
| clicking calendar icon. Date accepts the format | |
| M/DD/YYYY. Post Mark Date cannot be greater | |
| than Received date. | |
| Received Date | The text for Received date. Choose a date by |
| clicking calendar icon. Date accepts the format | |
| M/DD/YYYY. Received Date cannot be future date. | |
| This field is mandatory. | |
| Check # | The text for Check #. Accepts numeric values not |
| exceeding 10 digits. This field is mandatory. | |
| Check Amount | The text for amount received. Accepts value in the |
| format of currency (example 9999999999.99). This | |
| field is mandatory. Check amount should be equal | |
| Group Amount Total. |
| Check |
| Distribution |
| Group Id | Text for Group ID. Group ID accepts numeric value |
| of exactly 7 digits. This field is mandatory. | |
| Group Name | Text for Group name. It is a read only field |
| Amount | The text for amount received. Accepts value in the |
| format of currency (example 9999999999.99) | |
| Comments | Choose the comments from the list provided |
| Others | Text for others. If the Comments is Others specify |
| other comment | |
| Table | Display the Check distribution added for the batch. |
Button Functionality
The following table provides explanation for each button in the screen.
| Element | Description | |
| Add | Click the Add Link to add additional row for the | |
| Check Distribution | ||
| Add | Click add button to add the content of check | |
| distribution to the table. The Check distribution | ||
| amount should be equal to the check amount to add. | ||
| This is only a temporary addition. Becomes | ||
| permanent only on saving the record. | ||
| New | Click New to Create a new Batch entry | |
| Save | Click Save to save the batch entry data. | |
| Delete | Click Delete to delete the batch entry record checked | |
| for deletion. Becomes permanent only on saving the | ||
| record. | ||
| Close | Click Close button to close the batch data and | |
| process auto reconciliation. Closing the batch is | ||
| possible only if Tape Balance is equal to zero. | ||
| Search | Click search for searching the existing status of | |
| Batch Data. | ||
Credit Card Over Phone
The sequential steps involved in Credit card over phone are listed below.
-
- Step-1: After successful logon, click the menu Finance and select Cash Receipts. Then select Credit Card Over Phone. (See Figure D-17)
- Step-2: The screen navigates to Credit Card over phone screen to have transaction, credit card information and amount distribution details. (See Figure D-18)
- Step-3: Enter the values in the fields as per the format briefed in fields' explanation table.
- Step-4: Click Save to save the content. Initially Process button will be disabled. Once the contents are saved, Process button is enabled to process the contents.
- Step-5: Click Process button to process the transaction. Once Process is click, both Save and Process buttons are disabled.
- Step-6: Click Search button to have the list of all transactions ids This pops up a search screen. (See Figure D-19)
- Step-7: Enter the value in any one of the field or simply click search to perform search operation.
- Step-8: This navigates to a screen with search results. (See Figure D-20)
- Step-9: Click a transaction id for selection to view/modify the content or otherwise click back to credit card over phone screen.
Fields Explanation
The following table provides explanations for each of the screen fields.
| Element | Description |
| Transaction |
| Information |
| Transaction Id | The text for Transaction ID. This is auto generated |
| by the system | |
| Transaction Date | The text for Transaction date. Choose a date by |
| clicking calendar icon. Date accepts the format | |
| M/DD/YYYY. | |
| Transaction | The text for Transaction Status. This is a read only |
| Status | field. The system shows the transaction status based |
| on credit card authorization |
| Credit Card |
| Information |
| Card Holder's | The text for cardholder's name. Accepts alphabets |
| Name | and space between two words. |
| Credit Card | The text for credit card number. Accepts numeric |
| Number | values not exceeding 30 digits |
| Credit Card Type | Choose the type of credit card from the drop down |
| list available. | |
| Expiration Date | Choose a month and year of expiration from the drop |
| down list available | |
| First Name | The text for contact name. Accepts alphabets and |
| special characters like hyphen and single quotes not | |
| exceeding 25 characters. | |
| Middle Initial | The text for middle initial. Accepts alphabets not |
| exceeding 1 character. | |
| Last Name | The text for contact name. Accepts alphabets and |
| special characters like hyphen and single quotes not | |
| exceeding 35 characters. | |
| Street Address | The text for company address. Accepts alphanumeric |
| and special characters not exceeding 35 characters | |
| City | The text for city. Accepts alphabets and space |
| between two words not exceeding 30 characters. | |
| State | Choose the name of the state from the drop down list |
| of States available in United States of America | |
| Zip | Text for ZIP Code. Accepts numeric value of exactly |
| 5 digits. | |
| Payment Amount | Text for Payment Amount. Displays the amount due. |
| Amount |
| Distribution |
| Group Id | Text for Group ID. Group ID accepts numeric value |
| of exactly 7 digits. | |
| Group Name | Text for Group name. It is a read only field |
| Amount Due | Text for Amount Due. It is a read only field |
| Payment Amount | The text for amount received. Accepts value in the |
| format of currency (example 9999999999.99) | |
| Remarks | Text for Remarks. Accepts 50 characters |
Button Functionality
The following table provides explanation for each button in the screen.
| Element | Description | |
| Add | Click the Add Link to add additional row for the | |
| Check Distribution | ||
| New | Click new to Create a new Credit Card over phone | |
| entry | ||
| Save | Click Save to save the Credit Card over phone entry. | |
| Process | Click Process to process the credit card transaction | |
| Search | Click search for searching the existing Credit Card | |
| Information entered. | ||
| Back | Click Back Button to go back to the Credit card over | |
| phone screen. | ||
4 Cash Reconciliation
Cash Reconciliation is the transaction module that encompasses the process of reconciling the invoices, cash receipts and adjustments for a specific group and member enrolled and invoiced in the PX2 System. Reconciled Cash can be disbursed to the Carriers, Agents, PacAdvantage and Benefit Partners. Normally cash reconciliation is an automated process. But under special circumstances when the Cash Receipts, Invoices and Adjustments do not match the reconciliation can be done manually using the Cash reconciliation Process.
Also it encompasses the history of billing and payment details.
Access
The application can be accessed from the main menu as follows:
-
- Finance->Cash Reconciliation->Manual Reconciliation
- ->Billing & Payment History
- Finance->Cash Reconciliation->Manual Reconciliation
Pre-Requisites
Billing, Cash Receipts entries should have occurred for reconciliation.
Enrollment—Refer User Manual for Enrollment for further information on the enrollment process. Real time information and the transaction on the Group and member is required for Reconciliation.
Application Functions
This application has the following functions:
-
- Manual Reconciliation.
- Billing & Payment History
Manual Reconciliation
The sequential steps involved in Manual Reconciliation are listed below.
-
- Step-1: After successful logon, click the menu Finance and select Cash Reconciliation. Then select Manual Reconciliation (See Figure D-21)
- Step-2: The screen navigates to Group Search screen. (See Figure D-22)
- Step-3: Enter value in any one of the field or simply click Search button to perform search operation.
- Step-4: This pops up a screen with search result (See Figure D-23)
- Step-5: Click on any group id for selection
- Step-6: Screen navigates to Cash Reconciliation. (See Figure D-24)
Fields Explanation
The following table provides explanations for each of the screen fields.
| Element | Description |
| Group Id | Text to display the Group ID, This is a read only |
| field | |
| Group Name | Text to display the Group Name, This is a read only |
| field | |
| Association Name | Text for Association Name. It is a read only field |
| Rate Type | Text for Rate Type. It is a read only field |
| Group Type | Text for Group Type It is a read only field |
| Left to Balance | Text to display the Left to Balance, This is a read |
| only field. This field is dynamically populated based | |
| on the Check box selected for the reconciliation. | |
Button Functionality
The following table provides explanation for each button in the screen.
| Element | Description |
| Search | Click Search to search for a new group for |
| processing reconciliation | |
| Clear | Click Clear to Cancel and restore to the state as was |
| on loading the page | |
| Post | Click Post Reconciliation to Post Reconciliation. If |
| Reconciliation | the Amount Left To Balance is within (+/−2) any |
| user can post reconciliation. If the Amount is | |
| between $3.00 to $50.00 User with Level II | |
| authorization only can post reconciliation. Amount | |
| Between $51.00 to $100.00 User with Level III | |
| authorization only can post reconciliation. For | |
| amount greater than $100.00 User with Level IV | |
| authorization only can post reconciliation. | |
Billing & Payments History
The sequential steps involved in billing and payment history are listed below
-
- Step-1: After successful logon, click the menu Finance and select Cash Reconciliation. Then Billing & Payments History. (See Figure D-25)
- Step-2: Screen navigates group search. (See Figure D-26)
- Step-3: Enter value in any one of the field or simply click search button to perform searach operation.
- Step-4: This pops up a search result screen. (See Figure D-27)
- Step-5: Click a group id for selection.
- Step-6: Navigates to history screen. (See Figure D-28)
Fields Explanation
The following table provides explanations for each of the screen fields.
| Element | Description |
| Group Information |
| Group Id | Text for Group ID. It is a read only field. |
| Group Type | Text for Group Type. It is a read only field. |
| Group Name | Text for Group Name. It is a read only field |
| Status | Text for Status. It is a read only field |
| Association Name | Text for Association Name. It is a read only field |
| Rate Type | Text for Rate Type. It is a read only field |
Button Functionality
The following table provides explanation for each button in the screen.
| Element | Description | |
| Search | Click Search to search for billing and payments | |
| history | ||
5 Cash Disbursement
Cash disbursement consists of utility operations like commission disbursement and commission adjustment.
Access
The application can be accessed from the main menu as follows:
-
- Finance->Cash Disbursement->Commission disbursement
- ->Commission adjustments
- Finance->Cash Disbursement->Commission disbursement
All relevant transactional data pertaining to the group and member must be available for the cash disbursement.
Application Functions
This application has the following functions:
-
- Commission disbursement
- Commission adjustments
Commission Disbursement
The sequential steps involved in Agent Commission run are listed below.
-
- Step-1: After successful logon, click the menu Finance and select Finance Operations. Select Disbursement and then select Commission Disbursement. (See Figure D-29)
- Step-2: The screen navigates to Commission Disbursement Screen. (See Figure D-30)
- Step-3: Choose Bill period from the drop down list. Click Process
- Step-4: Click View Status to have the details of Run ids generated. Search screen pops up. Enter value in any of the fields, or simply click Search button to perform search operation. (See Figure D-31)
- Step-5: This pops up a screen with search result. Click any Run Id for selection to view the status of a particular run id. (See Figure D-32)
Fields Explanation
The following table provides explanations for each of the screen fields.
| Element | Description | |
| Run Id | The text for Export ID. This is auto generated by the | |
| system | ||
| Bill Period | The text for Export date. This is a read only field. | |
| Run By | The text for Export Status. This is a read only field. | |
| The system shows the Export status based on | ||
| premium transmission data export | ||
Button Functionality
The following table provides explanation for each button in the screen.
| Element | Description | |
| Process | Click Process to start the bill run process for the all | |
| the groups and member for the specified billing | ||
| period selected. | ||
| New | Click New to start new operation for the Bill Run. | |
| Search | Click Search to navigate to Commission Billing Run | |
| Status Search | ||
Commission Adjustments
The sequential steps involved in Commission Adjustments are listed below.
-
- Step-1: After successful logon, click the menu Finance and select Cash disbursement. Then select Commission Adjustments
- Step-2: The screen navigates to commission adjustment. (See Figure D-33)
- Step-3: Choose a type of adjustment. (See Figure D-34)
- Step-4: Choose an agent/agency id by clicking search icon. Agent name gets populated based on the selected value.
- Step-5: Enter adjustment amount. Then click save.
- Step-6: Click on search button yields the details of the adjustment ids created. (See Figure D-35)
6 Finance Operations
Finance Operation consists of the utility operations within the finance module for various processes like Premium Transmission Data Output, Mail House Billing Data Output, Lockbox and EFT Exports, Credit Card Import and export, and Import Risk Adjustment Factors.
Access
The application can be accessed from the main menu as follows:
-
- Finance->Finance Operations->Premium Transmission
- ->Billing
- ->Cash Receipts
- ->Risk Adjustment
- Finance->Finance Operations->Premium Transmission
Pre-Requisites
All relevant transactional data pertaining to the group and member must be available for the Finance Operations. To run this process, scheduler must be started.
Application Functions
This application has the following functions:
-
- Premium Transmission
- Mail House Billing
- Lock Box
- EFT Data Export
- Credit Card Export
- Credit Card Import
- Mail house Commission Data Export
- Risk Adjustment Import
Premium Transmission
The sequential steps involved in Premium Transmission are listed below.
-
- Step-1: After successful logon, click the menu Finance and select Finance Operations. Then select Premium Transmission (See Figure D-36)
- Step-2: The screen navigates to Transmission screen. (See Figure D-37)
- Step-3: Choose the dates for transmit and comments if any. Click Export. Immediately, the export status will display the status as “In Progress”.
- Step-4: Click Search to know the status of the export ids generated. (See Figure D-38)
Fields Explanation
The following table provides explanations for each of the screen fields.
| Element | Description |
| Export Id | The text for Export ID. This is auto generated by the |
| system | |
| Export Status | The text for Export Status. This is a read only field. |
| The system shows the Export status based on | |
| premium transmission data export | |
| Exported By | The text for Exported By. This is a read only field. |
| Export Date | The text for Export date. This is a read only field. |
| Transmit for the | Choose “Transmit for the following Dates From” by |
| following Dates | clicking calendar icon. The date can be in the format |
| From: | MM/DD/YYYY |
| Transmit for the | Choose “Transmit for the following Dates To” by |
| following Dates To | clicking calendar icon. The date can be in the format |
| MM/DD/YYYY | |
| Table | Display the Transmission ID for the Carrier and |
| Carrier Name | |
| Comments | The text for Comments. |
Button Functionality
The following table provides explanation for each button in the screen.
| Element | Description | |
| New | Click New button to Create new Premium Data | |
| Transmission | ||
| Export | Click Export button to Export the Premium Data | |
| Transmission based on the selection criteria | ||
| Search | Click Search Button to Search for the Premium Data | |
| Transmission and view the Export Status | ||
Mail House Billing Data Export
The sequential steps involved in Mail House Billing Export Data are listed below.
-
- Step-1: After successful logon, click the menu Finance and select Finance Operations. Select Billing and then select Mail House Billing Data Export. (See Figure D-39)
- Step-2: The screen navigates to Mail House Billing screen. (See Figure D-40)
- Step-3: Choose Export date and a group id for export. Click Export.
- Step-4: Click view status to know the status of export ids generated. Search screen pops up. Enter value in any of the field, or simply click search button to perform search operation. (See Figure D-41)
- Step-5: Click back to navigate back to Mail House Billing screen. (See Figure D-42)
Fields Explanation
The following table provides explanations for each of the screen fields.
| Element | Description |
| Mail House Billing Data |
| Export Id | The text for Export ID. This is auto generated by the |
| system | |
| Status | The text for Export Status. This is a read only field. |
| The system shows the Export status based on data | |
| exported | |
| Exported By | The text for Exported By. This is a read only field. |
| Export Date | The text for Export date. This is a read only field. |
| Export Date as of | Choose “Export Date as of” from the list of billing |
| period | |
| Selected Groups | The text displays the selected group count based on |
| the invoice period. Example 0 to 100. It is a read | |
| only field | |
| Comments | The text for Comments. |
| Filter |
| Group Id | The text for group Id. Accepts numeric values only. |
| Group Name | The text for group name. Accepts any characters. |
| Group Type | Choose a group type from the drop down list |
| available | |
| ROE Cycle Date | The text for ROE Cycle Date From. Choose from the |
| From | calendar icon in the format MM/DD/YYYY. |
| ROE Cycle Date | The text for ROE cycle end date. Choose from the |
| To | calendar icon in the format MM/DD/YYYY |
| Effective Date | The text for effective start date. Choose from the |
| From | calendar icon in the format MM/DD/YYYY |
| Effective Date To | The text for effective end date. Choose from the |
| calendar icon in the format MM/DD/YYYY | |
| Group Size From | The text for group size and specifies the starting |
| range. Accepts numeric values only. | |
| Group Size To | The text for group size and specifies the ending |
| range. Accepts numeric values only. | |
| View Selected | Check the View Selected Check Box to view only |
| selected groups. | |
| Table | Table displays the Groups selected based on the |
| Search and filter conditions. | |
Button Functionality
The following table provides explanation for each button in the screen.
| Element | Description |
| Check All | (At Text Header) Check All link Checks all the |
| groups displayed. | |
| Clear All | (At Text Header). Clear All link uncheck all the |
| groups that are checked | |
| Filter | Click the Filter to display the Group based on the |
| search criteria/filter conditions provided. | |
| Clear Filter | Clear the Content of the fields. |
| Check All | The “Check All” Link will check all the records in |
| the table | |
| Clear All | The “Clear All” Link will uncheck all the records in |
| the table that are checked. | |
| Check All on this | The “Check All on this Page” Link will check all the |
| Page | records in the table on this Page |
| Invert Selection | The Invert Selection Link will invert the selection |
| criteria for the check boxes. I.e. All Check Groups | |
| would be unchecked and vice versa. | |
| View Selected | Check the View Selected Check Box to view only |
| selected groups. | |
| <<, <, >, >> | These buttons are used for navigating to the next and |
| previous records for viewing. | |
| << - Show first record (s) | |
| < - Show previous record (s) | |
| > - Show next record (s) | |
| >> - Show last record (s) | |
| New | Click New to start new operation on this screen |
| Save | Click Save to save the Content of the Mail House |
| Billing | |
| View status | Click view status button to search the Status of the |
| Mail House Billing Process | |
Process Lock Box
The sequential steps involved in Lock Box are listed below.
-
- Step-1: After successful logon, click the menu Finance and select Finance Operations. Select Cash Receipts and then select Lock Box. (See Figure D-43)
- Step-2: The screen navigates to Import Lock Box screen. (See Figure D-44)
- Step-3: On clicking Search Button enables to have a list of Import Ids. This pops up a search screen. (See Figure D-45)
- Step-4: Enter value in any of the field or simply click search button to perform search operation. This navigates to a screen with search result. (See Figure D-46)
- Step-5: Choose an Import ID for selection to alter the content or simply click back button to navigate back to Lockbox screen.
- Step-6: Enter the values in the respective fields, as per the formats specified in the field explanation table and click Import.
Fields Explanation
The following table provides explanations for each of the screen fields.
| Element | Description | |
| Import Id | Read only field to display import id value | |
| Status | Read only field to display the status of import | |
| Import Date | Read only field to display the import date | |
| Imported By | Read only field to display the user who imported the | |
| files | ||
| Import File | Enter the file path or select the path by clicking | |
| browse button. The field is mandatory | ||
| Batch Date | Enter the date for Batch date or select a date by | |
| clicking calendar icon. The field is mandatory. | ||
| Tape Total | Text for tape Total. Enter the tape total. Accepts | |
| numeric values in the format 9999999.99 | ||
| Comment | Text for comments. | |
Button Functionality
The following table provides explanation for each button in the screen.
| Element | Description | |
| New | Click on new button enables to have a new import of | |
| Lockbox File. | ||
| Import | Click on import button will perform the action of | |
| importing the file selected. | ||
| Search | Click on the Search button to search for the Lockbox | |
| file import status. | ||
| Browse | Click on the Browse button will enable to choose a | |
| file to import | ||
EFT Data Export
The sequential steps involved in EFT Data Export are listed below.
-
- Step-1: After successful logon, click the menu Finance and select Finance Operations. Select Cash Receipts and then select EFT Data Export. (See Figure D-47)
- Step-2: The screen navigates to EFT Data Export screen. (See Figure D-48)
- Step-3: On clicking Search button leads to EFT Data Search screen to have all the Export Ids. (See Figure D-49)
- Step-4: Enter the value in any one of the field or simply click search button to perform search operation. This pops up a screen with search results. (See Figure D-50)
- Step-5: Choose an Export ID for selection, otherwise click Back button to navigate back to EFT Data Export.
- Step-6: Enter the values in the respective fields as per the format briefed under Fields' Explanation and click Export.
Fields Explanation
The following table provides explanations for each of the screen fields.
| Element | Description |
| Export EFT Data |
| Export Id | The text for Export ID. This is auto generated by the |
| system | |
| Status | The text for Export Status. This is a read only field. |
| The system shows the Export status based on data | |
| exported | |
| Exported By | The text for Exported By. This is a read only field. |
| Export Date | The text for Export date. This is a read only field. |
| Export Date as of | Choose “Export Date as of” from the list of billing |
| period | |
| Selected Groups | The text displays the selected group count based on |
| the invoice period. Example 0 to 100. It is a read | |
| only field | |
| Total Bill | Text to display the total bill amount. This is read |
| Amount | only field |
| Comments | The text for Comments. |
| Filter |
| Group Id | The text for group Id. Accepts numeric values only. |
| Group Name | The text for group name. Accepts any characters. |
| Group Type | Choose a group type from the drop down list |
| available | |
| ROE Cycle Date | The text for ROE Cycle Date From. Choose from the |
| From | calendar icon in the format MM/DD/YYYY. |
| ROE Cycle Date | The text for ROE cycle end date. Choose from the |
| To | calendar icon in the format MM/DD/YYYY |
| Effective Date | The text for effective start date. Choose from the |
| From | calendar icon in the format MM/DD/YYYY |
| Effective Date To | The text for effective end date. Choose from the |
| calendar icon in the format MM/DD/YYYY | |
| Group Size From | The text for group size and specifies the starting |
| range. Accepts numeric values only. | |
| Group Size To | The text for group size and specifies the ending |
| range. Accepts numeric values only. | |
| View Selected | Check the View Selected Check Box to view only |
| selected groups. | |
| Table | Table displays the Groups selected based on the |
| Search and filter conditions. | |
Button Functionality
The following table provides explanation for each button in the screen.
| Element | Description |
| Exported date As | On Selecting the Exported date As on, shows all the |
| on | groups/members available for the specific period |
| Check All | (At Text Header) Check All link Checks all the |
| groups displayed. | |
| Clear All | (At Text Header). Clear All link uncheck all the |
| groups that are checked | |
| Filter | Click the Filter to display the Group based on the |
| search criteria/filter conditions provided. | |
| Clear Filter | Clear the Content of the fields. |
| Check All | The “Check All” Link will check all the records in |
| the table | |
| Clear All | The “Clear All” Link will uncheck all the records in |
| the table that are checked. | |
| Check All on this | The “Check All on this Page” Link will check all the |
| Page | records in the table on this Page |
| Invert Selection | The Invert Selection Link will invert the selection |
| criteria for the check boxes. I.e. All Check Groups | |
| would be unchecked and vice versa. | |
| <<, <, >, >> | These buttons are used for navigating to the next and |
| previous records for viewing. | |
| << - Show first record (s) | |
| < - Show previous record (s) | |
| > - Show next record (s) | |
| >> - Show last record (s) | |
| New | Click New to start new operation on this screen |
| Export | Click Save to save the Content of the EFT Export |
| Commit | Click Commit to effect the EFT Payment |
| Search | Click on Search navigates to have EFT search |
| Back | Click Back navigates back to EFT payment screen |
Credit Card Export
The sequential steps involved in Credit Card Export are listed below.
-
- Step-1: After successful logon, click the menu Finance and select Finance Operations. Select Cash Receipts and then select Credit Card Export. (See Figure D-51)
- Step-2: The screen navigates to Credit Card Export Screen (See Figure D-52)
- Step-3: Choose export date and a group id. Click Export. This pops up a screen for confirmation to download. Click Ok. (See Figure D-53)
Fields Explanation
The following table provides explanations for each of the screen fields.
| Element | Description |
| Credit Card Export |
| Export Id | The text for Export ID. This is auto generated by the |
| system | |
| Status | The text for Export Status. This is a read only field. |
| The system shows the Export status based on data | |
| exported | |
| Exported By | The text for Exported By. This is a read only field. |
| Export Date | The text for Export date. This is a read only field. |
| Export Date as of | Choose “Export Date as of” from the list of billing |
| period | |
| Selected Groups | The text displays the selected group count based on |
| the invoice period. Example 0 to 100. It is a read | |
| only field | |
| Comments | The text for Comments. |
| Filter |
| Group Id | The text for group Id. Accepts numeric values only. |
| Group Name | The text for group name. Accepts any characters. |
| Group Type | Choose a group type from the drop down list |
| available | |
| ROE Cycle Date | The text for ROE Cycle Date From. Choose from the |
| From | calendar icon in the format MM/DD/YYYY. |
| ROE Cycle Date | The text for ROE cycle end date. Choose from the |
| To | calendar icon in the format MM/DD/YYYY |
| Effective Date | The text for effective start date. Choose from the |
| From | calendar icon in the format MM/DD/YYYY |
| Effective Date To | The text for effective end date. Choose from the |
| calendar icon in the format MM/DD/YYYY | |
| Group Size From | The text for group size and specifies the starting |
| range. Accepts numeric values only. | |
| Group Size To | The text for group size and specifies the ending |
| range. Accepts numeric values only. | |
| View Selected | Check the View Selected Check Box to view only |
| selected groups. | |
| Table | Table displays the Groups selected based on the |
| Search and filter conditions. | |
Button Functionality
The following table provides explanation for each button in the screen.
| Element | Description |
| Exported date As | On Selecting the Exported date As on, shows all the |
| on | groups/members available for the specific period |
| Check All | (At Text Header) Check All link Checks all the |
| groups displayed. | |
| Clear All | (At Text Header). Clear All link uncheck all the |
| groups that are checked | |
| Filter | Click the Filter to display the Group based on the |
| search criteria/filter conditions provided. | |
| Clear Filter | Clear the Content of the fields. |
| Check All | The “Check All” Link will check all the records in |
| the table | |
| Clear All | The “Clear All” Link will uncheck all the records in |
| the table that are checked. | |
| Check All on this | The “Check All on this Page” Link will check all the |
| Page | records in the table on this Page |
| Invert Selection | The Invert Selection Link will invert the selection |
| criteria for the check boxes. I.e. All Check Groups | |
| would be unchecked and vice versa. | |
| <<, <, >, >> | These buttons are used for navigating to the next and |
| previous records for viewing. | |
| << - Show first record (s) | |
| < - Show previous record (s) | |
| > - Show next record (s) | |
| >> - Show last record (s) | |
| New | Click New to start new operation on this screen |
| Save | Click Save to save the Content of the Credit Card |
| Export | |
Credit Card Import
The sequential steps involved in Credit Card Import are listed below.
-
- Step-1: After successful logon, click the menu Finance and select Finance Operations. Select Cash Receipts and then select Credit Card Import. (See Figure D-54)
- Step-2: The screen navigates to Credit Card Import Screen. (See Figure D-55)
- Step-3: Choose a file to import by clicking Browse button. The file should be in the format of .txt
- Step-4: Click Import button to import the selected file. If the file selected is imported successfully, status will show imported.
Fields Explanation
The following table provides explanations for each of the screen fields.
| Element | Description | |
| Import Id | Read only field to display import id value | |
| Status | Read only field to display the status of import | |
| Import Date | Read only field to display the import date | |
| Imported By | Read only field to display the user who imported the | |
| files | ||
| Import File | Enter the file path or select the path by clicking | |
| browse button. The field is mandatory | ||
| Comments | Text for Comments | |
Button Functionality
The following table provides explanation for each button in the screen.
| Element | Description | |
| New | Click on new button enables to have a new import of | |
| Credit Card File.. | ||
| Import | Click on import button will perform the action of | |
| importing the file selected. | ||
Mail house commission data export
The sequential steps involved in Agent Commission run are listed below.
-
- Step-1: After successful logon, click the menu Finance and select Finance Operations. Select Cash Receipts and then select Mail house Commission data export. (See Figure D-56)
- Step-2: The screen navigates to Mail House Commission Data Export Screen (See Figure D-57)
- Step-3: Choose export date and group id to be exported. Click Export.
- Step-4: Click view status to have the status details of export ids generated. Search screen pops up. Enter value in any of the field or simply click search button to perform search operation. (See Figure D-58)
- Step-5: This pops up a screen with search result. Click Back to navigate back to Mail house commission data export screen. (See Figure D-59)
Fields Explanation
The following table provides explanations for each of the screen fields.
| Element | Description |
| Cheque Billing |
| Export Id | The text for Export ID. This is auto generated by the |
| system | |
| Status | The text for Status. This is a read only field. The |
| system shows the Export status based on premium | |
| transmission data export | |
| Exported By | The text for Exported By. This is a read only field. |
| Export Date | The text for Export date. This is a read only field. |
| Exported date As | On Selecting the Exported date As on, shows all the |
| on | groups/members available for the specific period |
| Selected Groups | Displays the number of groups selected from the |
| Of | total number of available groups |
| Comments | The text for Comments. |
| Filter |
| Agent/Agency Id | Text for agent/agency id. Accepts numeric values of |
| not exceeding 10 digits | |
| Agent/Agency | Choose either agent or agency to incorporate names |
| Agent First Name | The text for contact name. Accepts alphabets and |
| special characters like hyphen and single quotes not | |
| exceeding 25 characters. Field is mandatory | |
| Agent Last Name | The text for contact name. Accepts alphabets and |
| special characters like hyphen and single quotes not | |
| exceeding 35 characters. Field is mandatory |
| Agency Legal Name |
| View Selected | Check the View Selected Check Box to view only |
| selected groups. | |
| Effective Date | The text for effective start date. Choose from the |
| From | calendar icon in the format MM/DD/YYYY |
| Effective Date To | The text for effective end date. Choose from the |
| calendar icon in the format MM/DD/YYYY | |
| Check All | The “Check All” Link will check all the records in |
| the table | |
| Clear All | The “Clear All” Link will uncheck all the records in |
| the table that are checked. | |
| Check All on this | The “Check All on this Page” Link will check all the |
| Page | records in the table on this Page |
| Invert Selection | The Invert Selection Link will invert the selection |
| criteria for the check boxes. I.e. All Check Groups | |
| would be unchecked and vice versa. | |
Button Functionality
The following table provides explanation for each button in the screen.
| Element | Description | |
| New | Click New to start new operation on this screen | |
| Export | Click Export button to Export the check billing data | |
| based on the selection criteria | ||
| Search | Click Search Button to Search for the check billing | |
| data and view the Export Status | ||
| Filter | Click the Filter to display the Group based on the | |
| search criteria/filter conditions provided. | ||
| Clear Filter | Clear the Content of the fields. | |
Risk Adjustment
The sequential steps involved in Risk Adjustment Import are listed below.
-
- Step-1: After successful logon, click the menu Finance and select Finance Operations. Select Risk Adjustment and then select Risk Adjustment Import. (See Figure D-60)
- Step-2: The screen navigates to Import Risk Adjustment Factor. (See Figure D-61)
- Step-3: Choose a file to import by clicking Browse button. The file format should be of .txt Click Import to import the selected file.
- Step-4: Click search button to know the status of import ids generated. This pops up a search screen, where the enter any value in one of the field or simply click search to perform search operation.
- Step-5: This pops up a screen with search result. Click on any import id to view the contents or otherwise click Back button to navigate back to Import Risk Adjustment Factor screen. (See Figure D-62)
Fields Explanation
The following table provides explanations for each of the screen fields.
| Element | Description |
| Import Id | Read only field to display import id value |
| Import Status | Read only field to display the status of import |
| Imported By | Read only field to display the user who imported the |
| files | |
| Import Date | Read only field to display the import date |
| Import File | Enter the file path or select the path by clicking |
| browse button. The field is mandatory | |
| Effective Date | Enter the date for Effective date or select a date by |
| clicking calendar icon. The field is mandatory. | |
Button Functionality
The following table provides explanation for each button in the screen.
| Element | Description | |
| New | Click on new button enables to have a new import of | |
| Risk Adjustment Factor File. | ||
| Import | Click on import button will perform the action of | |
| importing the file selected. | ||
| Search | Click on the Search button to search for the Risk | |
| Adjustment file import status. | ||
PX2 User Manual
Others
Version 1.0
Jul. 31, 2002
Copyright© 2002 Benefit Partners, Inc.
1 Introduction
Others encompass the modules like Search Zip, Call Tracking, Manual Mail Merge, Report and Letter Regeneration.
The Applications
Search Zip—. Search Zip provides basically two types of searches. First it analyses the zip codes provided namely zip1 and zip2 and provides the distance between the two locations. Another one is search can be made either by entering zip code, county or city
Call Tracking—. Call Tracking is used to track the calls that are made or received with specific business intension. It can be inbound (calls received) or outbound (calls made). It also has a feature for identifying task on hand for the calls as “To do List”
Manual Mail Merge—. The Mail Merge module addresses the functionality of the system where it needs to generate business correspondences using predefined templates. The templates are basically RTF files with placeholders for dynamic data in them. The output is usually a RTF file, but at times this could be a PostScript or a PDF document
Letter Regeneration—. The Letter Regeneration is mainly to generate letters as per the templates provided. The templates can be selected based on the selected criteria, namely Group, Employee, Agent and Dependent.
Reports—. Report Module encompasses the process of displaying the business information to the viewers. The objective of the Reports is to provide information captured in the system to the user in a presentable manner. The reports can be single, two-dimensional and multi dimensional providing the information to the decision-maker
2 Search Zip
Search Zip provides basically two types of searches. First it analyses the zip codes provided namely zip1 and zip2 and provides the distance between the two locations. Entering zip code, county or city can make another one is search.
Access
The application can be accessed from the main menu as follows:
-
- Others->Search Zip
Pre-Requisites
Zip search provides the distance between the two zip codes and also search can be made by either on zip code, county or city.
Application Functions
The application consists of only one screen.
-
- Zip Search—to arrive the distance of two zip codes and also to have a search either on zip code, county or city.
Search Zip
Zip search provides the distance between the two zip codes and also either on zip code, county or city can make search.
-
- Step-1: After successful logon, click the menu Others and Search Zip. (See Figure E-1)
- Step-2: Choose any one from the options [City, County, Zip] and enter corresponding value in the text field. Entry to this field is mandatory, before clicking Search button.
- Step-3: This pops up a screen with search results. (See Figure E-2)
- Step-4: Enter zip code1 and zip code2, as per field explanation provided in Fields Explanation table. Also choose the search option from City/County/Zip. Click Search. (See Figure E-3)
Fields Explanation
The following table provides explanations for each of the screen fields
| Element | Description |
| Zip1 | Enter the value for zip1. Accepts numeric values of 5 |
| digits. | |
| Zip2 | Enter the value for zip1. Accepts numeric values of 5 |
| digits. Both zip1 and zip2 cannot have the same value. | |
| Distance between | The text displays the distance between zip1 and zip2 |
| zip1 and zip is | |
| City | Choosing the value of the radio button for city for the |
| text typed in the search box will display matched | |
| records. The text entered for this search should be | |
| alpha. | |
| County | Choosing the value of the radio button for county for |
| the text typed in the search box will display matched | |
| records. The text entered for this search should be | |
| alpha. | |
| Zip | Choosing the value of the radio button for zip for the |
| value typed in the search box will display matched | |
| records. The value entered for this search should be | |
| numeric with 5 digits. | |
Button Functionality
The following table provides explanation for each button in the screen
| Element | Description | |
| Search | Click on the search button will search based on the | |
| selection of the radio button value for the text entered | ||
| in the search box. Search box should not be empty. | ||
| Cancel | Click on the cancel button to clear the data entered on | |
| the screen and focus on the same screen to proceed. | ||
| Click on Print will print the contents of the table | ||
| generated based on the search criteria. | ||
| Go button | Click on the go button to analyze the zip codes entered | |
| for their availability and displays the result for the | ||
| valid zip codes. | ||
3 Call Tracking
Call Tracking is used to track the calls that are made or received with specific business intension. It can be inbound (calls received) or outbound (calls made). It also has a feature for identifying task on hand for the calls as “To do List”.
Access
The application can be accessed from the main menu as follows:
-
- Others->Call Tracking
- ->To Do List
- Others->Call Tracking
Pre-Requisites
Group & Agent information must be available in the system as a pre-requisite
Application Functions
This application has the following functions:
-
- Call Tracking—to keep track of information received from group/agent
- To Do List—gives a list of task to be performed
Call Tracking
-
- Step-1: After successful logon, click the menu Sales & Marketing and select Call Tracking. Then select call tracking. (See Figure E-4)
- Step-2: Screen navigates to Call Tracking screen. (See Figure E-5)
- Step-3: Select a value for call type from the list available Choose. Group/Agent Id by clicking search icon. (See Figure E-6)
- Step-4: On clicking search icon, a search screen pops up. Search operation can be performed either based on the inputs or even if the fields are empty. (See Figure E-7)
- Step-5: Click on group id for selection
- Step-6: Enter the value of the fields, as per the format briefed in field's explanation section
- Step-7: Click save button.
Fields Explanation
The following table provides explanations for each of the screen fields.
| Element | Description |
| Call Type | Choose a type of call from the drop down list available |
| Referenced Entity | Choose an entity from either Group or Agent. Group is |
| the default selected value | |
| Group Id | The text for group id. Choose a group id by clicking |
| search icon. It is valid only if the option of referenced | |
| entity is group. The field is mandatory | |
| Agent Id | The text for agent id. Choose an agent id by clicking |
| search icon. It is valid only if the option of referenced | |
| entity is agent. The field is mandatory | |
| Caller Name | The text for caller name Accepts alphabets and special |
| characters like hyphen and single quotes not exceeding | |
| 35 characters. Field is mandatory | |
| Nature of Call | Choose a nature of call from the drop down list |
| available. Field is mandatory | |
| Other | The text for others. It accepts alphanumeric values. |
| The field is active only if the value of nature of call is | |
| other | |
| Date & Time | The text for date and time. It is a system generated |
| value and it is read only | |
| Follow-up | Click the check box, if the follow-up is required |
| required | |
| Follow-up Date | The text for follow-up date. Choose a date in the |
| format MM/DD/YYYY by clicking calendar icon. It is | |
| mandatory only if the follow-up value is clicked. | |
| Comment | The text for comments. Accepts alphanumeric and |
| special characters except double quotes of maximum | |
| length 255 characters | |
Button Functionality
The following table provides explanation for each button in the screen.
| Element | Description | |
| Save | Saves the entered information not only for the present | |
| screen. | ||
| Search | Clears the screen and perform search operation based | |
| on the input value for group/agent. | ||
| Cancel | Clears the contents entered in the fields or restore to | |
| the previous state as was before saving the changes. | ||
To do list
-
- Step-1: After successful logon, click the menu Others and select Call Tracking. Then select To Do List. (See Figure E-8)
- Step-2: Screen navigates to “To Do” List screen.
- Step-3: Choose call type. Enter date for either follow-up date or called date. Click Search. (See Figure E-9)
- Step-4: This pops up a screen with search result. (See Figure E-10)
- Step-5: On selecting an entity by clicking the check box, it means that the status is going to be changed.
- Step-6: On clicking save it will ask for confirming the change in status. Once it is confirmed the task is completed and get removed from the list.
Fields Explanation
The following table provides explanations for each of the screen fields.
| Element | Description |
| Call Type | Choose a type of call from the option of inbound and |
| outbound. The default value selected is inbound | |
| Follow-up Date | The text for follow-up date. Choose a date in the |
| format MM/DD/YYYY by clicking calendar icon. | |
| provided the option of follow-up-date is selected | |
| Called Date | The text for called date. Choose a date in the format |
| MM/DD/YYYY by clicking calendar icon, provided | |
| called date is selected | |
Button Functionality
The following table provides explanation for each button in the screen.
| Element | Description | |
| Save | Saves the entered information not only for the present | |
| screen. | ||
| Search | Clears the screen and perform search operation based | |
| on the input value for group/agent. | ||
| Cancel | Clears the contents entered in the fields or restore to | |
| the previous state as was before saving the changes. | ||
| Close | Close the window. | |
4 Manual Mail Merge
The Mail Merge module addresses the functionality of the system where it needs to generate business correspondences using predefined templates. The templates are basically RTF files with placeholders for dynamic data in them. The output is usually a RTF file, but at times this could be a PostScript or a PDF document
Access
The application can be accessed from the main menu as follows:
-
- Others->Manual Mail Merge
Pre-Requisites
All the pre-defined templates for generating business correspondence must be available for generating the same.
Application Functions
This application has the following functions:
-
- Mail Merge—to generate business correspondence as per the available templates.
Manual Mail Merge
The screen is to generate business correspondence.
The sequential steps involved in manual mail merge are listed below.
-
- Step-1: After successful logon, click the menu others select Manual Mail Merge. (See Figure E-11)
- Step-2: Navigates to a screen wherein a category has to be selected. Based on the selected category, the templates pertaining to that category will be displayed for generating business correspondence. (See Figure E-12)
- Step-3: Choose a template id for generating the business correspondence. (See Figure E-13)
- Step-4: This navigates to a screen, which has mainly three headings stating about the details of Template information, the category selected and the output option. The header that contains the fields based on the selected category, are all dynamically generated to have search operation. (See Figure E-14)
- Step-5: The content of the fields based on the category selected, has to be selected by search icon. Enter any value or first letter in any one of the fields to perform search operation. Click search icon. (See Figure E-15)
- Step-6: This pops up a screen with search result. (See Figure E-16)
- Step-7: Click on any hyperlink for selection.
- Step-8: Choose the output option. If the option is View the user can a view of the business letter generated from the chosen template or otherwise if the option is Print to Mailroom will queue the business correspondence generated to printer. A pop up screen will appear stating the status of mail merge. (See Figure E-17)
- Step-9: On clicking Ok button, screen navigates to word document as follows: (See Figure E-18)
5 Letter Regeneration
Letter Regeneration is used to generate letters for a specific period with specific type of letter say Add On, Termination etc., with specific addressee say Employee, Group, Dependent etc.,
Access
The application can be accessed from the main menu as follows:
-
- Others->Letter Regeneration
Pre-Requisites
Relevant information must be available in the system as a pre-requisite
Application Functions
This application has the following functions:
-
- Letter Regeneration—to generate letters with specific request
Letter Regeneration
-
- Step-1: After successful logon, click the menu Others and then Letter Regeneration. (See Figure E-19)
- Step-2: Screen navigates to Letter Regeneration screen.
- Step-3: Enter the values in the respective field as per the format explained in fields' explanation table.
- Step-4: Based on the selected value in Address Type, will allow to have search operation for address, by clicking the search icon. (See Figure E-20)
- Step-5: By clicking the search icon for addressee, search screen displays, for the selected value in address type.
- Step-6: Select an employee id. The selected employee name gets reflected in Letter Regeneration screen. (See Figure E-21)
- Step-7: According to the inputs, the templates will be displayed by clicking Search button to generate a letter. If no option is selected and simply clicking search button will display all the templates.
- Step-8: Click on any template for selection to generate a letter.
Fields Explanation
The following table provides explanations for each of the screen fields.
| Element | Description |
| Letter | The text for From date to generate a letter. Choose a |
| generated | date in the format MM/DD/YYYY by clicking calendar |
| between | icon provided |
| And | The text for To date to generate a letter. Choose a date |
| in the format MM/DD/YYYY by clicking calendar icon | |
| provided | |
| Type of letter | Choose a type of letter from the drop down list |
| available namely, Add On, Termination, Missing Info, | |
| Others | |
| Addressee type | Choose a type of addressee from the drop down list |
| available namely, Group, Employee, Dependent, | |
| Agent. This field is mandatory. | |
| Addressee | Based on the selected value of addressee type, will |
| restrict to choose a addressee by clicking the search | |
| icon. | |
| Addressee | Text for addressee name. This is a read only field. |
| name | Data is populated by selecting an addressee by clicking |
| search icon. | |
Button Functionality
The following table provides explanation for each button in the screen.
| Element | Description | |
| Search | Clears the screen and perform search operation based | |
| on the input value. | ||
| Clear | Clears the contents entered in the fields or restore to | |
| the previous state as was before saving the changes. | ||
Reports Module encompasses the process of displaying the business information to the viewers. The objective of the Reports is to provide information captured in the system to the user in a presentable manner. The reports can be single, two-dimensional and multi dimensional providing the information to the decision-maker.
Reports are categorized based on the modules and the purpose of the reports.
Access
The application can be accessed from the main menu as follows:
-
- Others->Reports
Pre-Requisites
All the master and transactional data must be available in the system to display the real time reporting feature.
Application Functions
This application has the following functions:
-
- Generate—to generate reports
Report
The screen is to generate report
The sequential steps involved in generating a report are listed below.
-
- Step-1: After successful logon, click the menu Others select Report. (See Figure E-22)
- Step-2: The screen navigates to report heading, which are identified as major headings to cover all the information. (See Figure E-23)
- Step-3: Choose any heading. Click (+) to expand and (−) to collapse. Screen displays the sub-headings under each major heading. (See Figure E-24)
- Step-4: Choose any sub-heading to have report.
- Step-5: Navigates to a screen for entering the query criteria. These fields are built dynamically based on the report sought. (See Figure E-25)
- Step-6: Enter the search criteria as available on the screen and Click Generate Report. Click on the back button to navigated back to the Report Screen.
- Step-7: Opens up a new browser window and displays the report in the crystal viewer. (See Figure E-26)
| Contents |
| Introduction | 1-1 | |
| The Applications | 1-1 | |
| Supply Request | 2-1 | |
| Access | 2-1 | |
| Access | 2-1 | |
| Internal Supply Request | 2-3 | |
| External Supply Request | 2-6 | |
| Work Groups | 3-1 | |
| Access | 3-1 | |
| Pre-requisites | 3-1 | |
| Application Functions | 3-1 | |
| Category | 3-2 | |
| Main Workgroup | 3-4 | |
| Child Workgroup | 3-7 | |
| Mail Members | 3-10 | |
| Swap Members | 3-13 | |
| Associates | 4-1 | |
| Access | 4-1 | |
| Pre-requisites | 4-1 | |
| Application Functions | 4-1 | |
| Associate | 4-1 | |
| Campaign | 5-1 | |
| Access | 5-1 | |
| Pre-requisites | 5-1 | |
| Application Functions | 5-1 | |
| Source Type | 5-2 | |
| Source Sub Type | 5-5 | |
| Campaign | 5-7 | |
| Campaign Search | 5-12 | |
| Sales Master | 6-1 | |
| Access | 6-1 | |
| Pre-requisites | 6-1 | |
| Application Functions | 6-2 | |
| Create Agency | 6-2 | |
| Search Agency | 6-9 | |
| Create Agent | 6-15 | |
| Search Agent | 6-23 | |
| Create Lead | 6-29 | |
| Search Lead | 6-35 | |
| Campaign to Lead | 6-40 | |
| Lead Tracking | 6-44 | |
| Lead Tracking - To Do List | 6-49 | |
| Create Agent Profile | 6-50 | |
| Search Agent Profile | 6-54 | |
| Quotes | 7-1 | |
| Access | 7-1 | |
| Pre-requisites | 7-1 | |
| Application Functions | 7-1 | |
| Group/Lead Info | 7-2 | |
1 Introduction
Sales and Marketing is the master and transaction module that encompasses the process of creating and maintaining master and transaction information that is required for the PX2 System like Agent, Agency, Lead, Quotes, Work Group, Associates, Supplier request, Lead and Agent Tracking and Campaign.
The Applications
The above-mentioned processes are accomplished in several applications embedded into the Sales and Marketing Module. These applications steer the tasks of creating, and maintaining master and transaction information for the PX2 entities, thereby helping achieve the goals of the Sales and Marketing.
Supply Request—A Supply Request is the process of ordering the handbooks, rate books, forms and application, complementary, super directories that are sent to the employer groups and its members through the mailroom. Supplier Request basically consists of Internal Supplier request to cater to the internal needs of the BPI and External Supplier request to cater to the external needs of the BPI.
Work Groups—Workgroups is the process of categorization of a group of agents, internal working personnel of BPI, external working personnel associated with BPI into a subset of work groups.
Associates—The Associated is the process of identifying and managing the personnel who are employed by BPI and work with BPI.
Campaign—A campaign is the process of identifying a segment of potential employer groups targeted through the media like the radio, newspaper, mailers etc. Benefit Partners organizes for the marketing campaigns through third parties or by itself periodically.
Sales Master—Sales Master is the process of maintaining the entire master records relevant to the Sales. This includes operations like creation and maintenance of Agent, Agency, Lead Masters, Lead Tracking, and Agent Profiles.
Quotes—Quotes are the processes of providing Quotes for potential business entities as well as existing business entities. Quotes can be requested for small Employer Groups or Alternate Groups (Individual Association Member, Association Group, COBRA etc.) as well as for employees of those groups.
2 Supply Request
Supplier request is to setup basic information for ordering various Handbooks, stationeries and other materials needs by BPI for their day to day business in the PX2 system Supplier Request are of two types, Internal and External
Access
The application can be accessed from the main menu as follows:
-
- Sales & Marketing->Supply Request->Internal Supply Request
- Sales & Marketing->Supply Request->External Supply Request
- Sales & Marketing->Supply Request->Confirm Internal
- Sales & Marketing->Supply Request->Confirm External
Pre-Requisites
Both internal and external supplier request contains header and the items (As Stock # in the header and Items below). The data for the Stock # and the Items are available in the tables TBL_BPICAS_CODE_CTRL and TBL_BPICAS_UTIL.
Table TBL_BPICAS_CODE_CTRL has CODE_ID, CODE_VALUE and CODE_DESC
The table needs to be populated to have the Stock # on the screen
Example Data
| CODE_ID | CODE_VALUE | CODE_DESC | |
| EXTERNAL | PSP | Pre-Selected package | |
| EXTERNAL | HB | Hand Book | |
| INTERNAL | SOS | Standard Office Supply | |
Table TBL_BPICAS_UTIL has REQUEST_TYPE, SUB_CLASS, UTIL_NAME and UTIL_DESC
The table needs to be populated to have the Items on the screen
Example Data
| REQUEST_TYPE | SUB_CLASS | UTIL_NAME | UTIL_DESC |
| EXTERNAL | HB | DNH | Dental Hand |
| Book | |||
| INTERNAL | SOS | BR | Binder Clips |
| Small | |||
Application Functionality
The application consists of two screens.
-
- Internal Supply Request—to have internal supply request
- External Supply Request—to have external supply request
Internal Supply Request
-
- Step-1: After successful login, click Supply Request then select Internal Supply Request. (See Figure F-1)
- Step-2: Navigates to Internal Supply Request screen. Entry in one quantity field is mandatory. Also confirmation can be accessed by clicking confirmation tab. (See Figure F-2)
- Step-3: On clicking Save navigates Confirmation screen. (See Figure F-3)
Fields Explanation
The following table provides explanations for each of the screen fields.
| Element | Description |
| Qty | Enter the value for quantity. Accepts only numeric |
| values. At least one value for quantity is mandatory. | |
| Special | Enter the text for special instructions. Accepts |
| Instructions | alphanumeric and special characters not exceeding 255 |
| characters. The field is optional. | |
Button Functionality
The following table provides explanations for each of the screen fields.
| Element | Description |
| Save button | Click on save button to the save the content keyed in |
| and navigates to confirmation screen displaying the | |
| Confirmation ID. | |
| Cancel button | Click on clear button clears the content and appears |
| again for fresh entries | |
External Supply Request
-
- Step-1: After successful login, click Supply Request then select External Supply Request. (See Figure F-4)
- Step-2: Navigates to External Supply Request screen. Entry in one quantity field is mandatory. Also confirmation can be accessed by clicking confirmation tab. (See Figure F-5)
- Step-3: On clicking Save navigates to Confirmation screen. (See Figure F-6)
Fields Explanation
The following table provides explanations for each of the screen fields.
| Element | Description |
| Qty | Enter the value for quantity. Accepts only numeric |
| values. At least one value for quantity is mandatory. | |
| Customer Request | Enter a date or click calendar icon to select a date. The |
| Date | field is mandatory. |
| Confirm | Choose the option by ticking the checkbox to have a |
| fulfillment | confirmation of request made by email. |
| by Email | |
| Agent/Employer | Enter the value for agent/employer group id. The field |
| Group Id | is mandatory. Or Choose the Agent or Group by |
| clicking the Search Icon | |
| Company Name | Enter the text for company name. The field is |
| mandatory | |
| Address | The text for company address. Accepts alphanumeric |
| and special characters not exceeding 35 characters | |
| Suite | The text for company suite Accepts alphanumeric and |
| special characters not exceeding 35 characters | |
| City | The text for city. Accepts alphabets and space between |
| two words not exceeding 30 characters. The field is | |
| mandatory | |
| State | Choose a state from the drop down list. The field is |
| mandatory | |
| Referenced Entity | Choose the option either Group or Agent |
| Zip | The text for zip. Accepts numeric value of exactly 5 |
| digits. | |
| Ship via | Choose the option of delivery from the available |
| modes like Mailroom, Will Call, | |
| Special | Enter the text for special instructions. Accepts |
| Instructions | alphanumeric and special characters not exceeding 255 |
| characters. | |
Button Functionality
The following table provides explanations for each of the screen fields.
| Element | Description |
| Save button | Click on save button to the save the content keyed in |
| and navigates to confirmation screen displaying the | |
| Confirmation ID. | |
| Cancel button | Click on clear button clears the content and appears |
| again for fresh entries | |
3 Work Groups
Work Group is to setup basic information like Category, Work Group and Child Work Group. Workgroups is the concept of categorization of a group of agents, internal working personnel of BPI, external-working personnel associated with BPI into a subset of work groups. Also this provides a feature of swapping the members within the work group.
Access
The application can be accessed from the main menu as follows:
-
- Sales & Marketing->Work Groups->Category
- Sales & Marketing->Work Groups->Main Workgroup
- Sales & Marketing->Work Groups->Child Workgroup
- Sales & Marketing->Work Groups->Mail Members
- Sales & Marketing->Work Groups->Swap Members
Pre-Requisites
There are no pre-requisites for using this application.
Application Functions
This application has the following functions:
-
- Category—To Create, Modify and view Category
- Main Workgroup—To Create, Modify and view Main Workgroup
- Child Workgroup—To Create, Modify and view Child Workgroup
- Mail Members—To Create, Modify and view Mail Members
- Swap Members—To Swap members between source and destination work groups
Category
-
- Step-1: After successful logon, click the menu Sales & Marketing and select Work Groups. Then select Category. (See Figure F-7)
- Step-2: Screen navigates to category screen. Enter the category name with its description as per the format briefed in field's explanation section. (See Figure F-8)
- Step-3: Click Add button to have a temporary storage.
- Step-4: Select a category name by clicking Edit button to modify a category name. (See Figure F-9)
- Step-5: Change any modifications and click Update
- Step-6: Click Save button to save the contents
Fields Explanation
The following table provides explanations for each of the screen fields.
| Element | Description |
| Name | The text for category name. Accepts alphabets and |
| numeric and “/” values not exceeding 30 characters. | |
| Entry to this field is mandatory. | |
| Description | The text for category description. Accepts alphabets |
| and numeric and special characters except double | |
| quotes with values not exceeding 255 characters. | |
Button Functionality
The following table provides explanation for each button in the screen.
| Elemet | Description |
| Add | Add the contents of category. It is only a temporary |
| addition. Becomes permanent record only after saving | |
| Edit | Edit button will allow for editing a specific record in |
| the table. | |
| Delete | Delete button will delete the records in the table |
| checked for deletion. It is only a temporary deletion. | |
| Becomes permanent record only after saving | |
| Update | Update the contents of category. It is only a temporary |
| update. Becomes permanent record only after saving | |
| Check All | The “Check All” Link will check all the records in the |
| table | |
| Clear All | The “Clear All” Link will uncheck all the records in the |
| table that are checked. | |
| The Print will pops up a screen displaying the content | |
| of the table created and enables the user to have print | |
| out of the same. | |
| Save | Saves the entered category in the database. The page |
| gets refreshed and the contents entered in the fields | |
| are shown. | |
| Cancel | Clears the contents entered in the fields or restore to |
| the previous state as was before saving the changes. | |
Main Workgroup
-
- Step-1: After successful logon, click the menu Sales & Marketing and select Work Groups. Then select Main Workgroup. (See Figure F-10)
- Step-2: Screen navigates to main workgroup screen. Choose a category name. Enter the main workgroup name with its description and also select the option whether it is a child work group or main work group, as per the format briefed in field's explanation section. (See Figure F-11)
- Step-3: Click Add button to have a temporary storage.
- Step-4: Select a main workgroup name by clicking Edit button to modify a main workgroup name. (See Figure F-12)
- Step-5: Change any modifications and click Update
- Step-6: Click Save button to save the contents
Fields Explanation
The following table provides explanations for each of the screen fields.
| Element | Description |
| Category | Choose a category from the drop down list available |
| Name | The text for main workgroup name. Accepts alphabets |
| and numeric values not exceeding 30 characters. | |
| Entry to this field is mandatory. | |
| Description | The text for main workgroup description. Accepts |
| alphabets and numeric and all special characters | |
| except double quotes with values not exceeding 255 | |
| characters. Field is optional | |
| Is this a child | Choose this option, if the main work group is also a |
| workgroup | child work group |
Button Functionality
The following table provides explanation for each button in the screen.
| Element | Description |
| Add | Add the contents of main workgroup. It is only a |
| temporary addition. Becomes permanent record only | |
| after saving | |
| Edit | Edit button will allow for editing a specific record in |
| the table. | |
| Delete | Delete button will delete the records in the table |
| checked for deletion. It is only a temporary deletion. | |
| Becomes permanent record only after saving | |
| Update | Update the contents of main workgroup. It is only a |
| temporary update. Becomes permanent record only | |
| after saving | |
| Check All | The “Check All” Link will check all the records in the |
| table | |
| Clear All | The “Clear All” Link will uncheck all the records in the |
| table that are checked. | |
| The Print will pops up a screen displaying the content | |
| of the table created and enables the user to have print | |
| out of the same. | |
| Save | Saves the entered main workgroup in the database. |
| The page gets refreshed and the contents entered in | |
| the fields are shown. | |
| Cancel | Clears the contents entered in the fields or restore to |
| the previous state as was before saving the changes. | |
Child Workgroup
-
- Step-1: After successful logon, click the menu Sales & Marketing and select Work Groups. Then select Child Workgroup. (See Figure F-13)
- Step-2: Screen navigates to child workgroup screen. Choose a main workgroup. Enter the child workgroup name with its description, as per the format briefed in field's explanation section. (See Figure F-14)
- Step-3: Click Add button to have a temporary storage.
- Step-4: Select a child workgroup name by clicking Edit button to modify a child workgroup name. (See Figure F-15)
- Step-5: Change any modifications and click Update
- Step-6: Click Save button to save the contents
Fields Explanation
The following table provides explanations for each of the screen fields.
| Element | Description |
| Main workgroup | Choose a main workgroup from the drop down list |
| available | |
| Name | The text for child workgroup name. Accepts alphabets |
| and numeric values not exceeding 30 characters. | |
| Entry to this field is mandatory. | |
| Description | The text for child workgroup description. Accepts |
| alphabets, numeric and special character except | |
| double quotes not exceeding 255 characters. Field is | |
| optional | |
Button Functionality
The following table provides explanation for each button in the screen.
| Element | Description |
| Add | Add the contents of child workgroup. It is only a |
| temporary addition. Becomes permanent record only | |
| after saving | |
| Edit | Edit button will allow for editing a specific record in |
| the table. | |
| Delete | Delete button will delete the records in the table |
| checked for deletion. It is only a temporary deletion. | |
| Becomes permanent record only after saving | |
| Update | Update the contents of child workgroup. It is only a |
| temporary update. Becomes permanent record only | |
| after saving | |
| Check All | The “Check All” Link will check all the records in the |
| table | |
| Clear All | The “Clear All” Link will uncheck all the records in the |
| table that are checked. | |
| The Print will pops up a screen displaying the content | |
| of the table created and enables the user to have print | |
| out of the same. | |
| Save | Saves the entered Child Workgroup in the database. |
| The page gets refreshed and the contents entered in | |
| the fields are shown. | |
| Cancel | Clears the contents entered in the fields or restore to |
| the previous state as was before saving the changes. | |
Mail Members
-
- Step-1: After successful logon, click the menu Sales & Marketing and select Work Groups. Then select Mail Members. (See Figure F-16)
- Step-2: Screen navigates to mail member's screen. Choose a child workgroup Enter the mail id, as per the format briefed in field's explanation section. (See Figure F-17)
- Step-3: Click Add button to have a temporary storage.
- Step-4: Selecting a mail member and clicking Edit button to modify a mail member name. (See Figure F-18)
- Step-5: Change any modifications and click Update
- Step-6: Click Save button to save the contents
Fields Explanation
The following table provides explanations for each of the screen fields.
| Element | Description |
| Child workgroup | Choose a child workgroup from the drop down list |
| available | |
| Mail Id | The text for mail id. Accepts alphabets, numeric and |
| special characters in the standard email format of | |
| length not exceeding 100 characters Entry to this field | |
| are mandatory. | |
Button Functionality
The following table provides explanation for each button in the screen.
| Element | Description |
| Add | Add the contents of mail member. It is only a |
| temporary addition. Becomes permanent record only | |
| after saving | |
| Edit | Edit button will allow for editing a specific record in |
| the table. | |
| Delete | Delete button will delete the records in the table |
| checked for deletion. It is only a temporary deletion. | |
| Becomes permanent record only after saving | |
| Update | Update the contents of mail member. It is only a |
| temporary update. Becomes permanent record only | |
| after saving | |
| Check All | The “Check All” Link will check all the records in the |
| table | |
| Clear All | The “Clear All” Link will uncheck all the records in the |
| table that are checked. | |
| The Print will pops up a screen displaying the content | |
| of the table created and enables the user to have print | |
| out of the same. | |
| Save | Saves the entered Mail Members in the database. The |
| page gets refreshed and the contents entered in the | |
| fields are shown. | |
| Cancel | Clears the contents entered in the fields or restore to |
| the previous state as was before saving the changes. | |
Swap Members
-
- Step-1: After successful logon, click the menu Sales & Marketing and select Work Groups. Then select Swap Members. (See Figure F-19)
- Step-2: Screen navigates to swap members screen. Choose a category, source child group and destination child group to swap members. Also select from the options, whether swap is to be full, partial or duplicate. (See Figure F-20)
- Step-3: Click Search to list the members for swapping from the Source work group to the destination work group.
- Step-4: Select the members for swapping and click Swap to swap the members from Source Work group to the destination Work Group.
- Step-5: Change any modifications and click Update
- Step-6: Click Save button to save the contents
Fields Explanation
The following table provides explanations for each of the screen fields.
| Element | Description |
| Choose Category | Choose the Category from the list. List all the Child |
| Work Group for the specific Category selected. | |
| Choose Source | Choose the Source Child Work group from the list |
| Child Work group | |
| Choose Destination | Choose the Destination Child Work group from |
| Child Work group | the list |
| Do you want to do a | Choose the Option Full, Partial or Duplicate Default |
| full swap or a | value of selection is Full |
| partial swap? | |
Button Functionality
The following table provides explanation for each button in the screen.
| Element | Description |
| Search | Click the search button to list the Member belonging to |
| the Source Work Group for swapping. Based on the | |
| Option, Full, Partial or Duplicate the Check box is | |
| enabled or disabled. Say for Full the Check box is | |
| disabled and the others the check box is enabled. | |
| Swap | Click Swap to swap the member from Source to |
| Destination Child Work Group | |
| Check All | The “Check All” Link will check all the records in the |
| table | |
| Clear All | The “Clear All” Link will uncheck all the records in the |
| table that are checked. | |
4 Associates
An associate is to setup basic information of associates working with BPI in the PX2 System. Associates can be of two types, Internal and External.
Access
The application can be accessed from the main menu as follows:
-
- Sales & Marketing->Associates
Pre-Requisites
Work of Category Internal or External must be available in the system for Assigning associated work group.
Application Functions
This application has the following functions:
-
- Associate—To Create, Modify and Delete Associates
Associate
-
- Step-1: After successful logon, click the menu Sales & Marketing and select Associates. (See Figure F-21)
- Step-2: Screen navigates general information. Choose associate type as either internal or external. (See Figure F-22)
- Step-3: Enter the values in the respective fields, as per the format briefed in field's explanation section.
- Step-4: Choose an available workgroup and assign it by clicking>>button. Then enter the value of license number if applicable.
- Step-5: Click Add button to have a temporary storage
- Step-6: Select an associate and click Edit button to modify an associate name. (See Figure F-23)
- Step-7: Change any modifications and click Update
- Step-8: Click Save button to save the contents
Fields Explanation
The following table provides explanations for each of the screen fields.
| Element | Description |
| Associate Type | Choose a type from either Internal or External. |
| Default value selected is External | |
| Salutation | Choose the salutation from the drop down list of |
| salutations available. | |
| First Name | The text for associate first name. Accepts alphabets |
| and special characters like hyphen and single quotes | |
| not exceeding 25 characters. This field is mandatory | |
| Middle Initial | The text for middle initial. Accepts alphabets not |
| exceeding 1 character. | |
| Last Name | The text for associate last name. Accepts alphabets |
| and special characters like hyphen and single quotes | |
| not exceeding 35 characters. | |
| Suffix | Choose the suffix from the drop down list of suffixes |
| available. | |
| Title | The text for title. Accepts alphabets, numeric and |
| special characters except single quotes not exceeding | |
| 255 characters. | |
| Address | The text for associate address. Accepts alphanumeric |
| and special characters not exceeding 35 characters | |
| Suite | The text for associate suite Accepts alphanumeric and |
| special characters except double quotes not exceeding | |
| 35 characters | |
| City | The text for city. Accepts alphabets and space between |
| two words not exceeding 30 characters. | |
| State | Choose the name of the state from the drop down list |
| of States available in United States of America. This | |
| field is mandatory | |
| Zip | The text for zip. Accepts numeric value of exactly 5 |
| digits. This field is mandatory | |
| Phone | The text for telephone number of the associate. Accepts |
| numeric values not exceeding 10 digits. The format is | |
| (999) 999-9999. | |
| Extension | The text for extension of telephone number Accepts |
| numeric values not exceeding 4 digits. The format is | |
| 9999. | |
| Fax | The text for fax number of the associate. Accepts |
| numeric values not exceeding 10 digits. The format is | |
| (999) 999-9999. | |
| The text for email of the associate person. Accepts | |
| alphabets, numeric and special characters in the | |
| standard email format of length not exceeding 100 | |
| characters. | |
| Department | Choose Department from the List. |
| Workgroups | Displays available workgroup based on the selection of |
| associate type | |
| Assigned | Choose a work group from the available and assigned |
| workgroups | it to assigned work group by clicking “>>” button. |
| This field is mandatory | |
| License | The text for license number. Accepts numeric values |
| number | not exceeding 10 digits |
Button Functionality
The following table provides explanation for each button in the screen.
| Element | Description |
| Add | Add the contents of associates. It is only a temporary |
| addition. Becomes permanent record only after saving | |
| Edit | Edit button will allow for editing a specific record in |
| the table. | |
| Delete | Delete button will delete the records in the table |
| checked for deletion. It is only a temporary deletion. | |
| Becomes permanent record only after saving | |
| Update | Update the contents of associate. It is only a temporary |
| update. Becomes permanent record only after saving | |
| Check All | The “Check All” Link will check all the records in the |
| table | |
| Clear All | The “Clear All” Link will uncheck all the records in the |
| table that are checked. | |
| The Print will pops up a screen displaying the content | |
| of the table created and enables the user to have print | |
| out of the same. | |
| Save | Saves the entered associate in the database. The page |
| gets refreshed and the contents entered in the fields | |
| are shown. | |
| Cancel | Clears the contents entered in the fields or restore to |
| the previous state as was before saving the changes. | |
5 Campaign
A marketing campaign is an initiative where an identifiable segment of potential employer groups are targeted and organizes for the marketing campaigns through third parties or by BPI PacAdvantage periodically.
The details of a campaign initiative are captured in the system through the campaign master the campaign master provides information on the campaign, duration and the personnel associated with the campaign. The media through which a campaign is done is captured in the system using the source type and source subtype.
Access
The application can be accessed from the main menu as follows:
-
- Sales & Marketing->Campaign->Source Type
- Sales & Marketing->Campaign->Source Sub Type
- Sales & Marketing->Campaign->Campaign
- Sales & Marketing->Campaign->Campaign Search
Pre-Requisites
There are no pre-requisites for using this application.
Application Functions
This application has the following functions:
-
- Source Type
- Source Sub Type
- Campaign
- Campaign Search
Source Type
The source type defines the media through which a campaign can be conducted. The screen provides functionality to save, edit or add new source type.
The sequential steps involved in the creation of a source type are listed below
-
- Step-1: After successful logon, click the menu Sales & Marketing. Select Campaign and then Source Type. (See Figure F-24)
- Step-2: Enter the value of source type and select the option of input source as per the format briefed in field's explanation section. (See Figure F-25)
- Step-3: Click Add button to have a temporary storage.
- Step-4: Selecting a source type and clicking Edit button to modify/a source type.
- Step-5: Change any modifications and click Update. (See Figure F-26)
- Step-6: Click Save button to save the contents.
Fields Explanation
The following table provides explanations for each of the screen fields.
| Element | Description |
| Source Type | The text for source type name. Accepts alphabets and |
| numeric values not exceeding 40 characters. Entry to | |
| this field is mandatory. Source Type Name does not | |
| accept duplicate values | |
| Input Source | Choose the option of Yes or No. with a default value |
| selected as Yes | |
| Table | Table displays the Source type data added |
Button Functionality
The following table provides explanation for each button in the screen.
| Element | Description |
| Add | Add the contents of source type. It is only a temporary |
| addition. Becomes permanent record only after saving | |
| Edit | Edit button will allow for editing a specific record in |
| the table. | |
| Delete | Delete button will delete the records in the table |
| checked for deletion. It is only a temporary deletion. | |
| Becomes permanent record only after saving | |
| Update | Update the contents of source type. It is only a |
| temporary update. Becomes permanent record only | |
| after saving | |
| Check Box | Check box will be disabled which has any reference to |
| other fields. Otherwise the checkbox will be enabled to | |
| have the utility of check all/clear all. | |
| Check All | The “Check All” Link will check all the enabled records |
| in the table | |
| Clear All | The “Clear All” Link will uncheck all the enabled |
| records in the table that are checked. | |
| The Print will pops up a screen displaying the content | |
| of the table created and enables the user to have print | |
| out of the same. | |
| Save | Saves the entered source type in the database. The |
| page gets refreshed and the contents entered in the | |
| fields are shown. | |
| Cancel | Clears the contents entered in the fields or restore to |
| the previous state as was before saving the changes. | |
Source Sub Type
Source sub type provides the information on the subcategory that may come under the source type. The screen provides functionality to save, edit or add new source sub type.
The sequential steps involved in the creation of a source sub type are listed below.
-
- Step-1: After successful logon, click the menu Sales & Marketing. Select Campaign and then Source Sub Type. (See Figure F-27)
- Step-2: Select a source sub type. Enter the value of source sub type with its description as per the format briefed in field's explanation section. (See Figure F-28)
- Step-3: Click Add button to have a temporary storage.
- Step-4: Selecting a source sub type and clicking Edit button to modify a source sub type.
- Step-5: Change any modifications and click Update
- Step-6: Click Save button to save the contents. (See Figure F-29)
Fields Explanation
The following table provides explanations for each of the screen fields.
| Element | Description |
| Source Type | Choose a source type from the available drop down list. |
| This field is mandatory. | |
| Source sub | The text for source sub type name. Accepts alphabets |
| Type | and numeric values of maximum length 40. Entry to |
| this field is mandatory. Source Sub Type Name does | |
| not accept duplicate values | |
| Description | The text for description of source sub type. Accepts |
| alphabets, numeric and special characters except | |
| double quote with values not exceeding 255 characters. | |
| Field is optional. | |
Button Functionality
The following table provides explanation for each button in the screen.
| Element | Description |
| Add | Add the contents of source sub type. It is only a |
| temporary addition. Becomes permanent record only | |
| after saving | |
| Edit | Edit button will allow for editing a specific record in |
| the table. | |
| Delete | Delete button will delete the records in the table |
| checked for deletion. It is only a temporary deletion. | |
| Becomes permanent record only after saving | |
| Update | Update the contents of source sub type. It is only a |
| temporary addition. Becomes permanent record only | |
| after saving | |
| Check Box | Check box will be disabled which has any reference to |
| other fields. Otherwise the checkbox will be enabled to | |
| have the utility of check all/clear all. | |
| Check All | The “Check All” Link will check all the enabled records |
| in the table | |
| Clear All | The “Clear All” Link will uncheck all the enabled |
| records in the table that are checked. | |
| The Print will pops up a screen displaying the content | |
| of the table created and enables the user to have print | |
| out of the same. | |
| Save | Saves the entered source sub type in the database. The |
| page gets refreshed and the contents entered in the | |
| fields are shown. | |
| Cancel | Clears the contents entered in the fields or restore to |
| the previous state as was before saving the changes. | |
Campaign
The campaign master provides information on the campaign, duration and the personnel associated with the campaign. The media through which a campaign is done is captured in the system using the source type and source subtype.
The source type defines the media through which a campaign can be conducted and the source sub type provides the information on the subcategory that may come under the source type. The screen provides functionality to save, edit or add new source type The sequential steps involved in the creation of a Campaign are listed below.
-
- Step-1: After successful logon, click the menu Sales & Marketing. Select Campaign and then Campaign. (See Figure F-30)
- Step-2: Enter the text for campaign name and its description. (See Figure F-31)
- Step-3: Choose source type and source sub type from drop down list. Based on the selection of Source Type the page gets refreshed to list the corresponding Source Sub Type.
- Step-4: Choose an associated workgroup. Make it assigned workgroup by clicking>>button.
- Step-5: Choose from and to dates of duration by clicking calendar icon
- Step-6: Click Save button. Screen gets refreshed with auto generated Campaign Id. The save button is now in update mode. (See Figure F-32)
- Step-7: Click Import button to import files. It pop up a new window. (See Figure F-33)
- Step-8: Choose the file to be imported and click import button.
- Step-9: Confirms the status of imported files. Click Back to Import Screen to navigates back for further importing of files. (See Figure F-34)
Fields Explanation
The following table provides explanations for each of the screen fields.
| Element | Description |
| Campaign Master | |
| Campaign Name | The text for campaign name. Accepts alphabets and |
| numeric values not exceeding 40 characters. Field is | |
| mandatory. | |
| Campaign ID | Text to Display Campaign ID. This is a read only |
| field. | |
| Description | The text for description of campaign name. Accepts |
| alphabets, numeric and special characters except | |
| double quotes not exceeding 50 characters. Field is | |
| optional. | |
| Source Type | Choose a source type from drop down list. Field is |
| mandatory. | |
| Source Sub Type | Choose a source sub type from the drop down list. |
| Source sub type depends on the selection of source | |
| type. Field is mandatory. | |
| Associated | Work groups are listed. |
| Workgroup | |
| Assigned | Assign a work group. Field is mandatory |
| Workgroup | |
| Duration From | Choose a valid date by clicking calendar icon. Date |
| accepts the format in MM/DD/YYYY. Field is | |
| mandatory. | |
| Duration To | Choose a valid date by clicking calendar icon. To date |
| cannot be greater than from date. Date accepts the | |
| format in MM/DD/YYYY. Field is mandatory | |
| Import Campaign | |
| Data | |
| Campaign ID | Text to Display Campaign ID. This is a read only |
| field. | |
| File Path | Enter the file path or select the path by clicking |
| browse button. The field is mandatory | |
| File Format | Choose a format from drop down list for File Format, |
| which should match with selection of file. The field is | |
| mandatory | |
| Comments | Text to enter comments. Accepts alphabets, numeric |
| Element | Description |
| and special characters except double quotes not | |
| exceeding 250 characters. This field is optional | |
Button Functionality
The following table provides explanation for each button in the screen.
| Element | Description |
| Campaign Master | |
| New | Creates a new campaign. |
| Save | Saves the entered campaign information. The page |
| gets refreshed with auto generated campaign id. The | |
| save button is now shown as Update Button and | |
| Import button is enabled | |
| Import | Click import to display a pop up screen to import the |
| campaign data. | |
| Update | Updates the contents modified |
| Cancel | Clears the contents entered in the fields or restore to |
| the previous state as was before saving the changes. | |
| Import Campaign | |
| Data | |
| New | Click new button to Import new Campaign data |
| View Previous | Navigates to a screen displaying imported files for the |
| Import | particular campaign id. |
| Back to | Navigates back to import screen for further import of |
| Campaign Import | files. |
| Import | Click import to import the campaign data in the |
| database | |
Campaign Search
Campaign search is to search campaign based on either campaign id or campaign name. Campaign search is to have view, delete or modify the campaigns already created
The sequential steps involved in the campaign search are listed below.
-
- Step-1: After successful logon, click the menu Sales & Marketing. Select Campaign and then Campaign Search. (See Figure F-35)
- Step-2: Search operation can be performed by clicking the search button either by entering the values in the fields or even with empty fields. Campaign id or a first letter of campaign name to have search operation. (See Figure F-36)
- Step-3: Displays the results of search. (See Figure F-37)
- Step-4: Select a campaign and choose the option of modify or view. If the option is modify the following screen appears for modification. (See Figure F-38)
- Step-5: Change the contents and click Update.
- Step-6: If the option is view, the following screen appears only to have a view. Campaigns that are not referred elsewhere can also be deleted. (See Figure F-39)
- Step-7: Click New Campaign button to go back to campaign create screen.
Fields Explanation
Refer field explanations provided for Create Campaign
Button Functionality
The following table provides explanation for each button in the screen.
| Element | Description | |
| Search | Clears the screen and perform search operation based | |
| on the input value for group/agent. | ||
| Cancel | Clears the contents entered in the fields or restore to | |
| the previous state as was before saving the changes. | ||
6 Sales Master
Sales Master is to setup basic information for Agent, Agency and Lead in the PX2 System. Sales Master also has functionality of Lead tracking, maintenance of Agent profile and Campaign to Lead conversion.
Access
The application can be accessed from the main menu as follows:
-
- Sales & Marketing->Sales Master->Create Agency
- Sales & Marketing->Sales Master->Search Agency
- Sales & Marketing->Sales Master->Create Agent
- Sales & Marketing->Sales Master->Search Agent
- Sales & Marketing->Sales Master->Create Lead
- Sales & Marketing->Sales Master->Search Lead
- Sales & Marketing->Sales Master->Campaign to Lead
- Sales & Marketing->Sales Master->Lead Tracking
- Sales & Marketing->Sales Master->Lead Tracking—To do list
- Sales & Marketing->Sales Master->Create Agent Profile
- Sales & Marketing->Sales Master->Search Agent Profile
Pre-Requisites
Pre-requisites for using this application are as follows:
Work Group must be defined and available in the system
Campaign data must be available to convert Campaign to lead
Associates data must be available for assigning BSS representatives.
Application Functions
This application has the following functions:
-
- Create Agency—to create/edit details of Agency
- Search Agency—to search the details of Agency for view modification or deletion
- Create Agent—to create/edit details of Agent
- Search Agent—to search the details of Agent for view modification or deletion
- Create Lead—to create/edit details of lead
- Search Lead—to search the details of lead for view modification or deletion
- Campaign to Lead—to convert campaign data to lead
- Lead Tracking—to track the information on lead
- Lead Tracking to do List—to track and follow up on lead
- Create Agent Profile—to create/edit details of Agent Profile
- Search Agent Profile—to search the details of Agent Profile for view modification or deletion
Create Agency
-
- Step-1: After successful logon, click the menu Sales & Marketing and select Sales Master. Then select Create Agency. (See Figure F-40)
- Step-2: Screen navigates to Agency Master screen. (See Figure F-41)
- Step-3: Enter the values for the respective fields, as per the format briefed in field's explanation section. Click Next.
- Step-4: Navigates to second part of the agency master's screen for filling in further information. (See Figure F-42)
- Step-5: Enter the values for the respective fields, as per the format briefed in field's explanation section. For agency work group, it should be selected by clicking search icon.
- Step-6: This pops up a screen for workgroup search. (See Figure F-43)
- Step-7: Choose category, Main workgroup and child workgroup from the respective drop down list and Click Add.
- Step-8: This displays a screen with the selected workgroup. (See Figure F-44)
- Step-9: After filling all the fields in agency master, click save to create agency master. Following is the sample confirmation screen for a successful creation of agency master. (See Figure F-45)
Fields Explanation
The following table provides explanations for each of the screen fields.
| Element | Description |
| Company Name | The text for company name. Accepts alphanumeric and |
| special characters. Field is mandatory | |
| DBA | The text for business nature. Accepts alphanumeric |
| and special characters. Field is optional | |
| Street Address | The text for company address. Accepts alphanumeric |
| and special characters not exceeding 35 characters | |
| Suite | The text for company suite. Accepts alphanumeric and |
| special characters not exceeding 35 characters | |
| City | The text for city. Accepts alphabets and space between |
| two words not exceeding 30 characters. | |
| State | Choose the name of the state from the drop down list |
| of States available in United States of America | |
| Zip | The text for zip. Accepts numeric value of exactly 5 |
| digits. Field is mandatory | |
| Phone | The text for telephone number of the contact person. |
| Accepts numeric values not exceeding 10 digits. The | |
| format is (999) 999-9999. | |
| Fax | The text for fax number of the contact person. Accepts |
| numeric values not exceeding 10 digits. The format is | |
| (999) 999-9999. | |
| Mode of | Choose a mode of communication from the drop down |
| Communication | list available. Based on the selected value, related |
| fields are mandatory. | |
| Salutation | Choose the salutation from the drop down list of |
| salutations available. | |
| First Name | The text for contact name. Accepts alphabets and |
| special characters like hyphen and single quotes not | |
| exceeding 25 characters. Field is mandatory | |
| Middle Initial | The text for middle initial. Accepts alphabets not |
| exceeding 1 character. | |
| Last Name | The text for contact name. Accepts alphabets and |
| special characters like hyphen and single quotes not | |
| exceeding 35 characters. Field is mandatory | |
| Street Address | The text for company address. Accepts alphanumeric |
| and special characters not exceeding 35 characters | |
| Suite | The text for company suite Accepts alphanumeric and |
| special characters not exceeding 35 characters | |
| City | The text for city. Accepts alphabets and space between |
| two words not exceeding 30 characters. | |
| State | Choose the name of the state from the drop down list |
| of States available in United States of America | |
| Zip | The text for zip. Accepts numeric value of exactly 5 |
| digits. Field is mandatory | |
| Phone | The text for telephone number of the contact person. |
| Accepts numeric values not exceeding 10 digits. The | |
| format is (999) 999-9999. | |
| Extension | The text for extension of telephone number Accepts |
| numeric values not exceeding 4 digits. The format is | |
| 9999. | |
| Fax | The text for fax number of the contact person. Accepts |
| numeric values not exceeding 10 digits. The format is | |
| (999) 999-9999. | |
| The text for email of the contact person. Accepts | |
| alphabets, numeric and special characters in the | |
| standard email format of length not exceeding 100 | |
| characters. | |
| Broker Type | Choose an option for broker type from either |
| Statewide, Regional or unknown | |
| Exclude from | Click this option to have exclusion of broadcast fax |
| Broadcast Fax | |
| Exclude from | Click this option to have exclusion of |
| Employee/ | employee/member term letter |
| Member | |
| Term Letter | |
| Exclude from | Click this option to have exclusion of overdue |
| overdue premium | premium notice |
| notice | |
| Exclude from | Click this option to have exclusion of |
| Employee/ | employee/member add on letter |
| Member | |
| Add on Letter | |
| Agency | Choose a agency work group by clicking search icon |
| Workgroup | |
| Internal | Choose an internal workgroup from the drop down list |
| Workgroup | available. The field is mandatory. |
| BSS Rep | Choose a value for BSS Rep from the drop down list |
| available | |
| Tax ID/SSN | The text for Tax ID/SSN. Accepts numeric values of |
| exactly 9 digits | |
| License Number | The text for License number. Accepts numeric values |
| not exceeding 15 digits | |
| License Type | Choose a type for license from the drop down list |
| available | |
| License | The text for License expiration date. Choose a date in |
| Expiration | the format MM/DD/YYYY by clicking calendar icon. |
| E&O Number | The text for E&O number. Accepts numeric values not |
| exceeding 15 digits | |
| E&O Expiration | The text for E&O Expiration date. Choose a date in the |
| format MM/DD/YYYY by clicking calendar icon. | |
| Preferred Mode | Choose an option for mode of payment either Check or |
| of payment | ACH |
| Bank Name | The text for bank name. Accepts alphabets, numeric |
| and special characters except double quotes with | |
| values not exceeding 50 characters. | |
| Account Number | The text for accounts number. Accepts numeric values |
| not exceeding 9 digits | |
| Element | Description |
| Account Type | Choose a type of account from the drop down list |
| available | |
| Routing Number | The text for routing number. Accepts numeric values |
| not exceeding 10 digits. | |
| Name of the | The text for name of the account holder. Accepts |
| Account | alphabets and numeric values not exceeding 50 |
| characters. | |
| Payee Name | The text for payee name. Accepts alphabets not |
| exceeding 60 characters. | |
| Requires special | Click this option for any special handling is required |
| handling | |
Button Functionality
The following table provides explanation for each button in the screen.
| Element | Description | |
| Next | Click Next to move to the next screen for entering the | |
| Agency information. | ||
| Save | Saves the entered information entered for the Agency | |
| in the screen one and two. | ||
| Cancel | Clears the contents entered in the fields or restore to | |
| the previous state as was before saving the changes. | ||
| Close | Closes the window and go back to agency master | |
| screen | ||
| Previous | Navigates to the previous screen. If any data is entered | |
| on this screen it validate the data prior to moving to | ||
| the previous screen. | ||
Search Agency
-
- Step-1: After successful logon, click the menu Sales & Marketing and select Sales Master. Then select Search Agency. (See Figure F-46)
- Step-2: Screen navigates to Search Agency Master screen. (See Figure F-47)
- Step-3: Either enter the value in any one of the field or simply click Search.
- Step-4: This pops up a screen with the search result. (See Figure F-48)
- Step-5: Choose an Agency Id for selection. The selected agency id can be modified or view and delete. If modify button is clicked details with the contents will be displayed for any modification or otherwise clicking view/delete button will enabled to view or deleted.
- Step-6: If the modify button is clicked following will be screen. Enter the text at the respective fields for modification, if any. The flow and procedure for modifying an agency master is similar to create agency master. (See Figure F-49)
- Step-7: If the view/delete button is clicked, following is the screen, which allows to view and delete. (See Figure F-50)
- Step-8: After viewing the contents, if the new agency is clicked will enable to add new agency master or if the delete button is clicked will delete the agency master that is currently in view. (See Figure F-51)
- Step-9: On clicking delete, navigates to confirming the deletion of agency record. From here clicking new agency button can create also new agency. (See Figure F-52)
Fields Explanation
Refer Field explanation provided for Create New Agency
Button Functionality
Refer Button Functionality provided for Create New Agency.
Create Agent
-
- Step-1: After successful logon, click the menu Sales & Marketing and select Sales Master. Then select Create Agent. (See Figure F-53)
- Step-2: Screen navigates to Agent Master screen. (See Figure F-54)
- Step-3: Enter the values for the respective fields, as per the format briefed in field's explanation section. Click Next.
- Step-4: Navigates to second part of the agent master screen for entering further information. (See Figure F-55)
- Step-5: Enter the values for the respective fields, as per the format briefed in field's explanation section. For agent work group, it should be selected by clicking search icon.
- Step-6: The selection procedure for Work group search is similar to that of workgroup search explained in Create Agency. For Associated agencies the procedure is same but the sample screen is as follows. (See Figure F-56)
- Step-7: Enter the first letter of agency id or agency name to perform search operation
- Step-8: This displays a screen with the selected workgroup. (See Figure F-57)
- Step-9: After filling all the fields in agent master, click save to create agent master. Following is the sample confirmation screen for a successful creation of agent master. (See Figure F-58)
Fields Explanation
The following table provides explanations for each of the screen fields.
| Element | Description |
| First Name | The text for contact name. Accepts alphabets and |
| special characters like hyphen and single quotes not | |
| exceeding 25 characters. Field is mandatory | |
| Middle Initial | The text for middle initial. Accepts alphabets not |
| exceeding 1 character. | |
| Last Name | The text for contact name. Accepts alphabets and |
| special characters like hyphen and single quotes not | |
| exceeding 35 characters. Field is mandatory | |
| Company Name | The text for company name. Accepts alphanumeric and |
| special characters. Field is mandatory | |
| DBA | The text for business nature. Accepts alphanumeric |
| and special characters. Field is optional | |
| Street Address | The text for company address. Accepts alphanumeric |
| and special characters not exceeding 35 characters | |
| Suite | The text for company suite Accepts alphanumeric and |
| special characters not exceeding 35 characters | |
| City | The text for city. Accepts alphabets and space between |
| two words not exceeding 30 characters. | |
| State | Choose the name of the state from the drop down list |
| of States available in United States of America | |
| Zip | The text for zip. Accepts numeric value of exactly 5 |
| digits. Field is mandatory | |
| Phone | The text for telephone number of the contact person. |
| Accepts numeric values not exceeding 10 digits. The | |
| format is (999) 999-9999. | |
| Fax | The text for fax number of the contact person. Accepts |
| numeric values not exceeding 10 digits. The format is | |
| (999) 999-9999. | |
| Mode of | Choose a mode of communication from the drop down |
| Communication | list available. Based on the selected value, related |
| fields are mandatory. | |
| The text for email of the contact person. Accepts | |
| alphabets, numeric and special characters in the | |
| standard email format of length not exceeding 100 | |
| characters. | |
| Gender | Choose a gender from the drop down list available. |
| Date of Birth | The text for date of birth. Choose a date by clicking |
| calendar icon. Date accepts the format | |
| MM/DD/YYYY. Birth date cannot be later than the | |
| current date. | |
| Salutation | Choose the salutation from the drop down list of |
| salutations available. | |
| First Name | The text for contact name. Accepts alphabets and |
| special characters like hyphen and single quotes not | |
| exceeding 25 characters. Field is mandatory | |
| Middle Initial | The text for middle initial. Accepts alphabets not |
| exceeding 1 character. | |
| Last Name | The text for contact name. Accepts alphabets and |
| special characters like hyphen and single quotes not | |
| exceeding 35 characters. Field is mandatory | |
| Street Address | The text for address. Accepts alphanumeric and special |
| characters not exceeding 35 characters | |
| Suite | The text for suite Accepts alphanumeric and special |
| characters not exceeding 35 characters | |
| City | The text for city. Accepts alphabets and space between |
| two words not exceeding 30 characters. | |
| State | Choose the name of the state from the drop down list |
| of States available in United States of America | |
| Zip | The text for zip. Accepts numeric value of exactly 5 |
| digits. Field is mandatory | |
| Phone | The text for telephone number of the contact person. |
| Accepts numeric values not exceeding 10 digits. The | |
| format is (999) 999-9999. | |
| Extension | The text for extension number of the employee. |
| Accepts numeric values not exceeding 4 digits | |
| Fax | The text for fax number of the contact person. Accepts |
| numeric values not exceeding 10 digits. The format is | |
| (999) 999-9999. | |
| The text for email of the contact person. Accepts | |
| alphabets, numeric and special characters in the | |
| standard email format of length not exceeding 100 | |
| characters. | |
| Broker Type | Choose an option for broker type from either |
| Statewide, Regional or unknown | |
| Exclude from | Click this option to have exclusion of broadcast fax |
| Broadcast Fax | |
| Exclude from | Click this option to have exclusion of |
| Employee/ | |
| Member | |
| Term Letter | employee/member term letter |
| Exclude from | Click this option to have exclusion of overdue |
| overdue premium | premium notice |
| notice | |
| Exclude from | Click this option to have exclusion of |
| Employee/ | employee/member add on letter |
| Member | |
| Add on Letter | |
| Agent Workgroup | Choose a agent work group by clicking search icon |
| Internal | Choose an internal workgroup from the drop down list |
| Workgroup | available. The field is mandatory. |
| BSS Rep | Choose a value for BSS Rep from the drop down list |
| available | |
| Associated | Choose a Associated Agency by clicking search icon |
| Agency | |
| Tax ID/SSN | The text for Tax ID/SSN. Accepts numeric values of |
| exactly 9 digits | |
| License Number | The text for License number. Accepts numeric values |
| not exceeding 15 digits | |
| License Type | Choose a type for license from the drop down list |
| available | |
| License | The text for License expiration date. Choose a date in |
| Expiration | the format MM/DD/YYYY by clicking calendar icon. |
| E&O Number | The text for E&O number. Accepts numeric values not |
| exceeding 15 digits | |
| E&O Expiration | The text for E&O Expiration date. Choose a date in the |
| format MM/DD/YYYY by clicking calendar icon. | |
| Preferred Mode | Choose an option for mode of payment either Check or |
| of payment | ACH |
| Bank Name | The text for bank name. Accepts alphabets, numeric |
| and special characters except double quotes with | |
| values not exceeding 50 characters. | |
| Account Number | The text for accounts number. Accepts numeric values |
| not exceeding 9 digits | |
| Account Type | Choose a type of account from the drop down list |
| available | |
| Routing Number | The text for routing number. Accepts numeric values |
| not exceeding 10 digits. | |
| Name of the | The text for name of the account holder. Accepts |
| Account | alphabets and numeric values not exceeding 50 |
| characters. | |
| Payee Name | The text for payee name. Accepts alphabets not |
| exceeding 60 characters. | |
| Requires special | Click this option for any special handling is required |
| handling | |
Button Functionality
The following table provides explanation for each button in the screen.
| Element | Description | |
| Next | Click Next to move to the next screen for entering the | |
| Agency information. | ||
| Save | Saves the entered information entered for the Agency | |
| in the screen one and two. | ||
| Cancel | Clears the contents entered in the fields or restore to | |
| the previous state as was before saving the changes. | ||
| Close | Closes the window and go back to agency master | |
| screen | ||
| Previous | Navigates to the previous screen. If any data is entered | |
| on this screen it validate the data prior to moving to | ||
| the previous screen. | ||
Search Agent
-
- Step-1: After successful logon, click the menu Sales & Marketing and select Sales Master. Then select Search Agent. (See Figure F-59)
- Step-2: Screen navigates to Search Agent Master screen. (See Figure F-60)
- Step-3: Either enter the value in any one of the field or simply click Search.
- Step-4: This pops up a screen with the search result. (See Figure F-61)
- Step-5: Choose an Agent Id for selection. The selected agent id can be modified or view and delete. If modify button is clicked details with the contents will be displayed for any modification or otherwise clicking view/delete button will enabled to view or deleted.
- Step-6: If the modify button is clicked following will be screen. (See Figure F-62)
- Step-7: Enter the text at the respective fields for modification, if any. The flow and procedure for modifying an agency master is similar to create agency master.
- Step-8: If the view/delete button is clicked, following is the screen that can have view or delete. (See Figure F-63)
- Step-9: After viewing the contents, if the new agency is clicked will enable to add new agency master or if the delete button is clicked it will delete the agent master which is currently in view.
- Step-10: On clicking delete, navigates to confirming the deletion of agency record. From here clicking new agency button can create new agency. (See Figure F-64)
Fields Explanation
Refer field explanation provided for Create Agent.
Button Functionality
Refer button functionality provided in Create Agent
Create Lead
-
- Step-1: After successful logon, click the menu Sales & Marketing and select Sales Master. Then select Create Lead. (See Figure F-65)
- Step-2: Screen navigates to Lead Master screen. (See Figure F-66)
- Step-3: Enter the values for the respective fields, as per the format briefed in field's explanation section. Click Next.
- Step-4: Navigates to second part of the lead master screen for entering further information. (See Figure F-67)
- Step-5: Enter the values for the respective fields, as per the format briefed in field's explanation section. Based on the selection of name as either agent/agency the corresponding value for agency/agent is selected by clicking search icon.
- Step-6: After filling all the fields in lead master, click save to create lead master. Following is the sample confirmation screen for a successful creation of lead master. (See Figure F-68)
Fields Explanation
The following table provides explanations for each of the screen fields.
| Element | Description |
| Group Type | Choose the Group Type from the list. |
| Association Id | Choose the association id from the list. If the Group |
| type is Guaranteed, Endorsed, PEO or Chamber | |
| corresponding association name will be listed. | |
| Member Type | Choose the member type as Individual Member or |
| Association Group. This option will be available if the | |
| Association selected is Guaranteed. | |
| Source Sub Type | Choose sub source type from the list. |
| Company Name | The text for company name. Accepts alphanumeric and |
| special characters. Field is mandatory | |
| DBA | The text for business nature. Accepts alphanumeric |
| and special characters. Field is optional | |
| Street Address | The text for company address. Accepts alphanumeric |
| and special characters not exceeding 35 characters | |
| Suite | The text for company suite Accepts alphanumeric and |
| special characters not exceeding 35 characters | |
| City | The text for city. Accepts alphabets and space between |
| two words not exceeding 30 characters. | |
| State | Choose the name of the state from the drop down list |
| of States available in United States of America | |
| Zip | The text for zip. Accepts numeric value of exactly 5 |
| digits. Field is mandatory | |
| Phone | The text for telephone number of the contact person. |
| Accepts numeric values not exceeding 10 digits. The | |
| format is (999) 999-9999. | |
| Fax | The text for fax number of the contact person. Accepts |
| numeric values not exceeding 10 digits. The format is | |
| (999) 999-9999. | |
| Salutation | Choose the salutation from the drop down list of |
| salutations available. | |
| First Name | The text for contact name. Accepts alphabets and |
| special characters like hyphen and single quotes not | |
| exceeding 25 characters. Field is mandatory | |
| Middle Initial | The text for middle initial. Accepts alphabets not |
| exceeding 1 character. | |
| Last Name | The text for contact name. Accepts alphabets and |
| special characters like hyphen and single quotes not | |
| exceeding 35 characters. Field is mandatory | |
| Street Address | The text for address. Accepts alphanumeric and special |
| characters not exceeding 35 characters | |
| Suite | The text for suite Accepts alphanumeric and special |
| characters not exceeding 35 characters | |
| City | The text for city. Accepts alphabets and space between |
| two words not exceeding 30 characters. | |
| State | Choose the name of the state from the drop down list |
| of States available in United States of America | |
| Zip | The text for zip. Accepts numeric value of exactly 5 |
| digits. Field is mandatory | |
| Phone | The text for telephone number of the contact person. |
| Accepts numeric values not exceeding 10 digits. The | |
| format is (999) 999-9999. | |
| Extension | The text for extension of telephone number Accepts |
| numeric values not exceeding 4 digits. The format is | |
| 9999. | |
| Fax | The text for fax number of the contact person. Accepts |
| numeric values not exceeding 10 digits. The format is | |
| (999) 999-9999. | |
| The text for email of the contact person. Accepts | |
| alphabets, numeric and special characters in the | |
| standard email format of length not exceeding 100 | |
| characters. | |
| None | Choose the option as none if applicable. |
| Agent | Choose an agent by clicking search icon. The option is |
| enabled only if the value is selected as agent for name. | |
| Agency | Choose an agency by clicking search icon. The option |
| is enabled only if the value is selected as agency for | |
| name. | |
| Internal | Choose an internal workgroup from the drop down list |
| Workgroup | available. The field is mandatory. |
| BSS Rep | Choose a value for BSS Rep from the drop down list |
| available | |
| No. Of employees | The text for number of employees. Accepts numeric |
| values not exceeding 4 digits. | |
| Plan Type | Choose a plan type from the drop down list available |
| Current Carrier | Choose a current carrier from the drop down list |
| available | |
| Deductible | The text for deductible. Accepts numeric values not |
| exceeding 12 digits. | |
| Co Pay | The text for co pay. Accepts numeric values not |
| exceeding 12 digits. | |
| Benefit level in | The text for benefit level in network |
| Network | |
| Benefit level | The text for benefit level out of network |
| out of Network | |
| Employer | The text for employer contribution. |
| Contribution in % | |
| Approximate | The text for approximate monthly premium. |
| monthly premium | |
| Renewal Date | The text for renewal date. Accepts date in the format |
| MM/DD/YYYY by clicking calendar icon. | |
| Best time to call | The text for best to call. |
| Comments | The text for comments. |
| Mode of | Select a mode of communication from the drop down |
| communications | list available |
Button Functionality
The following table provides explanation for each button in the screen.
| Element | Description | |
| Save | Saves the entered information not only for the present | |
| screen. | ||
| Search | Clears the screen and perform search operation based | |
| on the input value for group/agent. | ||
| Cancel | Clears the contents entered in the fields or restore to | |
| the previous state as was before saving the changes. | ||
| Close | Closes the window and go back to agency master | |
| screen | ||
| Previous | Navigates to the screen earlier to this. | |
Search Lead
-
- Step-1: After successful logon, click the menu Sales & Marketing and select Sales Master. Then select Search Lead. (See Figure F-69)
- Step-2: Screen navigates to Search Lead screen. (See Figure F-70)
- Step-3: Either enter value in any of the field or simply click Search.
- Step-4: This pops up a screen with the search result. (See Figure F-71)
- Step-5: Choose an Lead Id for selection. The selected lead id can be modified or view and delete. If modify button is clicked details with the contents will be displayed for any modification or otherwise clicking view/delete button will enabled to view or deleted.
- Step-6: If the modify button is clicked following will be screen. (See Figure F-72)
- Step-7: Enter the text at the respective fields for modification, if any. The flow and procedure for modifying a lead master is similar to create lead master.
- Step-8: If the view/delete button is clicked, following is the screen that can have view or delete. (See Figure F-73)
- Step-9: After viewing the contents, if the new lead is clicked, will enable to add new lead master or if the delete button is clicked it will delete the lead master, which is currently in view.
- Step-10: On clicking delete, navigates to confirming the deletion of lead record. From here clicking new lead button can create new lead. (See Figure F-74)
Fields Explanation
Refer field explanation provided for Create Lead
Button Functionality
Refer button functionality provided for Create Lead
Campaign to Lead
-
- Step-1: After successful logon, click the menu Sales & Marketing and select Sales Master. Then select Campaign to Lead. (See Figure F-75)
- Step-2: Screen navigates to Campaign to Lead screen. (See Figure F-76)
- Step-3: Enter the value of a campaign id or choose a campaign id by clicking search icon
- Step-4: Either enter value in any of the field or simply click Search. (See Figure F-77)
- Step-5: Click on any campaign id for selection (See Figure F-78)
- Step-6: By clicking Search Campaign Data the following screen gets displayed. (See Figure F-79)
- Step-7: Choose Campaign id. Click Convert to lead This converts campaign to lead and the selected campaign gets
Fields Explanation
The following table provides explanations for each of the screen fields.
| Element | Description |
| Campaign Id | Text for Campaign ID. Enter the Campaign ID or click |
| the search icon. | |
| Campaign | Text for Campaign ID |
| Name | |
| From Date | The text for From Date. Choose a date by clicking |
| calendar icon. Date accepts the format MM/DD/YYYY. | |
| To Date | The text for To Date. Choose a date by clicking |
| calendar icon. Date accepts the format MM/DD/YYYY. | |
Button Functionality
The following table provides explanation for each button in the screen.
| Element | Description |
| Search | Click search to display the Campaign ID based on the |
| search criteria. | |
| Close | Closes the window and go back to campaign to lead |
| screen | |
| Element | Description |
| Search | Displays the content of selected campaign id |
| Campaign Data | |
| Convert to | Converts campaign to lead and the item gets removed |
| Lead | from the campaign id list table. |
| Check All | The “Check All” Link will check all the records in the |
| table | |
| Clear All | The “Clear All” Link will uncheck all the records in the |
| table that are checked. | |
| Cancel | Clears the contents entered in the field. |
Lead Tracking
-
- Step-1: After successful logon, click the menu Sales & Marketing and select Sales Master. Then select Lead Tracking. (See Figure F-80)
- Step-2: Screen navigates to Lead Tracking screen. (See Figure F-81)
- Step-3: Enter the value of a lead id and Click Get Status to display the current status of the lead or choose a lead id by clicking search icon. (See Figure F-82)
- Step-4: Either enter value in any one of the field or simply click Search.
- Step-5: This pops up a screen with search result. (See Figure F-83)
- Step-6: Click on any lead id for selection. The status of the lead is displayed.
- Step-7: Choose the respective values and click save. (See Figure F-84)
Fields Explanation
The following table provides explanations for each of the screen fields.
| Element | Description |
| Lead Id | Text for Lead ID. Enter lead id of choose Lead ID by |
| clicking the Search Icon. | |
| Company | Read only field to display Company Name |
| Name | |
| Phone | Read only field to display Company Phone |
| First Name | Read only field to display First Name |
| Last Name | Read only field to display Last Name |
| Call Status | Choose from the Call Status provided. |
| Contact Result | Choose from the Contact Result provided. Only if the |
| “Call Status” option is “Made Contact” this will be | |
| enabled. | |
| Qualified Lead | Choose from the Qualified Lead Result provided. Only |
| Result | if the “Contact Result” option is “Qualified Lead” this |
| will be enabled. | |
| Non-Qualified | Choose from the Non-Qualified Lead Reasons |
| Lead Reasons | provided. Only if the “Contact Result” option is “Non- |
| Qualified Lead” this will be enabled. | |
| Not Interested | Choose from the Not Interested Reasons provided. |
| Reasons | Only if the “Qualified Lead Result” option is “Not |
| Interested” this will be enabled. | |
| Post Quote | Choose from the Post Quote Result provided. Only if |
| Result | the “Qualified Lead Result” option is “Produced |
| Quotes” this will be enabled. | |
| Status | Displays the status dynamically based on the |
| combination of the options selected. | |
| Notes | Text area to enter brief notes on the lead tracking |
| Follow up Date | The text for Follow up Date. Choose a date by clicking |
| calendar icon. Date accepts the format MM/DD/YYYY. | |
Button Functionality
The following table provides explanation for each button in the screen.
| Element | Description | |
| Save | Saves the entered information not only for the present | |
| screen. | ||
| Get Status | Show the status of the Lead being Tracked. | |
| Cancel | Clears the contents entered in the fields or restore to | |
| the previous state as was before saving the changes. | ||
Lead Tracking—To Do List
-
- Step-1: After successful logon, click the menu Sales & Marketing and select Sales Master. Then select Lead Tracking—To Do List.
- Step-2: Screen pops up a new window Lead Tracking To Do List screen. The screen can have only view option. The contents of this screen are the inputs of lead tracking screen. This screen displays the follow up on the Lead tracking. (See Figure F-85)
- Step-3: Click close.
Fields Explanation
The following table provides explanations for each of the screen fields.
| Element | Description | |
| User Id | Read only field for User id. | |
| Lead Id | Read only field for Lead Id. | |
| Lead Name | Read only field Lead Name. | |
| Phone | Read only field for Phone. | |
| Follow up Date | Read only field for follow up date. | |
Button Functionality
The following table provides explanation for each button in the screen.
| Element | Description | |
| Close | Closes the pop up window. | |
Create Agent Profile
-
- Step-1: After successful logon, click the menu Sales & Marketing and select Create Agent Profile (See Figure F-86)
- Step-2: Screen navigates to Agent Profile (See Figure F-87)
- Step-3: Click Save. Confirms the creation of agent profile. (See Figure F-88)
Fields Explanation
The following table provides explanations for each of the screen fields.
| Element | Description |
| Agent Details | |
| Workgroup Name | Choose a work group name from the available list. |
| List all child workgroup for the selected workgroup | |
| Agent ID | Choose a agent id from the available list |
| Agent Name | Text for agent name. Field is read only |
| Company Name | Text for agent name. Field is read only |
| Present Rating | Text for present rating accepts numeric values |
| Profile | |
| Information | |
| Do you currently | Choose the option from Yes or No |
| sell Health | |
| Insurance | |
| Do you currently | Choose the option from Yes/No/Unknown |
| sell PacAdvantage | |
| Types of Insurance | Select the check box of insurance from the available |
| sold by Agent | check box list. |
| Percentage of time | Text for percentage of time focussed on health |
| focused on Health | insurance. Accepts numeric values. |
| Insurance | |
| Average Group | Text for average group size [within Pac Advantage]. |
| Size(within | Accepts numeric values. |
| PacAdvantage) | |
| Average Group | Text for average group size [outside Pac |
| Size(outside | Advantage]. Accepts numeric values.. |
| PacAdvantage) | |
| Percentage of staff | Text for percentage of staff concentrating on Health |
| concentrating on | Insurance. Accepts numeric values. |
| Health Insurance | |
| Years in Business | Text for years in business. Accepts numeric values. |
| Subjective | |
| Ratings | |
| Broker knowledge | Choose a rating from 0 to 4 |
| of PacAdvantage | |
| Broker Potential | Choose a rating from 0 to 4 |
| Broker loyalty and | Choose a rating from 0 to 4 |
| confidence with | |
| PacAdvantage | |
| Subjective Rating | Choose a rating from 0 to 4 |
| Other | |
| Information | |
| Marketing Plans | Choose a marketing plan from the available drop |
| list. | |
| No. 1 Selling Plan | Choose a plan for selling plan [plan-1] from the |
| available drop down list | |
| No. 2 Selling Plan | Choose a plan for selling plan [plan-2] from the |
| available drop down list | |
Button Functionality
The following table provides explanations for each of the screen fields.
| Element | Description |
| Save button | Click on save button to the save the content keyed in |
| and navigates to confirmation screen displaying the | |
| Confirmation ID. | |
| Cancel button | Click on clear button clears the content and appears |
| again for fresh entries | |
Search Agent Profile
-
- Step-1: After successful logon, click the menu Sales & Marketing and select Sales Master. Then select Search Agent Profile. (See Figure F-89)
- Step-2: Screen navigates to Search Agent Profile screen (See Figure F-90)
- Step-3: Either enter value in any of the field or simply click Search.
- Step-4: This pops up a screen with the search result. (See Figure F-91)
- Step-5: Choose an Agent Id for selection. The selected agent id can be modified or viewed. If modify button is clicked details with the contents will be displayed for any modification or otherwise clicking view button will enabled to view the contents and prevents any modification
- Step-6: If the modify button is clicked following will be screen. (See Figure F-92)
- Step-7: Enter the text at the respective fields for modification, if any. The flow and procedure for modifying an agency profile is similar to create agency profile. On any change, and clicking Update will pop up a screen. (See Figure F-93)
- Step-8: If the view button is clicked, following is the screen, which can have only to view the contents, and no modification is allowed. (See Figure F-94)
- Step-9: After viewing the contents, if the new agency is clicked will enable to add new agency profile.
Fields Explanation
Refer field explanation referred in Create Agent Profile
Button Functionality
The following table provides explanations for each of the screen fields.
| Element | Description |
| Save | Click on save button to the save the content keyed in |
| and navigates to confirmation screen displaying the | |
| Confirmation ID. | |
| Cancel | Click on clear button clears the content and appears |
| again for fresh entries | |
| Modify | Modify enables to edit and modifications is possible |
| View | View enables to edit the content and modification is |
| not possible | |
| Update | Update the contents of source sub type. It is only a |
| temporary addition. Becomes permanent record only | |
| after saving | |
| New Agent Profile | Creates a new agent profile |
7 Quotes
Quotes are provided for potential business entities as well as existing business entities. Quotes can be requested for small Employer Groups or Alternate Groups (Individual Association Member, Association Group, COBRA etc.) as well as for employees of those groups. Access
The application can be accessed from the main menu as follows:
-
- Sales & Marketing->Quotes
Pre-Requisites
All master data must be available in the system for generation of Quotes. Pre-requisites for using this application are as follows:
-
- Carrier Maintenance—Refer “User Manual for Carrier Maintenance” for further information on the master records.
- Agent/Agency—Refer “User Manual for Sales and Marketing” for further information on the Agent/Agency records.
- Work Group—Refer “User Manual for Sales and Marketing” for further information on the Work Group records.
- Internal Associates—Refer “User Manual for Sales and Marketing” for further information on the Internal Associates records.
- Enrollment—Refer “User Manual for Enrollment” for further information on the Group and Member records.
Application Functions
This application has the following functions:
-
- Create Quotes
- Modify Quote/Create Quote Revision
- Generate Quote
- Generate Interim Quote
- View Missing Information
Create Quotes
This function enables the user to input necessary input information/parameters for quotes and save the information for retrieval at a later point in time.
A quote is unique for each Group and Lead; any changes to the quote will result in a new revision. To modify an existing quote or create a new quote revision, please refer to next section “Modify Quote/Create Quote Revision”.
-
- Step-1: After successful logon, click menu Sales & Marketing and select the option Quotes. (See Figure F-95)
- Step-2: Browser navigates to Group/Lead Info screen. Choose whether the quote is for a Lead or an Existing Group. Select the Lead/Group by clicking Lookup icon, found next to the lead/group Id field. Alternately, if the lead/group id is known, it can be entered directly into the field. (See Figure F-96)
- Step-3: On clicking the Lookup icon, based on whether the quote is for a lead or group, the browser navigates to either lead search or to group search screen. (See Figure F-97)
- A lead can be searched using first few characters of lead name, contact first/last name or contact phone number.
- A group can be searched using first few characters of its legal name, contact first/last name or tax id/SSN or group's effective date or phone number. (See Figure F-98)
- Step-4: Click on the group/lead, for which the quote is being created, to return to the main screen.
- Step-5: On selecting a lead/group, either using the lookup option or entering directly into the field, lead/group details and agent details get populated on the screen.
- If quoting for a group, an additional option, “Populate Current Enrollment” is enabled. Clicking the option populates additional group information like coverage and contribution option, agent fee, current employee information with their plans.
- Step-6: Choose the coverage and contribution options selected by the lead/group.
- Alternately, the “Default Coverage and Contribution” option can be used. Default coverage and contribution is Medical coverage alone selected with an employer contribution of 50% of lowest cost HMO plan towards employee premium and none towards dependent premium.
- Note: This section is enabled only if the lead/group is an employer group.
- Step-7: Click on the “Employee Info” tab on the top or the link at the bottom to navigate to employee information screen. If “Populate Current Enrollment” option was selected earlier, the screen comes populated with current employee information.
- Use “Set Size” option to set the number of employees on the quote; the screen inserts specified number of blank employee rows. Enter employee name, employee age/date of birth, coverage option, number of persons covered under the employee (including the employee), and the employee's zip code of residence. (See Figure F-99)
- Note: If zip code is not specified for an employee, the lead's/group's zip code is used for rates calculation.
- Alternately, employee information can be uploaded from a flat file. (See Figure F-100)
- Specify the file format, whether CSV ASCII or Fixed Position ASCII, browse and locate the file to be uploaded. Click Upload to upload employee information from the file.
- Step-8: Click on the “Quote Output” tab on the top or the link at the bottom to navigate to quote output screen. (See Figure F-101)
- Choose whether Standard quote or Interim quote is required. (Interim quote is explained in a subsequent section).
- Use “Exclude Plans” option to exclude any plans that should not appear on the quote. Select the plan(s) that need to be excluded (Hold ‘Control’ key to select multiple plans) and click Add button.
- Enter other information required for quotes like quote for, mode of output and addressee information.
- Step-9: Click Save button to save quote input information.
Fields Explanation
The following table provides explanations for each of the screen fields.
Common
| Element | Description |
| Quote # | The id with which the quote is uniquely identified |
| along with the revision. The field is read only. Quote id | |
| is auto generated. | |
| Quote Date | Date on the quote. The field is read only and reflects |
| the value entered in the quote date field on the | |
| “Group/Lead Info” tab. | |
| Lead/Group Id | Unique id of lead/group being quoted. The field is read- |
| only and reflects the value entered in the lead/group id | |
| field on the “Group/Lead Info” tab. | |
| Lead/Group | Name of the lead/group being quoted. This field is read |
| Name | only. |
| Type | Lead/Group's type; whether Small Employer Group, |
| Individual Association Member, Cal-COBRA etc. | |
Group/Lead Info Tab
| Element | Description |
| Lead/Group Information |
| Quote for | Choose the option to quote for either lead or group. |
| Lead/Group Id | Unique id of lead/group being quoted. Lead/Group id |
| can be selected by clicking Lookup icon. | |
| Other revisions | List all revisions for the quote and allows user to select |
| a specific revision. |
| General Information |
| Quote Date | Date on the quote. Entry in this field is mandatory. |
| Mode of | Choose a type of mode of request from the drop down |
| Request | list available |
| Post Mark Date | Date on which request for quote was post-marked. |
| Choose a date by clicking calendar icon. Entry in this | |
| field is mandatory. | |
| Receive Date | Date on which request for quote was received. Choose |
| a date by clicking calendar icon. Entry in this field is | |
| mandatory. | |
| Rate Type | Choose a rate type to be used for quoting. |
| Agent | Agent commission percentage to be used for blended |
| Commission | rate calculation. Entry in this field is mandatory. The |
| field is enabled only for the quotes on blended rate | |
| structure. | |
| Effective Date | Effective date for the quote. Choose a date by clicking |
| calendar icon. Entry in this field is mandatory. |
| Coverage & Contribution Information |
| Use default | Check to generate quote using default coverage and |
| coverage and | contribution options. Default coverage and |
| contribution | contribution is Medical coverage alone selected with an |
| employer contribution of 50% of lowest cost HMO plan | |
| towards employee premium and none towards | |
| dependent premium | |
| Contribution | For the line of coverage, choose contribution type opted |
| Type | by the lead/group. Leave as blank, when not quoting |
| the line of coverage. | |
| Specify Plan | When employer contribution is percentage of specified |
| plan, choose specified plan. | |
| Value for EE | Specify employer contribution towards employee's |
| premium. | |
| Value for Dep | Specify employer contribution towards dependent's |
| premium. | |
Employee Info Tab.
| Element | Description |
| Employee Information |
| Quote Spec EE | Check to indicate employees to be quoted, when using |
| “Employee Rate Illustration”, “Cal-COBRA” or “Fed- | |
| COBRA” options. | |
| Employee | Name of employee. Entry in this field is mandatory. |
| Name | |
| Age/DOB | Age or date of birth of employee. Date of birth has to |
| specify in MM/dd/yyyy format. Entry in this field is | |
| mandatory. | |
| Tier | Coverage choice opted by the employee. Entry in this |
| field is mandatory. | |
| # | Count of members covered under the employee's |
| coverage including the employee. System defaults | |
| value in this field based on the coverage type selected | |
| but is editable by the user. | |
| Zip | Zip code of employee's residence. If no value is |
| provided, employer's zip code is used for rate | |
| calculation. | |
| County | County of employee's residence. This is normally a |
| read-only field except in cases where employee's zip | |
| code spans multiple counties. In such cases, when the | |
| user tries to generate a quote, the system prompts the | |
| user to select the county. | |
| Medical Plan | Medical plan to be used when quoting using “Quote for |
| specified plans only” option. | |
| Dental Plan | Dental plan to be used when quoting using “Quote for |
| specified plans only” option. | |
| Vision Plan | Vision plan to be used when quoting using “Quote for |
| specified plans only” option. | |
| CAM Plan | CAM plan to be used when quoting using “Quote for |
| specified plans only” option. | |
| Total | Total number of employees on the quote. This field is |
| Employees | read only. |
| Total Waiving | Total number of employees waiving medical coverage. |
| Total Declining | Total number of employees declining coverage through |
| PacAdvantage plans. | |
| Total COBRAs | Total number of COBRAs covered under the employer. |
| Rate Differential Factor |
| Calculated by | Specify whether differential factor has to be calculated |
| System/ | by the system or is entered by the user. Option for |
| Entered by | entry by user is allowed only when quoting for a lead |
| user | or doing a group renewal quote. |
| Differential | Rate differential factor applicable for the lead/group. |
| Factor | |
Interim Quote Tab
| Element | Description |
| Medical |
| Quote Medical | Check to include quote for medical coverage. |
| Contribution | Check to include employer contribution summary in |
| Summary? | quote output. |
| Employer | Check to include employer rate summary in quotes |
| Summary | output for each of the contribution options, namely, % |
| of lowest cost HMO plan, % of lowest cost plan, % of | |
| specified plan and flat $ amount. | |
| Employee Quotes | Check to include individual employee quote sheets in |
| quotes output for each of the contribution option. | |
| Value for | Specify contribution percentage or dollar amount of |
| Employee | employer (in case of flat dollar contribution) towards |
| employee's premium for each of the contribution | |
| option. | |
| Value for | Specify contribution percentage or dollar amount of |
| Dependent | employer (in case of flat dollar contribution) towards |
| dependent's premium for each of the contribution | |
| option. |
| Dental |
| Quote Dental | Check to include quote for dental coverage. |
| Contribution | Check to include employer contribution summary in |
| Summary? | quote output. |
| Employer | Check to include employer rate summary in quotes |
| Summary | output for each of the contribution options, namely, % |
| of lowest cost plan, % of specified plan and flat $ | |
| amount. | |
| Employee Quotes | Check to include individual employee quote sheets in |
| quotes output for each of the contribution option. | |
| Value for | Specify contribution percentage or dollar amount of |
| Employee | employer (in case of flat dollar contribution) towards |
| employee's premium for each of the contribution | |
| option. | |
| Value for | Specify contribution percentage or dollar amount of |
| Dependent | employer (in case of flat dollar contribution) towards |
| dependent's premium for each of the contribution | |
| option. |
| Vision |
| Quote Vision | Check to include quote for vision coverage. |
| Contribution | Check to include employer contribution summary in |
| Summary? | quote output. |
| Employer | Check to include employer rate summary in quotes |
| Summary | output for each of the contribution options, namely, % |
| of lowest cost plan, % of specified plan and flat $ | |
| amount. | |
| Employee Quotes | Check to include individual employee quote sheets in |
| quotes output for each of the contribution option. | |
| Value for | Specify contribution percentage or dollar amount of |
| Employee | employer (in case of flat dollar contribution) towards |
| employee's premium for each of the contribution | |
| option. | |
| Value for | Specify contribution percentage or dollar amount of |
| Dependent | employer (in case of flat dollar contribution) towards |
| dependent's premium for each of the contribution | |
| option. |
| CAM |
| Quote CAM | Check to include quote for CAM coverage. |
| Contribution | Check to include employer contribution summary in |
| Summary? | quote output. |
| Employer | Check to include employer rate summary in quotes |
| Summary | output for each of the contribution options, namely, % |
| of lowest cost plan, % of specified plan and flat $ | |
| amount. | |
| Employee Quotes | Check to include individual employee quote sheets in |
| quotes output for each of the contribution option. | |
| Value for | Specify contribution percentage or dollar amount of |
| Employee | employer (in case of flat dollar contribution) towards |
| employee's premium for each of the contribution | |
| option. | |
| Value for | Specify contribution percentage or dollar amount of |
| Dependent | employer (in case of flat dollar contribution) towards |
| dependent's premium for each of the contribution | |
| option. | |
Quote Output
| Element | Description |
| Generate | Specify whether to generate a standard quote or an |
| interim quote. It is not sufficient to enter input | |
| parameters for interim quotes; this field has to be set | |
| to “Interim Quote” to generate an interim quote. | |
| Quote for | Specify whether to quote only for plans specified |
| specified | against each employee. |
| plans only | |
| Exclude specified | Exclude plans from appearing in the quote output. |
| plan | |
| Quote for | Specify whether quote is for a group or selected set of |
| employees within the group. | |
| When quoting | When quoting for groups, specify whether the quote |
| groups, include | output should have employer rate summary alone or |
| employer rate summary and employee quote pages. | |
| Mode of Output | Specify mode of quote output. |
| Send to whose | Specify whether the quote has to be sending to agent's |
| attention | attention or group's attention or other. If “other” is |
| selected name and address or email or fax of addressee | |
| has to be specified. | |
| Include program | Specify whether to include program brochure as part of |
| brochure | the quote output or not. |
Button Functionality
The following table provides explanation for each button in the screen.
Common
| Element | Description | |
| New | Clears the screen to allow creation of a quote. | |
| Save | Saves quote input information to the database. The | |
| saved quote can be retrieved at a later point in time. | ||
| Search | Allows searching for a saved quote. | |
Group/Lead Info Tab
| Element | Description |
| Populate Current | Populates quotes screen with additional group |
| Enrollment | information like coverage and contribution option, |
| agent fee, current employee information with their | |
| plans. | |
Employee Info Tab
| Element | Description |
| Set Size | Sets the size of the employee information entry table |
| based on the number entered in the field preceding the | |
| button. | |
| Upload Employee | Allows uploading employee information from text files |
| Information | of specific format. |
| Delete | Deletes selected (checked) employee rows from the |
| entry table. | |
Quote Output Tab
| Element | Description |
| Generate quote | Generates quotes output based on the quotes output |
| options specified. | |
Modify Quote/Create Quote Revision
This function enables the user to modify input information for an existing quote and save it as modification to current revision or as a new revision.
-
- Step-1: After successful logon, click menu Sales & Marketing and select the option Quotes.
- Step-2: Click Search button to search for an existing quote. The browser navigates to quotes search screen.
- A quote can be searched using quote number, quote date, first few characters of lead/group name. (See Figure F-102)
Click on quote to be modified to return to the main screen. (See Figure F-103)
-
- Step-3: Existing revision available for the quote gets listed in next to lead/group id field in the “Lead/Group Information” section. Select the revision number to modify. The screen refreshes to load the selected revision.
- Step-4: Make necessary modifications to the quotes input information and click save button. The system prompts with a question “Do you want to save changes as a new revision? . . . ” Click OK to save the modifications as a new revision; click Cancel to save the modifications to the same revision.
Generate Quote
This function enables the user to generate a quote and view, print, email or fax the quote output.
-
- Step-1: After successful logon, click menu Sales & Marketing and select the option Quotes. (See Figure F-104)
- Step-2: Click Search button to search for an existing quote. The browser navigates to quotes search screen.
- A quote can be searched using quote number, quote date, first few characters of lead/group name.
- Click on the quote to be modified to return to the main screen.
- Step-3: Click on the “Quote Output” tab on the top or the link at the bottom to navigate to quotes output screen. Ensure that the mode of output and “attention to” information are as desired. Click Generate Quote button to generate the quote.
- If “View” option was selected, a popup window appears and the quote output opens up as a word document in the window.
- If “Email” or “Fax” option was selected, the quotes output is send via email or fax directly to “Group”, “Agent” or “Other” as specified in “attention to” information.
- If “Print in Mailroom” option was selected, the quote output is send to the mailroom queue.
Generate Interim Quote
This function enables the user to generate an interim quote and view, print, email or fax the quote output.
An interim quote is different from a standard quote, in that, parameters can be specified for all the 4 contribution options.
-
- Step-1: After successful logon, click menu Sales & Marketing and select the option Quotes.
- Step-2: Click Search button to search for an existing quote. The browser navigates to quotes search screen.
- A quote can be searched using quote number, quote date, first few characters of lead/group name.
- Click on the quote to be modified to return to the main screen.
- Step-3: Click on the “Interim Quote” tab on the top or the link at the bottom to navigate to employee information screen. Specify the line of coverage to be quoted and the contribution parameters for each line of coverage. (See Figure F-105)
- Step-4: Click on the “Quote Output” tab on the top or the link at the bottom to navigate to quotes output screen. Choose Interim quote option. Ensure that other information required for quotes like quote for, mode of output and addressee information is entered as desired. Click Generate Quote button to generate the quote.
View Missing Information
This function enables the user to view any missing input information required for quote generation. The option would also list out any business rule that is not satisfied.
-
- Step 1: After successful logon, click menu Sales & Marketing and select the option Quotes.
- Step-2: Please refer to previous sections on how to create a new quote or modify a saved quote. Before clicking on save button to the save the quote-input information to the database, click on the “Missing Info” tab on the top or the link at the bottom to navigate to missing information screen.
- Step-3: If the quote has any mission information or any business rule not satisfied, the screen would list out all such items. (See Figure F-106)
- The missing information is grouped on how the input fields are grouped in the input screens. Click on the hyperlink at the top corner of each section to navigate to the specific area in the input screen where the missing information is located.
Related Applications
No related applications
PX2 User Manual User Administration Version 1.0 July 08, 2002 Copyright ©2002 Benefit Partners, Inc.
| Contents |
| Introduction | 1-1 | |
| The Applications | 1-1 | |
| Module | 2-1 | |
| Access | 2-1 | |
| Pre-requisites | 2-1 | |
| Application Functions | 2-1 | |
| Create Module | 2-1 | |
| Modify module | 2-3 | |
| Delete Module | 2-5 | |
| Related Applications | 2-6 | |
| Application | 3-1 | |
| Access | 3-1 | |
| Pre-requisites | 3-1 | |
| Application Functions | 3-1 | |
| Create Application | 3-1 | |
| Modify Application | 3-4 | |
| Delete Application | 3-6 | |
| Related Applications | 3-7 | |
| Resources | 4-1 | |
| Access | 4-1 | |
| Pre-requisites | 4-1 | |
| Application Functions | 4-1 | |
| Create Resource | 4-1 | |
| Modify Resource | 4-3 | |
| Delete Resource | 4-6 | |
| Related Applications | 4-7 | |
| Group | 5-1 | |
| Access | 5-1 | |
| Pre-requisites | 5-1 | |
| Application Functions | 5-1 | |
| Create Group | 5-1 | |
| Modify Group | 5-3 | |
| Delete Group | 5-5 | |
| Related Applications | 5-6 | |
| User | 6-1 | |
| Access | 6-1 | |
| Pre-requisites | 6-1 | |
| Application Functions | 6-1 | |
| Create User | 6-1 | |
| Modify User | 6-3 | |
| Delete User | 6-6 | |
| Related Applications | 6-7 | |
| User Role | 7-1 | |
| Access | 7-1 | |
| Pre-requisites | 7-1 | |
| Application Functions | 7-1 | |
| Create User Role | 7-1 | |
| Modify User Role | 7-3 | |
| Delete User Role | 7-4 | |
| Related Applications | 7-5 | |
| Mapping | 8-1 | |
| Access | 8-1 | |
| Pre-requisites | 8-1 | |
| Application Functions | 8-1 | |
| User Role Group | 8-1 | |
| Group Access Rights | 8-4 | |
| User Access Rights | 8-7 | |
| Related Applications | 8-11 | |
| Password Configuration | 9-1 | |
| Access | 9-1 | |
| Pre-requisites | 9-1 | |
| Application Functions | 9-1 | |
| Password Configuration | 9-1 | |
| Related Applications | 9-3 | |
1 Introduction
User Administration is the administrative module that encompasses the processes of creating and maintaining the PX2 entities like Module, Application, Resource, Group, User, User Role, Group Access rights, User Role Group Mapping and Password Configuration.
The Applications
The above-mentioned processes are accomplished in several applications embedded into the User Administration system. These applications steer the tasks of creating, and administering the PX2 entities, thereby helping achieve the goals of the User Administration system.
Module Master—Modules are the encapsulation from a wider perspective, of the broad functionalities of the PX2 system. For e.g. Carrier Maintenance, Sales and Marketing, Enrollment, Finance etc. This module master application is used to manage modules within the PX2 system.
Application Master—An application represents a business use case or a set of related use cases. The organization of related resources or pages in sequence constitute an application. A module consists of many applications. For e.g. Carrier Maintenance module consists of following applications viz. Zip Master, Carrier Master, and M Plan etc. This application master application is used to manage applications within the PX2 system.
Resource Master—These are entities or pages that are organized in logical sequence to achieve the functionality of an application. An application can have one or more resources, access to which is administered by the User Administration module. This resource master application is used to manage resources within the PX2 system.
Group Master—A group is a functional or logical collection of users. The grouping is based on the nature of operations performed by the users. A user can belong to multiple groups. This group master application is used to manage groups within the PX2 system.
User Master—A user is an entity representing a person working in any of the departments in Benefit Partners Inc. The identity of the user is to be authenticated by the User Administration System in consideration of his/her group and role. A user can belong to multiple groups and can play multiple roles. This user master application is used to manage users within the PX2 system.
User Role Master—User role represents a job a particular person performs in the system. A user can play multiple roles in the system. For e.g., a manager can play the role of a data entry personnel as well as that of an authorizing body. When logged in as data entry personnel, he/she may not have the privileges what was available as a manager. This user role master application is used to manage user roles within the PX2 system.
Mapping—This crucial process involves the creation of modular combinations of the entities. This process of mapping the entities is three-fold as detailed below.
User Role Group Mapping—This bi-fold process assigns a selected role to a user and then assigns the user to a selected group.
Group Access Rights—This process assigns access rights to a group for an application. Subsequently the resources in the selected application could be allotted individual Read, Write or No Access rights to the group.
User Access Rights—This process assigns access rights to the user for an application's resources. This assignment over-rides the rights available to the group to which the user belongs.
Password Configuration—This process configures the various password-related parameters. These parameters include maximum & minimum password length, maximum & minimum expiry days, password repeat count etc.
2 Module
Modules are the encapsulation from a wider perspective, of the functionalities associated with the PX2 system. For e.g. Carrier Maintenance, Sales and Marketing, Enrollment, Finance etc.
The module comprises of a group of applications. The following modules form an integral part of the core administrative system viz. Carrier Maintenance, Enrollment, Sales and Marketing and Finance.
Access
The application can be accessed from the main menu as follows:
-
- Security->Module->Create/Modify
- ->Delete Module
- Security->Module->Create/Modify
Pre-Requisites
There are no pre-requisites for using this application.
Application Functions
This application has the following functions:
-
- Create Module
- Modify Module
- Delete Module
Create Module
This function enables the creation of a new module. This creates a module with a unique id, under which several applications could be organized. The sequential steps involved in the creation of a new module are listed below.
-
- Step-1: After successful logon, click the menu Module and select the option Create/Modify. (See Figure G-G-1)
- Step-2: Enter the values in the respective field as per the format briefed in the Fields Explanation section, and click the Save button. (See Figure G-2)
Fields Explanation
The following table provides explanations for each of the screen fields.
| Element | Description |
| Module Id | The id with which the module is uniquely identified. |
| Accepts alphabets and numeric values. Entry in this | |
| field is mandatory. | |
| Module Name | The text for module name. Accepts alphabets and |
| numeric values. Entry in this field is mandatory. | |
| Comments | The comments pertinent to the module being |
| created. Accepts alphabets and numeric values. | |
| Entry in this field is optional. | |
Button Functionality
The following table provides explanation for each button in the screen.
| Element | Description | |
| Save | Saves the entered module information in the | |
| database. The page gets refreshed and the contents | ||
| entered in the fields are cleared. | ||
| Cancel | Clears the contents entered in the fields. | |
Modify Module
This function enables the modification of an existing module. After modification, the organization of applications under the module remains intact.
The sequential steps involved in the modification of an existing module are listed below.
-
- Step-1: After successful logon, click the menu Module and select the option Create/Modify (See Figure G-3)
- Step-2: Module id has to be selected by clicking the lookup icon. (See Figure G-4)
- This pops a window enlisting the existing module ids. (See Figure G-5)
- Step-3: Choose a module id by double clicking on any of the listed module ids. The selected module id gets inserted in the module id field automatically. (See Figure G-6)
- Step-4: Change the contents to be modified and click Update.
Fields Explanation
The following table provides explanation for each of the screen fields.
| Element | Description |
| Module Id | The id with which the module is uniquely identified. |
| Accepts alphabets and numeric values. Entry in this | |
| field is mandatory. | |
| Module Name | The text for module name. Accepts alphabets and |
| numeric values. Entry in this field is mandatory. | |
| Comments | The comments pertinent to the module being |
| modified. Accepts alphabets and numeric values. | |
| Entry in this field is optional. | |
Button Functionality
The following table provides explanation for each button in the screen
| Element | Description |
| Module Id | The id with which the module is uniquely identified. |
| Accepts alphabets and numeric values. Entry in this | |
| field is mandatory. | |
| Module Name | The text for module name. Accepts alphabets and |
| numeric values. Entry in this field is mandatory. | |
| Comments | The comments pertinent to the module being |
| modified. Accepts alphabets and numeric values. | |
| Entry in this field is optional. | |
Delete Module
This function enables the deletion of an existing module. Only the modules that are not associated with any other application are available for deletion.
The sequential steps involved in the deletion of an existing module are listed below.
-
- Step-1: After successful logon, click the menu Module and select the Delete option. (See Figure G-7)
- Step-2: Check the ids of the modules to be deleted. Only modules that do not have any applications organized under them can be deleted.
- Step-3: Click the Delete button to perform delete operation on the selected modules. (See Figure G-8)
Button Functionality
The following table provides explanation for each button in the screen.
| Element | Description | |
| Check Box | Check the modules to be deleted. Check box will be | |
| in disabled state for applications that have been used | ||
| in any of the higher-level entities of the User | ||
| Administration system. | ||
| Delete | Deletes the selected applications. | |
Related Applications
Related applications are:
-
- Application Master
- Resource Master
3 Application
An application represents a business use case or a set of related use cases. The organization of related resources or pages in sequence constitute an application. A module consists of many applications. For e.g. Carrier Maintenance module consists of following applications viz. Zip Master, Carrier Master, and M Plan etc. Each application is constituted of several pages.
Access
The application can be accessed from the main menu as follows:
-
- Security->Application->Create/Modify
- ->Delete Application
- Security->Application->Create/Modify
Pre-Requisites
The Module, under which the application is to be organized, must have been created and available.
Application Functions
This application has the following functions:
-
- Create application
- Modify application
- Delete application
Create Application
This function enables the creation of a new application. This creates an application with a unique id under which several resources could be organized.
The sequential steps involved in the creation of a new application are listed below.
-
- Step-1: After successful logon, click the menu Application and select the option Create/Modify. (See Figure G-9)
- Step-2: Enter the values in the respective fields, as per the format briefed in Fields Explanation section. (See Figure G-10)
- Step-3: To select an application, click the lookup icon. This pops a window enlisting the existing application ids. Choose an application id by double clicking on any application id for selection. Corresponding application name of the selected application id will be inserted automatically. (See Figure G-11)
- Step-4: Enter the application name directly.
- Step-5: Enter the comments directly.
- Step-6: To select a module, click the lookup icon. This pops a window enlisting the existing module ids. Choose a module id by double clicking on any module id for selection. The module name of the selected module id will be inserted automatically (See Figure G-12)
- Step-7: Click Save button to save the contents.
Fields Explanation
| Element | Description |
| Application Id | The id with which the application is uniquely |
| identified. Accepts alphabets and numeric values. | |
| Entry in this field is mandatory. Selection could also | |
| be made, by clicking the lookup icon. | |
| Application Name | The text for application name. Accepts alphabets and |
| numeric values. Entry in this field is mandatory. | |
| Comments | The comments pertinent to the Application being |
| created. Accepts alphabets and numeric values. | |
| Entry in this field is optional. | |
| Select the module | Clicking on the Lookup icon enlists the existing |
| modules, selecting which automatically makes an | |
| entry in the field. Entry in this field is mandatory. | |
| On this selection, modules selected will get | |
| associated with the application being created. | |
Button Functionality
| Element | Description |
| Application Id | The id with which the application is uniquely |
| identified. Accepts alphabets and numeric values. | |
| Entry in this field is mandatory. Selection could also | |
| be made, by clicking the lookup icon. | |
| Application Name | The text for application name. Accepts alphabets and |
| numeric values. Entry in this field is mandatory. | |
| Comments | The comments pertinent to the Application being |
| created. Accepts alphabets and numeric values. | |
| Entry in this field is optional. | |
| Select the module | Clicking on the Lookup icon enlists the existing |
| modules, selecting which automatically makes an | |
| entry in the field. Entry in this field is mandatory. | |
| On this selection, modules selected will get | |
| associated with the application being created. | |
Modify Application
This function enables the modification of an existing application. After modification, the organization of resources under the application remains intact.
The sequential steps involved in the modification of an existing application are listed below.
-
- Step-1: After successful logon, click the menu Application and select the option Create/Modify. (See Figure G-13)
- Step-2: Application id could be directly entered or selected by clicking the lookup icon. (See Figure G-14)
- This pops a window enlisting the existing application ids. (See Figure G-15)
- Step-3: Choose an application id by double clicking on any application id. The selected application id gets automatically inserted in the application id field with its corresponding application name.
- Step-4: Module has to be selected by clicking the lookup icon. [See step-3 of create application] (See Figure G-16)
- Step-5: Change the contents to be modified and click Update.
Fields Explanation
| Element | Description |
| Application Id | The id with which the application is uniquely |
| identified. Accepts alphabets and numeric values. | |
| Entry in this field is mandatory. | |
| Application Name | The text for Application name. Accepts alphabets |
| and numeric values. Entry in this field is mandatory. | |
| Comments | The comments pertinent to the application being |
| modified. Accepts alphabets and numeric values. | |
| Entry in this field is optional. | |
| Selected the | Clicking on the lookup icon enlists the existing |
| module | Modules, selecting which automatically makes an |
| entry in the field. Entry in this field is mandatory. | |
| Upon this selection, the selected modules will get | |
| associated with the application being modified. | |
Button Functionality
| Element | Description | |
| Update | Saves the entered Application information in the | |
| database. The page gets refreshed and the contents | ||
| entered in the fields are cleared. | ||
| Cancel | Clears the contents entered in the fields. | |
Delete Application
This function enables the deletion of an existing application. Only the applications that are not associated with any other resource or module are available for deletion.
The sequential steps involved in the deletion of an existing application are listed below.
-
- Step-1: After successful logon, click the menu Application and select the Delete option. (See Figure G-17)
- Step-2: Check the application ids to be deleted. Only applications that don't have any resources under them can be deleted.
- Step-3: Click Delete button to perform delete operation on the selected application ids. (See Figure G-18)
Button Functionality
| Element | Description | |
| Check Box | Check the applications to be deleted. Check box will | |
| be in disabled state for applications that have been | ||
| used in any other User Administration levels of | ||
| higher than it. | ||
| Delete | Deletes the selected applications. | |
Related Applications
Related applications are:
-
- Module Master
- Resource Master
4 Resources
These are entities or pages that are organized in logical sequence to achieve the functionality of an application. An application can have one or more resources, access to which is administered by the User Administration module.
The resources accessible from the system can be protected using a single access control (ACL). The ACL specifies the nature of access rights available for a page. For e.g. Read or Write or None.
Access
The application can be accessed from the main menu as follows:
-
- Security->Resource->Create/Modify
- ->Delete Resource
- Security->Resource->Create/Modify
Pre-Requisites
An application is constituted of resources. The application, to which the resources are to be attached, must be available in the system.
Application Functions
This application has the following functions:
-
- Create resource
- Modify resource
- Delete resource
Create Resource
This function enables the creation of a new resource. This creates a resource with a unique id.
The sequential steps involved in the creation of a new resource are listed below.
-
- Step-1: After successful logon, click menu Resource and select the option of Create/Modify. (See Figure G-19)
- Step-2: Enter the values in the respective fields, as per the format briefed in Fields Explanation section. (See Figure G-20)
- Step-3: For selecting an application, click the lookup icon. This pops a window enlisting the existing application ids. Choose an application id by double clicking on any application id for selection. The name of the selected application id will be inserted automatically. (See Figure G-21)
- Step-4: Enter the resource name directly.
- Step-5: Enter screen URL directly.
- Step-6: Enter comments directly.
- Step-7: Click the Save button to save the contents.
Fields Explanation
| Element | Description |
| Resource Id | The id with which the resource is uniquely |
| identified. Accepts alphabets and numeric values. | |
| Entry in this field is mandatory. | |
| Resource Name | The text for resource name. Accepts alphabets and |
| numeric values. Entry in this field is mandatory. | |
| Screen URL | The path URL for accessing the resource. Accepts |
| alphabets and numeric values. Entry in this field is | |
| mandatory. | |
| Comments | The comments pertinent to the resource being |
| created. Accepts alphabets and numeric values. | |
| Entry in this field is optional. | |
| Select the | Clicking on the lookup icon enlists the existing |
| Application | applications, selecting which automatically makes an |
| entry in the field. Entry in this field is mandatory. | |
| Upon this selection, the application selected will get | |
| associated with the resource being created. | |
Button Functionality
| Element | Description | |
| Save | Saves the entered resource information in the | |
| database. The page gets refreshed and the contents | ||
| entered in the fields are cleared. | ||
| Cancel | Clears the contents entered in the fields. | |
Modify Resource
This function enables the modification of an existing resource.
The sequential steps involved in the modification of an existing module are listed below.
-
- Step-1: After successful logon, click Resource menu and select the option Create/Modify. (See Figure G-22)
- Step-2: Resource id has to be selected by clicking the lookup icon. (See Figure G-23)
- This pops a window enlisting the existing application ids. (See Figure G-24)
- Step-3: Choose a resource id by double clicking on any resourced id. The selected resource id gets automatically inserted in the resource id field with its corresponding resource name.
- Step-4: Application has to be selected by clicking the lookup icon. [See step-3 of create resource] (See Figure G-25)
- Step-5: Change the contents to be modified and click Update.
Fields Explanation
| Element | Description |
| Resource Id | The id with which the resource is uniquely |
| identified. Entry in to this field is mandatory. | |
| Resource Name | The text for resource name. Accepts alphabets and |
| numeric values. Entry in this field is mandatory. | |
| Screen URL | The URL of the resource. Accepts alphabets and |
| numeric values. Entry in this field is mandatory. | |
| Comments | The comments pertinent to the resource being |
| modified. Accepts alphabets and numeric values | |
| Entry in this field is optional. | |
| Selected the | Clicking on the lookup icon enlists the existing |
| Application | applications selecting which automatically makes an |
| entry in the field. Entry in this field is mandatory. | |
| On this selection, applications selected will get | |
| associated with the resource being modified. | |
Button Functionality
| Element | Description | |
| Update | Saves the entered resource information in the | |
| database. The page gets refreshed and the contents | ||
| entered in the fields are cleared. | ||
| Cancel | Clears the contents entered in the fields. | |
Delete Resource
This function enables the deletion of an existing resource. Only the resources that are not associated with any application are available for deletion.
The sequential steps involved in the deletion of an existing resource are listed below.
-
- Step-1: After successful logon, click Resource menu and select the Delete option. (See Figure G-26)
- Step-2: Select the values of resource ids to be deleted. The resources that are not associated with any application only are available for deletion.
- Step-3: Click Delete button to perform delete operation on the selected resources. (See Figure G-27)
Button Functionality
| Element | Description |
| Check Box | Check the resources to be deleted. Check box will be |
| in disabled state for resources that have been used in | |
| any other User Administration levels of higher than | |
| this. | |
| Delete | Deletes the selected resources. |
Related Applications
Related applications are:
-
- Module Master
- Application Master
5 Group
A group is a functional or logical collection of users. The grouping is based on the nature of operations performed by the users. A user can belong to multiple groups. Groups provide an efficient way to manage large numbers of users because an administrator can specify permissions for an entire group at one time. The resources can be allocated to a group instead of assigning to an individual user. The user being a part of the group acquires access rights to those resources attached to the group.
Access
The application can be accessed from the main menu as follows:
-
- Security->Group->Create/Modify
- ->Delete Group
- Security->Group->Create/Modify
Pre-Requisites
There are no pre-requisites for using this application.
Application Functions
This application has the following functions:
-
- Create group
- Modify group
- Delete group
Create Group
This function enables the creation of a new group. This creates a group with a unique id under which several users could be organized.
The sequential steps involved in the creation of a new group are listed below.
-
- Step-1: After successful logon, click the menu Group and select the option Create/Modify. (See Figure G-28)
- Step-2: Enter the values in the respective fields as per the format briefed in the field's explanation section, and click the Save button. (See Figure G-29)
Fields Explanation
| Element | Description | |
| Group Id | The id with which the group is uniquely identified. | |
| Accepts alphabets and numeric values. Entry in this | ||
| field is mandatory. | ||
| Group Name | The text for group name. Accepts alphabets and | |
| numeric values. Entry in this field is mandatory. | ||
| Comments | The comments pertinent to the group being created. | |
| Accepts alphabets and numeric values. Entry in this | ||
| field is optional. | ||
Button Functionality
| Element | Description | |
| Save | Saves the entered group information in the database. | |
| The page gets refreshed and the contents entered in | ||
| the fields get cleared. | ||
| Clear | Clears the contents entered in the fields. | |
Modify Group
This function enables the modification of an existing group. After modification, the organization of users under the group remains intact.
The sequential steps involved in the modification of an existing group are listed below.
-
- Step-1: After successful logon, click the menu Group and select the option Create/Modify. (See Figure G-30)
- Step-2: Group id has to be selected by clicking the lookup icon.
- This pops a window enlisting the existing application ids. (See Figure G-31)
- Step-3: Choose a group id by double clicking on any group id for selection. The selected group id gets automatically inserted in the group id field with its corresponding group name. (See Figure G-32)
- Step-4: Change the contents to be modified and click the Update button. (See Figure G-33)
Fields Explanation
| Element | Description | |
| Group Id | The id with which the group is uniquely identified. | |
| Accepts alphabets and numeric values. Entry in this | ||
| field is mandatory. | ||
| Group Name | The text for group name. Accepts alphabets and | |
| numeric values. Entry in this field is mandatory. | ||
| Comments | The comments pertinent to the group being | |
| modified. Accepts alphabets and numeric values | ||
| Entry in this field is optional. | ||
Button Functionality
| Element | Description | |
| Update | Saves the entered group information in the database. | |
| The page gets refreshed and the contents entered in | ||
| the fields are cleared. | ||
| Cancel | Clears the contents entered in the fields. | |
Delete Group
This function enables the deletion of an existing group. Only the groups that are not associated with any other application are available for deletion.
The sequential steps involved in the deletion of an existing group are listed below.
-
- Step-1: After successful logon, click the menu Group and select the Delete option. (See Figure G-34)
- Step-2: Check the ids of the groups to be deleted. The disabled checkboxes represent the groups that are previously mapped to any users.
- Step-3: Click the Delete button to perform delete operation on the selected groups. (See Figure G-35)
Button Functionality
| Element | Description |
| Check Box | Check the groups to be deleted. Check box will be in |
| disabled state for groups that have been previously | |
| associated with users. | |
| Delete | Deletes the selected groups. |
Related Applications
Related application is:
-
- Users
6 User
A user is an entity representing a person working in any of the departments in Benefit Partners Inc. The identity of the user is to be authenticated by the User Administration system in consideration of his/her group and role. A user can belong to multiple groups and can play multiple roles.
Access
The application can be accessed from the main menu as follows:
-
- Security->User->Create/Modify
- ->Delete User
- Security->User->Create/Modify
Pre-Requisites
Groups must have been created and available to attach users to those groups. This attachment can be of any form like one user to one group or one user to many groups.
Application Functions
This application has the following functions:
-
- Create user
- Modify user
- Delete user
Create User
This function enables the creation of a new user.
The sequential steps involved in the creation of a new user are listed below.
-
- Step-1: After successful logon, click the menu User and select the option Create/Modify. (See Figure G-36)
- Step-2: Enter the values in the respective fields as per the format briefed in Fields Explanation section, and click the Save button. (See Figure G-37)
Fields Explanation
| Element | Description |
| First Name | The first name of the user. Accepts alphabets of |
| length not exceeding 25 characters. Entry in this | |
| field is mandatory. | |
| Middle Initial | The middle initial of the user. Accepts only 1 |
| alphabet character. Entry in this field is optional. | |
| Last Name | The last name of the user. Accepts alphabets of |
| length not exceeding 35 characters. Entry in this | |
| field is mandatory. | |
| User Id | The id with which the user is uniquely identified. |
| Accepts alphabets and numeric values. Entry in this | |
| field is mandatory. | |
| Password | The password to logon. Accepts alphabets, numeric |
| values and special characters. Entry in this field is | |
| mandatory. | |
| Display name | The display name is the name by which a user |
| wishes to display his/her name. Accepts alphabets | |
| and numeric values. Entry in this field is mandatory. | |
| Phone | The telephone number of a user. Accepts only 10 |
| digits of numeric and should be in the format 999 | |
| 999 9999. Entry in this field is mandatory. | |
| Extension | The extension number to access a user. Accepts only |
| 4 digits of numeric and should be in the format | |
| 9999. Entry in this field is optional. | |
| Fax | The fax number of a user. Accepts only 10 digits of |
| numeric and should be in the format 999 999 9999. | |
| Entry in this field is optional. | |
| The email id of a user. Accepts alphabets, numeric | |
| values and special characters of length not exceeding | |
| 100 with a valid email format. Entry in this field is | |
| mandatory. | |
| Lock | Lock the user access to the PX2 system. On |
| checking the lock check box, the user is denied | |
| access to the entire PX2 system. | |
Button Functionality
| Element | Description | |
| Save | Saves the entered user information in the database. | |
| The page gets refreshed and the contents entered in | ||
| the fields are cleared. | ||
| Cancel | Clears the contents entered in the fields. | |
Modify User
This function enables the modification of an existing user.
The sequential steps involved in the modification of an existing user are listed below.
-
- Step-1: After successful logon, click the menu User and select the option Create/Modify. (See Figure G-38)
- Step-2: User id has to be selected by clicking the lookup icon. (See Figure G-39)
- Step-3: This pops up a screen. Enter the user id. To run a search on existing user ids type a few letter(s) and click on the Search button. (See Figure G-40)
- Step-4: Double click on any user-id for selection. Corresponding display name will get inserted in the field automatically. (See Figure G-41)
- Step-5: Change the contents to be modified and click Update.
Field Explanation
| Element | Description |
| First Name | The first name of the user. Accepts alphabets of |
| length not exceeding 25 characters. Entry in this | |
| field is mandatory. | |
| Middle Initial | The middle initial of the user. Accepts only 1 |
| alphabet character. Entry in this field is optional. | |
| Last Name | The last name of the user. Accepts alphabets of |
| length not exceeding 35 characters. Entry in this | |
| field is mandatory. | |
| User Id | The id with which the user is uniquely identified. |
| Accepts alphabets and numeric values. Entry in this | |
| field is mandatory. | |
| Password | The password to logon. Accepts alphabets, numeric |
| values and special characters. Entry in this field is | |
| mandatory. | |
| Display name | The display name is the name by which a user |
| wishes to display his/her name. Accepts alphabets | |
| and numeric values. Entry in this field is mandatory. | |
| Phone | The telephone number of a user. Accepts only 10 |
| digits of numeric and should be in the format 999 | |
| 999 9999. Entry in this field is mandatory. | |
| Extension | The extension number to access a user. Accepts only |
| 4 digits of numeric and should be in the format | |
| 9999. Entry in this field is optional. | |
| Fax | The fax number of a user. Accepts only 10 digits of |
| numeric and should be in the format 999 999 9999. | |
| Entry in this field is optional. Entry in this field is | |
| mandatory. | |
| The email id of a user. Accepts alphabets, numeric | |
| values and special characters of length not exceeding | |
| 100 with a valid email format. Entry in this field is | |
| mandatory. | |
| Lock | Lock the user access to the PX2 system. On |
| checking the lock check box the user is denied access | |
| to the entire PX2 system. | |
Button Functionality
| Element | Description | |
| Update | Saves the entered user information in the database. | |
| The page gets refreshed and the contents entered in | ||
| the fields are cleared. | ||
| Cancel | Clears the contents entered in the fields. | |
Delete User
This function enables the deletion of an existing user. Only the users that are not associated with any other groups are available for deletion.
The sequential steps involved in the deletion of an existing user are listed below.
-
- Step-1: After successful logon, click the menu User and select the Delete option. (See Figure G-42)
- Step-2: Check the user ids to be deleted. Only the users that are not associated with any other groups are available for deletion.
- Step-3: Click Delete button to perform delete operation on the selected user ids. (See Figure G-43)
Button Explanation
| Element | Description | |
| Check Box | Check the users to be deleted. Check box will be in | |
| disabled state for users that have been used in any | ||
| other User Administration levels of higher than it. | ||
| Delete | Deletes the selected users. | |
Related Applications
Related application is:
-
- Group Master
7 User Role
User role represents a job a particular person performs in the system. A user can play multiple roles in the system. For e.g. a manager can play the role of data entry personnel as well as that of an authorizing body. When logged in as data entry personnel, he/she may not have the privileges what was available as a manager.
Access
The application can be accessed from the main menu as follows:
-
- Security->Application->Create/Modify
- ->Delete User Role
- Security->Application->Create/Modify
Pre-Requisites
There are no pre-requisites as such for using this application.
Application Functions
This application has the following functions:
-
- Create user role
- Modify user role
- Delete user role
Create User Role
This function enables the creation of a new user role. This creates a user role with a unique id to which several users could be mapped.
The sequential steps involved in the creation of a new user role are listed below.
-
- Step-1: After successful login, click the menu User Role and select the option Create/Modify. (See Figure G-44)
- Step-2: Enter the values in the respective fields as per the format briefed in fields explanation section, and click the Save button. (See Figure G-45)
Field Explanation
| Element | Description |
| User Role Id | The id with which the user role is uniquely |
| identified. Accepts alphabets and numeric values of | |
| length not exceeding 35 characters. Entry in this | |
| field is mandatory. | |
| User Role Name | The text for user role name. Accepts alphabets and |
| numeric values. Entry in this field is mandatory. | |
| Comments | The comments pertinent to the user role being |
| created. Accepts alphabets and numeric values. | |
| Entry in this field is optional. | |
Button Functionality
| Element | Description | |
| Save | Saves the entered user role information in the | |
| database. The page gets refreshed and the contents | ||
| entered in the fields get cleared. | ||
| Cancel | Clears the contents entered in the fields. | |
Modify User Role
This function enables the modification of an existing user role. Many user roles can be assigned to a user but only one role can be exercised at a time.
The sequential steps involved in the modification of an existing user role are listed below.
-
- Step-1: After successful logon, click the menu User Role and select the option Create/Modify. (See Figure G-46)
- Step-2: Enter the User role or select the user role id by clicking the lookup icon. (See Figure G-47)
- This pops a window enlisting the existing application ids. (See Figure G-48)
- Step-3: Double click on any user role id for selection. Corresponding display name will get inserted in the field automatically. (See Figure G-49)
- Step-4: Change the contents to be modified and click the Update button.
Field Explanation
| Element | Description |
| User Role Id | The id with which the user role is uniquely |
| identified. Accepts alphabets and numeric values of | |
| length not exceeding 35 characters. Entry in this | |
| field is mandatory. | |
| User Role Name | The text for user role name. Accepts alphabets and |
| numeric values. Entry in this field is mandatory. | |
| Comments | The comments pertinent to the user role being |
| created. Accepts alphabets and numeric values. | |
| Entry in this field is optional. | |
Button Functionality
| Element | Description | |
| Update | Saves the entered user role information in the | |
| database. The page gets refreshed and the contents | ||
| entered in the fields are cleared. | ||
| Cancel | Clears the contents entered in the fields. | |
Delete User Role
This function enables the deletion of an existing user role. Only he user roles that are not mapped to any users are only available for deletion.
The sequential steps involved in the deletion of an existing user role are listed below.
-
- Step-1: After successful logon, click the menu User Role and select the Delete option. (See Figure G-50)
- Step-2: Check the user role ids to be deleted. The user roles that are not associated with any other higher-level hierarchy of users only are available for deletion.
- Step-3: Click Delete button to perform delete operation on the selected user role ids. (See Figure G-51)
Button Explanation
| Element | Description | |
| Check Box | Check the user role to be deleted. Check box will be | |
| in disabled state for user roles that have been used in | ||
| any other User Administration levels of higher than | ||
| it. | ||
| Delete | Deletes the selected User roles. | |
Related Applications
Related applications are:
-
- User
- Mapping
8 Mapping
The Mapping master is the application used to create mapping between Groups, User and User Roles. This crucial process involves the creation of modular combinations of these entities.
Access
The application can be accessed from the main menu as follows:
-
- Security->User Role->Group Access Rights
- ->User Role Group
- ->User Access Rights
- Security->User Role->Group Access Rights
Pre-Requisites
Users, Groups, User Roles, Resources must be available in the system to establish mapping amongst them.
Application Functions
This application is to establish a relationship between Groups, User and User Roles.
-
- Create/Remove Group Access Rights
- Create/Remove User Role Group
- Create/Remove User Access Rights
User Role Group
This bi-fold process assigns a selected role to a user and then assigns the user to a selected group.
The sequential steps involved in the creating user role group are listed below.
-
- Step-1: After successful logon, click the menu Mapping and select the User Role Group option. (See Figure G-52)
- Step-2: User id has to be selected by clicking the lookup icon. (See Figure G-53)
- This pops up a screen. Enter the user id. (See Figure G-54)
- To run a search on existing user ids type a few letter(s) and click on the Search button.
- Step-3: Double click on any user-id for selection. User id and its corresponding display name will get inserted in the respective fields automatically.
- Step-4: To assign a role to the user, select an existing role by clicking the lookup icon. This pops a window enlisting the existing roles. Choose a role by double clicking on any role. The selected role name gets inserted in the role field automatically. (See Figure G-55)
- Step-5: Click Select button to complete the mapping of user to role. The window gets refreshed displaying the list of available groups. (See Figure G-56)
- Step-6: Now to associate the user with the assigned role to a group, check the group ids to be associated with.
- Step-7: Click on Save button to complete the process of mapping of the user to role to group.
Field Explanation
| Element | Description | |
| User Id | The id with which the user is uniquely identified. | |
| Display Name | The display name is the name by which a user | |
| wishes to display his/her name. | ||
| Select the Role | The selection of a role is to assign a role to the | |
| selected user id. | ||
Button Functionality
| Element | Description | |
| Select | Select will map the selected user to the selected role | |
| and enlist the existing groups. | ||
| Save | Saves the entered user, role, and group information | |
| in the database. The page gets refreshed and the | ||
| contents entered in the fields are cleared. | ||
| Clear/Cancel | The mapping process carried out up to that point | |
| gets cancelled. Clears the contents entered in the | ||
| fields. | ||
Group Access Rights
This process assigns access rights to a group for an application. Subsequently the resources in the selected application could be allotted individual read, write or no access rights to the group.
The sequential steps involved in the creating group access rights are listed below.
-
- Step-1: After successful login, click the menu Mapping and select the Group Access Rights option. (See Figure G-57)
- Step-2: Group id has to be selected by clicking the lookup icon. This pops a window enlisting the existing groups ids. Choose a group id by double clicking on any group id for selection. The selected group id gets inserted in the group id field automatically. (See Figure G-58)
- Step-3: Now to assign applications to the selected group, select the application id by clicking the lookup icon. This pops a window enlisting the existing applications. Choose an application by double clicking on any application id for selection. The selected application id gets inserted in the application field automatically. (See Figure G-59)
- Step-4: Click the Select button to complete the mapping of group to application. The window gets refreshed displaying the resources available under the application. (See Figure G-60)
- Step-5: Now to assign resource-wise access rights to the assigned group and application, check the resource names to be associated with and set the desired access right from the adjoining access right list as read or write or no access.
- Step-6: Click on Save button to complete the process of creating group access rights.
Field Explanation
| Element | Description |
| Select the Group | The id with which the group is uniquely identified. |
| Select the | The id with which the application is uniquely |
| Application | identified. |
| ACL [Access | Level indicates the level of accessing methods say |
| control level] | read, write and no access for the each of the |
| resources. | |
Button Explanation
| Element | Description | |
| Select | Select will map the selected group to the selected | |
| Application and enlist the resources under the | ||
| selected application. | ||
| Save | Saves the entered information in the database. The | |
| page gets refreshed and the contents entered in the | ||
| fields are cleared. | ||
| Clear/Cancel | The group access rights carried out up to that point | |
| gets cancelled. Clears the contents entered in the | ||
| fields. | ||
User Access Rights
User access rights represent the privileges required for accessing resources. An administrator protects resources by establishing access control lists to grant permissions to users and groups. Individual user permissions take precedence over group permissions. Individual user permission overrides the more restrictive group permission.
This process assigns access rights to the user for an application's resources. This assignment over-rides the rights available to the group to which the user belongs.
The sequential steps involved in the creating user access rights are listed below.
-
- Step-1: After successful logon, click the menu Mapping and select the User Access Rights (See Figure G-61)
- Step-2: User id has to be selected by clicking the lookup icon. (See Figure G-62)
- Enter the user id. To run a search on existing user ids type a few letter(s) and click on the Search button. The screen illustrated below pops up.
- Step-3: Double click on any user-id for selection. Corresponding display name will get inserted in the field automatically.
- Step-4: Application id has to be selected by clicking the lookup icon. This pops a window enlisting the existing application ids. Choose an application id by double clicking on any application id for selection. The selected application id gets inserted in the application id field automatically. (See Figure G-63)
- Step-5: To assign a role to the user with assigned application, now select an existing role by clicking the lookup icon. This pops a window enlisting the existing roles. Choose a role by double clicking on any role for selection. The selected role name gets inserted in the role field automatically. (See Figure G-64)
- Step-6: Click Select button to complete the process of user access rights. The window gets refreshed displaying the resources available under the selected application. (See Figure G-65)
- Step-7: Now to assign resource-wise access rights to the assigned user, application and role, check the resource names to be associated with and set the desired access right from the adjoining access right list as read or write or no access.
- Step-8: Click on Save button to complete the process of creating user access rights.
Field Explanation
| Element | Description | |
| User Id | The id with which the user is uniquely identified. | |
| Display Name | The display name is the name by which a user | |
| wishes to display his/her name. | ||
| Select the | The id with which the application is uniquely | |
| Application | identified. | |
| Select the Role | The selection of a role is to assign a role to the | |
| selected user id, application. | ||
| ACL [Access | Level indicates the level of accessing methods say | |
| control level] | read, write and no access for the each of the | |
| resources. | ||
Button Functionality
| Element | Description | |
| Select | Select will map the selected User, Role to the | |
| selected Application and enlist the resources under | ||
| the selected Application. | ||
| Save | Saves the entered information in the database. The | |
| page gets refreshed and the contents entered in the | ||
| fields are cleared. | ||
| Clear/Cancel | The user access rights carried out up to that point | |
| gets cancelled. Clears the contents entered in the | ||
| fields. | ||
Related Applications
Related applications are:
-
- Users
- Groups
- User Roles
- Resources
9 Password Configuration
This process configures the various password-related parameters. These parameters include maximum & minimum password length, maximum & minimum expiry days, password repeat count etc.
Access
The application can be accessed from the main menu as follows:
-
- Security->Configure->Password Configuration
Pre-Requisites
There are no pre-requisites as such for using this application.
Application Functions
This application is to administer the parameters related to password.
Configure Password
Password configuration is mainly to monitor and control the usage of password.
Following is the screen snapshot for password configuration. (See Figure G-66)
Fields Explanation
| Element | Description |
| Maximum | Maximum allowed length in characters of the |
| Password length | password. Entry in this field is mandatory. |
| Minimum | Minimum allowed length in characters of the |
| password length | password. Entry in this field is mandatory. |
| Maximum Expiry | Maximum allowed date for password expiration in |
| Days | days. Entry in this field is mandatory. |
| Minimum Expiry | Minimum allowed date for password expiration in |
| Days | days. Entry in this field is mandatory. |
| Prompt Expiry | Prompt expiry date is to highlight as a reminder for |
| Period | password expiration in days. Entry in this field is |
| mandatory. | |
| Password Repeat | This specifies the number of times the password has |
| Count | to have a new entry with no repetition of previous |
| passwords. Entry in this field is mandatory. | |
| Invalid Password | Invalid password count will have the count of |
| Count | attempting with invalid passwords before the user is |
| locked. Entry in this field is mandatory. | |
| Lock time for | Lock time for password in HH:MM:SS format to |
| password | have session-out. Entry in this field is mandatory. |
Button Functionality
| Element | Description | |
| Save | Saves the entered password information in the | |
| database. The page gets refreshed and the content | ||
| entered in the fields appear on the screen. | ||
Related Applications
None
Benefit Parners Inc Process Specification BPI_CAS_FSD_CM_01 Document Id: BPI_CAS_FSD_CM_01 Version: <1.0> Revision History
| Change Record |
| Date | Author | Version | Change Reference |
| Nov. 27, 2001 | Sudhakar K | 1.0 | Approved Version |
| Apr. 04, 2002 | Lala Viswanath | 1.1 | Approved Version |
| Oct. 24, 2002 | Riyaz Mohamed | 1.2 | |
| Reviewers |
| Name | Position | |
| Distribution |
| No Of | ||||
| Copy No. | Name | Copies | Location | |
1. Introduction 4
1.1. Purpose 4
1.2. Business Use Case Specification Reference 4
1.3. Definitions, Acronyms & Abbreviations 4
2. Process Identification 5
2.1. Background 5
2.2. Process Description & Flow 5
2.2.1. Create Carrier Master 5
2.2.2. Process Flow Diagrams 6
3. User Interface 8
3.1. User Interface Screens 8
3.1.1. Screen ID's 8
3.1.2. User Interface ID: Create Carrier Master 8
3.1.3. User Interface ID: Create Product 15
3.1.4. User Interface ID: Search Carrier Master 18
3.1.5. User Interface ID: Modify Carrier Master 20
3.1.6. User Interface ID: Modify Carrier Product 27
3.1.7. User Interface ID: View Carrier Master 31
3.1.8. User Interface ID: Search Product 33
3.1.9. User Interface ID: View Product Info 34
3.1.10. Screen Flow 36
1. Introduction
1.1 Purpose
This purpose of this document is to identify the process associated with the business use case Create Carrier Master.
1.2. Business Use Case Specification Reference
Business Use Specification
| Business Use Specification ID | Business Use Case Name | |
| BPI_SCOPE_CM_001 | Create Carrier Master | |
1.3. Definitions, Acronyms & Abbreviations
| Term | Explanation | |
2. Process Identification
2.1 Background
Create Carrier Master is user for creation of master record for the carrier which includes the general information about the carrier, Department Contact Information, Mode of Communications Line of Coverage, plan type and the benefit level offered by the carrier and the benefit description.
2.2. Process Description & Flow
This process describes the Use Case “Create Carrier Master”. This document is the amendment of BPI_CAS_FSD_CM—01 (Version 1.1).
2.2.1. Create Carrier Master
The flow of the process is as described below.
-
- a. Input the general information about the carrier.
- b. Input the Department Contact Information
- c. Validate if the department contact information has the right data type.
- d. If yes add the information to a temporary storage.
- e. If not re enter the information correctly and add again.
- f. Continue adding further department contact information.
- g. If yes follow steps from b) to e)
- h. Edit or delete the Department Contact Information.
- i. On edit remove the data from temporary storage and populate the department contact information data to the fields and change the data. Continue from c) to e).
- j. On delete remove the data from the temporary storage.
- k. Can continue from step b) onwards or go to step l)
- l. If not then check if the data entered for the general carrier information is correct or erroneous.
- m. If erroneous re enter the correct data.
- n. If Correct then save the data to the repository.
- o. System auto generates a unique identification number for the carrier.
- p. Choose the Line of coverage
- q. For the line of coverage choose the system show the Plan type.
- r. Choose the Plan Type
- s. For the plan type choose the system show the benefit level
- t. Choose the benefit level and enter the benefit level name for the specific carrier and add.
- u. The Line of coverage, plan type, Benefit Level and the name is populated in and shown.
- v. Check if the data entered is correct or erroneous.
- w. If erroneous then edit or delete the benefit level name.
- x. Else continue adding the next line of coverage
- y. If the process is completed save the data.
- z. The data is saved into the repository and unique identification number is generated for the all the benefit level offered by the specific carrier a
- CarrierName_PlanType_BenefitLevel_UniqueID
2.2.2. Process Flow Diagrams
(See Figure H-1)
3. User Interface
3.1. User Interface Screens
3.1.1. Screen ID's
| Corresponding HTML File | ||
| Screen ID (SID) | Screen Name | Name |
| carrier.general | Carrier General Info | /bpi/cas/carrier/master/ |
| CarrierInfo.jsp | ||
| carrier.search | Carrier Search | /bpi/cas/carrier/master/Carrier |
| Search.jsp | ||
| carrier.view | Carrier General Info | /bpi/cas/carrier/master/Carrier |
| View | GeneralInfo.jsp | |
| carrier.product | Carrier Product Info | /bpi/cas/carrier/master/Carrier |
| Product.jsp | ||
| carrier.prodsearch | Search Product | /bpi/cas/carrier/master/Product |
| Search.jsp | ||
| carrier.prodinfo | Carrier Product Info | /bpi/cas/carrier/master/Product |
| View.jsp | ||
3.1.2. User Interface ID: Create Carrier Master
3.1.2.1. Screen Name: Create Carrier Master
-
- (BPI_CAS_SCR_CM—001—001)
(See Figure H-2)
3.1.2.2. Element Name, Element Type, Label & Purpose
| Element | Element | ||
| Name | Type | Label | Purpose |
| Main Header | Text | Main Header | To give the heading for the screen being |
| Create | Create Carrier | navigated | |
| Carrier | Master | ||
| Master | |||
| Sub Header | Text | Sub Header | Provide Content Area Text |
| Carrier | Carrier | ||
| General | General | ||
| Information | Information | ||
| Sub Header | Text | Sub Header | Text for the Company Address |
| Address | Address | ||
| Company | Text | Company | Text for the entry field |
| Name | Name | ||
| Company | Entry Field | Company | Entry Field for Company name |
| Name (Entry | Name (Entry | ||
| Field) | Field) | ||
| Address | Text | Address | Text for the Address |
| Address | Entry Field | Address | Entry Field for Address |
| (Entry Field) | (Entry Field) | ||
| Suite/Apt # | Text | Suite/Apt # | Text for Suite/Apt # |
| Suite/Apt # | Entry Field | Suite/Apt # | Entry Field for Suite/Apt # |
| (Entry Field) | (Entry Field) | ||
| City | Text | City | Text for City |
| City (Entry | Entry Field | City (Entry | Entry Field for City |
| Field) | Field) | ||
| State | Text | State | Text for state |
| State (Entry | Entry Field | State (Entry | Entry Field for State |
| Field) | Field) | ||
| ZIP | Text | ZIP | Text for ZIP |
| ZIP (Entry | Entry Field | ZIP (Entry | Entry Field for ZIP |
| Field) | Field) | ||
| Sub Header | Text | Sub Header | Text for the sub heading |
| Contact | Contact | ||
| Department | Department | ||
| Department | Drop Down | Department | List all the departments for the carrier for |
| List | contact information | ||
| Contact | Text | Contact Name | Text for Contact name |
| Name | |||
| Salutation | Text | Salutation | Text for Salutation |
| First Name | Text | First Name | Text for First name |
| Middle name | Text | Middle name | Text for middle name |
| Last name | Text | Last name | Text for last name |
| Suffix | Text | Suffix | Text for Suffix |
| Title | Text | Title | Text for title |
| Salutation | Entry Field | Salutation | Entry Field for Salutation |
| First Name | Entry Field | First Name | Entry field for first name |
| Middle name | Entry Field | Middle name | Entry field for middle name |
| Last name | Entry Field | Last name | Entry field for last name |
| Suffix | Entry Field | Suffix | Entry Field for Suffix |
| Title | Entry Field | Title | Entry Field for title |
| Address | Text | Address | Text for the Address |
| Address | Entry Field | Address | Entry Field for Address |
| (Entry Field) | (Entry Field) | ||
| Suite/Apt # | Text | Suite/Apt # | Text for Suite/Apt # |
| Suite/Apt # | Entry Field | Suite/Apt # | Entry Field for Suite/Apt # |
| (Entry Field) | (Entry Field) | ||
| City | Text | City | Text for City |
| City (Entry | Entry Field | City (Entry | Entry Field for City |
| Field) | Field) | ||
| State | Text | State | Text for state |
| State (Entry | Entry Field | State (Entry | Entry Field for State |
| Field) | Field) | ||
| ZIP | Text | ZIP | Text for ZIP |
| ZIP (Entry | Entry Field | ZIP (Entry | Entry Field for ZIP |
| Field) | Field) | ||
| Mode of | Drop Down | Mode of | List various modes of contact preferred |
| Communication | List | Communication | |
| Phone | Text | Phone | Text for phone |
| FAX | Text | FAX | Text for FAX |
| Text | Text for email | ||
| Phone | Entry Field | Phone | Entry Field for Phone number |
| FAX | Entry Field | FAX | Entry field for FAX |
| Entry Field | Entry field for email | ||
| ADD | Button | ADD | To add the above details on to the html |
| (HTML | table after validation check. | ||
| Submit | |||
| button) | |||
| Table | HTML Table | Table | Table for adding up the contact |
| information | |||
| Delete | Button | Delete | To delete the contact information checked |
| (HTML | for deletion | ||
| Button) | |||
| Check All | Text Link | Check All | To check all the check boxes in the table |
| Clear All | Text Link | Clear All | To un check all the check boxes checked |
| in the table | |||
| Delete | Check box | Delete | To check the items for deletion |
| Edit | Button | Edit | To edit the contact information against the |
| (HTML | row selected for edition | ||
| Button) | |||
| Department | Text | Department | Shows the name of the department added. |
| Name | Name | For example finance, marketing etc. | |
| Last Name | Text | Last Name | Name of the contact person |
| Phone | Text | Phone | Phone of the contact person |
| FAX | Text | FAX | FAX of the contact person |
| Text | Email address of the contact person | ||
| SAVE | Button | SAVE | Save all the above information to the |
| (HTML | repository | ||
| Submit | |||
| button) | |||
| CANCEL | Button | CANCEL | To reset the entries made in all the fields |
| (HTML reset | |||
| button) | |||
3.1.2.3. Front End Validations
Validation Details
This section provides the front-end screen validations along with the associated message—Success/Error Message text
| # | Element Name | Action/Validation Details | Message |
| 1. | Company Name | Refer Document | Refer Document |
| (Entry Field) | No.BPI_CAS_FSD_COMMON | No.BPI_CAS_FSD_COMMON | |
| 2. | Address (Entry | Refer Document | Refer Document |
| Field) | No.BPI_CAS_FSD_COMMON | No.BPI_CAS_FSD_COMMON | |
| 3. | Suite/Apt # | Refer Document | Refer Document |
| No.BPI_CAS_FSD_COMMON | No.BPI_CAS_FSD_COMMON | ||
| 4. | Suite/Apt # | Refer Document | Refer Document |
| (Entry Field) | No.BPI_CAS_FSD_COMMON | No.BPI_CAS_FSD_COMMON | |
| 5. | City | Refer Document | Refer Document |
| No.BPI_CAS_FSD_COMMON | No.BPI_CAS_FSD_COMMON | ||
| 6. | City (Entry | Refer Document | Refer Document |
| Field) | No.BPI_CAS_FSD_COMMON | No.BPI_CAS_FSD_COMMON | |
| 7. | State | Refer Document | Refer Document |
| No.BPI_CAS_FSD_COMMON | No.BPI_CAS_FSD_COMMON | ||
| 8. | State (Entry | Refer Document | Refer Document |
| Field) | No.BPI_CAS_FSD_COMMON | No.BPI_CAS_FSD_COMMON | |
| 9. | ZIP (Entry Field) | Refer Document | Refer Document |
| No.BPI_CAS_FSD_COMMON | No.BPI_CAS_FSD_COMMON | ||
| 10. | Department | Should list various departments like | If none of the option is |
| Finance, Sales, Administration, | selected. Then should | ||
| Technical, Miscellaneous etc from the | show an Error Dialog | ||
| repository. | Box With message. | ||
| The First option should be - | “Department Name - | ||
| Choose One -. Subsequent options | Is required” | ||
| should be listed alphabetically. | |||
| 11. | Salutation | Refer Document | Refer Document |
| No.BPI_CAS_FSD_COMMON | No.BPI_CAS_FSD_COMMON | ||
| 12. | First Name | Refer Document | Refer Document |
| No.BPI_CAS_FSD_COMMON | No.BPI_CAS_FSD_COMMON | ||
| 13. | Middle name | Refer Document | Refer Document |
| No.BPI_CAS_FSD_COMMON | No.BPI_CAS_FSD_COMMON | ||
| 14. | Last name | Refer Document | Refer Document |
| No.BPI_CAS_FSD_COMMON | No.BPI_CAS_FSD_COMMON | ||
| 15. | Suffix | Refer Document | Refer Document |
| No.BPI_CAS_FSD_COMMON | No.BPI_CAS_FSD_COMMON | ||
| 16. | Title | Refer Document | Refer Document |
| No.BPI_CAS_FSD_COMMON | No.BPI_CAS_FSD_COMMON | ||
| 17. | Address (Entry | Refer Document | Refer Document |
| Field) | No.BPI_CAS_FSD_COMMON | No.BPI_CAS_FSD_COMMON | |
| 18. | Suite/Apt # | Refer Document | Refer Document |
| (Entry Field) | No.BPI_CAS_FSD_COMMON | No.BPI_CAS_FSD_COMMON | |
| 19. | City (Entry | Refer Document | Refer Document |
| Field) | No.BPI_CAS_FSD_COMMON | No.BPI_CAS_FSD_COMMON | |
| 20. | State (Entry | Refer Document | Refer Document |
| Field) | No.BPI_CAS_FSD_COMMON | No.BPI_CAS_FSD_COMMON | |
| 21. | ZIP (Entry Field) | Refer Document | Refer Document |
| No.BPI_CAS_FSD_COMMON | No.BPI_CAS_FSD_COMMON | ||
| 22. | Mode of | Should list various types of Mode of | If none of the option is |
| Communication | Communications like Phone, FAX, | selected. Then should | |
| email, USPS etc. from the repository. | show an Error Dialog | ||
| The First option should be - | Box With message. | ||
| Choose One -. Subsequent options | |||
| should be listed alphabetically. | |||
| 23. | Phone | Refer Document | Refer Document |
| No.BPI_CAS_FSD_COMMON | No.BPI_CAS_FSD_COMMON | ||
| 24. | Refer Document | Refer Document | |
| No.BPI_CAS_FSD_COMMON | No.BPI_CAS_FSD_COMMON | ||
| 25. | FAX | Refer Document | Refer Document |
| No.BPI_CAS_FSD_COMMON | No.BPI_CAS_FSD_COMMON | ||
| 26. | ADD | Should function with Enter Key | Error Dialog Box |
| Cursor Positioned on the “ADD” | Text: | ||
| button or Mouse Click. | “Department Name - | ||
| Check if the Contact Department is | Is required” | ||
| selected. If -choose one-default | |||
| option is only selected throw a Java | |||
| script error message. | |||
| Check if the Mode of Communication | |||
| is selected. If -choose one-default | |||
| option is only selected throw a Java | |||
| script error message. | |||
| Check if the value entered for the | |||
| fields for the Department contact | |||
| information are correct. If not throw | |||
| error message. | |||
| Success: Populates the HTML Table | |||
| with the data on each column as | |||
| relevant with the data entered in the | |||
| entry field. | |||
| 27. | Table | Should have column header and each | |
| subsequent row should be identified | |||
| by alternate color combinations. i.e. | |||
| First row should have color ‘x’ and | |||
| the next row should have color ‘y’. | |||
| The next row should have color ‘x’ | |||
| again and so on. The size of any text | |||
| inside any cell should be wrapped if | |||
| the text becomes too long. | |||
| 28. | Delete | Should function with Enter Key | Error Message: |
| Cursor Positioned on the “Delete” | “Please choose the | ||
| button or on Mouse Click. | row or rows to be | ||
| Delete Button should work on | deleted.” | ||
| multiple deletes based on the check | |||
| box or boxes selected. If the user | |||
| clicks on the delete button without | |||
| checking any of the delete check box | |||
| should throw error message. | |||
| Success: Deletes the row or rows from | |||
| the HTML Table(temporary storage) | |||
| 29. | Check All | On clicking the “Check All” link | On clicking the |
| should check all the check boxes in | “Check All” link | ||
| the HTML table. | should check all the | ||
| check boxes in the | |||
| HTML table. | |||
| 30. | Clear All | On clicking the “Clear All” link | On clicking the “Clear |
| should uncheck all the checked check | All” link should | ||
| boxes in the HTML table. | uncheck all the | ||
| checked check boxes | |||
| in the HTML table. | |||
| 31. | Delete | Check box option with default | Check box option with |
| “unchecked” | default “unchecked” | ||
| 32. | Edit | Should function with Enter Key | Should function with |
| Cursor Positioned on the “Edit” | Enter Key Cursor | ||
| button or on Mouse Click. | Positioned on the | ||
| On clicking the edit button the row | “Edit” button or on | ||
| edited should be removed from the | Mouse Click. | ||
| HTML table and the data should be | On clicking the edit | ||
| populated back on the editable entry | button the row edited | ||
| fields. | should be removed | ||
| from the HTML table | |||
| and the data should be | |||
| populated back on the | |||
| editable entry fields. | |||
| 33. | Department | Display the data in a text | |
| Name | |||
| 34. | Name | Display the data in a text | |
| 35. | Phone | Display the data in a text | |
| 36. | Display the data in a text | ||
| 37. | FAX | Display the data in a text | |
| 38. | SAVE | Should function with Enter Key | Error Dialog Box |
| Cursor Positioned on the “SAVE” | Text: | ||
| button or on Mouse Click. | “The value entered for | ||
| On saving the data the data gets saved | ‘field name’ is | ||
| to the database. | incorrect. Please enter | ||
| Validation Check: For the entire field | the correct value.” | ||
| on the carrier general information. | Note: The field name | ||
| Check if the data entered for the | should be picked up | ||
| Carrier General Information is correct. | dynamically for the | ||
| If not throw error message. | each field that is | ||
| Check if there is data populated on the | erroneous. | ||
| Department Contact information field. | For general script | ||
| If yes show a dialog box with message | validations for | ||
| “Would you like to Add the | common functionality | ||
| department contact information before | refer | ||
| saving” Yes/No. | BPI_CAS_FSD_COMMON | ||
| If yes allow the user to add the data. | System Error: | ||
| If no save the data without adding the | Common Text shall be | ||
| Department contact information to the | followed for the | ||
| HTML Table. | System Error. | ||
| On Successful saving the flow should | Dialog Box Text: | ||
| automatically be navigated to the next | |||
| screen. (BPI_CAS_SCR_CM_001_002) | |||
| 39. | Cancel | Cancel Button should clear all the | |
| content filled on the entry fields. | |||
3.1.3. User Interface ID: Create Product
3.1.3.1. Screen Name: Create Product (BPI_CAS_SCR_CM—001—002)
(See Figure H-3)
3.1.3.2. Element Name, Element Type, Label & Purpose
| Element | Element | ||
| Name | Type | Label | Purpose |
| Main Header | Text | Main Header | To give the heading for the screen being |
| Carrier | Carrier | navigated | |
| Offered Plan | Offered Plan | ||
| Trans Id | Text | Trans Id | Text for Trans Id |
| Trans Id | Entry Field | Trans Id | To Enter Trans Id |
| Plan Name | Text | Plan Name | Text for Plan Name |
| Plan Name | Entry Field | Plan Name | To Enter Plan Name |
| Carrier Name | Text | Carrier Name | Text for Carrier Name |
| Carrier Name | Drop Down | Carrier Name | Lists various Carrier Names. |
| List | |||
| Line of | Text | Line of | Text for Line of Coverage |
| Coverage | Coverage | ||
| Line of | Drop Down | Line of | Lists various line of coverage offered. |
| Coverage | List | Coverage | Example Medical, Dental, Vision, CAM |
| etc. | |||
| Plan Type | Text | Plan Type | Text for plan type |
| Plan Type | Drop Down | Plan Type | List the Plan Type available for the line of |
| List | coverage selected. Example HMO, PPO, | ||
| PSO etc. | |||
| Add | Button | Add | To add the Benefit Level Name to the |
| (HTML | HTML table. | ||
| Button) | |||
| Table | HTML table | Table | For adding and displaying all the names of |
| the benefit level offered by the carrier | |||
| Delete | Button | Delete | To delete single or multiple rows of the |
| (HTML | benefit level checked | ||
| Button) | |||
| Check All | Text Link | Check All | To check all the check boxes in the table |
| Clear All | Text Link | Clear All | To un check all the check boxes checked |
| in the table | |||
| Enrolment | Button | Enrolment | To Navigate to Enrolment Transmission |
| Screen | |||
| Premium | Button | Premium | To Navigate to Premium Transmission |
| Screen | |||
| Delete | Check box | Delete | To check the items for deletion |
| Edit | Button | Edit | To edit the benefit level against the row |
| (HTML | selected for edition | ||
| Button) | |||
| SAVE | Button | SAVE | Save all the above information to the |
| (HTML | repository | ||
| Submit | |||
| button) | |||
| Cancel | Button | Cancel | To reset the entries made in all the fields |
| (HTML reset | |||
| button) | |||
3.1.3.3. Front End Validations
Validation Details
This section provides the front-end screen validations along with the associated message—Success/Error Message text
| # | Element Name | Action/Validation Details | Message |
| 1. | Trans Id | This name should be brought from the | Plan Id is required |
| previous screen | PlanId accepts | ||
| BPI_CAS_SCR_CM_001_001. | alphanumeric values | ||
| only | |||
| 2. | Line of Coverage | Should list various types of Line of | Note: The Screen |
| Coverage from the database. | should not be | ||
| Default Line of Coverage should be - | refreshed when | ||
| Choose One - | choosing different | ||
| Subsequent line of coverage should be | Line of Coverage. | ||
| listed alphabetically. | Line of Coverage is | ||
| On choosing the line of coverage | required | ||
| corresponding Plan Type should be | |||
| listed. | |||
| On choosing different Line of | |||
| Coverage the Plan Type List should | |||
| be refreshed and new set of plan type | |||
| should be listed for the new line of | |||
| coverage selected. | |||
| 3. | Plan Type | Should list various types of Plan Type | Note: The Screen |
| from the database. | should not be | ||
| Plan Type should be Listed | refreshed when | ||
| alphabetically | choosing different | ||
| On choosing the Plan Type | Plan Type. | ||
| Corresponding Benefit Level Should | Plan Type is required | ||
| be listed. | |||
| On choosing different Plan Type the | |||
| Benefit Level List should be refreshed | |||
| and new set of Benefit Level should | |||
| be listed of the new Plan Type | |||
| selected. | |||
| 4. | Carrier Name | Should be entered | Carrier Name is |
| required | |||
| 5. | Plan Name | Should be entered | Plan Name is required |
| 6. | Add | Should function with Enter Key | Error Dialog Box |
| Cursor Positioned on the “ADD” | Text: | ||
| button or Mouse Click. | “The name entered for | ||
| Check if alternate Benefit Level name | alternate Benefit Level | ||
| is valid. | Name is incorrect. | ||
| If not throw error message. | Please enter the | ||
| Check if there is no duplicate entry for | correct name.” | ||
| the Combination of Line of Coverage, | “The is no name | ||
| Plan Type and Benefit level selected. | entered for Benefit | ||
| If Duplicate Show Error Message | Level Name. Please | ||
| Check if there is blank field if so | enter the name.” | ||
| throw error message | Error Dialog Box | ||
| Success: The items selected with the | Text: | ||
| benefit level name are added to the | “The Benefit Level | ||
| HTML table below (temporary) | Name for the | ||
| combination of Line | |||
| of Coverage, Plan type | |||
| and Benefit Level is | |||
| already entered. Please | |||
| select other | |||
| combination.” | |||
| 7. | Table | Should have column header and each | |
| subsequent row should be identified | |||
| by alternate color combinations. i.e. | |||
| First row should have color ‘x’ and | |||
| the next row should have color | |||
| ‘y’. The next row should have color ‘x’ | |||
| again and so on. The size of any text | |||
| inside any cell should be wrapped if | |||
| the text becomes too long. | |||
| 8. | Delete | Should function with Enter Key | Error Message: |
| Cursor Positioned on the “Delete” | “Please choose the | ||
| button or on Mouse Click. | row or rows to be | ||
| Delete Button should work on | deleted.” | ||
| multiple deletes based on the check | |||
| box or boxes selected. If the user | |||
| clicks on the delete button without | |||
| checking any of the delete check box | |||
| should throw error message. | |||
| Success: Deletes the row or rows from | |||
| the HTML table(temporary storage) | |||
| 9. | Check All | On clicking the “Check All” Link all | On clicking the |
| the rows with the check box option are | “Check All” Link all | ||
| checked. | the rows with the | ||
| check box option are | |||
| checked. | |||
| 10. | Clear All | On clicking the “Clear All” Link all | On clicking the “Clear |
| the rows with the check box option | All” Link all the rows | ||
| checked are unchecked. | with the check box | ||
| option checked are | |||
| unchecked. | |||
| 11. | Delete | Check box option with default | |
| “unchecked” | |||
| 12. | Edit | Should function with Enter Key | Note: All edits that are |
| Cursor Positioned on the “Edit” | done on the data from | ||
| button or on Mouse Click. | the repository or | ||
| On clicking the edit button the row | database, history of | ||
| edited should be removed from the | the changes made | ||
| table and the data should be populated | must be available. | ||
| back on the editable entry field. | |||
| 13. | SAVE | Should function with Enter Key | System Error: |
| Cursor Positioned on the “SAVE” | Common Text shall be | ||
| button or on Mouse Click. | followed for the | ||
| Validation Check: | System Error. | ||
| Check if there is any data entered in | Dialog box: | ||
| the alternate Benefit Level Name | “Would you like to | ||
| field. | Add the Alternate | ||
| If yes show a dialog box with message | Benefit Level name | ||
| “Would you like to Add the Alternate | before saving” Yes/ | ||
| Benefit Level name before saving” | No. | ||
| Yes/No. | |||
| If yes allow the user to add the data. | |||
| If no save the data without adding the | |||
| Alternate Benefit Level Name to the | |||
| HTML Table. | |||
| On saving the data the data gets saved | |||
| to the database. | |||
| Success: | |||
| On Successful saving the flow should | |||
| be automatically be navigated back to | |||
| the previous | |||
| screen. (BPI_CAS_SCR_CM_001_001) | |||
| 14. | Cancel | Cancel Button should clear all the | |
| content filled on the entry fields. | |||
3.1.4. User Interface ID: Search Carrier Master
3.1.4.1. Screen Name: Search Carrier Master (BPI_CAS_SCR_CM—001—003)
(See Figure H-4)
3.1.4.2. Element Name, Element Type, Label & Purpose
3.1.4.3. Front End Validations
Validation Details
This section provides the front-end screen validations along with the associated message—Success/Error Message text
| # | Element Name | Action/Validation Details | Message |
| 1. | Carrier name | Default option on the list is - | |
| Choose One - | |||
| Lists all the active carrier in | |||
| alphabetical order | |||
| 2. | View | Should function with Enter Key | Error Dialog Box |
| Cursor Positioned on the “View” | Text: “Please choose | ||
| button or on Mouse Click. | a carrier to view | ||
| On clicking the View Button if no | information” | ||
| Carrier name is selected then throw an | |||
| error message. | |||
| Else Success should navigate to the | |||
| view page | |||
| BPI_CAS_SCR_CM_001_006 with | |||
| the data pertaining to the carrier | |||
| selected. | |||
| 3. | Edit | Should function with Enter Key | Error Dialog Box |
| Cursor Positioned on the “Edit” | Text: | ||
| button or on Mouse Click. | “Please choose a carrier to | ||
| On clicking the Edit Button if no | Edit information” | ||
| Carrier name is choose then throw an | |||
| error message. | |||
| Else Success should navigate to the | |||
| Edit pages | |||
| BPI_CAS_SCR_CM_001_004 with | |||
| the data pertaining to the carrier | |||
| selected. | |||
3.1.5. User Interface ID: Modify Carrier Master
3.1.5.1. Screen Name: Modify Carrier Master (BPI_CAS_SCR_CM—001—004)
(See Figure H-5)
3.1.5.2. Element Name, Element Type, Label & Purpose
| Element | Element | ||
| Name | Type | Label | Purpose |
| Main Header | Text | Main Header | To give the heading for the screen being |
| Edit Carrier | Edit Carrier | navigated | |
| Master | Master | ||
| Sub Header | Text | Sub Header | Provide Content Area Text |
| Carrier | Carrier | ||
| General | General | ||
| Information | Information | ||
| Sub Header | Text | Sub Header | Text for the Company Address |
| Address | Address | ||
| Company | Text | Company | Text for the entry field |
| Name | Name | ||
| Company | Entry Field | Company | Entry Field for Company name with data |
| Name (Entry | Name (Entry | filled and editable | |
| Field) | Field) | ||
| Address | Text | Address | Text for the Address |
| Address | Entry Field | Address | Entry Field for Address with data filled |
| (Entry Field) | (Entry Field) | and editable | |
| Suite/Apt # | Text | Suite/Apt # | Text for Suite # |
| Suite/Apt # | Entry Field | Suite/Apt # | Entry Field for Suite/Apt #with data |
| (Entry Field) | (Entry Field) | filled and editable | |
| City | Text | City | Text for City |
| City (Entry | Entry Field | City (Entry | Entry Field for City with data filled and |
| Field) | Field) | editable | |
| State | Text | State | Text for state |
| State (Entry | Entry Field | State (Entry | Entry Field for State with data filled and |
| Field) | Field) | editable | |
| ZIP | Text | ZIP | Text for ZIP |
| ZIP (Entry | Entry Field | ZIP (Entry | Entry Field for ZIP with data filled and |
| Field) | Field) | editable | |
| Sub Header | Text | Sub Header | Text for the sub heading |
| Contact | Contact | ||
| Department | Department | ||
| Department | Drop Down | Department | List all the departments for the carrier for |
| List | contact information | ||
| Contact | Text | Contact Name | Text for Contact name |
| Name | |||
| Salutation | Text | Salutation | Text for salutation |
| First Name | Text | First Name | Text for First name |
| Middle name | Text | Middle name | Text for middle name |
| Last name | Text | Last name | Text for last name |
| Suffix | Text | Suffix | Text for suffix |
| Title | Text | Title | Text for title |
| Salutation | Entry Field | Salutation | Entry Field for salutation |
| First Name | Entry Field | First Name | Entry field for first name |
| Middle name | Entry Field | Middle name | Entry field for middle name |
| Last name | Entry Field | Last name | Entry field for last name |
| Suffix | Entry Field | Suffix | Entry Field for suffix |
| Title | Entry Field | Title | Entry Field for title |
| Address | Text | Address | Text for the Address |
| Address | Entry Field | Address | Entry Field for Address |
| (Entry Field) | (Entry Field) | ||
| Suite/Apt # | Text | Suite/Apt # | Text for Suite # |
| Suite/Apt # | Entry Field | Suite/Apt # | Entry Field for Suite/Apt # |
| (Entry Field) | (Entry Field) | ||
| City | Text | City | Text for City |
| City (Entry | Entry Field | City (Entry | Entry Field for City |
| Field) | Field) | ||
| State | Text | State | Text for state |
| State (Entry | Entry Field | State (Entry | Entry Field for State |
| Field) | Field) | ||
| ZIP | Text | ZIP | Text for ZIP |
| ZIP (Entry | Entry Field | ZIP (Entry | Entry Field for ZIP |
| Field) | Field) | ||
| Mode of | Drop Down | Mode of | List various modes of contact preferred |
| Communication | List | Communication | |
| Phone | Text | Phone | Text for phone |
| FAX | Text | FAX | Text for FAX |
| Text | Text for email | ||
| Phone | Entry Field | Phone | Entry Field for Phone number |
| Entry Field | Entry field for email address | ||
| FAX | Entry Field | FAX | Entry field for FAX |
| ADD | Button | ADD | To add the above details on to the HTML |
| (HTML | table below | ||
| Submit | |||
| button) | |||
| Table | HTML Table | Table | Table for adding up the contact |
| information. The table also contains all the | |||
| contact information already available in a | |||
| multiple rows. | |||
| Delete | Button | Delete | To delete the contact information. |
| (HTML | |||
| Button) | |||
| Check All | Text Link | Check All | To check all the check boxes in the table |
| Clear All | Text Link | Clear All | To un check all the check boxes checked |
| in the table | |||
| Delete | Check box | Delete | To check the items for deletion |
| Edit | Button | Edit | To edit the contact information against the |
| (HTML | row selected for edition | ||
| Button) | |||
| Department | Text | Department | Shows the name of the department added. |
| Name | Name | For example finance, marketing etc. | |
| Last Name | Text | Last Name | Last Name of the contact person |
| Phone | Text | Phone | Phone of the contact person |
| Text | Email address of the contact person | ||
| FAX | Text | FAX | Fax of the contact person |
| SAVE | Button | SAVE | Save all the above information to the |
| (HTML | repository | ||
| Submit | |||
| button) | |||
| CANCEL | Button | CANCEL | Cancels the current operations and sets to |
| (HTML Reset | the value as before saving | ||
| button) | |||
| EDIT | Button | EDIT | Navigates to the next screen without |
| CARRIER | (HTML | CARRIER | saving the data. The purpose is if the |
| OFFERED | Submit | OFFERED | editing needs to be done for the next |
| PLAN | button) | PLAN | screen (BPI_SCREEN_005) |
| New | Button(HTML | New | To create a new page as first time. |
| button) | |||
3.1.6. User Interface ID: Modify Carrier Product
3.1.6.1. Screen Name: Modify Carrier Product
-
- (BPI_CAS_SCR_CM—001—005)
(See Figure H-6)
3.1.6.2. Element Name, Element Type, Label & Purpose
3.1.6.3. Front End Validations
Validation Details
This section provides the front-end screen validations along with the associated message—Success/Error Message text
| # | Element Name | Action/Validation Details | Message |
| 1. | Carrier name | This name should be brought from the | |
| previous screen | |||
| BPI_CAS_SCR_CM_001_004. | |||
| 2. | Line of Coverage | Should list various types of Line of | Note: The Screen |
| Coverage from the database. | should not be | ||
| Default Line of Coverage should be - | refreshed when | ||
| Choose One - | choosing different line | ||
| Subsequent line of coverage should be | of coverage. | ||
| listed alphabetically. | |||
| On choosing the line of coverage | |||
| corresponding Plan Type should be | |||
| listed. | |||
| On choosing different Line of | |||
| Coverage the Plan Type List should | |||
| be refreshed and new set of plan type | |||
| should be listed for the new line of | |||
| coverage selected. | |||
| 3. | Plan Type | Should list various types of Plan Type | Note: The Screen |
| from the database. | should not be | ||
| Plan Type should be Listed | refreshed when | ||
| alphabetically | choosing different | ||
| On choosing the Plan Type | Plan Type. | ||
| Corresponding Benefit Level Should | |||
| be listed. | |||
| On choosing different Plan Type the | |||
| Benefit Level List should be refreshed | |||
| and new set of Benefit Level should | |||
| be listed of the new Plan Type | |||
| selected. | |||
| 4. | Benefit Level | Should list various types of Benefit | |
| Level from the database. | |||
| Benefit Level should be listed | |||
| alphabetically. | |||
| 5. | Benefit Level | The field is used for filling Benefit | |
| Name | Level Name | ||
| 6. | Alternate name | The field is used for entering | Error Dialog Box |
| Alternate Benefit Level Name | Text: | ||
| “The value entered for | |||
| Alternate Benefit | |||
| Level Name is | |||
| incorrect. Please enter | |||
| the correct value.” | |||
| 7. | Add | Should function with Enter Key | Error Dialog Box |
| Cursor Positioned on the “ADD” | Text: | ||
| button or Mouse Click. | “The value entered for | ||
| Check if Alternate Benefit Level name | Benefit Level Name is | ||
| is valid. | incorrect. Please enter | ||
| If not throw error message. | the correct value.” | ||
| Check if there is no duplicate entry for | Embedded Error | ||
| the Combination of Line of Coverage, | Message: | ||
| Plan Type and Benefit level selected. | Show this message on | ||
| If Duplicate Show Error Message | space above the | ||
| Success: The items selected with the | HTML table with | ||
| benefit level name are added to the | RED color. | ||
| HTML table below (temporary) | “The Benefit Level | ||
| Name for the | |||
| combination of Line | |||
| of Coverage, Plan type | |||
| and Benefit Level is | |||
| already available. | |||
| Please select other | |||
| benefit level.” | |||
| 8. | Table | Should have column header and each | |
| subsequent row should be identified | |||
| by alternate color combinations. i.e. | |||
| First row should have color ‘x’ and | |||
| the next row should have color | |||
| ‘y’. The next row should have color ‘x’ | |||
| again and so on. The size of any text | |||
| inside any cell should be wrapped if | |||
| the text becomes too long. | |||
| 9. | Delete | Check box option with default | |
| “unchecked” | |||
| 10. | Delete | Should function with Enter Key | Error Message: |
| Cursor Positioned on the “Delete” | “Please choose the | ||
| button or on Mouse Click. | row or rows to be | ||
| Delete Button should work on | deleted.” | ||
| multiple deletes based on the check | |||
| box or boxes selected. If the user | |||
| clicks on the delete button without | |||
| checking any of the delete check box | |||
| should throw error message. | |||
| Note: the delete action should only | |||
| delete the single or multiple rows | |||
| selected from the view inside the | |||
| table. | |||
| However the data must not be deleted | |||
| from the database on saving. It should | |||
| only inactivate the benefit level name/ | |||
| names selected for deletion. | |||
| 11. | Edit | Should function with Enter Key | Repository Data |
| Cursor Positioned on the “Edit” | should be green in | ||
| button or on Mouse Click. | color and the | ||
| On clicking the edit button the row | Temporary data | ||
| edited should be removed from the | should be red in color. | ||
| table and the data should be populated | |||
| back on the editable entry field. | |||
| 12. | SAVE | Should function with Enter Key | System Error: |
| Cursor Positioned on the “SAVE” | Common Text shall be | ||
| button or on Mouse Click. | followed for the | ||
| Validation Check: | System Error. | ||
| Check if there is any data entered in | Dialog box: | ||
| the Alternate Name field. | “Would you like to | ||
| If yes show a dialog box with message | Add the Alternate | ||
| “Would you like to Add Alternate | Benefit Level name | ||
| Benefit Level name before saving” | before saving” Yes/ | ||
| Yes/No. | No. | ||
| If yes allow the user to add the data. | Note: For all the | ||
| If no save the data without adding the | changes made history | ||
| Benefit Level Name to the HTML | of changes should be | ||
| Table. | available for viewing | ||
| On saving the data the data gets saved | via reports for the | ||
| to the database. | specific modules. | ||
| Success: | |||
| On Successful saving the flow should | |||
| be automatically be navigated back to | |||
| the Search | |||
| Screen. (BPI_CAS_SCR_CM_001_003) | |||
| Note: Data must not be deleted from | |||
| the database on saving. It should only | |||
| inactivate the benefit level name/ | |||
| names selected for deletion. | |||
| 13. | Cancel | To cancel the previous operation. | |
3.1.7. User Interface ID: View Carrier Master
3.1.7.1. Screen Name: View Carrier Master (BPI_CAS_SCR_CM—001—006)
(See Figure H-7)
3.1.7.2. Element Name, Element Type, Label & Purpose
| Element | Element | ||
| Name | Type | Label | Purpose |
| Main Header | Text | Main Header | To give the heading for the screen being |
| View Carrier | View Carrier | navigated | |
| Master | Master | ||
| Sub Header | Text | Sub Header | Name for the sub header |
| carrier | carrier | ||
| general | general | ||
| Information | Information | ||
| Carrier name | Dynamic Text | Carrier name | Name of the carrier being viewed |
| Sub Header | Text | Sub Header | Name of the sub header |
| Address | Address | ||
| Company | Text | Company | Text for the entry field |
| Name | Name | ||
| Company | Text | Company | Text for Company name with data filled |
| Name | Name | ||
| Address | Text | Address | Text for the Address |
| Address | Entry Field | Address | Text for Address with data filled |
| Suite/Apt # | Text | Suite/Apt # | Text for Suite # |
| Suite/Apt # | Text | Suite/Apt # | Text for Suite/Apt # with data filled |
| City | Text | City | Text for City |
| City | Text | City | Text for City with data filled |
| State | Text | State | Text for state |
| State | Text | State | Text for State with data filled |
| ZIP | Text | ZIP | Text for ZIP |
| ZIP | Text | ZIP | Text for ZIP with data filled |
| Table | HTML Table | Table | Table for populating the contact details |
| Department | Text | Department | Shows the name of the department added. |
| Name | Name | For example finance, marketing etc. | |
| Name | Text | Name | Name of the contact person |
| Phone | Text | Phone | Phone of the contact person |
| Text | Email address of the contact person | ||
| FAX | Text | FAX | Fax of the contact person |
| Back | HTML | Back | Submit Button to navigate back to the start |
| Button | screen | ||
| Delete | HTML | Delete | Button to delete the particular record |
| Button | currently viewed. | ||
3.1.7.3. Front End Validations
None.
3.1.8. User Interface ID: Search Product
3.1.8.1. Screen Name: Search Product (BPI_CAS_SCR_CM—001—007)
(See Figure H-8)
3.1.8.2. Element Name, Element Type, Label & Purpose
| Element | Element | ||
| Name | Type | Label | Purpose |
| Search | Text | Search | To give the heading for |
| Product | Product | the screen being navigated | |
| Plan name | Text | Plan name | Title for carrier name |
| Plan name | Drop Down | Plan name | List all the active carrier |
| List | names available | ||
| in the system | |||
| View | HTML | View | Button to view the |
| Button | carrier name selected | ||
| Edit | HTML | Edit | Button to edit the |
| Button | carrier name selected | ||
3.1.8.3. Front End Validations
Validation Details
This section provides the front-end screen validations along with the associated message—Success/Error Message text
| Element | |||
| # | Name | Action/Validation Details | Message |
| 1. | Carrier | Default option on the list is - | |
| name | Choose One - | ||
| Lists all the active carrier in | |||
| alphabetical order | |||
| 2. | View | Should function with Enter Key | Error Dialog Box |
| Cursor Positioned on the “View” | Text: “Please choose | ||
| button or on Mouse Click. | a carrier to view | ||
| On clicking the View Button if no | information” | ||
| Carrier name is selected then | |||
| throw an error message. | |||
| Else Success should navigate to the | |||
| view page | |||
| BPI_CAS_SCR_CM_001_006 | |||
| with the data pertaining to | |||
| the carrier selected. | |||
| 3. | Edit | Should function with Enter Key | Error Dialog Box |
| Cursor Positioned on the “Edit” | Text: | ||
| button or on Mouse Click. | “Please choose a | ||
| On clicking the Edit Button if no | carrier to Edit | ||
| Carrier name is choose then | information” | ||
| throw an error message. | |||
| Else Success should navigate to the | |||
| Edit pages | |||
| BPI_CAS_SCR_CM_001_004 | |||
| with the data pertaining to | |||
| the carrier selected. | |||
3.1.9. User Interface ID: View Product Info
3.1.9.1. Screen Name: View Product Info (BPI_CAS_SCR_CM—001—008)
(See Figure H-9)
3.1.9.2. Element Name, Element Type, Label & Purpose
| Element | Element | ||
| Name | Type | Label | Purpose |
| Main Header | Text | Main Header | To give the heading for the screen being |
| Carrier | Carrier | navigated | |
| Product Info | Product Info | ||
| Sub Header | Text | Sub Header | Name for the sub header |
| Plan Info | Plan Info | ||
| Plan Id | Text | Plan Id | Provide Text |
| Plan Id | Dynamic Text | Plan Id | Name of the Plan Id being viewed |
| Plan Name | Text | Plan Name | Provide Text |
| Plan Name | Dynamic Text | Plan Name | Name of the Plan Name being viewed |
| Carrier Name | Text | Carrier Name | Provide Text |
| Carrier Name | Dynamic Text | Carrier Name | Name of the Carrier Name being viewed |
| Line Of | Text | Line Of | Provide Text |
| Coverage | Coverage | ||
| Line Of | Dynamic Text | Line Of | Name of the Line Of Coverage Name |
| Coverage | Coverage | being viewed | |
| Plan Type | Text | Plan Type | Provide Text |
| Plan Type | Dynamic Text | Plan Type | Name of the Plan Type being viewed |
| Carrier name | Dynamic Text | Carrier name | Name of the carrier being viewed |
| Sub Header | Text | Sub Header | Name of the sub header |
| Address | Address | ||
| Table | HTML Table | Table | Table for populating the plan offered |
| Benefit level | Text | Benefit level | For showing the benefit level name |
| name | name | ||
| Product | Text | Product Name | For showing the Product name |
| Name | |||
| Delete | HTML | Delete | Button to delete the particular record |
| Button | currently viewed. | ||
| Back | HTML | Back | To Navigate to Search Screen |
| Button | |||
3.1.9.3. Front End Validations
None.
3.1.10. Screen Flow
(See Figure H-10)
Benefit Partners Inc Process Specification BPI_CAS_FSD_CM_02 Document Id: BPI_CAS_FSD_CM_02 Version: <1.0> Revision History
| Change Record |
| Date | Author | Version | Change Reference |
| Nov. 27, 2001 | Sudhakar K | 1.0 | Approved version |
| Apr. 05, 2002 | Lala Viswanath | 1.1 | Approved version |
| Oct. 24, 2002 | Riyaz Mohamed | 1.2 | |
| Reviewers |
| Name | Position | |
| Distribution |
| No Of | ||||
| Copy No. | Name | Copies | Location | |
Table Of Contents
1. Introduction 4
1.1 Purpose 4
1.2. Business Use Case Specification Reference 4
1.3. Definition, Acronyms & Abbreviations 4
2. Process Indentification 5
2.1 Background 5
2.2 Process Describtion & Flow 5
2.2.1. Create Line of Coverage 5
2.2.2. Create Plan Type 5
2.2.3. Create Benefit Level 5
2.2.4. Process Flow Diagrams 7
3. User Interface 8
3.1. User Interface Screens 8
3.1.1. Screen ID's 8
3.1.2. User Interface ID: Create Line of Coverage 8
3.1.3. User Interface ID: Create Plan Type 11
3.1.4. User Interface ID: Create Benefit Level 14
3.1.5. Screen Flow 17
1. Introduction
1.1. Purpose
This purpose of this document is to identify the process associated with the business use case Create Plan. This document is the amendment of BPI_CAS_FSD_CM—02 (Version 1.0).
1.2. Business Use Case Specification Reference
| Business Use Specification ID | Business Use Case Name | |
| BPI_SCOPE_CM_002 | Create M Plan | |
1.3. Definitions, Acronyms & Abbreviations
| Term | Explanation | |
2. Process Identification
2.1. Background
This process identifies the functionality for creation of Line of Coverage, Plan Type and Benefit Level.
This process is used to create various Line of Coverage, Plan type and benefit level offered by PacAdvantage. Line of coverage includes the coverage offered by PacAdvantage e.g. Medical, Dental, Vision, Chiropractic, Voluntary Medical etc. These classify broad range of all the line of coverage offered.
Plan type includes plan type for specific line of coverage e.g. PPO, HMO, PSO etc.
-
- Benefit Level specifies the specific benefit level offered for the line of coverage and plan type e.g. Standard, Preferred, preferred plus etc.
2.2. Process Description & Flow
2.2.1. Create Line of Coverage
-
- 1. Input Line of Coverage name
- 2. Validate Line of Coverage name
- 3. If yes add the information to a temporary storage.
- 4. If not re enter the information correctly and add again.
- 5. Edit or delete Line of Coverage name
- 6. If erroneous re enter the correct data.
- 7. If Correct then save the data to the repository
- 8. System auto generates a unique identification number for Line of Coverage
Refer Process Flow Diagram
2.2.2. Create Plan Type
-
- 1. Input Plan Type name
- 2. Validate Plan Type name
- 3. If yes add the information to a temporary storage.
- 4. If not re enter the information correctly and add again.
- 5. Edit or delete Plan Type name
- 6. If erroneous re enter the correct data.
- 7. If Correct then save the data to the repository
- 8. System auto generates a unique identification number for Plan Type
Refer Process Flow Diagram
2.2.3. Create Benefit Level
-
- 1. Input Benefit Level name
- 2. Validate Benefit Level name
- 3. If yes add the information to a temporary storage.
- 4. If not re enter the information correctly and add again.
- 5. Edit or delete Benefit Level name
- 6. If erroneous re enter the correct data.
- 7. If Correct then save the data to the repository
- 8. System auto generates a unique identification number for Benefit Level
Refer Process Flow Diagram
2.2.4. Process Flow Diagrams
(See Figure H-11)
3. User Interface
3.1. User Interface Screens
3.1.1. Screen ID's
| Screen | ||
| ID (SID) | Screen Name | Corresponding HTML File Name |
| plan.loc | Line of Coverage | /bpi/cas/carrier/mplan/LineOfCoverage.jsp |
| plan.plan | Plan Type | /bpi/cas/carrier/mplan/PlanType.jsp |
| plan.ben | Benefit Level | /bpi/cas/carrier/mplan/BenefitLevel.jsp |
3.1.2. User Interface ID: Create Line of Coverage
3.1.2.1. Screen Name: Create Line of Coverage (BPI_CAS_SCR_CM—002—001) (See Figure H-12)
3.1.2.2. Element Name, Element Type, Label & Purpose
| Element | Element | ||
| Name | Type | Label | Purpose |
| Main | Text | Main Header | To give the heading for the screen being |
| Header Line | Line of | navigated | |
| of coverage | coverage | ||
| Line of | Text | Line of | Provide text |
| Coverage | Coverage | ||
| Loc Name | Entry Field | Loc Name | Entering line of coverage |
| Add | HTML | Add | Button for adding the Line of coverage to |
| Button | the table below | ||
| Table | HTML table | Table | For adding and displaying all the names of |
| the Line of Coverage | |||
| Delete | Button | Delete | To delete the line of Coverage checked |
| (HTML Button) | |||
| Check All | Text Link | Check All | To check all the check boxes in the table |
| Clear All | Text Link | Clear All | To un check all the check boxes checked |
| in the table | |||
| Delete | Check box | Delete | To check the items for deletion |
| Edit | Button | Edit | To edit the Line of coverage against the |
| (HTML | row selected for edition | ||
| Button) | |||
| Save | Button | Save | Save all the above information to the |
| (HTML | repository | ||
| Submit | |||
| button) | |||
| Cancel | Button | Cancel | To reset the entries made in all the fields |
| (HTML reset | |||
| button) | |||
3.1.2.3. Front End Validations
Validation Details
This section provides the front-end screen validations along with the associated message—
| # | Element Name | Action/Validation Details | Message |
| 1. | Line of | This field is used for entering the | “Line of Coverage - |
| coverage Entry | line of coverage. The Line of | Is required.” | |
| coverage should be alphanumeric | “Line of Coverage - | ||
| only. The special character | Accepts alphanumeric | ||
| permitted is only space bar | values only” | ||
| between the two words. And can | |||
| have max length 20. Blank line of | |||
| coverage not allowed | |||
| 2. | Add | On Clicking add button or pressing | On click of Add button |
| enter key field with the cursor | checks for the above | ||
| position on the Add button, The | mentioned validations + | ||
| data gets added to the table. | “Line of Coverage - | ||
| Validation checks are done to not | Already exists.” | ||
| allow null value on the entry field | (Occurs on duplicate | ||
| and the entry field should have | record entry) | ||
| only alphanumeric values. | |||
| Duplicate name for the line of | |||
| coverage should not be allowed. | |||
| 3. | Table | Should have column header and | |
| each subsequent row should be | |||
| identified by alternate color | |||
| combinations. i.e. First row should | |||
| have color ‘x’ and the next row | |||
| should have color ‘y’. The next row | |||
| should have color ‘x’ again and so | |||
| on. The size of any text inside any | |||
| cell should be wrapped if the text | |||
| becomes too long. | |||
| 4. | Delete | Should function with Enter Key | “! Select record(s) for |
| Cursor Positioned on the “Delete” | deletion” | ||
| button or on Mouse Click. | (If the operation is in | ||
| Delete Button should work on | Edit Mode & delete | ||
| multiple deletes based on the | operation is invoked) | ||
| check box or boxes selected. If the | |||
| user clicks on the delete button | |||
| without checking any of the delete | |||
| check box should throw error | |||
| message. | |||
| Success: Deletes the row or rows | |||
| from the table (temporary storage) | |||
| 5. | Check All | On clicking the “Check All” link | |
| should check all the check boxes | |||
| in the HTML table. | |||
| 6. | Clear All | On clicking the “Clear All” link | |
| should uncheck all the checked | |||
| check boxes in the HTML table. | |||
| 7. | Delete | Check box option with default | Delete Check box is |
| “unchecked” | disabled and grayed | ||
| out if the data in the | |||
| corresponding row/ | |||
| rows has child parent | |||
| relationship. (I.e. it has | |||
| reference somewhere | |||
| else in the database.) | |||
| 8. | Edit | Should function with Enter Key | “! Complete the update |
| Cursor Positioned on the “Edit” | process” | ||
| button or on Mouse Click. | (If the operation is already | ||
| On clicking the edit button the row | in Edit Mode & another Edit | ||
| edited should be disabled and the | operation is invoked) | ||
| data should be populated back on | |||
| the editable entry field. | |||
| Note: All data that are from the | |||
| repository should be in green | |||
| color. The data that is added and | |||
| not saved should be in red. The | |||
| data selected for editing should be | |||
| displayed in gray. The “Add” | |||
| button will be changed to “Update” | |||
| button. | |||
| 9. | Save | Should function with Enter Key | For general script |
| Cursor Positioned on the “SAVE” | validations for common | ||
| button or on Mouse Click. | functionality refer | ||
| On saving the data the data gets | BPI_CAS_FSD_COMMON | ||
| saved to the database. | System Error: | ||
| Check if there is data populated for | Common Text shall be | ||
| editing. If yes show a dialog box | followed for the | ||
| with message “Complete update | System Error. | ||
| Process.” | “! Do any operation to | ||
| save.” | |||
| (Displayed when invoked | |||
| immediately after the | |||
| screen is loaded). | |||
| “! Complete the update | |||
| process” | |||
| (Displayed when Save | |||
| is invoked in Edit | |||
| Mode). | |||
| 10. | Cancel | Should reset all the entries to | |
| previous status before saving. i.e. | |||
| the fields should be blank. If any of | |||
| the data has been selected for | |||
| editing, the same data should | |||
| appear when cancel button is | |||
| clicked. | |||
3.1.3. User Interface ID: Create Plan Type
3.1.3.1. Screen Name: Create Plan Type (BPI_CAS_SCR_CM—002—002) (See Figure H-13)
3.1.3.2. Element Name, Element Type, Label & Purpose
| Element | Element | ||
| Name | Type | Label | Purpose |
| Main | Text | Main Header | To give the heading for the screen being |
| Header | Plan Type | navigated | |
| Plan Type | |||
| Plan Type | Text | Plan Type | Provide text |
| Plan type | Entry Field | Plan type | Entering Plan type |
| Entry | Entry | ||
| Add | HTML | Add | Button for adding the Plan Type to the |
| Button | table below | ||
| Table | HTML table | Table | For adding and displaying all the names of |
| the Plan Type | |||
| Delete | Button | Delete | To delete the Plan Type checked |
| (HTML Button) | |||
| Check All | Text Link | Check All | To check all the check boxes in the table |
| Clear All | Text Link | Clear All | To un check all the check boxes checked |
| in the table | |||
| Delete | Check box | Delete | To check the items for deletion |
| Edit | Button | Edit | To edit the Plan Type against the row |
| (HTML | selected for edition | ||
| Button) | |||
| SAVE | Button | SAVE | Save all the above information to the |
| (HTML | repository | ||
| Submit | |||
| button) | |||
| CANCEL | Button | CANCEL | To reset the entries made in all the fields |
| (HTML reset | |||
| button) | |||
3.1.3.3. Front End Validations
Validation Details
This section provides the front-end screen validations along with the associated message—Success/Error Message text
| # | Element Name | Action/Validation Details | Message |
| 1. | Plan type Entry | This field is used for entering the Plan | Error Dialog Box: |
| Type. The Plan Type should be | “Plan Name - is | ||
| alphanumeric only. The special character | required” | ||
| permitted is only space bar between the | “Plan Name - Accepts | ||
| two words. And can have max length 255. | alphanumeric values only” | ||
| Blank line of coverage not allowed | |||
| 2. | Add | On Clicking add button or pressing | Error Dialog Box: |
| enter key field with the cursor | On click of Add button | ||
| position on the button, The data | checks for the above | ||
| gets added to the table. Validation | mentioned validations + | ||
| checks are done to not allow null | “Plan Name - already | ||
| value on the entry field and the | exists.” | ||
| entry field should have only | (Occurs on duplicate | ||
| alphanumeric values. | record entry) | ||
| 3. | Table | Should have column header and | |
| each subsequent row should be | |||
| identified by alternate color | |||
| combinations. i.e. First row should | |||
| have color ‘x’ and the next row | |||
| should have color ‘y’. The next row | |||
| should have color ‘x’ again and so | |||
| on. The size of any text inside any | |||
| cell should be wrapped if the text | |||
| becomes too long. | |||
| 4. | Delete | Should function with Enter Key | Error Dialog Box: |
| Cursor Positioned on the “Delete” | “! Select record(s) for | ||
| button or on Mouse Click. | deletion” | ||
| Delete Button should work on | “! Complete the update | ||
| multiple deletes based on the | process” | ||
| check box or boxes selected. If the | (If the operation is in | ||
| user clicks on the delete button | Edit Mode & delete | ||
| without checking any of the delete | operation is invoked) | ||
| check box should throw error | |||
| message. | |||
| Success: Deletes the row or rows | |||
| from the table temporarily. | |||
| 5. | Check All | On clicking the “Check All” link | |
| should check all the check boxes | |||
| in the HTML table. | |||
| 6. | Clear All | On clicking the “Clear All” link | |
| should uncheck all the checked | |||
| check boxes in the HTML table. | |||
| 7. | Delete | Check box option with default | Delete Check box is |
| “unchecked” | disabled and grayed out if | ||
| the data in the | |||
| corresponding row/rows | |||
| has child parent | |||
| relationship. (i.e. it has | |||
| reference somewhere else | |||
| in the database.) | |||
| 8. | Edit | Should function with Enter Key | “! Complete the update |
| Cursor Positioned on the “Edit” | process” | ||
| button or on Mouse Click. | (If the operation is already | ||
| On clicking the edit button the row | in Edit Mode & another Edit | ||
| edited should be disabled in the | operation is invoked) | ||
| table and the data should be | |||
| populated back on the editable | |||
| entry field. | |||
| Note: All the data inside the table | |||
| that are available from the | |||
| repository should be green in color | |||
| text. The temporary data should be | |||
| red in color text. The data selected | |||
| for editing should be displayed in | |||
| gray. The “Add” button will be | |||
| changed to “Update” button. | |||
| 9. | Save | Should function with Enter Key | For general script |
| Cursor Positioned on the “SAVE” | validations for common | ||
| button or on Mouse Click. | functionality refer | ||
| On saving the data the data gets | BPI_CAS_FSD_COM | ||
| saved to the database. | MON | ||
| Check if there is data populated for | System Error: | ||
| editing. If yes show a dialog box | Common Text shall be | ||
| with message “Complete update | followed for the | ||
| Process.” | System Error. | ||
| “! Do any operation to | |||
| save.” | |||
| (Displayed when invoked | |||
| immediately after the | |||
| screen is loaded). | |||
| “! Complete the update | |||
| process.” | |||
| (Displayed when Save is | |||
| invoked in Edit Mode). | |||
| 10. | Cancel | Should reset to the previous status | |
| on clicking the cancel button. i.e. | |||
| make all the entry field blank. If | |||
| any of the data has been selected | |||
| for editing, the same data should | |||
| appear when cancel button is | |||
| clicked. | |||
3.1.4. User Interface ID: Create Benefit Level
3.1.4.1. Screen Name: Create Benefit Level (BPI_CAS_SCR_CM—002—003) (See Figure H-14)
3.1.4.2. Element Name, Element Type, Label & Purpose
| Element | Element | ||
| Name | Type | Label | Purpose |
| Main | Text | Main Header | To give the heading for the screen being |
| Header | Benefit Level | navigated | |
| Benefit | |||
| Level | |||
| Benefit | Text | Benefit Level | Provide text |
| Level Name | Name | ||
| Benefit | Entry Field | Benefit Level | Entering the benefit level name |
| Level Name | Name Entry | ||
| Entry | |||
| Add | HTML | Add | Button for adding the Benefit Level to the |
| Button | table below | ||
| Table | HTML table | Table | For adding and displaying all the names of |
| the Benefit Level | |||
| Delete | Button | Delete | To delete the Benefit Level checked |
| (HTML | |||
| Button) | |||
| Check All | Text Link | Check All | To check all the check boxes in the table |
| Clear All | Text Link | Clear All | To un check all the check boxes checked |
| in the table | |||
| Delete | Check box | Delete | To check the items for deletion |
| Edit | Button | Edit | To edit the Benefit Level against the row |
| (HTML | selected for edition | ||
| Button) | |||
| Save | Button | Save | Save all the above information to the |
| (HTML | repository | ||
| Submit | |||
| button) | |||
| Cancel | Button | Cancel | To reset the entries made in all the fields |
| (HTML reset | |||
| button) | |||
3.1.4.3. Front End Validations
Validation Details
This section provides the front-end screen validations along with the associated message—Success/Error Message text
| # | Element Name | Action/Validation Details | Message |
| 1 | Benefit Level | This field is used for entering the | Error Dialog Box: |
| Benefit Level. The Benefit Level | “Benefit Level - is | ||
| should be alphanumeric only. The | required” | ||
| special character permitted is only | “Benefit Level - | ||
| space bar between the two words. | Accepts alphanumeric values | ||
| And can have max length 255. | only” | ||
| Blank line of coverage not allowed | |||
| 2. | Add | On Clicking add button or pressing | Error Dialog Box: |
| enter key field with the cursor | On click of Add button | ||
| position on the button, The data | checks for the above | ||
| gets added to the table. Validation | mentioned validations + | ||
| checks are done to not allow null | “Benefit Level - already | ||
| value on the entry field and the | exists.” | ||
| entry field should have only alpha | (Occurs on duplicate | ||
| values. | record entry) | ||
| Should check for duplicate entries | |||
| 3. | Table | Should have column header and | |
| each subsequent row should be | |||
| identified by alternate color | |||
| combinations. i.e. First row should | |||
| have color ‘x’ and the next row | |||
| should have color ‘y’. The next row | |||
| should have color ‘x’ again and so | |||
| on. The size of any text inside any | |||
| cell should be wrapped if the text | |||
| becomes too long. | |||
| 4. | Delete | Should function with Enter Key | Error Dialog Box: |
| Cursor Positioned on the “Delete” | “! Select the record(s) | ||
| button or on Mouse Click. | for deletion” | ||
| Delete Button should work on | “! Complete the update | ||
| multiple deletes based on the | process” | ||
| check box or boxes selected. If the | (If the operation is in | ||
| user clicks on the delete button | Edit Mode & delete | ||
| without checking any of the delete | operation is invoked) | ||
| check box should throw error | |||
| message. | |||
| 5. | Check All | On clicking the “Check All” link | |
| should check all the check boxes | |||
| in the HTML table. | |||
| 6. | Clear All | On clicking the “Clear All” link | |
| should uncheck all the checked | |||
| check boxes in the HTML table. | |||
| 7. | Delete | Check box option with default | Delete Check box is |
| “unchecked” | disabled and grayed | ||
| out if the data in the | |||
| corresponding row/ | |||
| rows has child parent | |||
| relationship. (i.e. it has | |||
| reference somewhere | |||
| else in the database.) | |||
| 8. | Edit | Should function with Enter Key | “! Complete the update |
| Cursor Positioned on the “Edit” | process” | ||
| button or on Mouse Click. | (If the operation is already | ||
| On clicking the edit button the row | in Edit Mode & another Edit | ||
| edited should be removed from the | operation is invoked) | ||
| table and the data should be | |||
| populated back on the editable | |||
| entry field. | |||
| If the data is from the repository | |||
| show it in green color text. If it is | |||
| temporary data just added show it | |||
| in red color text. The data selected | |||
| for editing should be displayed in | |||
| gray. The “Add” button will be | |||
| changed to “Update” button. | |||
| 9. | Save | Should function with Enter Key | For general script |
| Cursor Positioned on the “Save” | validations for common | ||
| button or on Mouse Click. On | functionality refer | ||
| saving the data the data gets | BPI_CAS_FSD_COMMON | ||
| saved to the database. | System Error: | ||
| Check if there is data populated for | Common Text shall be | ||
| editing. If yes show a dialog box | followed for the | ||
| with message “Complete update | System Error. | ||
| Process.” | “! Do any operation to | ||
| save.” | |||
| (Displayed when invoked | |||
| immediately after the | |||
| screen is loaded). | |||
| “! Complete the update | |||
| process.” | |||
| (Displayed when Save | |||
| is invoked in Edit | |||
| Mode). | |||
| 10. | Cancel | Should reset to the previous status | |
| on clicking the cancel button. If | |||
| any of the data has been selected | |||
| for editing, the same data should | |||
| appear when cancel button is | |||
| clicked. | |||
3.1.5. Screen Flow
The flow of the process is as described below. (See Figure H-15)
Benefit Partners Inc Process Specification BPI_CAS_FSD_CM_03 Document ID: BPI_CAS_FSD_CM_03 Version: <1.0> Revision History
| Change Record |
| Date | Author | Version | Change Reference |
| Nov. 27, 2001 | Sudhakar K | 1.0 | Approved Version |
| Apr. 4, 2002 | Lala Viswanath | 1.1 | Approved Version |
| Oct. 24, 2002 | Riyaz Mohamed | 1.2 | |
| Reviewers |
| Name | Position |
| Distribution |
| No Of | ||||
| Copy No. | Name | Copies | Location | |
1. Introduction 4
1.1. Purpose 4
1.2. Business Use Case Specification Reference 4
1.3. Definitions, Acronyms & Abbrevations 4
2. Process Identification 5
2.1. Background 5
2.2. Process Description & Flow 5
2.2.1. Admin Fee 5
2.2.2. Agent Fee 6
2.2.3. Additional Fee 6
2.2.4. Rate Differential 6
2.2.5. Process Flow Diagrams 7
3. User Interface 9
3.1. User Interface Screens 9
3.1.1. Screen ID's 9
3.1.2. User Interface ID: Rate Classification-Admin Fees 10
3.1.3. User Interface ID: Rate Classification-Search Admin Fees 13
3.1.4. User Interface ID: Rate Classification-View Admin Fees 15
3.1.5. User Interface ID: Rate Classification-Agent Commission 17
3.1.6. User Interface ID: Rate Classification-Search Agent Commision 21
3.1.7. User Interface ID: Rate Classification-View Agent Commission 23
3.1.8. User Interface ID: Rate Classification-Additional Fees 25
3.1.9. User Interface ID: Rate Classification-Search Additional Fees 27
3.1.10. User Interface ID: Rate Classification-View Additonal Fees 30
3.1.11. User Interface ID: Rate Classification-Differential Fees 31
3.1.12. User Interface ID: Rate Classification-Search Differential Fees 33
3.1.13. User Interface ID: Rate Classification-View Differential Fees 36
3.1.14. Screen Flow 38
1. Introduction
1.1. Purpose
This purpose of this document is to identify the process associated with the business use case Create Rate Master. This document is the amendment of BPI_CAS_FSD_CM—03 (Version 1.1).
1.2. Business Use Case Specification Reference
| Business Use Specification ID | Business Use Case Name | |
| BPI_SCOPE_CM_003 | Create Rate Master | |
1.3. Definitions, Acronyms & Abbreviations
| Term | Explanation | |
2. Process Identification
2.1. Background
This process describes the Use Case “Rate Master”.
Rate Master is used to upload all the rates for the products (Benefits) provided by individual health insurance provider (Carrier). The individual rate files are provided by PacAdvantage with the rate for all the products offered by all the carriers in a specific file format. This Process for loading the rates would be covered in the Document Reference No: BPI_CAS_FSD_EC
The rates are normally classified as blended rates and raw rates.
Raw rates would include only the premium rates for the products offered.
Blended rate would include the sum total of the entire raw rate, admin fees, agent commission additional fees and Differential Fees. The rate classification would define the formula for calculating the blended rate for the product under offering. Using the administrative screens the classification of rates for arriving to these calculations is provided.
Admin Fees: Further Admin fees can be of two types % of the premium or a fixed flat $ amount.
Agent Commission: Agent commission can be a % of premium or a flat $ amount per member or a flat $ amount per group size.
Additional Fees: Additional Fees can be a % premium or flat $ amount for the carrier.
Differential Fees: The amount type for Differential Rate should include Flat $ amount as Flat $ amount per member and also Flat $ amount per Group. When the Flat $ amount is per group it should be able to specify group size.
The state is divided into several service areas based on the number of counties and their population. In the state of California there are presently 6 service areas. The Rate is based on the service area where the employees are residing. Also there are cases when the ZIP code has two or more Service Areas. Under these conditions the ZIP code should be attached to those services areas from where the rates are to be picked.
2.2. Process Description & Flow
2.2.1. Admin Fee
The flow of the process is as described below.
-
- 1. Input the rate type information.
- 2. Validate if the rate type information has the right data type.
- 3. If Correct then save the data to the repository.
- 4. Search admin fee records.
- 5. Select a record in modify mode
- 6. Edit the rate type information.
- 7. Validate if the rate type information has the right data type.
- 8. If Correct then save the data to the repository.
- 9. Search admin fee records.
- 10. Select a record in view/delete mode
- 11. View the selected admin fee
- 12. Delete the selected admin fee from the repository.
Refer Process Flow Diagram FIG. 1.
2.2.2. Agent Fee
The flow of the process is as described below.
-
- 1. Input the rate type information.
- 2. Validate if the rate type information has the right data type.
- 3. If Correct then save the data to the repository.
- 4. Search agent fee records.
- 5. Select a record in modify mode
- 6. Edit the rate type information.
- 7. Validate if the rate type information has the right data type.
- 8. If Correct then save the data to the repository.
- 9. Search agent fee records.
- 10. Select a record in view/delete mode
- 11. View the selected agent fee.
- 12. Delete the selected agent fee from the repository.
Refer Process Flow Diagram FIG. 2.
2.2.3. Additional Fee
The flow of the process is as described below.
-
- 1. Input the rate type information.
- 2. Validate if the rate type information has the right data type.
- 3. If Correct then save the data to the repository.
- 4. Search additional fee records.
- 5. Select a record in modify mode
- 6. Edit the rate type information.
- 7. Validate if the rate type information has the right data type.
- 8. If Correct then save the data to the repository.
- 9. Search additional fee records.
- 10. Select a record in view/delete mode
- 11. View the selected additional fee.
- 12. Delete the selected additional fee from the repository.
Refer Process Flow Diagram FIG. 3.
2.2.4. Rate Differential
The flow of the process is as described below.
-
- 1. Input the rate type information.
- 2. Validate if the rate type information has the right data type.
- 3. If Correct then save the data to the repository.
- 4. Search rate differential records.
- 5. Select a record in modify mode
- 6. Edit the rate type information.
- 7. Validate if the rate type information has the right data type.
- 8. If Correct then save the data to the repository.
- 9. Search rate differential records.
- 10. Select a record in view/delete mode
- 11. View the selected rate differential.
- 12. Delete the selected rate differential from the repository.
Refer Process Flow Diagram FIG. 4.
2.2.5. Process Flow Diagrams
(See Figure H-16)
(See Figure H-17)
(See Figure H-18)
(See Figure H-19)
3. User Interface
3.1. User Interface Screens
3.1.1. Screen ID's
| Corresponding HTML File | ||
| Screen ID (SID) | Screen Name | Name |
| rate.admin | Admin Fees | /bpi/cas/carrier/rates/AdminFee.jsp |
| rate.admin.search | Search Admin Fees | /bpi/cas/carrier/rates/AdminFeeSearch.jsp |
| rate.admin.view | View Admin Fees | /bpi/cas/carrier/rates/AdminFee |
| View.jsp | ||
| rate.admin.confirm | Confirm Admin Fees | /bpi/cas/carrier/rates/AdminFee |
| Confirm.jsp | ||
| rate.agent | Agent Commission | /bpi/cas/carrier/rates/AgentFee.jsp |
| rate.agent.search | Search Agent Commission | /bpi/cas/carrier/rates/AgentFeeSearch.jsp |
| rate.agent.view | View Agent Commission | /bpi/cas/carrier/rates/AgentFeeView.jsp |
| rate.agent.confirm | Confirm Agent Commission | /bpi/cas/carrier/rates/AgentFeeConfirm.jsp |
| rate.add | Additional Fees | /bpi/cas/carrier/rates/AdditionalFee.jsp |
| rate.add.search | Search Additional Fees | /bpi/cas/carrier/rates/AdditionalFee |
| Search.jsp | ||
| rate.add.view | View Additional Fees | /bpi/cas/carrier/rates/AdditionalFee |
| View.jsp | ||
| rate.add.confirm | Confirm Additional Fees | /bpi/cas/carrier/rates/AdditionalFee |
| Confirm.jsp | ||
| rate.ratediff | Differential Fees | /bpi/cas/carrier/rates/Differential |
| Rate.jsp | ||
| rate.ratediff.search | Search Differential Fees | /bpi/cas/carrier/rates/Differential |
| RateSearch.jsp | ||
| rate.ratediff.view | View Differential Fees | /bpi/cas/carrier/rates/Differential |
| RateView.jsp | ||
| rate.ratediff.confirm | Confirm Differential Fees | /bpi/cas/carrier/rates/Differential |
| RateConfirm.jsp | ||
3.1.2. User Interface ID: Rate Classification—Admin Fees
3.1.2.1. Screen Name: Rate Classification—Admin Fees (BPI_CAS_SCR_CM—003—001) (See Figure H-20)
3.1.2.2. Element Name, Element Type, Label & Purpose
| Element | Element | ||
| Name | Type | Label | Purpose |
| Main | Text | Main Header | To give heading for the screen being |
| Header rate | rate | navigated | |
| Classification | Classification | ||
| for Admin | for Admin | ||
| Fees | Fees | ||
| Rate Type | Radio | Rate Type | To Select a rate type (Whether |
| Blended or Non Blended) | |||
| Rate Type | Radio | Rate Type | To Select a rate type (Whether Enroll |
| or Renew) | |||
| Group Type | Drop Down | Group Type | List all the Group Type Available in the |
| List | system | ||
| Association | Drop Down | Association | List all the Association Type Available |
| ID | List | ID | in the system |
| Member | Radio | Member | To Select a Member type (Whether |
| Type | Type | Individual or Association) | |
| Percentage | Entry Field | Percentage | Entry field for entering % premium |
| Premium | Premium | ||
| Effective | Entry Field | Effective | To choose the date required, by |
| Date | Date | calendar or entering it | |
| Amount | Entry Field | Amount | Entry field for entering Amount in $ |
| Medical | Entry Field | Medical | Entry field for entering the Medical Fee |
| in $ | |||
| Dental | Entry Field | Dental | Entry field for entering the Dental Fee |
| in $ | |||
| Vision | Entry Field | Vision | Entry field for entering the Vision Fee |
| in % | |||
| CAM | Entry Field | CAM | Entry field for entering the CAM Fee in % |
| Save | Button | Save | Save all the above information to the |
| (HTML | repository | ||
| Submit | |||
| button) | |||
| Cancel | Button | Cancel | To reset the entries made in all the |
| (HTML reset | fields | ||
| Button) | |||
3.1.2.3. Front End Validations
Validation Details
This section provides the front-end screen validations along with the associated message—Success/Error Message text
| # | Element Name | Action/Validation Details | Message |
| 1. | Rate Type | Rate Type should be selected for | “Rate Type - Is |
| Adding Admin Fees(Either one of | required” | ||
| Blended Rate or Non Blended | |||
| Rate) and (Either one of Enroll or | |||
| Renew). | |||
| 2. | Group Type | Should list all the Group Type | “Group Type - Is |
| within the system | required” | ||
| The first option should be - | |||
| Choose One -. Subsequent | |||
| Group Types should be listed in | |||
| alphabetical order | |||
| 3. | Association Id | Should list all the Association Id | “Association Id - Is |
| within the system. The first option | required” | ||
| should be - | |||
| Choose One -. Subsequent | |||
| Group Types should be listed in | |||
| alphabetical | |||
| 4. | Member Type | Member Type should be selected | “Member Type - Is |
| for Adding Admin Fees if Group | required. Select either | ||
| Type is Guaranteed Association. | Individual Member or | ||
| Association Group” | |||
| 5. | Percentage | Percentage Premium should be | “Percentage |
| Premium | entered if the rate type is Blended | Premium - Is | |
| Required” | |||
| “Percentage Premium - | |||
| Accepts numeric value | |||
| only (0 to 100)” | |||
| 6. | Effective Date | Effective Date should be selected | “Effective Date - Is |
| from Calendar or entered | required” | ||
| For valid Date Format | “Effective Date - | ||
| Refer BPI_CAS_FSD_Common | Accepts the format in | ||
| MM/DD/YYYY” | |||
| 7. | Amount | Amount should be entered if the | “Amount - Is |
| rate type is Non Blended | required” | ||
| “Amount - Accepts | |||
| currency format only | |||
| (###.##) | |||
| 8. | Medical | Medical should be entered if the | “Medical - Is |
| rate type is Non Blended | required” | ||
| “Medical - Accepts | |||
| currency format only | |||
| (###.##)” | |||
| 9. | Dental | Medical should be entered if the | “Dental - Is |
| rate type is Non Blended | required” | ||
| “Dental - Accepts | |||
| currency format only | |||
| (###.##)” | |||
| 10. | Vision | Medical should be entered if the | “Vision - Is |
| rate type is Non Blended | required” | ||
| “Vision - Accepts | |||
| numeric value only | |||
| (0 to 100)” | |||
| 11. | CAM | Medical should be entered if the | “CAM - Is required” |
| rate type is Non Blended | “CAM - Accepts | ||
| numeric value only | |||
| (0 to 100)” | |||
| 12. | Save | Should function with Enter Key | For general script |
| Cursor Positioned on the “SAVE” | validations for | ||
| button or on Mouse Click. | common | ||
| On saving the data the data gets | functionality refer | ||
| saved to the database. | BPI_CAS_FSD_COMMON | ||
| Should there be any validation | System Error: | ||
| error on any of the fields. Should | Common Text shall | ||
| show the script error and place the | be followed for the | ||
| cursor on the specific entry field. | System Error. | ||
| Check if the entries are not | “! Do any operation to | ||
| duplicate. | save.” | ||
| On Successful saving the flow | (Displayed when | ||
| should reside in the same screen. | invoked immediately | ||
| Exception: If the data selected for | after the screen is | ||
| edition is from the repository retain | loaded). | ||
| its previous state. i.e. the data | “! Complete the update | ||
| should be visible in the table after | process.” | ||
| saving. | (Displayed when Save is | ||
| Also show different text color for | invoked in Edit Mode). | ||
| the data added (temporary) and | |||
| the data picked from the | |||
| repository. | |||
| 13. | Cancel | Should reset to the previous state | |
| on clicking the cancel button | |||
3.1.3. User Interface ID: Rate Classification—Search Admin Fees
3.1.3.1. Screen Name: Rate Classification—Search Admin Fees (BPI_CAS_SCR_CM—003—002) (See Figure H-21)
3.1.3.2. Element Name, Element Type, Label & Purpose
| Element | Element | ||
| Name | Type | Label | Purpose |
| Main | Text | Main Header | To give heading for the screen being |
| Header rate | rate | navigated | |
| Classification | Classification | ||
| for Admin | for Admin | ||
| Fees | Fees | ||
| Rate Type | Radio | Rate Type | To Select a rate type (Whether |
| Blended or Non Blended) | |||
| Rate Type | Radio | Rate Type | To Select a rate type (Whether Enroll |
| or Renew) | |||
| Group Type | Drop Down | Group Type | List all the Group Type Available in the |
| List | system | ||
| Association | Drop Down | Association | List all the Association Type Available |
| ID | List | ID | in the system |
| Percentage | Entry Field | Percentage | Entry field for entering % premium |
| Premium | Premium | ||
| Effective | Entry Field | Effective | To choose the date required, by |
| Date | Date | calendar or entering it | |
| Search | HTML | Search | Button to search the data based on |
| Button | inputs and displays the results in | ||
| HTML table below | |||
| Table | HTML table | Table | Shows the all the data in the column |
| format | |||
| View/ | Button | View/ | Button to view the selected record |
| Delete | (HTML | Delete | data |
| Button) | |||
| Check | Radio Button | Check Index | To check the items for modify, view |
| Index | and deletion | ||
| Edit | Button (HTML | Edit | To edit the data against the row |
| Button) | selected for edition | ||
| Cancel | Button | Cancel | To reset the entries made in all the |
| (HTML | fields | ||
| Button) | |||
3.1.3.3. Front End Validations
Validation Details
This section provides the front-end screen validations along with the associated message—Success/Error Message text
| # | Element Name | Action/Validation Details | Message |
| 1 | Effective Date | Effective Date should be selected | “Effective Date - |
| from Calendar or entered | Accepts the format in | ||
| For valid Date Format | MM/DD/YYYY” | ||
| Refer BPI_CAS_FSD_Common | |||
| 2 | Search | Should function with Enter Key | On click of Search |
| Cursor Positioned on the “Search” | button checks for the | ||
| button or Mouse Click. | above mentioned | ||
| All the entries are valid. It fetches | validations | ||
| the records from repository based | |||
| on inputs and displays the records | |||
| in the table below. Else throws error dialog | |||
| box. | |||
| 3 | Table | Should have column header and | |
| each subsequent row should be | |||
| identified by alternate color | |||
| combinations. I.e. first row should | |||
| have color ‘x’ and the next row | |||
| should have color ‘y’. The next row | |||
| should have color ‘x’ again and so | |||
| on. The size of the text inside any | |||
| cell should be wrapped if the text | |||
| becomes too long. | |||
| 4 | View/Delete | Should function with Enter Key | “! Select any one of |
| Cursor Positioned on the “View/ | the record” | ||
| Delete” button or on Mouse Click. | |||
| If the user clicks on the view | |||
| button without checking any of the | |||
| view radio button should throw | |||
| error message. | |||
| Success: View the current row | |||
| from the table. | |||
| 5 | Modify | Should function with Enter Key | |
| Cursor Positioned on the “Modify” | |||
| button or on Mouse Click. | |||
| On clicking the modify button the | |||
| row is edited and the data should | |||
| be populated. | |||
| 5 | Cancel | Should reset to the previous state | |
| on clicking the cancel button | |||
3.1.4. User Interface ID: Rate Classification—View Admin Fees
3.1.4.1. Screen Name: Rate Classification—View Admin Fees (BPI_CAS_SCR_CM—003—003) (See Figure H-22)
3.1.4.2. Element Name, Element Type, Label & Purpose
| Element | Element | ||
| Name | Type | Label | Purpose |
| Main | Text | Main Header | To give heading for the |
| Header rate | rate | screen being navigated | |
| Classification | Classification | ||
| for Admin | for Admin | ||
| Fees | Fees | ||
| Rate Type | Text Field | Rate Type | Displays Blended or Non |
| Blended rates | |||
| Enroll | Text Field | Enroll | Displays Enroll or Renew |
| Renew | Renew | ||
| Group Type | Text Field | Group Type | Displays Group Type |
| Association | Text Field | Association | Displays Association Type |
| ID | ID | ||
| Member | Text Field | Member | Displays Individual or |
| Type | Type | Association | |
| Percentage | Text Field | Percentage | Displays % premium |
| Premium | Premium | ||
| Effective | Text Field | Effective | Displays Effective date |
| Date | Date | ||
| Amount | Text Field | Amount | Displays Amount in $ |
| Medical | Text Field | Medical | Displays Medical Fee in $ |
| Dental | Text Field | Dental | Displays Dental Fee in $ |
| Vision | Text Field | Vision | Displays Vision Fee in % |
| CAM | Text Field | CAM | Displays CAM Fee in % |
| Delete | Button | Delete | To delete the data |
| (HTML | |||
| Button) | |||
| New Admin | Button | New Admin | Go to New Admin fee |
| fees | (HTML | fees | screen |
| Button) | |||
3.1.4.3. Front End Validations
Validation Details
This section provides the front-end screen validations along with the associated message—Success/Error Message text
| Element | |||
| # | Name | Action/Validation Details | Message |
| 1 | Delete | Should function with Enter Key | “Do you want to |
| Cursor Positioned on the “Delete” | delete the selected | ||
| button or on Mouse Click. | record?” | ||
| If the user clicks on the delete | |||
| button throw message box. | |||
| Success: Deletes the row from the | |||
| data base | |||
| 2 | New Admin | Should go to the admin fees | |
| Fees | screen clicking the New Admin | ||
| Fees button | |||
3.1.5. User Interface ID: Rate Classification—Agent Commission
3.1.5.1. Screen Name: Rate Classification—Agent Commission (BPI_CAS_SCR_CM—003—004) (See Figure H-23)
3.1.5.2. Element Name, Element Type, Label & Purpose
| Element | Element | ||
| Name | Type | Label | Purpose |
| Main | Text | Main Header | To give heading for the screen being |
| Header rate | rate | navigated | |
| Classification | Classification | ||
| for Agent | for Agent | ||
| Fees | Fees | ||
| Rate Type | Radio | Rate Type | To Select a rate type (Whether |
| Blended or Non Blended) | |||
| Rate Type | Radio | Rate Type | To Select a rate type (Whether Enroll |
| or Renew) | |||
| Enrolled | Check Box | Enrolled | To be checked if enrolled before 1997. |
| before 1997 | before 1997 | ||
| Group Type | Drop Down | Group Type | List all the Group Type Available in the |
| List | system | ||
| Association | Drop Down | Association | List all the Association Type Available |
| ID | List | ID | in the system |
| Member | Radio | Member | To Select a Member type (Whether |
| Type | Type | Individual or Association) | |
| Percentage | Entry Field | Percentage | Entry field for entering % premium |
| Premium | Premium | ||
| Effective | Entry Field | Effective | To choose the date required by |
| Date | Date | calendar or entering | |
| Group Size | Entry Field | Group Size | Entry field for entering Group size |
| Lower Limit | Lower Limit | Lower limit. | |
| Group Size | Entry Field | Group Size | Entry field for entering Group size |
| Upper Limit | Upper Limit | Upper limit. | |
| Amount | Entry Field | Amount | Entry field for entering Amount in $ |
| Medical | Entry Field | Medical | Entry field for entering the Medical Fee |
| in $ | |||
| Dental | Entry Field | Dental | Entry field for entering the Dental Fee |
| in $ | |||
| Vision | Entry Field | Vision | Entry field for entering the Vision Fee |
| in % | |||
| CAM | Entry Field | CAM | Entry field for entering the CAM Fee in % |
| Save | Button | Save | Save all the above information to the |
| (HTML | repository | ||
| Button) | |||
| Cancel | Button | Cancel | To reset the entries made in all the |
| (HTML | fields | ||
| Button) | |||
3.1.5.3. Front End Validations
Validation Details
This section provides the front-end screen validations along with the associated message—Success/Error Message text
| • | Element Name | Action/Validation Details | Message |
| 1. | Rate Type | Rate Type should be selected for | “Rate Type - Is |
| Adding Agent Fees (Either one of | Required” | ||
| Blended or Non Blended Rate and | |||
| Either one of Enroll or Renew) | |||
| 2. | Enrolled before | Should be selected if enrolled | |
| 1997 | before 1997. | ||
| 3. | Group Type | Should list all the Group Type | “Group Type - Is |
| within the system | required” | ||
| The first option should be - | |||
| Choose One -. Subsequent | |||
| Group Types should be listed in | |||
| alphabetical order | |||
| 4. | Association Id | Should list all the Association Id | “Association Id - Is |
| within the system. The first option | required” | ||
| should be - | |||
| Choose One -. Subsequent | |||
| Group Types should be listed in | |||
| alphabetical | |||
| 5. | Member Type | Member Type should be selected | “Member Type - Is |
| for Adding Agent Fees if Group | required. Select | ||
| Type is Guaranteed Association. | Individual Member | ||
| or Association | |||
| Group.” | |||
| 6. | Percentage | Percentage Premium should be | “Percentage |
| Premium | entered if the rate type is Blended | Premium” - Is | |
| required | |||
| “Percentage Premium | |||
| in - Accepts numeric | |||
| values only (0 to 100)” | |||
| 7. | Effective Date | Effective Date should be selected | “Effective Date - Is |
| from Calendar or entered | required” | ||
| For valid Date Format | “Effective Date - | ||
| Refer BPI_CAS_FSD_Common | Accepts the format in | ||
| MM/DD/YYYY” | |||
| 8. | Group Size | Group Size Lower Limit should be | “Group Size Lower |
| Lower Limit | entered if the rate type is Non | Limit - Is required” | |
| Blended | “Group Size Lower | ||
| limit - Accepts | |||
| numeric values only | |||
| (1-999)” | |||
| 9. | Group Size | Group Size Upper Limit should be | “Group Size Upper |
| Upper Limit | entered if the rate type is Non | Limit - Is required” | |
| Blended | “Group Size Upper | ||
| Limit—Accepts | |||
| numeric values only | |||
| (1-999)” | |||
| “Kindly enter Group | |||
| Size Upper limit | |||
| greater than Lower | |||
| Limit” | |||
| 10. | Amount | Amount should be entered if the | “Amount - Is |
| rate type is Non Blended | required” | ||
| “Amount - Accepts | |||
| currency format only | |||
| (###.##) | |||
| 11. | Medical | Medical should be entered if the | “Medical - Is |
| rate type is Non Blended | required” | ||
| “Medical - Accepts | |||
| currency format only | |||
| (###.##)” | |||
| 12. | Dental | Medical should be entered if the | “Dental - Is |
| rate type is Non Blended | required” | ||
| “Dental - Accepts | |||
| currency format only | |||
| (###.##)” | |||
| 13. | Vision | Medical should be entered if the | “Vision - Is |
| rate type is Non Blended | required” | ||
| “Vision - Accepts | |||
| numeric value only | |||
| (0 to 100)” | |||
| 14. | CAM | Medical should be entered if the | “CAM - Is required” |
| rate type is Non Blended | “CAM - Accepts | ||
| numeric value only | |||
| (0 to 100)” | |||
| 15. | Save | Should function with Enter Key | For general script |
| Cursor Positioned on the “SAVE” | validations for | ||
| button or on Mouse Click. | common | ||
| On saving the data the data gets | functionality refer | ||
| saved to the database. | BPI_CAS_FSD_COMMON | ||
| Should there be any validation | System Error: | ||
| error on any of the fields. Should | Common Text shall | ||
| show the script error and place the | be followed for the | ||
| cursor on the specific entry field. | System Error. | ||
| Check if the entries are not | “! Do any operation to | ||
| duplicate. | save.” | ||
| On Successful saving the flow | (Displayed when | ||
| should reside in the same screen. | invoked immediately | ||
| Exception: If the data selected for | after the screen is | ||
| edition is from the repository retain | loaded). | ||
| its previous state. I.e. the data | |||
| should be visible in the table after | |||
| saving. | |||
| 16. | Cancel | Should reset to the previous state | |
| on clicking the cancel button | |||
3.1.6. User Interface ID: Rate Classification—Search Agent Commission
3.1.6.1. Screen Name: Rate Classification—Search Agent Commission (BPI_CAS_SCR_CM—003—005) (See Figure H-24)
| Element | Element | ||
| Name | Type | Label | Purpose |
| Main | Text | Main Header | To give heading for the screen being |
| Header rate | rate | navigated | |
| Classification | Classification | ||
| for Agent | for Agent | ||
| Fees | Fees | ||
| Rate Type | Radio | Rate Type | To Select a rate type (Whether |
| Blended or Non Blended) | |||
| Enroll/ | Radio | Enroll/ | To Select a rate type (Whether Enroll |
| Renew | Renew | or Renew) | |
| Group Type | Drop Down | Group Type | List all the Group Type Available in the |
| List | system | ||
| Association | Drop Down | Association | List all the Association Type Available |
| ID | List | ID | in the system |
| Effective | Entry Field | Effective | To choose the date required by |
| Date | Date | calendar or entering | |
| Group Size | Entry Field | Group Size | Entry field for entering Group size |
| Lower Limit | Lower Limit | Lower limit. | |
| Group Size | Entry Field | Group Size | Entry field for entering Group size |
| Upper Limit | Upper Limit | Upper limit. | |
| Search | HTML | Search | Button to search the data based on |
| Button | inputs and displays the results in | ||
| HTML table below | |||
| Table | HTML table | Table | Shows the all the data in the column |
| format | |||
| View/ | Button | View/ | Button to view the selected record |
| Delete | (HTML | Delete | data |
| Button) | |||
| Check | Radio Button | Check Index | To check the items for modify, view |
| Index | and deletion | ||
| Modify | Button (HTML | Modify | To edit the data against the row |
| Button) | selected for edition | ||
| Cancel | Button | Cancel | To reset the entries made in all the |
| (HTML | fields | ||
| Button) | |||
3.1.6.3. Front End Validations
Validation Details
This section provides the front-end screen validations along with the associated message—Success/Error Message text
| • | Element Name | Action/Validation Details | Message |
| 1 | Effective Date | Effective Date should be selected | “Effective Date - |
| from Calendar or entered | Accepts the format in | ||
| For valid Date Format | MM/DD/YYYY” | ||
| Refer BPI_CAS_FSD_Common | |||
| 2 | Group Size | Group Size Lower Limit should be | “Group Size Lower |
| Lower Limit | entered if the rate type is Non | limit- Accepts | |
| Blended | numeric values only | ||
| (1-999)” | |||
| 3 | Group Size | Group Size Upper Limit should be | “Group Size Upper |
| Upper Limit | entered if the rate type is Non | Limit- Accepts | |
| Blended | numeric values only | ||
| (1-999)” | |||
| “Kindly enter Group Size | |||
| Upper limit greater than | |||
| Lower Limit” | |||
| 4 | Search | Should function with Enter Key | On click of Search |
| Cursor Positioned on the “Search” | button checks for the | ||
| button or Mouse Click. | above mentioned validations | ||
| All the entries are valid. It fetches | |||
| the records from repository based | |||
| on inputs and displays the records | |||
| in the table below. Else throws | |||
| error dialog box. | |||
| 5 | Table | Should have column header and | |
| each subsequent row should be | |||
| identified by alternate color | |||
| combinations. I.e. first row should | |||
| have color ‘x’ and the next row | |||
| should have color ‘y’. The next row | |||
| should have color ‘x’ again and so | |||
| on. The size of the text inside any | |||
| cell should be wrapped if the text | |||
| becomes too long. | |||
| 6 | View/Delete | Should function with Enter Key | “! Select any one of |
| Cursor Positioned on the “View/ | the record” | ||
| Delete” button or on Mouse Click. | |||
| If the user clicks on the view | |||
| button without checking any of the | |||
| view radio button should throw | |||
| error message. | |||
| Success: View the current row | |||
| from the table. | |||
| 7 | Modify | Should function with Enter Key | “! Select any one of |
| Cursor Positioned on the “Modify” | the record” | ||
| button or on Mouse Click. | |||
| On clicking the modify button the | |||
| row is edited and the data should | |||
| be populated. | |||
| 8 | Cancel | Should reset to the previous state | |
| on clicking the cancel button | |||
3.1.7. User Interface ID: Rate Classification—View Agent Commission
3.1.7.1. Screen Name: Rate Classification—View Agent Commission (BPI_CAS_SCR_CM—003—006) (See Figure H-25)
3.1.7.2. Element Name, Element Type, Label & Purpose
| Element | Element | ||
| Name | Type | Label | Purpose |
| Main | Text | Main Header | To give heading for the |
| Header rate | rate | screen being navigated | |
| Classification | Classification | ||
| for Agent | for Agent | ||
| Fees | Fees | ||
| Rate Type | Text Field | Rate Type | To Display rate type |
| (Whether Blended or Non | |||
| Blended) | |||
| Enroll Type | Text Field | Enroll Type | To Display enroll type |
| (Whether Enroll or Renew) | |||
| Enrolled | Text Field | Enrolled | To Display enrolled before |
| before 1997 | before 1997 | 1997 or not. | |
| Group Type | Text Field | Group Type | To Display Group Type |
| Association | Text Field | Association | To Display Association |
| ID | ID | Type | |
| Member | Text Field | Member | To Display member type |
| Type | Type | (Individual or Association) | |
| Percentage | Text Field | Percentage | To Display % premium |
| Premium | Premium | ||
| Effective | Text Field | Effective | To Display Effective date |
| Date | Date | ||
| Group Size | Text Field | Group Size | To Display Group size |
| Lower Limit | Lower Limit | Lower limit. | |
| Group Size | Text Field | Group Size | To Display Group size |
| Upper Limit | Upper Limit | Upper limit. | |
| Amount | Text Field | Amount | To Display Amount in $ |
| Medical | Text Field | Medical | To Display Medical Fee |
| in $ | |||
| Dental | Text Field | Dental | To Display Dental Fee in $ |
| Vision | Text Field | Vision | To Display Vision Fee in % |
| CAM | Text Field | CAM | To Display CAM Fee in % |
| Delete | Button | Delete | To delete the data |
| (HTML | |||
| Button) | |||
| New Agent | Button | New Agent | To go to New Agent fees |
| Fees | (HTML | Fees | screen |
| Button) | |||
3.1.7.3. Front End Validations
Validation Details
This section provides the front-end screen validations along with the associated message—Success/Error Message text
| • | Element Name | Action/Validation Details | Message |
| 1 | Delete | Should function with Enter Key | “Do you want |
| Cursor Positioned on the “Delete” | to delete the | ||
| button or on Mouse Click. | selected | ||
| If the user clicks on the delete | record?” | ||
| button throw message box. | |||
| Success: Deletes the row from the | |||
| data base | |||
| 2 | New Agent | Should go to the agent fees screen | |
| Fees | clicking the New Agent Fees | ||
| button | |||
3.1.8. User Interface ID: Rate Classification—Additional Fees
3.1.8.1. Screen Name: Rate Classification—Additional Fees (BPI_CAS_SCR_CM—003—007) (See Figure H-26)
3.1.8.2. Element Name, Element Type, Label & Purpose
| Element | Element | ||
| Name | Type | Label | Purpose |
| Main | Text | Main Header | To give heading for the |
| Header rate | rate | screen being navigated | |
| Classification | Classification | ||
| for | for | ||
| Additional | Additional | ||
| Fees | Fees | ||
| Cobra Type | Radio | Cobra Type | To Select a Cobra |
| Type (Whether Cal | |||
| Cobra or Federal Cobra) | |||
| Additional | Entry Field | Additional | Entry field for entering |
| Fee | Fee | % Additional Fees | |
| Percentage | Percentage | ||
| Effective | Entry Field | Effective | To choose the date |
| Date | Date | required by calendar | |
| or entering | |||
| Save | Button | Save | Save all the above |
| (HTML | information to the | ||
| Button) | repository | ||
| Cancel | Button | Cancel | To reset the entries |
| (HTML | made in all the fields | ||
| Button) | |||
3.1.8.3. Front End Validations
Validation Details
This section provides the front-end screen validations along with the associated message—Success/Error Message text
| • | Element Name | Action/Validation Details | Message |
| 1. | Cobra Type | Cobra Type should be selected for | “Kindly choose Cobra” |
| Adding Additional Fees | |||
| 2. | Additional Fee | Additional Fee Percentage should | “% Of Additional Fees - |
| Percentage | be entered. | Is required” | |
| “% of Additional Fees - | |||
| Accepts numeric value | |||
| only (0 to 100) | |||
| 3. | Effective Date | Effective Date should be selected | “Effective Date - Is |
| from Calendar or entered | required” | ||
| For valid Date Format | “Effective Date - | ||
| Refer BPI_CAS_FSD_Common | Accepts the format in | ||
| MM/DD/YYYY” | |||
| 4. | Save | Should function with Enter Key | For general script |
| Cursor Positioned on the “SAVE” | validations for | ||
| button or on Mouse Click. | common | ||
| On saving the data the data gets | functionality refer | ||
| saved to the database. | BPI_CAS_FSD_COMMON | ||
| Should there be any validation | System Error: | ||
| error on any of the fields. Should | Common Text shall | ||
| show the script error and place the | be followed for the | ||
| cursor on the specific entry field. | System Error. | ||
| Check if the entries are not | “! Do any operation to | ||
| duplicate. | save.” | ||
| On Successful saving the flow | (Displayed when | ||
| should reside in the same screen. | invoked immediately | ||
| Exception: If the data selected for | after the screen is | ||
| edition is from the repository retain | loaded). | ||
| its previous state. I.e. the data | |||
| should be visible in the table after | |||
| saving. | |||
| 5. | Cancel | Should reset to the previous state | |
| on clicking the cancel button | |||
3.1.9. User Interface ID: Rate Classification—Search Additional Fees
3.1.9.1. Screen Name: Rate Classification—Search Additional Fees (BPI_CAS_SCR_CM—003—008) (See Figure H-27)
3.1.9.2. Element Name, Element Type, Label & Purpose
| Element | Element | ||
| Name | Type | Label | Purpose |
| Main | Text | Main Header | To give heading for the |
| Header rate | rate | screen being navigated | |
| Classification | Classification | ||
| for | for | ||
| Additional | Additional | ||
| Fees | Fees | ||
| Cobra Type | Radio | Cobra Type | To Select a Cobra |
| Type (Whether Cal | |||
| Cobra or Federal Cobra) | |||
| Additional | Entry Field | Additional | Entry field for entering |
| Fee | Fee | % Additional Fees | |
| Percentage | Percentage | ||
| Effective | Entry Field | Effective | To choose the date |
| Date | Date | required by calendar | |
| or entering | |||
| Search | HTML | Search | Button to search the |
| Button | data based on inputs and | ||
| displays the results in | |||
| HTML table below | |||
| Table | HTML table | Table | Shows the all the data |
| in the column format | |||
| View/ | Button | View/ | Button to view the |
| Delete | (HTML | Delete | selected record data |
| Button) | |||
| Check | Radio Button | Check Index | To check the items for |
| Index | modify, view and | ||
| deletion | |||
| Modify | Button | Modify | To edit the data |
| (HTML | against the row selected | ||
| Button) | for edition | ||
| Cancel | Button | Cancel | To reset the entries |
| (HTML | made in all the fields | ||
| Button) | |||
3.1.9.3. Front End Validations
Validation Details
This section provides the front-end screen validations along with the associated message—Success/Error Message text
| • | Element Name | Action/Validation Details | Message |
| 1 | Additional Fee | Additional Fee Percentage should | “% of Additional Fees - |
| Percentage | be entered. | Accepts numeric value | |
| only (0 to 100) | |||
| 2 | Effective Date | Effective Date should be selected | “Effective Date - |
| from Calendar or entered | Accepts the format in | ||
| For valid Date Format | MM/DD/YYYY” | ||
| Refer BPI_CAS_FSD_Common | |||
| 3 | Search | Should function with Enter Key | On click of Search |
| Cursor Positioned on the “Search” | button checks for the | ||
| button or Mouse Click. | above mentioned validations | ||
| All the entries are valid. It fetches | |||
| the records from repository based | |||
| on inputs and displays the records | |||
| in the table below. Else throws | |||
| error dialog box. | |||
| 4 | Table | Should have column header and | |
| each subsequent row should be | |||
| identified by alternate color | |||
| combinations. I.e. first row should | |||
| have color ‘x’ and the next row | |||
| should have color ‘y’. The next row | |||
| should have color ‘x’ again and so | |||
| on. The size of the text inside any | |||
| cell should be wrapped if the text | |||
| becomes too long. | |||
| 5 | View/Delete | Should function with Enter Key | “! Select any one of |
| Cursor Positioned on the “View/ | the record” | ||
| Delete” button or on Mouse Click. | |||
| If the user clicks on the view | |||
| button without checking any of the | |||
| view radio button should throw | |||
| error message. | |||
| Success: View the current row | |||
| from the table. | |||
| 6 | Modify | Should function with Enter Key | “! Select any one of |
| Cursor Positioned on the “Modify” | the record” | ||
| button or on Mouse Click. | |||
| On clicking the modify button the | |||
| row is edited and the data should | |||
| be populated. | |||
| 7 | Cancel | Should reset to the previous state | |
| on clicking the cancel button | |||
3.1.10. User Interface ID: Rate Classification—View Additional Fees
3.1.10.1. Screen Name: Rate Classification—View Additional Fees (BPI_CAS_SCR_CM—003—009) (See Figure H-28)
3.1.10.2. Element Name, Element Type, Label & Purpose
| Element | Element | ||
| Name | Type | Label | Purpose |
| Main | Text | Main Header | To give heading for the |
| Header rate | rate | screen being navigated | |
| Classification | Classification | ||
| for | for | ||
| Additional | Additional | ||
| Fees | Fees | ||
| Cobra Type | Text Field | Cobra Type | To Display Cobra |
| Type (Whether Cal | |||
| Cobra or Federal Cobra) | |||
| Additional | Text Field | Additional | To Display % Additional |
| Fee | Fee | Fees | |
| Percentage | Percentage | ||
| Effective | Text Field | Effective | To Display Effective date |
| Date | Date | ||
| New | HTML | New | Button to go to new |
| Additional | Button | Additional | Additional fees |
| Fees | Fees | ||
| Delete | Button | Delete | To delete the current |
| (HTML | additional fees data | ||
| Button) | |||
3.1.10.3. Front End Validations
| • | Element Name | Action/Validation Details | Message |
| 1 | Delete | Should function with Enter Key | “Do you |
| Cursor Positioned on the “Delete” | want to | ||
| button or on Mouse Click. | delete the | ||
| If the user clicks on the delete | selected | ||
| button throw message box. | record?” | ||
| Success: Deletes the row from the | |||
| data base | |||
| 2 | New Additional | Should go to the additional fees | |
| Fees | screen clicking the New additional | ||
| Fees button | |||
3.1.11. User Interface ID: Rate Classification—Differential Fees
3.1.11.1. Screen Name: Rate Classification—Differential Fees (BPI_CAS_SCR_CM—003—010) (See Figure H-29)
3.1.11.2. Element Name, Element Type, Label & Purpose
| Element | Element | ||
| Name | Type | Label | Purpose |
| Main | Text | Main Header | To give heading for the |
| Header rate | rate | screen being navigated | |
| Classification | Classification | ||
| for | for | ||
| Differential | Differential | ||
| Factor | Factor | ||
| Group Size | Entry Field | Group Size | Entry field for entering |
| Lower Limit | Lower Limit | Group size Lower limit. | |
| Group Size | Entry Field | Group Size | Entry field for entering |
| Upper Limit | Upper Limit | Group size Upper limit. | |
| Differential | Entry Field | Differential | Entry field for entering |
| Factor | Factor | Differential Factor | |
| Effective | Entry Field | Effective | To choose the date |
| Date | Date | required by calendar or | |
| entering | |||
| Applicable | Radio | Applicable | To Select a Applicable |
| For | For | For (Whether New | |
| Business Only or New | |||
| Business or Renewal) | |||
| Group Size | Radio | Group Size | To Select a Group |
| Criteria | Criteria | Size Criteria (Whether | |
| Eligible Employee or | |||
| Enrolled Employee) | |||
| Save | Button | Save | Save all the above |
| (HTML | information to the | ||
| Submit | repository | ||
| button) | |||
| Cancel | Button | Cancel | To reset the entries |
| (HTML reset | made in all the fields | ||
| Button) | |||
3.1.11.3. Front End Validations
Validation Details
This section provides the front-end screen validations along with the associated message—Success/Error Message text
| • | Element Name | Action/Validation Details | Message |
| 1. | Group Size | Group Size Lower Limit should be | “Group Size Lower |
| Lower Limit | entered. | Limit - Is required” | |
| “Group Size Lower | |||
| limit- Accepts numeric | |||
| values only (1-999)” | |||
| 2. | Group Size | Group Size Upper Limit should be | “Group Size Upper |
| Upper Limit | entered. | Limit - Is required” | |
| “Group Size Upper | |||
| Limit- Accepts | |||
| numeric values only | |||
| (1-999)” | |||
| “Kindly enter Group Size | |||
| Upper limit greater than | |||
| Lower Limit” | |||
| 3. | Differential | Differential Factor should be | “Differential Factor - Is |
| Factor | entered. | required” | |
| “Differential Factor - | |||
| Accepts numeric values | |||
| only.” | |||
| “Differential Factor - | |||
| Cannot be Zero” | |||
| 4. | Effective Date | Effective Date should be selected | “Effective Date - Is |
| from Calendar or entered | required” | ||
| For valid Date Format | “Effective Date - | ||
| Refer BPI_CAS_FSD_Common | Accepts the format in | ||
| MM/DD/YYYY” | |||
| 5. | Save | Should function with Enter Key | For general script |
| Cursor Positioned on the “SAVE” | validations for | ||
| button or on Mouse Click. | common | ||
| On saving the data the data gets | functionality refer | ||
| saved to the database. | BPI_CAS_FSD_COMMON | ||
| Should there be any validation | System Error: | ||
| error on any of the fields. Should | Common Text shall | ||
| show the script error and place the | be followed for the | ||
| cursor on the specific entry field. | System Error. | ||
| Check if the entries are not | “! Do any operation to | ||
| duplicate. | save.” | ||
| On Successful saving the flow | (Displayed when | ||
| should reside in the same screen. | invoked immediately | ||
| after the screen is | |||
| loaded). | |||
3.1.12. User Interface ID: Rate Classification—Search Differential Fees
3.1.12.1. Screen Name: Rate Classification—Search Differential Fees (BPI_CAS_SCR_CM—003—011) (See Figure H-30)
3.1.12.2. Element Name, Element Type, Label & Purpose
| Element | Element | ||
| Name | Type | Label | Purpose |
| Main | Text | Main Header | To give heading for the screen being |
| Header rate | rate | navigated | |
| Classification | Classification | ||
| for | for | ||
| Differential | Differential | ||
| Factor | Factor | ||
| Group Size | Entry Field | Group Size | Entry field for entering Group size |
| Lower Limit | Lower Limit | Lower limit. | |
| Group Size | Entry Field | Group Size | Entry field for entering Group size |
| Upper Limit | Upper Limit | Upper limit. | |
| Differential | Entry Field | Differential | Entry field for entering Differential |
| Factor | Factor | Factor | |
| Effective | Entry Field | Effective | To choose the date required by |
| Date | Date | calendar or entering | |
| Applicable | Radio | Applicable | To Select a Applicable For (Whether |
| For | For | New Business Only or New Business | |
| or Renewal) | |||
| Group Size | Radio | Group Size | To Select a Group Size Criteria |
| Criteria | Criteria | (Whether Eligible Employee or | |
| Enrolled Employee) | |||
| Search | HTML | Search | Button to search the data based on |
| Button | inputs and displays the results in | ||
| HTML table below | |||
| Table | HTML table | Table | Shows the all the data in the column |
| format | |||
| View/ | Button | View/ | Button to view the selected record |
| Delete | (HTML | Delete | data |
| Button) | |||
| Check | Radio Button | Check Index | To check the items for modify, view |
| Index | and deletion | ||
| Modify | Button (HTML | Modify | To edit the data against the row |
| Button) | selected for edition | ||
| Cancel | Button | Cancel | To reset the entries made in all the |
| (HTML | fields | ||
| Button) | |||
3.1.12.3. Front End Validations
Validation Details
This section provides the front-end screen validations along with the associated message—Success/Error Message text
| • | Element Name | Action/Validation Details | Message |
| 1 | Group Size | Group Size Lower Limit should | “Group Size Lower |
| Lower Limit | accept numeric. | limit- Accepts numeric | |
| values only (1-999)” | |||
| 2 | Group Size | Group Size Upper Limit should | “Group Size Upper |
| Upper Limit | accept numeric. | Limit- Accepts | |
| numeric values only | |||
| (1-999)” | |||
| “Kindly enter Group Size | |||
| Upper limit greater than | |||
| Lower Limit” | |||
| 3 | Differential | Differential Factor should accept | “Differential Factor - |
| Factor | numeric.. | Accepts numeric values | |
| only.” | |||
| 4 | Effective Date | Effective Date should be selected | “Effective Date - |
| from Calendar or entered | Accepts the format in | ||
| For valid Date Format | MM/DD/YYYY” | ||
| Refer BPI_CAS_FSD_Common | |||
| 5 | Search | Should function with Enter Key | On click of Search |
| Cursor Positioned on the “Search” | button checks for the | ||
| button or Mouse Click. | above mentioned validations | ||
| All the entries are valid. It fetches | |||
| the records from repository based | |||
| on inputs and displays the records | |||
| in the table below. Else throws | |||
| error dialog box. | |||
| 6 | Table | Should have column header and | |
| each subsequent row should be | |||
| identified by alternate color | |||
| combinations. I.e. first row should | |||
| have color ‘x’ and the next row | |||
| should have color ‘y’. The next row | |||
| should have color ‘x’ again and so | |||
| on. The size of the text inside any | |||
| cell should be wrapped if the text | |||
| becomes too long. | |||
| 7 | View/Delete | Should function with Enter Key | “! Select any one of the |
| Cursor Positioned on the “View/ | record” | ||
| Delete” button or on Mouse Click. | |||
| If the user clicks on the view | |||
| button without checking any of the | |||
| view radio button should throw | |||
| error message. | |||
| Success: View the current row | |||
| from the table. | |||
| 8 | Modify | Should function with Enter Key | “! Select any one of |
| Cursor Positioned on the “Modify” | the record” | ||
| button or on Mouse Click. | |||
| On clicking the modify button the | |||
| row is edited and the data should | |||
| be populated. | |||
| 9 | Cancel | Should reset to the previous state | |
| on clicking the cancel button | |||
3.1.13. User Interface ID: Rate Classification—View Differential Fees
3.1.13.1. Screen Name: Rate Classification—View Differential Fees (BPI_CAS_SCR_CM—003—012) (See Figure H-31)
3.1.13.2. Element Name, Element Type, Label & Purpose
| Element | Element | ||
| Name | Type | Label | Purpose |
| Main | Text | Main Header | To give heading for the |
| Header rate | rate | screen being navigated | |
| Classification | Classification | ||
| for | for | ||
| Differential | Differential | ||
| Factor | Factor | ||
| Group Size | Text Field | Group Size | To Display Group size |
| Lower Limit | Lower Limit | Lower limit. | |
| Group Size | Text Field | Group Size | To Display Group size |
| Upper Limit | Upper Limit | Upper limit. | |
| Differential | Text Field | Differential | To Display |
| Factor | Factor | Differential Factor | |
| Effective | Text Field | Effective | To Display Effective date |
| Date | Date | ||
| Applicable | Text Field | Applicable | To Display Applicable |
| For | For | For (Whether New | |
| Business Only | |||
| or New Business | |||
| or Renewal) | |||
| Group Size | Text Field | Group Size | To Display Group |
| Criteria | Criteria | Size Criteria (Whether | |
| Eligible Employee or | |||
| Enrolled Employee) | |||
| New | Button | New | To go to Differential |
| Differential | (HTML | Differential | rate screen. |
| Rate | Button) | Rate | |
| Delete | Button | Delete | To delete the current |
| (HTML | Differential fee | ||
| Button) | |||
3.1.13.3. Front End Validations
Validation Details
This section provides the front-end screen validations along with the associated message—Success/Error Message text
| • | Element Name | Action/Validation Details | Message |
| 1 | Delete | Should function with Enter Key | “Do you want |
| Cursor Positioned on the “Delete” | to delete the | ||
| button or on Mouse Click. | selected | ||
| If the user clicks on the delete | record?” | ||
| button throw message box. | |||
| Success: Deletes the row from the | |||
| data base | |||
| 2 | New | Should go to the agent fees screen | |
| Differential | clicking the New Differential Fees | ||
| Fees | button | ||
3.1.14. Screen Flow
(See Figure H-32)
Benefit Partners Inc Process Specification BPI_CAS_FSD_CM_04 Document ID: BPI_CAS_FSD_04 Version: <1.0> Revision History
| Change Record |
| Date | Author | Version | Change Reference |
| Nov. 27, 2001 | Sudhakar K | 1.0 | Approved Version |
| Apr. 04, 2002 | Lala Viswanath | 1.1 | Approved Version |
| Oct. 24, 2002 | Riyaz Mohamed | 1.2 | |
| Reviewers |
| Name | Position | |
| Distribution |
| No Of | ||||
| Copy No. | Name | Copies | Location | |
1. Introduction 4
1.1. Purpose 4
1.2. Business Use Case Specification Reference 4
1.3. Definitions, Acronyms & Abbreviations 4
2. Process Identification 5
2.1. Background 5
2.2. Process Description & Flow 5
2.2.1. Zip Code Search 5
2.2.2. Zip Distance 5
2.2.3. Process Flow Diagrams 6
3. User Interface 7
3.1. User Interface Screens 7
3.1.1. Screen ID's 7
3.1.2. User Interface ID: Zip Search 7
3.2. Screen Flow 10
1. Introduction
1.1. Purpose
This purpose of this document is to identify the process associated with the business use case Create ZIP. This document is the amendment of BPI_CAS_FSD_CM—04 (Version 1.0).
1.2. Business Use Case Specification Reference
| Business Use Specification ID | Business Use Case Name | |
| BPI_SCOPE_CM_004 | Create ZIP | |
1.3. Definitions, Acronyms & Abbreviations
| Term | Explanation | |
2. Process Identification
2.1. Background
This process describes the Use Case “Create ZIP”. Standard ZIP is loaded into the system. Refer the document reference no. BPI_CAS_FSC_EC for process of loading ZIP Code. Also for the specific ZIP Codes the corresponding service areas are loaded. The state is divided into several service areas based on the number of counties and their population. In the state of California there are presently 6 service areas. The Rate is based on the service area where the employees are residing.
2.2. Process Description & Flow
2.2.1. Zip Code Search
The Screen described below has two features provided:
Zip code search feature is by which the user can search for zip based on any of the selection criteria. Search for zip is based on City name, County name or a Valid Zip code. When user enters the search value, search results are displayed on a table format.
There is also provision for canceling the search value. Numbers of records fetched are also displayed on the screen.
There is also a feature to print the records fetched. A separate page is invoked on clicking the printer icon. The print page has the fetched records with print button. Clicking on which will invoke the printer dialog.
User can view records in Normal as well as Expanded mode. Expanded mode can be invoked by clicking the gif in the table header.
2.2.2. Zip Distance
Zip Distance feature is by which user can get the distance of the zip codes entered .Zip distance is calculated based on the geographical distribution of the area by its latitudinal & longitudinal position. The result is displayed in miles.
The user interface for Zip is provided below. The two screenshots is the same screen shown to describe these two features.
2.2.3. Process Flow Diagrams
(See Figure H-33)
3. User Interface
3.1. User Interface Screens
3.1.1. Screen ID's
| Screen ID | Corresponding HTML File | ||
| (SID) | Screen Name | Name | |
| zip.zipsearch | Zip Search | /bpi/cas/carrier/zip/ZipSearch.jsp | |
3.1.2. User Interface ID: Zip Search
3.1.2.1. Screen Name: Zip Search (BPI_CAS_SCR_CM—004—001) (See Figure H-34)
Zip Distance: BPI_CAS_SCR_CM—004—002 (See Figure H-35)
3.1.2.2. Element Name, Element Type, Label & Purpose
| Element | Element | ||
| Name | Type | Label | Purpose |
| Main | Text | Main Header | To give heading for the screen |
| Header | Searching | being navigated | |
| Searching | ZIPS | ||
| ZIPS | |||
| City | Text | City | Provide Text |
| City | Radio | City | To choose a city for search |
| County | Text | County | Provide Text |
| County | Radio | County | To choose a county for search |
| ZIP | Text | ZIP | Provide Text |
| ZIP | Radio | ZIP | To choose a zip for search |
| Search | Entry Field | Search | Entering the Zip search value |
| Value | Value | ||
| Search | HTML | Search | Button to be invoked for |
| Button | displaying the search results | ||
| based on the Entered text in | |||
| Search Value. | |||
| Cancel | HTML | Cancel | To clear the entered field. |
| Button | |||
| ZIP 1 | Text | ZIP 1 | Provide Text |
| ZIP 1 | Entry Field | ZIP 1 | Entering the Zip1 value |
| ZIP 2 | Text | ZIP 2 | Provide Text |
| ZIP 2 | Entry Field | ZIP 2 | Entering the Zip2 value |
| Go | HTML | Go | Button to be invoked for |
| Button | displaying the distance between | ||
| the two zip codes entered | |||
| in miles. | |||
| Cancel | HTML | Cancel | To clear the entered field. |
| Button | |||
3.1.2.3. Front End Validations
Validation Details
This section provides the front-end screen validations along with the
| # | Element Name | Action/Validation Details | Message |
| 1. | City | Max length of the search | |
| field is set. | |||
| 2. | County | Max length of the search | |
| field is set. | |||
| 3. | Zip | Max length of the search | |
| field is set. | |||
| 4. | Search | On click of the button, | “Search Value - Is |
| records are fetched from | required.” | ||
| repository based on | “City - Accepts | ||
| selection criteria. | alphabetic characters | ||
| only.” | |||
| “County - Accepts | |||
| alphabetic characters | |||
| only.” | |||
| “ZIP - Accepts exactly | |||
| 5 digit numbers only.” | |||
| 5. | Cancel | On click of this button, | |
| entry field is cleared. | |||
| 6. | Go | On click of the button, | “Zip1 - Is required.” |
| distance between the two | “Zip2 - Is required.” | ||
| zip codes is displayed. | “ZIP - Accepts exactly | ||
| 5 digit numbers only.” | |||
| 7. | Cancel | On click of this button, | |
| entry field is cleared. | |||
3.2. Screen Flow
This section describes the screen flow for the group enrollment process. (See Figure H-36)
Benefit Partners Inc Process Specification Cobra Enrollment Document ID: BPI_CAS_FSD_EN_02 Version: <1.0> Revision History
| Change Record |
| Date | Author | Version | Change Reference |
| Dec. 18, 2001 | Sudhakar k | 1.0 | Baseline Release |
| Jan. 7. 2002 | Sudhakar k | 1.0 Rev 1 | REVISION 1 |
| Reviewers |
| Name | Position | |
| Distribution |
| No Of | ||||
| Copy No. | Name | Copies | Location | |
1 Introduction 4
1.1 Purpose 4
1.2 Business Use Case Specification Reference 4
1.3 Document Reference 4
1.4 Definitions, Acronyms & Abbreviations 4
2 Process Identification 5
2.1 Background 5
2.2 Process Description 5
2.3 Process Flow 5
3 User Interface 9
3.1 User Interface Screens 9
3.1.1 Screen ID's 9
3.1.2 User Interface Id: BPI_SCR_EN—002—001-Group Search 10
3.1.3 User Interface Id: BPI_SCR_EN—002—002-Group Information 13
3.1.4 User Interface Id: BPI_SCR_EN—002—003-Dependent Information 19
3.1.5 User Interface Id: BPI_SCR_EN—002—004-Coverage Information 24
3.1.6 User Interface Id: BPI_SCR_EN—002—006-Summary/Missing Information 28
3.1.7 User Interface Id: BPI_SCR_EN—002—007-Existing COBRA Employee Search 31
3.1.8 User Interface Id: BPI_SCR_EN—002—008-Existing COBRA Enrollment 34
3.1.9 User Interface Id: BPI_SCR_EN—002—009-Primary Member Information 38
3.1.10 User Interface Id: BPI_SCR_EN—002—010-Existing Coverage Information 42
3.2 Screen Flow: 45
4 Business Rule Mapping 46
5 User Role 49
1 Introduction
1.1 Purpose
The purpose of this document is to describe the process of COBRA Enrollment. This document identifies how the user interacts with the system, the data to be captured, the business logic to be implemented, and the output of the process.
1.2 Business Use Case Specification Reference
| Business Use Specification ID | Business Use Case Name | |
| BPI_SCOPE_EN | Enrollment | |
| BPI_SCOPE_EN_002 | COBRA Enrollment | |
| BPI_SCOPE_EN_001 | Group Enrollment | |
1.3 Document Reference
| Document ID | Document Name | |
| BPI_CAS_FSD_EN | Functional Specification | |
| Document- Enrollment | ||
| BPI_CAS_FSD_EN_001 | Process Flow - | |
| New Business Enrollment | ||
| BPI_CAS_FSD_EN_002 | Process Flow - | |
| Enrollment Changes/Add-On | ||
| BPI_CAS_FSD_EN_003 | Process Flow - | |
| COBRA Enrollment/Changes | ||
| BPI_CAS_FSD_EN_005 | Process Flow - | |
| Termination/Reinstatement | ||
1.4 Definitions, Acronyms & Abbreviations
| Term | Explanation | |
2 Process Identification
2.1 Background
California State laws and federal laws govern COBRA Rules based on whether it is Cal COBRA or Federal COBRA.
The decision whether the Group is a CAL COBRA or FEDERAL COBRA would be based on the Group size or the number of employee in the group. If the number of the employee were greater than or equal to 20 then it would be FEDERAL COBRA. If the group size were less than 20 employees then it would be Cal COBRA. This needs to be entered at the time of group enrollment. Based on applications received for group.
2.2 Process Description
The objective of the COBRA Enrollment is to:
-
- New Business COBRA Enrollment
- Existing member converting to COBRA because of the qualifying rules.
- Add on for COBRA members
- Changes to COBRA members
- Requalification and Open enrollment and Open enrollment for the COBRA members.
2.3 Process Flow
Process for COBRA is based on the type of COBRA enrollment
-
- New Business COBRA Enrollment
- Existing members converting into COBRA after termination
Process Flow for New Business COBRA Enrollment
-
- 1) Search for the group and select the SEG Group or Alternate Group with whom the COBRA members are to be added.
- 2) Specify if the Member is enrolling as COBRA member as an individual or with dependent
- 3) If the member is enrolling with dependent then specify the number of dependent
- 4) Enter member general information, which includes the personal information and address information.
- 5) Add the dependant/dependents if the option selected is with dependent and enter the dependent/dependents information.
- 6) Enter COBRA information for the member and dependents as applicable.
- 7) Select the Line of coverage options for the member and dependent as applicable.
- 8) List COBRA member summary and select the Benefit Level (Carrier Selection) based on the ZIP code and Service area provided.
- 9) Show missing information for the COBRA enrollment.
- 10) Enroll/Decline the COBRA enrollment (based on ACL).
Process Flow for new Business COBRA (See Figure I-1)
Process Flow for existing Member COBRA Enrollment
-
- 1) Search for the group and employee who need to be converted into the COBRA members.
- 2) Check the term status and reasons for the Employee/dependent.
- 3) Process COBRA Eligibility checks. This checks the eligibility of the Employee if termed and the reasons for the term, which form the basic for the qualifying event. Of if the employee is not termed and the dependent/dependents are termed their reasons for terms and qualifying event. If none qualify then COBRA enrollment is declined based on ACL. If either qualifies then the COBRA enrollment information is shown with option to select line of coverage for the termed members.
- 4) Identify the primary member based on the criteria.
- Employee is also termed and opts for COBRA then the employee becomes the primary member.
- If spouse is termed with children and spouse opts for COBRA coverage then spouse becomes the primary member
- If Children/child is termed and opts for COBRA coverage the oldest child becomes the primary member.
- 5) Check if the Plan is available in the Primary members ZIP/Service area. If so then the member should select the same plan as was before. If not, pend and send quote for plans available and then allow the member to select the plan that is available in the new ZIP service area.
- 6) Dependents should have the same plan as well. However they can waive any plan. (Refer the business rules for COBRA)
- 7) Show Summary and missing information.
- 8) Enroll/Decline member/members as COBRA group.
Process Flow for Existing COBRA conversion (See Figure I-2)
3 User Interface
3.1 User Interface Screens
3.1.1 Screen ID's
| Screen ID (SID) | Screen Name | Corresponding HTML File Name |
| bpi.enrollment.cobra.new. | Group Search | /bpi/cas/enrollment/cobra/new/groupsearch/ |
| search | GroupSearch.jsp | |
| bpi.enrollment.cobra.new. | Group Information | /bpi/cas/enrollment/cobra/new/general |
| general | info/GeneralInfo.jsp | |
| bpi.enrollment.cobra.new. | Billing Info | /bpi/cas/enrollment/cobra/new/billinginfo/ |
| billing | BillingInfo.jsp | |
| bpi.enrollment.cobra.new. | Coverage Info | /bpi/cas/enrollment/cobra/new/coverage |
| coverage | info/CoverageInfo.jsp | |
| bpi.enrollment.cobra.new. | Dependent Information | /bpi/cas/enrollment/cobra/new/dependent |
| dependent | info/DependentInfo.jsp | |
| bpi.enrollment.cobra.new. | Cobra Search | /bpi/cas/enrollment/cobra/new/cobrasearch/ |
| searchcobra | CobraSearch.jsp | |
| bpi.enrollment.cobra.new. | Missing Information | /bpi/cas/enrollment/cobra/new/missing |
| missing | info/MissingInfo.jsp | |
| bpi.enrollment.cobra.new. | Group Inactivate | bpi/cas/enrollment/cobra/new/groupinactivate/ |
| inactivate | GroupInactivate.jsp | |
| bpi.enrollment.cobra.new. | Confirmation | /bpi/cas/enrollment/cobra/new/confirmation/ |
| confirmation | Confirmation.jsp | |
| bpi.enrollment.cobra.existing. | Employee Search | /bpi/cas/enrollment/cobra/existing/employee |
| employeesearch | search/EmployeeSearch.jsp | |
| bpi.enrollment.cobra.existing. | Member Process | /bpi/cas/enrollment/cobra/existing/member |
| memberprocess | process/MemberProcess.jsp | |
| bpi.enrollment.cobra.existing. | Existing General | /bpi/cas/enrollment/cobra/existing/general |
| general | Information | info/GeneralInfo.jsp |
| bpi.enrollment.cobra.existing. | Existing Billing Info | /bpi/cas/enrollment/cobra/existing/billing |
| billing | info/BillingInfo.jsp | |
| bpi.enrollment.cobra.existing. | Existing Coverage Info | /bpi/cas/enrollment/cobra/existing/coverage |
| coverage | info/CoverageInfo.jsp | |
| bpi.enrollment.cobra.existing. | Existing Dependent Info | /bpi/cas/enrollment/cobra/existing/dependent |
| dependent | info/DependentInfo.jsp | |
| bpi.enrollment.cobra.existing. | Existing Cobra Search | /bpi/cas/enrollment/cobra/existing/cobra |
| searchcobra | search/CobraSearch.jsp | |
| bpi.enrollment.cobra.existing. | Existing Missing Info | /bpi/cas/enrollment/cobra/existing/missing |
| missing | info/MissingInfo.jsp | |
| bpi.enrollment.cobra.existing. | Existing confirmation | /bpi/cas/enrollment/cobra/existing/confirmation/ |
| confirmation | Confirmation.jsp | |
| bpi.enrollment.cobra.existing. | Existing Inactivate | /bpi/cas/enrollment/cobra/existing/group |
| inactivate | inactivate/GroupInactivate.jsp | |
3.1.2 User Interface Id: BPI_SCR_EN—002—001—Group Search
3.1.2.1 Screen Name: Group Search (See Figure I-3)
3.1.2.2 Element Name, Element Type, Label & Purpose
| Element | |||
| Name | Element Type | Label | Purpose |
| Group Id | Text | Group Id | To provide text |
| Group Id | Entry Field | Group Id | Enter the group |
| Id for Search | |||
| Group | Text | Group Name | To provide text |
| Name | |||
| Group | Entry Field | Group Name | To enter group name for |
| Name | search | ||
| Group | Text | Group Phone | To provide text |
| Phone | |||
| Group | Entry field | Group phone | Enter group phone number |
| phone | for search | ||
| Search | HTML button | Search | Button for searching the |
| Group | |||
| Table | HTML Table | Table | Table to display group |
| information | |||
| Select | Radio Button | Select Group | Button to select the |
| Group | group for Attaching | ||
| the COBRA members | |||
| Single | Radio Button | Single Member | To choose if the COBRA |
| Member | Member is enrolling as a | ||
| single member | |||
| Member | Radio Button | Member | To choose if the COBRA |
| With | With | Member is enrolling as a | |
| dependent | dependent | member with dependent | |
| Dependent | Entry Field | Dependent | Field to enter the number of |
| Member | Member | dependent members being | |
| Count | Count | added to the member as | |
| COBRA | |||
3.1.2.3 Screen Validations
| Element Name | Action/Validation Details | Message |
| Group ID | Enter valid group ID only | Error Dialog Box: |
| “Please enter | ||
| valid group ID” | ||
| Group Name | Enter the group name | None |
| Group Phone | Enter valid phone number for the | Error Dialog Box: |
| group | “Please enter | |
| valid phone | ||
| number” | ||
| Search | On click of the search button | None |
| should list the groups or a single | ||
| group based on the search | ||
| criteria. | ||
| Select Group | If the groups are multiple then the | Error Dialog Box: |
| radio button option to select the | “Please select a | |
| specific group should be | group with whom | |
| provided. | you would like | |
| If the Group available is only one | to add | |
| then it should be selected by | COBRA | |
| default. | member” | |
| Select member | There should be option either to | None |
| Only or Member | select single member or member | |
| with dependent | with dependent. | |
| Dependent | If the option selected is member | Error Dialog Box: |
| Member Count | with dependent specify the | “Please enter |
| number of dependents. | the number of | |
| dependent as | ||
| the option | ||
| selected is | ||
| member with | ||
| dependent. | ||
3.1.2.4 Help Menu
New Business enrollment can bring in the members as COBRA. This screen is used for adding the COBRA members to the new business groups based on the selection of the group.
| Element Name | Purpose | Valid Values | |
| Search | To search for | Should list single or | |
| the Group | multiple groups based | ||
| on the search criteria. | |||
| Single Member or | This is to specify | None | |
| member with | if the member is | ||
| dependent | availing COBRA | ||
| benefits | |||
| individually or | |||
| with dependents | |||
| Dependent | Specify the | None | |
| Member Count | count of the | ||
| dependent | |||
| members to be | |||
| enrolled with the | |||
| primary member | |||
| as COBRA. | |||
3.1.3 User Interface Id: BPI_SCR_EN—002—002—Group Information
3.1.3.1 Screen Name: Group Information (See Figure I-4)
3.1.3.2
| Element | |||
| Name | Element Type | Label | Purpose |
| Employer | Text | Employer Information | To provide text |
| Information | |||
| Date PM | Text | Date PM | To provide text |
| Date PM | Entry field | Date PM | Provide entry for Date |
| Postmarked | |||
| Date | Text | Date Recd | To provide text |
| Recd | |||
| Date | Entry field | Date Recd | Provide entry for Date |
| Recd | Received | ||
| Salutation | Text | Salutation | To provide text |
| Salutation | Drop Down List | Salutation | List the Salutation MR., |
| MRS., MS. | |||
| First | Text | First name | To provide text |
| name | |||
| First | Entry field | First name | Provide entry field for the |
| name | First name | ||
| Last | Text | Last name | To provide text |
| name | |||
| Last | Entry Field | Last Name | Provide entry field for the |
| Name | Last name | ||
| MI | Text | MI | To provide text |
| MI | Entry Field | MI | Enter the middle initial |
| Suffix | Text | Suffix | To provide text |
| Suffix | List | Suffix | List the suffix for selection |
| Social | Text | Social Security Number | To provide text |
| Security | |||
| Number | |||
| SSN | Entry field | SSN | Enter the SSN number |
| Unique | Text | Unique ID | To provide text |
| ID | |||
| Unique | Entry field (Uneditable). | Unique ID | Show the unique ID |
| ID | generated | ||
| Auto | HTML button | Auto Generate | Button to generate Unique Id |
| Generate | if SSN is not provided | ||
| Date of | Text | Date of Birth | To provide text |
| Birth | |||
| Date of | Calendar | Date of Birth | Calendar to select the birth |
| Birth | date, Should also allow to | ||
| enter date of birth as MM/ | |||
| DD/YYYY | |||
| Gender | Text | Gender | To provide text |
| Gender | List | Gender | List whether Male or Female |
| Physical | Text | Physical Main Address | To provide text |
| Main | |||
| Address | |||
| Street | Entry field | Street Address | Enter the street address |
| Address | |||
| Suite/ | Text | Suite/Apts. | To provide text |
| Apts. | |||
| Suite/ | Entry Field | Suite/Apts. | Enter the suite/apts. number |
| Apts. | |||
| City | Text | City | To provide text |
| City | Entry Field | City | Enter the city name |
| State | Text | State | To provide text |
| State | Drop Down List | State | List all the state in US |
| ZIP | Text | ZIP | To provide text |
| ZIP | Entry Field | ZIP | Enter zip code |
| Service | Text | Service Area | To provide text |
| Area | |||
| Service | Entry Field (uneditable) | Service Area | Shows the Service Area |
| Area | or list | based on the ZIP code typed | |
| Show list if the ZIP has | |||
| multiple service area | |||
| County | Text | County | To provide text |
| County | Entry Field (uneditable) | County | Display the county name |
| based on the zip and service | |||
| area selected | |||
| Preferred | Text | Preferred mode of | To provide text |
| mode of | correspondence | ||
| correspondence | |||
| Mode of | Drop Down List | Mode of correspondence | List the mode of |
| correspondence | communication, USPS, FAX, | ||
| or email/web. Phone is not | |||
| allowed. | |||
| Phone | Text | Phone number | To provide text |
| number | |||
| Phone | Entry Field | Phone | To enter phone number |
| Home | Text | Home FAX No. | To provide text |
| FAX No. | |||
| FAX | Entry Field | FAX | To enter FAX number |
| Extension | Entry Field | Extension | To enter extension number |
| E-Mali | Text | E-Mali Address | To provide text |
| Address | |||
| Entry field | E-mail Address | Enter email address | |
| Address | |||
| Mailing | Text | Mailing Address | To provide text |
| Address | |||
| Street | Text | Street Address | To provide text |
| Address | |||
| Street | Entry field | Street Address | Enter the street address |
| Address | |||
| Suite/ | Text | Suite/Apts./PO Box # | To provide text |
| Apts./PO | |||
| Box # | |||
| Suite/ | Entry Field | Suite/Apts./PO Box # | Enter the suite/apts. number |
| Apts./PO | |||
| Box # | |||
| City | Text | City | To provide text |
| City | Entry Field | City | Enter the city name |
| State | Text | State | To provide text |
| State | Drop Down List | State | List all the state in US |
| ZIP | Text | ZIP | To provide text |
| ZIP | Entry Field | ZIP | Enter zip code |
| Cancel | HTML Reset Button | Cancel | To cancel the operation and |
| reset for new selection | |||
| Continue | HTML Submit | Continue | To save the data gathered in |
| Button | this screen and continue to | ||
| the next screen | |||
| BPI_CAS_SCR_EN_002— | |||
| 003 | |||
3.1.3.3 Screen Validations
| Element Name | Action/Validation Details | Message |
| Salutation | Refer Document | Refer Document |
| No.BPI_CAS_FSD_COMMON | No.BPI_CAS_FSD_COMMON | |
| First name | Refer Document | Refer Document |
| No.BPI_CAS_FSD_COMMON | No.BPI_CAS_FSD_COMMON | |
| Last name | Refer Document | Refer Document |
| No.BPI_CAS_FSD_COMMON | No.BPI_CAS_FSD_COMMON | |
| MI | Refer Document | Refer Document |
| No.BPI_CAS_FSD_COMMON | No.BPI_CAS_FSD_COMMON | |
| Suffix | Refer Document | Refer Document |
| No.BPI_CAS_FSD_COMMON | No.BPI_CAS_FSD_COMMON | |
| Birth date. | Refer Document | Refer Document |
| No.BPI_CAS_FSD_COMMON | No.BPI_CAS_FSD_COMMON | |
| SSN | Refer Document | Refer Document |
| No.BPI_CAS_FSD_COMMON | No.BPI_CAS_FSD_COMMON | |
| Unique Id | Unique 9 digit ID should be | None |
| generated if the SSN number is | ||
| not provided. This unique ID | ||
| should not be repeated for any | ||
| employee. Also unique Id should | ||
| be generated on change mode. | ||
| Number should start with | ||
| 999 999 000 and start | ||
| descending e.g. | ||
| 999 998 999 | ||
| 999 998 998 and so on | ||
| Street Address | Refer Document | Refer Document |
| No.BPI_CAS_FSD_COMMON | No.BPI_CAS_FSD_COMMON | |
| Suite/Apts. | Refer Document | Refer Document |
| No.BPI_CAS_FSD_COMMON | No.BPI_CAS_FSD_COMMON | |
| City | Refer Document | Refer Document |
| No.BPI_CAS_FSD_COMMON | No.BPI_CAS_FSD_COMMON | |
| State | Refer Document | Refer Document |
| No.BPI_CAS_FSD_COMMON | No.BPI_CAS_FSD_COMMON | |
| ZIP | Refer Document | Refer Document |
| No.BPI_CAS_FSD_COMMON | No.BPI_CAS_FSD_COMMON | |
| Service Area | Should pick up the service area | None |
| based on the Zip code number | ||
| typed in the above ZIP entry field | ||
| from the database | ||
| If there are multiple service area | ||
| then it should list the service area | ||
| for picking up the service area. | ||
| County | Show the county name based on | none |
| the ZIP code and Service area | ||
| combination | ||
| Mode of | List mode of communications like | Error Dialog Box: |
| Communication | USPS, FAX, Email/Web and | “Please choose the mode of |
| others. If the option selected is | communication” | |
| Email then the Email address | ||
| field cannot be blank. | ||
| Default Option should be - | ||
| choose one- | ||
| If none is selected should throw | ||
| error message. | ||
| Phone | Refer Document | Refer Document |
| No.BPI_CAS_FSD_COMMON | No.BPI_CAS_FSD_COMMON | |
| Extension | Refer Document | Refer Document |
| No.BPI_CAS_FSD_COMMON | No.BPI_CAS_FSD_COMMON | |
| FAX | Refer Document | Refer Document |
| No.BPI_CAS_FSD_COMMON | No.BPI_CAS_FSD_COMMON | |
| Extension | Refer Document | Refer Document |
| No.BPI_CAS_FSD_COMMON | No.BPI_CAS_FSD_COMMON | |
| E-mail Address | Refer Document | Refer Document |
| No.BPI_CAS_FSD_COMMON | No.BPI_CAS_FSD_COMMON | |
| Gender | Refer Document | Refer Document |
| No.BPI_CAS_FSD_COMMON | No.BPI_CAS_FSD_COMMON | |
| Street Address | Refer Document | Refer Document |
| No.BPI_CAS_FSD_COMMON | No.BPI_CAS_FSD_COMMON | |
| Suite/Apts. | Refer Document | Refer Document |
| No.BPI_CAS_FSD_COMMON | No.BPI_CAS_FSD_COMMON | |
| City | Refer Document | Refer Document |
| No.BPI_CAS_FSD_COMMON | No.BPI_CAS_FSD_COMMON | |
| State | Refer Document | Refer Document |
| No.BPI_CAS_FSD_COMMON | No.BPI_CAS_FSD_COMMON | |
| ZIP | Refer Document | Refer Document |
| No.BPI_CAS_FSD_COMMON | No.BPI_CAS_FSD_COMMON | |
| Cancel | Reset Button | To reset the value in the Entry Field to |
| its previous state as was on loading the | ||
| page | ||
| Continue | Should function with Enter Key | Error Dialog Box: |
| Cursor Positioned on the | “The value entered for the Field Name | |
| “Continue” button or on Mouse | is erroneous. Please enter valid values. | |
| Click. | “Please choose the mode of | |
| Check for all the validation on the | communication” | |
| fields | ||
| If any data type error throw error | ||
| message. | ||
| Allows blank entry | ||
| On Success Leads to the next | ||
| page for filling further information | ||
| on the employee. | ||
| Screen | ||
| BPI_CAS_SCR_EN_002_003 | ||
3.1.3.4 Help Menu
This screen is used for filling up the primary COBRA member information. The information contained here is the personal information and the address information. The ZIP and the service are provided here governs the rate calculation for the COBRA member.
| Element Name | Purpose | Valid Values | |
| Continue | On clicking the | None | |
| button leads to | |||
| the next page | |||
| for filling up the | |||
| dependent | |||
| information if | |||
| applicable of | |||
| member | |||
| coverage | |||
| information. | |||
3.1.4 User Interface Id: BPI_SCR_EN—002—003—Dependent Information
3.1.4.1 Screen Name: Dependent Information (See Figure I-5)
3.1.4.2 Element Name, Element Type, Label & Purpose
| Element | |||
| Name | Element Type | Label | Purpose |
| Salutation | Text | Salutation | To provide text |
| Salutation | List | Salutation | List type of salutation |
| Dependent | Text | Dependent First name | To provide text |
| First | |||
| name | |||
| First | Entry Field | First Name | Enter the first name |
| Name | |||
| Dependent | Text | Dependent Last name | To provide text |
| Last | |||
| name | |||
| Last | Entry field | Last name | Enter the last name |
| name | |||
| MI | Text | MI | To provide text |
| MI | Entry Field | MI | Enter the middle initial |
| Suffix | Text | Suffix | To provide text |
| Suffix | Entry Field | Suffix | Enter the suffix |
| Dependent | Text | Dependent Social Security | To provide text |
| Social | Number | ||
| Security | |||
| Number | |||
| SSN | Text | SSN | To provide text |
| SSN | Entry field | SSN | Enter the SSN number |
| Unique | Text | Unique ID | To provide text |
| ID | |||
| Unique | Entry field (Uneditable). | Unique ID | Show the unique ID |
| ID | generated | ||
| Gender | Text | Gender | To provide text |
| Gender | List | Gender | List the gender |
| Relationship | Text | Relationship | To provide text |
| Relationship | List | Relationship | List all types of relation ship |
| like spouse, domestic | |||
| partner, child, step child | |||
| others | |||
| Birth | Text | Birth Date | To provide text |
| Date | |||
| Birth | Calendar | Birth Date | Calendar to choose the birth |
| Date | date | ||
| Add | HTML Submit | Add Dependent | To add the above dependent |
| Dependent | Button | Information to the html table | |
| below | |||
| Table | HTML Table | Table | Table for adding up the |
| dependent information | |||
| Delete | Button (HTML | Delete | To delete the items checked |
| Button) | for deletion | ||
| Check | Text Link | Check All | To check all the check boxes |
| All | in the table | ||
| Clear All | Text Link | Clear All | To un check all the check |
| boxes checked in the table | |||
| Delete | Check box | Delete | To check the items for |
| deletion | |||
| Edit | Button (HTML | Edit | To edit the items against the |
| Button) | row selected for edition | ||
| Disabled | Text | Disabled | To provide text |
| Disabled | Radio Button | Disabled Radio Button | Temporary or permanent |
| Radio | disability (Can be only one or | ||
| Button | the other) Default NONE. | ||
| Domestic | Text | Domestic Partner | To provide text |
| Partner | |||
| Domestic | Check box | Domestic Partner | Is Form available if so check. |
| Partner | |||
| Legal | Text | Legal Guardian | To provide text |
| Guardian | |||
| Legal | Check box | Legal Guardian | Is Form available if so check. |
| Guardian | |||
| Signature | Text | Signature | To provide text |
| Signature | Check box | Signature | Is signature available if check |
| Continue | HTML Button | Continue | On clicking the continue |
| button save the information | |||
| Cancel | HTML reset Button | Cancel | To reset to the state as was |
| before loading the page | |||
3.1.4.3 Screen Validations
| Element Name | Action/Validation Details | Message |
| First Name | Refer BPI_CAS_FSD_Common | Refer BPI_CAS_FSD_Common |
| Last name | Refer BPI_CAS_FSD_Common | Refer BPI_CAS_FSD_Common |
| MI | Refer BPI_CAS_FSD_Common | Refer BPI_CAS_FSD_Common |
| Suffix | Refer BPI_CAS_FSD_Common | Refer BPI_CAS_FSD_Common |
| SSN Number | Refer BPI_CAS_FSD_Common | Refer BPI_CAS_FSD_Common |
| Unique Id | Unique 9 digit ID should be | None |
| generated if the SSN number is | ||
| not provided. This unique ID | ||
| should not be repeated for any | ||
| employee. Also unique Id should | ||
| be generated on change mode. | ||
| Number should start with | ||
| 999 999 000 and start | ||
| descending e.g. | ||
| 999 998 999 | ||
| 999 998 998 and so on | ||
| Birth Date | Refer BPI_CAS_FSD_Common | Refer BPI_CAS_FSD_Common |
| Gender | Refer BPI_CAS_FSD_Common | Refer BPI_CAS_FSD_Common |
| Relationship | Default option should be - | Error Dialog Box: |
| Choose one-. If none is | “Please select the relationship of the | |
| selected throw error message | dependent with the employee” | |
| Add Dependent | On clicking the Add Dependent | Error Dialog Box: |
| the dependent information gets | “The value entered in the field name is | |
| filled in the HTML Table. All | incorrect. Please enter valid entries” | |
| validation checks are performed | ||
| on the entry field before adding | ||
| the dependent. | ||
| Table | Should have column header and | None |
| each subsequent row should be | ||
| identified by alternate color | ||
| combinations. i.e. First row | ||
| should have color ‘x’ and the next | ||
| row should have color ‘y’. The | ||
| next row should have color ‘x’ | ||
| again and so on. The size of any | ||
| text inside any cell should be | ||
| wrapped if the text becomes too | ||
| long. | ||
| Note: The values inside the table | ||
| on create mode would be blank. | ||
| If this screen is reached on edit/ | ||
| change mode then the values | ||
| inside the table would be green in | ||
| color if retrieved from the | ||
| database, If temporarily added | ||
| then it would be red in color. | ||
| Delete | Should function with Enter Key | Error Dialog Box: |
| Cursor Positioned on the “Delete” | “Please choose the row or rows to be | |
| button or on Mouse Click. | deleted.” | |
| Delete Button should work on | ||
| multiple deletes based on the | ||
| check box or boxes selected. If | ||
| the user clicks on the delete | ||
| button without checking any of | ||
| the delete check box should | ||
| throw error message. | ||
| Success: Deletes the row or | ||
| rows from the HTML Table | ||
| (temporary storage) | ||
| Check All | On clicking the “Check All” link | On clicking the “Check All” link should |
| should check all the check boxes | check all the check boxes in the HTML | |
| in the HTML table. | table. | |
| Clear All | On clicking the “Clear All” link | On clicking the “Clear All” link should |
| should uncheck all the checked | uncheck all the checked check boxes in | |
| check boxes in the HTML table. | the HTML table. | |
| Delete | Check box option with default | Check box option with default |
| “unchecked” | “unchecked” | |
| Edit | Should function with Enter Key | On clicking the edit button the row |
| Cursor Positioned on the “Edit” | edited should be removed from the | |
| button or on Mouse Click. | HTML table and the data should be | |
| On clicking the edit button the | populated back on the editable entry | |
| row edited should be removed | fields. | |
| from the HTML table and the data | ||
| should be populated back on the | ||
| editable entry fields. | ||
| On clicking the edit for the data | ||
| that is Green in color (permanent | ||
| data) the edit becomes disabled | ||
| and the Add button becomes | ||
| Update. | ||
| On clicking edit for the red color | ||
| data (temporary data) the row | ||
| with the data disappears from the | ||
| table | ||
| Domestic Partner | Default is un checked. Allow to | None |
| check if applicable | ||
| Legal Guardian | Default is un checked. Allow to | None |
| check if applicable | ||
| Signature | Default is un checked. Allow to | None |
| check if applicable | ||
| Continue | Should function with Enter Key | Dialog Box: |
| Cursor Positioned on the | “Do you want to add the coverage | |
| “Continue” button or on Mouse | information before continuing” Yes/No | |
| Click. | ||
| On success should save the data | ||
| lead to the next page. | ||
| Cancel | Should reset to the state as was | None |
| before loading the page. | ||
3.1.4.4 Help Menu
This screen is used for filling up the dependent COBRA member information. The information contained here is the personal information. If there are multiple dependent then you can add the dependent COBRA members here.
| Element Name | Purpose | Valid Values | |
| Continue | On clicking the | none | |
| button leads to | |||
| the next page | |||
| for filling up the | |||
| member | |||
| coverage | |||
| information. | |||
3.1.5 User Interface Id: BPI_SCR_EN—002—004—Coverage Information
3.1.5.1 Screen Name: Coverage Information (See Figure I-6)
3.1.5.2 Element Name, Element Type, Label & Purpose
| Element | |||
| Name | Element Type | Label | Purpose |
| COBRA | Page sub Header | COBRA qualifying Event | To provide text |
| qualifying | |||
| Event | |||
| Initial | Text | Initial COBRA effective date | To provide text |
| COBRA | |||
| effective | |||
| date | |||
| Date | Entry field | Date | Enter the initial effective date |
| COBRA | Text | COBRA End Date | To provide text |
| End | |||
| Date | |||
| Period | Entry field | Period | Enter the COBRA effective |
| period | |||
| Reasons | Text | Reasons for electing COBRA | To provide text |
| for | |||
| electing | |||
| COBRA | |||
| Reasons | Drop Down List | Reasons for electing COBRA | List the reasons for COBRA |
| for | election | ||
| electing | |||
| COBRA | |||
| Where | Text | Where would you like the | To provide text |
| would | bills to be sent | ||
| you like | |||
| the bills | |||
| to be | |||
| sent | |||
| Where | Check Box | Where would you like the | Check if the bill is to be sent |
| would | bills to be sent | to the group or the member | |
| you like | |||
| the bills | |||
| to be | |||
| sent | |||
| Is | Text | Is member signature verified | To provide text |
| member | |||
| signature | |||
| verified | |||
| Is | Check box | Is member signature verified | Check if signature is verified |
| member | |||
| signature | |||
| verified | |||
| Line of | HTML Table | Line of Coverage Selection | Table to display the Member |
| Coverage | Table | names and the Line of | |
| Selection | coverage check boxes for | ||
| Table | picking the line of coverage | ||
| for each COBRA members | |||
| Coverage | Check Box | Coverage Selection | Check box to select the line |
| Selection | of coverage | ||
| Show | HTML button | Show Coverage Choice | Button to show the coverage |
| Coverage | choice for each line of | ||
| Choice | coverage based on the check | ||
| box/boxes checked. | |||
| Continue | HTML Button | Continue | Button to save the data and |
| lead to the next screen for | |||
| showing the summary and | |||
| selection of Benefit level | |||
| offered by carriers (Screen | |||
| BPI_CAS_SCR_EN 002_004) | |||
3.1.5.3 Screen Validations
| Element Name | Action/Validation Details | Message |
| Date | Defaults to system date. User | Error Dialog Box: |
| can either enter the date of pick | “Date cannot be | |
| the date form the calendar | future date” | |
| Please enter | ||
| past date” | ||
| COBRA effective | Defaults to 18 months. Can be | None |
| period | changed by the user. | |
| Reasons for | List the qualifying reasons for | None |
| electing COBRA | COBRA. | |
| Where would you | Option to bill either the group of | None |
| like the bills to be | the COBRA member based on | |
| sent | the flag checked | |
| Is member | Check if the member signature is | None |
| signature verified | verified | |
| Line of Coverage | Table to show the Line of | None |
| Selection Table | coverage against each member | |
| for picking the option. The Line of | ||
| coverage displayed is based on | ||
| the line of coverage selected by | ||
| the primary group. | ||
| Note: The table would display the | ||
| Member name in the following | ||
| priority. | ||
| Employee as primary member | ||
| Spouse as the next member | ||
| Other members would be listed | ||
| based on the age. | ||
| Coverage | Check Box to pick any | None |
| Selection | combination of coverage's for all | |
| the member for this specific | ||
| COBRA group | ||
| Show Coverage | On click of the Coverage choice | None |
| Choice | system should identify the | |
| coverage choice based on the | ||
| options checked. Whether | ||
| member only, member and | ||
| spouse etc. | ||
| Continue | On clicking the continue button | Dialog Box: |
| saves the data and leads to the | “Are you sure | |
| page | to continue” | |
| BPI_CAS_SCR_EN_002_005 | ||
3.1.5.4 Help Menu
This screen is used for filling up the COBRA qualifying events and the COBRA tenure for the members. Also there is an option to select the line of coverage opted for the various members.
| Element Name | Purpose | Valid Values | |
| Continue | On clicking the | None | |
| button leads to | |||
| the next page | |||
| for selecting the | |||
| benefit level | |||
| (Carrier) | |||
3.1.6 User Interface Id: BPI_SCR_EN—002—006—Summary/Missing Information
3.1.6.1 Screen Name: Missing Info (See Figure I-7)
3.1.6.2 Element Name, Element Type & Purpose
| Element | |||
| Name | Element Type | Label | Purpose |
| Member | Text | Member Missing Information | To provide text |
| Missing | |||
| Information | |||
| Employee | Expandable Tree | Employee Tab | Should be able to expand the |
| Tab | Employee Tab to list the | ||
| Details for the Employee | |||
| Missing and information and | |||
| Also show an expandable tab | |||
| for the Dependent Missing | |||
| Information | |||
| Enrollment | Drop Down List | Enrollment Status | List the status of enrollment. |
| Status | Can be Enroll or Decline | ||
| Remarks | Entry Field | Remarks | Remark for the status of |
| enrollment | |||
| Reasons | Drop Down List | Reasons for Decline | List the reasons for decline |
| for | |||
| Decline | |||
| Other | Entry Field | Other Reasons | Any other reasons for decline |
| Reasons | or others | ||
| Cancel | HTML Button | Cancel | To reset the operation |
| Process | HTML Button | Process Enrollment | Process the enrollment and |
| Enrollment | leads to the enrollment | ||
| confirmation page. | |||
| BPI_CAS_SCR_EN_001_011 | |||
3.1.6.3 Screen Validations
| Element Name | Action/Validation Details | Message |
| Enrollment Status | List the status of enrollment. The | Error Dialog Box: |
| default option should be -choose | “Please choose enrollment status | |
| one- | before continuing.” | |
| If the option selected is Decline. | ||
| Should list the list box containing | ||
| reasons for the decline. | ||
| If none is selected throw error | ||
| message. | ||
| Remarks | Can accept any character. | |
| Reasons for | List the reasons for the decline. | Error Dialog Box: |
| Decline | The default option should be - | “Please choose reasons for declining |
| choose one- | before continuing.” | |
| If none is selected throw error | ||
| message. | ||
| Other Reasons | Can accept any character. | None |
| Cancel | Resets to the status as was on | None |
| loading this page. | ||
| Process | Should function with Enter Key | Error Dialog Box: |
| Enrollment | Cursor Positioned on the | “Please choose enrollment status |
| “Process Enrollment” button or on | before continuing.” | |
| Mouse Click. | “Please choose reasons for declining | |
| On success leads to the | before continuing.” | |
| confirmation page. | ||
| BPI_CAS_SCR_EN_001_011 | ||
| It checks the eligibility rule for the | ||
| COBRA member once again. | ||
| Process the post enrollment | ||
| activity like sending emails, | ||
| welcome letter. First month | ||
| invoices and email alert to GMS, | ||
| Sales and finance. | ||
3.1.7 User Interface Id: BPI_SCR_EN—002—007—Existing COBRA Employee Search
3.1.7.1 Screen Name: Employee Search (See Figure I-8)
3.1.7.2 Element Name, Element Type & Purpose
| Element | |||
| Name | Element Type | Label | Purpose |
| Group | Text | Group ID | To provide text |
| ID | |||
| Group Id | Entry field | Group Id | Enter the group id for |
| searching the employee | |||
| Employee | Text | Employee ID | To provide text |
| ID | |||
| Employee | Entry field | Employee ID | Enter the Employee ID for searching |
| ID | the employee | ||
| Employee | Text | Employee SSN | To provide text |
| SSN | |||
| Employee | Entry field | Employee SSN | Enter the Employee SNN for |
| SSN | searching the employee | ||
| Phone | Text | Phone number | To provide text |
| number | |||
| Phone | Entry field | Phone number | Enter the Employee Phone |
| number | number for searching the employee | ||
| List | HTML Tree | List Employee | Tree to List the Employee |
| Employee | and their dependent | ||
| Employee | HTML Table | Employee Table | Table to list employee |
| Table | information and status | ||
| Dependent | HTML table | Dependent Table | Table to list dependent |
| Table | information and status | ||
| Process | HTML button | Process COBRA | Button to check the COBRA |
| COBRA | eligibility and take to the next | ||
| page | |||
| BPI_CAS_SCR_EN_002_008 | |||
| if eligible. If not the show the same page. | |||
3.1.7.3 Screen Validations
| Element Name | Action/Validation Details | Message |
| Group Id | Enter the Group ID or pick the | Group ID can be entered along with |
| group ID based on the Group | any other valid fields for the employee | |
| search | provided below. | |
| Employee ID | Enter the employee Id or pick the | Note: At least on of the field with the |
| employee based on the | search criteria for the employee must | |
| employee search window. | be entered | |
| Employee SSN | Enter the employee SSN or pick | Note: At least on of the field with the |
| the employee based on the | search criteria for the employee must | |
| employee search window. | be entered | |
| Phone number | Enter the employee Phone or | Note: At least on of the field with the |
| pick the employee based on the | search criteria for the employee must | |
| employee search window. | be entered | |
| List Employee | Tree to open up if dependent | None |
| exist for the employee | ||
| Employee Table | List the employee with status and | None |
| effective date | ||
| Dependent Table | List the dependent with status | None |
| and effective date | ||
| Process COBRA | Check the status and term | Embedded error if non-of the member |
| reasons and process the | is termed or not qualifies for COBRA. | |
| eligibility check for the existing | ||
| member to COBRA | ||
| Note: It should check the | ||
| following status. Term Status, | ||
| Term reasons | ||
| Only the member termed all | ||
| eligible for the COBRA. The | ||
| reasons for term can either | ||
| decline COBRA enrollment or | ||
| define the COBRA period. | ||
3.1.8 User Interface Id: BPI_SCR_EN—002—008—Existing COBRA Enrollment
3.1.8.1 Screen Name: COBRA Enrollment (See Figure I-9)
3.1.8.2 Element Name, Element Type & Purpose
| Element | |||
| Name | Element Type | Label | Purpose |
| COBRA | Page sub Header | COBRA qualifying Event | To provide text |
| qualifying | |||
| Event | |||
| Initial | Text | Initial COBRA effective date | To provide text |
| COBRA | |||
| effective | |||
| date | |||
| Date | Entry field | Date | Enter the initial effective date |
| COBRA | Text | COBRA End Date | To provide text |
| End | |||
| Date | |||
| Period | Entry field | Period | Enter the COBRA effective |
| period Default to the period | |||
| based on the qualifying | |||
| event. | |||
| Reasons | Text | Reasons for Term | To provide text |
| for Term | |||
| Reasons | Dynamic Text | Reasons for Term | Reasons for Term based on |
| for Term | the term reasons provided | ||
| Term | Text | Term Date | To provide text |
| Date | |||
| Term | Dynamic text | Term Date | Display the term date of the |
| Date | member | ||
| Where | Text | Where would you like the | To provide text |
| would | bills to be sent | ||
| you like | |||
| the bills | |||
| to be | |||
| sent | |||
| Where | Check Box | Where would you like the | Check if the bill is to be sent |
| would | bills to be sent | to the group or the member | |
| you like | |||
| the bills | |||
| to be | |||
| sent | |||
| Is | Text | Is member signature verified | To provide text |
| member | |||
| signature | |||
| verified | |||
| Is | Check box | Is member signature verified | Check if signature is verified |
| member | |||
| signature | |||
| verified | |||
| Line of | HTML Table | Line of Coverage Selection | Table to display the Member |
| Coverage | Table | names and the Line of | |
| Selection | coverage check boxes for | ||
| Table | picking the line of coverage | ||
| for each COBRA members | |||
| Check if | Check box | Check if member is not | Check if the member is not |
| member | enrolling for COBRA | enrolling for COBRA | |
| is not | |||
| enrolling | |||
| for | |||
| COBRA | |||
| Coverage | Check Box | Coverage Selection | Check box to select the line |
| Selection | of coverage | ||
| Show | HTML button | Show Coverage Choice | Button to show the coverage |
| Coverage | choice for each line of | ||
| Choice | coverage based on the check | ||
| box/boxes checked. | |||
| Continue | HTML Button | Continue | Button to save the data and |
| lead to the next screen for | |||
| showing the summary and | |||
| selection of Benefit level | |||
| offered by carriers (Screen | |||
| BPI_CAS_SCR_EN_002_009) | |||
3.1.8.3 Screen Validations
| Element Name | Action/Validation Details | Message |
| Date | Default to the date next to the | Error Dialog |
| term date. Allow for making | Box: | |
| changes based on authorization | “Date cannot | |
| be prior to | ||
| the term | ||
| date. Please | ||
| enter the | ||
| valid date” | ||
| Period | Default to the period based on | none |
| the Qualifying events. Allow to | ||
| change based on authorization | ||
| Where would you | Check the option for billing, | none |
| like the bills to be | Whether to the group or the | |
| sent | member | |
| Is member | Check if signature is verified | none |
| signature verified | ||
| Line of Coverage | Table to show the Line of | None |
| Selection Table | coverage against each member | |
| for picking the option. The Line of | ||
| coverage displayed is based on | ||
| the line of coverage selected by | ||
| the primary group. | ||
| Note: The table would display the | ||
| Member name in the following | ||
| priority. | ||
| Employee as primary member | ||
| Spouse as the next member | ||
| Other members would be listed | ||
| based on the age. | ||
| Check if member | This is check if the member is not | None |
| is not enrolling for | opting for the COBRA | |
| COBRA | ||
| Coverage | Check Box to pick any | None |
| Selection | combination of coverage's for all | |
| the member for this specific | ||
| COBRA group | ||
| Show Coverage | On click of the Coverage choice | None |
| Choice | system should identify the | |
| coverage choice based on the | ||
| options checked. Whether | ||
| member only, member and | ||
| spouse etc. | ||
| Continue | On clicking the continue button | Dialog Box: |
| saves the data and leads to the | “Are you | |
| page | sure to | |
| BPI_CAS_SCR_EN_002_009 | continue” | |
3.1.9 User Interface Id: BPI_SCR_EN—002—009—Primary Member Information
3.1.9.1 Screen Name: Primary Member Information (See Figure I-10)
Note: This screen is pre filled with the employee information available in the employee master for all the members and the dependents belonging to this employee. Changes can be made to the information as applicable.
3.1.9.2
| Element | |||
| Name | Element Type | Label | Purpose |
| Main | Text | Main Address | To provide text |
| Address | |||
| Street | Entry field | Street Address | Enter the street address |
| Address | |||
| Suite/ | Text | Suite/Apts. | To provide text |
| Apts. | |||
| Suite/ | Entry Field | Suite/Apts. | Enter the suite/apts. number |
| Apts. | |||
| City | Text | City | To provide text |
| City | Entry Field | City | Enter the city name |
| State | Text | State | To provide text |
| State | Drop Down List | State | List all the state in US |
| ZIP | Text | ZIP | To provide text |
| ZIP | Entry Field | ZIP | Enter zip code |
| Service | Text | Service Area | To provide text |
| Area | |||
| Service | Entry Field(uneditable) | Service Area | Shows the Service Area |
| Area | or list | based on the ZIP code typed | |
| Show list if the ZIP has | |||
| multiple service area | |||
| County | Text | County | To provide text |
| County | Entry Field(uneditable) | County | Display the county name |
| based on the zip and service | |||
| area selected | |||
| Preferred | Text | Preferred mode of | To provide text |
| mode | correspondence | ||
| of | |||
| correspondence | |||
| Mode of | Drop Down List | Mode of correspondence | List the mode of |
| correspondence | communication, USPS, FAX, | ||
| Home | Text | Home Phone number | To provide text |
| Phone | |||
| number | |||
| Phone | Entry Field | Phone | To enter phone number |
| Extension | Entry Field | Extension | To enter extension number |
| Home | Text | Home FAX No. | To provide text |
| FAX No. | |||
| FAX | Entry Field | FAX | To enter FAX number |
| Extension | Entry Field | Extension | To enter extension number |
| E-Mali | Text | E-Mali Address | To provide text |
| Address | |||
| Entry field | E-mail Address | Enter email address | |
| Address | |||
| Alternate | Text | Alternate Address | To provide text |
| Address | |||
| Street | Text | Street Address | To provide text |
| Address | |||
| Street | Entry field | Street Address | Enter the street address |
| Address | |||
| Suite/ | Text | Suite/Apts./PO Box # | To provide text |
| Apts./PO | |||
| Box # | |||
| Suite/ | Entry Field | Suite/Apts./PO Box # | Enter the suite/apts. number |
| Apts./ | |||
| PO Box # | |||
| City | Text | City | To provide text |
| City | Entry Field | City | Enter the city name |
| State | Text | State | To provide text |
| State | Drop Down List | State | List all the state in US |
| ZIP | Text | ZIP | To provide text |
| ZIP | Entry Field | ZIP | Enter zip code |
| Cancel | HTML Reset Button | Cancel | To cancel the operation and |
| reset for new selection | |||
| Continue | HTML Submit | Continue | To save the data gathered in |
| Button | this screen and continue to | ||
| the next screen | |||
| BPI_CAS_SCR_EN_002— | |||
| 010 | |||
3.1.9.3 Screen Validations
| Element Name | Action/Validation Details | Message |
| Street Address | Refer Document | Refer Document |
| No.BPI_CAS_FSD_COMMON | No.BPI_CAS_FSD_COMMON | |
| Suite/Apts. | Refer Document | Refer Document |
| No.BPI_CAS_FSD_COMMON | No.BPI_CAS_FSD_COMMON | |
| City | Refer Document | Refer Document |
| No.BPI_CAS_FSD_COMMON | No.BPI_CAS_FSD_COMMON | |
| State | Refer Document | Refer Document |
| No.BPI_CAS_FSD_COMMON | No.BPI_CAS_FSD_COMMON | |
| ZIP | Refer Document | Refer Document |
| No.BPI_CAS_FSD_COMMON | No.BPI_CAS_FSD_COMMON | |
| Service Area | Should pick up the service area | None |
| based on the Zip code number | ||
| typed in the above ZIP entry field | ||
| from the database | ||
| If there are multiple service area | ||
| then it should list the service area | ||
| for picking up the service area. | ||
| County | Show the county name based on | none |
| the ZIP code and Service area | ||
| combination | ||
| Mode of | List mode of communications like | Error Dialog Box: |
| Communication | USPS, FAX, Email and others. If | “Please choose the mode of |
| the option selected is Email then | communication” | |
| the Email address field cannot be | ||
| blank. | ||
| Default Option should be - | ||
| choose one- | ||
| If none is selected should throw | ||
| error message. | ||
| Phone | Refer Document | Refer Document |
| No.BPI_CAS_FSD_COMMON | No.BPI_CAS_FSD_COMMON | |
| Extension | Refer Document | Refer Document |
| No.BPI_CAS_FSD_COMMON | No.BPI_CAS_FSD_COMMON | |
| FAX | Refer Document | Refer Document |
| No.BPI_CAS_FSD_COMMON | No.BPI_CAS_FSD_COMMON | |
| Extension | Refer Document | Refer Document |
| No.BPI_CAS_FSD_COMMON | No.BPI_CAS_FSD_COMMON | |
| E-mail Address | Refer Document | Refer Document |
| No.BPI_CAS_FSD_COMMON | No.BPI_CAS_FSD_COMMON | |
| Street Address | Refer Document | Refer Document |
| No.BPI_CAS_FSD_COMMON | No.BPI_CAS_FSD_COMMON | |
| Suite/Apts. | Refer Document | Refer Document |
| No.BPI_CAS_FSD_COMMON | No.BPI_CAS_FSD_COMMON | |
| City | Refer Document | Refer Document |
| No.BPI_CAS_FSD_COMMON | No.BPI_CAS_FSD_COMMON | |
| State | Refer Document | Refer Document |
| No.BPI_CAS_FSD_COMMON | No.BPI_CAS_FSD_COMMON | |
| ZIP | Refer Document | Refer Document |
| No.BPI_CAS_FSD_COMMON | No.BPI_CAS_FSD_COMMON | |
| Cancel | Reset Button | To reset the value in the Entry Field to |
| its previous state as was on loading the | ||
| page | ||
| Continue | Should function with Enter Key | Error Dialog Box: |
| Cursor Positioned on the | “The value entered for the Field Name | |
| “Continue” button or on Mouse | is erroneous. Please enter valid values. | |
| Click. | “Please choose the mode of | |
| Check for all the validation on the | communication” | |
| fields | ||
| If any data type error throw error | ||
| message. | ||
| Allows blank entry | ||
| On Success Leads to the next | ||
| page for filling further information | ||
| on the employee. | ||
| Screen | ||
| BPI_CAS_SCR_EN_002_010 | ||
3.1.10 User Interface Id: BPI_SCR_EN—002—010—Existing Coverage Information
3.1.10.1 Screen Name: Coverage Information (See Figure I-11)
3.1.10.2 Element Name, Element Type, Label & Purpose
| Element | |||
| Name | Element Type | Label | Purpose |
| Benefit | HTML Table | Benefit Level (carrier | Table to display all the |
| Level | Selection) | Members in the row and The | |
| (carrier | Benefit level selection option | ||
| Selection) | in the Columns. | ||
| Member | Link | Member name | Provide feature to edit the |
| name | member information by | ||
| clicking this link | |||
| Coverage | HTML ROW | Coverage Choice | The row get pre populated |
| Choice | based on the choice made in | ||
| the screen | |||
| BPI_CAS_SCR_EN_002_009 | |||
| Benefit | Link | Benefit Level Name | Link to the carrier selection |
| Level | for the specific line of | ||
| Name | coverage if not available in | ||
| the ZIP and service area of | |||
| the Primary member. | |||
| PCP info | Link | PCP info (Available) | Link to edit the PCP info of |
| (Available) | the individual members as | ||
| applicable. | |||
| COBRA | HTML Button | COBRA Summary | Button to click for saving the |
| Summary | date and navigating to the | ||
| next page for displaying | |||
| COBRA summary/missing | |||
| information | |||
| Cancel | HTML rest button | Cancel | Button to reset to the state as |
| was on loading the page. | |||
3.1.10.3 Screen Validations
| Element Name | Action/Validation Details | Message |
| Benefit Level | Should have column header and | None |
| (carrier Selection) | each subsequent row should be | |
| identified by alternate color | ||
| combinations. I.e. First row | ||
| should have color ‘x’ and the next | ||
| row should have color ‘y’. The | ||
| next row should have color ‘x’ | ||
| again and so on. The size of any | ||
| text inside any cell should be | ||
| wrapped if the text becomes too | ||
| long. | ||
| The Header and the Left Column | ||
| should be distinguishable. | ||
| Member name | This is a link to edit the member | None |
| information when on change or | ||
| edit mode. This | ||
| PCP Info | This is a link to edit the PCP | None |
| information for the specific | ||
| member. If PCP information is | ||
| not available then on clicking the | ||
| link it allows to fill in the PCP | ||
| information for the specific line of | ||
| coverage. | ||
| Coverage Choice | Displays the dynamic text based | None |
| on the choices checked in the | ||
| previous screen | ||
| BPI_CAS_SCR_EN_002_004 | ||
| Benefit Level | Default benefit level would that | None |
| Selection | the employee selected when the | |
| status was enrolled. | ||
| On clicking the Link show a | ||
| minimized window with option to | ||
| select the benefit level for the | ||
| specific line of coverage. Note | ||
| the line of coverage is displayed | ||
| based on the Group options. (i.e | ||
| only if the group has selected the | ||
| line of coverage. | ||
| Also the benefit level (carrier) | ||
| displayed is based on the ZIP | ||
| code/Service area of the | ||
| primary COBRA member. | ||
| Only if the prior Benefit level is | ||
| not available in the current ZIP/ | ||
| service are of the primary | ||
| member this is allowed to be | ||
| changed. | ||
| COBRA | On clicking the COBRA Summary | Dialog Box: |
| Summary | button save the content of this | “Are you sure |
| page into the repository and | you would like to | |
| leads to the COBRA summary | continue” | |
| page to display the COBRA | ||
| missing information. Screen | ||
| BPI_CAS_SCR_EN_002_006 | ||
| This also does all the COBRA | ||
| eligibility checks prior to the | ||
| display of summary page. | ||
| Cancel | Resets to the state as was on | none |
| loading the page. | ||
Note: the rest of the flow is common for both new Business COBRA and the Existing member conversion to COBRA.
Screen BPI_CAS_SCR_EN—006 followed by COBRA enrollment.
3.2 Screen Flow:
Screen Flow Diagram for COBRA Enrollment (See Figure I-12)
4 Business Rule Mapping
| Activity | Rules |
| New Business COBRA (NB | Need to know initial COBRA effective date |
| brings in COBRA) | Need to have system calculate COBRA end date (18 mo, 36 mo, or |
| other) based on Term Reason (Qualifying events). | |
| For system to do this we need to have the following data captured | |
| during the New Business COBRA Enrollment | |
| a) Initial Effective date | |
| b) Qualifying events | |
| COBRA coverage | COBRA coverage has no lapse of time from the date of term & |
| COBRA enrollment | |
| Exception: Death | |
| Main subscribers coverage is terminated date of death and not the end | |
| of the month: qualified beneficiaries (i.e. spouse/child) effective date | |
| of COBRA is the day after the members death | |
| Note: Since the COBRA coverage has no lapse of time it should be | |
| basically effective from the day following the term date what ever be | |
| the reasons. | |
| Normal terms are always done on the end of the Month. | |
| Death is done on the day of the death. | |
| COBRA Election | 60 days to elect COBRA coverage from the time of COBRA notification |
| letter. | |
| 60 days is based off the: | |
| Date that we are notified of the termination (Postmark date for | |
| termination) | |
| OR | |
| The termination date | |
| WHICHEVER IS LATER. The decision is to be made based on | |
| manual review by GMS personnel. | |
| COBRA Election for Federal | If a FED COBRA group, we need to include an additional 14 days from |
| COBRA | termination notification date because FED Employers have 14 days to |
| notify their employees of their rights after which they notify the plan | |
| administrator/Pac Advantage). The decision is to be made based on | |
| manual review by GMS personnel. | |
| COBRA Premium Dues | COBRA members initial premium (all premiums from effective date to |
| current) must be made/mailed/postmarked within 45 days from the | |
| COBRA election date (the date the application is postmarked) | |
| If payment is not MADE within this time frame, the COBRA coverage is | |
| termed flat (effective date). Any partial premium payments made will | |
| be reimbursed. | |
| Provide over ride for 45th day rule (ACL) | |
| (This override needs to be available upon creating the COBRA) | |
| COBRA Employee governed by | If main Employer group goes into possible term status or is termed, the |
| Employer (Groups) | COBRA will need to be notified and put in same status. |
| Employee will have the same coverage type, carrier & co-pay as when | |
| termed (continue with exact coverage as before) | |
| Cannot add dependents that were not previously covered (until o/e or | |
| qualifying event) | |
| Benefit Levels | Benefit level cannot change. Optional benefits and medical offered by |
| the group is not mandatory [Line of Coverage] | |
| Possible extension of COBRA | Social Security disability - coverage extended to a total of 29 month |
| coverage | (11 mo. Extension) (all other term reasons apply) |
| The main subscriber does not have to elect to extend the coverage for | |
| himself, just his dependents can elect to take the extension | |
| Age 60 prior to loss of employment & worked for Employer for 5 | |
| consecutive years - coverage extended until the Employee turns age | |
| 65 (all other term reasons apply) | |
| The main subscriber does not have to elect to extend the coverage for | |
| himself, just his dependents can elect to take the extension | |
| Also there should be a facility to grant COBRA extension if applicable | |
| based on authority. | |
| Qualifying Events | Qualifying Beneficiaries | Continuation period |
| TERMINATION_OF_EMPLOYMENT | Employee, Spouse and Children | 18 |
| REDUCTION_OF_WORK_HOURS | Employee, Spouse and Children | 18 |
| CAN_NO_LONGER_AFFORD_COVERAGE | Employee, Spouse and Children | 18 |
| OBTAINED_COVERAGE_ELSE— | Employee, Spouse and Children | 18 |
| WHERE | ||
| DEATH | Spouse and Children | 36 |
| ENTITLED_TO_MEDICARE | Employee, Spouse and Children | 36 |
| FRAUD_OR_MISREPRESENTATION | Employee, Spouse and Children | 36 |
| DPND_OBTAINED_COVERAGE— | Employee, Spouse and Children | 18 |
| ELSEWHERE | ||
| DIVORCE_OR_LEGAL_SEPARATION | Employee, Spouse and Children | 36 |
| EMPLOYEE_CANNOT_AFFORD— | Spouse | 36 |
| SPOUSE_COVERAGE | ||
| DPND_DEATH | None | 18 |
| DPND_ENTITLED_TO_MEDICARE | Dependent Spouse and Children | 36 |
| DPND_FRAUD_OR_MISREPRESENTATION | None | 36 |
| OVER_AGE_23 | Dependent Child | 18 |
| NO_LONGER_AN_ELIGIBLE_DEPENDENT | Dependent Spouse and Children | 18 |
| NO_LONGER_A_DISABLED_CHILD | Dependent Child | 18 |
| EMPLOYEE_CAN_NO_LONGER— | Child | 18 |
| AFFORD_CHILD_COVERAGE | ||
| OTHERS | Employee, Spouse and Children | 36 |
There are other qualifying events, which are also considered while COBRA enrollment based on their Reason For Term. |
5 User Role
The respective level of user role can over rule the following missing information.
| User Role | Level II, Level III, Level IV | |
| S.No., | Missing Information | Condition |
| 1 | SSN already exists. | Employee SSN already exists |
| 2 | SSN already exists. | Dependent SSN already exists |
| Change Record |
| Date | Author | Version | Change Reference | |
| 18/10/2001 | Sudhakar K | 1.0 | ||
| Reviewers |
| Name | Position | |
| Distribution |
| No Of | ||||
| Copy No. | Name | Copies | Location | |
1. Introduction 4
1.1. Purpose 4
1.2. Business Use Case Specification Reference 4
1.3. Definitions, Acronyms & Abbreviations 4
2. Process Identification 5
2.1. Background 5
Process Description 5
2.3. Process Flow 5
2.4. User Interface Screens 5
Change:- Employee Change New Request 19
3. Business Rule Mapping 23
4. User Role 27
1. Introduction
1.1. Purpose
his document identifies how the user interacts with the system, the data to be captured, the business logic to be implemented, and the output of the process.
1.2. Business Use Case Specification Reference
| Business Use Specification ID | Business Use Case Name | |
| BPI_SCOPE_EN | Enrollment | |
| BPI_SCOPE_EN_002 | Enrollment Add On | |
Other Document Reference
| Document ID | Document name |
| BPI_CAS_FSD_EN | Functional Specification Document - |
| Enrollment | |
| BPI_CAS_FSD_EN_001 | Process Flow - New Business Enrollment |
| BPI_CAS_FSD_EN_003 | Process Flow - COBRA Enrollment/Changes |
| BPI_CAS_FSD_EN_005 | Process Flow - Termination/Reinstatement |
| BPI_CAS_RULEBOX | RULE BOX for Add on and change |
1.3. Definitions, Acronyms & Abbreviations
| Term | Explanation | |
2. Process Identification
Process Flow and Description
This process is used to make changes to the Existing groups/members or dependents or add a new member/dependent to the Group or employee based on the business rules associated with changes and “Add ON's”.
2.1. Background
2.2. Process Description
The objective of the process
2.3. Process Flow
This process is used to make changes to the Existing groups/members or dependents or add a new member/dependent to the Group or employee based on the business rules associated with changes and “Add ON's”.
2.4. User Interface Screens
2.4.1. Screen ID's
| Screen | ||
| Screen ID (SID) | Name | Corresponding HTML File Name |
| Enrollment.addon.newemp.groupsearch | Group Search | bpi/cas/enrollment/addon/newemp/groupsearch |
| Enrollment.addon.newemp.changerequest | ChangeRequest | bpi/cas/enrollment/addon/newemp/changerequest |
| Enrollment.addon.newemp.groupgeneral | EmployeeGeneral | bpi/cas/enrollment/addon/newemp/addemployee |
| Info | ||
| Enrollment.addon.newemp.employeecoverage | EmployeeCoverage | bpi/cas/enrollment/addon/newemp/employeecoverage |
| Info | ||
| Enrollment.addon.newemp.dependent | DependentGeneral | bpi/cas/enrollment/addon/newemp/adddependent |
| Info | ||
| Enrollment.addon.newemp.missing | PreEnrollment | bpi/cas/enrollment/addon/newemp/preenrollment |
| Enrollment.addon.newemp.summary | EnrollmentSummary | bpi/cas/enrollment/addon/newemp/ |
| enrollmentsummary | ||
| Enrollment.addon.newemp.confirmation | Confirmation | bpi/cas/enrollment/addon/newemp/confirmation |
| Enrollment.addon.newemp.employeesearch | Employee | bpi/cas/enrollment/addon/newemp/employeesearch |
| Search | ||
| enrollment.addon.newemp.dependentsearch | Dependent | bpi/cas/enrollment/addon/newemp/dependentsearch |
| Search | ||
| enrollment.addon.employeesearch | Employee | bpi/cas/enrollment/addon/adddependent/ |
| Search | employeesearch | |
| enrollment.addon.changerequest | Change | bpi/cas/enrollment/addon/adddependent/ |
| Request | changerequest | |
| enrollment.addon.dependent | Dependent | bpi/cas/enrollment/addon/adddependent/dependent |
| General Info | ||
| enrollment.addon.adddependentsearch | Modify | bpi/cas/enrollment/addon/adddependent/ |
| dependent | dependentsearch | |
| enrollment.addon.missingforadddependent | PreEmrollment | bpi/cas/enrollment/addon/adddependent/preenrollment |
| enrollment.addon.addconfirmation | Confirmation | bpi/cas/enrollment/addon/adddependent/confirmation |
| bpi.enrollment.change.group.groupsearch | Group Search | bpi/cas/enrollment/change/group/groupsearch |
| bpi.enrollment.change.group.changerequest | Change | bpi/cas/enrollment/change/group/changerequest |
| Request | ||
| bpi.enrollment.change.group.identifychanges | Identify | bpi/cas/enrollment/change/group/identifychanges |
| Chagnes | ||
| bpi.enrollment.change.group.general | Group | bpi/cas/enrollment/change/group/generalinfo |
| GeneralInfo | ||
| bpi.enrollment.change.group.billing | Group Billing | bpi/cas/enrollment/change/group/billinginfo |
| Info | ||
| bpi.enrollment.change.group.agent | Agent Info | bpi/cas/enrollment/change/group/agentinfo |
| bpi.enrollment.change.group.coverage | Coverage Info | bpi/cas/enrollment/change/group/coverageinfo |
| bpi.enrollment.change.group.missinginfo | Missing Info | bpi/cas/enrollment/change/group/missinginfo |
| bpi.enrollment.change.group.confirmation | Confirmation | bpi/cas/enrollment/change/group/confirmation |
| bpi.enrollment.change.group.groupmodify | Modify Search | bpi/cas/enrollment/change/group/groupmodifysearch |
| search | ||
| bpi.enrollment.change.employee.employee | Employee | bpi/cas/enrollment/change/employee/employeesearch |
| search | Search | |
| bpi.enrollment.change.employee.changerequest | Change | bpi/cas/enrollment/change/employee/changerequest |
| Request | ||
| bpi.enrollment.change.employee.identifychanges | Identify | bpi/cas/enrollment/change/employee/identifychanges |
| Changes | ||
| bpi.enrollment.change.employee.individual | Individual | bpi/cas/enrollment/change/employee/indivemployee |
| employee | Employee | |
| bpi.enrollment.change.employee.individual | Individual | bpi/cas/enrollment/change/employee/indivbilling |
| billing | Billing | |
| bpi.enrollment.change.employee.individual | Individual | bpi/cas/enrollment/change/employee/indivcoverage |
| coverage | Coverage | |
| bpi.enrollment.change.employee.individual | Individual | bpi/cas/enrollment/change/employee/indivmissing |
| missing | Employee | |
| Missing | ||
| bpi.enrollment.change.employee.employee | Modify Search | bpi/cas/enrollment/change/employee/employeemodify |
| modifysearch | search | |
| bpi.enrollment.change.employee.employee | Employee | bpi/cas/enrollment/change/employee/employeeconfirm |
| confirm | Confirm | |
| bpi.enrollment.change.employee.employee | Employee | bpi/cas/enrollment/change/employee/employeegeneral |
| general | General Info | |
| bpi.enrollment.change.employee.employee | Employee | bpi/cas/enrollment/change/employee/employeecoverage |
| coverage | Coverage | |
| bpi.enrollment.change.employee.employee | Missing Info | bpi/cas/enrollment/change/employee/employeemissing |
| missing | ||
| bpi.enrollment.change.dependent.dependent | Dependent | bpi/cas/enrollment/change/dependent/dependentsearch |
| search | Search | |
| bpi.enrollment.change.dependent.changerequest | Change | bpi/cas/enrollment/change/dependent/changerequest |
| Request | ||
| bpi.enrollment.change.dependent.identify | Identify | bpi/cas/enrollment/change/dependent/identifychanges |
| changes | Changes | |
| bpi.enrollment.change.dependent.dependent | Dependent | bpi/cas/enrollment/change/dependent/dependentgeneral |
| general | General | |
| bpi.enrollment.change.dependent.missing | Missing Info | bpi/cas/enrollment/change/dependent/missinginfo |
| info | ||
| bpi.enrollment.change.dependent.dependent | Confirmation | bpi/cas/enrollment/change/dependent/dependentconfirm |
| confirm | ||
| bpi.enrollment.change.dependent.dependent | Modify Search | bpi/cas/enrollment/change/dependent/dependentmodify |
| modify | ||
2.4.1.1. SID, Element Name, Element Type & Purpose
2.4.1.1.1 SID: enrollment.addon.newemp.groupsearch
2.4.1.1.1.1 Screen Snap Shot
Refer BPI_CAS_FSD_EN—01—user Interface ID:BPI_CAS_SCR_EN—001—012
2.4.1.1.1.2 Element Name, Element Type & Purpose
Refer 3.1.13.2 of BPI_CAS_FSD_EN—01 for the details.
2.4.1.1.2 SID: enrollment.addon.newemp.changerequest
2.4.1.1.2.1 Screen Snap Shot
2.4.1.1.2.2 Element Name, Element Type & Purpose
2.4.1.1.3 SID: enrollment.addon.newemp.groupgeneral
2.4.1.1.3.1 Screen Snap Shot
Refer User Interface ID: BPI_CAS_SCR_EN—001—002—Group General of BPI_CAS_FSD_EN—01
2.4.1.1.3.2 Element Name, Element Type & Purpose
Refer 3.1.3.2 of BPI_CAS_FSD_EN—01 for the details.
2.4.1.1.4 SID: enrollment.addon.newemp.employeecoverage
2.4.1.1.4.1 Screen Snap Shot
Refer to User Interface ID: BPI_CAS_SCR_EN—001—007—Employee Coverage of BPI_CAS_FSD_EN—01
2.4.1.1.4.2 Element Name, Element Type & Purpose
Refer 3.1.8.2 of BPI_CAS_FSD_EN—01 for the details.
2.4.1.1.5 SID: enrollment.addon.newemp.dependent
2.4.1.1.5.1 Screen Snap Shot
Refer to User Interface ID: BPI_CAS_SCR_EN—001—008—Dependent of BPI_CAS_FSD_EN—01
2.4.1.1.5.2 Element Name, Element Type & Purpose
Refer 3.1.9.2 of BPI_CAS_FSD_EN—01 for the details
2.4.1.1.6 SID: enrollment.addon.newemp.missing
2.4.1.1.6.1 Screen Snap Shot
Refer to User Interface ID: BPI_CAS_SCR_EN—001—010—Missing Information of BPI_CAS_FSD_EN—01
2.4.1.1.6.2 Element Name, Element Type & Purpose
Refer to 3.1.11.2 of BPI_CAS_FSD_EN—01
2.4.1.1.7 SID: enrollment.addon.newemp.summary
2.4.1.1.7.1 Screen Snap Shot
Refer to User Interface ID: BPI_CAS_SCR_EN—001—009—Enrollment Summary of BPI_CAS_FSD_EN—01
2.4.1.1.7.2 Element Name, Element Type & Purpose
Refer to 3.1.10.1 of BPI_CAS_FSD_EN—01
2.4.1.1.8 SID: enrollment.addon.newemp.confirmation
2.4.1.1.8.1 Screen Snap Shot
Refer to User Interface ID: BPI_CAS_SCR_EN—001—011—Enrollment Confirmation of BPI_CAS_FSD_EN—01
2.4.1.1.8.2 Element Name, Element Type & Purpose
Refer to 3.1.12.2 of BPI_CAS_FSD_EN—01
2.4.1.1.9 SID: enrollment.addon.newemp.employeesearch
2.4.1.1.9.1 Screen Snap ShotElement Name, Element Type & Purpose
Refer to User Interface ID: BPI_CAS_SCR_EN—001—013—Employee Search of BPI_CAS_FSD_EN—01
2.4.1.1.9.2 Element Name, Element Type & Purpose
Refer to 3.1.14.2 of BPI_CAS_FSD_EN—01
2.4.1.1.10 SID: enrollment.addon.newemp.dependentsearch
2.4.1.1.10.1 Screen Snap Shot
Refer to User Interface ID: BPI_CAS_SCR_EN—001—014—Dependent Search of BPI_CAS_FSD_EN—01
2.4.1.1.10.2 Element Name, Element Type & Purpose
Refer to 3.1.15.2 of BPI_CAS_FSD_EN—01
2.4.1.1.11 SID: enrollment.addon.employeesearch
2.4.1.1.1.1.1 Screen Snap Shot
Refer to User Interface ID: BPI_CAS_SCR_EN—001—013—Employee Search of BPI_CAS_FSD_EN—01
2.4.1.1.11.2 Element Name, Element Type & Purpose
Refer to 3.1.14.2 of BPI_CAS_FSD_EN—01
2.4.1.1.12 SID: enrollment.addon.changerequest
2.4.1.1.12.1 Screen Snap Shot
2.4.1.1.12.2 Element Name, Element Type & Purpose
2.4.1.1.13 SID: enrollment.addon.dependent
2.4.1.1.13.1 Screen Snap Shot
Refer to User Interface ID: BPI_CAS_SCR_EN—001—008—Dependent of BPI_CAS_FSD_EN—01
2.4.1.1.13.2 Element Name, Element Type & Purpose
2.4.1.1.14 SID: enrollment.addon.adddependentsearch
2.4.1.1.14.1 Screen Snap Shot
Refer to User Interface ID: BPI_CAS_SCR_EN—001—014—Dependent Search of BPI_CAS_FSD_EN—01
2.4.1.1.14.2 Element Name, Element Type & Purpose
Refer to 3.1.15.2 of BPI_CAS_FSD_EN—01
2.4.1.1.15 SID: enrollment.addon.missingforadddependent
2.4.1.1.15.1 Screen Snap Shot
Refer to User Interface ID: BPI_CAS_SCR_EN—001—010—Missing Information of BPI_CAS_FSD_EN—001
2.4.1.1.15.2 Element Name, Element Type & Purpose
Refer to 3.1.11.2 of BPI_CAS_FSD_EN—01
2.4.1.1.16 SID: enrollment.addon.addconfirmation
2.4.1.1.16.1 Screen Snap Shot
Refer to User Interface ID: BPI_CAS_SCR_EN—001—011—Enrollment Confirmation of BPI_CAS_FSD_EN—01
2.4.1.1.16.2 Element Name, Element Type & Purpose
Refer to 3.1.12.2 of BPI_CAS_FSD_EN—01
2.4.1.1.17 Change Screen SID
2.4.1.1.17.1 Screen Snap Shot
Refer to User Interface ID BPI_CAS_FSD_EN—01
BPI_CAS_RULKEBOX
2.4.1.1.17.2 Element Name, Element Type & Purpose
Refer to User Interface ID BPI_CAS_FSD_EN—01
BPI_CAS_RULKEBOX
2.4.2. Screen Flow
(See Figure I-13)
(See Figure I-14)
(See Figure I-15)
(See Figure I-16)
(See Figure I-17)
Change:—Group Change New Request
(See Figure I-18)
Change:—Group Modify Pending Changes
(See Figure I-19)
Change:—Employee Change New Request
(See Figure I-20)
Change:—Employee Modify Pending Changes
(See Figure I-21)
Change:—Dependent Change New Request
(See Figure I-22)
Change:—Dependent Modify Pending Changes
(See Figure I-23)
3. Business Rule Mapping
| Activity | Rules |
| Employer Add On | The rate for the employer is guaranteed for one |
| year (One year from the date of enrollment) Hence | |
| the entire rates that is effective for the employer/ | |
| group needs to be effective for the new employees | |
| as well. However the eligibility of the Employee is | |
| base on the normal eligibility rules that is applicable | |
| for the Employee at the time of enrollment. Counts | |
| for the add-on employee can go more than 70 and | |
| up to 100 if Small Employer Group (override based | |
| on ACL). If Guaranteed association then there is no | |
| limit on the employee count at any time. | |
| Process Add on | Shows the missing information of the Add On |
| employee and emails the missing information to the GMS | |
| rep. | |
| Process Add on | On successful Add On the welcome mail is sent to |
| the Employer/Employee and cc to Agent. Billing | |
| adjustment is made which would be handled in the | |
| Finance Module. | |
| Process Add On (waiting Period) | Adding employee needs to check on the Waiting |
| Period. If the employee does not satisfy the waiting | |
| period then it should send email to the GMS rep. | |
| Also the employee effective date should default to | |
| the date when the employee is actually eligible. | |
| If the Employee satisfied the waiting period and is | |
| 60 days past the waiting period then it should flag | |
| this as missing information as this becomes a late | |
| application, which needs clarification from the | |
| employer before enrolling the employee. This | |
| employee can be enrolled only with authorization. | |
| The employee application form is not deemed as | |
| “Late” if it is postmarked within 60 days from the | |
| eligibility date. If it is postmarked more than 60 | |
| days from the eligibility date, the application is | |
| declined as it is “Late”. | |
| Late application can be enrolled only on the next | |
| ROE. | |
| Activity | Rules |
| Employee Add On (Adding Dependent) |
| Employee Add On | The rate for the employer is guaranteed for one |
| year (One year form the date of enrollment) Hence | |
| the entire rate that is effective for the employer/ | |
| group needs to be effective for the new dependent | |
| as well. However the eligibility of the Dependent is | |
| base on the normal eligibility rules that is applicable | |
| for the Dependent at the time of enrollment. | |
| Coverage Choice to be manipulated by System | |
| automatically. | |
| Process Add on | Shows the missing information of the Add On |
| Dependent and emails the missing information to | |
| the GMS rep. | |
| Process Add on | On successful Add On the welcome mail is sent to |
| the Employer/Employee/Dependent and cc to | |
| Agent. Billing adjustment is made which would be | |
| handled in the Finance Module. | |
| General Rules | If the employee has selected the Employee only |
| option as coverage choice then it needs to be | |
| changed for adding a dependent. System would not | |
| allow adding dependent with Employee only status. |
| Employer Change |
| Demographic changes | Demographic change can include change in |
| Company Name, Contact name, Address, Phone, | |
| Fax, Email, Tax ID. All these change can be made | |
| and does not affect the business rules except for | |
| transmission of letter, email contacts | |
| Billing Changes | All Billing changes are flag and email is sent to |
| GMS rep and Finance for Information. Billing | |
| changes would effect the billing frequency or the | |
| mode of payment (EFT, Credit Card or Check) | |
| Waiting Period Change | Change in the waiting period would affect the |
| Employee Eligibility criteria for all add on | |
| employees, going forward, as the change may be. | |
| Change in the Employee type for the waiting period | |
| consideration would also affect the Employee | |
| Eligibility for the New Employees ‘Add-On’, going | |
| forward. | |
| Waiting Period would be based on the Employer | |
| Effective date. | |
| Effective date for changing the Waiting period | |
| should default to the 1st of the following month. | |
| Waiting period can be changed only once from the | |
| date of enrollment (effective date) to one-year cycle | |
| for the employer. | |
| If the waiting period changes are more than once in | |
| the calendar year for the employer. This is to be | |
| notified to the GMS rep and only the authorized | |
| person can override this and allow for waiting | |
| period change beyond 1 in employer anniversary | |
| date (one year cycle). | |
| Employer Contribution | Contribution would be based on the Employer |
| Effective date. | |
| Effective date for changing the Contribution should | |
| default to the 1st of the following month. | |
| Contribution can be changed only twice from the | |
| date of enrollment (effective date) to one-year cycle | |
| for the employer. | |
| If the Contribution changes are more than once in | |
| the calendar year for the employer. This is to be | |
| notified to the GMS rep and only the authorized | |
| person can override this and allow for contribution | |
| change beyond 1 in employer calendar year. | |
| Note: Effective dates for Contribution changes | |
| should be 1st following month if the billing cycle | |
| has not completed. | |
| If the billing cycle is complete then it should be | |
| effective the next billing cycle. I.e 1st of the | |
| month following the next month. | |
| Optional benefits Changes | a) Medical: No change allowed. |
| b) Dental Can be added only during ROE cycle. | |
| Can be dropped any time. Note if dental is | |
| dropped then it can be added in the ROE | |
| following 12 month from the date of dropping | |
| the dental plan. | |
| c) Vision and CAM: Can be added and dropped | |
| any time. Note if an optional benefit is dropped | |
| then it can be added in the ROE following 12 | |
| month from the date of dropping the optional | |
| benefit. | |
| d) This is to be notified to the GMS rep and only | |
| the authorized person can override this. | |
| Employee Counts (Number of employee) | Can be changed only at next ROE cycle. |
| COBRA | Can Change any time but will effective from 1st of |
| the month only | |
| If this changes then any existing COBRA with this | |
| group will change accordingly and automatically, 1st | |
| of the month. | |
| Should trigger automatic transmission | |
| TEFRA | Can be change any time but will be effective from |
| 1st of the month only. | |
| Transmit record to the carrier only if the employee | |
| is 65+ | |
| Part time coverage/Domestic partner | Can be change only during open enrollment or Re |
| qualification and open enrollment. But should allow | |
| for overriding this feature based on authority. | |
| Note: Any over riding function should trigger auto | |
| email to the concerned GMS rep for making the | |
| changes based on their authority. | |
| Agent Change | This triggers a new process flow. (Refer process |
| flow diagram FIG. 4.) | |
Note: For all changes effective date will be defaulted based on POST MARK DATE, If POST MARK date is lesser than 15th Day of month then Effective date will be 1st day of next month else it will be 1st day of next of the next month
4. User Role
The respective level of user role can over rule the following missing information.
| User Role | Level II, Level III, | |
| S.No., | Missing Information | Level IV Condition |
| 1 | SSN already exists. | Employee |
| 2 | SSN already exists. | Dependent |
| Employee, Group and Dependent Changes (w.r.t. Current Date) |
| User Role | Condition | |
| Level I | Reinstatement date is with in 30 days prior or later | |
| Level II | Reinstatement date is with in 30 days prior or later | |
| Level III | Reinstatement date is with in 60 days prior or later | |
| Change Record |
| Date | Author | Version | Change Reference | |
| Dec. 18, 2001 | Sudhakar k | 1.0 | Baseline Release | |
| Reviewers |
| Name | Position | |
| Distribution |
| No Of | ||||
| Copy No. | Name | Copies | Location | |
1. Introduction 4
1.1. Purpose 4
1.2. Business Use Case Specification Reference 4
1.3. Definitions, Acronyms & Abbreviations 4
1.4. Document Reference 4
2. Process Identification 5
2.1. Background 5
2.2. Process Description 5
2.3. Process Flow 6
3. User Interface 8
3.1. User Interface Screens 8
3.1.1. Screen ID's 8
3.1.2. SID, Element Name, Element Type & Purpose 9
3.1.3. Screen Flow 21
4. Business Rule Mapping 24
5. User Role 25
1. Introduction
1.1. Purpose
The purpose of this document is to describe the process of ROE/OE Process. This document identifies how the user interacts with the system, the data to be captured, the business logic to be implemented, and the output of the process.
1.2. Business Use Case Specification Reference
| Business Use Specification ID | Business Use Case Name | |
| BPI_SCOPE_EN | Enrollment | |
| BPI_SCOPE_EN_004 | Enrollment - ROE | |
1.3. Definitions, Acronyms & Abbreviations
| Term | Explanation | |
1.4. Document Reference
| Document ID | Document Name |
| BPI_CAS_FSD_EN | Functional Specification Document - |
| Enrollment | |
| BPI_CAS_FSD_EN_001 | Process Flow - New Business Enrollment |
| BPI_CAS_FSD_EN_002 | Process Flow - Enrollment Changes/Add-On |
| BPI_CAS_FSD_EN_003 | Process Flow - COBRA Enrollment/Changes |
| BPI_CAS_FSD_EN_005 | Process Flow - Termination/Reinstatement |
2. Process Identification
2.1. Background
Once a year, on the anniversary date of a group's enrollment in PacAdvantage (or for some, it's July 1st, not their anniversary date), the group's participation, contribution and qualification is reviewed. This review is to ensure that the group meets the qualification requirement. The main objective of this process is to review these criteria and re qualify as needed, notify them of rate changes and provide an opportunity for employees of the group to make changes to their enrollment.
This process is identified as Re-qualification and open enrollment. Also there is another process associated with this called as open enrollment where in the group has the privilege to make the changes to the plan, waiting period etc.
The difference between the two processes is that for re-qualification the Group has to under go the eligibility check to qualify for their next term.
For open enrollment the group need not re qualify and under go the eligibility checks.
The group should already have been enrolled with the PacAdvantage and have no termination date for the ROE to be done.
2.2. Process Description
The objective of the ROE/OE Process is to:
-
- Annual Re qualification or open enrollment form filled by the Employer
- Open Enrollment Change form completed by employee, if applicable
- Employee Enrollment form(s) completed by employee, if applicable
- Dependent Enrollment form(s) completed by employee, if applicable
The following are the other requirements that will be supported and constraints on the proposed system:
-
- 1) The system has to initiate ROE/OE process 3 months prior to the actual anniversary date for the specific group. This process needs to be initiated by GMS personnel.
- 2) System has to pick up the Groups for ROE based on the rules defined below:
- Group Size: less than or equal to 4—All the groups needs to be re-qualified.
- Group Size: 5 to 9—10% of the Group needs to be re-qualified
- Group Size: greater than or equal to 10—1% of the group needs to be re-qualified.
- 3) System has to randomly pick up the groups based on the above rules for ROE based on random generator algorithm.
- 4) All other Group that is a part of ROE and OE needs to have their open enrollment processed.
- 5) Also their needs to be a facility to have manual OE process wherein the Employee or Employees are manually picked for ROE or OE process. Manual OE is usually performed based on searching the Employee based on line of coverage and plan.
- 6) There needs to be a feature to Finalize the ROE or OE for all the groups that have the same REO/OE cycle.
2.3. Process Flow
Process for ROE/OE
The process starts after manual initiation
-
- 1) Identify the group that has their anniversary date 3 months hence.
2) Based on the group size identify if the group needs to be re-qualified.
-
- 3) Randomly pick up the group for re-qualification
- 4) If the group is not picked for re-qualification then the group only needs to have open enrollment.
- 5) Send ROE/OE packets to mail house. The packet includes the Agent Packet and the group packet.
- 6) Also sent the packets to the COBRA members of the existing group.
- 7) Send reminder for the ROE/OE every month.
- 8) Receive the ROE/OE packets completed by the Group and enter into the system.
- 9) Follow up for missing information
- 10) Convey the Group/Agent about the ROE status on completion of the process.
Note the screens for entry of data for the ROE/OE processes are similar to the Group/Employee/Dependent Changes screen. However for the ROW/OE process the status would be identified as ROE process.
Process Flow Diagram—ROE process (See Figure I-24)
3. User Interface
3.1. User Interface Screens
3.1.1. Screen ID's
| Screen ID (SID) | Screen Name | Corresponding HTML File Name |
| enrollment.roe.groupsearch | Group Search | /bpi/cas/enrollment/roe/groupsearch |
| enrollment.roe.request | Group Request | /bpi/cas/enrollment/roe/request |
| enrollment.roe.identifygroupchange | Identify Group Change | /bpi/cas/enrollment/roe/identifygroupchange |
| Request | ||
| enrollment.roe.groupgeneral | Group General Info | /bpi/cas/enrollment/roe/groupgeneral |
| enrollment.roe.groupbilling | Group Billing Info | /bpi/cas/enrollment/roe/groupbilling |
| enrollment.roe.groupagent | Group Agent Info | /bpi/cas/enrollment/roe/groupagent |
| enrollment.roe.agentsearch | Agent Search | /bpi/cas/enrollment/roe/agentsearch |
| enrollment.roe.groupcoverage | Group Coverage Info | /bpi/cas/enrollment/roe/groupcoverage |
| enrollment.roe.employeesearch | Employee Search | /bpi/cas/enrollment/roe/employeesearch |
| enrollment.roe.identifyemployeechange | Identify Employee Change | /bpi/cas/enrollment/roe/identifyemployeechange |
| Request | ||
| enrollment.roe.employeegeneral | Employee General Info | /bpi/cas/enrollment/roe/addemployee |
| enrollment.roe.employeecoverage | Employee Coverage Info | /bpi/cas/enrollment/roe/employeecoverage |
| enrollment.roe.dependentsearch | Dependent Search | /bpi/cas/enrollment/roe/dependentsearch |
| enrollment.roe.identifydependentchange | Identify Dependent Change | /bpi/cas/enrollment/roe/identifydependentchange |
| Request | ||
| enrollment.roe.dependentgeneral | Dependent General | /bpi/cas/enrollment/roe/adddependent |
| enrollment.roe.groupsummary | Group Summary | /bpi/cas/enrollment/roe/enrollmentsummary |
| enrollment.roe.groupmissing | Group Missing Info | /bpi/cas/enrollment/roe/preenrollment/ |
| enrollment.roe.groupconfirm | Group Confirm | /bpi/cas/enrollment/roe/groupconfirm |
| enrollment.roe.individualemployeesearch | Indiv Employee Search/ | /bpi/cas/enrollment/roe/indivemployeesearch |
| Indiv Group Search | ||
| enrollment.roe.indivemployeerequest | Indiv Employee Request | /bpi/cas/enrollment/roe/indivemployeerequest |
| enrollment.roe.identifyindivemployee | Identify Indiv Employee | /bpi/cas/enrollment/roe/identifyindivemployeechange |
| change | Change Request | |
| enrollment.roe.individualemployeegeneral | Indiv Employee General | /bpi/cas/enrollment/roe/indivemployee |
| Info | ||
| enrollment.roe.individualbilling | Indiv Billing Info | /bpi/cas/enrollment/roe/indivbilling |
| enrollment.roe.individualagent | Indiv Agent Info | /bpi/cas/enrollment/roe/indivagent |
| enrollment.roe.individualagentsearch | Indiv Agent Search | /bpi/cas/enrollment/roe/indivagent |
| enrollment.roe.individualemployeecoverage | Indiv Coverage Info | /bpi/cas/enrollment/roe/indivcoverage |
| enrollment.roe.individualdependentsearch | Indiv Dependent Search | /bpi/cas/enrollment/roe/indivdependentsearch |
| enrollment.roe.identifyindivdependent | Identify indiv Dependent | /bpi/cas/enrollment/roe/identifyindivdependent |
| change | Change Request | change |
| enrollment.roe.individualdependentgeneral | Indiv Dependent General | /bpi/cas/enrollment/roe/indivdependent/ |
| Info | ||
| enrollment.roe.individualsummary | Indiv Enrollment Summary | /bpi/cas/enrollment/roe/indivenrollmentsummary |
| enrollment.roe.individualmissing | Indiv Pre Enrollment | /bpi/cas/enrollment/roe/indivpreenrollment |
| bpi.enrollment.cobraroe.new.searchcobra | COBRA Search | /bpi/cas/enrollment/cobraroe/new/cobraroesearch |
| bpi.enrollment.cobraroe.new.request | COBRA ROE/OE | /bpi/cas/enrollment/cobraroe/new/request |
| Process Request | ||
| bpi.enrollment.cobraroe.new.identify | Identify COBRA ROE/ | /bpi/cas/enrollment/cobraroe/new/identifychanges |
| changes | OE Change Request Info | |
| bpi.enrollment.cobraroe.new.general | COBRA General Info | /bpi/cas/enrollment/cobraroe/new/generalinfo |
| bpi.enrollment.cobraroe.new.billing | COBRA Billing Info | /bpi/cas/enrollment/cobraroe/new/billinginfo |
| bpi.enrollment.cobraroe.new.coverage | COBRA Coverage Info | /bpi/cas/enrollment/cobraroe/new/coverageinfo |
| bpi.enrollment.cobraroe.new.dependent | COBRA Dependent Info | /bpi/cas/enrollment/cobraroe/new/dependentinfo |
| bpi.enrollment.cobraroe.new.missing | COBRA Missing Info | /bpi/cas/enrollment/cobraroe/new/missinginfo |
| bpi.enrollment.cobraroe.new.confirmation | COBRA Confirmation | /bpi/cas/enrollment/cobraroe/new/confirmation |
| Enrollment.roe.manualroe | ROE/OE Process | /bpi/cas/enrollment/roe/manualroe |
| Enrollment.roe.roetransfer | ROE/OE Transfer | /bpi/cas/enrollment/roe/roetransfer |
3.1.2. SID, Element Name, Element Type & Purpose
3.1.2.1. SID: enrollment.roe.groupsearch
3.1.2.1.1 Screen Snap Shot
Refer to User Interface ID: BPI_CAS_SCR_EN—001—012—Group Search of BPI_CAS_FSD_EN—01
3.1.2.1.2 Element Name, Element Type & Purpose
Refer to 3.1.13.2 of BPI_CAS_FSD_EN—01
3.1.2.2. SID: enrollment.roe.request
3.1.2.2.1 Screen Snap Shot (See Figure I-25)
3.1.2.3. SID: enrollment.roe.identifygroupchange
3.1.2.3.1 Screen Snap Shot (See Figure I-26)
3.1.2.4. SID: enrollment.roe.groupgeneral
3.1.2.4.1 Screen Snap Shot
Refer to User Interface ID: BPI_CAS_SCR_EN—001—002—Group General of BPI_CAS_FSD_EN—01
3.1.2.4.2 Element Name, Element Type & Purpose
Refer to 3.1.3.2 of BPI_CAS_FSD_EN—01
3.1.2.5. SID: enrollment.roe.groupbilling
3.1.2.5.1 Screen Snap Shot
Refer to User Interface ID: BPI_CAS_SCR_EN—001—003—Billing of BPI_CAS_FSD_EN—01
3.1.2.5.2 Element Name, Element Type & Purpose
Refer to 3.1.4.2 of BPI_CAS_FSD_EN—01
3.1.2.6. SID: enrollment.roe.groupagent
3.1.2.6.1 Screen Snap Shot
Refer to User Interface ID: BPI_CAS_SCR_EN—001—005—Agent of BPI_CAS_FSD_EN—01
3.1.2.6.2 Element Name, Element Type & Purpose
Refer to 3.1.6.2 of BPI_CAS_FSD_EN—01
3.1.2.7. SID: enrollment.roe.agentsearch
3.1.2.7.1 Screen Snap Shot
3.1.2.7.2 Element Name, Element Type & Purpose
3.1.2.8. SID: enrollment.roe.groupcoverage
3.1.2.8.1 Screen Snap Shot
Refer to User Interface ID: BPI_CAS_SCR_EN—001—004—Group Coverage of BPI_CAS_FSD_EN—01
3.1.2.8.2 Element Name, Element Type & Purpose
Refer to 3.1.5.2 of BPI_CAS_FSD_EN—01
3.1.2.9. SID: enrollment.roe.employeesearch
3.1.2.9.1 Screen Snap Shot
Refer to User Interface ID: BPI_CAS_SCR_EN—001—013—Employee Search of BPI_CAS_FSD_EN—01
3.1.2.9.2 Element Name, Element Type & Purpose
Refer to 3.1.14.2 of BPI_CAS_FSD_EN—01
3.1.2.10. SID: enrollment.roe.identifyemployeechange
3.1.2.10.1 Screen Snap Shot (See Figure I-27)
3.1.2.11. SID: enrollment.roe.employeegeneral
3.1.2.11.1 Screen Snap Shot
Refer to User Interface ID: BPI_CAS_SCR_EN—001—006—Employee Information of BPI_CAS_FSD_EN—01
3.1.2.11.2 Element Name, Element Type & Purpose
Refer to 3.1.7.2 of BPI_CAS_FSD_EN—01
3.1.2.12. SID: enrollment.roe.employeecoverage
3.1.2.12.1 Screen Snap Shot
Refer to User Interface ID: BPI_CAS_SCR_EN—001—007—Employee Coverage of BPI_CAS_FSD_EN—01
3.1.2.12.2 Element Name, Element Type & Purpose
Refer to 3.1.8.2 of BPI_CAS_FSD_EN—01
3.1.2.13. SID: enrollment.roe.dependentsearch
3.1.2.13.1 Screen Snap Shot
Refer to User Interface ID: BPI_CAS_SCR_EN—001—014—Dependent Search of BPI_CAS_FSD_EN—01
3.1.2.13.2 Element Name, Element Type & Purpose
Refer to 3.1.15.2 of BPI_CAS_FSD_EN—01
3.1.2.14. SID: enrollment.roe.identifydependentchange
3.1.2.14.1 Screen Snap Shot (See Figure I-28)
3.1.2.15. SID: enrollment.roe.dependentgeneral
3.1.2.15.1 Screen Snap Shot
Refer to User Interface ID: BPI_CAS_SCR_EN—001—008—Dependent of BPI_CAS_FSD_EN—01
3.1.2.15.2 Element Name, Element Type & Purpose
Refer to 3.1.9.2 of BPI_CAS_FSD_EN—01
3.1.2.16. SID: enrollment.roe.groupsummary
3.1.2.16.1 Screen Snap Shot
Refer to User Interface ID: BPI_CAS_SCR_EN—001—009—Enrollment Summary of BPI_CAS_FSD_EN—01
3.1.2.16.2 Element Name, Element Type & Purpose
Refer to 3.1.10.2 of BPI_CAS_FSD_EN—01
3.1.2.17. SID: enrollment.roe.groupmissing
3.1.2.17.1 Screen Snap Shot
Refer to User Interface ID: BPI_CAS_SCR_EN—001—100—Missing Information of BPI_CAS_FSD_EN—01
3.1.2.17.2 Element Name, Element Type & Purpose
Refer to 3.1.11.2 of BPI_CAS_FSD_EN—01
3.1.2.18. SID: enrollment.roe.groupconfirm
3.1.2.18.1 Screen Snap Shot
Refer to User Interface ID: BPI_CAS_SCR_EN—001—011—Enrollment Confirmation of BPI_CAS_FSD_EN—001
3.1.2.18.2 Element Name, Element Type & Purpose
Refer to 3.1.12.2 of BPI_CAS_FSD_EN—01
3.1.2.19. SID: enrollment.roe.individualemployeesearch
3.1.2.19.1 Screen Snap Shot
Refer to User Interface ID: BPI_CAS_SCR_EN—001—013—Employee Search of BPI_CAS_FSD_EN—01
3.1.2.19.2 Element Name, Element Type & Purpose
Refer to 3.1.14.2 of BPI_CAS_FSD_EN—01
3.1.2.20. SID: enrollment.roe.indivemployeerequest
3.1.2.20.1 Screen Snap Shot
3.1.2.20.2 Element Name, Element Type & Purpose
3.1.2.21. SID: enrollment.roe.identifyindivemployeechange
3.1.2.21.1 Screen Snap Shot
3.1.2.21.2 Element Name, Element Type & Purpose
3.1.2.22. SID: enrollment.roe.individualemployeegeneral
3.1.2.22.1 Screen Snap Shot
Refer to User Interface ID: BPI_CAS_SCR_EN—001—006—Employee Information of BPI_CAS_FSD_EN—01
3.1.2.22.2 Element Name, Element Type & Purpose
Refer to 3.1.7.2 of BPI_CAS_FSD_EN—01
3.1.2.23. SID: enrollment.roe.individualbilling
3.1.2.23.1 Screen Snap Shot
Refer to User Interface ID: BPI_CAS_SCR_EN—001—003—Billing of BPI_CAS_FSD_EN—01
3.1.2.23.2 Element Name, Element Type & Purpose
Refer to 3.1.4.2 of BPI_CAS_FSD_EN—01
3.1.2.24. SID: enrollment.roe.individualagent
3.1.2.24.1 Screen Snap Shot
Refer to User Interface ID: BPI_CAS_SCR_EN—001—005—Agent of BPI_CAS_FSD_EN—01
3.1.2.24.2 Element Name, Element Type & Purpose
Refer to 3.1.6.2 of BPI_CAS_FSD_EN—01
3.1.2.25. SID: enrollment.roe.individualagentsearch
3.1.2.25.1 Screen Snap Shot
3.1.2.25.2 Element Name, Element Type & Purpose
3.1.2.26. SID: enrollment.roe.individualemployeecoverage
3.1.2.26.1 Screen Snap Shot
Refer to User Interface ID: BPI_CAS_SCR_EN—001—007—Employee Coverage of BPI_CAS_FSD_EN—01
3.1.2.26.2 Element Name, Element Type & Purpose
Refer to 3.1.8.2 of BPI_CAS_FSD_EN—01
3.1.2.27. SID: enrollment.roe.individualdependentsearch
3.1.2.27.1 Screen Snap Shot
Refer to User Interface ID: BPI_CAS_SCR_EN—001—014—Dependent Search of BPI_CAS_FSD_EN—01
3.1.2.27.2 Element Name, Element Type & Purpose
Refer to 3.1.15.2 of BPI_CAS_FSD_EN—01
3.1.2.28. SID: enrollment.roe.identifyindivdependentchange
3.1.2.28.1 Screen Snap Shot
3.1.2.28.2 Element Name, Element Type & Purpose
3.1.2.29. SID: enrollment.roe.individualdependentgeneral
3.1.2.29.1 Screen Snap Shot
Refer to User Interface ID: BPI_CAS_SCR_EN—001—008—Dependent of BPI_CAS_FSD_EN—01
3.1.2.29.2 Element Name, Element Type & Purpose
Refer to 3.1.9.2 of BPI_CAS_FSD_EN—01
3.1.2.30. SID: enrollment.roe.individualsummary
3.1.2.30.1 Screen Snap Shot
Refer to User Interface ID: BPI_CAS_SCR_EN—001—009—Enrollment Summary of BPI_CAS_FSD_EN—01
3.1.2.30.2 Element Name, Element Type & Purpose
Refer to 3.1.10.2 of BPI_CAS_FSD_EN—01
3.1.2.31. SID: enrollment.roe.individualmissing
3.1.2.31.1 Screen Snap Shot
Refer to User Interface ID: BPI_CAS_SCR_EN—001—010—Missing Information of BPI_CAS_FSD_EN—01
3.1.2.31.2 Element Name, Element Type & Purpose
Refer to 3.1.11.2 of BPI_CAS_FSD_EN—01
3.1.2.32. SID: bpi.enrollment.cobraroe.new.searchcobra
3.1.2.32.1 Screen Snap Shot
Refer to 3.1.1 Screen Shot: BPI_SCR_EN—002—001 of BPI_CAS_FSD_EN—02
3.1.2.32.2 Element Name, Element Type & Purpose
Refer to 3.1.2 of BPI_CAS_FSD_EN—02
3.1.2.33. SID: bpi.enrollment.cobraroe.new.request
3.1.2.33.1 Screen Snap Shot (See Figure I-29)
3.1.2.34. SID: bpi.enrollment.cobraroe.new.identifychanges
3.1.2.34.1 Screen Snap Shot (See Figure I-30)
3.1.2.35. SID: bpi.enrollment.cobraroe.new.general
3.1.2.35.1 Screen Snap Shot
Refer to 3.8.1 Screen Shot: BPI_SCR_EN—002—009 of BPI_CAS_FSD_EN—02
3.1.2.35.2 Element Name, Element Type & Purpose
Refer to 3.8.2 of BPI_CAS_FSD_EN—02
3.1.2.36. SID: bpi.enrollment.cobraroe.new.billing
3.1.2.36.1 Screen Snap Shot
Refer to User Interface ID: BPI_CAS_SCR_EN—001—003—Billing of BPI_CAS_FSD_EN—01
3.1.2.36.2 Element Name, Element Type & Purpose
Refer to 3.1.4.2 of BPI_CAS_FSD_EN—01
3.1.2.37. SID: bpi.enrollment.cobraroe.new.coverage
3.1.2.37.1 Screen Snap Shot
Refer to 3.9.1 Screen Shot: BPI_SCR_EN—002—010 of BPI_CAS_FSD_EN—02
3.1.2.37.2 Element Name, Element Type & Purpose
Refer to 3.9.2 of BPI_CAS_FSD_EN—02
3.1.2.38. SID: bpi.enrollment.cobraroe.new.dependent
3.1.2.38.1 Screen Snap Shot
Refer to 3.3.1 Screen Shot: BPI_SCR_EN—002—003 of BPI_CAS_FSD_EN—02
3.1.2.38.2 Element Name, Element Type & Purpose
Refer to 3.3.2 of BPI_CAS_FSD_EN—02
3.1.2.39. SID: bpi.enrollment.cobraroe.new.missing
3.1.2.39.1 Screen Snap Shot
Refer to 3.5.1 Screen Shot: BPI_SCR_EN—002—006 of BPI_CAS_FSD_EN—02
3.1.2.39.2 Element Name, Element Type & Purpose
Refer to 3.5.2 of BPI_CAS_FSD_EN—02
3.1.2.40. SID: bpi.enrollment.cobraroe.new.confirmation
3.1.2.40.1 Screen Snap Shot
Refer to User Interface ID: BPI_CAS_SCR_EN—001—011—Enrollment Confirmation of BPI_CAS_FSD_EN—01
3.1.2.40.2 Element Name, Element Type & Purpose
Refer to 3.1.12.2 of BPI_CAS_FSD_EN—01
3.1.3. Screen Flow
(See Figure I-31)
(See Figure I-32)
(See Figure I-33)
4. Business Rule Mapping
| Activity | Rules |
| ROE Process | Identify the group randomly based on the Group size for |
| ROE. | |
| ROE validation | All the eligibility rules that are applicable as new |
| business enrollment are applicable for the ROE as well. | |
| Open | Open enrollment allows for making the changes that are |
| Enrollment | normally not possible during the normal changes. |
| Billing | Bill in a normal way if the ROE/OE has a completed |
| status. Make the bill for the new effective date. | |
| If the ROE/OE has a status as pend then pend the bill | |
| for the new effective date. | |
5. User Role
The respective level of user role can over rule the following missing information.
| User Role | Level II, Level III, | |
| S.No., | Missing Information | Level IV Condition |
| ROE OE SEG/Alternate/Indiv Group |
| 1 | SSN already exists. | Employee SSN already exists |
| 2 | SSN already exists. | Dependent SSN already exists |
| 3 | Employer Tax Id already | Employer Tax Id already exists |
| exists. |
| ROE OE COBRA Group |
| 1 | SSN already exists. | Employee SSN already exists |
| 2 | SSN already exists. | Dependent SSN already exists |
| Change Record |
| Date | Author | Version | Change Reference |
| December 12, 2001 | Sudhakar K | 1.0 | Initial version |
| January 8, 2002 | Sudhakar K | 1.0 rev 1 | Revision 1 |
| Reviewers |
| Name | Position | |
| Distribution |
| No Of | ||||
| Copy No. | Name | Copies | Location | |
1. Introduction 4
1.1. Purpose 4
1.2. Business Use Case Specification Reference 4
1.3. Definitions, Acronyms & Abbreviations 4
2. Process Identification 5
2.1. Background 5
2.2. Process Description 5
2.3. Process Flow 5
3. User Interface 7
3.1. User Interface Screens 7 3.1.1. Screen ID's 7
3.1.2. Screen Flow 36
4. Business Rule Mapping 37
5. User Role 41
1. Introduction
1.1. Purpose
The purpose of this document is to identify the process associated with the business use case Termination and Reinstatement
1.2. Business Use Case Specification Reference
| Business Use Specification ID | Business Use Case Name | |
| BPI_SCOPE_EN | Enrollment | |
| BPI_SCOPE_EN_005 | Termination and Reinstatement | |
1.3. Definitions, Acronyms & Abbreviations
| Term | Explanation | |
2. Process Identification
2.1. Background
<Brief Description of the Process>
2.2. Process Description
Process Flow for Group Term
This process is used to terminate or reinstate the Group, Employee and or Dependent.
The FIG. 1 shows the process flow for the group termination. The group can be termed broadly based on two reasons; Non-payment of Premium or by group request for termination. Non-payment of premium is an automated process and starts and completes the term process automatically. The employer request is a manual term process and the Group is termed manually.
Automated Term process initiates the Term Process. Letter is sent to the Group with 15 days notice for reinstatement. The system holds the status as “Term Pending” although the group believes they are completely termed. The reason for this is to prevent the sending of termination then reinstatement transmissions to the carriers; which causes confusion. The finance department then processes the term to completion if the payment is not received. Finance also has ability to override the term pend status based on authority.
Manual Term process is based on the request received from the group. All manual term process is notified to finance for necessary action. If the Group has a shortfall then the system notifies the finance department and finance processes the term. Term letter is send to the Group for paying through the balance premium. If the balance premium is paid then the finance department completes the term. If the balance is not paid then finance terms the group retrospectively.
If the Group has a refund due them then the system notifies the finance department and finance processes the refund and completes the term process.
Process Flow for Employee Term
Employee term is based on the Employer request to terminate the employee based on certain reasons. Based on these reasons the employee is termed and all employees who are termed needs to be sent the COBRA packets for COBRA enrollment. Billing adjustments are made for the employee term in the next invoice generated.
Process Flow for Dependent Term
Dependent term is based on the Employer/Employee request to terminate the Dependent based on certain reasons. Based on these reasons the Dependent is termed and the termed Dependent are sent the COBRA packets for COBRA enrollment. Billing adjustments are made for the Dependent term in the next invoice generated for the Group.
2.3. Process Flow
Process flow description (See Figure I-34)
3. User Interface
3.1. User Interface Screens
3.1.1. Screen ID's
| Screen ID | Corresponding HTML File | |
| (SID) | Screen Name | Name |
| enrollment.termination. | Search Group for Termination | /bpi/cas/enrollment/termination/ |
| groupsearch | group/GroupSearch.jsp | |
| enrollment.termination. | Group Termination Request | /bpi/cas/enrollment/termination/ |
| grouptermination | group/GroupTerminationRequest.jsp | |
| request | ||
| enrollment.termination. | Group Termination Process | /bpi/cas/enrollment/termination/ |
| groupprocess | group/GroupProcessTermination.jsp | |
| termination | ||
| enrollment.termination. | Group Termination | /bpi/cas/enrollment/termination/ |
| grouptermination | Confirmation | group/GroupTerminationConfirm.jsp |
| confirm | ||
| enrollment.termination. | Multiple Group Termination | /bpi/cas/enrollment/termination/ |
| multiple | Request | group/MultipleGroupTermination |
| groupsearch | Request.jsp | |
| enrollment.termination. | Multiple Group Termination | /bpi/cas/enrollment/termination/ |
| multiple | Confirmation | group/MultipleGroupTermination |
| grouptermination | Confirm.jsp | |
| confirm | ||
| enrollment.termination. | Search Employee for | /bpi/cas/enrollment/termination/ |
| employee | Termination | employee/EmployeeSearch.jsp |
| search | ||
| enrollment.termination. | Employee Termination Request | /bpi/cas/enrollment/termination/ |
| employee | employee/EmployeeTermination | |
| terminationrequest | Request.jsp | |
| enrollment.termination. | Employee Process Termination | /bpi/cas/enrollment/termination/ |
| employee | employee/EmployeeProcess | |
| processtermination | Termination.jsp | |
| enrollment.termination. | Employee Termination | /bpi/cas/enrollment/termination/ |
| employee | Confirmation | employee/EmployeeTermination |
| terminationconfirm | Confirm.jsp | |
| enrollment.termination. | Search Dependent for | /bpi/cas/enrollment/termination/ |
| dependent | Termination | dependent/DependentSearch.jsp |
| search | ||
| enrollment.termination. | Dependent Termination | /bpi/cas/enrollment/termination/ |
| dependent | Request | dependent/DependentTermination |
| terminationrequest | Request.jsp | |
| enrollment.termination. | Dependent Process Termination | /bpi/cas/enrollment/termination/ |
| dependent | dependent/DependentProcess | |
| processtermination | Termination.jsp | |
| enrollment.termination. | Dependent Termination | /bpi/cas/enrollment/termination/ |
| dependent | Confirmation | dependent/DependentTermination |
| terminationconfirm | Confirm.jsp | |
| enrollment.reinstatement. | Search Group for | /bpi/cas/enrollment/reinstatement/ |
| groupsearch | Reinstatement | group/GroupSearch.jsp |
| enrollment.reinstatement. | Group Reinstatement Request | /bpi/cas/enrollment/reinstatement/ |
| groupreinstatementrequest | group/GroupReinstatement | |
| Request.jsp | ||
| enrollment.reinstatement. | Group Process Reinstatement | /bpi/cas/enrollment/reinstatement/ |
| groupprocess | group/GroupProcessReinstatement.jsp | |
| reinstatement | ||
| enrollment.reinstatement. | Group Reinstatement | /bpi/cas/enrollment/reinstatement/ |
| groupreinstatementconfirm | Confirmation | group/GroupReinstatement |
| Confirm.jsp | ||
| enrollment.reinstatement. | Search for Employee | /bpi/cas/enrollment/reinstatement/ |
| employee | Reinstatement | employee/EmployeeSearch.jsp |
| search | ||
| enrollment.reinstatement. | Employee Reinstatement | /bpi/cas/enrollment/reinstatement/ |
| employee | Request | employee/EmployeeReinstatement |
| reinstatement | Request.jsp | |
| request | ||
| enrollment.reinstatement. | Employee Process | /bpi/cas/enrollment/reinstatement/ |
| employee | Reinstatement | employee/EmployeeProcess |
| processreinstatement | Reinstatement.jsp | |
| enrollment.reinstatement. | Employee Reinstatement | /bpi/cas/enrollment/reinstatement/ |
| employee | Confirmation | employee/EmployeeReinstatement |
| reinstatement | Confirm.jsp | |
| confirm | ||
| enrollment.reinstatement. | Search Dependent for | /bpi/cas/enrollment/reinstatement/ |
| dependent | Reinstatement | dependent/DependentSearch.jsp |
| search | ||
| enrollment.reinstatement. | Dependent Reinstatement | /bpi/cas/enrollment/reinstatement/ |
| dependent | Request | dependent/DependentReinstatement |
| reinstatement | Request.jsp | |
| request | ||
| enrollment.reinstatement. | Dependent Process | /bpi/cas/enrollment/reinstatement/ |
| dependent | Reinstatement | dependent/DependentProcess |
| processreinstatement | Reinstatement.jsp | |
| enrollment.reinstatement. | Dependent Reinstatement | /bpi/cas/enrollment/reinstatement/ |
| dependent | Confirmation | dependent/DependentReinstatement |
| reinstatement | Confirm.jsp | |
| confirm | ||
3.1.1.1. SID, Element Name, Element Type & Purpose
SID: enrollment.termination.groupsearch
Screen Snap Shot (See Figure I-35)
| Element | |||
| Name | Element Type | Purpose | |
| Group Id | Entry Field | Enter Group Id | |
| Group Name | Entry Field | Enter Group Name | |
| Phone Number | Entry Field | Enter Phone Number | |
SID: enrollment.termination.groupterminationrequest
Screen Snap Shot (See Figure I-36)
| Element Name | Element Type | Purpose |
| Mode of Request | Selection Box | Entry Field for the Group Id. |
| Postmark Date | Entry Field | Entry Field for the Group Name |
| Date Received | Entry Field | Entry Field for the Date Received |
| Authorized Contact | Selection Box | Entry Field for the Authorized |
| Contact | ||
| Requested Term | Entry Field | Entry Field for the Request Term |
| Date | Date | |
| Reason for Term | Selection Box | Select the Reason for Term |
| Other Reason | Entry Field | Entry Field for the Other Reason |
SID: enrollment.termination.groupprocesstermination
Screen Snap Shot (See Figure I-37)
| Element Name | Element Type | Purpose |
| Effective Term Date | Entry Field | Entry Field for the Group Id. |
| Change Term Status | Select Box | Select Change Term Status |
SID: enrollment.termination.groupterminationconfinn
Screen Snap Shot (See Figure I-38)
SID: enrollment.termination.multiplegroupsearch
Screen Snap Shot (See Figure I-39)
| Element Name | Element Type | Purpose |
| Postmark Date | Entry Field | Entry Field for the Group Name |
| Date Received | Entry Field | Entry Field for the Date Received |
| Requested Term | Entry Field | Entry Field for the Request Term |
| Date | Date | |
| Reason for Term | Selection Box | Select the Reason for Term |
| Other Reason | Entry Field | Entry Field for the Other Reason |
SID: enrollment.termination.multiplegroupterminationconfirm
Screen Snap Shot (See Figure I-40)
SID: enrollment.termination.employeesearch
Screen Snap Shot (See Figure I-41)
| Element Name | Element Type | Purpose |
| Group Name | Entry Field | Entry Field for the Group Name. |
| Group Id | Entry Field | Entry Field for the Group ID |
| Employee First | Entry Field | Entry Field for the Employee First |
| Name | Name | |
| Employee Last | Entry Field | Entry Field for the Employee Last |
| Name | Name | |
| Employee Phone | Entry Field | Entry Field for the Employee Phone |
| Number | Number | |
| Employee SSN | Entry Field | Entry Field for the Employee SSN |
| Employee ID | Entry Field | Entry Field for the Employee ID |
SID: enrollment.termination.employeeterminationrequest
Screen Snap Shot (See Figure I-42)
| Element Name | Element Type | Purpose |
| Mode of Request | Selection Box | Entry Field for the Group Id. |
| Postmark Date | Entry Field | Entry Field for the Group Name |
| Date Received | Entry Field | Entry Field for the Date Received |
| Authorized Contact | Selection Box | Entry Field for the Authorized |
| Contact | ||
| Requested Term | Entry Field | Entry Field for the Request Term |
| Date | Date | |
| Reason for Term | Selection Box | Select the Reason for Term |
| Other Reason | Entry Field | Entry Field for the Other Reason |
SID: enrollment.termination.employeeprocesstermination
Screen Snap Shot (See Figure I-43)
| Element Name | Element Type | Purpose |
| Effective Term Date | Entry Field | Entry Field for the Group Id. |
| Change Term Status | Select Box | Select Change Term Status |
SID: enrollment.termination.employeeterminationconfirm
Screen Snap Shot (See Figure I-44)
SID: enrollment.termination.dependentsearch
Screen Snap Shot (See Figure I-45)
| Element | ||
| Element Name | Type | Purpose |
| Employee First | Entry Field | Entry Field for the Employee First Name. |
| Name | ||
| Employee Last | Entry Field | Entry Field for the Employee Last Name |
| Name | ||
| Employee SSN | Entry Field | Entry Field for the Employee SSN |
| Employee Id | Entry Field | Entry Field for the Employee Id |
| Dependent | Entry Field | Entry Field for the Dependent First Name |
| First Name | ||
| Dependent Last | Entry Field | Entry Field for the Dependent Last Name |
| Name | ||
| Dependent | Entry Field | Entry Field for the Dependent SSN |
| SSN | ||
| Dependent Id | Entry Field | Entry Field for the Dependent Id |
SID: enrollment.termination.dependentterminationrequest
Screen Snap Shot (See Figure I-46)
| Element Name | Element Type | Purpose |
| Mode of Request | Selection Box | Entry Field for the Group Id. |
| Postmark Date | Entry Field | Entry Field for the Group Name |
| Date Received | Entry Field | Entry Field for the Date Received |
| Authorized Contact | Selection Box | Entry Field for the Authorized |
| Contact | ||
| Requested Term | Entry Field | Entry Field for the Request |
| Date | Term Date | |
| Reason for Term | Selection Box | Select the Reason for Term |
| Other Reason | Entry Field | Entry Field for the Other Reason |
SID: enrollment.termination.dependentprocesstermination
Screen Snap Shot (See Figure I-47)
| Element Name | Element Type | Purpose |
| Effective Term Date | Entry Field | Entry Field for the Term Date. |
| Change Term Status | Select Box | Select Change Term Status |
SID: enrollment.termination.dependentterminationconfirm
Screen Snap Shot (See Figure I-48)
SID: enrollment.reinstatement.groupsearch
Screen Snap Shot (See Figure I-49)
| Element | |||
| Name | Element Type | Purpose | |
| Group Id | Entry Field | Enter Group Id | |
| Group Name | Entry Field | Enter Group Name | |
| Phone Number | Entry Field | Enter Phone Number | |
SID: enrollment.reinstatement.groupreinstatementrequest
Screen Snap Shot (See Figure I-50)
| Element Name | Element Type | Purpose |
| Mode of Request | Selection Box | Entry Field for the Group Id. |
| Postmark Date | Entry Field | Entry Field for the Group Name |
| Date Received | Entry Field | Entry Field for the Date Received |
| Authorized Contact | Selection Box | Entry Field for the Authorized |
| Contact | ||
| Reinstatement Date | Entry Field | Entry Field for the Request Rein |
| Requested | Date | |
| Reason for | Selection Box | Select the Reason for |
| Reinstatement | Reinstatement | |
| Other Reason | Entry Field | Entry Field for the Other Reason |
SID: enrollment.reinstatement.groupprocessreinstatement
Screen Snap Shot (See Figure I-51)
| Element Name | Element Type | Purpose | |
| Effective Date | Entry Field | Entry Field for the Date. | |
| Change Status | Select Box | Select Change Status | |
SID: enrollment.reinstatement.groupreinstatementconfirm
Screen Snap Shot (See Figure I-52)
SID: enrollment.reinstatement.employeesearch
Screen Snap Shot (See Figure I-53)
| Element | ||
| Element Name | Type | Purpose |
| Group Name | Entry Field | Entry Field for the Group Name. |
| Group Id | Entry Field | Entry Field for the Group ID |
| Employee First | Entry Field | Entry Field for the Employee First Name |
| Name | ||
| Employee Last | Entry Field | Entry Field for the Employee Last Name |
| Name | ||
| Employee | Entry Field | Entry Field for the Employee Phone |
| Phone Number | Number | |
| Employee SSN | Entry Field | Entry Field for the Employee SSN |
| Employee ID | Entry Field | Entry Field for the Employee ID |
SID: enrollment.reinstatement.employeereinstatementrequest
Screen Snap Shot (See Figure I-54)
| Element Name | Element Type | Purpose |
| Mode of Request | Selection Box | Entry Field for the Group Id. |
| Postmark Date | Entry Field | Entry Field for the Group Name |
| Date Received | Entry Field | Entry Field for the Date Received |
| Authorized Contact | Selection Box | Entry Field for the Authorized |
| Contact | ||
| Reinstatement Date | Entry Field | Entry Field for the Request ReinX |
| Requested | Number | |
| Reason for | Selection Box | Select the Reason for |
| Reinstatement | Reinstatement | |
| Other Reason | Entry Field | Entry Field for the Other Reason |
SID: enrollment.reinstatement.employeeprocessreinstatement
Screen Snap Shot (See Figure I-55)
| Element Name | Element Type | Purpose | |
| Effective Date | Entry Field | Entry Field for the Date. | |
| Change Status | Select Box | Select Change Status | |
SID: enrollment.reinstatement.employeereinstatementconfirm
Screen Snap Shot
SID: enrollment.reinstatement.dependentsearch
Screen Snap Shot (See Figure I-56)
| Element | ||
| Element Name | Type | Purpose |
| Employee First | Entry Field | Entry Field for the Employee First Name. |
| Name | ||
| Employee Last | Entry Field | Entry Field for the Employee Last Name |
| Name | ||
| Employee SSN | Entry Field | Entry Field for the Employee SSN |
| Employee Id | Entry Field | Entry Field for the Employee Id |
| Dependent | Entry Field | Entry Field for the Dependent First Name |
| First Name | ||
| Dependent Last | Entry Field | Entry Field for the Dependent Last Name |
| Name | ||
| Dependent | Entry Field | Entry Field for the Dependent SSN |
| SSN | ||
| Dependent Id | Entry Field | Entry Field for the Dependent Id |
SID: enrollment.reinstatement.dependentreinstatementrequest
Screen Snap Shot (See Figure I-57)
| Element Name | Element Type | Purpose |
| Mode of Request | Selection Box | Entry Field for the Group Id. |
| Postmark Date | Entry Field | Entry Field for the Group Name |
| Date Received | Entry Field | Entry Field for the Date Received |
| Authorized Contact | Selection Box | Entry Field for the Authorized |
| Contact | ||
| Reinstatement Date | Entry Field | Entry Field for the Request Rein |
| Requested | Date | |
| Reason for | Selection Box | Select the Reason for |
| Reinstatement | Reinstatement | |
| Other Reason | Entry Field | Entry Field for the Other Reason |
SID: enrollment.reinstatement.dependentprocessreinstatement
Screen Snap Shot (See Figure I-58)
| Element Name | Element Type | Purpose | |
| Effective Date | Entry Field | Entry Field for the Date. | |
| Change Status | Select Box | Select Change Status | |
SID: enrollment.reinstatement.dependentreinstatementconfirm
Screen Snap Shot (See Figure I-59)
3.1.2. Screen Flow (See Figure I-60)
4. Business Rule Mapping
| Activity | Rules |
| Term Process (request received from) | The person who requested the term should be the |
| designated contact person or agent assigned to | |
| that group. Other persons are not authorized to | |
| initiate the term request. | |
| Term Process (Manual) | On employer request the term process is initiated. |
| The term process should check the billing | |
| status and the balance due or refund. If the | |
| group has paid through and there is no | |
| shortage or surplus then this process should | |
| auto initiate the term process. Send letters the | |
| Group, Employee and dependent. Notify via | |
| mail to the GMS rep if the group size is less | |
| than 15 and if above 15 notify the Sales rep. | |
| If there is a shortage then send a mail to the | |
| finance and put the term status as term | |
| pending. Finance should initiate follow up for | |
| collecting the balance due and sent the term | |
| letter and payment letter. On receipt of | |
| payment term the Group. If the Payment is not | |
| received then retro terms the group. | |
| If there is refund due to the group the finance | |
| should process the refund and initiate the term | |
| there after. | |
| Note: GMS can process Term up to 30days. | |
| (LEVEL I) | |
| Term beyond 30 days-60 days can be | |
| processed only by lead (LEVEL II) | |
| Term extended beyond 60 days is based on | |
| ultimate authority to a specified user ((LEVEL III | |
| and IV) | |
| Term Process (Automated) | Automated term process is initiated if the group |
| does not pay the premium or there is shortage of | |
| premium. Term letter is sent to the group on 32 day | |
| of non-receipt of payment and the Group is given | |
| 15-day notice to repay. If the Group does not pay | |
| within 32 +15 days the finance should finalize term | |
| based on authority. | |
| General Term rules | If the group is termed then all the employees and |
| dependents for the group are termed. The COBRA | |
| Members associated with the group should also be | |
| termed. The term letter should be sent to the entire | |
| member for the Group including the COBRA group. | |
| EFT and auto credit card deductions should stop | |
| on term. | |
| Term Process | Dependent can be terminated based on various |
| reason provide for the employee termination | |
| All term should be effective end of the current | |
| month or if the term is requested for the month after | |
| the current month. | |
| Dependent cannot be termed with past date | |
| beyond 30 days. | |
| Exception: | |
| Death of the dependent. The dependent is termed | |
| the on the day of the death. | |
| Term Rules | Auto initiate Dependent terms if the age of the |
| dependent is 23 and the dependent other than | |
| spouse or domestic partner are no longer eligible. | |
| Also send the COBRA packet to the dependent if | |
| termed. | |
| Billing Adjustment | Make adjustment to the billing for the termed |
| dependent in the next billing cycle. | |
| Term Process (request received from) | The person who requested the term should be the |
| designated contact person. Other persons are not | |
| authorized to initiate the term request. | |
| Term Process (Manual) | On employer request the term process is initiated. |
| The term process should check the billing | |
| status and the balance due or refund. If the | |
| group has paid through and there is no | |
| shortage or surplus then this process should | |
| auto initiate the term process. Send letters the | |
| Group, Employee and dependent. Notify via | |
| mail to the GMS rep if the group size is less | |
| than 15 and if above 15 notify the Sales rep. | |
| If there is a shortage then send a mail to the | |
| finance and put the term status as term | |
| pending. Finance should initiate follow up for | |
| collecting the balance due and sent the term | |
| letter and payment letter. On receipt of | |
| payment term the Group. If the Payment is not | |
| received then retro terms the group. | |
| If there is refund due to the group the finance | |
| should process the refund and initiate the term | |
| there after. | |
| Note: GMS can process Term up to 30days. | |
| (LEVEL I) | |
| Term beyond 30 days-60 days can be | |
| processed only by lead (LEVEL II) | |
| Term extended beyond 60 days is based on | |
| ultimate authority to a specified user (LEVEL III | |
| and IV) | |
| Term Process (Automated) | Automated term process is initiated if the group |
| does not pay the premium or there is shortage of | |
| premium. Term letter is sent to the group on 32 day | |
| of non-receipt of payment and the Group is given | |
| 15-day notice to repay. If the Group does not pay | |
| within 32 +15 days the finance should finalize term | |
| based on authority. | |
| General Term rules | If the group is termed then all the employees and |
| dependents for the group are termed. The COBRA | |
| Members associated with the group should also be | |
| termed. The term letter should be sent to the entire | |
| member for the Group including the COBRA group. | |
| EFT and auto credit card deductions should stop | |
| on term. | |
| Term Process | This is to complete the term process where the |
| term status was term pend. All auto initiated term | |
| process has the term status as term pend. It | |
| requires user intervention to complete the term | |
| process based on authority. | |
| Term Process | Employee can be terminated based on various |
| reason provide for the employee termination | |
| All term should be effective end of the current | |
| month or if the term is requested for the month after | |
| the current month. | |
| Employee cannot be termed with past date beyond | |
| 30 days. | |
| Exception: | |
| Death of the employee. The employee is termed | |
| the on the day of the death. | |
| Process Associated with term | All employee terms should send term letter to the |
| employee and group. The employee can opt for | |
| COBRA and hence the COBRE enrollment packet | |
| should be sent to the employee | |
| Billing Adjustment | There should be billing adjustment in the |
| subsequent bill for the termed employee. | |
| Term Process | Dependent can be terminated based on various |
| reason provide for the employee termination | |
| All term should be effective end of the current | |
| month or if the term is requested for the month after | |
| the current month. | |
| Dependent cannot be termed with past date | |
| beyond 30 days. | |
| Exception: | |
| Death of the dependent. The dependent is termed | |
| the on the day of the death. | |
| Term Rules | Auto initiate Dependent terms if the age of the |
| dependent is 23 and the dependent other than | |
| spouse or domestic partner are no longer eligible. | |
| Also send the COBRA packet to the dependent if | |
| termed. | |
| Billing Adjustment | Make adjustment to the billing for the termed |
| dependent in the next billing cycle. | |
| Reinstatement Process | The person who requested the reinstatement |
| should be the designated contact person. Other | |
| persons are not authorized to initiate the | |
| reinstatement request. | |
| If reinstatement cannot happen then send the | |
| denial letter. | |
| If reinstated notify finance | |
| System should calculate the reinstatement fees. | |
| Finance will reinstate on receipt of payment. | |
| Note When the group is reinstated all the members | |
| associated with the group are also reinstated. | |
| Including COBRA group. | |
| GMS can reinstate within 30 days. Any period | |
| above this needs authorization. | |
| Reinstatement Process | The person who requested the reinstatement |
| should be the designated contact person. Other | |
| persons are not authorized to initiate the | |
| reinstatement request. | |
| If reinstatement cannot happen then send the | |
| denial letter. | |
| Note When the Employee is reinstated all the | |
| dependents of the Employee are also reinstated. | |
| Reinstatement Process | The person who requested the reinstatement |
| should be the designated contact person. Other | |
| persons are not authorized to initiate the | |
| reinstatement request. | |
| If reinstatement cannot happen then send the | |
| denial letter. | |
| If reinstated notify finance for reinstatement fees | |
| calculation if applicable. | |
5. User Role
The respective level user can terminate or reinstate the dependent, employee or group based on the criteria mention in the following table. The following validations are done with respect to the current date.
| S.No., | User Role | Condition |
| Dependent Termination |
| 1 | Level I | Termination date is with in 30 days prior or later |
| 2 | Level II | Termination date is with in 60 days prior or later |
| 3 | Level III, | Termination date is with in 90 days prior or later |
| Level IV |
| Employee Termination |
| 1 | Level I | Termination date is with in 30 days prior or later |
| 2 | Level II | Termination date is with in 60 days prior or later |
| 3 | Level III, | Termination date is with in 90 days prior or later |
| Level IV |
| Group Termination |
| 1 | Level I | Termination date is with in 30 days prior or later |
| 2 | Level II | Termination date is with in 60 days prior or later |
| 3 | Level III, | Termination date is with in 90 days prior or later |
| Level IV |
| Dependent Reinstatement |
| 1 | Level I | Reinstatement date is with in 30 days prior or later |
| 2 | Level II | Reinstatement date is with in 60 days prior or later |
| 3 | Level III, | Reinstatement date is with in 90 days prior or later |
| Level IV |
| Employee Reinstatement |
| 1 | Level I | Reinstatement date is with in 30 days prior or later |
| 2 | Level II | Reinstatement date is with in 60 days prior or later |
| 3 | Level III, | Reinstatement date is with in 90 days prior or later |
| Level IV |
| Group Reinstatement |
| 1 | Level I | Reinstatement date is with in 30 days prior or later |
| 2 | Level II | Reinstatement date is with in 60 days prior or later |
| 3 | Level III, | Reinstatement date is with in 90 days prior or later |
| Level IV | ||
1.3. Definitions, Acronyms & Abbreviations
| Term | Explanation | |
| BPI_CAS_FSD_EN | Functional Specification Document- | |
| Enrollment | ||
| BPI_CAS_FSD_EN_001 | Process Specification - New Business | |
| Enrollment | ||
| BPI_CAS_FSD_EN_002 | Process Specification - Enrollment | |
| Changes/Add-On | ||
| BPI_CAS_FSD_EN_003 | Process Specification - COBRA | |
| Enrollment/Changes | ||
| BPI_CAS_FSD_EN_004 | Process Specification - ROE/OE | |
| BPI_CAS_FSD_EN_005 | Process Specification - Termination/ | |
| Reinstatement | ||
2. Process Identification
2.1. Background
Any process or transaction that is performed by PacAdvantage is subject to a review process. The rule for such is defined in the PacAdvantage handbook. There are cases when the Customer is not satisfied with some of the decisions made during the administration of the program. When a customer is not satisfied with the decision made they can submit a request for Program Review. Once a decision has been made to grant or deny the request, an Appeal can then be submitted to overturn the decision of the Program Review. Not all decisions are appealable. In any case, all grievances need to be sent to PacAdvantage-Roseville, along with other certain requirements, for making a decision whether to consider the Grievances or to reject them as the case may be.
PacAdvantage-Roseville makes the decision on the initial requests or “Program Reviews” and forwards the response to the customer. Upon receipt of a second request or “Appeal”, if the decision is appealable, Pac Advantage-Roseville forwards the information to PacAdvantage-SF to make a ruling. (If the decision is not appealable, PacAdvantage-Roseville sends a letter regarding such to the customer.) PacAdvantage-SF then returns a ruling and PacAdvantage-Roseville forwards the response to the customer.
This entire process needs to be captured and tracked by the system.
Any transaction within the system has a history. The personnel handling the grievance need to review the history and generate a report regarding the grievance for review.
2.2. Process Description
The objective of the Grievance process is to:
-
- 1) Maintain a status for all Grievances received from the customer and follow up with the decision made either by PacAdvantage-Roseville or PacAdvantage-SF.
The following are the other requirements that will be supported and constraints on the proposed system:
-
- 1) The system would track the initial request from open to close.
- 2) The system would track subsequent requests, if a proper appeal, from re-open to close.
- 3) Track subsequent requests, if not a proper appeal, for receive dates, remarks and any correspondence.
- 4) The system would also have a history of all the transactions to get the report for the Nature of Grievance.
2.3. Process Flow
Process for Grievances—first request (or “Program Review”)
-
- 1) Receive the Grievance from Group and/or Member and/or Agent representing the Group and/or Member.
- 2) Categorize the nature of the Grievance.
- 3) Review the history and collect all the relevant documents for the Grievance.
- 4) Make decision to approve/deny the Grievance.
- 5) Close the Grievance.
- 6) Send relevant letters.
- 7) If the Grievance is in favor of the group or the employee, send notification to Finance and or GMS to take necessary action (Reinstate the Group/Member).
Process for Grievances—second request (or “Appeal”)
-
- 1) Receive the Grievance from the Group and/or Member and/or Agent representing the Group and/or Member.
- 2) Categorize the nature of the Grievance.
- 3) Review the history and collect all the relevant documents for the Grievance.
- 4) Forward the document with relevant information to PacAdvantage-SF.
- 5) Follow up with PacAdvantage-SF regarding the decision on the Grievance.
- 6) On receiving the decision convey the decision to the Group and or employee.
- 7) Close the Grievance.
- 8) Send relevant letters.
- 9) If the Grievance is in favor of the group or the employee send notification to Finance and or GMS to take necessary action (Reinstate the Group/Member).
3. User Interface
3.1. User Interface Screens
3.1.1. Screen ID's
| Corresponding | ||
| Screen ID (SID) | Screen Name | HTML File Name |
| bpi.enrollment.grievance.appellant | Grievance Search | grievancesearch |
| search | ||
| bpi.enrollment.grievance.grievance | Grievance Create | Grievancecreate |
| create | ||
| bpi.enrollment.grievance.grievance | Grievance Modify | Grievancemodify |
| modify | ||
| bpi.enrollment.grievance.grievance | Grievance Close | Grievanceclose |
| close | ||
3.1.1.1. SID, Element Name, Element Type & Purpose
SID: bpi.enrollment.grievance.appelantsearch (See Figure I-61)
Element Name
| Element | |||
| Name | Element Type | Label | Purpose |
| Complainant | Text | Complainant Type | To display text |
| Type | |||
| appellantType | Radio button | Complainant Type | To select the type “Group” or |
| “Member” | |||
| Complainant | Text | Complainant ID | To display text |
| ID | |||
| appellantId | Text Field | Complainant ID | To enter complainant id |
| Company | Text | Company Name | To display text |
| Name | |||
| companyName | Text Field | Company Name | To enter company name |
| First Name | Text | First Name | To display text |
| firstName | Text Field | First Name | To enter first name |
| Last Name | Text | Last Name | To display text |
| lastName | Text Field | Last Name | To enter last name |
| SSN | Text Field | SSN/Tax ID | To enter SSN or Tax ID |
| Phone | Text | Phone Number | To display text |
| Number | |||
| phoneNumber | Text Field | Phone Number | To enter phone number |
| search | HTML button | Search | To perform Search operation |
| cancel | HTML button | Cancel | To reset the all search fields |
| Search Table | HTML Table | To list the Complainant ID, Company | |
| Name, First Name, Last Name and | |||
| Phone number is displayed on the | |||
| screen | |||
3.1.1.2. SID, Element Name, Element Type & Purpose
SID: bpi.enrollment.grievance.grievancecreate (See Figure I-62)
| Element | |||
| Name | Element Type | Label | Purpose |
| Complainant | Text | Complainant Type | To display text |
| Type | |||
| Complainant | Text | Complainant Type | To display complainant type |
| Type | dynamically | ||
| Complainant | Text | Complainant ID | To display text |
| ID | |||
| Complainant | Text | Complainant ID | To display complainant type |
| ID | dynamically | ||
| Group | HTML Table | Group Information | To display company name, contact |
| Information | name, address, phone, effective date, | ||
| ROE date, status | |||
| Postmark | Text | Postmark Date | To display text |
| Date | |||
| postMarkDate | Calendar | Postmark Date | To enter the postmark date |
| Received date | Text | Received date | To display text |
| receivedDate | Calendar | Received date | To enter the received date |
| Nature Of | Text | Nature of Grievance | To display text |
| Grievance | |||
| natureOfGrievance | List | Nature of Grievance | To list the Nature of Grievance. |
| Upon selection of the Nature of | |||
| Grievance, the corresponding | |||
| Grievance Type is displayed on the | |||
| screen | |||
| Subject of | Text | Subject of Grievance | To display text |
| Grievance | |||
| subjectOfGrievance | List | Subject of Grievance | To list the Subject of Grievance for |
| selection | |||
| Urgent | Text | Urgent | To display text |
| urgent | Checkbox | Urgent | To select the option of having |
| urgent. | |||
| Remarks | Text | Remarks | To display text |
| remarks | Text Area | Remarks | To enter remarks larger area is |
| provided | |||
| save | HTML button | Save | Submit the data and save in the |
| database | |||
| cancel | HTML button | Cancel | To reset to previous status as was on |
| loading the page | |||
Screen Validations
| Element Name | Action/Validation Details | Message |
| Postmark Date | Should default to system date. | Error Dialog Box: |
| Postmark date can never be a future | “Please choose the correct date. Postmark | |
| date and can be one day older than | date can be a future date.” | |
| current date only. | ||
| Received date | Should default to system date. | Error Dialog Box: |
| Received date can never be a future | “Please choose the correct date. Received | |
| date and should be equal to OR | date can be a future date.” | |
| greater than current date. | ||
| Nature of | Default Option should be - Choose | Error Dialog Box: |
| Grievance | One- Should list all the types of | “Please choose the nature of grievance. |
| Natures of Grievances | ||
| Subject of | Default Option should be - Choose | Error Dialog Box: |
| Grievance | One- Should list all the types of | “Please choose the subject of grievance. |
| subject of Grievances | ||
| Remarks | Entry Text Area to enter the remarks | None |
| for the Grievance. The text area | ||
| should have scrollbar if the content | ||
| within the text area grows. | ||
| Save | Should function On clicking the | Error Dialog Box: |
| Save Button or pressing the Enter | “The value entered for ‘field name’ is | |
| key with cursor on the “Save | incorrect. Please enter the correct value.” | |
| Button” | Note: The “field name” name should be | |
| Save the data to the repository with | dynamically picked based on the name of | |
| the status of the Grievance as open. | the field for which the error has occurred. | |
| Auto generate the grievance ID | ||
| Cancel | Should reset to the status as was on | None |
| loading the page on clicking the | ||
| cancel button | ||
3.1.1.3. SID, Element Name, Element Type & Purpose
bpi.enrollment.grievance.grievancemodify (See Figure I-63)
| Element | |||
| Name | Element Type | Label | Purpose |
| Search by | Text | Search by Complainant | To display text |
| Complainant | |||
| searchType | Radio button | Search by Complainant | To select the option of search |
| Search by | Text | Search by Grievance | To display text |
| Grievance | |||
| searchType | Radio button | Search by Grievance | To select the option of search |
| Grievance ID | Text | Grievance ID | To display text |
| grievanceID | Read only field | Grievance ID | To display Grievance ID. Ability to |
| search for open Grievances | |||
| Complainant | Text | Complainant ID | To display text |
| ID | |||
| appellantId | Entry Field | Complainant ID | To enter complainant ID. Ability to |
| search for open Grievances for the | |||
| specific complainant. | |||
| search | Button | Search | To search for the Grievance ID or the |
| Complainant ID (group or member | |||
| id) with open grievances | |||
| Grievance | HTML Table | Grievance Process Table | List the grievances based on the |
| Process Table | search criteria. | ||
| Process | HTML Button | Process | To show the grievance selected for |
| further processing | |||
| Grievance | HTML Table | Grievance | Table to display Postmark Date, |
| Received Date, Nature of Grievance, | |||
| Subject of Grievance, Appellant | |||
| Type, Appellant ID, Grievance | |||
| Status, Remarks. | |||
| Additional | Text | Additional Remarks | To display text |
| Remarks | |||
| additionalRemarks | Entry Field | Additional Remarks | To enter text |
| Forward for | Text | Forward for Approval | To display text |
| Approval | |||
| forwardForApproval | Check box | Forward for Approval | To check if forwarding for approval |
| Forward to | Text | Forward to | To display text |
| forwardedTo | Entry Field | Forward to | If “Forward for Approval” is |
| checked then this field must be | |||
| completed. To enter the name of the | |||
| person to whom the Grievance is to | |||
| be forwarded | |||
| Forward Date | Text | Forward Date | To display text |
| forwardDate | Calendar | Forward Date | If “Forward for Approval” is |
| checked then this field must be | |||
| completed. Enter the forward date | |||
| Batch Date | Text | Batch Date | To display text |
| batchDate | Calendar | Batch Date | To enter batch date |
| save | HTML button | Save | Save the data and save in the |
| database | |||
| cancel | HTML button | Cancel | To reset to previous status as was on |
| loading the page | |||
Screen Validations
| Element Name | Action/Validation Details | Message |
| Grievance | Entry field to enter grievance ID and | Error Message: |
| on tab should populate the Grievance | “The grievance ID not available” | |
| based on the Grievance id | ||
| Complainant | Entry fields to enter Complainant ID | Error Message: |
| and on tab should populate all the | “Complainant ID not available” | |
| Grievances for the specific appellant. | ||
| Search | Search for the Grievance ID or | None |
| Appellant ID | ||
| Grievance Process | The table gets populated based on | None |
| Table | the search criteria. For Grievance ID | |
| the table shows only one grievance. | ||
| For Appellant search the table shows | ||
| all the grievances for the specific | ||
| Appellant. | ||
| Process | Process the specific Row in the table | NONE |
| selected | ||
| Grievance | Table to display Postmark Date, | None |
| Received Date, Nature of Grievance, | ||
| Subject of Grievance, Appellant | ||
| Type, Appellant ID, Grievance | ||
| Status, Remarks. | ||
| Additional | Entry field for additional remarks | None |
| Remarks | ||
| Forward for | Check box to check if forward or | None |
| Approval | not. | |
| Forward To | If “Forward for Approval” is | Error Dialog Box: |
| checked then this field must be | “Please Enter the Forwarded to persons | |
| completed. To enter the name of the | name” | |
| person to whom the Grievance is to | ||
| be forwarded | ||
| Forward Date | Allow entering the date or picking | Error Dialog Box: |
| up from the calendar | “Please Enter the Forwarded Date” | |
| If “Forward for Approval” is | ||
| checked then this field must be | ||
| completed. Enter the forward date | ||
| Batch Date | Allow entering the batch date or | None |
| picking up from the calendar | ||
| Save | Should function On clicking the | Error Dialog Box: |
| Save Button or pressing the Enter | “The value entered for ‘field name’ is | |
| key with cursor on the “Save | incorrect. Please enter the correct value.” | |
| Button” | Note: The “field name” name should be | |
| Save the data on clicking the save | dynamically picked based on the name of | |
| button. | the field for which the error has occurred. | |
| Cancel | Reset to the state as was on loading | None |
| the page | ||
3.1.1.4. SID, Element Name, Element Type & Purpose
SID: bpi.enrollment.grievance.grievanceclose (See Figure I-64)
| Element | |||
| Name | Element Type | Label | Purpose |
| Search by | Text | Search by Complainant | To display text |
| Complainant | |||
| searchType | Radio button | Search by Complainant | To select the option of search |
| Search by | Text | Search by Grievance | To display text |
| Grievance | |||
| searchType | Radio button | Search by Grievance | To select the option of search |
| Grievance ID | Text | Grievance ID | To display text |
| grievanceID | Entry Field | Grievance ID | To enter Grievance ID. Ability to |
| search for open Grievances | |||
| Complainant | Text | To display text | |
| ID | |||
| complainant | Text Field | Complainant ID | To display Complainant ID. Ability |
| ID | to search for open Grievances for the | ||
| specific complainant | |||
| search | Button | Search | To search for the Grievance ID or the |
| Complainant ID(group or member | |||
| id) with open grievances | |||
| Grievance | HTML Table | Grievance Close Table | List the grievances based on the |
| Close Table | search criteria. | ||
| Grievance | HTML Table | Grievance Table | Table to display Postmark Date, |
| Table | Received Date, Nature of Grievance, | ||
| Subject of Grievance, Appellant | |||
| Type, Appellant ID, Grievance | |||
| Status, Remarks. | |||
| Conclusion | Text | Conclusion | To display text |
| conclusion | List | Conclusion | List the conclusion of appeal as |
| Approved, Denied, or Cancelled | |||
| Reason | Text | Reason | To display text |
| reason | List | Reason | List the Reason for the conclusion |
| otherReason | Entry Field | Other Reason | To enter reason not included in |
| Reason List | |||
| Batch Date | Text | Batch Date | To display text |
| batchDate | Calendar | Batch Date | To enter batch date |
| Save | HTML button | Save | Submit the data and save in the |
| database | |||
Screen Validations
| Element Name | Action/Validation Details | Message |
| Grievance | Entry field to enter grievance ID. | Error Message: |
| “Grievance ID is required” | ||
| Complainant | Entry fields to enter Complainant ID. | Error Message: |
| “Complainant ID is required” | ||
| Search | Search for the Grievance ID or | None |
| Appellant ID | ||
| Grievance Close | The table gets populated based on | None |
| Table | the search criteria. For Grievance ID | |
| the table shows only one grievance. | ||
| For Appellant search the table shows | ||
| all the grievances for the specific | ||
| Appellant. | ||
| Close | Process the specific Row in the table | NONE |
| selected | ||
| Conclusion | Default option should be - choose | None |
| one- . List the conclusions for | ||
| closing the grievance as Approved, | ||
| Denied or cancelled | ||
| Reason | Default option should be - choose | None |
| one- . List the reasons applicable | ||
| Other Reason | If the reason selected is others the | None |
| enter the other reason | ||
| Batch Date | Allow entering the batch date or | None |
| picking up from the calendar | ||
| Submit | Should function On clicking the | Error Dialog Box: |
| Submit Button or pressing the Enter | “The value entered for ‘field name’ is | |
| key with cursor on the “Submit | incorrect. Please enter the correct value.” | |
| Button” | Note: The “field name” name should be | |
| Save the data on clicking the submit | dynamically picked based on the name of | |
| button. | the field for which the error has occurred. | |
3.1.2. Screen Flow
(See Figure I-65)
4. Business Rule Mapping
| Activity | Rules |
| Appeals and grievance | Appeals and grievance is the screen that needs to |
| be handled by personnel skilled with the | |
| operations of the PacAdvantage and the | |
| governing rules. All appeals are entered and | |
| followed up for the outcome of the appeals. The | |
| turn around time for the appeals should be 3 days | |
| at the BPI office for entering the record and | |
| gathering the reports and summarizing the history. | |
| Change Record |
| Date | Author | Version | Change Reference | |
| Jan. 23, 2001 | Sudhakar k | 1.0 | Baseline Release | |
| Reviewers |
| Name | Position | |
| Distribution |
| No Of | ||||
| Copy No. | Name | Copies | Location | |
1. Introduction 4
1.1. Purpose 4
1.2. Business Use Case Specification Reference 4
1.3. Definitions, Acronyms & Abbreviations 4
2. Process Identification 5
2.1. Background 5
2.2. Process Description 5
2.3. Process Flow 5
3. User Interface 7
3.1. User Interface Screens 7
3.1.1. Screen ID's 7
3.1.2. Screen Flow 17
4. Business Rule Mapping 15
1. Introduction
1.1. Purpose
The purpose of this document is to describe the process of Association Master. This document identifies how the user interacts with the system, the data to be captured, the business logic to be implemented, and the output of the process.
1.2. Business Use Case Specification Reference
| Business Use Specification ID | Business Use Case Name |
| BPI_SCOPE_EN | Enrollment |
| SCOPE_ADD | Addendum to the Scope Document |
| BPI_SCOPE_EN_01 | Business Use case specification - |
| Group Enrollment | |
| BPI_SCOPE_EN_03 | Business Use case specification - |
| Create Individual | |
| Association | |
1.3. Definitions, Acronyms & Abbreviations
| Term | Explanation | |
2. Process Identification
2.1. Background
Associations are basically a body of groups/members representing certain types of associations within the State of California. Association Groups and Association Members can participate in the PacAdvantage program similar to small employer groups or members. Associations are classified as Guaranteed, Endorsed, PEO's or Chambers. Each of the associations classified have specific business rules when participating in PacAdvantage program. This document identifies the rules and business governing the association groups and members.
2.2. Process Description
The objective of the Association Master is to:
-
- 1) Create a master record for the association based on the classification of the association and specify the business rules associated with these classifications.
- 2) The master record for association includes
- General information about the association
- Contact information
- Coverage Information
- Agent information
- Other information like internal work group, membership status etc.
2.3. Process Flow
Process for Association Master
Create, modify or inactivate an association master is the basic operations that can be performed on the association master.
-
- 1) Enter general information about the association. The general information includes
- Association Type
- Association Name
- Affiliation ID
- Address
- Suite
- City
- State
- ZIP
- 2) Enter contact information. The contact information includes
- Salutation
- First Name
- Middle Initial
- Last Name
- Suffix
- Contact Phone
- Contact Fax
- Email Address
- 3) Enter coverage information. Coverage information includes
- Line of coverage offered
- Domestic Partner Coverage
- Rate Type
- Admin Fees Type (Note: This are captured in Carrier Maintenance Module (Rate Classification)
- Agent Fees Type (Note: This are captured in Carrier Maintenance Module (Rate Classification)
- Additional Fees type (Note: This are captured in Carrier Maintenance Module (Rate Classification)
- 4) Enter other information. Other information includes
- Internal Work group
- Membership status
- Contract Date
- Association re qualification period
- Special Handling
- 1) Enter general information about the association. The general information includes
3. User Interface
3.1. User Interface Screens
3.1.1. Screen ID's
| Screen ID | Corresponding HTML File | |
| (SID) | Screen Name | Name |
| enrollment.association. | Association | /bpi/cas/enrollment/association/ |
| association | General Info | associationgeneral/Association |
| general | GeneralInfo.jsp | |
| enrollment.association. | Association | /bpi/cas/enrollment/association/ |
| association | Coverage Info | associationcoverage/Association |
| coverage | CoverageInfo.jsp | |
| enrollment.association. | Association | /bpi/cas/enrollment/association/ |
| association | Other Info | associationother/Association |
| other | OtherInfo.jsp | |
| enrollment.association. | Association | /bpi/cas/enrollment/association/ |
| association | Confirmation | associationconfirm/Association |
| confirm | Confirm.jsp | |
| enrollment.association. | Internal | /bpi/cas/enrollment/association/ |
| internal | WorkGroup | internalworkgroupsearch/Internal |
| workgroupsearch | Search | WorkGroupSearch.jsp |
| enrollment.association. | Association | /bpi/cas/enrollment/association/ |
| association | Search | associationgeneral/Association |
| generalsearch | GeneralSearch.jsp | |
3.1.1.1. SID, Element Name, Element Type & Purpose
SID: enrollment.association.associationgeneral
Screen Snap Shot (See Figure I-66)
| Element | ||
| Name | Element Type | Purpose |
| General | Header Text | To provide content for header |
| Information | ||
| Association | Text | To provide text |
| name | ||
| Association | Entry Field | Enter association name |
| name | ||
| Search | HTML Button | To show pop up window |
| to search for the | ||
| association name | ||
| for editing the data. | ||
| Association | Text | To provide text |
| Type | ||
| Association | Drop Down List | List the types of |
| Type | association to select from | |
| Address | Sub Header | To provide content |
| Information | for sub header | |
| Address | Text | To provide text |
| Address | Entry field | Enter the address |
| Suite | Text | To provide text |
| Suite | Entry field | Enter the suite number |
| City | Text | To provide text |
| City | Entry field | Enter the city name |
| State | Text | To provide text |
| State | Drop Down List | List the states in USA for selection |
| ZIP | Text | To provide text |
| ZIP | Entry field | Enter the ZIP code |
| Contact | Sub Header for | Text for sub header content |
| Information | contact information | |
| Salutation | Text | To provide text |
| Salutation | Drop Down List | Select the salutation |
| First Name | Text | To provide text |
| First name | Entry field | Enter first name |
| MI | Text | To provide text |
| MI | Entry field | Enter Middle initial |
| Last name | Text | To provide text |
| Last name | Entry field | Enter last name |
| Suffix | Text | To provide text |
| Suffix | Drop down List | To select the suffix |
| Phone | Text | To provide text |
| Phone | Entry field | Enter phone number |
| Extension | Text | To provide text |
| Extension | Entry field | Enter extension number |
| FAX | Text | To provide text |
| Fax | Entry Field | Enter the Fax number |
| Text | To provide text | |
| Entry field | Enter the email address | |
| Continue | HTML Button | Save and continue to the next screen |
| BPI_CAS_SCR_EN_007_002 | ||
| Cancel | Reset Button | Reset to the status as |
| was on loading the page | ||
SID: enrollment.association.associationcoverage
Screen Snap Shot (See Figure I-67)
| Element | ||
| Name | Element Type | Purpose |
| Coverage | Header Text | To provide header for Coverage |
| Information | ||
| Line of | Text | To provide text |
| coverage | ||
| Line of | Check boxes | Check boxes to select |
| Coverage | multiple line of coverage offered | |
| Domestic | Text | To provide text |
| Partner | ||
| Coverage | ||
| Domestic | Radio Boxes | To choose yes or no for |
| Partner | domestic partner coverage | |
| Coverage | ||
| Coverage Rate | Text | To provide text |
| Type | ||
| Coverage Rate | Radio Boxes | To choose if the rate type is |
| type | blended or non blended | |
| Continue | HTML Button | Submit button to save the data |
| entered in to the repository | ||
| and navigate to the next screen | ||
| BPI_CAS_SCR_EN_007_003 | ||
| Cancel | HTML reset Button | To reset to the status as |
| was on loading the page. | ||
SID: enrollment.association.associationother
Screen Snap Shot (See Figure I-68)
| Element | ||
| Name | Element Type | Purpose |
| Other | Header text | To provide text for the header |
| Information | ||
| Internal work | Text | To provide text |
| group | ||
| Internal work | Entry field | Enter the work group ID |
| group | ||
| Search | HTML Button | Button to search for the |
| work group to be | ||
| attached to the association | ||
| Membership | Text | To provide text |
| status | ||
| Membership | Drop down list | List the membership status as |
| status | active, closed or frozen | |
| Contract Date | Entry field (Calendar) | To enter or pick up the |
| association's effective date | ||
| Association re | Entry field (Calendar) | To enter or pick up the |
| qualification | association's re | |
| period | qualification date | |
| Batch billing | Text | To provide text |
| Batch billing | Radio box | To specify if the association |
| groups and members | ||
| are to billed as one batch | ||
| Desired | Text | To provide text |
| Association | ||
| name on the | ||
| bill | ||
| Desired | Radio Box | To specify if the Association |
| Association | name should be on the bill or not | |
| name on the | ||
| bill | ||
| Continue | HTML Button | Button to save the |
| information on this page | ||
| Clear | HTML reset Button | To reset to the status |
| as was on loading the page. | ||
SID: enrollment.association.associationconfirm
Screen Snap Shot (See Figure I-69)
SID: enrollment.association.internalworkgroupsearch
Screen Snap Shot (See FIG. 70)
SID: enrollment.association.associationgeneralsearch
Screen Snap Shot (See Figure I-71)
3.1.2. Screen Flow
(See Figure I-72)
4. Business Rule Mapping
| Activity | Rules |
| Allow | Are eligible to enroll at any time and follow business |
| Employer | rules for Non-Association Small Employer Groups 2-50. |
| Groups 2-50 | This rules applies for Guaranteed, Endorsed, PEO's and |
| Chambers | |
| Allow | Must have a membership number and apply after 60 |
| Individual | days (read as waiting period), but within 120 days, of |
| Members | becoming a member of the Association or of a group |
| sponsored for coverage. Effective date of coverage will | |
| be within 45 days of receipt of a completed application. | |
| Declines must wait until Open Enrollment. Waives may | |
| enroll within 30 days of losing other employer- | |
| sponsored coverage. The Individual Association | |
| member is required to enroll in all lines of coverage | |
| offered by the Association Master. The Individual | |
| Association member is not eligible for COBRA. | |
| This is applicable only to Guaranteed association | |
| Allow | Are eligible to enroll at any time and follow business |
| Employer | rules for Small Employer Groups 2-50 EXCEPT for the |
| Groups >100 | size of the group for Guaranteed association (Group size |
| can be un limited for guaranteed association) | |
| Rates | Rate for each association for various rate classification |
| are defined in the carrier maintenance module. (Admin | |
| Fees, Agent Commission, Additional Fees and Rate | |
| differential) | |
| Agent | All associations have an Agency and/or Agent(s). |
| Commissions are applicable to both Group's and | |
| Association Member's. For both, the agent is attached at | |
| the Group/Association member, but can only be chosen | |
| from the particular agents attached to the association. | |
| Agent is selected based on the internal work group | |
| assigned to the agent/agency. | |
| Screen Rules | Small employer group after identifying the association |
| for Group | would follow the same navigation as applicable for the |
| Small employer group. The Group Affiliated to an | |
| association should also have the Membership Number | |
| and the date of membership. | |
| Screen Rules | Individual association would follow the same navigation |
| for Individual | as applicable to the employee after selecting the |
| Association | association and validating that the association is |
| members | guaranteed. The only additional things needed are a |
| “Membership Number” and a “Date of Membership”. | |
| Essentially the “Date of Membership” replaces the | |
| employee “Date of Hire” for an employee. | |
| Change Record |
| Date | Author | Version | Change Reference | |
| Dec. 18, 2001 | Sudhakar k | 1.0 | Baseline Release | |
| Jan. 30, 2002 | Sudhakar | 1.0 Rev1 | Revision | |
| Reviewers |
| Name | Position | |
| Distribution |
| No Of | ||||
| Copy No. | Name | Copies | Location | |
1. Introduction 4
1.1. Purpose 4
1.2. Business Use Case Specification Reference 4
1.3. Definitions, Acronyms & Abbreviations 4
2. Process Identification 5
2.1. Background 5
2.2. Process Description 5
2.3. Process Flow 5
Process for Carrier Issues 5
3. User Interface 6
3.1. User Interface Screens 6
3.1.1. Screen ID's 6
Screen Validations 14
3.1.2. Screen Flow 16
4. Business Rule Mapping 17
1. Introduction
1.1. Purpose
The purpose of this document is to describe the process of Carrier Issues. This document identifies how the user interacts with the system, the data to be captured, the business logic to be implemented, and the output of the process.
1.2. Business Use Case Specification Reference
| Business Use Specification ID | Business Use Case Name |
| BPI_SCOPE_EN | Enrollment |
| SCOPE_ADD | Addendum to the Scope Document |
1.3. Definitions, Acronyms & Abbreviations
| Term | Explanation | |
| BPI_CAS_FSD_EN | Functional Specification | |
| Document - Enrollment | ||
| BPI_CAS_FSD_EN_001 | Process Specification - | |
| New Business Enrollment | ||
| BPI_CAS_FSD_EN_002 | Process Specification - | |
| Enrollment Changes/Add-On | ||
| BPI_CAS_FSD_EN_003 | Process Specification - | |
| COBRA Enrollment/Changes | ||
| BPI_CAS_FSD_EN_004 | Process Specification - | |
| ROE/OE | ||
| BPI_CAS_FSD_EN_005 | Process Specification - | |
| Termination/Reinstatement | ||
2. Process Identification
2.1. Background
Various issues can arise for a member or group once enrolled with a carrier through PacAdvantage. These issues can vary from not receiving identification cards to incomplete transmission upload by the carrier. As PacAdvantage becomes aware of these issues it is their responsibility to resolve the issue in a timely manner acting as a liaison between the member and the carrier. All issues need to be tracked from start to finish by reason for issue and related carrier for reporting on performance standards as well providing information to PacAdvantage-SF regarding recurring issues within a carrier.
Issues can arise at the Group level, for all members on a group and/or all members on a line of coverage. Issues can also arise at the Employee level and/or Dependent level, by member and/or by plan.
Within PacAdvantage there are personnel who specifically handle all carrier related issues. Other representatives within PacAdvantage can receive the initial request, document it as needed and forward it to the Carrier Issue personnel. The Carrier Issue personnel contact the carrier to resolve the issue. They mark the documentation as needed and then close the issue and forward the resolutions back to the initial requester (Originator). The Originator informs the member/group of resolution.
2.2. Process Description
The objective of the Carrier Issues process is to:
-
- 1) Maintain a status for all Carrier Issues received from the customer and follow up with the carrier for resolution and inform the customer of resolution.
The following are the other requirements that will be supported and constraints on the proposed system:
-
- 1) The system would track the initial request from open to close.
- 2) The system would track both the reported issue and the actual issue.
- 3) The system would track the final resolution.
- 4) The system would also have a history of all the transactions to get the report for the Reported Issue.
2.3. Process Flow
Process for Carrier Issues
-
- 1) Representative is notified of the issue by the customer and cannot resolve the issue alone.
- 2) Representative initiates a request either from the Group level, Employee level, or Dependent level.
- 3) The representative categorizes the reported issue and provides any supporting documentation.
- 4) The issue is marked as “Open” for the Carrier Issue personnel to handle.
- 5) The Carrier Issue personnel contact the carrier.
- 6) The Carrier Issue personnel provide the carrier with necessary information to resolve the issue. (i.e. re-transmission, e-mail of information)
- 7) The Carrier Issue personnel mark the issue as “Closed” and inform the Originator.
- 8) The originator follows-up with the member.
3. User Interface
3.1. User Interface Screens
3.1.1. Screen ID's
<List SID and the screen name and Corresponding HTML file for the screen.
| Corresponding | ||
| Screen ID (SID) | Screen Name | HTML File Name |
| bpi.enrollment.carrierissue.carrier | Carrier Issue | carrierissuesearch |
| issuesearch | Search | |
| bpi.enrollment.carrierissue.carrier | Carrier Issue | carrierissuecreate |
| issuecreate | Create | |
| bpi.enrollment.carrierissue.carrier | Carrier Issue | carrierissuemodify |
| issuemodify | Modify | |
| bpi.enrollment.carrierissue.carrier | Carrier Issue | carrierissueclose |
| issueclose | Close | |
3.1.1.1. SID, Element Name, Element Type & Purpose
SID: bpi.enrollment.carrierissue.carrierissuesearch (See Figure I-73)
| Element | |||
| Name | Element Type | Label | Purpose |
| Customer | Text | Customer Type | To display text |
| Type | |||
| clientType | Radio button | Customer Type | To select the type “Group” or |
| “Member” | |||
| Customer ID | Text | Customer ID | To display text |
| clientId | Text Field | Customer ID | To enter complainant id |
| Company | Text | Company Name | To display text |
| Name | |||
| companyName | Text Field | Company Name | To enter company name |
| First Name | Text | First Name | To display text |
| firstName | Text Field | First Name | To enter first name |
| Last Name | Text | Last Name | To display text |
| lastName | Text Field | Last Name | To enter last name |
| SSN | Text Field | SSN/Tax ID | To enter SSN or Tax ID |
| SSN | Text Field | SSN/Tax ID | To enter SSN or Tax ID |
| Phone | Text | Phone Number | To display text |
| Number | |||
| phoneNumber | Text Field | Phone Number | To enter phone number |
| search | HTML button | Search | To perform Search operation |
| cancel | HTML button | Cancel | To reset the all search fields |
| Search Table | HTML Table | To list the Complainant ID, Company | |
| Name, First Name, Last Name and | |||
| Phone number is displayed on the | |||
| screen | |||
3.1.1.2. SID, Element Name, Element Type & Purpose
SID: bpi.enrollment.carrierissue.carrierissuecreate (See Figure I-74)
| Element | ||
| Element Name | Type | Purpose |
| Received date | Text | To display text |
| Received date | Calendar | To enter the received date |
| Reported Issue | Text | To display text |
| Reported Issue | List | To list the Reported Issue. |
| Group | Entry Field | To enter Group ID if Client |
| Type is Group. Ability to search for | ||
| Group, upon selection or entry of the | ||
| Group, the group's general | ||
| information is displayed (Company | ||
| Name, Contact Name, | ||
| Address, Phone, Effective | ||
| Date, ROE Date, Status) | ||
| Member | Entry Field | To enter Member ID if |
| Client Type is Member. Ability to | ||
| search for Member, upon | ||
| selection or entry of the member ID, | ||
| the member's general information | ||
| is displayed (Name, Address, | ||
| Phone, Effective Date, ROE | ||
| Date, Status, Benefit Level, | ||
| Coverage Choice) | ||
| Remarks | Text | To display text |
| Remarks | Entry Field | To enter remarks |
| Submit | HTML | Submit the data and |
| button | save in the database | |
| Cancel | HTML | To reset to previous status |
| button | as was on loading the page | |
| Cancel | HTML | To reset to previous status |
| button | as was on loading the page | |
Screen Validations
| Element Name | Action/Validation Details | Message |
| Received date | Should default to system date. | Error Dialog Box: |
| Received date can never be a future | “Please choose the correct date. | |
| date. | Received date can be a future date.” | |
| Reported | Default Option should be - Choose | Error Dialog Box: |
| Issue | One - Should list all the types of | “Please choose the |
| Reported Issues | reported issue. | |
| Client Type | Option to choose Group or member | None |
| with radio button group. | ||
| Client | Entry field to enter the group ID or | None |
| member ID based on the Client type | ||
| selected. Based on the Client | ||
| selected Display the Group or | ||
| member information in the HTML | ||
| table. | ||
| Search | Pop up window to search for the | None |
| Group or Member based on the | ||
| Client type selected. | ||
| Group | HTML Table to display the Group | None |
| Information | ||
| Member | HTML Table to display member | None |
| information | ||
| Remarks | Entry Text Area to enter the remarks | None |
| for the Carrier Issue. The text area | ||
| should have scrollbar if the content | ||
| within the text area grows. | ||
| Submit | Should function On clicking the | Error Dialog Box: |
| Submit Button or pressing the Enter | “The value entered for | |
| key with cursor on the “Submit | ‘field name’ is incorrect. | |
| Button” | Please enter the | |
| Save the data to the repository with | correct value.”Note: | |
| the status of the Carrier Issue as | The “field name” name | |
| open. | should bedynamically | |
| Auto generate the Carrier Issue ID | picked based on the | |
| name of the field for | ||
| which the error has occurred. | ||
| Cancel | Should reset to the status as was on | None |
| loading the page on clicking the | ||
| cancel button | ||
3.1.1.3. SID, Element Name, Element Type & Purpose
SID: bpi.enrollment.carrierissue.carrierissuemodify (See Figure I-75)
| Element Name | Element Type | Purpose |
| Carrier Issue ID | Text | To display text |
| Carrier Issue ID | Entry Field | To enter Carrier Issue ID. Ability to search for |
| open Carrier Issues | ||
| Client | Text | To display text |
| Client | Entry Field | To enter client ID. Ability to search for open |
| Issues for the specific client | ||
| Search | Pop Up window | To search for the Carrier Issue ID or the Client ID |
| (group or member id) with open issues | ||
| Carrier Issue | HTML Table | List the issues based on the search criteria. |
| Process Table | ||
| Process | HTML Button | To show the issue selected for further processing |
| Carrier Issue | HTML Table | Table to display Received Date, Reported Issue, |
| Client Type, Client ID, Issue Status, Remarks. | ||
| Additional | Text | To display text |
| Remarks | ||
| Additional | Entry Field | To enter text |
| Remarks | ||
| Notify Carrier | Text | To display text |
| Notify Carrier | Radio Button | To check if notifying to carrier |
| Mode of | Text | To display text |
| Notification | ||
| Mode of | List Box | If “Notify Carrier” is checked then this field |
| Notification | must be completed. To enter the mode of | |
| notification | ||
| Date Notified | Text | To display text |
| Date Notified | Calendar | If “Notify Carrier” is checked then this field |
| must be completed. Enter the notified date | ||
| Batch Date | Text | To display text |
| Batch Date | Calendar | To enter batch date |
| Submit | HTML button | Submit the data and save in the database |
| Cancel | HTML button | To reset to previous status as was on loading the |
| page | ||
Screen Validations
| Element Name | Action/Validation Details | Message |
| Carrier Issue | Entry field to enter Carrier Issue ID | Error Message: |
| and on tab should populate the | “Carrier Issue ID is required” | |
| Carrier Issue based on the Carrier | ||
| Issue id | ||
| Client | Entry fields to enter Client ID and on | Error Message: |
| tab should populate all the Carrier | “Client ID is required” | |
| Issues for the specific Client. | ||
| Search | search for the Carrier Issue ID or | None |
| Client ID | ||
| Carrier Issue | The table gets populated based on | None |
| Process Table | the search criteria. For Carrier Issue | |
| ID the table shows only one Carrier | ||
| Issue. For Client search the table | ||
| shows all the Carrier Issues for the | ||
| specific Client. | ||
| Process | Process the specific Row in the table | NONE |
| selected | ||
| Carrier Issue | Table to display Received Date, | None |
| Reported Issue, Client Type, Client | ||
| ID, Issue Status, Remarks. | ||
| Additional | Entry field for additional remarks | None |
| Remarks | ||
| Notify Carrier | Radio button to select if notify or not | None |
| Mode of | If “Notify Carrier” is yes then this | Error Dialog Box: |
| Notification | field must be completed. To enter | “Please Enter the Mode of Notification” |
| the Mode of Notification for whom | ||
| the Issue is to be forwarded | ||
| Date Notified | Allow entering the date or picking | Error Dialog Box: |
| up from the calendar | “Please Enter the Notified Date” | |
| If “Notify Carrier” is yes then this | ||
| field must be completed. Enter the | ||
| notified date | ||
| Batch Date | Allow entering the batch date or | None |
| picking up from the calendar | ||
| Submit | Should function On clicking the | Error Dialog Box: |
| Submit Button or pressing the Enter | “The value entered for ‘field name’ is | |
| key with cursor on the “Submit | incorrect. Please enter the correct value.” | |
| Button” | Note: The “field name” name should be | |
| Save the data on clicking the submit | dynamically picked based on the name of | |
| button. If the Mode of Notification is | the field for which the error has occurred. | |
| Email, then open new message with | ||
| appropriate information. If Mode of | ||
| Notification is Fax, then enter | ||
| appropriate information for fax. | ||
| Cancel | Reset to the state as was on loading | None |
| the page | ||
3.1.1.4. SID, Element Name, Element Type & Purpose
SID: bpi.enrollment.carrierissue.carrierissueclose (See Figure I-76)
| Element Name | Element Type | Label | Purpose |
| Search by | Text | Search by Customer | To display text |
| Customer | |||
| searchType | Radio button | Search by Customer | To select the option of search |
| Search by | Text | Search by Carrrier Issue | To display text |
| Carrrier Issue | |||
| searchType | Radio button | Search by Carrrier Issue | To select the option of search |
| Carrier Issue | Text | Carrier Issue ID | To display text |
| ID | |||
| carrierIssueId | Entry Field | Carrier Issue ID | To enter Carrier Issue ID. Ability to |
| search for open Carrier Issue | |||
| Customer ID | Text | To display text | |
| customerId | Text Field | Customer ID | To display Customer ID. Ability to |
| search for open Carrier Issue for the | |||
| specific Customer | |||
| search | Button | Search | To search for the Carrier Issue ID or |
| the Customer ID(group or member | |||
| id) with open carrier issues | |||
| Carrier Issue | HTML Table | Carrier Issue Close Table | List the carrier issue based on the |
| Close Table | search criteria. | ||
| Carrier Issue | HTML Table | Carrier Issue Table | Table to display Received Date, |
| Table | Reported Issue, Client Type, Client | ||
| ID, Issue Status, Remarks. | |||
| Actual Issue | Text | To display text | Actual Issue |
| Actual Issue | List | List the Actual Issue | Actual Issue |
| Retransmission | Text | To display text | Retransmission |
| Retransmission | Radio button | Select if retransmission | Retransmission |
| needed or not | |||
| Resolution | Text | To display text | Resolution |
| Resolution | List | List the Resolution of Issue | Resolution |
| as Verbally Updated; | |||
| Retransmitted, etc. | |||
| Resolution | Text | To display text | Resolution Comments |
| Comments | |||
| Resolution | Entry Field | To enter text | Resolution Comments |
| Comments | |||
| Date Carrier | Text | To display text | Date Carrier Resolved |
| Resolved | |||
| Date Carrier | Calendar | To enter date Carrier | Date Carrier Resolved |
| Resolved | resolved | ||
| Batch Date | Text | To display text | Batch Date |
| Batch Date | Calendar | To enter batch date | Batch Date |
| Notify | Text | To display text | Notify Originator |
| Originator | |||
| Notify | Radio Button | To select if notifying to | Notify Originator |
| Originator | Originator | ||
| save | HTML button | Save | Submit the data and save in the |
| database | |||
Screen Validations
| Element Name | Action/Validation Details | Message |
| Carrier Issue | Entry field to enter Carrier Issue ID | Error Message: |
| and on tab should populate the | “Carrier Issue ID is required” | |
| Carrier Issue based on the Carrier | ||
| Issue id | ||
| Customer | Entry fields to enter Client ID and on | Error Message: |
| tab should populate all the Carrier | “Customer ID is required” | |
| Issues for the specific Client. | ||
| Search | search for the Carrier Issue ID or | None |
| Client ID | ||
| Carrier Issue | The table gets populated based on | None |
| Process Table | the search criteria. For Carrier Issue | |
| ID the table shows only one Carrier | ||
| Issue. For Client search the table | ||
| shows all the Carrier Issues for the | ||
| specific Client. | ||
| Close | Close the specific Row in the table | None |
| selected | ||
| Carrier Issue | Table to display Received Date, | None |
| Reported Issue, Client Type, Client | ||
| ID, Issue Status, Remarks. | ||
| Actual Issue | Default option should be the same as | |
| reported issue. List all issues. | ||
| Retransmission | Radio button to select if retransmit | None |
| or not | ||
| Resolution | Default option should be —choose | |
| one—. List the resolutions for closing | ||
| the issue as Updated, Denied or | ||
| cancelled | ||
| Resolution | Entry field for additional comments | None |
| Comments | ||
| Date Carrier | Allow entering the date or picking | None |
| Resolved | up from the calendar | |
| If “Notify Carrier” is yes then this | ||
| field must be completed. Enter the | ||
| notified date | ||
| Batch Date | Allow entering the batch date or | None |
| picking up from the calendar | ||
| Notify Originator | Radio button to select if notify or | |
| not. If yes send pre-formatted email | ||
| to Originator. | ||
| Submit | Should function On clicking the | Error Dialog Box: |
| Submit Button or pressing the Enter | “The value entered for ‘field name’ is | |
| key with cursor on the “Submit | incorrect. Please enter the correct value.” | |
| Button” | Note: The “field name” name should be | |
| Save the data on clicking the submit | dynamically picked based on the name of | |
| button. If the Mode of Notification is | the field for which the error has occurred. | |
| Email, then open new message with | ||
| appropriate information. If Mode of | ||
| Notification is Fax, then enter | ||
| appropriate information for fax. | ||
| Cancel | Reset to the state as was on loading | None |
| the page | ||
3.1.2. Screen Flow
(See Figure I-77)
4. Business Rule Mapping
| Activity | Rules |
| Carrier Issues | Carrier Issue is the screen that needs to be handled by |
| personnel skilled with the operations of the | |
| PacAdvantage and the coordination of data with the | |
| Carriers. | |
| All issues are entered and followed up for the resolution | |
| of the issue. | |
| Change Record |
| Date | Author | Version | Change Reference |
| Jan. 10, 2002 | Sudhakar K | 1.0 | Baseline Release |
| Feb. 6, 2002 | Sudhakar K | 1.1 | Revised Version |
| Aug. 09, 2002 | Chandrasekaran L | 1.2 | 1. Changes to reflect screen |
| modifications | |||
| 2. Changes to reflect latest | |||
| FSD format | |||
| Reviewers |
| Name | Position | |
| Distribution |
| No Of | ||||
| Copy No. | Name | Copies | Location | |
1. Introduction 4
1.1. Purpose 4
1.2. Business Use Case Specification Reference 4
1.3. Definitions, Acronyms & Abbreviations 4
2. Process Identification 5
2.1. Background 5
2.2. Process Description 5
2.3. Process Flow 5
3. User Interface 7
3.1. User Interface Screens 7
3.1.1. Suppress Batch Billing 7
3.1.2. Group Auto Bill Suppressing 10
3.1.3. Manual Bill 10
3.1.4. Billing Adjustments 15
3.2. Interface Flow 16
4. Business Rule Mapping 17
1. Introduction
1.1. Purpose
The purpose of this document is to describe the process of Billing. This document identifies how the user interacts with the system, the data to be captured, the business logic to be implemented, and the output of the process.
1.2. Business Use Case Specification Reference
| Business Use Specification ID | Business Use Case Name | |
| BPI_SCOPE_FI_001 | Finance - Business use | |
| case Specification - Billing | ||
1.3. Definitions, Acronyms & Abbreviations
| Term | Explanation | |
2. Process Identification
2.1. Background
Billing is the process of creating the invoice for the Customers enrolled in the PacAdvantage program. The Invoice is on broad base classified into two—First Time Invoice (invoice to the group/member that has enrolled as new business) and Running invoice or periodic invoice (To the existing Group/Members).
2.2. Process Description
The objective of the Billing process is to:
-
- 1) Generate first time invoice to the groups/members who have enrolled as new business. The invoice should get all the information about the group/member prior to invoicing. Generation of first time invoice is an automated process and should be triggered on completion of group/member enrollment.
- 2) Generate running invoice or periodic invoice to the existing groups/members. All the information about the existing group/members and their real time transaction details are required to invoice correctly.
This billing sub module also needs to have a feature to incorporate the following.
-
- Suppress periodic Bill for a specific Group/Member or collective group and members
- Preview invoice prior to creation of actual invoice.
- Suppress late fee for a specific Group/Member or collective group and members
- Calculate Reinstatement Fee for a specific Group/Member or collective group and members
- Include feature to add dynamic content on the bills sent to the for a specific Group/Member or collective groups and members
- Calculate additional fee for Credit card transaction if applicable.
- Calculate adjustment when there is retrospective change in Benefit Level (for the Carrier Selected) for group/member and make adjustments in the subsequent bill.
- Calculate adjustment if the group/members have termed.
- Generate manual invoice and preview invoices before generating them.
- All billing transactions would be period specific (i.e. the bills would be associated with the month of coverage). Invoices would be run only on a monthly basis, whatever is the billing frequency. For example if the billing frequency opted is quarterly. The excess amount would be adjusted as credits in the subsequent month's invoices.
- Invoice view/preview prior to generation of invoice needs to be provided in the Enrollment module.
2.3. Process Flow
Process for billing—First Time Invoice
-
- 1) Enrollment is completed for the new business prior to generation of First Time Invoice.
- 2) All information relevant for billing (Generation of Invoice is gathered) These information are
- Group ID
- Group Billing Address
- Billing information for the group like billing frequency, mode of payment and relevant information for mode of payment like EFT or Credit Card.
- Employees and Dependents information
- Member count
- Employer Contribution
- Employee Contribution
- Raw Rate for Each of the Benefit Level for the specific Carrier selected by the employee (for specific Age bracket, Service Area, Coverage Choice with effective date)
- Rate differential based on member count (Group size) with effective date
- Admin fees for the specific group type with effective date.
- Agent commission that is defined in the Agent Info tab for the group if defined. Otherwise the default agent commission specified in the Carrier Maintenance Module (Agent Commission Fees) with effective date.
- Additional fees if any for the specific group type with effective date.
Process for billing—Running Invoice (Periodic Invoice)
-
- 1) Monthly or periodic invoice is sent to the existing group/members based on the Frequency selected by the group/member and the mode of communication preferred.
- 2) Existing billing also gathers all information relevant for billing.
- 3) In addition to this it also needs the previous invoice history to calculate the additional fees, late fees, reinstatement fees or as applicable.
- 4) The running invoice generated is for the coverage period following the previous invoice period. I.e if the previous invoice was generated in the month of Jan. 5, 2002 and for the coverage period February 2002, The invoice generate on Feb. 5, 2001 would be for the coverage period March 2002,
- 5) Billing should also calculate the Fees required for Credit Card transaction if applicable.
- 6) Adjustment for Add On employee/dependent or member.
- 7) Adjustment for Termed employee/dependent or member.
- 8) Reinstatement fees Termed Group, employee/dependent or member are reinstated.
- 9) Invoice once created by the system cannot be cancelled.
An invoice is considered closed only if the invoice has been reconciled. Hence all open invoices should be considered for late fee calculation.
3. User Interface
3.1. User Interface Screens
3.1.1. Suppress Batch Billing
3.1.1.1. Screen Snapshot (See Figure J-1)
3.1.1.2. Element Name, Element Type & Purpose
| Element | Element | ||
| Name | Type | Label | Purpose |
| Bill Period | Option Box | Bill Period | Bill period for which batch billing is suppressed |
| Selected | Display Text | Selected Groups | Displays count of groups selected out of total |
| Groups | groups |
| Filter |
| Group Id | Text Box | Group Id | To filter groups based on group id |
| Group Name | Text Box | Group Name | To filter groups based on group name |
| Group Type | Option Box | Group Type | To filter groups based on group type |
| Group Size | Text Box | Group Size | To filter groups based on group size |
| ROE Date | Text Box | ROE Date - To | To filter groups based on ROE date of groups |
| Range | |||
| Effective Date | Text Box | Effective Date - | To filter groups based on effective date of groups |
| Range | To | ||
| Rate Type | Option Box | Rate Type | To filter groups based on rate type |
| View | Option Box | View | To filter groups based on whether batch billing is |
| suppressed or not | |||
| Filter | Command | Filter | Refreshes group selection table based on the filter |
| entered | |||
| Clear Filter | Command | Clear Filter | Clears the filter and displays all groups in the |
| group selection table | |||
| Groups | Selection | For selecting groups for export. Options for | |
| Selection | Table | selection all groups, all groups in a page, | |
| deselecting all and selection inversion are | |||
| available to the user. | |||
| New | Command | New | Clears the screen |
| Save | Command | Save | Saves the suppressed groups information to the |
| database | |||
3.1.1.3. Screen Validations
| Element Name | Action/Validation Details | Message |
| Bill Period | Check to see that billing | “Please enter a |
| period is not null | valid billing period” | |
3.1.2. Group Auto Bill Suppressing
3.1.2.1. Screen Snapshot (See Figure J-2)
3.1.2.2. Element Name, Element Type & Purpose
| Element | Element | ||
| Name | Type | Label | Purpose |
| Run Id | Display Text | Import Id | Displays unique system |
| generated id for | |||
| the bill process run | |||
| Bill Period | Option Box | Bill Period | Period for which |
| batch billing is run | |||
| Run By | Display Text | Run By | Displays id of user |
| who initiated the process | |||
| New | Command | New | Clears the screen |
| Process | Command | Process | Starts the batch |
| billing process | |||
| View Status | Command | View Status | View status of |
| batch billing process | |||
3.1.2.3. Screen Validations
| Element Name | Action/Validation Details | Message |
| Bill Period | Check to see that billing | “Please enter a |
| period is not null | valid billing period” | |
3.1.3. Manual Bill
3.1.3.1. Screen Snapshot (See Figure J-3)
3.1.3.2. Element Name, Element Type & Purpose
| Element | Element | ||
| Name | Type | Label | Purpose |
| Bill Details |
| Bill # | Display Text | Bill # | Displays unique system generated bill # |
| Bill Date | Display Text | Bill Date | Displays bill date |
| Bill Period | Option Box | Bill Period | Period for which group is billed |
| Due Date | Display Text | Due Date | Displays date on which bill is due |
| Status | Display Text | Status | Displays the status of bill: Open or Reconciled |
| Reconciled | Display Text | Reconciled Date | Displays date on which bill was reconciled |
| Date |
| Group Information |
| Group Id | Text Box | Group Id | Id of the group being billed |
| Group Type | Display Text | Group Type | Displays group type |
| Group Name | Display Text | Group Name | Displays group name |
| Association | Display Text | Association | Displays name of association if group is enrolled |
| Name | Name | through one | |
| Status | Display Text | Status | Displays status of group |
| Rate Type | Display Text | Rate Type | Displays the rate type for the group: blended or |
| non-blended |
| Billing Summary |
| Prior Bill | Display Text | Prior period | Displays prior period bill amount for the group |
| Amount | billed amount | ||
| Adjustments | Display Text | Adjustments | Displays adjustments total for the group |
| since prior | |||
| period | |||
| Payments | Display Text | Payments | Displays payments made by the group from |
| received | previous bill | ||
| Past Due | Display Text | Past due amount | Displays amount due from previous bill |
| Current Bill | Display Text | Current bill | Displays current bill amount |
| amount | |||
| Total Due | Display Text | Total due | Displays total due from the group |
| Employer Level Adjustments |
| Adjustment | Option Box | Adjustment Type | Type of adjustment |
| Type | |||
| Amount | Text Box | Amount | Adjustment Amount |
| Period | Option Box | Period | Period for which adjustment entry is posted |
| Adjustments | Entry Table | ||
| Entry Table |
| Employee Level Adjustments |
| Employee | Display | Employee Name | Displays name of employee |
| Name | Column | ||
| Period | Display | Period | Displays adjustment period |
| Column | |||
| Plan Name | Display | Plan Name | Displays the name of the plan |
| Column | |||
| Plan Type | Display | Plan Type | Displays plan type |
| Column | |||
| Coverage | Display | Coverage Type | Displays coverage option selected by the |
| Type | Column | employee | |
| # Members | Display | # Members | Displays member count under the employee's |
| Column | coverage | ||
| Premium | Display | Premium | Displays premium |
| Column | |||
| Admin Fee | Display | Admin Fee | Displays admin fee |
| Column | |||
| Agent Fee | Display | Agent Fee | Displays agent fee |
| Column | |||
| Total Premium | Display | Total Premium | Displays total premium |
| Column |
| Employee Level Detail |
| Employee | Display | Employee Name | Displays name of employee |
| Name | Column | ||
| Plan Name | Display | Plan Name | Displays the name of the plan |
| Column | |||
| Plan Type | Display | Plan Type | Displays plan type |
| Column | |||
| Coverage | Display | Coverage Type | Displays coverage option selected by the |
| Type | Column | employee | |
| # Members | Display | # Members | Displays member count under the employee's |
| Column | coverage | ||
| Premium | Display | Premium | Displays premium |
| Column | |||
| Admin Fee | Display | Admin Fee | Displays admin fee |
| Column | |||
| Agent Fee | Display | Agent Fee | Displays agent fee |
| Column | |||
| Total Premium | Display | Total Premium | Displays total premium |
| Column |
| Bill Summary |
| Medical | Display Text | Subtotal - | Displays medical premium subtotal |
| Premium | Medical | ||
| Premium | |||
| Dental | Display Text | Subtotal - Dental | Displays dental premium subtotal |
| Premium | Premium | ||
| Vision | Display Text | Subtotal - Vision | Displays vision premium subtotal |
| Premium | Premium | ||
| CAM | Display Text | Subtotal - CAM | Displays CAM premium subtotal |
| Premium | Premium | ||
| Admin | Display Text | Administration | Displays total of member level admin fee |
| Member Fee | Member Fee | ||
| Agent Member | Display Text | Agent Member | Displays total of member level agent fee |
| Fee | Fee | ||
| Admin Flat | Display Text | Administration | Displays group level admin flat fee |
| Fee | Flat Fee | ||
| Agent Flat Fee | Display Text | Agent Flat Fee | Displays group level agent flat fee |
| Current Due | Display Text | Total Due | Displays current bill amount |
| Current Period | |||
| Past Due | Display Text | Add Past | Displays amount due from previous bill |
| Amount Due | |||
| Total Due | Display Text | Total Due | Displays total due from the group |
| New | Command | New | Clears the screen |
| Create | Command | Create | Creates the bill |
3.1.3.3. Screen Validations
| Element | ||
| Name | Action/Validation Details | Message |
| Bill Period | Check to see if bill period is not null | “Please enter a |
| and is valid | valid bill period” | |
| Group Id | Check to see if group id is not null | “Please enter a |
| and is valid | valid group id” | |
| Adjustment | Check to see that the value for the | “Please enter a |
| Type | filed is not null and is valid | valid adjustment |
| type” | ||
| Amount | Check to see that the value for the | “Please enter a valid |
| filed is not null and is valid | adjustment amount” | |
| Period | Check to see that the value for the | “Please enter a valid |
| filed is not null and is valid | adjustment period” | |
3.1.4. Billing Adjustments
3.1.4.1. Screen Snapshot (See Figure J-4)
3.1.4.2. Element Name, Element Type & Purpose
| Element | Element | ||
| Name | Type | Label | Purpose |
| Adjustment Id | Display Text | Adjustment Id | Displays unique system generated id for the |
| adjustment | |||
| Adjustment | Text Box | Adjustment Date | Adjustment Date |
| Date | |||
| Status | Display Text | Status | Status of the adjustment: Open or Reconciled |
| Group Id | Text Box | Group Id | Id of group for which adjustment entry is made |
| Group Type | Display Text | Group Type | Displays group type |
| Group Name | Display Text | Group Name | Displays group name |
| Association | Display Text | Association | Displays name of association if group is enrolled |
| Name | Name | through one | |
| Group Status | Display Text | Group Status | Displays status of group |
| Adjustment | Option Box | Adjustment Type | Type of adjustment |
| Type | |||
| Amount | Text Box | Amount | Adjustment Amount |
| Period | Option Box | Period | Period for which adjustment entry is posted |
| New | Command | New | Clears screen for a new adjustment entry |
| Save | Command | Save | Saves the adjustment entry to the database |
| Search | Command | Search | Provides search functionality for adjustments |
3.1.4.3. Screen Validations
| Element | ||
| Name | Action/Validation Details | Message |
| Group Id | Check to see that the value for the | “Please enter a |
| filed is not null and is valid | valid group id” | |
| Adjustment | Check to see that the value for the | “Please enter a |
| Type | filed is not null and is valid | valid adjustment |
| type” | ||
| Amount | Check to see that the value for the | “Please enter a valid |
| filed is not null and is valid | adjustment amount” | |
| Period | Check to see that the value for the | “Please enter a valid |
| filed is not null and is valid | adjustment period” | |
3.2. Interface Flow
N/A
4. Business Rule Mapping
| Activity | Rules |
| I - First Time Invoice | Blended |
| For Small Employer Group | (New Business) Note: All new business falls under blended |
| rate only | |
| 1. | Check All the member for Small Employer Group |
| 2. | Check the Employee Raw Rate for the Specific Line of Coverage for the (Carrier |
| Selected) Benefit Level. | |
| 3. | Apply formula on the entire employee for all the line of coverage provided by the group |
| for the (Carrier Selected) Benefit Level (Age Bracket, Coverage Choice and Service | |
| Area for the specific Employee). Refer Formula | |
| 4. | The Admin Fees, Agent Commission and Rate Differential Factor are governed by the |
| effective date. Apply the effective date for these fees with the Effective date for the | |
| Group in deriving the Blended rate for the employees and the total amount payable by | |
| the Group. However the Agent commission is based on the one provided at the group | |
| level in the Agent Information Tab. It overrides the fee provided in the carrier | |
| maintenance agent commission fees. | |
| 5. | Check if the initial payment made by the group equals the Total amount as derived |
| above. If not then check the difference. Allow for Reconciliation up to $2 without and | |
| authorized intervention. For amount between $50-$3 Allow reconciliation based on | |
| security. For amount above $50 allow reconciliation based on ultimate authority. (This | |
| rule governs if the group can be enrolled or not. Hence there should be an invoice | |
| preview that identifies the Cash received and the total amount due for the new business) | |
| This should be viewable by all. | |
| 6. | The rate should be picked up based on the rules specified below: |
| Check the Effective date for the Group (Initial enrollment date) | |
| Check the rate from the rate table whose effective date is latest but less than the | |
| effective date of the Group. (E.g.) Group Effective date 3/1/01. Rate effective dates | |
| 1/1/01 and 7/1/01. In this example since the group effective date is 3/1/01 the Rate | |
| picked should be 1/1/01 effective date rate. | |
| 7. | Show the Employer Contribution and the Employee Deduction in the invoice summary. |
| Billing Address should be picked up based on the billing address provided by the group. | |
| If billing address is not provided, then business address should be considered for billing. | |
| Also check the mode of communication. If the group prefers to be mailed emailed or | |
| faxed and accordingly transmit the invoice. Refer Sample Invoice 1 for the Small | |
| Employer Group (New Business) |
| Note: Small employer may bring in the COBRA members. Bill the COBRA members |
| separately or along with the Group based on the decision made for billing the COBRA |
| Group. |
| If the COBRA members are billed separately. Generate a separate invoice for the each | |
| subscriber COBRA members. Refer Rule for COBRA Member Invoice | |
| However the bill for the COBRA members can be sent to the primary group if that | |
| option is selected. | |
| All COBRA Invoices whether billed to the primary group or the COBRA Group should | |
| have a separate invoice for all the COBRA groups. |
| (New Business) Note: All new business falls under blended rate | |
| For COBRA Members | only even for COBRA members brought by new business. |
| 1. | Check the entire subscriber COBRA member for Small Employer Group (primary |
| Group). | |
| 2. | Check Coverage Choice for the Subscriber member for each lines of coverage and also |
| note that these line of coverage are selected by the Primary group. | |
| 3. | Check what are the line of coverage picked up be each of the members including the |
| subscriber member and their dependent. |
| Note: The rate for the COBRA member should be based on the following rule. |
| Identify the subscriber member line of coverage selected. The age, service area and the | |
| coverage choice provided by the subscriber member is the governing rate. | |
| If the subscriber does not select the line of coverage that the dependent member have | |
| selected. Check if the dependent member have relation ship as spouse or child/children. | |
| If the Relationship is spouse then the Spouse Age should be the deciding factor for the | |
| rate and the coverage choice opted. | |
| If the relationship is child/children then the eldest dependent member should be the | |
| deciding factor for the rate based on the Age. |
| Note however in all the above cases the Service Area is governed by the Service area of |
| the Subscriber COBRA member. |
| Note: If the Primary COBRA member is a child they have their own Group ID and |
| their own line of coverage and benefit level. |
| For Individual | (New Business) Note: All new business falls under blended rate |
| Association Member | even for the individual association member. |
| 1. | Individual association member can have dependent attached to the member. |
| 2. | The rate for the individual association member is governed by the rate applicable for the |
| Guaranteed association based on the effective date for the Association. | |
| 3. | The individual members can have the same line of coverage as defined by the |
| association. | |
| 4. | The Admin Fee, Agent Commission, Additional fees and rate differential factor is as |
| applicable for the Association with the effective date. | |
| 5. | The calculation formula is the same as applicable for the employee of Small employer |
| group. | |
| 6. | The dependents for the individual association members are governed by what has been |
| selected by the subscriber individual association member. |
| Small employer Group | New Business) Note: All new business falls under blended rate |
| affiliated to association | even for the Small employer group affiliated to an association. |
| 1. | Small employer groups affiliated with an association have the same rules as applicable |
| to the Small employer group with exception for the rate. | |
| 2. | The Admin fees, Agent commission, additional fees and Differential factor for the small |
| employer groups affiliated with an association are as defined for the Association with | |
| effective date for the Association. | |
| 3. | However the Agent commission is based on the one provided at the group level in the |
| Agent Information Tab. It overrides the fee provided in the carrier maintenance agent | |
| commission fees |
| II - First Time Invoice Formula | Blended for Small Employer Group |
| Blended Rate = (Raw Rate * Differential Factor)/(1- Agent Commission % - Admin |
| Fee %) |
| Example | The formula for the premium calculation for invoice Blended is as follows (Blended) |
| a) Raw Rate | |
| b) Agent Commission | |
| c) Admin fee | |
| d) Additional Fees | |
| e) Differential factor | |
| III - First Time Invoice Formula | Blended for COBRA Members |
| Example | The formula for the premium calculation for the invoice Blended for Cal COBRA is as |
| follows: | |
| Cal Cobra Total Premium = Blended Rate * (1 + Additional Fees %) | |
| IV - Running Invoice | Blended |
| 1. | For Running invoice all that is applicable for first time invoice is applicable. In addition |
| to that the running invoice has the following as well: | |
| 2. | Late fee if applicable: Late fee charges are 5% on the Amount due in the prior |
| invoices. The late fee calculation rule is as follows: | |
| Due Date: | |
| Postmark date: | |
| Received date: | |
| If the post mark date for cash receipt is available it should fall on or before due date. | |
| If postmark date is not available then if should check 5 calendar days backward from the | |
| date received and see if it falls within the due date. | |
| If the amount is received within the due date as per the above rules and is short late fee | |
| is still applied for the shortage of premium. | |
| If the above two conditions are not satisfied then late fee is charged for the Group or | |
| member. |
| Note: Late fee is charged on the prior month's current premium |
| (e.g.) Due date is 1st of every month or the first business day of the month. Whichever is |
| applicable. For example 2/1/01 |
| Date payment received : 2/1/01 No late fee |
| Date payment received is 2/2/01 and post marked 1/31/01 No late fee |
| Date payment received is 2/3/01 and post marked 2/2/01 late fee applicable |
| Date payment received is 2/6/01 and postmarked date not available. Look 5 days behind for |
| the date for receipt. I.e 2/1/01 hence no late fees |
| Date payment received is 2/8/01 and postmarked date not available. Look 5 days behind for |
| the date for receipt. I.e 2/3/01 hence late fees applicable. |
| 3. | Balance forward if applicable: Balance forward is the amount balance from the |
| previous invoice or shortage of premium. | |
| 4. | Billing Adjustment: Billing adjustments can have various categories: Note The |
| adjustment can be positive or negative based on the coverage period. | |
| Employee Coverage Choice Change | |
| Employee/Dependent Benefit Level(Selected carrier) change | |
| Employee/Dependent Termination | |
| Employee/Dependent Add On | |
| Rate for the Benefit Level Offered by the carrier changes retrospectively. I.e over | |
| writing the previous effective date that was applicable for the group. | |
| 5. | Credit Card Payment transaction fee if applicable: Credit card transaction fee is |
| 2.5% of the total amount due for the group/member | |
| 6. | NSF Check if applicable: $25 handling fees is charged for the NSF check. |
| 7. | Reinstatement fees: (Reinstatement fees are on the following assumption that on the |
| date of term all the previous balances on the group are settled.) The group needs to be | |
| reinstated on the date next to the term date. The Amount due for the reinstatement from | |
| the date following the term dates to the current month when the group is reinstated. |
| (e.g.) Group Term Date: 2/31/01 |
| Date when the group was reinstated 5/10/01 |
| Effective reinstatement date is 3/1/01. Reinstatement fees is calculated for the Period 3/1/01 |
| I.e. the month when the reinstatement occurred. The invoice contains the premium due for |
| the next month as well i.e. 6/1/01. However the current amount due is based on the current |
| period i.e. from 3/1/01 to 5/31/01, Next months period 6/31/01 and reinstatement fees |
| Percentage on the premium due when reinstatement occurred (The amount on which the |
| reinstatement fees is calculated.) |
| Note: Subsequent billing cycle would contain the Reinstatement Adjustments and |
| Reinstatement fees on reinstatement for the group/member. |
| A reinstatement fee is 10% of the premium due when reinstatement occurred. |
| V - Running Invoice | Non - Blended |
| Note: The difference in the rules for non-blended and blended is in the rate calculation |
| rules. The rest of the processes are same as for the blended. |
| Formula | Formula for Non - Blended Rates |
| The formula for the premium calculation for the invoice Non - Blended is as | |
| follows | |
| (Non-Blended) | |
| a) Raw Rate | |
| b) Agent Commission per Member | |
| c) Agent Commission per Group based on group size | |
| d) Admin fee per Member | |
| e) Admin fee per Group based on group size | |
| f) Additional Fees | |
| g) Differential factor | |
| Member Level Fees = Raw Rate + Member Count * (Agent Commission Per | |
| Member + Admin Fee Per Member) | |
| Note (If differential factor is applicable then Raw rate should be factored i.e | |
| Raw Rate * Differential Factor) | |
| Group Level Fees = Agent Commission per Group Size + Admin Fees per | |
| Group size | |
| Total Non Blended Premium Billed to Group = | |
| Member Level Fees + Group Level Fees |
| Example | Raw Rate | = $100 |
| Agent Commission per Member | = $10 | |
| Agent Commission per Group based on group size | = $50 for Group size => 15 | |
| Admin fee per Member | = $10 | |
| Admin fee per Group based on group size | = $50 for Group size => 15 | |
| Additional Fees | = 10% on Raw Rate | |
| Differential factor | ||
| Employee1 Member count including employee | = 3 | |
| Employee2 Member count including employee | = 2 | |
| Employee3 Member count including employee | = 4 | |
| Employee4 Member count including employee | = 5 | |
| Employee5 Member count including employee | = 1 | |
| Total Member count | = 15 | |
| Group size (=>15) | = 15 | |
| Member Level Fee | ||
| Employee1 = 100 + 3 (10 + 10) | = $160 | |
| Employee2 = 100 + 2 (10 + 10) | = $140 | |
| Employee3 = 100 + 4 (10 + 10) | = $180 | |
| Employee4 = 100 + 5 (10 + 10) | = $200 | |
| Employee5 = 100 + 1 (10 + 10) | = $120 | |
| Member Level Fees | = $800 | |
| Group Level Fees | = $50 + $50 + $100 | |
| Total Non Blended Premium Billed to Group = |
| Member Level Fees + Group Level Fees = $800 + $100= $900 | |
| This formula is for the specific Benefit Level (offered by carrier) for a specific line of | |
| coverage and a specific employee/member. | |
| The total amount billed to group should include all the Rates after applying this formula | |
| for all the employees/members and their line of coverage. | |
| Formula | Formula for Non - Blended Rates |
| Example | The formula for the premium calculation for the invoice Non Blended for Cal |
| COBRA is as follows: | |
| Member Premium for Cal COBRA = Raw Rate * (1 +Additional fee %) | |
| Example: | |
| Member Premium for Cal COBRA =0 100 * (1 + 0.10) = $110 | |
| Amount Billed to COBRA Group = $110 | |
| This formula is for the specific Benefit Level (offered by carrier) for a specific line of | |
| coverage and a specific employee/member. | |
| The total amount billed to COBRA Subscriber member should include all the Rates after | |
| applying this formula for all the members and their line of coverage. | |
| Change Record |
| Date | Author | Version | Change Reference |
| Jan. 15, 2002 | Sudhakar K | 1.0 | Baseline Release |
| Feb. 8, 2002 | Sudhakar K | 1.1 | Revision |
| Aug. 09, 2002 | Chandrasekaran L | 1.2 | 3. Changes to |
| reflect screen | |||
| modifications | |||
| 4. Changes to | |||
| reflect latest | |||
| FSD format | |||
| Reviewers |
| Name | Position | |
| Distribution |
| No Of | ||||
| Copy No. | Name | Copies | Location | |
1. Introduction 4
1.1. Purpose 4
1.2. Business Use Case Specification Reference 4
1.3. Definitions, Acronyms & Abbrevations 4
2. Process Identification 5
2.1. Background 5
2.2. Process Description 5
2.3. Process Flow 5
3. User Interface 7
3.1. User Interface Screens 7
3.1.1. Manual Cash Batch 7
3.2 Interface Flow 9
4. Business Rule Mapping 10
1. Introduction
1.1. Purpose
The purpose of this document is to describe the process of Cash Receipt. This document identifies how the user interacts with the system, the data to be captured, the business logic to be implemented, and the output of the process.
1.2. Business Use Case Specification Reference
| Business Use Specification ID | Business Use Case Name |
| BPI_SCOPE_FI_002 | Finance - Business use case Specification - |
| Cash Receipt | |
1.3. Definitions, Acronyms & Abbreviations
| Term | Explanation | |
| EFT | Electronic Fund Transfer | |
2. Process Identification
2.1. Background
Cash Receipt is the process of entering the cash received by BPI into the system. The cash receipt can be received in various modes as defined by the business process. Cash Receipt includes Lock Box receipts, Check, Credit Card, EFT and Transfer.
2.2. Process Description
This Cash Receipt sub module also needs to incorporate the following.
-
- 1) Enter the lock box payment received as a batch process into the system
- 2) Enter EFT payment received as a batch process into the system
- 3) EFT payment made directly to Wells Fargo Bank
- 4) On line payment using the Credit Card and Check
- 5) User interface to make payment over phone by Credit card or Check
- 6) Credit Card payment with automatic pulling of the cash or manually on request
- 7) Handle negative check i.e. NSF's, Refund and Transfer.
- 8) Transfer of cash from one group to the other.
This Cash Receipt sub module also needs to have a feature to incorporate the following.
-
- Batch the cash receipt based on the batch number defined.
- There should be ability to batch each of the modes of the payment received into a separate batch.
- For EFT, Credit Card, On Line Check and Lockbox payments there should be ability to upload the files into the system as one batch. Reconciliation will follow once the batch is imported and closed.
- In addition, prior entry of Lock box total entry made needs to tally with the lock box total.
This document details only one mode of cash entry namely, Manual Batch. Lockbox, EFT and payments through credit cards are detailed in their respective process specification documents.
2.3. Process Flow
Cash receipts into the system can be from the following sources:
-
- EFT
- Check received at BPI
- Lock Box file
- On line Credit Card
- Check or Credit card over phone
The cash received by any of the above mode is batched and entered into the system. The batch number is identified based on the mode of payment receipts. All batches should be identified uniquely with batch number and timestamp.
The Payment received are either entered manually into the system or uploaded into the system from the files available. The batch total and sum of the entries made in each batch should tally before saving the batch.
Batch date should represent the deposit date.
Batch Types are:
-
- 1. Manual Batch
- 2. NSF Batch
- 3. Returns Batch
- 4. Positive Transfer
- 5. Negative Transfer
- 6. Lockbox Check
- 7. Auto-Batch EFT
- 8. Direct Deposit
- 9. Wire Transfer
- 10. CC over phone
- 11. Auto-Batch Credit Card
- 12. Online Credit Card
3. User Interface
3.1. User Interface Screens
3.1.1. Manual Cash Batch
3.1.1.1. Screen Snapshot (See Figure J-5)
3.1.1.2. Element Name, Element Type & Purpose
| Element | Element | ||
| Name | Type | Label | Purpose |
| Batch Information |
| Batch Id | Display Text | Batch Id | Displays unique system generated id for the batch |
| Batch Date | Text Box | Batch Date | Batch Date |
| Batch Total | Display Text | Batch Total | Displays total of all cash entries |
| Batch Type | Option Box | Batch Type | Type of manual batch. Possible options are |
| Manual Batch, NSF Batch, Returns Batch, | |||
| Positive Transfer, Negative Transfer | |||
| Tape Total | Text Box | Tape Total | Tape total of all cash entries |
| Tape Balance | Display Text | Tape Balance | Displays difference between the tape total and |
| total of cash entries entered | |||
| Batch Status | Display Text | Batch Status | Displays status of batch: Open or Closed |
| Check Information |
| Postmark Date | Text Box | Postmark Date | Date on which the payment was postmarked |
| Received Date | Text Box | Received Date | Date on which payment was received |
| Check # | Text Box | Check # | Check number |
| Check Amount | Text Box | Check Amount | Check amount |
| Check Distribution |
| Group Id | Text Box | Group Id | Group against which payment is allocated |
| Group Name | Display Text | Group Name | Displays name of selected group |
| Amount | Text Box | Amount | Amount allocated to the group out of the total |
| payment amount | |||
| Comments | Option Box | Comments | Standard comments for the payment, if any |
| Others | Text Box | Others | To enter any comments other than the standard |
| ones | |||
| Payment | Editable Table | Displays all payment entries for the batch for | |
| Entries | editing | ||
| New | Command | New | Clears screen for a new batch entry |
| Save | Command | Save | Saves the batch information to the database |
| Close | Command | Close | Closes the batch. A batch can not be edited after |
| closing | |||
| Search | Command | Search | To search for saved batches |
3.1.1.3. Screen Validations
| Element Name | Action/Validation Details | Message |
| Batch Information |
| Batch Date | Check to see if batch date is not null | “Please enter a valid batch date” |
| and is valid | ||
| Batch Type | Check to see if valid batch type is | “Please select a valid batch type” |
| selected | ||
| Tape Total | Check to see if tape total is not null | “Please enter a valid tape total” |
| and is valid |
| Check Information |
| Postmark Date | Check to see if postmark date is not | “Please enter a valid postmark date” |
| null and is valid | ||
| Received Date | Check to see if the received date is | “Please enter a valid received date” |
| not null and is valid | ||
| Check # | Check to see if check number is not | “Please enter a valid check number” |
| null and is valid | ||
| Check Amount | Check to see if check amount is not | “Please enter a valid check amount” |
| null and is valid |
| Check Distribution |
| Group Id | Check to see if group id is not null | “Please enter a valid group id” |
| and is valid | ||
| Amount | Check to see if amount is not null | “Please enter a valid amount” |
| and is valid | ||
3.2. Interface Flow
N/A
4. Business Rule Mapping
| Activities | Rules |
| Batch Entry | Unique id should be created for each batched. The batch total should be tallied to the |
| individual sum before saving the batch. The batch id should be uniquely generated prior to | |
| creation of batch. Each cash receipt should have the postmark date, date received and the | |
| system date (I.e the date when the batch is created) and batch total. The line items within | |
| each batch should have a feature to Split the payment for multiple group ids if required. | |
| Batch date should be the deposit data. | |
| Any entries made to the batch can be saved prior to completion of the batch entries. | |
| However there would be a status for the batch which would indicate if the batch is closed or | |
| not. Modification can be done only to the batches that are open. Any batch that is closed | |
| cannot be modified. If there is an erroneous entry for the batch and the batch is saved. | |
| Only Transfer can be done and it is not allowed to delete the batch that are closed. | |
| Only the batches that are closed can be reconciled. | |
| Batch by File | The batch that are created by uploading the files like for Lockbox, EFT or Credit Card will |
| Uploads | have an identification that payment for this batch was made by Lockbox, EFT or Credit |
| Card. These batches are always closed. | |
| Negative | NSF would be entered into the system and there would be an indicator indicating that this |
| Check (NSF) | batch is a NSF batch. |
| Transfer | Cash transfer may be due to the reason that the Cash has been wrongly enter for the group to |
| which the cash does not belong. In such cased entering negative cash receipt for the Group | |
| for whom the cash has been wrongly entered and making positive cash to the group to whom | |
| the cash belongs makes the cash adjustment. There should be a positive and negative cash | |
| adjustment. | |
| Returns | Refund would be a batch and would be handled similar to the NSF Check. |
| Change Record |
| Date | Author | Version | Change Reference |
| Jan. 15, 2002 | Sudhakar K | 1.0 | Baseline Release |
| Feb. 13, 2002 | Sudhakar K | 1.1 | Revision |
| Aug. 09, 2002 | Chandrasekaran L | 1.2 | 5. Changes to reflect screen |
| modifications | |||
| 6. Changes to reflect latest | |||
| FSD format | |||
| Reviewers |
| Name | Position | |
| Distribution |
| No Of | ||||
| Copy No. | Name | Copies | Location | |
1. Introduction 4
1.1. Purpose 4
1.2. Business Use Case Specification Reference 4
1.3. Definitions, Acronyms & Abbreviations 4
2. Process Identification 5
2.1. Background 5
2.2. Process Flow And Description 5
3. User Interface 7
3.1. User Interface Screens 7
3.1.1. Manual Reconciliation 7
3.1.2. Billing & Payments History 10
3.2. Interface Flow 12
4. Business Rule Mapping 13
1. Introduction
1.1. Purpose
The purpose of this document is to describe the process of Cash Reconciliation. This document identifies how the user interacts with the system, the data to be captured, the business logic to be implemented, and the output of the process.
1.2. Business Use Case Specification Reference
| Business Use Specification ID | Business Use Case Name |
| BPI_SCOPE_FI_003 | Finance - Business use case Specification - |
| Cash Reconciliation | |
1.3. Definitions, Acronyms & Abbreviations
| Term | Explanation | |
| EFT | Electronic Fund Transfer | |
2. Process Identification
2.1. Background
Cash Reconciliation is the process of reconciling the cash receipts to individual invoices and reconciling the amount paid by the group.
The objective of the Cash Reconciliation process is to reconcile:
-
- 1) Billed amounts and cash receipt
- 2) Cash to negative cash
- 3) Adjustment to cash
- 4) Adjustment to billed amounts
- 5) Billed amount to itself if the total due results in zero
- 6) Adjustment to Adjustment
2.2. Process Flow and Description
Process for Cash Reconciliation:
Reconciliation is the process of matching one to one the cash received on hand and the invoices that are open. The cash are received by numerous ways as described in BPI_CAS_FSD_FI—02 (Cash Receipt). The invoice is generated for the various groups/members based on the premium due. These invoices are matched with the cash receipts and reconciled.
The rule for reconciliation should be as follows:
-
- 1. Look for the Negative Cash available and reconcile it with the positive cash (for NSF checks).
- 2. Look for the oldest unreconciled invoice and reconcile with the oldest cash.
The reconciliation process should look through all the invoices that have not been reconciled for a specific group and reconcile the invoice that has the earliest date with the cash received. It should also match the Cash receipt with the invoice amount.
Note: reconciliation process is started automatically when the cash receipt batch is closed and it reconciles the cash received with the invoices.
-
- Billed amounts and cash receipt: This reconciliation process is to reconcile the invoice that has not yet been reconciled for the specific group and check if the invoice is earliest un reconciled invoice for the specific group and reconcile the invoice with the cash received form the group/member.
- Cash to negative cash: This is the process of reconciling the negative cash with the positive cash received from the group. This case arises when there is a NSF check and the group's invoice has been reconciled. The bank usually notifies NSF check and then NSF Cash receipt entry is created in the system. Now on receipt of a replacement check against the NSF check the NSF check is reconciled with the replacement check provided the amount tallies.
- Adjustments to Cash: This is the process of reconciling the cash receipt with the adjustment that may be available in the next invoice. Example: If the group has received the invoice for the next month and they have an employee termed this month after the generation of invoice. The generated invoice would not identify this adjustment for the termed employees as the employee was termed after creation of invoice. But the Group may deduct the adjustments for the termed employee and send the cash that would be short as they would sent the check with the adjustments. Hence this process should identify such conditions and adjust the cash receipt for the invoice with adjustment taken in to account. The next invoice would show the cash receipt and the adjustment for the employees termed. This process can also be coined as “Reconciled but not billed”.
- Adjustment to billed amounts: This process identifies the invoices that are already billed to the group and any adjustments that are not made in the current invoice needs to be adjusted in the next invoice with the adjustments made.
- Billed amount to itself if the total due results in zero: This is process identifies if the group is termed and the invoice is already created for the group for the next month. Invoice would be created for the termed group on group termination and would adjust that with previous invoice. There would always be a final invoice for the termed groups showing adjustments that would include refund, or short fall or zero balance.
- Adjustment to Adjustment: This process is for adjusting the late fee with late fee is waived, Reinstatement fees with reinstatement fee waive as the case may be. If the Late fee is shown in the previous invoice that can be adjusted by waiving late fee or reinstatement fees as applicable. Example: Late fees may be $25.00 and waive late fees would be $ −25.00. Here adjustment to adjustment would be $25 to $25. Also adjustment needs to be made on invoice with invoice.
3. User Interface
3.1. User Interface Screens
3.1.1. Manual Reconciliation
3.1.1.1. Screen Snapshot (See Figure J-6)
3.1.1.2. Element Name, Element Type & Purpose
| Element | Element | ||
| Name | Type | Label | Purpose |
| Group Information |
| Group Id | Display Text | Group Id | Displays id of the group |
| Group Type | Display Text | Group Type | Displays group type |
| Group Name | Display Text | Group Name | Displays group name |
| Association | Display Text | Association | Displays name of association if group is enrolled |
| Name | Name | through one | |
| Status | Display Text | Status | Displays status of group |
| Rate Type | Display Text | Rate Type | Displays the rate type for the group: blended or |
| non-blended | |||
| Left to balance | Display Text | Left to balance | Displays amount left to be reconciled |
| Bill Information |
| Bill # | Display | Bill # | |
| Column | |||
| Coverage | Display | Coverage Period | |
| Period | Column | ||
| Due Date | Display | Due Date | |
| Column | |||
| Bill Date | Display | Bill Date | |
| Column | |||
| Bill Total | Display | Bill Total | |
| Column | |||
| Total Due | Display | Total Due | |
| Column |
| Adjustments Information |
| Adjustment Id | Display | Adj. Id | |
| Column | |||
| Adjustment | Display | Adj. Type | |
| Type | Column | ||
| Adjustment | Display | Adj. Date | |
| Date | Column | ||
| User Id | Display | User Id | |
| Column | |||
| Coverage | Display | Cvrg Month | |
| Month | Column | ||
| Amount | Display | Amount | |
| Column |
| Cash Receipts |
| Batch Id | Display | Batch Id | |
| Column | |||
| Postmarked | Display | Date PM | |
| Date | Column | ||
| Date Received | Display | Date Recd | |
| Column | |||
| Check # | Display | Check # | |
| Column | |||
| Batch Type | Display | Batch Type | |
| Column | |||
| Payment | Display | Pmt Amt | |
| Amount | Column | ||
| Unused | Display | Unused Amt | |
| Amount | Column | ||
| Comments | Display | Comments | |
| Column | |||
| Post | Command | Post | Post reconciliation entries |
| Reconciliation | Reconciliation | ||
| Clear | Command | Clear | Clears screen for a new import. |
| Search | Command | Search | Provides functionality to search groups |
3.1.1.3. Screen Validations
Note: Reconciliation can have any of the possible combination provided below:
-
- 1) Invoice to Invoice
- 2) Invoice to Cash receipt
- 3) Invoice to Adjustment
- 4) Cash receipt to cash receipt
- 5) Cash receipt to adjustment
- 6) Adjustment to adjustment
Hence, the validation for the amount left to balance is done based on any of the combination selected from the check boxes.
Note: Adjustments would be shown only under special conditions where term has been initiated after generation of invoices and the group pays short taking this adjustments into account.
3.1.2. Billing & Payments History
3.1.2.1. Screen Snapshot (See Figure J-7)
3.1.2.2. Element Name, Element Type & Purpose
| Element | Element | ||
| Name | Type | Label | Purpose |
| Group Information |
| Group Id | Display Text | Group Id | Displays id of the group |
| Group Type | Display Text | Group Type | Displays group type |
| Group Name | Display Text | Group Name | Displays group name |
| Association | Display Text | Association | Displays name of association if group is enrolled |
| Name | Name | through one | |
| Status | Display Text | Status | Displays status of group |
| Rate Type | Display Text | Rate Type | Displays the rate type for the group: blended or |
| non-blended |
| Bill Information |
| Bill # | Display | Bill # | |
| Column | |||
| Coverage | Display | Coverage Period | |
| Period | Column | ||
| Due Date | Display | Due Date | |
| Column | |||
| Bill Date | Display | Bill Date | |
| Column | |||
| Bill Total | Display | Bill Total | |
| Column | |||
| Total Due | Display | Total Due | |
| Column |
| Adjustments Information |
| Adjustment Id | Display | Adj. Id | |
| Column | |||
| Adjustment | Display | Adj. Type | |
| Type | Column | ||
| Adjustment | Display | Adj. Date | |
| Date | Column | ||
| User Id | Display | User Id | |
| Column | |||
| Coverage | Display | Cvrg Month | |
| Month | Column | ||
| Amount | Display | Amount | |
| Column |
| Cash Receipts |
| Batch Id | Display | Batch Id | |
| Column | |||
| Postmarked | Display | Date PM | |
| Date | Column | ||
| Date Received | Display | Date Recd | |
| Column | |||
| Check # | Display | Check # | |
| Column | |||
| Batch Type | Display | Batch Type | |
| Column | |||
| Payment | Display | Pmt Amt | |
| Amount | Column | ||
| Unused | Display | Unused Amt | |
| Amount | Column | ||
| Comments | Display | Comments | |
| Column | |||
| Search | Command | Search | Provides functionality to search groups |
3.1.2.3. Screen Validations
NA
3.2. Interface Flow
N/A
4. Business Rule Mapping
| Activities | Rules |
| Automated | Automatic Reconciliation would be done on closing the batch for the cash receipt. If the |
| Reconciliation | cash receipt batch were closed then it would start the reconciliation process. |
| The following process would be auto reconciled: | |
| Billed amounts and cash receipt | |
| Adjustment to cash | |
| Billed amount to itself if the total due results in zero | |
| Adjustment to billed amounts | |
| Reconciliation | Reconciliation process would look for the earliest un reconciled invoice and reconciles it |
| for the Existing | provided it is less than $ + 2.00. |
| Groups | Reconciliation would be as per the following sequence. |
| Look for the Negative Cash available and reconcile it with the positive cash (for NSF | |
| checks). | |
| Look for the oldest unreconciled invoice and reconcile with the oldest un-reconciled | |
| cash and so on. | |
| On Reconciliation the entire invoice, cash receipts would have a status as reconciled. | |
| Manual | This process would trigger reconciliation manually based on authority or if the user is trying |
| Reconciliation | to reconcile and specific cash receipts with the invoice as the case may be. Manual |
| reconciliation can be does only for those invoices that has not reconciled automatically | |
| Manual | Cash to negative cash |
| Reconciliation | Adjustment to Adjustment |
| Any reconciliation that is not completed by automatic reconciliation process would be | |
| reconciled manually. | |
| Formula for | General formula for reconciliation would be as follows: |
| reconciliation | Billed amounts and cash receipt = (Invoice Amount − Cash Receipt) |
| Adjustment to cash = (Adjustment − Cash Receipts) | |
| Billed amount to itself if the total due results in zero = (Invoice Amount + Invoice Amount) | |
| Adjustment to billed amounts = (Adjustment Amount + Invoice Amount) | |
| Cash to negative cash = (Cash receipt + cash receipt) | |
| Adjustment to Adjustment = (Adjustment + adjustment) | |
| General formula = (Invoice Amount + Adjustment Amount − Cash Receipt Amount) | |
| Example | |
| Invoice = $1000.00, Cash receipt = $ −100.00, Cash receipt = $ 918.00, | |
| Adjustment = $ −100.00, Adjustment = $ −80.00 | |
| Amount that can be Reconciled = 1000 − (−100) − (800) + (−100) + (−80) = 1000 + 100 − 918 − 100 − 80 = $ 2.00 | |
| This $ 2.00 is balance forward for the subsequent invoice. | |
| New Business | Excluding COBRA and Individual Association Members who follow the reconciliation rules |
| Reconciliation | as per the Existing Group, the new business groups is auto reconcile if within $ +−2.00. If |
| the amount is short by $100.00 the invoice and the cash receipt would be reconciled and the | |
| short fall would be balance forward in the next invoice. PacAdvantage Fund (A Cash | |
| Receipt Batch auto generated by the system) would adjust this short fall. This would be | |
| based on authority (Finance/GMS). | |
| Also for the new business the auto reconciliation process would apply to reconcile the | |
| Invoice Generated on successful enrollment with the cash receipt as initial enrollment | |
| payment. | |
| Change Record |
| Date | Author | Version | Change Reference |
| Jan. 15, 2002 | Sudhakar K | 1.0 | Baseline Release |
| Feb. 13, 2002 | Sudhakar K | 1.1 | Revision |
| Aug. 09, 2002 | Chandrasekaran L | 1.2 | 7. Changes to reflect screen |
| modifications | |||
| 8. Changes to reflect latest | |||
| FSD format | |||
| Reviewers |
| Name | Position | |
| Distribution |
| No Of | ||||
| Copy No. | Name | Copies | Location | |
1. Introduction 4
1.1. Purpose
1.2. Business Use Case Specification Reference 4
1.3. Definition, Acronyms & Abbrevations 4
2. Process Identification 5
2.1. Background 5
2.2. Process Description 5
2.3. Process Flow 5
3. User Interface 6
3.1. User Interface Screens 6
3.1.1. Risk Adjustment Factors Import 6
3.2. Interface Flow 7
4 Business Rule Mapping 8
1. Introduction
1.1. Purpose
The purpose of this document is to describe the process of Risk Adjustment. This document identifies how the user interacts with the system, the data to be captured, the business logic to be implemented, and the output of the process.
1.2. Business Use Case Specification Reference
| Business Use Specification ID | Business Use Case Name |
| BPI_SCOPE_FI_007 | Finance - Business use case Specification - |
| Risk Adjustment | |
1.3. Definitions, Acronyms & Abbreviations
| Term | Explanation | |
| EFT | Electronic Fund Transfer | |
2. Process Identification
2.1. Background
Risk Adjustment is the process of accessing the risk borne by each of the Carrier in paying for the claims submitted to them by members.
Risk adjustment factor is assigned to the Carrier. Based on these factors the carrier may be classified as Payers, Receivers or None (if no factor is assigned). Payers are the one who pays in the risk adjustment amount to the Pool. Receivers are the one who receives the Risk Adjustment amount from the pool.
These risk adjustment factors are pre-defined by PacAdvantage.
2.2. Process Description
The objective of the Risk Adjustment process is to:
-
- 1) Provide for upload of Risk Adjustment (RA) factors in the form of text files into PX2 system
The uploaded data would subsequently be used in cash disbursement reports for suggesting the amount to be paid out to carriers after application of RA factors.
The following are the other requirements that will be supported and constraints on the proposed system:
-
- 1) The system will maintain a log of all zip codes and service area imports. The log information will include the user, the day & time of import, the file path & format and the status of the import.
2.3. Process Flow
Process for upload of Risk Adjustment factors
-
- 1) The import file and an effective date for import are all input from the user.
- 2) The system checks to see if the file data is per the format expected. If not, an error is reported.
- 3) If data already exists for an effective date, the system prompts to the user as to whether it should overwrite the data or cancel the import.
- 4) The system imports Risk Adjustment factors to its database.
3. User Interface
3.1. User Interface Screens
3.1.1. Risk Adjustment Factors Import
3.1.1.1. Screen Snapshot (See Figure J-8)
3.1.1.2. Element Name, Element Type & Purpose
| Element | Element | ||
| Name | Type | Label | Purpose |
| Import Id | Display Text | Import Id | Displays unique id for the import |
| Status | Display Text | Status | Displays status of import |
| Imported By | Display Text | Imported By | Displays id of user who did the import |
| Import Date | Display Text | Import Date | Displays date on which import was done |
| Import File | Text Box | Import File | Full path of the file to be imported |
| Effective Date | Text Box | Effective Date | Date on which the RA factors becomes effective |
| New | Command | New | Clears screen for a new import. |
| Import | Command | Import | Starts the import process |
| Search | Command | Search | Provides functionality for search of imports |
3.1.1.3. Screen Validations
| Element Name | Action/Validation Details | Message |
| Import File Name | Check to see that the value for the | “Please enter a |
| field is not null | valid import | |
| file name” | ||
| Effective Date | Check to see that the value for the | “Please enter a |
| filed is not null and is valid | valid effective | |
| date” | ||
3.2. Interface Flow
N/A
4. Business Rule Mapping
| Activities | Rules |
| Risk | The formula for risk Adjustment factor is as given below: |
| Assessment | Raw Rate = Premium Amount (Raw Rate for Medical Line of coverage and the benefit |
| Formula | level for the specific carrier opted by the member) |
| Adjustment Factor = Fixed dollar amount per member count (can be negative or | |
| positive based on whether the Carrier is receiver or payer) Positive is the receiver and | |
| negative is the payer. | |
| Risk Adjustment amount = Raw rate + (Risk Adjustment factor * member count for | |
| that plan) | |
| Example | |
| Adjustment Factor = $ +5.00 for Aetna (receiver) | |
| Adjustment Factor = $ −2.00 for Health Net (payer) | |
| Employee 1 = $ 400 with (4 member inclusive of employee) Aetna | |
| Employee 2 = $ 300 with (2 member inclusive of employee) Health net | |
| Employee 3 = $ 200 with (1 member inclusive of employee) Health net | |
| For Health net | |
| 300 + (−2 * 2) + 200 + (−2 * 1) = 304 + 202 = 494.00 | |
| For Aetna | |
| 400 + (5 * 4) = $ 420.00 | |
| Note: the adjustment factor has an effective date attach to it. Normally it is loaded once | |
| in 6 months. | |
| Change Record |
| Date | Author | Version | Change Reference |
| Nov. 29, 2001 | Chandrasekaran L | 1.0 | Baseline Release |
| Mar. 20, 2002 | Chandrasekaran L | 1.1 | 1. Mail-merge list updated |
| with triggering | |||
| application, delivery | |||
| mode and whether | |||
| mail merge is | |||
| automated or manual. | |||
| 2. Mail merge log | |||
| functionality added | |||
| Aug. 02, 2002 | Chandrasekaran L | 2.0 | 1. Regeneration |
| functionality added | |||
| 2. Template list updated | |||
| 3. Modified to suit | |||
| latest FSD template | |||
| Reviewers |
| Name | Position | |
| Distribution |
| No Of | ||||
| Copy No. | Name | Copies | Location | |
1. Introduction 4
1.1. Purpose 4
1.2. Scope Document Reference 4
1.3. Process Specification Document Reference 4
1.4. Definitions Acronyms and Abbreviations 4
2. Module Functionality 5
2.1. Brief Description 5
3. Letter Regeneration 6
3.1. Brieft Description 6
3.2. Storing The Template 6
3.3. Storing The Dynamic Text 6
3.3.1. Implementation Notes 6
3.4. Reproducing A Letter 6
3.4.1. User Interface 7
4. Mail Merge Templates 8
1. Introduction
1.1. Purpose
The purpose of this document is to describe the functional requirements for the Mail Merge module. This document provides a brief description of the module functionality and identifies all the integration points with other modules.
This document is to be read in conjunction with the BPI Scope document, which identifies all the business use cases for the proposed system. For each business use case or a set of logically related use cases, a detailed process specification document is prepared. The process specification document identifies how the user interacts with the system, the data to be captured, the business logic to be implemented, and the output for each business use case. This document consists of forward references to all the process specifications associated with the Mail Merge module.
1.2. Scope Document Reference
This section provides the scope document references for the module.
| Scope Document | ||
| Reference | Document Description | Version |
| BPI_SCOPE | Scope Document for BPI | 1.0 |
| BPI_SCOPE_ADD | Addendum to the BPI scope document | 1.0 |
1.3. Process Specification Document Reference
This section provides the forward references to the process specification document for the module.
| Process Specification | |||
| Document Reference | Document Description | Version | |
1.4. Definitions, Acronyms and Abbreviations
| Term | Explanation |
| Mail Merge | Mail merge is the process of populating predefined |
| templates with dynamic data to extract business | |
| correspondences like quotes, letters to groups, agents etc. | |
2. Module Functionality
2.1. Brief Description
The Mail Merge module addresses the functionality of the system where it needs to generate business correspondences using predefined templates. The templates are basically RTF files with placeholders for dynamic data in them. The output is usually a RTF file, but at times this could be a PostScript or a PDF document. The diagram below illustrates the mail merge process. (See Figure K-1)
Benefit Partners, Inc uses a lot of mail merge templates for their business correspondences. There are around 150 templates that are in use today.
The proposed system will also maintain a log of mail merge letters generated. The log information includes the template id, timestamp, triggering application, user generating the letter, and to whom the letter is addressed (i.e., which group or member or agent).
3. Letter Regeneration
3.1. Brief Description
Benefit Partners, Inc would like to have functionality where a letter can be reproduced exactly as the original at a later point in time without having to store a whole electronic copy of the original letter. This functionality would be achieved by storing just the dynamic text that goes into generation of the original letter and the template used for the original letter in a persistent medium. When a letter has to be reproduced the template used for the original letter and the dynamic text are retrieved from the persistent medium and merged to produce a copy of the original letter.
3.2. Storing the Template
The proposed functionality requires the template used for generation of the original letter, to be available at the time of reproducing the letter. This would be achieved by versioning the templates whenever there is a change to template. All the versions of a template would be maintained, as electronic copies, for achieving the proposed functionality. The current version to be used for each template would be specifiable in a configuration file (XML).
3.3. Storing the Dynamic Text
The dynamic that goes into generated letter would be stored as an entity (column) in a database table. The dynamic text would be stored as a key-value pair that maps each placeholder in the template with the data that goes in the placeholder. The likely database structure for the table that holds the dynamic data is shown in the “Data Structures” section.
3.3.1 Implementation Notes
Since the size of the dynamic text is relatively huge and varying for different letters, it would be stored as a long field in the database. Most of the database implementations (especially IBM DB2 UDB) suggest that a table containing long fields be placed on a separate storage disk in order to avoid a performance hit. With an idea on the average number of letters generated by Benefit Partners, Inc, it is estimated that the data size growth would be at the rate of 3.5-5 GB per year.
3.4. Reproducing a Letter
The proposed functionality would require a new application to reproduce a letter. The user would be able to search previously generated letters using different parameters like date and time of generation of original letter, type of letter (welcome, term, reinstate etc), intended addressee etc. The system would fetch the version of template used, retrieve the dynamic text from the database and reproduces the letter.
3.4.1 User Interface (See Figure K-2)
3.4.1.1 Screen Fields Explanation
| Element | Element | ||
| Name | Type | Label | Purpose |
| Period | Text Boxes | Letters generated | To specify a criteria for searching letters based on |
| between . . . | generated date and time | ||
| Type of letter | Option Box | Type of letter | To specify a criteria for searching letters based on |
| the type of letter. Letter types are welcome, term, | |||
| add-on etc | |||
| Addressee | Text Box | Addressee | To specify a criteria for searching letters based on |
| letter addressee. A lookup option is provided to | |||
| search groups, employees, agents etc. | |||
| Searched | Display Table | Displays letters that match the search criteria. | |
| Letters List | |||
| Generate | Command | Generate | Reproduces selected letters. |
| Selected | Selected | ||
4. Mail Merge Templates
The following table lists out the mail merge templates to be used in the proposed system.
Note: Unless specified otherwise, delivery mode is addressee's preferred mode of communication.
| Dlry | ||||||
| # | Category/Module | ID | Description | Trigger Process | A/M | Mode |
| 1. | Group | 001 | New group welcome | New Biz | A | |
| Enrollment | ||||||
| 2. | Group | 002 | Notification of adding new | EE Add-on | A | |
| employee | ||||||
| 3. | Group | 003 | Notification of adding | DEP Add-on | A | |
| dependent when employee is | ||||||
| already enrolled | ||||||
| 4. | Group | 004 | Missing information for new | New Biz | A | |
| group | Enrollment | |||||
| 5. | Employee (add- | 005 | Missing information for new | EE Add-on/ | A | |
| on/changes) | employee adding to existing | Changes | ||||
| group | ||||||
| 6. | Group | 006 | Denial to enroll add-on | EE/DEP Add- | A | |
| (employee or dependent) | on | |||||
| 7. | Group | 007 | Notification of employee | EE Term | A | |
| and/or dependent term | ||||||
| 8. | Group | 008 | Notification of group changes | GRP Changes | A | |
| processed | ||||||
| 9. | Group | 009 | Notification of overdue | Cash | A & M | |
| premium | Reconciliation | |||||
| 10. | Group | 011 | Notification of employee or | EE/DEP | A | |
| dependent changes processed | Changes | |||||
| 11. | Group | 012 | Notification of employee | M | ||
| retroactive termination | ||||||
| 12. | Group | 013 | Missing info request dependent | DEP Add-on/ | A | |
| Changes | ||||||
| 13. | Group | 014 | Denial of reinstatement | GRP | A | |
| Reinstatement | ||||||
| 14. | Group | 015 | Approval of reinstatement | GRP | A | |
| Reinstatement | ||||||
| 15. | Cobra and | 016 | Request for missing | COBRA | A | |
| CalCobra | information | Enrollment | ||||
| 16. | Group | 017 | Termination for non-payment | GRP | A | |
| of premium with reinstatement | Termination | |||||
| 17. | Group | 018 | Termination for non-payment | GRP | A | |
| of premium with no | Termination | |||||
| reinstatement option | ||||||
| 18. | Group | 019 | New group not qualified | New Biz | A | |
| (declined) | Enrollment | |||||
| 19. | Employee (add-on) | 020 | Notification of add-on | EE Add-on | A | |
| employee to existing group | ||||||
| 20. | Employee | 021 | Notification of employee term | EE Term | A | |
| (termination) | ||||||
| 21. | Employee (group | 022 | Notification of retroactive | GRP Term | A | |
| termination) | group term due to shortage of | |||||
| premium | ||||||
| 22. | Employee (group | 023 | Notification of group term | GRP Term | A | |
| termination) | ||||||
| 23. | Employee | 024 | Notification of employee | EE/DEP | A | |
| (changes) | changes processed | Changes | ||||
| Dependent | Changes processed for | |||||
| dependent | ||||||
| 24. | Employee (group | 025 | Notification that group has | GRP Changes | A | |
| termination of line | terminated a line of coverage | |||||
| of coverage) | ||||||
| 25. | Employee | 026 | Notification of retro- | EE Term | A | |
| (termination) | termination | |||||
| 26. | Employee (group | 027 | Notification to employee of | GRP | A | |
| reinstatement) | group's reinstatement | Reinstatement | ||||
| 27. | Group | 028 | Group Requalification approval | ROE Process | A | |
| 28. | Group | 029 | Termination for non- | ROE Process | A | |
| requalification | ||||||
| 29. | Employee | 031 | Notification to employee of | DEP Add-on | A | |
| (dependent new | dependent enrollment when | |||||
| enrollment) | employee is already enrolled | |||||
| 30. | Group | 032 | Notification of termination of | GRP Changes | A | |
| line of coverage | ||||||
| 31. | Group | 037 | Voluntary termination | GRP Term | A | |
| 32. | Group | 038 | Missing information at ROE or | ROE Process | A | |
| O/E | ||||||
| 33. | Agent | 040 | New agent welcome letter | Agent Creation | A | |
| 34. | Employee (add-on) | 041 | CalCobra initial notification | EE Add-on | A | USPS |
| (always sent 2 business days | ||||||
| after letter 020. Must be | ||||||
| mailed USPS | ||||||
| 35. | Group | 042 | Denial of group change | GRP Changes | A | |
| 36. | Group | 043 | Denial of change for employee | EE/DEP | A | |
| or dependent | Changes | |||||
| 37. | Employee | 044 | Notification of CalCobra rights | EE Term | A | USPS |
| (termination | (always send 2 business days | |||||
| after letter 007. Must be | ||||||
| mailed USPS. | ||||||
| 38. | Agent (group, | 046 | Cover letter for agents | A | ||
| employee or | regarding group, employee, and | |||||
| dependent) | dependent correspondence. | |||||
| 39. | Group | 052 | Notification of waiver of late | Late fee waive | A | |
| fee | ||||||
| 40. | Group | 053 | Manual letter Declaration of | M | ||
| Eligibility for over age 23 | ||||||
| Dependent Child | ||||||
| 41. | Group | 054 | Manual letter Certification of | M | ||
| Corporate Wage Earner of Self | ||||||
| Employed Income | ||||||
| 42. | Group | 055 | Manual letter Termination due | M | ||
| to Shortage of premium | ||||||
| 43. | Group | 057 | Manual letter Notification of | M | ||
| employee on disability | ||||||
| 44. | Group | 058 | Manual letter Verification of | M | ||
| employee on un-paid leave | ||||||
| 45. | Association | 060 | Individual member termed due | ROE Process | A | |
| (requalification) | to non-requalification | |||||
| 46. | Cobra and | 070 | New Cobra/CalCobra welcome | COBRA | A | |
| CalCobra | letter | Enrollment | ||||
| 47. | Cobra and | 071 | Cobra/CalCobra terming due to | Automated | A | |
| CalCobra | ending of continuation period. | Process | ||||
| Letter needs to be sent 60 days | ||||||
| prior to the coverage end date. | ||||||
| 48. | CalCobra | 072 | CalCobra Voluntary | Cal-COBRA | A | |
| termination prior to | Term | |||||
| continuation end date | ||||||
| 49. | Cobra | 073 | Cobra Voluntary termination | COBRA Term | A | |
| prior to continuation end date | ||||||
| 50. | Cobra and | 074 | Termination due to non- | COBRA Term | A | |
| CalCobra | payment of initial | |||||
| Cobra/CalCobra premium | ||||||
| 51. | Cobra and | 075 | 45 day premium notice | Automated | A | |
| CalCobra | Process | |||||
| 52. | Cobra and | 076 | Ineligible for Cobra/CalCobra | COBRA | A | |
| CalCobra | Enrollment | |||||
| 53. | Employee | 078 | Employee term notice with no | EE Term | A | |
| Cobra option | ||||||
| 54. | Grievance | 080 | Group denial of late fee waive | Late fee waive | A | |
| 55. | Grievance | 081 | Group denial of copay change | Appeals & | A | |
| for employee/dependent | Grievances | |||||
| 56. | Grievance | 082 | Group denial of reinstatement | Appeals & | A | |
| for non-payment | Grievances | |||||
| 57. | Grievance | 083 | Group denial of retroactive | Appeals & | A | |
| effective date | Grievances | |||||
| 58. | Grievance | 084 | Group denial of retro- | Appeals & | A | |
| termination date | Grievances | |||||
| 59. | Grievance | 085 | Group denial of enrollment for | Appeals & | A | |
| employee or dependent | Grievances | |||||
| 60. | Grievance | 086 | Group denial for carrier change | Appeals & | A | |
| for employee/dependent | Grievances | |||||
| 61. | Grievance | 087 | Group denial to add a newborn | Appeals & | A | |
| dependent | Grievances | |||||
| 62. | Grievance | 088 | Group denial for a retro-active | Appeals & | A | |
| carrier transfer for employee or | Grievances | |||||
| dependent | ||||||
| 63. | Grievance | 089 | Group denial to add domestic | Appeals & | A | |
| partner coverage | Grievances | |||||
| 64. | Grievance | 090 | Group denial of 2nd review or | Appeals & | A | |
| appeal | Grievances | |||||
| 65. | Dependent | 092 | Manual letter | M | ||
| Declaration of eligibility for | ||||||
| over age 23 dependent | ||||||
| 66. | Agent (Sales and | 100 | Event followup | M | ||
| Marketing | ||||||
| 67. | Agent (Sales and | 101 | Enrollment meeting | M | ||
| Marketing) | questionnaire | |||||
| Need to tie information to a | ||||||
| lead | ||||||
| 68. | Agent (Sales and | 102 | Business tracking report | M | ||
| Marketing) | ||||||
| 69. | Agent (Sales and | 103 | Lead Form | M | ||
| Marketing) | ||||||
| 70. | Agent (Sales and | 104 | Broker Survey letter | M | ||
| Marketing) | ||||||
| 71. | Agent (sales and | 105 | BSS intro to agent | M | ||
| marketing) | ||||||
| 72. | Agent (sales and | 106 | Follow-up on agent intro | M | ||
| Marketing) | ||||||
| 73. | Agent (Sales and | 107 | Letterhead - blank | M | ||
| Marketing) | ||||||
| 74. | Agent (sales and | 108 | Fax coversheet - blank | M | ||
| marketing) | ||||||
| 75. | Agent | 109 | Tax ID number request | M | ||
| (commissions) | ||||||
| 76. | Agent | 110 | Request W9 | M | ||
| (commissions) | ||||||
| 77. | Agent | 111 | Vehicle collection order | M | ||
| (commission) | ||||||
| 78. | Agent | 112 | Broker of record dispute | M | ||
| (commission) | ||||||
| 79. | Agent | 113 | Broker collection letter | M | ||
| (commission) | ||||||
| 80. | Agent | 114 | License expiration letter | M | ||
| (commission) | ||||||
| 81. | Agent | 116 | Debit 1 | M | ||
| (commissions) | ||||||
| 82. | Agent | 117 | Debit 2 | M | ||
| (Commission) | ||||||
| 83. | Agent | 118 | Debit 3 | M | ||
| (Commission) | ||||||
| 84. | Agent | 119 | Francise Tax Board | M | ||
| (Commissions) | withholding | |||||
| 85. | Group | 120 | Manual letter. Agent license | M | ||
| expired; group need to select | ||||||
| new agent. | ||||||
| 86. | Group | 121 | Manual letter. $ Owed due to | M | ||
| denial of retro-term of | ||||||
| EE/dependent | ||||||
| 87. | Group | 122 | Manual letter. $ Owed - | M | ||
| EE/dependent will be termed. | ||||||
| 88. | Group | 124 | Manual letter. Federal Cobra | M | ||
| election form | ||||||
| 89. | Agent | 125 | Requalification reminder letter | M | ||
| (requalification) | to agent, contains a list of | |||||
| groups who have not returned | ||||||
| material. | ||||||
| 90. | Agent (group non- | 126 | Overdue premiums for groups. | M | ||
| payment of | Contains a list of agent's | |||||
| premium) | groups. | |||||
| 91. | Group | 127 | Manual letter Electronic Funds | M | ||
| Transfer Election Form | ||||||
| 92. | Supply ordering | 127 A | Pick list for fulfilling supply | M | ||
| requests | ||||||
| 93. | CalCobra only | 128 | Notification that Employer has | GRP Changes | A | |
| termed a line of coverage. | ||||||
| (Sent to CalCobra when line of | ||||||
| coverage is termed) | ||||||
| 94. | CalCobra only | 129 | Notification that Employer has | GRP Changes | A | |
| added a line of coverage. (Sent | ||||||
| to CalCobra when adding the | ||||||
| line of coverage at the | ||||||
| employer master.) | ||||||
| 95. | Association | 131 | Notification of dependent term | Assocn | A | |
| individual member | Member DEP | |||||
| Term | ||||||
| 96. | Association | 132 | Denial to enroll dependent | Assocn | A | |
| Individual member | Member DEP | |||||
| Add-on | ||||||
| 97. | Association | 133 | Voluntary Termination | Assocn | A | |
| Individual member | Member Term | |||||
| 98. | Association | 134 | Missing information request at | Assocn | A | |
| Individual member | ROE or OE | Member ROE | ||||
| Process | ||||||
| 99. | Association | 135 | Denial of change request | Assocn | A | |
| Individual member | Member | |||||
| Changes | ||||||
| 100. | Association | 136 | Notification of dependent retro- | Assocn | A | |
| Individual member | term | Member DEP | ||||
| Term | ||||||
| 101. | Association | 137 | Notification of Overdue | Cash | A&M | |
| Individual Member | premium | Reconciliation | ||||
| 102. | Association | 138 | Individual member group | Assocn | A | |
| Individual member | termination for NPOP with | Member Term | ||||
| reinstatement option | ||||||
| 103. | Association | 139 | Denial of reinstatement | Assocn | A | |
| Individual member | Member | |||||
| Reinstatement | ||||||
| 104. | Association | 140 | Dependent add-on welcome | Assocn | A | |
| Individual member | letter | Member DEP | ||||
| Add-on | ||||||
| 105. | Association | 141 | Missing information request at | Assocn | A | |
| Individual member | new business or dependent add | Member | ||||
| Enrollment or | ||||||
| DEP Add-on | ||||||
| 106. | Association | 142 | Individual member group | Assocn | A | |
| Individual member | termination with no | Member Term | ||||
| reinstatement option | ||||||
| 107. | Association | 143 | Individual member new group | Assocn | A | |
| Individual member | not eligible | Member | ||||
| Enrollment | ||||||
| 108. | Association | 144 | Manual Letter. Individual | M | ||
| Individual member | member premium shortage not | |||||
| received | ||||||
| 109. | Association | 145 | Manual letter. Outstanding | M | ||
| Individual member | premium due on termed | |||||
| individual member group | ||||||
| 110. | Association | 146 | Manual letter. $ Owed due to | M | ||
| Individual member | denial of retro-term of | |||||
| dependent. | ||||||
| 111. | Association | 147 | Manual Letter. $ Owed - | M | ||
| individual member | dependent will be termed. | |||||
| 112. | Association | 148 | Individual member notification | Assocn | A | |
| Individual member | of retro-term | Member Term | ||||
| 113. | Association | 149 | Individual member welcome | Assocn | A | |
| Individual member | Member | |||||
| Enrollment | ||||||
| 114. | Employee/Dependent | 150 | Cal-COBRA Election Form | EE/DEP Term | A | |
| 115. | Dependent | 151 | Notification of dependent | DEP Term | A | |
| (termination) | termination | |||||
| 116. | Association | 152 | Approval of Individual | Assocn | A | |
| Individual member | Association member | Member | ||||
| reinstatement | Reinstatement | |||||
| 117. | Group (Dependent | 153 | Notification of dependent term | DEP Term | A | |
| termination) | to Group | |||||
| 118. | Group (Dependent | 154 | Notification of dependent | DEP Term | A | |
| retro termination) | retroactive term to Group | |||||
| 119. | Group (Dependent | 155 | Dependent add on denial | DEP Add-on | A | |
| add on denial) | Notification letter | |||||
| 120. | Grievance | 156 | Review Denial of Employee | A | ||
| Retroactive Effective date | ||||||
| 121. | Grievance | 157 | Review Denial of Dependent | A | ||
| Retroactive Effective date | ||||||
| 122. | Grievance | 158 | Review Denial of Dependent | A | ||
| Retroactive Termination date | ||||||
| for employee | ||||||
| 123. | Grievance | 159 | Review Denial of dependent | A | ||
| late enrollee | ||||||
| 124. | Grievance | 160 | Manual letter. Claim form | A | ||
| return letter to Employee | ||||||
| 125. | Grievance | 161 | Manual letter. Claim form | A | ||
| return letter to Association | ||||||
| member | ||||||
| 126. | Grievance | 162 | Manual letter. Dependent | A | ||
| Claim form return letter to | ||||||
| Employee | ||||||
| 127. | Grievance | 163 | Manual letter. Claim form | A | ||
| return letter to Association | ||||||
| member's Dependent | ||||||
| 128. | Group | 164 | Notification of Group Premium | Group Term | A | |
| Shortage Retro Term | ||||||
| 129. | Employee | 165 | Employee notification of | DEP Term | A | |
| (Dependent Retro | Dependent Retro Term | |||||
| Term | ||||||
| 130. | Cobra Calcobra | 166 | Cobra Cal cobra notification of | Group Term | A | |
| group's Retro Term | ||||||
| 131. | Group (Cobra and | 167 | Parent Group Cover Letter for | A | ||
| Cal Cobra group) | Cobra member | |||||
| 132. | Group | 167 A | Group Cover Letter | A | ||
| 133. | Association | 168 | Association Cover Letter | A | ||
| (Association | ||||||
| Individual member | ||||||
| 134. | Employee | 169 | Denial of Dependent changes | DEP Changes | A | |
| (Dependent changes | ||||||
| denial) | ||||||
| Change Record |
| Date | Author | Version | Change Reference |
| Feb. 14, 2002 | Sudhakar K | 1.0 | Baseline Release |
| Apr. 29, 2002 | Sudhakar K | 1.0 Rev 1 | Revised Version |
| Oct. 17, 2002 | Jerald agnal V | 2.0 | Revised Version |
| Reviewers |
| Name | Position | |
| Distribution |
| No Of | ||||
| Copy No. | Name | Copies | Location | |
1. Introduction 6
1.1. Purpose 6
1.2. Business Use Case Specification Reference 6
1.3. Definitions, Acronyms & Abbreviations 6
2. Process Identification 7
2.1. Background 7
2.2. Process Description 7
2.3. Process Flow 7
3. User Interface 9
3.1. User Interface Screens 9
3.1.1. Reports: BPI_SCR_REP_INPUT 9
3.1.2. Help Menu 10
3.2. User Interface Screens 10
3.2.1. Reports: BPI_SCR_REP_OUTPUT 10
3.2.2. Help Menu 11
4. Business Rule Mapping 12
4.1. Module Name: Carrier Maintenance 12
4.1.1. Report ID: BPI_CAS_REP_CM_001 12
4.1.2. Report ID: BPI_CAS_REP_CM_002 12
4.1.3. Report ID: BPI_CAS_REP_CM_003 13
4.1.4. Report ID: BPI_CAS_REP_CM_005 13
4.1.5. Report ID: BPI_CAS_REP_CM_006 14
4.1.6. Report ID: BPI_CAS_REP_CM_007 15
4.2. Module Name: Sales And Marketing 16
4.2.1. Report ID: BPI_CAS_REP_SM_001 16
4.2.2. Report ID: BPI_CAS_REP_SM_002 16
4.2.3. Report ID: BPI_CAS_REP_SM_003 17
4.2.4. Report ID: BPI_CAS_REP_SM_004 17
4.2.5. Report ID: BPI_CAS_REP_SM_005 18
4.2.6. Report ID: BPI_CAS_REP_SM_006 18
4.2.7. Report ID: BPI_CAS_REP_SM_007 19
4.2.8. Report ID: BPI_CAS_REP_SM_008 19
4.2.9. Report ID: BPI_CAS_REP_SM_009 20
4.2.10. Report ID: BPI_CAS_REP_SM_010 20
4.2.11. Report ID: BPI_CAS_REP_SM_011 21
4.2.12. Report ID: BPI_CAS_REP_SM_012 21
4.2.13. Report ID: BPI_CAS_REP_SM_013 22
4.2.14. Report ID: BPI_CAS_REP_SM_014 22
4.2.15. Report ID: BPI_CAS_REP_SM_015 23
4.2.16. Report ID: BPI_CAS_REP_SM_016 23
4.2.17. Report ID: BPI_CAS_REP_SM_017 24
4.2.18. Report ID: BPI_CAS_REP_SM_018 24
4.2.19. Report ID: BPI_CAS_REP_SM_019 25
4.2.20. Report ID: BPI_CAS_REP_SM_020 25
4.2.21. Report ID: BPI_CAS_REP_SM_021 26
4.2.22. Report ID: BPI_CAS_REP_SM_022 26
4.2.23. Report ID: BPI_CAS_REP_SM_023 27
4.3. Module Name: Enrollment 28
4.3.1. Report ID: BPI_CAS_REP_EN_001 28
4.3.2. Report ID: BPI_CAS_REP_EN_002 29
4.3.3. Report ID: BPI_CAS_REP_EN_003 29
4.3.4. Report ID: BPI_CAS_REP_EN_004 30
4.3.5. Report ID: BPI_CAS_REP_EN_005 30
4.3.6. Report ID: BPI_CAS_REP_EN_006 31
4.3.7. Report ID: BPI_CAS_REP_EN_007 31
4.3.8. Report ID: BPI_CAS_REP_EN_008 32
4.3.9. Report ID: BPI_CAS_REP_EN_009 32
4.3.10. Report ID: BPI_CAS_REP_EN_010 33
4.3.11. Report ID: BPI_CAS_REP_EN_011 33
4.3.12. Report ID: BPI_CAS_REP_EN_012 34
4.3.13. Report ID: BPI_CAS_REP_EN_013 34
4.3.14. Report ID: BPI_CAS_REP_EN_014 35
4.3.15. Report ID: BPI_CAS_REP_EN_015 35
4.3.16. Report ID: BPI_CAS_REP_EN_016 36
4.3.17. Report ID: BPI_CAS_REP_EN_017 36
4.3.18. Report ID: BPI_CAS_REP_EN_018 37
4.3.19. Report ID: BPI_CAS_REP_EN_020 37
4.3.20. Report ID: BPI_CAS_REP_EN_021 37
4.3.21. Report ID: BPI_CAS_REP_EN_023 39
4.3.22. Report ID: BPI_CAS_REP_EN_024 39
4.3.23. Report ID: BPI_CAS_REP_EN_026 39
4.3.24. Report ID: BPI_CAS_REP_EN_027 40
4.3.25. Report ID: BPI_CAS_REP_EN_030 40
4.3.26. Report ID: BPI_CAS_REP_EN_031 42
4.3.27. Report ID: BPI_CAS_REP_EN_032 42
4.3.28. Report ID: BPI_CAS_REP_EN_033 43
4.3.29. Report ID: BPI_CAS_REP_EN_034 43
4.3.30. Report ID: BPI_CAS_REP_EN_035 44
4.3.31. Report ID: BPI_CAS_REP_EN_036 44
4.3.32. Report ID: BPI_CAS_REP_EN_037 45
4.3.33. Report ID: BPI_CAS_REP_EN_038 45
4.3.34. Report ID: BPI_CAS_REP_EN_039 46
4.3.35. Report ID: BPI_CAS_REP_EN_040 46
4.3.36. Report ID: BPI_CAS_REP_EN_041 47
4.3.37. Report ID: BPI_CAS_REP_EN_042 47
4.3.38. Report ID: BPI_CAS_REP_EN_043 48
4.3.39. Report ID: BPI_CAS_REP_EN_044 48
4.3.40. Report ID: BPI_CAS_REP_EN_045 49
4.3.41. Report ID: BPI_CAS_REP_EN_046 49
4.3.42. Report ID: BPI_CAS_REP_EN_047 50
4.3.43. Report ID: BPI_CAS_REP_EN_048 50
4.3.44. Report ID: BPI_CAS_REP_EN_051 51
4.3.45. Report ID: BPI_CAS_REP_EN_052 51
4.4. Module Name: Finance 52
4.4.1. Report ID: BPI_CAS_REP_FI_001 52
4.4.2. Report ID: BPI_CAS_REP_FI_002 52
4.4.3. Report ID: BPI_CAS_REP_FI_003 53
4.4.4. Report ID: BPI_CAS_REP_FI_004 53
4.4.5. Report ID: BPI_CAS_REP_FI_005 54
4.4.6. Report ID: BPI_CAS_REP_FI_006 54
4.4.7. Report ID: BPI_CAS_REP_FI_007 56
4.4.8. Report ID: BPI_CAS_REP_FI_008 57
4.4.9. Report ID: BPI_CAS_REP_FI_009 59
4.4.10. Report ID: BPI_CAS_REP_FI_010 60
4.4.11. Report ID: BPI_CAS_REP_FI_011 62
4.4.12. Report ID: BPI_CAS_REP_FI_012 63
4.4.13. Report ID: BPI_CAS_REP_FI_013 65
4.4.14. Report ID: BPI_CAS_REP_FI_014 66
4.4.15. Report ID: BPI_CAS_REP_FI_015 67
4.4.16. Report ID: BPI_CAS_REP_FI_016 67
4.4.17. Report ID: BPI_CAS_REP_FI_017 68
4.4.18. Report ID: BPI_CAS_REP_FI_018 68
4.4.19. Report ID: BPI_CAS_REP_FI_019 69
4.4.20. Report ID: BPI_CAS_REP_FI_020 69
4.4.21. Report ID: BPI_CAS_REP_FI_021 70
4.4.22. Report ID: BPI_CAS_REP_FI_022 70
4.4.23. Report ID: BPI_CAS_REP_FI_025 71
4.4.24. Report ID: BPI_CAS_REP_FI_026 72
4.4.25. Report ID: BPI_CAS_REP_FI_027 72
4.4.26. Report ID: BPI_CAS_REP_FI_028 73
4.4.27. Report ID: BPI_CAS_REP_FI_029 73
4.4.28. Report ID: BPI_CAS_REP_FI_031 74
4.4.29. Report ID: BPI_CAS_REP_FI_032 75
4.4.30. Report ID: BPI_CAS_REP_FI_033 75
4.4.31. Report ID: BPI_CAS_REP_FI_035 76
4.4.32. Report ID: BPI_CAS_REP_FI_036 77
4.4.33. Report ID: BPI_CAS_REP_FI_038 77
4.4.34. Report ID: BPI_CAS_REP_FI_040 77
4.4.35. Report ID: BPI_CAS_REP_FI_041 78
4.4.36. Report ID: BPI_CAS_REP_FI_042 78
4.4.37. Report ID: BPI_CAS_REP_FI_044 79
4.5. Module Name: Miscellaneous (Security, Work Group, Supply Request and Associates) 80
4.5.1. Report ID: BPI_CAS_REP_MISC_001 80
4.5.2. Report ID: BPI_CAS_REP_MISC_002 81
5. Interface Flow 82
6. Data Structures 83
6.1. Back End Validations 83
7. Non-Functional Requirements 84
8. Access Control List 85
1. Introduction
1.1. Purpose
The purpose of this document is to describe the process of Reports and reporting the information and the data available in the system. This document identifies how the user interacts with the system, the data to be captured, the business logic to be implemented, and the output of the process.
1.2. Business Use Case Specification Reference
| Business Use Specification ID | Business Use Case Name | |
| BPI_SCOPE_REP | Reports | |
1.3. Definitions, Acronyms & Abbreviations
| Term | Explanation | |
2. Process Identification
2.1. Background
2.2. Process Description
The objective of the Reports is to provide information captured in the system to the user in a presentable manner.
The reports can be single, two-dimensional and multi dimensional providing the information to the decision-maker.
The objective of reporting is to paint that picture by analyzing and interpreting vast quantities of data-customer demographics, cross-sales, service calls, Internet experiences and online transactions—turning information into insight and developing conclusive, fact-based strategies to gain that competitive edge.
Reports are categorized based on the modules and the purpose of the reports.
2.3. Process Flow
All reports can be classified based on the following criteria:
-
- Purpose of Report: Briefly outline the intended use and the purpose of the report and what information it is to provide.
- Intended Audience/Delivery To: This specifies the intended audience for the report and to whom the report is to be delivered. The can be ranging from President, Vice President Operations, Managers and CFO's and BPI Team.
- Frequency of reports (Monthly, Weekly daily etc.): The frequencies of reports are based on whether the reports are Automated or Manual. All automated reports would have the frequency for delivery (Monthly, Weekly etc.). Manual reports does not have any frequency and can also be called as adhoc report, which is reported on the screen in the form of HTML when, required by the user.
- Mode of Delivery: All automated reports are delivered via email to the users defined as the intended audience. Adhoc reports are viewable on the screen and can be printed in HTML format.
- Output Format (HTML, XL or RTF): Output Format can be XL, HTML or RTF. The formats are based on the report type. All reports that are automated are in XL format. The reports that are manual or Adhoc are in HTML format.
- User Interface required for the report or not: Adhoc Reports and manual reports require user interface to generate the report. These reports are generated in HTML format.
- Automated reports does not require User interface.
- Input to the system (Input parameters): This defines the input parameters required to generate the Report. Input can be based on single parameter, Multiple parameters with and/or Conditions.
- Expected Output of the report (Output Parameters): This defines the output of the report. The output can be single dimensional or multi dimensional.
- Output can also be based on certain logic's, calculation and comparative reports or derivative of two or more reports summarized.
The reports that are generated automatically should be delivered to the intended audience via email. Also all the generated reports should be store under some file path in a systematic manner (may be time stamp and report ID) and logged in file or Database (preferably in database) so that we can retrieve the reports retrospectively from this file path.
3. User Interface
3.1. User Interface Screens
3.1.1. Reports: BPI_SCR_REP_INPUT
3.1.1.1. Screen Snapshot
This is a generalized screen for all the reports. This screen can be split into two parts, one as an input parameter to obtain the desired report and the second part is the report itself. (See Figure L-1)
3.1.1.2. Element Name, Element Type & Purpose
| Element Name | Element Type | Purpose |
| Module ID | Text | Describes the name of the module the |
| report is extracted from. | ||
| Report name | Text | Name of the report |
| Report ID | Text | ID of the Report |
| Parameters | Text | Specifies the input parameters for |
| the report | ||
| Parameter Entries | Entry Field | Specifies the entry fields |
| for the parameters | ||
| Fetch report | HTML Button | Button to fetch the report based on |
| the input criteria | ||
3.1.1.3. Screen Validations
| Element | ||
| Name | Action/Validation Details | Message |
| Parameter | Entry Field for the parameters, E.g. | Error Message: |
| Entries | group ID, Group name, from Date, | “The data you have |
| To Date etc. that is required to build | entered is in correct” | |
| the dynamic reports. | Please enter the | |
| Note: The number of parameters | correct data.” | |
| depends on the report in question. | ||
| The report output can be based on | ||
| the input criteria. The input criteria | ||
| are provided to narrow down the | ||
| search results or narrow down to a | ||
| specific output for the report. | ||
3.1.2. Help Menu
| Element Name | Purpose | Valid Values |
| Parameter Entries | Describe the | Based on specific Reports |
| parameters used | ||
| for the report. | ||
3.2. User Interface Screens
3.2.1. Reports: BPI_SCR_REP_OUTPUT
3.2.1.1. Screen Snapshot (See Figure L-2)
This is a generalized screen for all the reports. This screen can be split into two parts, one as an input parameter to obtain the desired report and the second part is the report itself.
3.2.1.2. Element Name, Element Type & Purpose
| Element Name | Element Type | Purpose |
| Module Name | Text | Describes the name of the module |
| the report is extracted from. | ||
| Report name | Text | Name of the report |
| Report ID | Text | ID of the Report |
| Report Description | Text | Brief Description of the report |
| Report | HTML Table | HTML Table Containing the |
| Report | ||
| Back | HTML Button | Button to navigate back to the |
| Previous Page. (INPUT for the | ||
| Report) | ||
3.2.1.3. Screen Validations
| Element Name | Action/Validation Details | Message |
| Report | The HTML Table for the report is | None |
| dynamic and based on the report can | ||
| be single or multi dimensional. | ||
| Back | HTML Button to navigate to the | None |
| previous screen (Input Screen) | ||
3.2.2. Help Menu
| Element Name | Purpose | Valid Values |
| Report | Shows the | Based on the report the output can be |
| generated reports | single of multi dimensional. | |
4. Business Rule Mapping
4.1. Module Name: Carrier Maintenance
4.1.1. Report ID: BPI_CAS_REP_CM—001
| Report ID | BPI_CAS_REP_CM_001 |
| Report Name | Rates in different format |
| Purpose of | This report is used to show the rates for the various |
| Report | health products offered by Carrier |
| Delivery To | Carriers and All BPI users |
| Frequency | Non periodic |
| Mode of | None |
| Delivery | |
| Output Format | XL or HTML |
| User Interface | Yes |
| Required Yes/ | |
| No | |
| Automated or | Manual |
| Manual | |
| Input to report | 1. Eff_Date |
| 2. Carrier_ID | |
| 3. Plan_Type_ID | |
| 4. Benefit_ID | |
| Output of the | Product Name, Product Name, Rates for Employee Only, |
| Report | Employee and Spouse, Employee and Dependents, |
| Employee, Spouse and Dependents. | |
4.1.2. Report ID:BPI_CAS_REP_CM—002
| Report ID | BPI_CAS_REP_CM_002 |
| Report Name | Comparison on the current rates provided by the |
| carrier with past rate. | |
| Purpose of | This report is to compare the current rate offered |
| Report | by the carrier with their previous rates based on a |
| specified period. | |
| Delivery To | PacAdvantage and All BPI users |
| Frequency | Non periodic |
| Mode of | None |
| Delivery | |
| Output Format | XL or HTML |
| User Interface | Yes |
| Required Yes/ | |
| No | |
| Automated or | Manual |
| Manual | |
| Input to report | 1. Eff_Date |
| 2. Carrier_ID | |
| 3. Plan_Type_ID | |
| 4. Benefit_ID | |
| 5. Eff_Date1 | |
| 6. Carrier_ID1 | |
| 7. Plan_Type_ID1 | |
| 8. Benefit_ID1 | |
| Output of the | Product Name, Product Name, Rates for Employee Only, |
| Report | Employee and Spouse, Employee and Dependents, |
| Employee, Spouse and Dependents. | |
4.1.3. Report ID:BPI_CAS REP_CM—003
| Report ID | BPI_CAS_REP_CM_003 |
| Report Name | Plan availability |
| Purpose of | This report is used to show the plan availability for the |
| Report | specified carrier in a Zip's available in California. |
| Delivery To | Carriers and All BPI users |
| Frequency | Non periodic |
| Mode of | None |
| Delivery | |
| Output Format | XL or HTML |
| User Interface | Yes |
| Required Yes/ | |
| No | |
| Automated or | Manual |
| Manual | |
| Input to report | 1. Eff_Date |
| 2. Plan ID | |
| Output of the | Product Name, Carrier name, ZIP, Effective Date and |
| Report | Rating Region. |
4.1.4. Report ID:BPI_CAS_REP_CM—005
| Report ID | BPI_CAS_REP_CM_005 |
| Report Name | ZIP Codes with No Coverage |
| Purpose of | This report is used to show the Zip's in California where |
| Report | there is no coverage. |
| Delivery To | Carriers and All BPI users |
| Frequency | Non periodic |
| Mode of | None |
| Delivery | |
| Output Format | XL or HTML |
| User Interface | Yes |
| Required Yes/ | |
| No | |
| Automated or | Manual |
| Manual | |
| Input to report | EFF_DATE, |
| LOC_ID. | |
| Output of the | ZIP, Effective Date of Plan non-Availability. |
| Report | |
4.1.5. Report ID:BPI_CAS_REP_CM—006
| Report ID | BPI_CAS_REP_CM_006 |
| Report Name | Plan Changes - Member Effected |
| Purpose of | When there is a change in the plan availability in a |
| Report | specific ZIP code and or County or whenever a plan |
| ceases to exist report about the entire member in the | |
| specific ZIP or County with that planshould be listed. | |
| Delivery To | Carriers and All BPI users |
| Frequency | Non periodic |
| Mode of | |
| Delivery | |
| Output Format | XL |
| User Interface | No |
| Required Yes/ | |
| No | |
| Automated or | Automated/Should be triggered by Plan changes |
| Manual | |
| Input to report | EFF_DATE, |
| PLAN_ID | |
| Output of the | Group name, Group ID, Member Name, Member SSN |
| Report | or Unique ID, Member Benefit Level, Coverage |
| Choice, ZIP, County, Service Area | |
4.1.6. Report ID:BPI_CAS_REP_CM—007
| Report ID | BPI_CAS_REP_CM_007 |
| Report Name | Consolidated report on Rate Classification sorted by Rate |
| Type (Admin, Agent Commission, Additional fees | |
| and Differential Factor) | |
| Purpose of | To report on the Fees structure for the rate Classification |
| Report | based on the Admin fees, Agent Commission |
| Additional fees and differential factor. | |
| Delivery To | Adhoc |
| Frequency | Non periodic |
| Mode of | none |
| Delivery | |
| Output Format | HTML |
| User Interface | Yes |
| Required Yes/ | |
| No | |
| Automated or | Manual |
| Manual | |
| Input to report | PARAMEFFDATE |
| Output of the | Rate Type - Blended: |
| Report | Group Type, Agent Commission, Admin Fee, |
| Rate Type - Non Blended: | |
| LOC Type, Group Type, Group Size, Per Member | |
| Flat Amt, Per Group Flat Amt, | |
| Differential Factor: | |
| Group size down limit, Group size up limit, Differential | |
| factor. | |
4.2. Module Name: Sales and Marketing
4.2.1. Report ID:BPI_CAS_REP_SM—001
| Report ID | BPI_CAS_REP_SM_001 |
| Report Name | Sold Group Details for Period Specified |
| Purpose of | This report is used to show the Total Groups sold for a |
| Report | specified effective date and also show the cumulative |
| sales up to date | |
| Delivery To | BSS Manager, Vice President Operations, President |
| Frequency | Monthly |
| Mode of | |
| Delivery | |
| Output Format | XL or HTML |
| User Interface | Yes |
| Required Yes/ | |
| No | |
| Automated or | Manual and Automated |
| Manual | |
| Input to report | Effective Date |
| Output of the | Group Name, Group ID, Writing Agent Name, |
| Report | Marketing Source, Contact Date, Active |
| Subscribers Count, Active Dependent Count | |
4.2.2. Report ID:BPI_CAS_REP_SM—002
| Report ID | BPI_CAS_REP_SM_002 |
| Report Name | Sold Group Details for Period Specified based on Group |
| Type | |
| Purpose of | This report is used to show the Total Groups sold for a |
| Report | specified effective date and also show the cumulative |
| sales up to date for a specific group type | |
| Delivery To | BSS Manager, Vice President Operations, President |
| Frequency | Monthly |
| Mode of | |
| Delivery | |
| Output Format | XL or HTML |
| User Interface | Yes |
| Required Yes/ | |
| No | |
| Automated or | Manual and Automated |
| Manual | |
| Input to report | Effective Date, Group Type |
| Output of the | Group Name, Group ID, Writing Agent Name, |
| Report | Marketing Source, Contact Date, Subscribers Count, |
| Dependent Count | |
4.2.3. Report ID:BPI_CAS_REP_SM—003
| Report ID | BPI_CAS_REP_SM_003 |
| Report Name | Average Group Size |
| Purpose of | This report is used to show the average group size, |
| Report | i.e. employees/group for Small Employer Group |
| Delivery To | BSS Manager, Vice President Operations, President |
| Frequency | Monthly |
| Mode of | |
| Delivery | |
| Output Format | XL or HTML |
| User Interface | Yes |
| Required Yes/ | |
| No | |
| Automated or | Manual and Automated |
| Manual | |
| Input to report | Effective Date |
| Output of the | Group Name, Group ID, Writing Agent Id, Marketing |
| Report | Source, Contact Date, Subscribers Count, Dependent |
| Count | |
4.2.4. Report ID:BPI_CAS_REP_SM—004
| Report ID | BPI_CAS_REP_SM_004 |
| Report Name | Comparison between case sold Current Months and |
| Previous Year Current Month | |
| Purpose of | This report is used to compare the Case sold in the |
| Report | current month with the cash sold in the previous |
| year current month. | |
| Delivery To | BSS Manager, Vice President Operations, President |
| Frequency | Monthly |
| Mode of | |
| Delivery | |
| Output Format | XL or HTML |
| User Interface | Yes |
| Required Yes/ | |
| No | |
| Automated or | Manual/Automated |
| Manual | |
| Input to report | Effective Date |
| Output of the | Group Type, Current New Groups, Current New |
| Report | Subscribers, Current New Dependents, Current New |
| Member, Prior Year Current New Groups, Prior Year | |
| Current New Subscribers, Prior Year Current New | |
| Dependents, Prior Year Current New Members, This | |
| Month New Subscribers % of Total, This Month New | |
| Groups % of Total, % of Change from Prior Year | |
4.2.5. Report ID:BPI_CAS_REP_SM—005
| Report ID | BPI_CAS_REP_SM_005 |
| Report Name | Group Enrollment With line of Coverage |
| Purpose of | This report is used to identify the groups enrolled with |
| Report | each line of coverage based on effective date. |
| Delivery To | BSS Manager, Vice President Operations, President |
| Frequency | Monthly |
| Mode of | |
| Delivery | |
| Output Format | XL or HTML |
| User Interface | Yes |
| Required Yes/ | |
| No | |
| Automated or | Manual/Automated |
| Manual | |
| Input to report | Effective Date |
| Output of the | Group Type, Year To Date Groups, Year To Date |
| Report | Subscribers, Year To Date Dependents, Year To Date |
| Members, Current New Groups, Current New | |
| Subscribers, Current New Dependents, Current New | |
| Members, Current Terminated Groups, Current | |
| Terminated Subscribers, Current Terminated | |
| Dependents, Current Terminated Members, | |
| Net Gain/Loss Groups, Net Gain/Loss Subscribers, | |
| Net Gain/Loss Dependents, Net Gain/Loss Members | |
4.2.6. Report ID:BPI_CAS_REP_SM—006
| Report ID | BPI_CAS_REP_SM_006 |
| Report Name | Leads by Source for Specified Period |
| Purpose of | This report is used to identify the leads generated |
| Report | based on the source sub type for the specified |
| period. | |
| Delivery To | BSS Manager, Vice President Operations, President |
| Frequency | Weekly, Monthly |
| Mode of | |
| Delivery | |
| Output Format | XL |
| User Interface | Yes |
| Required Yes/ | |
| No | |
| Automated or | Manual/Automated |
| Manual | |
| Output of the | Source Code, Last 12 Months Lead Given, Last 12 |
| Report | Months Lead Sold, Last 12 Months Close Ratio, Last |
| 90 Days Lead Given, Last 90 days Lead Sold, Last 90 | |
| Days Close Ratio, This Month Lead Given, This Month | |
| Lead Sold, This Month Close Ratio, | |
4.2.7. Report ID:BPI_CAS_REP_SM—007
| Report ID | BPI_CAS_REP_SM_007 |
| Report Name | New Lead tracking for brokers |
| Purpose of | This report is used to track the new agent and leads. |
| Report | |
| Delivery To | BSS Manager, Vice President Operations, President |
| Frequency | Weekly, Monthly |
| Mode of | |
| Delivery | |
| Output Format | XL |
| User Interface | Yes |
| Required Yes/ | |
| No | |
| Automated or | Automated |
| Manual | |
| Input to report | Date |
| Output of the | Agent Name, Last 12 Months Lead Given, Last 12 |
| Report | Months Lead Sold, Last 12 Months Close Ratio, Last 90 |
| Days Lead Given, Last 90 days Lead Sold, Last 90 Days | |
| Close Ratio, This Month Lead Given, This Month Lead | |
| Sold, This Month Close Ratio, | |
4.2.8. Report ID:BPI_CAS_REP_SM—008
| Report ID | BPI_CAS_REP_SM_008 |
| Report Name | Quote Tracking |
| Purpose of | This report is used to track the quotes generated |
| Report | per week to the quotes converted to sales. |
| Delivery To | BSS Manager, Vice President Operations, President |
| Frequency | Weekly, Monthly |
| Mode of | |
| Delivery | |
| Output Format | XL |
| User Interface | Yes |
| Required Yes/ | |
| No | |
| Automated or | Automated |
| Manual | |
| Input to report | Date |
| Output of the | For Quote Generation and Groups Sold (Last 30 days, |
| Report | Last 90 days, Last 120 day and Last 365 days) |
4.2.9. Report ID:BPI_CAS_REP_SM—009
| Report ID | BPI_CAS_REP_SM_009 |
| Report Name | Quote With 10 or More employees |
| Purpose of | This report is used to track the quotes with 10 |
| Report | or more employees for follow up. |
| Delivery To | Sales Team |
| Frequency | Monthly |
| Mode of | |
| Delivery | |
| Output Format | XL |
| User Interface | No |
| Required Yes/ | |
| No | |
| Automated or | Automated |
| Manual | |
| Input to report | Date |
| Output of the | Quote No, Company Name, Agent Name, EE Count, |
| Report | Quote Date, Quote Rev, Lead No, Source Sub Type |
4.2.10. Report ID:BPI_CAS_REP_SM—010
| Report ID | BPI_CAS_REP_SM_010 |
| Report Name | Sales with 10 of More employees |
| Purpose of | This report is used to track the sales with 10 or more |
| Report | employees for follow up and customer service. |
| Delivery To | Sales team, GMS Team |
| Frequency | Monthly |
| Mode of | |
| Delivery | |
| Output Format | XL |
| User Interface | No |
| Required Yes/ | |
| No | |
| Automated or | Automated |
| Manual | |
| Input to report | Date |
| Output of the | Group Number, Company Name, Writing Agent, |
| Report | Employee Count, Effective Date, Quote Number, Lead |
| Number, Source Sub Type | |
4.2.11. Report ID:BPI_CAS_REP_SM—011
| Report ID | BPI_CAS_REP_SM_011 |
| Report Name | Quote by Sales Rep/Work Group |
| Purpose of | This report is used to track the quote generated |
| Report | by sales rep belonging to a specific work group. |
| Delivery To | BSS Manager, Vice President Operations, President |
| Frequency | Monthly |
| Mode of | |
| Delivery | |
| Output Format | XL |
| User Interface | No |
| Required Yes/ | |
| No | |
| Automated or | Automated |
| Manual | |
| Input to report | Date |
| Output of the | Work Group Name, Date Quoted, Company Name, |
| Report | Agent ID, Marketing Source, Proposed Effective Date, |
| EE count. | |
4.2.12. Report ID:BPI_CAS_REP_SM—012
| Report ID | BPI_CAS_REP_SM_012 |
| Report Name | Agent Extract |
| Purpose of | This report is used to extract information about the agents |
| Report | up to date |
| Delivery To | BSS Manager, Vice President Operations, President |
| Frequency | Monthly |
| Mode of | |
| Delivery | |
| Output Format | XL |
| User Interface | No |
| Required Yes/ | |
| No | |
| Automated or | Automated |
| Manual | |
| Input to report | Date |
| Output of the | Agent ID, Agent Name, Company Name, Gender, |
| Report | Address, Suite, city, State, Zip, County ID, Phone, Fax, |
| Email, DOB, Agent Tax ID, Work Group, | |
| Commission Groups, Writing Groups, Internal Reps | |
4.2.13. Report ID:BPI_CAS_REP_SM—013
| Report ID | BPI_CAS_REP_SM_012 |
| Report Name | Agent Extract |
| Purpose of | This report is used to extract information about the agents |
| Report | up to date |
| Delivery To | BSS Manager, Vice President Operations, President |
| Frequency | Monthly |
| Mode of | |
| Delivery | |
| Output Format | XL |
| User Interface | No |
| Required Yes/ | |
| No | |
| Automated or | Automated |
| Manual | |
| Input to report | Date |
| Output of the | Agent ID, Agent Name, Company Name, Gender, |
| Report | Address, Suite, city, State, Zip, County ID, Phone, |
| Fax, Email, DOB, Agent Tax ID, Work Group, | |
| Commission Groups, Writing Groups, Internal Reps | |
4.2.14. Report ID:BPI_CAS_REP_SM—014
| Report ID | BPI_CAS_REP_SM_014 |
| Report Name | Quarterly Sales By County |
| Purpose of | This report is used to provide Quarterly sales done by |
| Report | outside sales rep by county |
| Delivery To | BSS Manager, Vice President Operations, President |
| Frequency | Monthly |
| Mode of | |
| Delivery | |
| Output Format | XL |
| User Interface | No |
| Required Yes/ | |
| No | |
| Automated or | Automated |
| Manual | |
| Input to report | Date |
| Output of the | County ID, County Name, Current Group ID, Current |
| Report | Effective Date, Current Subscriber's Total, |
| Current Dependent's Total, Current Member's Total, | |
| Year to Date Group's Total, Year to Date ubscriber's | |
| Total, Year to Date Dependent's Total, Year to Date | |
| Member's Total | |
4.2.15. Report ID:BPI_CAS_REP_SM—015
| Report ID | BPI_CAS_REP_SM_015 |
| Report Name | Enrollment for an Agent |
| Purpose of | This report is used to provide enrollment done by an |
| Report | agent and the group demographics (for Active |
| Groups Only) | |
| Delivery To | BSS Manager, Vice President Operations, President |
| Frequency | Monthly |
| Mode of | None |
| Delivery | |
| Output Format | XL, HTML |
| User Interface | Yes |
| Required Yes/ | |
| No | |
| Automated or | Manual |
| Manual | |
| Input to report | Date, |
| Agent Id | |
| Output of the | Group Id, Group Name, Address, Suite, City, State, Zip, |
| Report | Phone, Email, Effective Date, Group ROE Cycle, |
| EE count, DEP count | |
4.2.16. Report ID:BPI_CAS_REP_SM—016
| Report ID | BPI_CAS_REP_SM_016 |
| Report Name | Enrollment for an Agencies |
| Purpose of | This report is used to provide enrollment done by an |
| Report | agency and associated writing agent, the group |
| demographics (for Active Groups Only) | |
| Delivery To | BSS Manager, Vice President Operations, President |
| Frequency | Monthly |
| Mode of | None |
| Delivery | |
| Output Format | XL, HTML |
| User Interface | Yes |
| Required Yes/ | |
| No | |
| Automated or | Manual |
| Manual | |
| Input to report | Date, |
| Agency Id | |
| Output of the | Group ID, Group Name, Address, Suite, City, State, |
| Report | Zip, Phone, Email, Writing Agent ID, Effective Date, |
| Group ROE Cycle, EE count, DEP count | |
4.2.17. Report ID:BPI_CAS_REP_SM—017
| Report ID | BPI_CAS_REP_SM_017 |
| Report Name | Association Available |
| Purpose of | This report is used to provide information about the |
| Report | association and association groups and individual |
| member. | |
| Delivery To | BSS Manager, Vice President Operations, President |
| Frequency | Monthly |
| Mode of | None |
| Delivery | |
| Output Format | XL, HTML |
| User Interface | Yes |
| Required Yes/ | |
| No | |
| Automated or | Manual |
| Manual | |
| Input to report | Date, |
| Association ID | |
| Output of the | Group Id, Group Name, Address, Suite, City, State, |
| Report | Zip, Phone, Email, Writing Agent ID, Group Eective |
| Date, Group ROE Cycle, EE count, DEP count | |
4.2.18. Report ID:BPI_CAS_REP_SM—018
| Report ID | BPI_CAS_REP_SM_018 |
| Report Name | List of Agent with Agencies along with Group |
| Purpose of | This report is used to provide information on a |
| Report | agencies and the groups and members attached |
| to the agent/agencies | |
| Delivery To | All BPI |
| Frequency | Adhoc/Monthly |
| Mode of | None |
| Delivery | |
| Output Format | HTML |
| User Interface | Yes |
| Required Yes/ | |
| No | |
| Automated or | Manual |
| Manual | |
| Input to report | Date, |
| Agency Id | |
| Output of the | Group ID, Group Name, Address, Suite, City, State, Zip, |
| Report | Phone, Email, Group Effective Date, Group ROE Cycle, |
| EE count, DEP count | |
4.2.19. Report ID:BPI_CAS_REP_SM—019
| Report ID | BPI_CAS_REP_SM_019 |
| Report Name | Agent with Group/member Counts |
| Purpose of | This report is used to provide information on |
| Report | a agent with Group and member count. |
| Delivery To | All BPI |
| Frequency | Adhoc/Monthly |
| Mode of | None |
| Delivery | |
| Output Format | HTML |
| User Interface | Yes |
| Required Yes/ | |
| No | |
| Automated or | Manual |
| Manual | |
| Input to report | Date |
| Output of the | Agent ID, New Agent, Agent Name, Agent Type, |
| Report | Group Count, Member Count, BSU Rep, Group Type, |
| Period | |
4.2.20. Report ID:BPI_CAS_REP_SM—020
| Report ID | BPI_CAS_REP_SM_020 |
| Report Name | Sold Cases by Sales Reps |
| Purpose of | To see what groups have sold for the month. |
| Report | |
| Delivery To | Weekly/Monthly totals to each BSU rep in their |
| work group. | |
| Frequency | Monthly/Weekly |
| Mode of | |
| Delivery | |
| Output Format | XL or HTML |
| User Interface | Yes |
| Required Yes/ | |
| No | |
| Automated or | Manual and Automated |
| Manual | |
| Input to report | Date |
| Output of the | Agent ID, New Agent, Agent Name, Agent Type, Group |
| Report | ID, Group Name, BSU Rep, Group Type, EE |
| members, Quote Date, Effective Date, Finalized | |
| Date, Rate Tier | |
4.2.21. Report ID:BPI_CAS_REP_SM—021
| Report ID | BPI_CAS_REP_SM_021 |
| Report Name | Lead Tracking |
| Purpose of | To see history of the BSU reps leads. |
| Report | |
| Delivery To | BSS Manager, Vice President Operations, President |
| Weekly to each BSU rep in their work group. | |
| Frequency | Monthly/Weekly |
| Mode of | |
| Delivery | |
| Output Format | XL or HTML |
| User Interface | Yes |
| Required Yes/ | |
| No | |
| Automated or | Manual and Automated |
| Manual | |
| Input to report | Date |
| Output of the | Agent ID, Agent Name, Company, Date Lead Added, |
| Report | Source, BSU Rep, Quote Process Date, Group Size, |
| Lead Follow Up Date, Lead Status, Enrolled Date | |
4.2.22. Report ID:BPI_CAS_REP_SM—022
| Report ID | BPI_CAS_REP_SM_022 |
| Report Name | Hot and Cold Agents |
| Purpose of | To report on the agent based on the agents business with |
| Report | PacAdvantage |
| Delivery To | BSS Manager, Vice President Operations, President |
| Weekly to each BSU rep in their work group. | |
| Frequency | Adhoc |
| Mode of | none |
| Delivery | |
| Output Format | HTML |
| User Interface | Yes |
| Required Yes/ | |
| No | |
| Automated or | Manual |
| Manual | |
| Input to report | Date |
| Output of the | Agent Id, New Agent, Agent Name, Agent Type, |
| Report | Business Generated Leads/Conversion, Member |
| Count, Workgroup, Period | |
4.2.23. Report ID:BPI_CAS_REP_SM—023
| Report ID | BPI_CAS_REP_SM_023 |
| Report Name | Agent Profile |
| Purpose of | To report on the agent Profile statue |
| Report | |
| Delivery To | BSS Manager, Vice President Operations, President |
| Weekly to each BSU rep in their work group. | |
| Frequency | Adhoc |
| Mode of | None |
| Delivery | |
| Output Format | HTML |
| User Interface | Yes |
| Required Yes/ | |
| No | |
| Automated or | Manual |
| Manual | |
| Input to report | Date |
| Output of the | Agent Id, New Agent, Agent First Name, Agent Last |
| Report | Name, Agent Type, Agent Profile Information, |
| Status, Bsu Rep | |
4.3. Module Name: Enrollment
4.3.1. Report ID:BPI_CAS_REP_EN—001
| Report ID | BPI_CAS_REP_EN_001 |
| Report Name | Enrollment By Plan |
| Purpose of | This report is used to provide information on enrollment |
| Report | by Benefit Level for each line of coverage |
| Delivery To | VP Finance, Vice President Operations, President |
| Frequency | Monthly |
| Mode of | |
| Delivery | |
| Output Format | XL |
| User Interface | No |
| Required Yes/ | |
| No | |
| Automated or | Automated |
| Manual | |
| Input to report | Effective Date |
| Output of the | Plan Name, Plan Type, Line of Coverage, prior month |
| Report | Total members, Current month New Subscriber, Current |
| month dependent, current termination, current month | |
| net gain and loss, total members active last month + net | |
| gain and loss, number of members Currently enrolled, | |
| This month new subscription % and % change from | |
| previous month. | |
4.3.2. Report ID:BPI_CAS_REP_EN—002
| Report ID | BPI_CAS_REP_EN_002 |
| Report Name | Enrollment By Counties |
| Purpose of | This report is used to provide information on enrollment |
| Report | by Counties for each line of coverage |
| Delivery To | VP Finance, Vice President Operations, President |
| Frequency | Monthly |
| Mode of | |
| Delivery | |
| Output Format | XL |
| User Interface | No |
| Required Yes/ | |
| No | |
| Automated or | Automated |
| Manual | |
| Input to report | Date |
| Output of the | State, County, Plan Type, Line of Coverage, Active |
| Report | Member last period, New Subscriber Current Month, |
| New Dependent Current Month, Terminated Current | |
| Month, Net gain/Loss, System generated Currently | |
| Enrolled Count. Currently Enrolled Active | |
| Subscribers and Active Dependents. | |
4.3.3. Report ID:BPI_CAS_REP_EN—003
| Report ID | BPI_CAS_REP_EN_003 |
| Report Name | Enrollment By Association |
| Purpose of | This report is used to provide information on enrollment |
| Report | by Association Name |
| Delivery To | VP Finance, Vice President Operations, President |
| Frequency | Monthly |
| Mode of | |
| Delivery | |
| Output Format | XL |
| User Interface | No |
| Required Yes/ | |
| No | |
| Automated or | Automated |
| Manual | |
| Input to report | Date |
| Output of the | Association ID, Group Name, Association name, |
| Report | Number of New Groups, Subscribers, dependents, |
| Total Number of Groups, Subscribers and dependent | |
| up to date. | |
4.3.4. Report ID:BPI_CAS_REP_EN—004
| Report ID | BPI_CAS_REP_EN_004 |
| Report Name | Enrollment By Counties |
| Purpose of | This report is used to provide information on enrollment |
| Report | by Counties |
| Delivery To | VP Finance, Vice President Operations, President |
| Frequency | Monthly |
| Mode of | |
| Delivery | |
| Output Format | XL |
| User Interface | No |
| Required Yes/ | |
| No | |
| Automated or | Automated |
| Manual | |
| Input to report | Date |
| Output of the | Group Type, County Name, |
| Report | (Total Enrolled) # of Groups, Total Active |
| Subscriber, Total Active Dependent (New Enrollment for | |
| Current Period) New Subscriber, New Dependent, This | |
| period terms Net gain/Loss, # of | |
| Groups, # of COBRA, # of Association | |
4.3.5. Report ID:BPI_CAS_REP_EN—005
| Report ID | BPI_CAS_REP_EN_005 |
| Report Name | Monthly Individual Application received and processes |
| Purpose of | This report is used to provide information on |
| Report | Applications received and processed on weekly/monthly |
| basis. (This report is based on mail room entry) | |
| Delivery To | VP Finance, Vice President Operations, President |
| Frequency | Monthly |
| Mode of | |
| Delivery | |
| Output Format | XL, HTML |
| User Interface | Yes |
| Required Yes/ | |
| No | |
| Automated or | Automated, Manual |
| Manual | |
| Input to report | Applications received Date |
| Output of the | Line Of Coverage, Small Employer Group - Subscribers, |
| Report | Small Employer Group - Dependents, COBRA |
| Subscribers, COBRA dependents, Association | |
| Subscribers and Association dependents. | |
4.3.6. Report ID:BPI_CAS_REP_EN—006
| Report ID | BPI_CAS_REP_EN_006 |
| Report Name | Total Enrollment By Benefit Level (Carrier Offered) |
| Purpose of | This report is used to provide information on total |
| Report | enrollment based on the benefit level offered by |
| carriers. (Small Employer Groups) | |
| Delivery To | VP Finance, Vice President Operations, President |
| Frequency | Monthly |
| Mode of | |
| Delivery | |
| Output Format | XL, |
| User Interface | No |
| Required Yes/ | |
| No | |
| Automated or | Automated |
| Manual | |
| Input to report | Effective Date |
| Output of the | Plan Name, Plan Type, Active Last Period, This Period |
| Report | New Subscribers, This Period New Dependents, This |
| Period Terminated, This Period Net Gain Loss, Active | |
| Subscribers, Active Dependents | |
4.3.7. Report ID:BPI_CAS_REP_EN—007
| Report ID | BPI_CAS_REP_EN_007 |
| Report Name | Applications Declined by reasons |
| Purpose of | This report is used to provide information on |
| Report | Applications declined based on specific reasons. |
| Delivery To | VP Finance, Vice President Operations, President |
| Frequency | Monthly |
| Mode of | |
| Delivery | |
| Output Format | XL, |
| User Interface | No |
| Required Yes/ | |
| No | |
| Automated or | Automated |
| Manual | |
| Input to report | Date |
| Output of the | Reasons for Decline, # of Subscriber Application, |
| Report | # of Dependent Application, COBRA Subscriber |
| Application, COBRA Dependent Application, | |
| Association Subscriber Application, Association | |
| Dependent Applications. | |
4.3.8. Report ID:BPI_CAS_REP_EN—008
| Report ID | BPI_CAS_REP_EN_008 |
| Report Name | Group applications Declined by reasons |
| Purpose of | This report is used to provide information on Group |
| Report | Applications declined based on specific reasons. |
| Delivery To | VP Finance, Vice President Operations, President |
| Frequency | Monthly |
| Mode of | |
| Delivery | |
| Output Format | XL, |
| User Interface | No |
| Required Yes/ | |
| No | |
| Automated or | Automated |
| Manual | |
| Input to report | Date |
| Output of the | Reasons for Decline, # of Group Application, |
| Report | # of Association Application, # of |
| COBRA Application. | |
4.3.9. Report ID:BPI_CAS_REP_EN—009
| Report ID | BPI_CAS_REP_EN_009 |
| Report Name | Member Termination Summary |
| Purpose of | This report is used to provide information on Members |
| Report | Termed. |
| Delivery To | VP Finance, Vice President Operations, President |
| Frequency | Monthly |
| Mode of | |
| Delivery | |
| Output Format | XL, |
| User Interface | No |
| Required Yes/ | |
| No | |
| Automated or | Automated |
| Manual | |
| Input to report | Date |
| Output of the | Group Type, Subscriber Terminated this Period, |
| Report | Dependent Terminated this period, Members |
| Terminated this period | |
4.3.10. Report ID:BPI_CAS_REP_EN—010
| Report ID | BPI_CAS_REP_EN_010 |
| Report Name | Group Termination Summary |
| Purpose of | This report is used to provide information on Groups |
| Report | Termed. |
| Delivery To | VP Finance, Vice President Operations, President |
| Frequency | Monthly |
| Mode of | |
| Delivery | |
| Output Format | XL, |
| User Interface | No |
| Required Yes/ | |
| No | |
| Automated or | Automated |
| Manual | |
| Input to report | Date |
| Output of the | Group Type, No of Groups terminated this period, |
| Report | Subscriber Terminated this period, Dependent |
| Terminated this period, Members Terminated this period. | |
4.3.11. Report ID:BPI_CAS_REP_EN—011
| Report ID | BPI_CAS_REP_EN_011 |
| Report Name | New Group Summary |
| Purpose of | This report is used to provide information on New |
| Report | Groups Enrolled during Current Period |
| Delivery To | VP Finance, Vice President Operations, President |
| Frequency | Monthly |
| Mode of | |
| Delivery | |
| Output Format | XL, |
| User Interface | No |
| Required Yes/ | |
| No | |
| Automated or | Automated |
| Manual | |
| Input to report | Date |
| Output of the | Group Type, New Groups, New Subscribers, New |
| Report | Dependents, New members |
4.3.12. Report ID:BPI_CAS_REP_EN—012
| Report ID | BPI_CAS_REP_EN_012 |
| Report Name | New Employees and Add-On Summary |
| Purpose of | This report is used to provide information on New |
| Report | Employees and Add On's |
| Delivery To | VP Finance, Vice President Operations, President |
| Frequency | Monthly |
| Mode of | |
| Delivery | |
| Output Format | XL, |
| User Interface | No |
| Required Yes/ | |
| No | |
| Automated or | Automated |
| Manual | |
| Input to report | Date |
| Output of the | Group Type, New Subscribers, New Dependents, New |
| Report | members |
4.3.13. Report ID:BPI_CAS_REP_EN—013
| Report ID | BPI_CAS_REP_EN_013 |
| Report Name | Group Termination details for a specific group size. |
| Purpose of | This report is used to provide information on termed |
| Report | Groups by Group Size |
| Delivery To | VP Finance, Vice President Operations, President |
| Frequency | Monthly |
| Mode of | |
| Delivery | |
| Output Format | XL, |
| User Interface | No |
| Required Yes/ | |
| No | |
| Automated or | Automated |
| Manual | |
| Input to report | Date |
| Output of the | Small Employer Group Term reasons, Writing Agent, |
| Report | Group Size (<=4, 5-9, 10-14, 15-24, 25-29, 30>=) |
| Total Groups, Total Members, Total Subscriber and | |
| Total Dependent. | |
4.3.14. Report ID:BPI_CAS_REP_EN—014
| Report ID | BPI_CAS_REP_EN_014 |
| Report Name | Member Demographics by Age Bucket |
| Purpose of | This report is used to provide information on Member |
| Report | demographics by age bucket |
| Delivery To | VP Finance, Vice President Operations, President |
| Frequency | Monthly |
| Mode of | |
| Delivery | |
| Output Format | XL, |
| User Interface | No |
| Required Yes/ | |
| No | |
| Automated or | Automated |
| Manual | |
| Input to report | Date |
| Output of the | Age and gender, Line of Coverage, Group type, New |
| Report | Subscriber this period, New Dependent This period, |
| New Member this period, Total Subscriber, | |
| total dependent, total member | |
| Age of enrolled member (<=29, 30-39, 40-49, | |
| 50-59, 60-64, 65>=) | |
4.3.15. Report ID:BPI_CAS_REP_EN—015
| Report ID | BPI_CAS_REP_EN_015 |
| Report Name | Member Demographics for Newly Enrolled members |
| Purpose of | This report is used to provide information on newly |
| Report | enrolled member by member demographics |
| Delivery To | VP Finance, Vice President Operations, President |
| Frequency | Monthly |
| Mode of | |
| Delivery | |
| Output Format | XL, |
| User Interface | No |
| Required Yes/ | |
| No | |
| Automated or | Automated |
| Manual | |
| Input to report | Date |
| Output of the | Age and gender, Line of Coverage, Group type, New |
| Report | Subscriber this period, New Dependent This period, |
| New Member this period Age of Newly enrolled | |
| subscriber | |
| Age of enrolled member (<=29, 30-39, 40-49, | |
| 50-59, 60-64, 65>=) | |
4.3.16. Report ID:BPI_CAS_REP_EN—016
| Report ID | BPI_CAS_REP_EN_016 |
| Report Name | Employee Demographics by Coverage Choice. |
| Purpose of | This report is used to provide information on enrolled |
| Report | employee by coverage choice. |
| Delivery To | VP Finance, Vice President Operations, President |
| Frequency | Monthly |
| Mode of | |
| Delivery | |
| Output Format | XL, |
| User Interface | No |
| Required Yes/ | |
| No | |
| Automated or | Automated |
| Manual | |
| Input to report | Date |
| Output of the | Loc, Coverage Choice (Employee only, Employee |
| Report | and Child/ren, Employee Spouse, Employee family) |
| New Subscriber, New Dependent, New member this | |
| period. | |
| Total Enrollments | |
| Subscriber, Dependent, Member Currently Enrolled up | |
| to date, Age of enrolled Subscriber | |
| (<=29, 30-39, 40-49, 50-59, 60-64, 65>=) | |
4.3.17. Report ID:BPI_CAS_REP_EN—017
| Report ID | BPI_CAS_REP_EN_017 |
| Report Name | Group Enrollment by group type with and without agent |
| Purpose of | This report is used to provide information on enrolled |
| Report | Group with/without agent. |
| Delivery To | VP Finance, Vice President Operations, President |
| Frequency | Monthly |
| Mode of | |
| Delivery | |
| Output Format | XL, |
| User Interface | No |
| Required Yes/ | |
| No | |
| Automated or | Automated |
| Manual | |
| Input to report | Date |
| Output of the | Group Type, With agent or without agent, Group Count, |
| Report | Total active subscribers, Total active Dependents, This |
| Period New groups, This period new Subscribers, | |
| This period Add ons, This period terms, Net gain | |
| and loss, No of SEG Groups, No of Cobras, No | |
| of Associations. | |
4.3.18. Report ID:BPI_CAS_REP_EN—018
| Report ID | BPI_CAS_REP_EN_018 |
| Report Name | Aging Report for Pending status |
| Purpose of | This report is used to provide information on |
| Report | performance by duration for Received applications |
| and pending up to date. (i.e. how many | |
| applications and what | |
| type are in pend status. | |
| Delivery To | VP Finance, Vice President Operations, President |
| Frequency | Daily |
| Mode of | |
| Delivery | |
| Output Format | XL, HTML |
| User Interface | Yes |
| Required Yes/ | |
| No | |
| Automated or | Manual |
| Manual | |
| Input to report | Date |
| Output of the | Process Type, Reference_ID, Date Started, Started By, |
| Report | Work group, Days in Pending Status. |
4.3.19. Report ID:BPI_CAS_REP_EN—020
| Report ID | BPI_CAS_REP_EN_020 |
| Report Name | Group Enrolled by Group Size |
| Purpose of | This report is used to provide information on group |
| Report | enrolled by group size |
| Delivery To | VP Finance, Vice President Operations, President |
| Frequency | Monthly |
| Mode of | |
| Delivery | |
| Output Format | XL |
| User Interface | No |
| Required Yes/ | |
| No | |
| Automated or | Automated |
| Manual | |
| Input to report | Date |
| Output of the | Group Size, Group Name, Writing Agent, Group Count, |
| Report | Subscribers Count, Dependent Count, Total |
| Member Count, | |
| (Group Size as (<=4, 5-9, 10-14, 15-24, 25-29, | |
| 30>=)) | |
4.3.20. Report ID:BPI_CAS_REP_EN—021
| Report ID | BPI_CAS_REP_EN_021 |
| Report Name | Define Contribution |
| Purpose of | This report is used to provide information on group |
| Report | enrolled by Contribution Type for Small Employer Group |
| Delivery To | VP Finance, Vice President Operations, President |
| Frequency | Monthly |
| Mode of | |
| Delivery | |
| Output Format | XL |
| User Interface | No |
| Required Yes/ | |
| No | |
| Automated or | Automated |
| Manual | |
| Input to report | Date |
| Output of the | Employer Defined Contribution, Product Type, |
| Report | Contribution Type, Contribution Amount, Groups |
| Current Month, Groups Calendar Year to Date | |
4.3.21. Report ID:BPI_CAS_REP_EN—023
| Report ID | BPI_CAS_REP_EN_023 |
| Report Name | Report on Other's Remarks form all the screens |
| Purpose of | This report is used to provide information on New |
| Report | remarks that needs to be added in to the system |
| Delivery To | IT, VP Finance, Vice President Operations, President |
| Frequency | Monthly |
| Mode of | Manual |
| Delivery | |
| Output Format | XL, HTML |
| User Interface | Yes |
| Required Yes/ | |
| No | |
| Automated or | Manual |
| Manual | |
| Input to report | Screen ID |
| Output of the | Module Name, Element Name, Remarks/Others |
| Report | |
4.3.22. Report ID:BPI_CAS_REP_EN—024
| Report ID | BPI_CAS_REP_EN_024 |
| Report Name | Summary Report |
| Purpose of | This report is used to provide information on summary |
| Report | of Enrollment as on date |
| Delivery To | VP Finance, Vice President Operations, President |
| Frequency | Monthly |
| Mode of | |
| Delivery | |
| Output Format | XL, |
| User Interface | No |
| Required Yes/ | |
| No | |
| Automated or | Automated |
| Manual | |
| Input to report | Date |
| Output of the | Group type, Current Group Count, Current Subscriber |
| Report | Count, Current Dependent Count, Current Member |
| Count, Year-to-date Group Count, Year-to-date | |
| Subscriber Count, Year-to-date Dependent | |
| Count, Year-to-date Member Count. | |
4.3.23. Report ID:BPI_CAS_REP_EN—026
| Report ID | BPI_CAS_REP_EN_026 |
| Report Name | Employee and Members by Line of Coverage |
| Purpose of | This report is used to provide information on |
| Report | employees lives by line of coverage and member per |
| group by line of coverage. | |
| Delivery To | VP Finance, Vice President Operations, President |
| Frequency | Monthly |
| Mode of | |
| Delivery | |
| Output Format | XL, |
| User Interface | No |
| Required Yes/ | |
| No | |
| Automated or | Automated |
| Manual | |
| Input to report | Date |
| Output of the | Line of Coverage, Employees Count, Dependent |
| Report | Counts, member Counts Number of Members |
| Per group/Line of Coverage. | |
4.3.24. Report ID:BPI_CAS_REP_EN—027
| Report ID | BPI_CAS_REP_EN_030 |
| Report Name | Un Insured Groups and employees |
| Purpose of | This report is used to provide information on |
| Report | Groups and Employees Enrolling without prior |
| coverage. | |
| Delivery To | VP Finance, Vice President Operations, President |
| Frequency | Monthly |
| Mode of | |
| Delivery | |
| Output Format | XL, |
| User Interface | No |
| Required Yes/ | |
| No | |
| Automated or | Automated |
| Manual | |
| Input to report | Date. |
| Output of the | Employee Count Active up to date without prior |
| Report | Coverage, Employee Count up to date without |
| prior Coverage | |
| Current Employee Count without prior coverage, Current | |
| Employee Count Termed without prior coverage. | |
4.3.25. Report ID:BPI_CAS_REP_EN—030
| Report ID | BPI_CAS_REP_EN_030 |
| Report Name | Un Insured Groups and employees |
| Purpose of | This report is used to provide information on |
| Report | Groups and Employees Enrolling without prior |
| coverage. | |
| Delivery To | VP Finance, Vice President Operations, President |
| Frequency | Monthly |
| Mode of | |
| Delivery | |
| Output Format | XL, |
| User Interface | No |
| Required Yes/ | |
| No | |
| Automated or | Automated |
| Manual | |
| Input to report | Date. |
| Output of the | Employee Count Active up to date without prior |
| Report | Coverage, Employee Count up to date without |
| prior Coverage | |
| Current Employee Count without prior coverage, Current | |
| Employee Count Termed without prior coverage. | |
4.3.26. Report ID:BPI_CAS_REP_EN—031
| Report ID | BPI_CAS_REP_EN_031 | |
| Report Name | Prior Insurance Carrier | |
| Purpose of | This report is used to provide information on | |
| Report | Employees with prior coverage information. | |
| Delivery To | VP Finance, Vice President Operations, President | |
| Frequency | Ad hoc | |
| Mode of | Manual | |
| Delivery | ||
| Output Format | XL, HTML | |
| User Interface | Yes | |
| Required Yes/ | ||
| No | ||
| Automated or | Manual | |
| Manual | ||
| Input to report | Date | |
| Output of the | Prior Coverage carrier name, Employee Count | |
| Report | ||
4.3.27. Report ID:BPI_CAS_REP_EN—032
| Report ID | BPI_CAS_REP_EN_032 |
| Report Name | ROE Report |
| Purpose of | This report is used to provide information on Ad On, |
| Report | Change after and before ROE |
| Delivery To | VP Finance, Vice President Operations, President |
| Frequency | Monthly |
| Mode of | |
| Delivery | |
| Output Format | XL |
| User Interface | No |
| Required Yes/ | |
| No | |
| Automated or | Automated |
| Manual | |
| Input to report | |
| Output of the | Group Id, ROE Status, ROE Result, Date Received |
| Report | Requal Info, Date Postmark Requal info type, No of |
| Employees, No of COBRA'S. | |
4.3.28. Report ID:BPI_CAS_REP_EN—033
| Report ID | BPI_CAS_REP_EN_033 |
| Report Name | Carrier issues by Carrier and By issues |
| Purpose of | This report is used to provide information on Carrier |
| Report | Issues by Issues and By Carrier |
| Delivery To | VP Finance, Vice President Operations, President |
| Frequency | Monthly |
| Mode of | |
| Delivery | |
| Output Format | XL |
| User Interface | No |
| Required Yes/ | |
| No | |
| Automated or | Automated |
| Manual | |
| Input to report | Date |
| Output of the | Carrier Name, Carrier Issue Reported, Carrier Issue - |
| Report | Actual, Date Received, Date Resolved Total Days |
| To process | |
4.3.29. Report ID:BPI_CAS_REP_EN—034
| Report ID | BPI_CAS_REP_EN_034 |
| Report Name | Appeals and Grievances |
| Purpose of | This report is used to provide information on Appeals |
| Report | and Grievances |
| Delivery To | VP Finance, Vice President Operations, President |
| Frequency | Monthly |
| Mode of | |
| Delivery | |
| Output Format | XL |
| User Interface | No |
| Required Yes/ | |
| No | |
| Automated or | Automated |
| Manual | |
| Input to report | Date |
| Output of the | Nature of Appeals, Appellant Type, Appellant Name, |
| Report | Group No, Date Received, Date Closed, Conclusion |
4.3.30. Report ID:BPI_CAS_REP_EN—035
| Report ID | BPI_CAS_REP_EN_035 |
| Report Name | COBRA Enrollment by COBRA Type |
| Purpose of | This report is used to provide information on COBRA |
| Report | Enrollment by COBRA type and by Line of Coverage |
| Delivery To | VP Finance, Vice President Operations, President |
| Frequency | Monthly |
| Mode of | |
| Delivery | |
| Output Format | XL |
| User Interface | No |
| Required Yes/ | |
| No | |
| Automated or | Automated |
| Manual | |
| Input to report | Date |
| Output of the | COBRA Type, No of New COBRA's Groups |
| Report | Subscribers & Dependents - for Current and |
| Enrolled Total | |
4.3.31. Report ID:BPI_CAS_REP_EN—036
| Report ID | BPI_CAS_REP_EN_036 |
| Report Name | Disabled Dependent |
| Purpose of | This report is used to provide information on Disabled |
| Report | Dependent |
| Delivery To | VP Finance, Vice President Operations, President |
| Frequency | Monthly |
| Mode of | |
| Delivery | |
| Output Format | XL |
| User Interface | No |
| Required Yes/ | |
| No | |
| Automated or | Automated |
| Manual | |
| Input to report | Date |
| Output of the | Group Id, Group Name, Disabled Type, Disabled |
| Report | Dependent Count |
4.3.32. Report ID:BPI_CAS_REP_EN—037
| Report ID | BPI_CAS_REP_EN_037 |
| Report Name | Employee Status up to date |
| Purpose of | This report is used to provide information on Employee |
| Report | Status up to date. |
| Delivery To | All BPI |
| Frequency | Adhoc |
| Mode of | None |
| Delivery | |
| Output Format | HTML |
| User Interface | Yes |
| Required Yes/ | |
| No | |
| Automated or | Manual |
| Manual | |
| Input to report | Group ID |
| Output of the | Group Id, Group Name, Employee SSN, Employee |
| Report | Name, Employee Status Up to date, Effective Date |
4.3.33. Report ID:BPI_CAS_REP_EN—038
| Report ID | BPI_CAS_REP_EN_038 |
| Report Name | Employer/Group Status (Including COBRA and |
| Small Employer and Individual Association | |
| Member and Association group) | |
| Purpose of | This report is used to provide information on Group |
| Report | Level Status up to date. |
| Delivery To | All BPI |
| Frequency | Adhoc |
| Mode of | None |
| Delivery | |
| Output Format | HTML |
| User Interface | Yes |
| Required Yes/ | |
| No | |
| Automated or | Manual |
| Manual | |
| Input to report | Group ID |
| Output of the | Group ID, Group Type, Employee Status Up to date, |
| Report | Effective Date, Employee Count, Member Count. |
4.3.34. Report ID:BPI_CAS_REP_EN—039
| Report ID | BPI_CAS_REP_EN_039 |
| Report Name | COBRA/Cal COBRA Status up to date |
| Purpose of | This report is used to provide information on COBRA/ |
| Report | Cal COBRA Status up to date. |
| Delivery To | All BPI |
| Frequency | Adhoc |
| Mode of | None |
| Delivery | |
| Output Format | HTML |
| User Interface | Yes |
| Required Yes/ | |
| No | |
| Automated or | Manual |
| Manual | |
| Input to report | GROUP ID |
| Output of the | Parent Group Id, Parent Group Name, Anniversary |
| Report | Date, COBRA Group Id, COBRA Group Name, COBRA |
| type, Status Up to Date, Effective Date, Member Count, | |
| COBRA Tenure, COBRA End Date | |
4.3.35. Report ID:BPI_CAS_REP_EN—040
| Report ID | BPI_CAS_REP_EN_040 |
| Report Name | Association Group and Member Counts |
| Purpose of | This report is used to provide information on a |
| Report | specific association and the Groups and individual |
| members affiliated with the Association | |
| Delivery To | All BPI |
| Frequency | Adhoc |
| Mode of | None |
| Delivery | |
| Output Format | HTML |
| User Interface | Yes |
| Required Yes/ | |
| No | |
| Automated or | Manual |
| Manual | |
| Input to report | Association ID |
| Output of the | Association ID, Association name, Association Type, |
| Report | Association Group Type, Group ID/Member ID, |
| Employee SSN, Employee Name, Status Up to Date, | |
| Effective Date of Status, Anniversary Date, Employee | |
| Count, Member Count | |
4.3.36. Report ID:BPI_CAS_REP_EN—041
| Report ID | BPI_CAS_REP_EN_041 |
| Report Name | Carrier Issues for a specific Carrier (Member Level) |
| Purpose of | This report is used to provide information on Carrier |
| Report | Issues on a specific carrier. |
| Delivery To | All BPI |
| Frequency | Adhoc |
| Mode of | None |
| Delivery | |
| Output Format | HTML |
| User Interface | Yes |
| Required Yes/ | |
| No | |
| Automated or | Manual |
| Manual | |
| Input to report | Carrier ID |
| Output of the | Carrier ID, Carrier Name, List of Member for the carrier |
| Report | specified with SSN # or ID, Date of Birth, Effective Date |
| with the carrier, Plan Opted by Member, Transmission | |
| status, Transmission Date. | |
4.3.37. Report ID:BPI_CAS_REP_EN—042
| Report ID | BPI_CAS_REP_EN_042 |
| Report Name | Carrier Issues for a specific Carrier (Group Level) |
| Purpose of | This report is used to provide information on Carrier |
| Report | Issues on a specific carrier (Group Level). |
| Delivery To | All BPI |
| Frequency | Adhoc |
| Mode of | None |
| Delivery | |
| Output Format | HTML |
| User Interface | Yes |
| Required Yes/ | |
| No | |
| Automated or | Manual |
| Manual | |
| Input to report | Carrier ID |
| Output of the | Carrier ID, Carrier Name, Group ID, Group name, |
| Report | Effective Date, Member Count, Transmission status, |
| Transmission Date. | |
4.3.38. Report ID:BPI_CAS_REP_EN—043
| Report ID | BPI_CAS_REP_EN_043 |
| Report Name | Report on Transaction History for Enrollment (Group |
| Level) | |
| Purpose of | This report is used to provide information on the History |
| Report | of all the transactions and changes (Enrollment) made on |
| the group up to date. | |
| Delivery To | All BPI |
| Frequency | Adhoc |
| Mode of | None |
| Delivery | |
| Output Format | HTML |
| User Interface | Yes |
| Required Yes/ | |
| No | |
| Automated or | Manual |
| Manual | |
| Input to report | Group ID |
| Output of the | Group Id, Group Name, Group Type, Nature of |
| Report | Transaction, Transaction Description, Effective Date, |
| User Id | |
4.3.39. Report ID:BPI_CAS_REP_EN—044
| Report ID | BPI_CAS_REP_EN_044 |
| Report Name | Report on Transaction History for Enrollment (Employee |
| Level) | |
| Purpose of | This report is used to provide information on the History |
| Report | of all the transactions and changes (Enrollment) made on |
| the employee up to date. | |
| Delivery To | All BPI |
| Frequency | Adhoc |
| Mode of | None |
| Delivery | |
| Output Format | HTML |
| User Interface | Yes |
| Required Yes/ | |
| No | |
| Automated or | Manual |
| Manual | |
| Input to report | Group ID |
| Output of the | Group Id, Group Name, Group Type, Employee ID, |
| Report | Employee SSN, Nature of Transaction, Transaction |
| Description Effective Date, User Id | |
4.3.40. Report ID:BPI_CAS_REP_EN—045
| Report ID | BPI_CAS_REP_EN_045 |
| Report Name | Report on Transaction History for Enrollment |
| (Dependent Level) | |
| Purpose of | This report is used to provide information on the History |
| Report | of all the transactions and changes (Enrollment) made on |
| the dependent up to date. | |
| Delivery To | All BPI |
| Frequency | Adhoc |
| Mode of | None |
| Delivery | |
| Output Format | HTML |
| User Interface | Yes |
| Required Yes/ | |
| No | |
| Automated or | Manual |
| Manual | |
| Input to report | Group ID |
| Output of the | Group ID, Group name, Group Type, Employee |
| Report | ID/SSN, Dependent Id Dependent SSN, Nature of |
| Transaction, Transaction Description, Effective Date, | |
| User Id | |
4.3.41. Report ID:BPI_CAS_REP_EN—046
| Report ID | BPI_CAS_REP_EN_046 |
| Report Name | Agent Change record for a specific group |
| Purpose of | This report is used to provide information on the Agent |
| Report | Change record for a specific group |
| Delivery To | All BPI |
| Frequency | Adhoc |
| Mode of | None |
| Delivery | |
| Output Format | HTML |
| User Interface | Yes |
| Required Yes/ | |
| No | |
| Automated or | Manual |
| Manual | |
| Input to report | Date |
| Output of the | Agent ID, Agent Name, Effective Change Date |
| Report | |
4.3.42. Report ID:BPI_CAS_REP_EN—047
| Report ID | BPI_CAS_REP_EN_047 |
| Report Name | Report on ROE/OE on Groups |
| Purpose of | This report is used to provide information on the Groups |
| Report | that underwent or is in process for ROE/OE. |
| Delivery To | All BPI |
| Frequency | Adhoc |
| Mode of | None |
| Delivery | |
| Output Format | HTML |
| User Interface | Yes |
| Required Yes/ | |
| No | |
| Automated or | Manual |
| Manual | |
| Input to report | Date |
| Output of the | Group Id, Group Name, Group Type, Effective Date, |
| Report | Process (ROE or OE), ROE/OE Date. |
4.3.43. Report ID:BPI_CAS_REP_EN—048
| Report ID | BPI_CAS_REP_EN_048 |
| Report Name | Report on Blended Vs Non Blended Group |
| Purpose of | This report is used to provide information on the |
| Report | Blended Vs Non Blended Group. |
| Delivery To | All BPI |
| Frequency | Adhoc |
| Mode of | None |
| Delivery | |
| Output Format | HTML |
| User Interface | Yes |
| Required Yes/ | |
| No | |
| Automated or | Manual |
| Manual | |
| Input to report | Date |
| Output of the | Group Id, Group Name, Group Type, Effective Date, |
| Report | Blended/Non Blended, Blended Group Count, Non |
| Blended group Count | |
4.3.44. Report ID:BPI_CAS_REP_EN—051
| Report ID | BPI_CAS_REP_EN_051 |
| Report Name | Reports on Group schedule to be termed. |
| Purpose of | This is to report on the Groups whose are scheduled to |
| Report | be termed. |
| Delivery To | VP Operations, GMS Manager |
| Frequency | Monthly |
| Mode of | |
| Delivery | |
| Output Format | XL |
| User Interface | No |
| Required Yes/ | |
| No | |
| Automated or | Automated |
| Manual | |
| Input to report | Date |
| Output of the | Group ID, Group name, Group Type, Work Group, |
| Report | Terminated Date, Term Process initiation Date, |
| Term Reasons, Days Pending | |
4.3.45. Report ID:BPI_CAS_REP_EN—052
| Report ID | BPI_CAS_REP_FI_044 |
| Report Name | Enrollment Transmission Status |
| Purpose of | This report is used to show the status for the transmission |
| Report | for various external transmissions for a specified |
| duration | |
| Delivery To | IT |
| Frequency | Non periodic |
| Mode of | None |
| Delivery | |
| Output Format | XL or HTML |
| User Interface | Yes |
| Required Yes/ | |
| No | |
| Automated or | Manual |
| Manual | |
| Input to report | From Date |
| To Date | |
| Output of the | Transmission Time and Date, Process Period, Data |
| Report | Format Transmission Type, File Size, Record |
| Count, Status. | |
4.4. Module Name: Finance
4.4.1. Report ID:BPI_CAS_REP_FI—001
| Report ID | BPI_CAS_REP_FI_001 |
| Report Name | Pending Commission |
| Purpose of | To report on the list of commissions reconciled but |
| Report | unpaid at the month-end. |
| Delivery To | CFO, Manager Finance |
| Frequency | Monthly, Adhoc |
| Mode of | |
| Delivery | |
| Output Format | XL, HTML |
| User Interface | Yes |
| Required Yes/ | |
| No | |
| Automated or | Automated, Manual |
| Manual | |
| Input to report | Agent ID |
| Output of the | Agent ID, Agent name (Commission Payee), Period |
| Report | End Date, Billing Period, Group ID, Month Period |
| Ending, Writing Agent ID, Writing Agent name, Member | |
| Counts for the Group, Line of Coverage, Commission | |
| Split Percent, Flat Fee (Group Level), Per Member Fees, | |
| Total Fees Payable, Monthly Premium amount, Blended/ | |
| Non Blended. | |
4.4.2. Report ID:BPI_CAS_REP_FI—002
| Report ID | BPI_CAS_REP_FI_002 |
| Report Name | Agent Owing PacAdvantage Money |
| Purpose of | To report on the list of agents who must pay back |
| Report | commission to the PacAdvantage. Represents |
| receivable to PacAdvantage at the month-end. | |
| Delivery To | CFO, Manager Finance |
| Frequency | Monthly, Adhoc |
| Mode of | |
| Delivery | |
| Output Format | XL, HTML |
| User Interface | Yes |
| Required Yes/ | |
| No | |
| Automated or | Automated, Manual |
| Manual | |
| Input to report | |
| Output of the | Agent ID, Agent Type, Commission Address Block, B/F |
| Report | Amount (Balance Forward) |
4.4.3. Report ID:BPI_CAS_REP_FI—003
| Report ID | BPI_CAS_REP_FI_003 |
| Report Name | Cash Batches |
| Purpose of | To report on the list of cash batches entered during |
| Report | the month in question. |
| Delivery To | CFO, Manager Finance |
| Frequency | Monthly, Adhoc |
| Mode of | |
| Delivery | |
| Output Format | XL, HTML |
| User Interface | Yes |
| Required Yes/ | |
| No | |
| Automated or | Automated, Manual |
| Manual | |
| Input to report | Start Date, |
| End Date, | |
| Batch Type | |
| Output of the | Batch Number, Deposit Date, Tape Total, Batch Total, |
| Report | Batch Type, Batch Status, User ID |
4.4.4. Report ID:BPI_CAS_REP_FI—004
| Report ID | BPI_CAS_REP_FI_004 |
| Report Name | MRMIB Blended Rate Comparison |
| Purpose of | To report on medical and dental member counts |
| Report | associated with blended rate invoices reconciled during |
| the month. Used to allocate cash reconciled between | |
| blended and non-blended. | |
| Delivery To | CFO, Manager Finance |
| Frequency | Monthly, Adhoc |
| Mode of | |
| Delivery | |
| Output Format | XL, HTML |
| User Interface | Yes |
| Required Yes/ | |
| No | |
| Automated or | Automated, Manual |
| Manual | |
| Input to report | Date, |
| Output of the | Group Id, Invoice Period, Current medical count, Current |
| Report | dental count, prior medical count, prior dental count, |
| Reconciled date | |
4.4.5. Report ID:BPI_CAS_REP_FI—005
| Report ID | BPI_CAS_REP_FI_005 |
| Report Name | A/R Totals by Group |
| Purpose of | To report on customer account balance on the month-end. |
| Report | |
| Delivery To | CFO, Manager Finance |
| Frequency | Monthly, Adhoc |
| Mode of | |
| Delivery | |
| Output Format | XL, HTML |
| User Interface | Yes |
| Required Yes/ | |
| No | |
| Automated or | Automated, Manual |
| Manual | |
| Input to report | |
| Output of the | Group ID, A/R, Unbilled, Un App Cash, Total A/R, |
| Report | Current, 30 Days, 60 Days, 90 Days, over 120 |
4.4.6. Report ID:BPI_CAS_REP_FI—006
| Report ID | BPI_CAS_REP_FI_006 |
| Report Name | Reconciled not Billed Break Down |
| Purpose of | To report on distribution of adjustment and members |
| Report | associated with those adjustments used in reconciliation |
| that has not yet appeared on an invoice and will | |
| appear in the next invoice. | |
| Delivery To | CFO, Manager Finance |
| Frequency | Monthly, Adhoc |
| Mode of | |
| Delivery | |
| Output Format | XL, HTML |
| User Interface | Yes |
| Required Yes/ | |
| No | |
| Automated or | Automated, Manual |
| Manual | |
| Input to report | Adjustment Period |
| Output of the | HEALTH PLAN PREMIUMS - GROSS |
| Report | ADD: CAL COBRA FEES |
| LESS: RISK ADJUSTMENT WITHHELD | |
| HEALTH PLAN PREMIUMS - NET | |
| AGENT COMMISSIONS | |
| FLAT FEES | |
| MEDICAL - NON-BLENDED | |
| DENTAL - NON-BLENDED | |
| MEDICAL - BLENDED | |
| DENTAL - BLENDED | |
| VISION - BLENDED | |
| CAM - BLENDED | |
| GROUP DIRECT FEES | |
| FLAT FEES | |
| MEDICAL - NON-BLENDED | |
| DENTAL - NON-BLENDED | |
| MEDICAL - BLENDED | |
| DENTAL - BLENDED | |
| VISION - BLENDED | |
| CAM - BLENDED | |
| ADMINISTRATIVE FEES | |
| FLAT FEES | |
| MEDICAL - NON-BLENDED | |
| DENTAL - NON-BLENDED | |
| MEDICAL - BLENDED | |
| DENTAL - BLENDED | |
| VISION - BLENDED | |
| CAM - BLENDED | |
| LATE FEES | |
| REINSTATEMENT FEES | |
| NSF FEES | |
| COBRA FEES | |
| VARIANCE +/−$2.00 | |
| OTHER FEES | |
| TOTAL PREMIUM | |
| RISK ADJUSTMENT PAYABLE (MEMO) | |
| MEMBERS | |
| MEDICAL | |
| DENTAL | |
| VISION | |
| CAM | |
4.4.7. Report ID:BPI_CAS_REP_FI—007
| Report ID | BPI_CAS_REP_FI_007 |
| Report Name | Reconciled not Billed Break Down Details |
| (Group Level) | |
| Purpose of | To report on distribution of adjustment and members |
| Report | associated with those adjustments used in reconciliation |
| that has not yet appeared on an invoice and will appear in | |
| the next invoice. This done for individual groups. | |
| Delivery To | CFO, Manager Finance |
| Frequency | Monthly, Adhoc |
| Mode of | |
| Delivery | |
| Output Format | XL, HTML |
| User Interface | Yes |
| Required Yes/ | |
| No | |
| Automated or | Automated, Manual |
| Manual | |
| Input to report | Adjustment Period |
| Output of the | GROUP NO, |
| Report | GROUP NAME, |
| GROUP EFF_DATE, | |
| GROUP TYPE, | |
| AGENT NO, | |
| BILLING PERIOD, | |
| INVOICE DATE, | |
| RECONCILIED DATE, | |
| CURRENT MONTH PREMIUM, | |
| PRIOR PERIOR ADJ'S, | |
| PLAN_ID, | |
| HEALTH PLAN PREMIUM, | |
| CAL COBRA FEES, | |
| RISK ADJ WITHHELD, | |
| HEALTH PLAN PREMIUMS - GROSS | |
| ADD: CAL COBRA FEES | |
| LESS: RISK ADJUSTMENT WITHHELD | |
| HEALTH PLAN PREMIUMS - NET | |
| AGENT COMMISSIONS | |
| FLAT FEES | |
| MEDICAL - NON-BLENDED | |
| DENTAL - NON-BLENDED | |
| MEDICAL - BLENDED | |
| DENTAL - BLENDED | |
| VISION - BLENDED | |
| CAM - BLENDED | |
| GROUP DIRECT FEES | |
| FLAT FEES | |
| MEDICAL - NON-BLENDED | |
| DENTAL - NON-BLENDED | |
| MEDICAL - BLENDED | |
| DENTAL - BLENDED | |
| VISION - BLENDED | |
| CAM - BLENDED | |
| ADMINISTRATIVE FEES | |
| FLAT FEES | |
| MEDICAL - NON-BLENDED | |
| DENTAL - NON-BLENDED | |
| MEDICAL - BLENDED | |
| DENTAL - BLENDED | |
| VISION - BLENDED | |
| CAM - BLENDED | |
| LATE FEES | |
| REINSTATEMENT FEES | |
| NSF FEES | |
| COBRA FEES | |
| VARIANCE +/−$2.00 | |
| OTHER FEES | |
| TOTAL PREMIUM | |
| RISK ADJUSTMENT PAYABLE (MEMO) | |
| MEMBERS | |
| MEDICAL | |
| DENTAL | |
| VISION | |
| CAM | |
4.4.8. Report ID:BPI_CAS_REP_FI—008
| Report ID | BPI_CAS_REP_FI_008 |
| Report Name | A/R Break Down (Carrier Level) |
| Purpose of | To report on distribution of amount appearing on |
| Report | unreconciled invoices along with the member count. |
| Delivery To | CFO, Manager Finance |
| Frequency | Monthly, Adhoc |
| Mode of | |
| Delivery | |
| Output Format | XL, HTML |
| User Interface | Yes |
| Required Yes/ | |
| No | |
| Automated or | Automated, Manual |
| Manual | |
| Input to report | Bill Period |
| Output of the | HEALTH PLAN PREMIUMS - GROSS |
| Report | ADD: CAL COBRA FEES |
| LESS: RISK ADJUSTMENT WITHHELD | |
| HEALTH PLAN PREMIUMS - NET | |
| AGENT COMMISSIONS | |
| FLAT FEES | |
| MEDICAL - NON-BLENDED | |
| DENTAL - NON-BLENDED | |
| MEDICAL - BLENDED | |
| DENTAL - BLENDED | |
| VISION - BLENDED | |
| CAM - BLENDED | |
| GROUP DIRECT FEES | |
| FLAT FEES | |
| MEDICAL - NON-BLENDED | |
| DENTAL - NON-BLENDED | |
| MEDICAL - BLENDED | |
| DENTAL - BLENDED | |
| VISION - BLENDED | |
| CAM - BLENDED | |
| ADMINISTRATIVE FEES | |
| FLAT FEES | |
| MEDICAL - NON-BLENDED | |
| DENTAL - NON-BLENDED | |
| MEDICAL - BLENDED | |
| DENTAL - BLENDED | |
| VISION - BLENDED | |
| CAM - BLENDED | |
| LATE FEES | |
| REINSTATEMENT FEES | |
| NSF FEES | |
| COBRA FEES | |
| VARIANCE +/−$2.00 | |
| OTHER FEES | |
| TOTAL PREMIUM | |
| RISK ADJUSTMENT PAYABLE (MEMO) | |
| MEMBERS | |
| MEDICAL | |
| DENTAL | |
| VISION | |
| CAM | |
4.4.9. Report ID:BPI_CAS_REP_FI—009
| Report ID | BPI_CAS_REP_FI_009 |
| Report Name | A/R Break Down Details (Group Level) |
| Purpose of | To report on distribution of amount appearing on |
| Report | unreconciled invoices along with the member count. This |
| done for individual groups | |
| Delivery To | CFO, Manager Finance |
| Frequency | Monthly, Adhoc |
| Mode of | |
| Delivery | |
| Output Format | XL, HTML |
| User Interface | Yes |
| Required Yes/ | |
| No | |
| Automated or | Automated, Manual |
| Manual | |
| Input to report | Period |
| Output of the | GROUP NO, |
| Report | GROUP NAME, |
| GROUP EFF_DATE, | |
| GROUP TYPE, | |
| AGENT NO, | |
| BILLING PERIOD, | |
| INVOICE DATE, | |
| RECONCILIED DATE, | |
| CURRENT MONTH PREMIUM, | |
| PRIOR PERIOR ADJ'S, | |
| PLAN_ID, | |
| HEALTH PLAN PREMIUM, | |
| CAL COBRA FEES, | |
| RISK ADJ WITHHELD, | |
| HEALTH PLAN PREMIUMS - GROSS | |
| ADD: CAL COBRA FEES | |
| LESS: RISK ADJUSTMENT WITHHELD | |
| HEALTH PLAN PREMIUMS - NET | |
| AGENT COMMISSIONS | |
| FLAT FEES | |
| MEDICAL - NON-BLENDED | |
| DENTAL - NON-BLENDED | |
| MEDICAL - BLENDED | |
| DENTAL - BLENDED | |
| VISION - BLENDED | |
| CAM - BLENDED | |
| GROUP DIRECT FEES | |
| FLAT FEES | |
| MEDICAL - NON-BLENDED | |
| DENTAL - NON-BLENDED | |
| MEDICAL - BLENDED | |
| DENTAL - BLENDED | |
| VISION - BLENDED | |
| CAM - BLENDED | |
| ADMINISTRATIVE FEES | |
| FLAT FEES | |
| MEDICAL - NON-BLENDED | |
| DENTAL - NON-BLENDED | |
| MEDICAL - BLENDED | |
| DENTAL - BLENDED | |
| VISION - BLENDED | |
| CAM - BLENDED | |
| LATE FEES | |
| REINSTATEMENT FEES | |
| NSF FEES | |
| COBRA FEES | |
| VARIANCE +/−$2.00 | |
| OTHER FEES | |
| TOTAL PREMIUM | |
| RISK ADJUSTMENT PAYABLE (MEMO) | |
| MEMBERS | |
| MEDICAL | |
| DENTAL | |
| VISION | |
| CAM | |
4.4.10. Report ID:BPI_CAS_REP_FI—010
| Report ID | BPI_CAS_REP_FI_010 |
| Report Name | Billing Distribution (Carrier Level) |
| Purpose of | To report on distribution on amount and member counts |
| Report | appearing on invoices generated during the month. |
| Delivery To | CFO, Manager Finance |
| Frequency | Monthly, Adhoc |
| Mode of | |
| Delivery | |
| Output Format | XL, HTML |
| User Interface | Yes |
| Required Yes/ | |
| No | |
| Automated or | Automated, Manual |
| Manual | |
| Input to report | From Date |
| To Date | |
| Output of the | HEALTH PLAN PREMIUMS - GROSS |
| Report | ADD: CAL COBRA FEES |
| LESS: RISK ADJUSTMENT WITHHELD | |
| HEALTH PLAN PREMIUMS - NET | |
| AGENT COMMISSIONS | |
| FLAT FEES | |
| MEDICAL - NON-BLENDED | |
| DENTAL - NON-BLENDED | |
| MEDICAL - BLENDED | |
| DENTAL - BLENDED | |
| VISION - BLENDED | |
| CAM - BLENDED | |
| GROUP DIRECT FEES | |
| FLAT FEES | |
| MEDICAL - NON-BLENDED | |
| DENTAL - NON-BLENDED | |
| MEDICAL - BLENDED | |
| DENTAL - BLENDED | |
| VISION - BLENDED | |
| CAM - BLENDED | |
| ADMINISTRATIVE FEES | |
| FLAT FEES | |
| MEDICAL - NON-BLENDED | |
| DENTAL - NON-BLENDED | |
| MEDICAL - BLENDED | |
| DENTAL - BLENDED | |
| VISION - BLENDED | |
| CAM - BLENDED | |
| LATE FEES | |
| REINSTATEMENT FEES | |
| NSF FEES | |
| COBRA FEES | |
| VARIANCE +/−$2.00 | |
| OTHER FEES | |
| TOTAL PREMIUM | |
| RISK ADJUSTMENT PAYABLE (MEMO) | |
| MEMBERS | |
| MEDICAL | |
| DENTAL | |
| VISION | |
| CAM | |
4.4.11. Report ID:BPI_CAS_REP_FI—011
| Report ID | BPI_CAS_REP_FI_011 |
| Report Name | Billing Distribution Detail (Group Level) |
| Purpose of | To report on distribution on amount and member counts |
| Report | appearing on invoices generated during the month. This |
| is done for the individual group | |
| Delivery To | CFO, Manager Finance |
| Frequency | Monthly, Adhoc |
| Mode of | |
| Delivery | |
| Output Format | XL, HTML |
| User Interface | Yes |
| Required Yes/ | |
| No | |
| Automated or | Automated, Manual |
| Manual | |
| Input to report | From Date |
| To Date | |
| Output of the | GROUP NO, |
| Report | GROUP NAME, |
| GROUP EFF_DATE, | |
| GROUP TYPE, | |
| AGENT NO, | |
| BILLING PERIOD, | |
| INVOICE DATE, | |
| RECONCILIED DATE, | |
| CURRENT MONTH PREMIUM, | |
| PRIOR PERIOR ADJ'S, | |
| PLAN_ID, | |
| HEALTH PLAN PREMIUM, | |
| CAL COBRA FEES, | |
| RISK ADJ WITHHELD, | |
| HEALTH PLAN PREMIUMS - GROSS | |
| ADD: CAL COBRA FEES | |
| LESS: RISK ADJUSTMENT WITHHELD | |
| HEALTH PLAN PREMIUMS - NET | |
| AGENT COMMISSIONS | |
| FLAT FEES | |
| MEDICAL - NON-BLENDED | |
| DENTAL - NON-BLENDED | |
| MEDICAL - BLENDED | |
| DENTAL - BLENDED | |
| VISION - BLENDED | |
| CAM - BLENDED | |
| GROUP DIRECT FEES | |
| FLAT FEES | |
| MEDICAL - NON-BLENDED | |
| DENTAL - NON-BLENDED | |
| MEDICAL - BLENDED | |
| DENTAL - BLENDED | |
| VISION - BLENDED | |
| CAM - BLENDED | |
| ADMINISTRATIVE FEES | |
| FLAT FEES | |
| MEDICAL - NON-BLENDED | |
| DENTAL - NON-BLENDED | |
| MEDICAL - BLENDED | |
| DENTAL - BLENDED | |
| VISION - BLENDED | |
| CAM - BLENDED | |
| LATE FEES | |
| REINSTATEMENT FEES | |
| NSF FEES | |
| COBRA FEES | |
| VARIANCE +/−$2.00 | |
| OTHER FEES | |
| TOTAL PREMIUM | |
| RISK ADJUSTMENT PAYABLE (MEMO) | |
| MEMBERS | |
| MEDICAL | |
| DENTAL | |
| VISION | |
| CAM | |
4.4.12. Report ID:BPI_CAS_REP_FI—012
| Report ID | BPI_CAS_REP_FI_012 |
| Report Name | Cash balancing (Carrier Level) |
| Purpose of | To report on distribution of the Dollars associated with |
| Report | all the invoices reconciled during the current period |
| (Week, Month). | |
| Delivery To | CFO, Manager Finance |
| Frequency | Monthly, Weekly, Adhoc |
| Mode of | |
| Delivery | |
| Output Format | XL, HTML |
| User Interface | Yes |
| Required Yes/ | |
| No | |
| Automated or | Automated, Manual |
| Manual | |
| Input to report | From Date |
| To Date | |
| Output of the | HEALTH PLAN PREMIUMS - GROSS |
| Report | ADD: CAL COBRA FEES |
| LESS: RISK ADJUSTMENT WITHHELD | |
| HEALTH PLAN PREMIUMS - NET | |
| AGENT COMMISSIONS | |
| FLAT FEES | |
| MEDICAL - NON-BLENDED | |
| DENTAL - NON-BLENDED | |
| MEDICAL - BLENDED | |
| DENTAL - BLENDED | |
| VISION - BLENDED | |
| CAM - BLENDED | |
| GROUP DIRECT FEES | |
| FLAT FEES | |
| MEDICAL - NON-BLENDED | |
| DENTAL - NON-BLENDED | |
| MEDICAL - BLENDED | |
| DENTAL - BLENDED | |
| VISION - BLENDED | |
| CAM - BLENDED | |
| ADMINISTRATIVE FEES | |
| FLAT FEES | |
| MEDICAL - NON-BLENDED | |
| DENTAL - NON-BLENDED | |
| MEDICAL - BLENDED | |
| DENTAL - BLENDED | |
| VISION - BLENDED | |
| CAM - BLENDED | |
| LATE FEES | |
| REINSTATEMENT FEES | |
| NSF FEES | |
| COBRA FEES | |
| VARIANCE +/−$2.00 | |
| OTHER FEES | |
| TOTAL PREMIUM | |
| RISK ADJUSTMENT PAYABLE (MEMO) | |
| MEMBERS | |
| MEDICAL | |
| DENTAL | |
| VISION | |
| CAM | |
4.4.13. Report ID:BPI_CAS_REP_FI—013
| Report ID | BPI_CAS_REP_FI_013 |
| Report Name | Cash balancing (Group Level) |
| Purpose of | To report on distribution of the Dollars associated with |
| Report | all the invoices reconciled during the current period |
| (Week, Month) for individual benefit level. | |
| Delivery To | CFO, Manager Finance |
| Frequency | Monthly, Weekly, Adhoc |
| Mode of | |
| Delivery | |
| Output Format | XL, HTML |
| User Interface | Yes |
| Required Yes/ | |
| No | |
| Automated or | Automated, Manual |
| Manual | |
| Input to report | From Date |
| To Date | |
| Output of the | GROUP NO, |
| Report | GROUP NAME, |
| GROUP EFF_DATE, | |
| GROUP TYPE, | |
| AGENT NO, | |
| BILLING PERIOD, | |
| INVOICE DATE, | |
| RECONCILIED DATE, | |
| CURRENT MONTH PREMIUM, | |
| PRIOR PERIOR ADJ'S, | |
| PLAN_ID | |
| HEALTH PLAN PREMIUM, | |
| CAL COBRA FEES, | |
| RISK ADJ WITHHELD, | |
| HEALTH PLAN PREMIUMS - GROSS | |
| ADD: CAL COBRA FEES | |
| LESS: RISK ADJUSTMENT WITHHELD | |
| HEALTH PLAN PREMIUMS - NET | |
| AGENT COMMISSIONS | |
| FLAT FEES | |
| MEDICAL - NON-BLENDED | |
| DENTAL - NON-BLENDED | |
| MEDICAL - BLENDED | |
| DENTAL - BLENDED | |
| VISION - BLENDED | |
| CAM - BLENDED | |
| GROUP DIRECT FEES | |
| FLAT FEES | |
| MEDICAL - NON-BLENDED | |
| DENTAL - NON-BLENDED | |
| MEDICAL - BLENDED | |
| DENTAL - BLENDED | |
| VISION - BLENDED | |
| CAM - BLENDED | |
| ADMINISTRATIVE FEES | |
| FLAT FEES | |
| MEDICAL - NON-BLENDED | |
| DENTAL - NON-BLENDED | |
| MEDICAL - BLENDED | |
| DENTAL - BLENDED | |
| VISION - BLENDED | |
| CAM - BLENDED | |
| LATE FEES | |
| REINSTATEMENT FEES | |
| NSF FEES | |
| COBRA FEES | |
| VARIANCE +/−$2.00 | |
| OTHER FEES | |
| TOTAL PREMIUM | |
| RISK ADJUSTMENT PAYABLE (MEMO) | |
| MEMBERS | |
| MEDICAL | |
| DENTAL | |
| VISION | |
| CAM | |
4.4.14. Report ID:BPI_CAS_REP_FI—014
| Report ID | BPI_CAS_REP_FI_014 |
| Report Name | Un Reconciled Cash |
| Purpose of | To report on List of unreconciled cash items at the end |
| Report | of the month. |
| Delivery To | CFO, Manager Finance |
| Frequency | Monthly, Weekly, Adhoc |
| Mode of | |
| Delivery | |
| Output Format | XL, HTML |
| User Interface | Yes |
| Required Yes/ | |
| No | |
| Automated or | Automated, Manual |
| Manual | |
| Input to report | Start Date |
| End Date | |
| Output of the | Crec No, Group No, Date, Amount, Status, Term Date |
| Report | |
4.4.15. Report ID:BPI_CAS_REP_FI—015
| Report ID | BPI_CAS_REP_FI_015 |
| Report Name | Cash Receipt Report |
| Purpose of | To report on List of cash items in each cash batch |
| Report | |
| Delivery To | CFO, Manager Finance |
| Frequency | Monthly, Weekly, Adhoc |
| Mode of | |
| Delivery | |
| Output Format | HTML |
| User Interface | Yes |
| Required Yes/ | |
| No | |
| Automated or | Manual |
| Manual | |
| Input to report | Batch Number |
| Output of the | ID, Date, Check No, Amount, Rec (Reconciled), Group |
| Report | ID and Group name. |
4.4.16. Report ID:BPI_CAS_REP_FI—016
| Report ID | BPI_CAS_REP_FI_016 |
| Report Name | Group and Premium transmitted to the Carrier |
| Purpose of | To report on the Groups and the premium transmitted |
| Report | to the carriers based on the member. |
| (Premium Transmission based on members | |
| Delivery To | GMS, Finance |
| Frequency | Adhoc |
| Mode of | None |
| Delivery | |
| Output Format | HTML |
| User Interface | Yes |
| Required Yes/ | |
| No | |
| Automated or | Manual |
| Manual | |
| Input to report | Start Date |
| End Date | |
| Output of the | Employer Tax ID, Group ID, Employer Tax ID, |
| Report | Employee ID, Carrier ID, Year ID, Plan Code, Premium |
| Code, Premium Billed Amt (as Sent), Premium Billed | |
| Amt (Translated), Premium Applied Date, Premium | |
| Due Date, Geographic Area. | |
4.4.17. Report ID:BPI_CAS_REP_FI—017
| Report ID | BPI_CAS_REP_FI_017 |
| Report Name | Employee Level Adjustments based on Changes |
| Purpose of | To report on the employee level adjustments based on |
| Report | changes. (Employee Add On, Employee Term, |
| Dependent Add On, Dependent Term, Change of Benefit | |
| Level, Change of Coverage Choice (Employee Only, | |
| Employee Spouse etc.) | |
| Delivery To | GMS, Finance |
| Frequency | Adhoc |
| Mode of | none |
| Delivery | |
| Output Format | HTML |
| User Interface | Yes |
| Required Yes/ | |
| No | |
| Automated or | Manual |
| Manual | |
| Input to report | Start Date |
| End Date | |
| Output of the | Group ID, Group Name, Employee ID, Employee SSN, |
| Report | Adjustment Amount, Effective Date, Adjustment Period, |
| Adjustment Type, Adjustment Status. | |
4.4.18. Report ID:BPI_CAS_REP_FI—018
| Report ID | BPI_CAS_REP_FI_018 |
| Report Name | Fees Applied or Waived on Group Level |
| Purpose of | To report on all types of fees applied and or waived for a |
| Report | specific group during the defined period. |
| Delivery To | GMS, Finance |
| Frequency | Adhoc |
| Mode of | none |
| Delivery | |
| Output Format | HTML |
| User Interface | Yes |
| Required Yes/ | |
| No | |
| Automated or | Manual |
| Manual | |
| Input to report | Start Date |
| End Date | |
| Output of the | Group ID, Group Name, Fees Type, Fees Amount, |
| Report | Invoice Number, Invoice Date, Reconciliation Status. |
4.4.19. Report ID:BPI_CAS_REP_FI—019
| Report ID | BPI_CAS_REP_FI_019 |
| Report Name | Premium History on Group/Employee Level |
| Purpose of | To report on the premium collected from group (broken |
| Report | down to employee) up to date |
| Delivery To | GMS, Finance |
| Frequency | Adhoc |
| Mode of | None |
| Delivery | |
| Output Format | HTML |
| User Interface | Yes |
| Required Yes/ | |
| No | |
| Automated or | Manual |
| Manual | |
| Input to report | Group ID |
| Output of the | Invoice ID, Invoice Date, Group ID, Total Inv, |
| Report | Total Due. |
4.4.20. Report ID:BPI_CAS_REP_FI—020
| Report ID | BPI_CAS_REP_FI_020 |
| Report Name | Group Not paid “Accounts receivable total by Group” |
| Purpose of | To report on the groups not paid - Sort by Agent |
| Report | |
| Delivery To | GMS, Finance |
| Frequency | Adhoc |
| Mode of | none |
| Delivery | |
| Output Format | HTML |
| User Interface | Yes |
| Required Yes/ | |
| No | |
| Automated or | Manual |
| Manual | |
| Input to report | |
| Output of the | Agent ID, Agent Name, Invoice Amount Due, Period |
| Report | Outstanding, Group ID, Group Name. |
4.4.21. Report ID:BPI_CAS_REP_FI—021
| Report ID | BPI_CAS_REP_FI_021 |
| Report Name | Group paid short |
| Purpose of | To report on the groups paid short - Sort by Agent |
| Report | |
| Delivery To | GMS, Finance |
| Frequency | Adhoc |
| Mode of | none |
| Delivery | |
| Output Format | HTML |
| User Interface | Yes |
| Required Yes/ | |
| No | |
| Automated or | Manual |
| Manual | |
| Input to report | |
| Output of the | Agent ID, Agent Name, Amount Due, Period |
| Report | Outstanding, Group ID, Group Name, Amount |
| Received, Amount Received, Amount short, Due Date. | |
4.4.22. Report ID:BPI_CAS_REP_FI—022
| Report ID | BPI_CAS_REP_FI_022 | |
| Report Name | Group for Refund | |
| Purpose of | To report on the groups for Refund | |
| Report | ||
| Delivery To | GMS, Finance | |
| Frequency | Adhoc | |
| Mode of | none | |
| Delivery | ||
| Output Format | HTML | |
| User Interface | Yes | |
| Required Yes/ | ||
| No | ||
| Automated or | Manual | |
| Manual | ||
| Input to report | ||
| Output of the | Group ID, Group name, Agent ID, Agent name, | |
| Report | Refund Amount, reasons for Refund. | |
4.4.23. Report ID:BPI_CAS_REP_FI—025
| Report ID | BPI_CAS_REP_FI_025 |
| Report Name | Prepaid Commission |
| Purpose of | To report on distribution of next month's invoices |
| Report | reconciled and paid in current |
| Delivery To | CFO, Manager Finance |
| Frequency | Monthly, Adhoc |
| Mode of | |
| Delivery | |
| Output Format | XL, HTML |
| User Interface | Yes |
| Required Yes/ | |
| No | |
| Automated or | Automated/Manual |
| Manual | |
| Input to report | Year Month |
| Output of the | Group ID, Group Effective Date, Group Type, Bill |
| Report | Period, Invoice Date, Reconciled Date, Flat Fees, |
| Medical Blended, Other, Medical Member Fees, Dental | |
| Blended, Dental Member Fees, Vision Blended, CAM | |
| Blended, Total. | |
4.4.24. Report ID:BPI_CAS_REP_FI—026
| Report ID | BPI_CAS_REP_FI_026 |
| Report Name | Un Applied (Open) Commission Adjustment |
| Purpose of | To report on commission adjustments to Apply to |
| Report | the next commission run. (These are not yet |
| applied and may change) | |
| Delivery To | CFO, Commission Specialist |
| Frequency | Adhoc |
| Mode of | none |
| Delivery | |
| Output Format | XL/HTML |
| User Interface | Yes |
| Required Yes/ | |
| No | |
| Automated or | Manual |
| Manual | |
| Input to report | Start Date |
| End Date | |
| Output of the | Commission Adjustment ID, Date of Adjustment, Type |
| Report | (1099, Amount, Both), Adjustment Amount, |
| Description, Agent name and Agent ID | |
4.4.25. Report ID:BPI_CAS_REP_FI—027
| Report ID | BPI_CAS_REP_FI_027 |
| Report Name | Invoice and Payment History |
| Purpose of | To report on invoice and payment history and date both |
| Report | reconciled |
| Delivery To | GMS and Finance |
| Frequency | Adhoc |
| Mode of | None |
| Delivery | |
| Output Format | HTML |
| User Interface | Yes |
| Required Yes/ | |
| No | |
| Automated or | Manual |
| Manual | |
| Input to report | Group ID |
| Output of the | Type, Date, Amount, Reconciled |
| Report | |
4.4.26. Report ID:BPI_CAS_REP_FI—028
| Report ID | BPI_CAS_REP_FI_028 |
| Report Name | Commission Register |
| Purpose of | To report on the results of semi monthly Commission run |
| Report | |
| Delivery To | Commission Specialist and CFO |
| Frequency | Semi monthly after Commission Run |
| Mode of | |
| Delivery | |
| Output Format | XL |
| User Interface | No |
| Required Yes/ | |
| No | |
| Automated or | Automated |
| Manual | |
| Input to report | Commission Period |
| Output of the | Check Number, Check Date, Check Amount, |
| Report | Commission Amount, prior balance Forward amount, |
| Commission Fees, Total Adjustment, 1099 Amount, B/F | |
| Amount, Agent Id, Commission period, | |
| Commission payee | |
| (B/F - Balance Forward usually relating to negative | |
| balance) | |
4.4.27. Report ID:BPI_CAS_REP_FI—029
| Report ID | BPI_CAS_REP_FI_029 |
| Report Name | Summary of unpaid Commission |
| Purpose of | To preview all commission to be paid this period. |
| Report | Includes current period and those payable from the |
| prior periods (previously pended). Sum of Current | |
| amount will be equal to the cash balance report for the | |
| commissions for the same period. | |
| Delivery To | Commission Specialist and CFO |
| Frequency | Run after each Commission Run |
| Mode of | |
| Delivery | |
| Output Format | XL |
| User Interface | no |
| Required Yes/ | |
| No | |
| Automated or | Automated |
| Manual | |
| Input to report | Commission Period |
| Output of the | Agent ID, Commission payee, type, Period End Date, |
| Report | Period, Commission fees. |
4.4.28. Report ID:BPI_CAS_REP_FI—031
| Report ID | BPI_CAS_REP_FI_031 |
| Report Name | Agent License Expiration date |
| Purpose of | To report on agent and their license expiration date |
| Report | |
| Delivery To | Commission specialist |
| Frequency | Adhoc |
| Mode of | None |
| Delivery | |
| Output Format | HTML |
| User Interface | Yes |
| Required Yes/ | |
| No | |
| Automated or | Manual |
| Manual | |
| Input to report | Date |
| Output of the | Agent ID, Agent Name, Effective Date, Address, City, |
| Report | Phone, License No, Expiration Date, Status |
4.4.29. Report ID:BPI_CAS_REP_FI—032
| Report ID | BPI_CAS_REP_FI_032 |
| Report Name | Listing of groups by Agent |
| Purpose of | To report on list of all groups associated with an agent |
| Report | sort by status. |
| Delivery To | Commission specialist, GMS, Finance and CFO |
| Frequency | Adhoc |
| Mode of | None |
| Delivery | |
| Output Format | HTML |
| User Interface | Yes |
| Required Yes/ | |
| No | |
| Automated or | Manual |
| Manual | |
| Input to report | Agent ID |
| Output of the | Group Id, Group Name, Effective Date, Group |
| Report | Status, Agent id, Agent Name. |
4.4.30. Report ID:BPI_CAS_REP_FI—033
| Report ID | BPI_CAS_REP_FI_033 |
| Report Name | Listing of an agent's groups and reconciliation |
| history for the last 4 months invoices with current | |
| commission payable. | |
| Purpose of | To report on the group's recent history, agent and total |
| Report | commission payable by agent and to show what |
| commissions are currently payable. | |
| (Should be able to sort) | |
| Delivery To | Commission specialist, GMS, Finance and CFO |
| and agent | |
| Frequency | Adhoc |
| Mode of | None |
| Delivery | |
| Output Format | HTML |
| User Interface | Yes |
| Required Yes/ | |
| No | |
| Automated or | Manual |
| Manual | |
| Input to report | Date |
| Agent ID | |
| Output of the | Agent Id, Agent Name, Agent License, Group Id, Group |
| Report | Name, Enrolled Status, Invoices For 30 Days, Invoices |
| For 60 Days, Invoices For 90 Days, Invoices | |
| For 120 Days, | |
4.4.31. Report ID:BPI_CAS_REP_FI—035
| Report ID | BPI_CAS_REP_FI_035 |
| Report Name | Cash Extract |
| Purpose of | To report on individual payments entered to identify |
| Report | and trace on group level |
| Delivery To | GMS, Finance |
| Frequency | Adhoc |
| Mode of | None |
| Delivery | |
| Output Format | HTML |
| User Interface | Yes |
| Required Yes/ | |
| No | |
| Automated or | Manual |
| Manual | |
| Input to report | Start Date |
| End Date | |
| Output of the | Cash Receipt Id, Group Id, Cash Rec Date, Amount, |
| Report | Batch, Batch Date |
4.4.32. Report ID:BPI_CAS_REP_FI—036
| Report ID | BPI_CAS_REP_FI_036 | |
| Report Name | New Business | |
| Purpose of | To report all new business entered, by day | |
| Report | ||
| Delivery To | Customer Service, Finance, Management | |
| Frequency | Adhoc | |
| Mode of | None | |
| Delivery | ||
| Output Format | HTML | |
| User Interface | Yes | |
| Required Yes/ | ||
| No | ||
| Automated or | Manual | |
| Manual | ||
| Input to report | Start Date | |
| End Date | ||
| Output of the | Group ID, Group Name, Date Received, Check | |
| Report | Amount, Effective Date, Status | |
4.4.33. Report ID:BPI_CAS_REP_FI—038
| Report ID | BPI_CAS_REP_FI_038 |
| Report Name | Operating Account Daily cash Activity |
| Purpose of | To summarize cash activity in system and |
| Report | through the bank |
| Deliver To | Finance, Accounting manager, CFO |
| Frequency | Monthly, Adhoc |
| Mode of | |
| Delivery | |
| Output Format | XL HTML |
| User Interface | Yes |
| Required Yes/ | |
| No | |
| Automated or | Manual/Auto |
| Manual | |
| Input to report | Date |
| Output of the | Date, Manual Batch, NSF Batch, Returns Batch, Positive |
| Report | Transfer, Negative Transfer, Lockbox Check, |
| Auto-Batch EFT, Direct Deposit, Wire Transfer, CC | |
| Over Phone, Auto-Batch Credit Card, Online Credit | |
| Card, TR to 4159 297506, TR to 4159 297456, | |
| Interest Received | |
4.4.34. Report ID:BPI_CAS_REP_FI—040
| Report ID | BPI_CAS_REP_FI_040 | |
| Report Name | Recap pf A/R & A/P | |
| Purpose of | To summarize for entry to financials | |
| Report | ||
| Delivery To | Accounting Manager, CFO | |
| Frequency | Monthly | |
| Mode of | ||
| Delivery | ||
| Output Format | XL HTML | |
| User Interface | No | |
| Required Yes/ | ||
| No | ||
| Automated or | Auto | |
| Manual | ||
| Input to report | Bill Period | |
| Output of the | Code Number, Carrier, Un reconciled, | |
| Report | Reconciled/Unbilled, Total | |
4.4.35. Report ID:BPI_CAS_REP_FI—041
| Report ID | BPI_CAS_REP_FI_041 |
| Report Name | Deferred revenue & Expense & Worksheet for journal |
| entries | |
| Purpose of | To itemize amounts for deferred revenue and expenses |
| Report | (for financials) and journal entries for these. |
| Delivery To | Accounting Manager, CFO |
| Frequency | Monthly |
| Mode of | |
| Delivery | |
| Output Format | XL HTML |
| User Interface | No |
| Required Yes/ | |
| No | |
| Automated or | Auto |
| Manual | |
| Input to report | |
| Output of the | Account No, Description, Deferred Revenue |
| Report | |
4.4.36. Report ID:BPI_CAS_REP_FI—042
| Report ID | BPI_CAS_REP_FI_042 |
| Report Name | Check with Commission Statement |
| Purpose of | To pay agents and report commission activity for a |
| Report | period. |
| Delivery To | Mail house (electronically), agents |
| Frequency | Semi-Monthly |
| Mode of | None |
| Delivery | |
| Output Format | Paper check, HTML, electronic file to mail house. |
| User Interface | No |
| Required Yes/ | |
| No | |
| Automated or | Automated |
| Manual | |
| Input to report | Agent ID, Commission Period |
| Output of the | Group Id, Group Name, Month Paid, Effective Date, |
| Report | Product Type, Total Member, Split Percentage, Flat Fee, |
| PM Fee, Total Fees, Monthly Premium, % Com, | |
| 1099 Amount. | |
4.4.37. Report ID:BPI_CAS_REP_FI—044
| Report ID | BPI_CAS_REP_FI_044 |
| Report Name | Finance Transmission Status |
| Purpose of | This report is used to show the status for the |
| Report | transmission for various external transmissions |
| for a specified duration | |
| Delivery To | IT |
| Frequency | Non periodic |
| Mode of | None |
| Delivery | |
| Output Format | XL or HTML |
| User Interface | Yes |
| Required Yes/ | |
| No | |
| Automated or | Manual |
| Manual | |
| Input to report | From Date |
| To Date | |
| Output of the | Transmission Time and Date, Process Period, Data |
| Report | Format Transmission Type, File Size, |
| Record Count, Status. | |
4.5. Module Name: Miscellaneous (Security, Work Group, Supply Request and Associates)
4.5.1. Report ID:BPI_CAS_REP_MISC—001
| Report ID | BPI_CAS_REP_MISC_001 |
| Report Name | User Access right report from Security |
| Purpose of | This report is used to provide information on the user |
| Report | name, user roles, user groups and access rights |
| Delivery To | All BPI |
| Frequency | Adhoc |
| Mode of | None |
| Delivery | |
| Output Format | HTML |
| User Interface | Yes |
| Required Yes/ | |
| No | |
| Automated or | Manual |
| Manual | |
| Input to report | User ID |
| Output of the | User ID, User name, User roles, User group, Resource, |
| Report | Access rights. |
4.5.2. Report ID:BPI_CAS_REP_MISC—002
| Report ID | BPI_CAS_REP_MISC_002 |
| Report Name | Report on Work group |
| Purpose of | This report is used to provide information on the work |
| Report | groups and the Groups and member counts per |
| work group | |
| Delivery To | All BPI |
| Frequency | Adhoc |
| Mode of | None |
| Delivery | |
| Output Format | HTML |
| User Interface | Yes |
| Required Yes/ | |
| No | |
| Automated or | Manual |
| Manual | |
| Input to report | Work group ID |
| Output of the | Work Group ID, Work Group Name, Group Count, |
| Report | Member Count |
5. Interface Flow
This outlines the menu for the reports. (See Figure L-3)
6. Data Structures
Not Applicable
| Data Element Name | Data Element Type | |
6.1. Back End Validations
Not applicable
| Field Element Name | Back End Validation | |
7. Non-Functional Requirements
| Non Functional Requirement | Details | |
8. Access Control List
| User ID | Job Description | Functionality | Access Level | |
| Change Record |
| Date | Author | Version | Change Reference |
| Nov. 24, 2001 | Ramamoorthi Mahalingam | 1.0 | Initial Version |
| Dec. 03, 2001 | Ramamoorthi Mahalingam | 1.1 | Updated Version |
| Reviewers |
| Name | Position | |
| Distribution |
| No Of | ||||
| Copy No. | Name | Copies | Location | |
1. Introduction 4
1.1. Purpose 4
1.2. Business Use Case Specification Reference 4
1.3. Definitions, Acronyms & Abbreviations 4
2. Process Identification 5
2.1. Process Description & Flow 5
2.2. Process Flow Diagram 5
3. User Interface 7
3.1. User Interface Screeens 7
3.1.1. Screen ID's 7
3.1.2. User Interface ID: Source Type 7
3.1.3. User Interface ID: Source Sub Type 10
3.1.4. User Interface ID: Campaign Master-Create 13
3.1.5. User Interface ID: Modify Campaign Master 16
3.1.6. User Interface ID: View Campaign Master 20
3.1.7. Screen Flow 24
4. Business Rule Mapping 26
1. Introduction
1.1. Purpose
This functional specification document addresses the part of the sales and marketing system that would assign and track the marketing campaigns, which are made by BPI as part of their marketing efforts.
1.2. Business Use Case Specification Reference
| Business Use Specification ID | Business Use Case Name | |
| BPI_SCOPE_SM.DOC | Sales & Marketing | |
| BPI_SCOPE_SM_01 | Create Sales Rep Master | |
1.3. Definitions, Acronyms & Abbreviations
| Term | Explanation | |
2. Process Identification
2.1. Process Description & Flow
A marketing campaign is an initiative where an identifiable segment of potential employer groups are targeted through the media like the radio, newspaper, mailers etc. Benefit Partners organizes for the marketing campaigns through third parties or by itself periodically.
The details of a campaign initiative are captured in the system through the campaign master.
The campaign master provides information on the campaign, duration and the personnel associated with the campaign. The media through which a campaign is done is captured in the system using the source type and source subtype.
The source type defines the media through which a campaign can be conducted and the source sub type provides the information on the subcategory that may come under the source type.
The source type and source sub type are configurable and must be created in sequence of source type followed by source subtype. For associated source type and source subtype for a campaign, the details get reflected on the campaign master only if it is captured prior to creation the campaign master.
Creation and modification of a campaign master leads to generation of email to the internal and external sales reps.
The source type can be used as an input for marketing methods in the agent profile and as source in the employer group master on enrollment.
The responses received from a marketing campaign are captured in Employer Group Master.
This would typically help in analyzing the responses made to the marketing campaign and also provide necessary tracking information for future market campaign planning and decision-making on the effectiveness of the campaign. This would provide a tracking mechanism that would measure the affect that an ad or ad campaign has on brand and/or company awareness, interest, attitude and enrollment conversions.
The internal sales rep makes a request for the welcome packets through the supply request
The flow diagram describes a typical flow on a campaign. The source type, source subtype and campaign can also be modified, viewed and inactivated.
2.2. Process Flow Diagram (See Figure M-1)
3. User Interface
3.1. User Interface Screens
3.1.1. Screen ID's
| Screen ID | Corresponding HTML | |
| (SID) | Screen Name | File Name |
| utl.campaign.sourcetype | Source type | /bpi/cas/marketing/ |
| campaign/SourceType.jsp | ||
| utl.campaign.sourcesubtype | Source | /bpi/cas/marketing/ |
| sub type | campaign/SourceSubType.jsp | |
| utl.campaign.create | Campaign | /bpi/cas/marketing/campaign/ |
| CampaignMaster.jsp | ||
| utl.campaign.search | Search | /bpi/cas/marketing/campaign/ |
| Campaign | CampaignSearch.jsp | |
| utl.campaign.view | View | /bpi/cas/marketing/campaign/ |
| Campaign | CampaignView.jsp | |
3.1.2. User Interface ID: Source Type
3.1.2.1. Screen name: Source Type (BPI_CAS_SM_SCR—001—001) (See Figure M-2)
3.1.2.2. SID, Element Name, Element Type & Purpose
| Element | Element | ||
| Name | Type | Label | Purpose |
| Main Header | Text | Main Header | To give the heading for the screen being |
| “Source | “Source Type” | navigated | |
| Type” | |||
| Source Type | Text | Source Type | Text For “Source Type” |
| Source Type | Entry Field | Source Type | Entry field for entering the source type |
| Entry Field | Entry Field | ||
| Input Source | Text | Input Source | Text for “Input Source” |
| Input Source | List | Input Source | List with values Yes/No - Default No |
| List | List | ||
| Add | HTML Button | Add | Button for adding the Source Type/Input |
| Source information in to the HTML table. | |||
| Changes with label “Modify” when the row in | |||
| the table is on edit mode. | |||
| Table | HTML table | Table | For displaying all the information added by |
| pressing the add button, in the form of rows, | |||
| for every add operation/Rows retrieved from | |||
| the permanent repository | |||
| Delete | Button | Delete | To delete the rows checked |
| (HTML | |||
| Button) | |||
| Check All | Text Link | Check All | To check all the check boxes in the table |
| Clear All | Text Link | Clear All | To un check all the check boxes checked in |
| the table/does not function when all the | |||
| checkboxes in the table are unchecked | |||
| Delete | Check box | Delete | To check the items for deletion |
| Edit | Button | Edit | To edit the rows entered by “Add”/ |
| (HTML | “Modify”/displayed from permanent | ||
| Button) | repository against the row selected for | ||
| editing | |||
| Save | Button | Save | Save the information to the repository |
| (HTML | |||
| Submit | |||
| button) | |||
| Cancel | Button | Cancel | Reset information as described in the |
| scenarios | |||
3.1.2.3. Front End Validations
| Element | ||
| Name | Action/Validation Details | Error Message Text |
| Source | Mandatory Entry | When the Add HTML Button is |
| Type | Becomes non editable when on modify mode | pressed with an empty entry on the |
| Entry | for data from permanent repository | source type entry field, an Error |
| Field | Dialog Box pops up with the message | |
| “Please enter the source type before | ||
| adding to the table” with “yes” option | ||
| On press of Yes Button, The cursor | ||
| must be placed on the source type | ||
| entry field | ||
| Input | Default - No | Not Applicable |
| Source | ||
| List | ||
| Add | On Clicking the add button or pressing the | When the Add HTML Button is |
| enter key field with the cursor positioned on the | pressed with an empty entry on the | |
| Add button, the data gets added to the table. | source type entry field, an Error | |
| Validation checks are done to not allow null | Dialog Box pops up with the message | |
| value on the source type entry field. | “Please enter the source type before | |
| Must not allow duplicate entries on the source | adding to the table” with “yes” option. | |
| type. | On press of Yes Button, The cursor | |
| Must not allow the length of the field entry to go | must be placed on the source entry | |
| beyond as per the database design for the | field | |
| column | For duplicate entries, Error dialog box - | |
| “Duplicate values not allowed. | ||
| Please enter again” | ||
| Modify | On Clicking modify button or the pressing the | None |
| enter key field with the cursor position on the | ||
| modify button, The data gets added to the | ||
| table. | ||
| Table | Should have column header and each | |
| subsequent row should be identified by | ||
| alternate color combinations. i.e. First row | ||
| should have color ‘x’ and the next row should | ||
| have color ‘y’. The next row should have color | ||
| ‘x’ again and so on. The size of any text inside | ||
| any cell should be wrapped if the text becomes | ||
| too long. | ||
| The letters must be green in color for the rows | ||
| retrieved from the permanent repository and | ||
| red for the rows in temporary storage. | ||
| All the letters of the row on edit must be in dark | ||
| gray. | ||
| Delete | Should function with enter key cursor | Error Dialog Box: “Please choose the |
| positioned on the “Delete” button or on mouse | row or rows to be deleted.” with “yes” | |
| click | option | |
| Delete button should work on multiple deletes | ||
| based on the check box or boxes selected. If | ||
| the user clicks on the delete button without | ||
| checking any of the check box should throw | ||
| error message. | ||
| Success: Deletes the row or rows from the | ||
| table (temporary storage) | ||
| Check | On clicking the “Check All” link should check all | Not Applicable |
| All | the check boxes in the HTML table. | |
| Clear All | On clicking the “Clear All” link should uncheck | Not Applicable |
| all the checked check boxes in the HTML table. | ||
| Edit | Should function with Enter Key Cursor | |
| positioned on the “Edit” button or on mouse | ||
| click. | ||
| Refer Interface flow on scenarios - “edit data” | ||
| Save | Should function with enter key cursor | Not Applicable |
| positioned on the “Save” button or on mouse | ||
| click. | ||
| On saving the data the data gets saved to the | ||
| permanent repository. | ||
| Cancel | All the data entered is reset with empty/initial | Not Applicable |
| values in the data entry fields as the case may | ||
| be (Text Field, List etc). | ||
| If a row is already modified and added to the | ||
| table on the screen and the Cancel button is | ||
| pressed, the row remains with the modified | ||
| values | ||
| Browser | When a user tries to close the window with out | Error Dialog box message: “Do you |
| Window | saving data into the permanent repository, a | want to save all changes before |
| dialog box pops up | closing/leaving the window? “with a | |
| “Yes” and “No” option. | ||
| On press of “Yes” leads to saving of | ||
| information and “No” leads to the | ||
| source type screen with the original | ||
| values | ||
3.1.3. User Interface ID: Source Sub Type
3.1.3.1. Screen name: Source Sub Type (BPI_CAS_SM_SCR—001—002) (See Figure M-3)
3.1.3.2. SID, Element Name, Element Type & Purpose
| Element | Element | ||
| Name | Type | Label | Purpose |
| Main Header | Text | Main Header | To give the heading for the screen being |
| “Source Sub | “Source Sub | navigated | |
| Type” | Type” | ||
| Source Type | Text | Source Type | Text For “Source Type” |
| Source Type | Non Editable | Source Type | Search with a List of all active source types |
| List | field with | List | retrieved from the permanent repository. |
| search | |||
| Source Sub | Text | Source Sub | Text For “Source Sub Type” |
| Type | Type | ||
| Source Sub | Entry Field | Source Sub | Entry field for entering the source sub type |
| Type Entry | Type Entry | ||
| Field | Field | ||
| Description | Text | Description | Text for “Description” |
| Description | Entry Field | Description | Entry field for entering the description |
| Entry Field | Entry Field | ||
| Add | HTML Button | Add | Button for adding the Source Type/Source |
| Sub Type information in to the HTML table. | |||
| Changes with label “Modify” when the row in | |||
| the table is on edit mode. | |||
| Table | HTML table | Table | For displaying all the information added by |
| pressing the add button in the form of rows, | |||
| for every add operation/rows retrieved from | |||
| the permanent repository | |||
| Delete | Button | Delete | To delete the rows checked |
| (HTML | |||
| Button) | |||
| Check All | Text Link | Check All | To check all the check boxes in the table |
| Clear All | Text Link | Clear All | To un check all the check boxes checked in |
| the table/does not function when all the | |||
| checkboxes in the table are unchecked | |||
| Delete | Check box | Delete | To check the items for deletion |
| Edit | Button | Edit | To edit the rows entered by “Add”, “Modify”, |
| (HTML | displayed from permanent repository against | ||
| Button) | the row selected for editing | ||
| Save | Button | Save | Save the information to the repository |
| (HTML | |||
| Button) | |||
| Cancel | Button | Cancel | Cancel information as described in the |
| scenarios | |||
3.1.3.3. Front End Validations
| Element | ||
| Name | Action/Validation Details | Error Message Text |
| Source | Mandatory Entry | When the Add/Modify HTML Button |
| Sub | Becomes non editable when on modify mode | is pressed with an empty entry on the |
| Type | for data from permanent repository | source sub type entry field, an Error |
| Entry | Dialog Box pops up with the | |
| Field | message “Please enter the source | |
| sub type before adding to the table” | ||
| with “yes” option | ||
| On press of Yes Button, The cursor | ||
| must be placed on the source sub | ||
| type entry field | ||
| Source | Default - “Choose One” with list of all active | When the Add/Modify HTML Button |
| Type | source types | is pressed without choosing a source |
| List | Becomes non editable when on modify mode | type, an Error Dialog Box pops up |
| for data from permanent repository | with the message “Please choose | |
| the source type before adding to the | ||
| table” with “yes” option | ||
| On press of Yes Button, The user is | ||
| allowed to choose a source type with | ||
| the original values still available for | ||
| the source sub type. | ||
| Add | On Clicking add button or the pressing the | When the Add HTML Button is |
| enter key field with the cursor position on the | pressed with an empty entry on the | |
| Add button, The data gets added to the table. | source sub type entry field, an Error | |
| Validation checks are done to not allow null | Dialog Box pops up with the | |
| value on the source sub type entry field. | message “Please enter the source | |
| Must not allow duplicate entries for a | sub type before adding to the table” | |
| combination of source type and source subtype | with “yes” option. | |
| Must not allow the length of the field entry to go | When the Add HTML Button is | |
| beyond as per the database design for the | pressed without choosing a source | |
| column | type, an Error Dialog Box pops up | |
| with the message “Please choose | ||
| the source type before adding to the | ||
| table” with “yes” option | ||
| For duplicate entries, Error dialog box - | ||
| “Duplicate values not allowed. | ||
| Please enter again” | ||
| Modify | On Clicking Modify button or the pressing the | When the “Modify” HTML Button is |
| enter key field with the cursor position on the | pressed with an empty entry on the | |
| Modify button, the data gets added to the table. | source sub type entry field, an Error | |
| Validation checks are done to not allow null | Dialog Box pops up with the | |
| value on the source sub type entry field | message “Please enter the source | |
| Must not allow duplicate entries for a | sub type before adding to the table” | |
| combination of source type and source subtype | with “yes” option. | |
| Must not allow the length of the field entry to go | On press of Yes Button, The cursor | |
| beyond as per the database design for the | must be placed on the source entry | |
| column | field | |
| For duplicate entries, Error dialog box - | ||
| “Duplicate values not allowed. | ||
| Please enter again” | ||
| Table | Should have column header and each | |
| subsequent row should be identified by | ||
| alternate color combinations. i.e. First row | ||
| should have color ‘x’ and the next row should | ||
| have color ‘y’. The next row should have color | ||
| ‘x’ again and so on. The size of any text inside | ||
| any cell should be wrapped if the text becomes | ||
| too long. | ||
| The letters must be green in color for the rows | ||
| retrieved from the permanent repository and | ||
| red for the rows in temporary storage. | ||
| All the letters of the row on edit must be in dark gray. | ||
| Delete | Should function with enter key cursor | Error Dialog Box: “Please choose |
| positioned on the “Delete” button or on mouse | the row or rows to be deleted.” with | |
| click | “yes” option | |
| Delete button should work on multiple deletes | ||
| based on the check box or boxes selected. If | ||
| the user clicks on the delete button without | ||
| checking any of the check box should throw | ||
| error message. | ||
| Success: Deletes the row or rows from the | ||
| table (temporary storage) | ||
| Check | On clicking the “Check All” link should check all | Not Applicable |
| All | the check boxes in the HTML table. | |
| Clear All | On clicking the “Clear All” link should uncheck | Not Applicable |
| all the checked check boxes in the HTML table. | ||
| Edit | Should function with Enter Key Cursor | |
| positioned on the “Edit” button or on mouse click. | ||
| Refer Interface flow on (source subtype) | ||
| scenarios - “edit data” | ||
| Save | Should function with enter key cursor | Not Applicable |
| positioned on the “Save” button or on mouse click. | ||
| On saving the data the data gets saved to the | ||
| permanent repository. | ||
| Cancel | All the data entered is Cancel with empty/initial | Not Applicable |
| values in the data entry fields as the case may | ||
| be (Text Field, List etc). | ||
| If a row is already modified and added to the | ||
| table on the screen and the Cancel button is | ||
| pressed, the row remains with the modified | ||
| values | ||
3.1.4. User Interface ID: Campaign Master—Create
3.1.4.1. Screen name: Campaign Master—Create (BPI_CAS_SM_SCR—001—003) (See Figure M-4)
3.1.4.2. SID, Element Name, Element Type & Purpose
| Element | Element | ||
| Name | Type | Label | Purpose |
| Main Header | Text | Main Header | To give the heading for the screen being |
| “Campaign | “Campaign | navigated | |
| Master” | Master” | ||
| Campaign | Text | Campaign | Text For “Campaign Name” |
| Name | Name | ||
| Campaign | Entry field | Campaign | Entry field for entering the campaign name |
| Name | Name | ||
| Entry Field | Entry Field | ||
| Description | Text | Description | Text for “Description” |
| Description | Entry Field | Description | Entry field for entering the description |
| Entry Field | Entry Field | ||
| Source Type | Text | Source Type | Text for “Source Type” |
| Source Type | Non Editable | Source Type | Provides a list of active source types |
| Field with | |||
| Search | |||
| Sub Type | Text | Sub Type | Text for “Source Sub Type” |
| Source Sub | Non editable | Source Sub | Provides a List of active source subtypes for |
| Type | Field with | Type | a selected source type |
| Search | |||
| Import | HTML Button | Import | HTML Button with Import Label leads to |
| import screen for importing the data for the | |||
| campaign data. | |||
| Associated | Text | Associated | Text for “Associated Workgroups” |
| Workgroups | Workgroups | ||
| Associated | Combo Box | Associated | Contains the agent list added on selection |
| Workgroups | Workgroups | from the “Associated Workgroups”-Child | |
| Combo Box | Combo Box | work groups available | |
| Associated | List | Associated | List of Active workgroups - child work groups |
| Workgroups | Workgroups | from database | |
| List | List | ||
| Duration | Text | Duration | Text for “Duration” |
| From Date | Text | From Date | Text for “From” |
| To Date | Text | To Date | Text for “To” |
| From Date | Calendar | From Date | Calendar for From Date |
| To Date | Calendar | To Date | Calendar for To Date |
| Save | HTML Button | Save | Button for saving the data |
3.1.4.3. Front End Validations
| Element | ||
| Name | Action/Validation Details | Error Message Text |
| Campaign | Mandatory Entry | When the “Save” HTML Button is |
| Name | pressed with an empty entry on the | |
| Entry | campaign name, an Error Dialog Box | |
| Field | pops up with the message “Please | |
| enter the Campaign Name” with | ||
| “yes” option. | ||
| On press of Yes Button, The cursor | ||
| must be placed on the campaign | ||
| name entry field | ||
| Import | Must be visible only if the source type | |
| Button | selected has input source option as yes | |
| Save | On clicking the save button or pressing the | When the save HTML Button is |
| enter key field with the cursor positioned on | pressed with an empty entry on the | |
| the save button, The data gets inserted to the | Campaign, an error dialog box pops | |
| permanent repository. | up with the message “Please enter | |
| Validation checks are done to not allow null | the campaign name” If campaign | |
| value on the campaign name. | name is not filled up and placement | |
| Must not allow duplicate entries for a | of cursor in respective field. | |
| combination of campaign for a from date and | For duplicate entries, Error dialog | |
| to date for a combination of source type and | box - “Duplicate values not allowed. | |
| source subtype | Please enter again” | |
| Must not allow the length of the field entry to | For Invalid dates (from date - beyond - | |
| go beyond as per the database design for the | to date) or (To date - before - | |
| column | from date) - Error dialog box - | |
| Must choose the Source Type, Sub Type. | “Please check the validity of from | |
| From date must not be less than the system | and to dates” with Yes option | |
| date - caution message | For invalid dates (from date, to date | |
| From date must not be beyond the to date or | less than the system date)- caution | |
| to date must not be before the from date. | message in an error dialog box - | |
| To date must not be lesser than system date - | “Dates selected is before the system | |
| caution message | date - is it valid entry?” with yes and | |
| no option. If Yes - acceptable and if | ||
| No - not acceptable. | ||
| If the source type is not selected, | ||
| then on press of the save button | ||
| leads to error dialog box with error | ||
| message “Choose Source Type” | ||
| with Yes option | ||
| If the source subtype is not selected, | ||
| then on press of the save button | ||
| leads to the error dialog box with | ||
| error message “choose the source | ||
| subtype” with Yes option | ||
| On press of Yes on both cases, goes | ||
| to the screen with the original values | ||
| and enables the user to choose the | ||
| Source Type or Source Subtype | ||
3.1.5. User Interface ID: Modify Campaign Master
3.1.5.1. Screen name: Modify Campaign Master
Step1 (BPI_CAS_SM_SCR—001—004) (See Figure M-5)
-
- Step 2 (BPI_CAS_SM_SCR—001—005) (See Figure M-6)
3.1.5.2. SID, Element Name, Element Type & Purpose
Step-1:
| Element | Element | ||
| Name | Type | Label | Purpose |
| Main Header | Text | Main Header | To give the heading for the |
| “Search | “Search | screen being navigated | |
| Campaign | Campaign | ||
| Master” | Master” | ||
| Campaign | Text | Campaign | Text For “Campaign Name” |
| Name | Name | ||
| Campaign | Entry | Campaign | Text field for entering |
| Name | Field | Name | Campaign name. |
| Campaign ID | Text | Campaign ID | Text for Campaign Id |
| Campaign ID | Entry | Campaign ID | Text field for entering |
| Field | campaign id | ||
| Search | Button | Search | Search for Campaigns |
| Cancel | Button | Cancel | Cancel the operation |
| Modify | Button | Modify | To edit the current record |
| View/Delete | Button | View/Delete | To View the current record |
Step-2:
| Element | Element | ||
| Name | Type | Label | Purpose |
| Main Header | Text | Main Header | To give the heading for the screen being |
| “Modify | “Modify | navigated | |
| Campaign | Campaign | ||
| Master” | Master” | ||
| Campaign | Text | Campaign | Text For “Campaign Name” |
| Name | Name | ||
| Campaign | Entry Field | Campaign | Text for modifying Campaign name. |
| Name | Name | ||
| Description | Text | Description | Text for “Description” |
| Description | Entry Field | Description | Entry field for modifying the description |
| Entry Field | Entry Field | ||
| Source Type | Text | Source Type | Text for “Source Type” |
| Source Type | List | Source Type | Search feature with a List of active source |
| types with default source type saved during | |||
| the creation of the campaign master | |||
| Sub Type | Text | Sub Type | Text for “Source Sub Type” |
| Source Sub | List | Source Sub | Search feature with a list of active source |
| Type | Type | subtypes for a selected source type with the | |
| default value of the sub type saved during | |||
| the creation of the campaign master. | |||
| Import | HTML Button | Import | HTML Button for Import |
| Associated | Text | Associated | Text for “Associated Workgroups” |
| workgroups | workgroups | ||
| Associated | Combo Box | Associated | Contains the workgroups list added on |
| Workgroups | Workgroups | selection from the “Associated Workgroups” - | |
| Combo Box | Combo Box | child workgroups available for category | |
| “Campaign”- saved during the creation of | |||
| the campaign master | |||
| Associated | List | Associated | List of Active workgroups from database |
| Workgroups | Workgroups | minus the workgroup list - child workgroups in | |
| List | List | the combo box | |
| Duration | Text | Duration | Text for “Duration” |
| From Date | Text | From Date | Text for “From” |
| To Date | Text | To Date | Text for “To” |
| From Date | Calendar | From Date | Calendar for From Date and showing the |
| date saved during the creation of the | |||
| campaign master | |||
| To Date | Calendar | To Date | Calendar for To Date and showing the date |
| saved during the creation of the campaign | |||
| master | |||
| Update | HTML Button | Modify | Button for modifying data |
3.1.5.3. Front End Validations
| Element | ||
| Name | Action/Validation Details | Error Message Text |
| Modify in | Must choose a campaign | When the modify button is pressed |
| step 1 | without choosing the campaign, error | |
| screen | dialog “Choose a campaign” with a | |
| yes option. | ||
| Campaign | Non Editable Campaign Name field | |
| Name | ||
| Text | ||
| Import | Must be enabled only if the campaign | |
| Button | master create record has an input | |
| source | ||
| Modify | On clicking “Modify” button or pressing the | When the “Modify” HTML Button is |
| enter key field with the cursor positioned on | pressed with an empty entry on the | |
| the “Modify” button, the data gets modified to | Campaign, an error dialog box pops | |
| the permanent repository and makes the data | up with the message “Please enter | |
| of an input file of the previous entry inactive. | the campaign name” | |
| Validation checks are done to not allow null | For duplicate entries, Error dialog | |
| value on the campaign name. | box - “Duplicate values not allowed. | |
| Must not allow duplicate entries for a | Please enter again” | |
| combination of campaign for a from date and | For Invalid dates (from date - beyond - | |
| to date for a combination of source type and | to date) or (To date - before - | |
| source subtype | from date) - Error dialog box - | |
| Must not allow the length of the field entry to | “Please check the validity of from | |
| go beyond as per the database design for the | and to dates” with Yes option | |
| column | For invalid dates (from date, to date | |
| From date must not be less than the system | less than the system date)- caution | |
| date - caution message | message in an error dialog box - | |
| From date must not be beyond the to date or | “Dates selected is before the system | |
| to date must not be before the from date. | date - is it valid entry?” with yes and | |
| To date must not be lesser than system date - | no option. If Yes - acceptable and if | |
| caution message | No - not acceptable. | |
| If the source type is not selected, | ||
| then on press of the save button | ||
| leads to error dialog box with error | ||
| message “Choose Source Type” | ||
| with Yes option | ||
| If the source subtype is not selected, | ||
| then on press of the save button | ||
| leads to the error dialog box with | ||
| error message “choose the source | ||
| subtype” with Yes option | ||
| On press of Yes on both cases, goes | ||
| to the screen with the original values | ||
| and enables the user to choose the | ||
| Source Type or Source Subtype | ||
3.1.6. User Interface ID: View Campaign Master
This screen below captures the information for viewing campaign master
-
- Step-1: Choose the campaign for viewing navigates to the view campaign master screen
- Step-2: View the campaign master
3.1.6.1. Screen Name: View Campaign Master (BPI_CAS_SM_SCR—001—006) (See Figure M-7)
(See Figure M-8)
3.1.6.2. SID, Element Name, Element Type & Purpose
Step-1:
| Element | Element | ||
| Name | Type | Label | Purpose |
| Main Header | Text | Main Header | To give the heading for |
| “Search | “Search | the screen being | |
| Campaign | Campaign | navigated | |
| Master” | Master” | ||
| Campaign | Text | Campaign | Text For “Campaign |
| Name | Name | Name” | |
| Campaign | Entry Field | Campaign | Text field for entering |
| Name | Name | Campaign name. | |
| Campaign ID | Text | Campaign ID | Text for Campaign Id |
| Campaign ID | Entry | Campaign ID | Text field for entering |
| Field | campaign id | ||
| Search | Button | Search | Search for Campaigns |
| Cancel | Button | Cancel | Cancel the operation |
| Modify | Button | Modify | To edit the current record |
| View/Delete | Button | View/Delete | To View the current |
| record | |||
Step-2:
| Element | Element | ||
| Name | Type | Label | Purpose |
| Main Header | Text | Main Header | To give the heading for the screen being |
| “View | “View Campaign | navigated | |
| Campaign | Master” | ||
| Master” | |||
| Campaign | Text | Campaign | Text For “Campaign Name” |
| Name | Name | ||
| Campaign | Text | Campaign | Non Editable field for viewing campaign |
| Name | Name | name | |
| Description | Text | Description | Text for “Description” |
| Description | Text | Description | Non Editable field for viewing the description |
| Source Type | Text | Source Type | Text for “Source Type” |
| Source Type | Text | Source Type | Non Editable field for viewing the Source |
| Type | |||
| Source Sub | Text | Source Sub | Text for “Source Sub Type” |
| Type | Type | ||
| Source Sub | Text | Source Sub | Non Editable field for viewing the Source Sub |
| Type | Type | Type | |
| Associated | Text | Associated | Text for “Associated Workgroups” |
| Workgroups | Workgroups | ||
| Associated | Non Editable | Associated | Contains the Workgroup list active for the |
| Workgroups | Combo Box | Workgroups | campaign |
| Combo Box | Combo Box | ||
| Duration | Text | Duration | Text for “Duration” |
| From Date | Text | From Date | Text for “From” |
| To Date | Text | To Date | Text for “To” |
| From Date | Text | From Date | Shows the from date for the campaign |
| To Date | Text | To Date | Shows the to date for the campaign |
3.1.6.3. Front End Validations
| Element | ||
| Name | Action/Validation Details | Error Message Text |
| View in | Must choose a campaign | When the view button is pressed |
| step 1 | without choosing the campaign, error | |
| screen | dialog “Choose a campaign” with a | |
| yes option. | ||
3.1.7. Screen Flow (See Figure M-9)
4. Business Rule Mapping
Source Type
| Activity | Rules |
| Create Source Type | Should have unique Id for a source Type - 10 |
| digits with an increment of 1, Say 0000000001, | |
| 0000000002, 0000000003 and so on. | |
Source Sub Type
| Activity | Rules |
| Create Source Sub Type | Should have unique Id 10 digit for a source sub |
| type with an increment of 1, Say 0000000001, | |
| 0000000002, 0000000003 and so on. | |
Campaign
| Activity | Rules |
| Create Campaign | Should have unique Id 10 digit for a campaign with |
| Master | an increment of 1, Say 0000000001, 0000000002, |
| 0000000003 and so on. | |
| Change Record |
| Date | Author | Version | Change Reference |
| Dec. 16, 2001 | Ramamoorthi Mahalingam | 1.0 | Dec. 16, 2001 |
| Reviewers |
| Name | Position | |
| Distribution |
| No Of | ||||
| Copy No. | Name | Copies | Location | |
1. Introduction 4
1.1. Purpose 4
1.2. Business Use Case Specification Reference 4
1.3. Definitions, Acronyms & Abbrevations 4
2. Process Identification 5
2.1. Process Description & Flow 5
3. User Interface 6
3.1. User Interface Screens 6
3.1.1. Screen ID's 6
3.1.2. User Interface ID: Create Lead Master 6
3.1.3. User Interface ID: Search Lead Master 13
3.1.4. User Interface ID: Modify Lead Master 14
3.1.5. User Interface ID: View & Delete Lead Master 21
3.1.6. User Interface ID: Create Agent Master 27
3.1.7. User Interface ID: Search Agent Master 34
3.1.8. User Interface ID: Modify Agent Master 36
3.1.9. User Interface ID: View & Delete Agent Master 43
3.1.10. User Interface ID: Create Agency Master 49
3.1.11. User Interface ID: Search Agency Master 56
3.1.12. User Interface ID: Modify Agency Master 57
3.1.13. User Interface ID: View & Deleter Agency Master 63
3.1.14. User Interface Id: Lead Tracking 68
4. Business Rule Mapping 75
1. Introduction
1.1. Purpose
This functional specification document addresses the part of the sales and marketing system that would deal with creation of master records for sales like the Lead master, Agent/Agency master.
1.2. Business Use Case Specification Reference
| Business Use Specification ID | Business Use Case Name | |
| BPI_SCOPE_SM_002 | Agent Master | |
| BPI_SCOPE_SM_003 | Agency Master | |
| BPI_SCOPE_SM_006 | Lead Master | |
1.3. Definitions, Acronyms & Abbreviations
| Term | Explanation | |
2. Process Identification
2.1. Process Description & Flow (See FIG. 10)
The user creates the sales masters which shall include lead master, agent master and agency master and has the ability to view, delete and modify apart from create function.
-
- user can navigate to the screens from the content area or from the menus
The users also maintain tracking information of a lead in a lead master.
3. User Interface
3.1. User Interface Screens
3.1.1. Screen ID's
<List SID and the screen name and Corresponding HTML file for the screen.
| Corresponding HTML File | ||
| Screen ID (SID) | Screen Name | Name |
| sales.leadmaster.creategeninfo | Lead Master Page 1 of 2 | LeadMasterCreate1.jsp |
| sales.leadmaster.createotherinfo | Lead Master Page 2 of 2 | LeadMasterCreate2.jsp |
| sales.leadmaster.search | Search Lead Master | LeadMasterSearch.jsp |
| sales.leadmaster.view | View Lead Master | LeadMasterView.jsp |
| sales.agentmaster.creategeninfo | Agent Master Page 1 of 2 | AgentMasterCreate1.jsp |
| sales.agentmaster.createotherinfo | Agent Master Page 2 of 2 | AgentMasterCreate2.jsp |
| sales.agentmaster.search | Search Agent Master | AgentMasterSearch.jsp |
| sales.agentmaster.view | View Agent Master | AgentMasterView.jsp |
| sales.agencymaster.creategeninfo | Agency Master Page 1 of 2 | AgencyMasterCreategeninfo.jsp |
| sales.agencymaster.createotherinfo | Agency Master Page 2 of 2 | AgencyMasterCreateotherinfo.jsp |
| sales.agencymaster.search | Search Agency Master | AgencyMasterSearch.jsp |
| sales.agencymaster.view | View Agency Master | AgencyMasterView.jsp |
| sales.leadmaster.leadtrack | Lead Tracking | LeadTrack.jsp |
3.1.2. User Interface ID: Create Lead Master
3.1.2.1. Screen Name: Create Lead Master (BPI_CAS_SM_SCR—002—001, BPI_CAS_SM_SCR—002—002 & BPI_CAS_SM_SCR—002—003)
This screen below captures the information for creating lead master.
-
- Step 1: Fill the mandatory information in page1. Click “Next” to navigate to page2.
- Step 2: Fill the mandatory information in page2 and click “Save” to save the Lead Master data.
- Step 3: Saving of Lead data takes you to Confirmation page.
Page1 (BPI_CAS_SM_SCR—002—001) (See Figure M-11)
Page2 (BPI_CAS_SM_SCR—002—002) (See Figure M-12)
Confirmation page (BPI_CAS_SM_SCR—002—003) (See Figure M-13)
3.1.2.2. SID, Element Name, Element Type & Purpose
| Element | Element | Element | |
| Name | Type | Type | Purpose |
| Lead Type | Text | Lead Type | Text showing “Lead Type” |
| Group Type | Text | Group Type | Text showing “Group Type” |
| Group Type | Select Feature | Group Type | To select “Group Type” |
| Association ID | Text | Association ID | Text showing “Association ID” |
| Association ID | Select Feature | Association ID | To select “Associations”, if the Group Type |
| selected is either | |||
| Guaranteed Association or Endorsed Association | |||
| or PEO Association or Chamber Association. | |||
| Member Type | Text | Member Type | Text for “Member Type” |
| Member Type | Radio Button | Member Type | To select either Individual Member or Association |
| Member if Group Type selected is a Guaranteed | |||
| Association who offers both Individual and | |||
| Association Member coverage | |||
| Source Sub | Text | Source Sub | Text for “Source Sub Type” |
| Type | Type | ||
| Source Sub | Non Editable | Source Sub | Search feature for a source Type Field |
| Type Search | Entry field | Type Search | |
| Field | Field | ||
| Sub Header | Text | Sub Header | To give the heading for the sub section |
| “General | “General | ||
| Information” | Information” | ||
| Company | Text | Company | Text for “Company Name”. |
| Company | Entry Field | Company | Entry field for company. |
| DBA | Text | DBA | Text for “DBA”. |
| DBA | Entry Field | DBA | Entry field for dba. |
| Street Address | Text | Street Address | Text for “Street Address”. |
| Street Address | Entry Field | Street Address | Entry field for street address. |
| Suite | Text | Suite | Text for “Suite” |
| Suite | Entry Field | Suite | Entry Field for Suite. |
| City | Text | City | Text for “City” |
| City | Entry Field | City | Entry Field for City. |
| State | Text | State | Text for “State” |
| State | Select Feature | State | Select feature for selecting a state in US. |
| Zip | Text | Zip | Text for “Zip” |
| Zip | Entry Field | Zip | Entry Field for Zip. |
| Phone | Text | Phone | Text for “Phone” |
| Phone | Entry Field | Phone | Entry Field for Phone. |
| Fax | Text | Fax | Text for “Fax” |
| Fax | Entry Field | Fax | Entry Field for Fax. |
| Sub Header | Text | Sub Header | To give the heading for the sub section |
| “Contact | “Contact | ||
| Information” | Information” | ||
| Sub Header | Text | Sub Header | To give the heading for the sub section |
| “Contact - 1” | “Contact - 1” | ||
| Salutation | Text | Salutation | Text for “Salutation” |
| Salutation | Select Feature | Salutation | Select feature for selecting a salutation. |
| First Name | Text | First Name | Text for “First Name” |
| First Name | Entry Field | First Name | Entry Field for First Name. |
| MI | Text | MI | Text for “MI” |
| MI | Entry Field | MI | Entry Field for MI. |
| Last Name | Text | Last Name | Text for “Last Name” |
| Last Name | Entry Field | Last Name | Entry Field for Last Name. |
| Street Address | Text | Street Address | Text for “Street Address”. |
| Street Address | Entry Field | Street Address | Entry field for street address. |
| Suite | Text | Suite | Text for “Suite” |
| Suite | Entry Field | Suite | Entry Field for Suite. |
| Zip | Text | Zip | Text for “Zip” |
| Zip | Entry Field | Zip | Entry Field for Zip. |
| City | Text | City | Text for “City” |
| City | Entry Field | City | Entry Field for City. |
| State | Text | State | Text for “State” |
| State | Select Feature | State | Select feature for selecting a state in US. |
| Phone | Text | Phone | Text for “Phone” |
| Phone | Entry Field | Phone | Entry Field for Phone. |
| Extn. | Text | Extn. | Text for “Extn” |
| Extn | Entry Field | Extn | Entry Field for Extn. |
| Fax | Text | Fax | Text for “Fax” |
| Fax | Entry Field | Fax | Entry Field for Fax. |
| Text | Text for “Email” | ||
| Entry Field | Entry Field for Email. | ||
| Sub Header | Text | Sub Header | To give the heading for the sub section |
| “Contact - 2” | “Contact - 2” | ||
| First Name | Text | First Name | Text for “First Name” |
| First Name | Entry Field | First Name | Entry Field for First Name. |
| MI | Text | MI | Text for “MI” |
| MI | Entry Field | MI | Entry Field for MI. |
| Last Name | Text | Last Name | Text for “Last Name” |
| Last Name | Entry Field | Last Name | Entry Field for Last Name. |
| Street Address | Text | Street Address | Text for “Street Address”. |
| Street Address | Entry Field | Street Address | Entry field for street address. |
| Suite | Text | Suite | Text for “Suite” |
| Suite | Entry Field | Suite | Entry Field for Suite. |
| Zip | Text | Zip | Text for “Zip” |
| Zip | Entry Field | Zip | Entry Field for Zip. |
| City | Text | City | Text for “City” |
| City | Entry Field | City | Entry Field for City. |
| State | Text | State | Text for “State” |
| State | Select Feature | State | Select feature for selecting a state in US. |
| Phone | Text | Phone | Text for “Phone” |
| Phone | Entry Field | Phone | Entry Field for Phone. |
| Extn. | Text | Extn. | Text for “Extn” |
| Extn | Entry Field | Extn | Entry Field for Extn. |
| Fax | Text | Fax | Text for “Fax” |
| Fax | Entry Field | Fax | Entry Field for Fax. |
| Text | Text for “Email” | ||
| Next | HTML Button | Next | Takes the user to next screen. |
| Cancel | HTML Button | Cancel | Resets the Data to original values |
| Entry Field | Entry Field for Email. | ||
| Sub Header | Text | Sub Header | To give the heading for the sub section |
| “Associated | “Associated | ||
| Personnel” | Personnel” | ||
| None | Radio | None | Default radio option. |
| Agent | Radio | Agent | Radio for associated agent |
| Agent | Non-Editable | Agent | Shows the number of associated agent. |
| Text | |||
| Agent-Popup | Image | Agent-Popup | Clicking this will open a new window, using |
| which user can assign agents for this Lead. | |||
| Agency | Radio | Agency | Radio for associated agency |
| Agency | Non-Editable | Agency | Shows the number of associated agency(s). |
| Text | |||
| Agency-Popup | Image | Agency-Popup | Clicking this will open a new window, using |
| which user can assign agency(s) for this Lead. | |||
| Internal | Text | Internal | Text for “Internal Workgroup” |
| Workgroup | Workgroup | ||
| Internal | Select Feature | Internal | Shows the internal workgroups. User can |
| Workgroup | Workgroup | select a internal workgroup for this lead. | |
| BSS Rep | Text | BSS Rep | Text for “BSS Rep” |
| BSS Rep | Select Feature | BSS Rep | Shows the BSS Rep (Associates) for the |
| selected internal workgroup. User can select a | |||
| BSS Rep for this Lead. | |||
| Sub Header | Text | Sub Header | To give the heading for the sub section |
| “Past Plan | “Past Plan | ||
| Details” | Details” | ||
| Number of | Text | Number of | Text for “Number of Employees” |
| Employees | Employees | ||
| Number of | Entry Field | Number of | Entry field for entering the number of |
| Employees | Employees | employees | |
| Entry Field | Entry Field | ||
| Plan Type | Text | Plan Type | Text for “Plan Type” |
| Plan Type | Drop Down List | Plan Type | List for selecting the Plan Type used by the |
| entry field | entry field | company at present—Picks up values based | |
| on the plan types defined in the CM Module | |||
| Current | Text | Current Carrier | Text for “Current Carrier” |
| Carrier | |||
| Current | Drop Down List | Current Carrier | List for selecting the current carrier—picks up |
| Carrier Entry | Entry field | values from the list carriers available in the | |
| field | CM Module | ||
| Deductible | Text | Deductible | Text for “Deductible” |
| Deductible | Entry Field | Deductible | Entry field for entering the Deductible at |
| Entry field | Entry field | present | |
| Co Pay | Text | Co Pay | Text for “Co Pay Amount” |
| Amount | Amount | ||
| Co Pay | Entry Field | Co Pay | Entry field for entering the Co Pay Amount at |
| Amount Entry | Amount Entry | present | |
| field | field | ||
| Benefit level in | Text | Benefit level in | Text for “Benefit Level In Network” |
| network | network | ||
| Benefit Level | Entry Field | Benefit Level in | Entry field for entering the current carrier |
| in network | network Entry | ||
| Entry field | field | ||
| Benefit Level | Text | Benefit Level | Text for “Benefit Level Out of Network” |
| Out of | Out of Network | ||
| Network | |||
| Benefit Level | Entry Field | Benefit Level | Entry field for entering the Benefit level out of |
| Out of | Out of Network | network | |
| Network | |||
| Employer | Text | Employer | Text for “Employer Contribution” |
| Contribution | Contribution | ||
| Employer | Entry Field | Employer | Entry field for entering the employer |
| Contribution | Contribution | contribution | |
| Entry Field | Entry Field | ||
| Approximately | Text | Approximately | Text for “Approximately Monthly Premium” |
| Monthly | Monthly | ||
| Premium | Premium | ||
| Approximately | Entry Field | Approximately | Entry field for entering the Approximately |
| Monthly | Monthly | Monthly Premium at present. | |
| Premium Entry | Premium Entry | ||
| Field | Field | ||
| Renewal Date | Text | Renewal Date | Text for “Renewal Date” |
| Renewal Date | Entry Field | Renewal Date | Entry field for entering Date. |
| Renewal Date | Image | Renewal Date | User Can click on this image and select the |
| Image | Image | date using calendar window. | |
| Sub Header | Text | Sub Header | To give the heading for the sub section |
| “Other | “Other | ||
| Information” | Information” | ||
| Best Time to | Text | Best Time to | Text for “Best Time to Call” |
| Call | Call | ||
| Best Time to | Entry field | Best Time to | entry field for entering the best time to call. |
| Call | Call | ||
| Comments | Text | Comments | Text for “Comments” |
| Comments | Entry field | Comments | Entry Field for the comments |
| Entry Field | Entry Field | ||
| Mode of | Text | Mode of | Text for “”Mode of Communication |
| Communication | Communication | ||
| Mode Of | List | Mode Of | List providing the list of mode of |
| Communication | Communication | communication - Shall include Email, Fax, | |
| USPS | |||
| Previous | HTML Button | Previous | Takes user to the Previous page. |
| Save | HTML Button | Save | Saves the Data. |
| Cancel | HTML Button | Cancel | Resets the Data to original values |
3.1.2.3. Front End Validations
| Element | ||
| Name | Action/Validation Details | Error Message Text |
| Group Type | Mandatory. | Error Dialog Box on Save “Is |
| Required”. | ||
| Association | For Guaranteed Association or Endorsed | Error Dialog Box on Save “Is |
| ID | Association or PEO Association or Chamber | Required” |
| Association, Association is Mandatory | ||
| Member Type | For Guaranteed Association, Member Type is | |
| Mandatory | ||
| Company | Mandatory. Accepts all alphanumeric and | Error Dialog Box on Save |
| Name | Special characters except double quotes. | “Accepts all alphanumeric and |
| Special characters except | ||
| double quotes” | ||
| Zip | Mandatory. Accepts exactly 5 numeric digits. | Error Dialog Box “Accepts |
| exactly 5 digits number only”. | ||
| Contact1 First | Mandatory. Accepts all alphanumeric and | Error Dialog Box on Save |
| Name | Special characters except double quotes. | “Accepts all alphanumeric and |
| Special characters except | ||
| double quotes” | ||
| Contact1 Zip | Mandatory. Accepts exactly 5 numeric digits. | Error Dialog Box “Accepts |
| exactly 5 digits number only”. | ||
| Internal | Mandatory. | Error Dialog on Save “Is |
| workgroup | Required”. | |
3.1.2.4. Screen Flow
The following are the scenarios the user may come across when operating on the screen:
| Scenario | Description |
| Next | The User can navigate to the next screen (page2). |
| Previous | The User can navigate to the previous screen (page1). |
| Save | The system checks for all the validations for all the mandatory |
| information filled up, the system successfully saves the data. | |
| Upon saving the data, shows a Confirmation page to the user. | |
| Cancel | The User can have the information reset to the original values |
3.1.3. User Interface ID: Search Lead Master
3.1.3.1. Screen Name: Search Lead Master (BPI_CAS_SM_SCR—002—004)
This screen below captures the information for searching an existing “Lead”.
-
- Step 1: Enter the mandatory lead information and click the search button. This page will display the result of search. User can choose a lead and navigate to either “Modify” screen or “View/Delete” screen. (See Figure M-14)
3.1.3.2. SID, Element Name, Element Type & Purpose
| Element | |||
| Name | Element Type | Label | Purpose |
| Main Header | Text | Main Header | To give the heading |
| “Lead | “Lead | for the screen | |
| Search” | Search” | ||
| Lead ID | Text | Lead ID | Text For “Lead ID” |
| Lead ID | Entry Field | Lead ID | Entry field for lead id |
| Lead Type | Text | Lead Type | Text For “Lead ID” |
| Lead Type | Select Feature | Lead Type | Select Feature for selecting |
| the Group Type | |||
| First Name | Text | First Name | Text For “First Name” |
| First Name | Entry Field | First Name | Entry field for First Name |
| Last Name | Text | Last Name | Entry field for Last Name |
| Last Name | Entry Field | Last Name | Entry field for Last Name |
| Company | Text | Company | Text For “First “Company” |
| Company | Entry Field | Company | Entry field for Company |
| Phone | Text | Phone | Entry field for “Phone” |
| Phone | Entry Field | Phone | Entry field for Phone |
| Lead Button | Radio Button | Lead Button | Used to select the lead for |
| Radio | Radio | modifying or | |
| viewing/deleting. | |||
| Modify | HTML Button | Modify | Leads to the modify screen |
| of the selected lead | |||
| View/Delete | HTML Button | View/Delete | Leads to the view/delete |
| screen of the selected | |||
3.1.3.3. Front End Validations
| Element | ||
| Name | Action/Validation Details | Error Message Text |
| Lead ID | Mandatory. Any one of the fields | Error Dialog Box on Search |
| in the search screen is mandatory. | “Accepts Alphanumeric | |
| Accepts Alphanumeric values only | values only.” | |
3.1.3.4. Screen Flow
The following are the scenarios the user may come across when operating on the search screen.
| Scenario | Description |
| Search | The system checks for all the validations for all the mandatory |
| information. Fetches the lead(s) that matches with the search | |
| conditions. | |
| Cancel | Clears the search fields |
3.1.4. User Interface ID: Modify Lead Master
3.1.4.1. Screen Name: Modify Lead Master (BPI_CAS_SM_SCR—002—005, BPI_CAS_SM_SCR—002—006 & BPI_CAS_SM_SCR—002—007)
This screen below captures the information for modifying lead master.
-
- Step-1: Using search screen (BPI_CAS_SM_SCR—002—004), search the available Lead(s).
- Step-2: Select a Lead and click “Modify” to navigate to page1.
- Step-3: Modify the lead information and click “Next” to navigate you to page2.
- Step-4: Click the “Save” to save the modified lead information.
- Step-5: Saving of Lead data takes you to Confirmation page.
Page1 (BPI_CAS_SM_SCR—002—005) (See Figure M-15)
Page2 (BPI_CAS_SM_SCR—002—006) (See Figure M-16)
Confirmation Page (BPI_CAS_SM_SCR—002—007) (See Figure M-17)
3.1.4.2. SID, Element Name, Element Type & Purpose
| Element | Element | Element | |
| Name | Type | Type | Purpose |
| Lead Type | Text | Lead Type | Text showing “Lead Type” |
| Group Type | Text | Group Type | Text showing “Group Type” |
| Group Type | Select Feature | Group Type | To select “Group Type” |
| Association ID | Text | Association ID | Text showing “Association ID” |
| Association ID | Select Feature | Association ID | To select “Associations”, if the Group Type |
| selected is either | |||
| Guaranteed Association or Endorsed Association | |||
| or PEO Association or Chamber Association. | |||
| Member Type | Text | Member Type | Text for “Member Type” |
| Member Type | Radio Button | Member Type | To select either Individual Member or Association |
| Member if Group Type selected is a Guaranteed | |||
| Association who offers both Individual and | |||
| Association Member coverage | |||
| Source Sub | Text | Source Sub | Text for “Source Sub Type” |
| Type | Type | ||
| Source Sub | Non Editable | Source Sub | Search feature for a source Type Field |
| Type Search | Entry field | Type Search | |
| Field | Field | ||
| Sub Header | Text | Sub Header | To give the heading for the sub section |
| “General | “General | ||
| Information” | Information” | ||
| Company | Text | Company | Text for “Company Name”. |
| Company | Entry Field | Company | Entry field for company. |
| DBA | Text | DBA | Text for “DBA”. |
| DBA | Entry Field | DBA | Entry field for dba. |
| Street Address | Text | Street Address | Text for “Street Address”. |
| Street Address | Entry Field | Street Address | Entry field for street address. |
| Suite | Text | Suite | Text for “Suite” |
| Suite | Entry Field | Suite | Entry Field for Suite. |
| City | Text | City | Text for “City” |
| City | Entry Field | City | Entry Field for City. |
| State | Text | State | Text for “State” |
| State | Select Feature | State | Select feature for selecting a state in US. |
| Zip | Text | Zip | Text for “Zip” |
| Zip | Entry Field | Zip | Entry Field for Zip. |
| Phone | Text | Phone | Text for “Phone” |
| Phone | Entry Field | Phone | Entry Field for Phone. |
| Fax | Text | Fax | Text for “Fax” |
| Fax | Entry Field | Fax | Entry Field for Fax. |
| Sub Header | Text | Sub Header | To give the heading for the sub section |
| “Contact | “Contact | ||
| Information” | Information” | ||
| Sub Header | Text | Sub Header | To give the heading for the sub section |
| “Contact - 1” | “Contact - 1” | ||
| Salutation | Text | Salutation | Text for “Salutation” |
| Salutation | Select Feature | Salutation | Select feature for selecting a salutation. |
| First Name | Text | First Name | Text for “First Name” |
| First Name | Entry Field | First Name | Entry Field for First Name. |
| MI | Text | MI | Text for “MI” |
| MI | Entry Field | MI | Entry Field for MI. |
| Last Name | Text | Last Name | Text for “Last Name” |
| Last Name | Entry Field | Last Name | Entry Field for Last Name. |
| Street Address | Text | Street Address | Text for “Street Address”. |
| Street Address | Entry Field | Street Address | Entry field for street address. |
| Suite | Text | Suite | Text for “Suite” |
| Suite | Entry Field | Suite | Entry Field for Suite. |
| Zip | Text | Zip | Text for “Zip” |
| Zip | Entry Field | Zip | Entry Field for Zip. |
| City | Text | City | Text for “City” |
| City | Entry Field | City | Entry Field for City. |
| State | Text | State | Text for “State” |
| State | Select Feature | State | Select feature for selecting a state in US. |
| Phone | Text | Phone | Text for “Phone” |
| Phone | Entry Field | Phone | Entry Field for Phone. |
| Extn. | Text | Extn. | Text for “Extn” |
| Extn | Entry Field | Extn | Entry Field for Extn. |
| Fax | Text | Fax | Text for “Fax” |
| Fax | Entry Field | Fax | Entry Field for Fax. |
| Text | Text for “Email” | ||
| Entry Field | Entry Field for Email. | ||
| Sub Header | Text | Sub Header | To give the heading for the sub section |
| “Contact - 2” | “Contact - 2” | ||
| First Name | Text | First Name | Text for “First Name” |
| First Name | Entry Field | First Name | Entry Field for First Name. |
| MI | Text | MI | Text for “MI” |
| MI | Entry Field | MI | Entry Field for MI. |
| Last Name | Text | Last Name | Text for “Last Name” |
| Last Name | Entry Field | Last Name | Entry Field for Last Name. |
| Street Address | Text | Street Address | Text for “Street Address”. |
| Street Address | Entry Field | Street Address | Entry field for street address. |
| Suite | Text | Suite | Text for “Suite” |
| Suite | Entry Field | Suite | Entry Field for Suite. |
| Zip | Text | Zip | Text for “Zip” |
| Zip | Entry Field | Zip | Entry Field for Zip. |
| City | Text | City | Text for “City” |
| City | Entry Field | City | Entry Field for City. |
| State | Text | State | Text for “State” |
| State | Select Feature | State | Select feature for selecting a state in US. |
| Phone | Text | Phone | Text for “Phone” |
| Phone | Entry Field | Phone | Entry Field for Phone. |
| Extn. | Text | Extn. | Text for “Extn” |
| Extn | Entry Field | Extn | Entry Field for Extn. |
| Fax | Text | Fax | Text for “Fax” |
| Fax | Entry Field | Fax | Entry Field for Fax. |
| Text | Text for “Email” | ||
| Next | HTML Button | Next | Takes the user to next screen. |
| Cancel | HTML Button | Cancel | Resets the Data to original values |
| Entry Field | Entry Field for Email. | ||
| Sub Header | Text | Sub Header | To give the heading for the sub section |
| “Associated | “Associated | ||
| Personnel” | Personnel” | ||
| None | Radio | None | Default radio option. |
| Agent | Radio | Agent | Radio for associated agent |
| Agent | Non-Editable | Agent | Shows the number of associated agent. |
| Text | |||
| Agent-Popup | Image | Agent-Popup | Clicking this will open a new window, using |
| which user can assign agents for this Lead. | |||
| Agency | Radio | Agency | Radio for associated agency |
| Agency | Non-Editable | Agency | Shows the number of associated agency(s). |
| Text | |||
| Agency-Popup | Image | Agency-Popup | Clicking this will open a new window, using |
| which user can assign agency(s) for this Lead. | |||
| Internal | Text | Internal | Text for “Internal Workgroup” |
| Workgroup | Workgroup | ||
| Internal | Select Feature | Internal | Shows the internal workgroups. User can |
| Workgroup | Workgroup | select a internal workgroup for this lead. | |
| BSS Rep | Text | BSS Rep | Text for “BSS Rep” |
| BSS Rep | Select Feature | BSS Rep | Shows the BSS Rep (Associates) for the |
| selected internal workgroup. User can select a | |||
| BSS Rep for this Lead. | |||
| Sub Header | Text | Sub Header | To give the heading for the sub section |
| “Past Plan | “Past Plan | ||
| Details” | Details” | ||
| Number of | Text | Number of | Text for “Number of Employees” |
| Employees | Employees | ||
| Number of | Entry Field | Number of | Entry field for entering the number of |
| Employees | Employees | employees | |
| Entry Field | Entry Field | ||
| Plan Type | Text | Plan Type | Text for “Plan Type” |
| Plan Type | Drop Down List | Plan Type | List for selecting the Plan Type used by the |
| entry field | entry field | company at present - Picks up values based | |
| on the plan types defined in the CM Module | |||
| Current | Text | Current Carrier | Text for “Current Carrier” |
| Carrier | |||
| Current | Drop Down List | Current Carrier | List for selecting the current carrier - picks up |
| Carrier Entry | Entry field | values from the list carriers available in the | |
| field | CM Module | ||
| Deductible | Text | Deductible | Text for “Deductible” |
| Deductible | Entry Field | Deductible | Entry field for entering the Deductible at |
| Entry field | Entry field | present | |
| Co Pay | Text | Co Pay | Text for “Co Pay Amount” |
| Amount | Amount | ||
| Co Pay | Entry Field | Co Pay | Entry field for entering the Co Pay Amount at |
| Amount Entry | Amount Entry | present | |
| field | field | ||
| Benefit level in | Text | Benefit level in | Text for “Benefit Level In Network” |
| network | network | ||
| Benefit Level | Entry Field | Benefit Level in | Entry field for entering the current carrier |
| in network | network Entry | ||
| Entry field | field | ||
| Benefit Level | Text | Benefit Level | Text for “Benefit Level Out of Network” |
| Out of | Out of Network | ||
| Network | |||
| Benefit Level | Entry Field | Benefit Level | Entry field for entering the Benefit level out of |
| Out of | Out of Network | network | |
| Network | |||
| Employer | Text | Employer | Text for “Employer Contribution” |
| Contribution | Contribution | ||
| Employer | Entry Field | Employer | Entry field for entering the employer |
| Contribution | Contribution | contribution | |
| Entry Field | Entry Field | ||
| Approximately | Text | Approximately | Text for “Approximately Monthly Premium” |
| Monthly | Monthly | ||
| Premium | Premium | ||
| Approximately | Entry Field | Approximately | Entry field for entering the Approximately |
| Monthly | Monthly | Monthly Premium at present. | |
| Premium Entry | Premium Entry | ||
| Field | Field | ||
| Renewal Date | Text | Renewal Date | Text for “Renewal Date” |
| Renewal Date | Entry Field | Renewal Date | Entry field for entering Date. |
| Renewal Date | Image | Renewal Date | User Can click on this image and select the |
| Image | Image | date using calendar window. | |
| Sub Header | Text | Sub Header | To give the heading for the sub section |
| “Other | “Other | ||
| Information” | Information” | ||
| Best Time to | Text | Best Time to | Text for “Best Time to Call” |
| Call | Call | ||
| Best Time to | Entry field | Best Time to | entry field for entering the best time to call. |
| Call | Call | ||
| Comments | Text | Comments | Text for “Comments” |
| Comments | Entry field | Comments | Entry Field for the comments |
| Entry Field | Entry Field | ||
| Mode of | Text | Mode of | Text for “”Mode of Communication |
| Communication | Communication | ||
| Mode Of | List | Mode Of | List providing the list of mode of |
| Communication | Communication | communication - Shall include Email, Fax, | |
| USPS | |||
| Previous | HTML Button | Previous | Takes user to the Previous page. |
| Save | HTML Button | Save | Saves the Data. |
| Cancel | HTML Button | Cancel | Resets the Data to original values |
3.1.4.3. Front End Validations
| Element | ||
| Name | Action/Validation Details | Error Message Text |
| Group Type | Mandatory. | Error Dialog Box on Save “Is |
| Required”. | ||
| Association | For Guaranteed Association or Endorsed | Error Dialog Box on Save “Is |
| ID | Association or PEO Association or Chamber | Required” |
| Association, Association is Mandatory | ||
| Member Type | For Guaranteed Association, Member Type is | |
| Mandatory | ||
| Company | Mandatory. Accepts all alphanumeric and | Error Dialog Box on Save |
| Name | Special characters except double quotes. | “Accepts all alphanumeric and |
| Special characters except | ||
| double quotes” | ||
| Zip | Mandatory. Accepts exactly 5 numeric digits. | Error Dialog Box “Accepts |
| exactly 5 digits number only”. | ||
| Contact1 First | Mandatory. Accepts all alphanumeric and | Error Dialog Box on Save |
| Name | Special characters except double quotes. | “Accepts all alphanumeric and |
| Special characters except | ||
| double quotes” | ||
| Contact1 Zip | Mandatory. Accepts exactly 5 numeric digits. | Error Dialog Box “Accepts |
| exactly 5 digits number only”. | ||
| Internal | Mandatory. | Error Dialog on Save “Is |
| workgroup | Required”. | |
3.1.4.4. Screen Flow
The following are the scenarios the user may come across when operating on the screen:
| Scenario | Description |
| Next | The User can navigate to the next screen (page2). |
| Previous | The User can navigate to the previous screen (page1). |
| Save | The system checks for all the validations for all the mandatory |
| information filled up, the system successfully saves the data. | |
| Upon saving the data, shows a Confirmation page to the user. | |
| Cancel | The User can have the information reset to the original values |
3.1.5. User Interface ID: View & Delete Lead Master
3.1.5.1. Screen Name: View & Delete Lead Master (BPI_CAS_SM_SCR—002—008 & BPI_CAS_SM_SCR—002—009)
This screen below captures the information for view/delete lead master.
-
- Step-1: Using search screen (BPI_CAS_SM_SCR—002—004), search the available Lead(s).
- Step-2: Select a Lead and click “View/Delete” to navigate to view/delete page.
- Step-3: Click the “Delete” to delete the lead information.
- Step-4: Deletion of Lead data takes you to Confirmation page.
- View/Delete Page (BPI_CAS_SM_SCR—002—08) (See Figure M-18)
- Confirmation Page (BPI_CAS_SM_SCR—002—09) (See Figure M-19)
DB Admin should only do Delete Lead Master. The “inactivation” of a Lead Master should change the status of Lead as “Dead”. The only other case for “Delete” as noted here would be to get rid of erroneous information added to the system; for this we should prompt for specific reasons as to why the Lead is being deleted. Upon deletion, the status of Lead is changed to “2” in DB.
3.1.5.2. SID, Element Name, Element Type & Purpose
| Element | Element | ||
| Name | Type | Label | Purpose |
| Lead ID | Text | Lead ID | Text showin “Lead ID” |
| Lead ID | Read-only Text | Lead ID | Shows the value of “Lead ID” |
| Sub Header | Text | Sub Header | To give the heading for the sub section |
| “Master | “Master | ||
| Information” | Information” | ||
| Group Type | Text | Group Type | Text showing “Group Type” |
| Group Type | Read-only Text | Group Type | Shows the value of “Group Type” |
| Association | Text | Association | Text showing “Association ID” |
| Type | Type | ||
| Association | Read-only Text | Association | Shows the value of “Association Type” |
| Type | Type | ||
| Member Type | Text | Member Type | Text for “Member Type” |
| Member Type | Read-only Text | Member Type | Shows the value of “Member Type” |
| Source Sub | Text | Source Sub | Text for “Source Sub Type” |
| Type | Type | ||
| Source Sub | Read-only Text | Source Sub | Shows the value of “Source sub type” |
| Type Search | Type Search | ||
| Field | Field | ||
| Sub Header | Text | Sub Header | To give the heading for the sub section |
| “General | “General | ||
| Information” | Information” | ||
| Company | Text | Company | Text for “Company Name”. |
| Company | Read-only Text | Company | Shows the value of company. |
| DBA | Text | DBA | Text for “DBA”. |
| DBA | Read-only Text | DBA | Shows the value of dba. |
| Street Address | Text | Street Address | Text for “Street Address”. |
| Street Address | Read-only Text | Street Address | Shows the value of street address. |
| Suite | Text | Suite | Text for “Suite” |
| Suite | Read-only Text | Suite | Shows the value of Suite. |
| City | Text | City | Text for “City” |
| City | Read-only Text | City | Shows the value of City. |
| State | Text | State | Text for “State” |
| State | Read-only Text | State | Shows the value of state |
| Zip | Text | Zip | Text for “Zip” |
| Zip | Read-only Text | Zip | Shows the value for Zip. |
| Phone | Text | Phone | Text for “Phone” |
| Phone | Read-only Text | Phone | Shows the value for Phone. |
| Fax | Text | Fax | Text for “Fax” |
| Fax | Read-only Text | Fax | Shows the value for Fax. |
| Sub Header | Text | Sub Header | To give the heading for the sub section |
| “Contact | “Contact | ||
| Information” | Information” | ||
| Sub Header | Text | Sub Header | To give the heading for the sub section |
| “Contact - 1” | “Contact - 1” | ||
| Salutation | Text | Salutation | Text for “Salutation” |
| Salutation | Read-only Text | Salutation | Shows the value for salutation. |
| First Name | Text | First Name | Text for “First Name” |
| First Name | Read-only Text | First Name | Shows the value for First Name. |
| MI | Text | MI | Text for “MI” |
| MI | Read-only Text | MI | Shows the value for MI. |
| Last Name | Text | Last Name | Text for “Last Name” |
| Last Name | Read-only Text | Last Name | Shows the value for Last Name. |
| Street Address | Text | Street Address | Text for “Street Address”. |
| Street Address | Read-only Text | Street Address | Shows the value for street address. |
| Suite | Text | Suite | Text for “Suite” |
| Suite | Read-only Text | Suite | Shows the value for Suite. |
| Zip | Text | Zip | Text for “Zip” |
| Zip | Read-only Text | Zip | Shows the value for Zip. |
| City | Text | City | Text for “City” |
| City | Read-only Text | City | Shows the value for City. |
| State | Text | State | Text for “State” |
| State | Read-only Text | State | Shows the value for state |
| Phone | Text | Phone | Text for “Phone” |
| Phone | Read-only Text | Phone | Shows the value for Phone. |
| Extn. | Text | Extn. | Text for “Extn” |
| Extn | Read-only Text | Extn | Shows the value for Extn. |
| Fax | Text | Fax | Text for “Fax” |
| Fax | Read-only Text | Fax | Shows the value for Fax. |
| Text | Text for “Email” | ||
| Read-only Text | Shows the value for Email. | ||
| Sub Header | Text | Sub Header | To give the heading for the sub section |
| “Contact - 2” | “Contact - 2” | ||
| First Name | Text | First Name | Text for “First Name” |
| First Name | Read-only Text | First Name | Shows the value for First Name. |
| MI | Text | MI | Text for “MI” |
| MI | Read-only Text | MI | Shows the value for MI. |
| Last Name | Text | Last Name | Text for “Last Name” |
| Last Name | Read-only Text | Last Name | Shows the value for Last Name. |
| Street Address | Text | Street Address | Text for “Street Address”. |
| Street Address | Read-only Text | Street Address | Shows the value for street address. |
| Suite | Text | Suite | Text for “Suite” |
| Suite | Read-only Text | Suite | Shows the value for Suite. |
| Zip | Text | Zip | Text for “Zip” |
| Zip | Read-only Text | Zip | Shows the value for Zip. |
| City | Text | City | Text for “City” |
| City | Read-only Text | City | Shows the value for City. |
| State | Text | State | Text for “State” |
| State | Read-only Text | State | Shows the value for State. |
| Phone | Text | Phone | Text for “Phone” |
| Phone | Read-only Text | Phone | Shows the value for Phone. |
| Extn. | Text | Extn. | Text for “Extn” |
| Extn | Read-only Text | Extn | Shows the value for Extn. |
| Fax | Text | Fax | Text for “Fax” |
| Fax | Read-only Text | Fax | Shows the value for Fax. |
| Text | Text for “Email” | ||
| Read-only Text | Shows the value for Email. | ||
| Sub Header | Text | Sub Header | To give the heading for the sub section |
| “Associated | “Associated | ||
| Personnel” | Personnel” | ||
| Agent | Text | Agent | Text for “Agent” |
| Agent | Read-only Text | Agent | Shows the number of associated agent. |
| Agency | Text | Agency | Text for “Agency” |
| Agency | Read-only Text | Agency | Shows the number of associated agency(s). |
| Internal | Text | Internal | Text for “Internal Workgroup” |
| Workgroup | Workgroup | ||
| Internal | Read-only Text | Internal | Shows the value for internal workgroups. |
| Workgroup | Workgroup | ||
| BSS Rep | Text | BSS Rep | Text for “BSS Rep” |
| BSS Rep | Read-only Text | BSS Rep | Shows the value for BSS Rep (Associates). |
| Sub Header | Text | Sub Header | To give the heading for the sub section |
| “Past Plan | “Past Plan | ||
| Details” | Details” | ||
| Number of | Text | Number of | Text for “Number of Employees” |
| Employees | Employees | ||
| Number of | Read-only Text | Number of | Shows the value for number of employees |
| Employees | Employees | ||
| Entry Field | Entry Field | ||
| Plan Type | Text | Plan Type | Text for “Plan Type” |
| Plan Type | Read-only Text | Plan Type | Shows the value for Plan Type. |
| entry field | entry field | ||
| Current | Text | Current Carrier | Text for “Current Carrier” |
| Carrier | |||
| Current | Read-only Text | Current Carrier | Shows the value for current carrier |
| Carrier Entry | Entry field | ||
| field | |||
| Deductible | Text | Deductible | Text for “Deductible” |
| Deductible | Read-only Text | Deductible | Shows the value for Deductible at present |
| Entry field | Entry field | ||
| Co Pay | Text | Co Pay | Text for “Co Pay Amount” |
| Amount | Amount | ||
| Co Pay | Read-only Text | Co Pay | Shows the value for Co Pay Amount at |
| Amount Entry | Amount Entry | present | |
| field | field | ||
| Benefit level in | Text | Benefit level in | Text for “Benefit Level In Network” |
| network | network | ||
| Benefit Level | Read-only Text | Benefit Level in | Shows the value for current carrier |
| in network | network Entry | ||
| Entry field | field | ||
| Benefit Level | Text | Benefit Level | Text for “Benefit Level Out of Network” |
| Out of | Out of Network | ||
| Network | |||
| Benefit Level | Read-only Text | Benefit Level | Shows the value for Benefit level out of |
| Out of | Out of Network | network | |
| Network | |||
| Employer | Text | Employer | Text for “Employer Contribution” |
| Contribution | Contribution | ||
| Employer | Read-only Text | Employer | Shows the value for employer contribution |
| Contribution | Contribution | ||
| Entry Field | Entry Field | ||
| Approximately | Text | Approximately | Text for “Approximately Monthly Premium” |
| Monthly | Monthly | ||
| Premium | Premium | ||
| Approximately | Read-only Text | Approximately | Shows the value for Monthly Premium at |
| Monthly | Monthly | present. | |
| Premium Entry | Premium Entry | ||
| Field | Field | ||
| Renewal Date | Text | Renewal Date | Text for “Renewal Date” |
| Renewal Date | Read-only Text | Renewal Date | Shows the value for Renewal Date. |
| Sub Header | Text | Sub Header | To give the heading for the sub section |
| “Other | “Other | ||
| Information” | Information” | ||
| Best Time to | Text | Best Time to | Text for “Best Time to Call” |
| Call | Call | ||
| Best Time to | Read-only Text | Best Time to | Shows the value for the best time to call. |
| Call | Call | ||
| Comments | Text | Comments | Text for “Comments” |
| Comments | Read-only Text | Comments | Shows the value for comments |
| Entry Field | Entry Field | ||
| Mode of | Text | Mode of | Text for “”Mode of Communication |
| Communication | Communication | ||
| Mode Of | Read-only Text | Mode Of | Shows the value for mode of communication |
| Communication | Communication | ||
| New Lead | HTML Button | New Lead | Takes the user to “Create Lead Master” |
| screen | |||
| Delete | HTML Button | Delete | Deletes the Lead Master in database. |
3.1.5.3. Front End Validations
None
3.1.5.4. Screen Flow
The following are the scenarios the user may come across when operating on the step2 screen.
| Scenario | Description | |
| New Lead | Used to Navigate to “Create Lead Master” screen. | |
| Delete | Inactivates (Delete) the Record. | |
3.1.6. User Interface ID: Create Agent Master
3.1.6.1. ScreenName: CreateAgentMaster (BPI_CAS_SM_SCR—002—010, BPI_CAS_SM_SCR—002—011 & BPI_CAS_SM_SCR—002—012)
This screen below captures the information for creating agent master.
-
- Step-1: Fill the mandatory information in page1. Click “Next” to navigate to page2.
- Step-2: Fill the mandatory information in page2 and click “Save” to save the Agent Master data.
- Step-3: Saving of Agent data takes you to Confirmation page.
Page1 (BPI_CAS_SM_SCR—002—010) (See Figure M-20)
Page2 (BPI_CAS_SM_SCR—002—011) (See Figure M-21)
Confirmation page (BPI_CAS_SM_SCR—002—012) (See Figure M-22)
| Element | Element | ||
| Name | Type | Label | Purpose |
| Sub Header | Text | Sub Header | To give the heading for the sub section |
| “Agent | “Agent | ||
| Information” | Information” | ||
| First Name | Text | First Name | Text for “First Name” |
| First Name | Entry Field | First Name | Entry Field for First Name. |
| MI | Text | MI | Text for “MI” |
| MI | Entry Field | MI | Entry Field for MI. |
| Last Name | Text | Last Name | Text for “Last Name” |
| Last Name | Entry Field | Last Name | Entry Field for Last Name. |
| Company | Text | Company | Text for “Company Name”. |
| Name | Name | ||
| Company | Entry Field | Company | Entry field for company. |
| Name | Name | ||
| DBA | Text | DBA | Text for “DBA”. |
| DBA | Entry Field | DBA | Entry field for dba. |
| Street Address | Text | Street Address | Text for “Street Address”. |
| Street Address | Entry Field | Street Address | Entry field for street address. |
| Suite | Text | Suite | Text for “Suite” |
| Suite | Entry Field | Suite | Entry Field for Suite. |
| City | Text | City | Text for “City” |
| City | Entry Field | City | Entry Field for City. |
| State | Text | State | Text for “State” |
| State | Select Feature | State | Select feature for selecting a state in US. |
| Zip | Text | Zip | Text for “Zip” |
| Zip | Entry Field | Zip | Entry Field for Zip. |
| Phone | Text | Phone | Text for “Phone” |
| Phone | Entry Field | Phone | Entry Field for Phone. |
| Extn. | Text | Extn. | Text for “Extn.” |
| Extn. | Entry Field | Extn. | Entry Field for Extn. |
| Fax | Text | Fax | Text for “Fax” |
| Fax | Entry Field | Fax | Entry Field for Fax. |
| Mode of | Text | Mode of | Text for “Mode of Communication” |
| communication | communication | ||
| Mode of | Entry Field | Mode of | Entry Field for Mode of Communication. |
| Communication | Communication | ||
| Gender | Text | Gender | Text for “Gender” |
| Gender | Select Feature | Gender | Select feature for gender. |
| Text | Text for Email. | ||
| Entry Field | Entry Field for “Email” | ||
| Date of Birth | Text | Date of Birth | Text for Email. |
| Date of Birth | Entry Field | Date of Birth | Entry Field for Date of Birth. |
| Sub Header | Text | Sub Header | To give the heading for the sub section |
| “Contact | “Contact | ||
| Information” | Information” | ||
| Sub Header | Text | Sub Header | To give the heading for the sub section |
| “Contact - 1” | “Contact - 1” | ||
| Salutation | Text | Salutation | Text for “Salutation” |
| Salutation | Select Feature | Salutation | Select feature for selecting a salutation. |
| First Name | Text | First Name | Text for “First Name” |
| First Name | Entry Field | First Name | Entry Field for First Name. |
| MI | Text | MI | Text for “MI” |
| MI | Entry Field | MI | Entry Field for MI. |
| Last Name | Text | Last Name | Text for “Last Name” |
| Last Name | Entry Field | Last Name | Entry Field for Last Name. |
| Street Address | Text | Street Address | Text for “Street Address”. |
| Street Address | Entry Field | Street Address | Entry field for street address. |
| Suite | Text | Suite | Text for “Suite” |
| Suite | Entry Field | Suite | Entry Field for Suite. |
| City | Text | City | Text for “City” |
| City | Entry Field | City | Entry Field for City. |
| State | Text | State | Text for “State” |
| State | Select Feature | State | Select feature for selecting a state in US. |
| Zip | Text | Zip | Text for “Zip” |
| Zip | Entry Field | Zip | Entry Field for Zip. |
| Phone | Text | Phone | Text for “Phone” |
| Phone | Entry Field | Phone | Entry Field for Phone. |
| Extn. | Text | Extn. | Text for “Extn.” |
| Extn. | Entry Field | Extn. | Entry Field for Extn. |
| Fax | Text | Fax | Text for “Fax” |
| Fax | Entry Field | Fax | Entry Field for Fax. |
| Text | Text for Email. | ||
| Entry Field | Entry Field for “Email” | ||
| Sub Header | Text | Sub Header | To give the heading for the sub section |
| “Contact - 2” | “Contact - 2” | ||
| Salutation | Text | Salutation | Text for “Salutation” |
| Salutation | Select Feature | Salutation | Select feature for selecting a salutation |
| First Name | Text | First Name | Text for “First Name” |
| First Name | Entry Field | First Name | Entry Field for First Name. |
| MI | Text | MI | Text for “MI” |
| MI | Entry Field | MI | Entry Field for MI. |
| Last Name | Text | Last Name | Text for “Last Name” |
| Last Name | Entry Field | Last Name | Entry Field for Last Name. |
| Street Address | Text | Street Address | Text for “Street Address”. |
| Street Address | Entry Field | Street Address | Entry field for street address. |
| Suite | Text | Suite | Text for “Suite” |
| Suite | Entry Field | Suite | Entry Field for Suite. |
| City | Text | City | Text for “City” |
| City | Entry Field | City | Entry Field for City. |
| State | Text | State | Text for “State” |
| State | Select Feature | State | Select feature for selecting a state in US. |
| Zip | Text | Zip | Text for “Zip” |
| Zip | Entry Field | Zip | Entry Field for Zip. |
| Phone | Text | Phone | Text for “Phone” |
| Phone | Entry Field | Phone | Entry Field for Phone. |
| Extn. | Text | Extn. | Text for “Extn.” |
| Extn. | Entry Field | Extn. | Entry Field for Extn. |
| Fax | Text | Fax | Text for “Fax” |
| Fax | Entry Field | Fax | Entry Field for Fax. |
| Text | Text for Email. | ||
| Entry Field | Entry Field for “Email” | ||
| Next | HTML Button | Next | Takes user to the Next page. |
| Cancel | HTML Button | Cancel | Resets the Data to original values |
| Broker Type | Text | Broker Type | Text for “Broker Type” |
| Broker Type | Radio Buttons | Broker Type | Statewide, Regional and Unknown (default) |
| Sub Header | Sub Header | ||
| “Additional | “Additional | ||
| Preferences” | Preferences” | ||
| Exclude from | Check box | Exclude from | If checked then Yes. |
| Broadcast | Broadcast | ||
| Messaging | Messaging | ||
| Exclude from | Check box | Exclude from | If checked then yes. |
| overdue | overdue | ||
| premium | premium | ||
| notices | notices | ||
| Exclude from | Check box | Exclude from | If checked then Yes |
| Employee/Member | Employee/Member | ||
| Term | Term | ||
| Letters | Letters | ||
| Exclude from | Check Box | Exclude from | If checked then Yes |
| Employee/Member | Employee/Member | ||
| Add-on | Add-on | ||
| Term Letters | Term Letters | ||
| Sub Header | Text | Sub Header | To give the heading for the sub section |
| “Associated | “Associated | ||
| Personnel” | Personnel” | ||
| Agent | Text | Agent | Text for “Agent Workgroup” |
| Workgroup | Workgroup | ||
| Agent | Non-Editable | Agent | Shows the number of associated agent. |
| Text | |||
| Agent-Popup | Image | Agent-Popup | Clicking this will open a new window, using |
| which user can assign agents for this Lead. | |||
| Agency | Text | Agency | Text for “Agency Workgroup” |
| Workgroup | Workgroup | ||
| Agency | Non-Editable | Agency | Shows the number of associated agency(s). |
| Text | |||
| Agency-Popup | Image | Agency-Popup | Clicking this will open a new window, using |
| which user can assign agency(s) for this | |||
| Lead. | |||
| Internal | Text | Internal | Text for “Internal Workgroup” |
| Workgroup | Workgroup | ||
| Internal | Select Feature | Internal | Shows the internal workgroups. User can |
| Workgroup | Workgroup | select a internal workgroup for this lead. | |
| BSS Rep | Text | BSS Rep | Text for “BSS Rep” |
| BSS Rep | Select Feature | BSS Rep | Shows the BSS Rep (Associates) for the |
| selected internal workgroup. User can select | |||
| a BSS Rep for this Lead. | |||
| Sub Header | Text | Sub Header | Text for License Information |
| “License | “License | ||
| Information” | Information” | ||
| Tax ID/SSN | Text | Tax ID/SSN | Text For “Tax ID/SSN” |
| TaxID/SSN | Entry field | TaxID/SSN | Entry field for entering the TAX ID/SSN |
| Entry Field | Entry Field | ||
| License | Text | License | Text for “License Number” |
| Number | Number | ||
| License | Calendar | License | Calendar |
| Expiration | Expiration | ||
| E&O Number | Text | E&O Number | Text for “E&O” |
| E&O Number | Entry Field | E&O Number | Entry field for E&O Number |
| E&O | Text | E&O | Text for “E & O Expiration List” |
| Expiration | Expiration | ||
| E&O | Editable | E&O | Calendar for E&O expiration calendar |
| Expiration | text/Calendar | Expiration | |
| Sub Header | Text | Sub Header | To give the heading for the subsection |
| “Bank | “Bank | ||
| Information” | Information” | ||
| Preferred Mode | Text | Preferred Mode | Text for “Preferred Mode of Payment” |
| of Payment | of Payment | ||
| Preferred Mode | Radio Button | Preferred Mode | Check or ACH |
| of Payment | of Payment | ||
| Bank Name | Text | Bank Name | Text for Bank Name |
| Bank Name | Entry Field | Bank Name | Entry field for Bank Name |
| Account | Text | Account | Text for Account Number |
| Number | Number | ||
| Account | Entry field | Account | Entry Field For Account Number |
| Number | Number | ||
| Routing | Text | Routing | Text for Routing Number |
| Number | Number | ||
| Routing | Entry field | Routing | Entry Field for Routing Number |
| Number | Number | ||
| Account Type | Text | Account Type | Text for Account Type |
| Account Type | Select feature | Account Type | Select feature to select the type of account |
| Name on the | Text | Name on the | Text for “Name on the account” |
| Account | Account | ||
| Name on the | Entry Field | Name on the | Entry field for “Name on the Account” |
| Account | Account | ||
| Payee Name | Text | Payee Name | Text for Payee Name |
| Payee Name | Entry field | Payee Name | Entry Field for Payee Name |
| Requires | Check Box | Requires | Check box for “requires special handling” if |
| Special | Special | checked - means Yes | |
| Handling | Handling | ||
| Previous | HTML Button | Previous | Takes user to the Previous page. |
| Save | HTML Button | Save | Saves the Data. |
| Cancel | HTML Button | Cancel | Resets the Data to original values |
3.1.6.2. SID, Element Name, Element Type & Purpose
| Element | Element | ||
| Name | Type | Label | Purpose |
| Sub Header | Text | Sub Header | To give the heading for the sub section |
| “Agent | “Agent | ||
| Information” | Information” | ||
| First Name | Text | First Name | Text for “First Name” |
| First Name | Entry Field | First Name | Entry Field for First Name. |
| MI | Text | MI | Text for “MI” |
| MI | Entry Field | MI | Entry Field for MI. |
| Last Name | Text | Last Name | Text for “Last Name” |
| Last Name | Entry Field | Last Name | Entry Field for Last Name. |
| Company | Text | Company | Text for “Company Name”. |
| Name | Name | ||
| Company | Entry Field | Company | Entry field for company. |
| Name | Name | ||
| DBA | Text | DBA | Text for “DBA”. |
| DBA | Entry Field | DBA | Entry field for dba. |
| Street Address | Text | Street Address | Text for “Street Address”. |
| Street Address | Entry Field | Street Address | Entry field for street address. |
| Suite | Text | Suite | Text for “Suite” |
| Suite | Entry Field | Suite | Entry Field for Suite. |
| City | Text | City | Text for “City” |
| City | Entry Field | City | Entry Field for City. |
| State | Text | State | Text for “State” |
| State | Select Feature | State | Select feature for selecting a state in US. |
| Zip | Text | Zip | Text for “Zip” |
| Zip | Entry Field | Zip | Entr Field for Zip. |
| Phone | Text | Phone | Text for “Phone” |
| Phone | Entry Field | Phone | Entry Field for Phone. |
| Extn. | Text | Extn. | Text for “Extn.” |
| Extn. | Entry Field | Extn. | Entry Field for Extn. |
| Fax | Text | Fax | Text for “Fax” |
| Fax | Entry Field | Fax | Entry Field for Fax. |
| Mode of | Text | Mode of | Text for “Mode of Communication” |
| communication | communication | ||
| Mode of | Entry Field | Mode of | Entry Field for Mode of Communication. |
| Communication | Communication | ||
| Gender | Text | Gender | Text for “Gender” |
| Gender | Select Feature | Gender | Select feature for gender. |
| Text | Text for Email. | ||
| Entry Field | Entry Field for “Email” | ||
| Date of Birth | Text | Date of Birth | Text for Email. |
| Date of Birth | Entry Field | Date of Birth | Entry Field for Date of Birth. |
| Sub Header | Text | Sub Header | To give the heading for the sub section |
| “Contact | “Contact | ||
| Information” | Information” | ||
| Sub Header | Text | Sub Header | To give the heading for the sub section |
| “Contact - 1” | “Contact - 1” | ||
| Salutation | Text | Salutation | Text for “Salutation” |
| Salutation | Select Feature | Salutation | Select feature for selecting a salutation. |
| First Name | Text | First Name | Text for “First Name” |
| First Name | Entry Field | First Name | Entry Field for First Name. |
| MI | Text | MI | Text for “MI” |
| MI | Entry Field | MI | Entry Field for MI. |
| Last Name | Text | Last Name | Text for “Last Name” |
| Last Name | Entry Field | Last Name | Entry Field for Last Name. |
| Street Address | Text | Street Address | Text for “Street Address”. |
| Street Address | Entry Field | Street Address | Entry field for street address. |
| Suite | Text | Suite | Text for “Suite” |
| Suite | Entry Field | Suite | Entry Field for Suite. |
| City | Text | City | Text for “City” |
| City | Entry Field | City | Entry Field for City. |
| State | Text | State | Text for “State” |
| State | Select Feature | State | Select feature for selecting a state in US. |
| Zip | Text | Zip | Text for “Zip” |
| Zip | Entry Field | Zip | Entry Field for Zip. |
| Phone | Text | Phone | Text for “Phone” |
| Phone | Entry Field | Phone | Entry Field for Phone. |
| Extn. | Text | Extn. | Text for “Extn.” |
| Extn. | Entry Field | Extn. | Entry Field for Extn. |
| Fax | Text | Fax | Text for “Fax” |
| Fax | Entry Field | Fax | Entry Field for Fax. |
| Text | Text for Email. | ||
| Entry Field | Entry Field for “Email” | ||
| Sub Header | Text | Sub Header | To give the heading for the sub section |
| “Contact - 2” | “Contact - 2” | ||
| Salutation | Text | Salutation | Text for “Salutation” |
| Salutation | Select Feature | Salutation | Select feature for selecting a salutation. |
| First Name | Text | First Name | Text for “First Name” |
| First Name | Entry Field | First Name | Entry Field for First Name. |
| MI | Text | MI | Text for “MI” |
| MI | Entry Field | MI | Entry Field for MI. |
| Last Name | Text | Last Name | Text for “Last Name” |
| Last Name | Entry Field | Last Name | Entry Field for Last Name. |
| Street Address | Text | Street Address | Text for “Street Address”. |
| Street Address | Entry Field | Street Address | Entry field for street address. |
| Suite | Text | Suite | Text for “Suite” |
| Suite | Entry Field | Suite | Entry Field for Suite. |
| City | Text | City | Text for “City” |
| City | Entry Field | City | Entry Field for City. |
| State | Text | State | Text for “State” |
| State | Select Feature | State | Select feature for selecting a state in US. |
| Zip | Text | Zip | Text for “Zip” |
| Zip | Entry Field | Zip | Entry Field for Zip. |
| Phone | Text | Phone | Text for “Phone” |
| Phone | Entry Field | Phone | Entry Field for Phone. |
| Extn. | Text | Extn. | Text for “Extn.” |
| Extn. | Entry Field | Extn. | Entry Field for Extn. |
| Fax | Text | Fax | Text for “Fax” |
| Fax | Entry Field | Fax | Entry Field for Fax. |
| Text | Text for Email. | ||
| Entry Field | Entry Field for “Email” | ||
| Next | HTML Button | Next | Takes user to the Next page. |
| Cancel | HTML Button | Cancel | Resets the Data to original values |
| Broker Type | Text | Broker Type | Text for “Broker Type” |
| Broker Type | Radio Buttons | Broker Type | Statewide, Regional and Unknown (default) |
| Sub Header | Sub Header | ||
| “Additional | “Additional | ||
| Preferences” | Preferences” | ||
| Exclude from | Check box | Exclude from | If checked then Yes. |
| Broadcast | Broadcast | ||
| Messaging | Messaging | ||
| Exclude from | Check box | Exclude from | If checked then yes. |
| overdue | overdue | ||
| premium | premium | ||
| notices | notices | ||
| Exclude from | Check box | Exclude from | If checked then Yes |
| Employee/Member | Employee/Member | ||
| Term | Term | ||
| Letters | Letters | ||
| Exclude from | Check Box | Exclude from | If checked then Yes |
| Employee/Member | Employee/Member | ||
| Add-on | Add-on | ||
| Term Letters | Term Letters | ||
| Sub Header | Text | Sub Header | To give the heading for the sub section |
| “Associated | “Associated | ||
| Personnel” | Personnel” | ||
| Agent | Text | Agent | Text for “Agent Workgroup” |
| Workgroup | Workgroup | ||
| Agent | Non-Editable | Agent | Shows the number of associated agent. |
| Text | |||
| Agent-Popup | Image | Agent-Popup | Clicking this will open a new window, using |
| which user can assign agents for this Lead. | |||
| Agency | Text | Agency | Text for “Agency Workgroup” |
| Workgroup | Workgroup | ||
| Agency | Non-Editable | Agency | Shows the number of associated agency(s). |
| Text | |||
| Agency-Popup | Image | Agency-Popup | Clicking this will open a new window, using |
| which user can assign agency(s) for this | |||
| Lead. | |||
| Internal | Text | Internal | Text for “Internal Workgroup” |
| Workgroup | Workgroup | ||
| Internal | Select Feature | Internal | Shows the internal workgroups. User can |
| Workgroup | Workgroup | select a internal workgroup for this lead. | |
| BSS Rep | Text | BSS Rep | Text for “BSS Rep” |
| BSS Rep | Select Feature | BSS Rep | Shows the BSS Rep (Associates) for the |
| selected internal workgroup. User can select | |||
| a BSS Rep for this Lead. | |||
| Sub Header | Text | Sub Header | Text for License Information |
| “License | “License | ||
| Information” | Information” | ||
| Tax ID/SSN | Text | Tax ID/SSN | Text For “Tax ID/SSN” |
| TaxID/SSN | Entry field | TaxID/SSN | Entry field for entering the TAX ID/SSN |
| Entry Field | Entry Field | ||
| License | Text | License | Text for “License Number” |
| Number | Number | ||
| License | Calendar | License | Calendar |
| Expiration | Expiration | ||
| E&O Number | Text | E&O Number | Text for “E&O” |
| E&O Number | Entry Field | E&O Number | Entry field for E&O Number |
| E&O | Text | E&O | Text for “E & O Expiration List” |
| Expiration | Expiration | ||
| E&O | Editable | E&O | Calendar for E&O expiration calendar |
| Expiration | text/Calendar | Expiration | |
| Sub Header | Text | Sub Header | To give the heading for the subsection |
| “Bank | “Bank | ||
| Information” | Information” | ||
| Preferred Mode | Text | Preferred Mode | Text for “Preferred Mode of Payment” |
| of Payment | of Payment | ||
| Preferred Mode | Radio Button | Preferred Mode | Check or ACH |
| of Payment | of Payment | ||
| Bank Name | Text | Bank Name | Text for Bank Name |
| Bank Name | Entry Field | Bank Name | Entry field for Bank Name |
| Account | Text | Account | Text for Account Number |
| Number | Number | ||
| Account | Entry field | Account | Entry Field For Account Number |
| Number | Number | ||
| Routing | Text | Routing | Text for Routing Number |
| Number | Number | ||
| Routing | Entry field | Routing | Entry Field for Routing Number |
| Number | Number | ||
| Account Type | Text | Account Type | Text for Account Type |
| Account Type | Select feature | Account Type | Select feature to select the type of account |
| Name on the | Text | Name on the | Text for “Name on the account” |
| Account | Account | ||
| Name on the | Entry Field | Name on the | Entry field for “Name on the Account” |
| Account | Account | ||
| Payee Name | Text | Payee Name | Text for Payee Name |
| Payee Name | Entry field | Payee Name | Entry Field for Payee Name |
| Requires | Check Box | Requires | Check box for “requires special handling” if |
| Special | Special | checked - means Yes | |
| Handling | Handling | ||
| Previous | HTML Button | Previous | Takes user to the Previous page. |
| Save | HTML Button | Save | Saves the Data. |
| Cancel | HTML Button | Cancel | Resets the Data to original values |
3.1.6.3. Front End Validations
| Element | ||
| Name | Action/Validation Details | Error Message Text |
| First Name | Mandatory. Accepts all alphanumeric and | Error Dialog Box on Save |
| Special characters except double quotes. | “Accepts all alphanumeric and | |
| Special characters except | ||
| double quotes”. | ||
| Last Name | Mandatory. Accepts all alphanumeric and | Error Dialog Box on Save |
| Special characters except double quotes. | “Accepts all alphanumeric and | |
| Special characters except | ||
| double quotes”. | ||
| Company | Mandatory. Accepts all alphanumeric and | Error Dialog Box on Save |
| Name | Special characters except double quotes. | “Accepts all alphanumeric and |
| Special characters except | ||
| double quotes” | ||
| Zip | Mandatory. Accepts exactly 5 numeric digits. | Error Dialog Box “Accepts |
| exactly 5 digits number only”. | ||
| Contact1 First | Mandatory. Accepts all alphanumeric and | Error Dialog Box on Save |
| Name | Special characters except double quotes. | “Accepts all alphanumeric and |
| Special characters except | ||
| double quotes” | ||
| Contact1 Last | Mandatory. Accepts all alphanumeric and | Error Dialog Box on Save |
| Name | Special characters except double quotes. | “Accepts all alphanumeric and |
| Special characters except | ||
| double quotes” | ||
| Contact1 Zip | Mandatory. Accepts exactly 5 numeric digits. | Error Dialog Box “Accepts |
| exactly 5 digits number only”. | ||
| Internal | Mandatory. | Error Dialog on Save “Is |
| workgroup | Required”. | |
3.1.6.4. Screen Flow
The user enters the information on the agent master
The following are the scenarios the user may come across when operating on the screen
| Scenario | Description |
| Save | Saves the agent data and shows the user confirmation page. |
| Next | Navigates to the page2. |
| Previous | Navigates to the page1. |
| Cancel | Resets the information |
3.1.7. User Interface ID: Search Agent Master
3.1.7.1. Screen Name: Search Agent Master (BPI_CAS_SM_SCR—002—013)
This screen below captures the information for searching an existing “Agent”.
-
- Step-1: Enter the mandatory agent information and click the search button. This page will display the result of search. User can choose a agent and navigate to either “Modify” screen or “View/Delete” screen. (See Figure M-23)
3.1.7.2. SID, Element Name, Element Type & Purpose
| Element | Element | ||
| Name | Type | Label | Purpose |
| Main Header | Text | Main Header | To give the heading for the screen |
| “Agent Search” | “Agent Search” | ||
| Agent ID | Text | Agent ID | Text For “Agent ID” |
| Agent ID | Entry Field | Agent ID | Entry field for agent id |
| First Name | Text | First Name | Text For “First Name” |
| First Name | Entry Field | First Name | Entry field for First Name |
| Last Name | Text | Last Name | Text for Last Name |
| Last Name | Entry Field | Last Name | Entry field for Last Name |
| Company | Text | Company | Text For “First “Company” |
| Company | Entry Field | Company | Entry field for Company |
| Phone | Text | Phone | Text for “Phone” |
| Phone | Entry Field | Phone | Entry field for Phone |
| Tax ID | Text | Tax ID | Text For “Tax ID” |
| Tax ID | Select Feature | Tax ID | Entry field for Tax |
| Agent Button | Radio Button | Agent Button | Used to select the agent for modifying or |
| Radio | Radio | viewing/deleting. | |
| Modify | HTML Button | Modify | Agents to the modify screen of the selected |
| agent | |||
| View/Delete | HTML Button | View/Delete | Agents to the view/delete screen of the |
| selected | |||
3.1.7.3. Front End Validations
| Element | Error Message | |
| Name | Action/Validation Details | Text |
| Agent | Mandatory. Any one of the fields in the search | Error Dialog |
| ID | screen is mandatory. Accepts Alphanumeric | Box on Search |
| values only | “Accepts | |
| Alphanumeric | ||
| values only.” | ||
3.1.7.4. Screen Flow
The following are the scenarios the user may come across when operating on the search screen.
| Scenario | Description |
| Search | The system checks for all the validations for all the |
| mandatory information. Fetches the agent(s) that matches with | |
| the search conditions. | |
| Cancel | Clears the search fields |
3.1.8. User Interface ID: Modify Agent Master
3.1.8.1. Screen Name: Modify Agent Master (BPI_CAS_SM_SCR—002—014, BPI_CAS_SM_SCR—002—015 & BPI_CAS_SM_SCR—002—016)
This screen below captures the information for modifying agent master.
-
- Step-1: Using search screen (BPI_CAS_SM_SCR—002—013), search the available Agent(s).
- Step-2: Select a Agent and click “Modify” to navigate to page 1.
- Step-3: Modify the Agent information and click “Next” to navigate you to page2.
- Step-4: Click the “Save” to save the modified agent information.
- Step-5: Saving of Agent data takes you to Confirmation page.
Page1 (BPI_CAS_SM_SCR—002—014) (See Figure M-24)
Page2 (BPI_CAS_SM_SCR—002—015) (See Figure M-25)
Confirmation Page (BPI_CAS_SM_SCR—002—016) (See Figure M-26)
3.1.8.2. SID, Element Name, Element Type & Purpose
| Element | |||
| Name | Element Type | Label | Purpose |
| Sub Header | Text | Sub Header | To give the heading for the sub section |
| “Agent | “Agent | ||
| Information” | Information” | ||
| First Name | Text | First Name | Text for “First Name” |
| First Name | Entry Field | First Name | Entry Field for First Name. |
| MI | Text | MI | Text for “MI” |
| MI | Entry Field | MI | Entry Field for MI. |
| Last Name | Text | Last Name | Text for “Last Name” |
| Last Name | Entry Field | Last Name | Entry Field for Last Name. |
| Company Name | Text | Company | Text for “Company Name”. |
| Name | |||
| Company Name | Entry Field | Company | Entry field for company. |
| Name | |||
| DBA | Text | DBA | Text for “DBA”. |
| DBA | Entry Field | DBA | Entry field for dba. |
| Street Address | Text | Street Address | Text for “Street Address”. |
| Street Address | Entry Field | Street Address | Entry field for street address. |
| Suite | Text | Suite | Text for “Suite” |
| Suite | Entry Field | Suite | Entry Field for Suite. |
| City | Text | City | Text for “City” |
| City | Entry Field | City | Entry Field for City. |
| State | Text | State | Text for “State” |
| State | Select Feature | State | Select feature for selecting a state in US. |
| Zip | Text | Zip | Text for “Zip” |
| Zip | Entry Field | Zip | Entry Field for Zip. |
| Phone | Text | Phone | Text for “Phone” |
| Phone | Entry Field | Phone | Entry Field for Phone. |
| Extn. | Text | Extn. | Text for “Extn.” |
| Extn. | Entry Field | Extn. | Entry Field for Extn. |
| Fax | Text | Fax | Text for “Fax” |
| Fax | Entry Field | Fax | Entry Field for Fax. |
| Mode of | Text | Mode of | Text for “Mode of Communication” |
| communication | communication | ||
| Mode of | Entry Field | Mode of | Entry Field for Mode of Communication. |
| Communication | Communication | ||
| Gender | Text | Gender | Text for “Gender” |
| Gender | Select Feature | Gender | Select feature for gender. |
| Text | Text for Email. | ||
| Entry Field | Entry Field for “Email” | ||
| Date of Birth | Text | Date of Birth | Text for Email. |
| Date of Birth | Entry Field | Date of Birth | Entry Field for Date of Birth. |
| Sub Header | Text | Sub Header | To give the heading for the sub section |
| “Contact | “Contact | ||
| Information” | Information” | ||
| Sub Header | Text | Sub Header | To give the heading for the sub section |
| “Contact - 1” | “Contact - 1” | ||
| Salutation | Text | Salutation | Text for “Salutation” |
| Salutation | Select Feature | Salutation | Select feature for selecting a salutation. |
| First Name | Text | First Name | Text for “First Name” |
| First Name | Entry Field | First Name | Entry Field for First Name. |
| MI | Text | MI | Text for “MI” |
| MI | Entry Field | MI | Entry Field for MI. |
| Last Name | Text | Last Name | Text for “Last Name” |
| Last Name | Entry Field | Last Name | Entry Field for Last Name. |
| Street Address | Text | Street Address | Text for “Street Address”. |
| Street Address | Entry Field | Street Address | Entry field for street address. |
| Suite | Text | Suite | Text for “Suite” |
| Suite | Entry Field | Suite | Entry Field for Suite. |
| City | Text | City | Text for “City” |
| City | Entry Field | City | Entry Field for City. |
| State | Text | State | Text for “State” |
| State | Select Feature | State | Select feature for selecting a state in US. |
| Zip | Text | Zip | Text for “Zip” |
| Zip | Entry Field | Zip | Entry Field for Zip. |
| Phone | Text | Phone | Text for “Phone” |
| Phone | Entry Field | Phone | Entry Field for Phone. |
| Extn. | Text | Extn. | Text for “Extn.” |
| Extn. | Entry Field | Extn. | Entry Field for Extn. |
| Fax | Text | Fax | Text for “Fax” |
| Fax | Entry Field | Fax | Entry Field for Fax. |
| Text | Text for Email. | ||
| Entry Field | Entry Field for “Email” | ||
| Sub Header | Text | Sub Header | To give the heading for the sub section |
| “Contact - 2” | “Contact - 2” | ||
| Salutation | Text | Salutation | Text for “Salutation” |
| Salutation | Select Feature | Salutation | Select feature for selecting a salutation. |
| First Name | Text | First Name | Text for “First Name” |
| First Name | Entry Field | First Name | Entry Field for First Name. |
| MI | Text | MI | Text for “MI” |
| MI | Entry Field | MI | Entry Field for MI. |
| Last Name | Text | Last Name | Text for “Last Name” |
| Last Name | Entry Field | Last Name | Entry Field for Last Name. |
| Street Address | Text | Street Address | Text for “Street Address”. |
| Street Address | Entry Field | Street Address | Entry field for street address. |
| Suite | Text | Suite | Text for “Suite” |
| Suite | Entry Field | Suite | Entry Field for Suite. |
| City | Text | City | Text for “City” |
| City | Entry Field | City | Entry Field for City. |
| State | Text | State | Text for “State” |
| State | Select Feature | State | Select feature for selecting a state in US. |
| Zip | Text | Zip | Text for “Zip” |
| Zip | Entry Field | Zip | Entry Field for Zip. |
| Phone | Text | Phone | Text for “Phone” |
| Phone | Entry Field | Phone | Entry Field for Phone. |
| Extn. | Text | Extn. | Text for “Extn.” |
| Extn. | Entry Field | Extn. | Entry Field for Extn. |
| Fax | Text | Fax | Text for “Fax” |
| Fax | Entry Field | Fax | Entry Field for Fax. |
| Text | Text for Email. | ||
| Entry Field | Entry Field for “Email” | ||
| Next | HTML Button | Next | Takes user to the Next page. |
| Cancel | HTML Button | Cancel | Resets the Data to original values |
| Broker Type | Text | Broker Type | Text for “Broker Type” |
| Broker Type | Radio Buttons | Broker Type | Statewide, Regional and Unknown (default) |
| Sub Header | Sub Header | ||
| “Additional | “Additional | ||
| Preferences” | Preferences” | ||
| Exclude from | Check box | Exclude from | If checked then Yes. |
| Broadcast | Broadcast | ||
| Messaging | Messaging | ||
| Exclude from | Check box | Exclude from | If checked then yes. |
| overdue | overdue | ||
| premium | premium | ||
| notices | notices | ||
| Exclude from | Check box | Exclude from | If checked then Yes |
| Employee/Member | Employee/Member | ||
| Term | Term | ||
| Letters | Letters | ||
| Exclude from | Check Box | Exclude from | If checked then Yes |
| Employee/Member | Employee/Member | ||
| Add-on | Add-on | ||
| Term Letters | Term Letters | ||
| Sub Header | Text | Sub Header | To give the heading for the sub section |
| “Associated | “Associated | ||
| Personnel” | Personnel” | ||
| Agent | Text | Agent | Text for “Agent Workgroup” |
| Workgroup | Workgroup | ||
| Agent | Non-Editable | Agent | Shows the number of associated agent. |
| Text | |||
| Agent-Popup | Image | Agent-Popup | Clicking this will open a new window, using |
| which user can assign agents for this Lead. | |||
| Agency | Text | Agency | Text for “Agency Workgroup” |
| Workgroup | Workgroup | ||
| Agency | Non-Editable | Agency | Shows the number of associated agency(s). |
| Text | |||
| Agency-Popup | Image | Agency-Popup | Clicking this will open a new window, using |
| which user can assign agency(s) for this | |||
| Lead. | |||
| Internal | Text | Internal | Text for “Internal Workgroup” |
| Workgroup | Workgroup | ||
| Internal | Select Feature | Internal | Shows the internal workgroups. User can |
| Workgroup | Workgroup | select a internal workgroup for this lead. | |
| BSS Rep | Text | BSS Rep | Text for “BSS Rep” |
| BSS Rep | Select Feature | BSS Rep | Shows the BSS Rep (Associates) for the |
| selected internal workgroup. User can | |||
| select a BSS Rep for this Lead. | |||
| Sub Header | Text | Sub Header | Text for License Information |
| “License | “License | ||
| Information” | Information” | ||
| Tax ID/SSN | Text | Tax ID/SSN | Text For “Tax ID/SSN” |
| TaxID/SSN | Entry field | TaxID/SSN | Entry field for entering the TAX ID/SSN |
| Entry Field | Entry Field | ||
| License | Text | License | Text for “License Number” |
| Number | Number | ||
| License | Calendar | License | Calendar |
| Expiration | Expiration | ||
| E&O Number | Text | E&O Number | Text for “E&O” |
| E&O Number | Entry Field | E&O Number | Entry field for E&O Number |
| E&O Expiration | Text | E& O Expiration | Text for “E & O Expiration List” |
| E&O Expiration | Editable | E& O Expiration | Calendar for E& O expiration calendar |
| text/Calendar | |||
| SubHeader | Text | Sub Header | To give the heading for the subsection |
| “Bank | “Bank | ||
| Information” | Information” | ||
| Preferred Mode | Text | Preferred Mode | Text for “Preferred Mode of Payment” |
| of Payment | of Payment | ||
| Preferred Mode | Radio Button | Preferred Mode | Check or ACH |
| of Payment | of Payment | ||
| Bank Name | Text | Bank Name | Text for Bank Name |
| Bank Name | Entry Field | Bank Name | Entry field for Bank Name |
| Account | Text | Account | Text for Account Number |
| Number | Number | ||
| Account | Entry field | Account | Entry Field For Account Number |
| Number | Number | ||
| Routing | Text | Routing | Text for Routing Number |
| Number | Number | ||
| Routing | Entry field | Routing | Entry Field for Routing Number |
| Number | Number | ||
| Account Type | Text | Account Type | Text for Account Type |
| Account Type | Select feature | Account Type | Select feature to select the type of account |
| Name on the | Text | Name on the | Text for “Name on the account” |
| Account | Account | ||
| Name on the | Entry Field | Name on the | Entry field for “Name on the Account” |
| Account | Account | ||
| Payee Name | Text | Payee Name | Text for Payee Name |
| Payee Name | Entry field | Payee Name | Entry Field for Payee Name |
| Requires | Check Box | Requires | Check box for “requires special handling” if |
| Special | Special | checked - means Yes | |
| Handling | Handling | ||
| Previous | HTML Button | Previous | Takes user to the Previous page. |
| Save | HTML Button | Save | Saves the Data. |
| Cancel | HTML Button | Cancel | Resets the Data to original values |
3.1.8.3. Front End Validations
| Element | ||
| Name | Action/Validation Details | Error Message Text |
| First Name | Mandatory. Accepts all alphanumeric and | Error Dialog Box on Save |
| Special characters except double quotes. | “Accepts all alphanumeric and | |
| Special characters except | ||
| double quotes”. | ||
| Last Name | Mandatory. Accepts all alphanumeric and | Error Dialog Box on Save |
| Special characters except double quotes. | “Accepts all alphanumeric and | |
| Special characters except | ||
| double quotes”. | ||
| Company | Mandatory. Accepts all alphanumeric and | Error Dialog Box on Save |
| Name | Special characters except double quotes. | “Accepts all alphanumeric and |
| Special characters except | ||
| double quotes” | ||
| Zip | Mandatory. Accepts exactly 5 numeric digits. | Error Dialog Box “Accepts |
| exactly 5 digits number only”. | ||
| Contact1 First | Mandatory. Accepts all alphanumeric and | Error Dialog Box on Save |
| Name | Special characters except double quotes. | “Accepts all alphanumeric and |
| Special characters except | ||
| double quotes” | ||
| Contact1 Last | Mandatory. Accepts all alphanumeric and | Error Dialog Box on Save |
| Name | Special characters except double quotes. | “Accepts all alphanumeric and |
| Special characters except | ||
| double quotes” | ||
| Contact1 Zip | Mandatory. Accepts exactly 5 numeric digits. | Error Dialog Box “Accepts |
| exactly 5 digits number only”. | ||
| Internal | Mandatory. | Error Dialog on Save “Is |
| workgroup | Required”. | |
3.1.8.4. Screen Flow
The user enters the information on the agent master
The following are the scenarios the user may come across when operating on the screen
| Scenario | Description |
| Save | Saves the agent data and shows the user confirmation page. |
| Next | Navigates to the page2. |
| Previous | Navigates to the page1. |
| Cancel | Resets the information |
3.1.9. User Interface ID: View & Delete Agent Master
3.1.9.1. Screen Name: View & Delete Agent Master (BPI_CAS_SM_SCR—002—017 & BPI_CAS_SM_SCR—002—018)
This screen below captures the information for view/delete agent master.
-
- Step-1: Using search screen (BPI_CAS_SM_SCR—002—013), search the available Agent(s).
- Step-3: Select a Agent and click “View/Delete” to navigate to view/delete page.
- Step-3: Click the “Delete” to delete the agent information.
- Step-4: Deletion of Agent data takes you to Confirmation page.
View/Delete Page (BPI_CAS_SM_SCR—002—017) (See Figure M-27)
Confirmation Page (BPI_CAS_SM_SCR—002—018) (See Figure M-28)
3.1.9.2. SID, Element Name, Element Type & Purpose
| Element | Element | ||
| Name | Type | Label | Purpose |
| Sub Header | Text | Sub Header | To give the heading for the sub section |
| “Agent | “Agent | ||
| Information” | Information” | ||
| First Name | Text | First Name | Text for “First Name” |
| First Name | Read-only Text | First Name | Display the value for First Name. |
| MI | Text | MI | Text for “MI” |
| MI | Read-only Text | MI | Display the value for MI. |
| Last Name | Text | Last Name | Text for “Last Name” |
| Last Name | Read-only Text | Last Name | Display the value for Last Name. |
| Company | Text | Company | Text for “Company Name”. |
| Name | Name | ||
| Company | Read-only Text | Company | Display the value for company. |
| Name | Name | ||
| DBA | Text | DBA | Text for “DBA”. |
| DBA | Read-only Text | DBA | Display the value for dba. |
| Street Address | Text | Street Address | Text for “Street Address”. |
| Street Address | Read-only Text | Street Address | Display the value for street address. |
| Suite | Text | Suite | Text for “Suite” |
| Suite | Read-only Text | Suite | Display the value for Suite. |
| City | Text | City | Text for “City” |
| City | Read-only Text | City | Display the value for City. |
| State | Text | State | Text for “State” |
| State | Read-only Text | State | Display the value for state. |
| Zip | Text | Zip | Text for “Zip” |
| Zip | Read-only Text | Zip | Display the value for Zip. |
| Phone | Text | Phone | Text for “Phone” |
| Phone | Read-only Text | Phone | Display the value for Phone. |
| Extn. | Text | Extn. | Text for “Extn.” |
| Extn. | Read-only Text | Extn. | Display the value for Extn. |
| Fax | Text | Fax | Text for “Fax” |
| Fax | Read-only Text | Fax | Display the value for Fax. |
| Mode of | Text | Mode of | Text for “Mode of Communication” |
| communication | communication | ||
| Mode of | Read-only Text | Mode of | Display the value for Mode of Communication. |
| Communication | Communication | ||
| Gender | Text | Gender | Text for “Gender” |
| Gender | Read-only Text | Gender | Display the value for gender. |
| Text | Text for Email. | ||
| Read-only Text | Display the value for “Email” | ||
| Date of Birth | Text | Date of Birth | Text for Email. |
| Date of Birth | Read-only Text | Date of Birth | Display the value for Date of Birth. |
| Sub Header | Text | Sub Header | To give the heading for the sub section |
| “Contact | “Contact | ||
| Information” | Information” | ||
| Sub Header | Text | Sub Header | To give the heading for the sub section |
| “Contact - 1” | “Contact - 1” | ||
| Salutation | Text | Salutation | Text for “Salutation” |
| Salutation | Read-only Text | Salutation | Display the value for salutation. |
| First Name | Text | First Name | Text for “First Name” |
| First Name | Read-only Text | First Name | Display the value for First Name. |
| MI | Text | MI | Text for “MI” |
| MI | Read-only Text | MI | Display the value for MI. |
| Last Name | Text | Last Name | Text for “Last Name” |
| Last Name | Read-only Text | Last Name | Display the value for Last Name. |
| Company | Text | Company | Text for “Company Name”. |
| Name | Name | ||
| Company | Read-only Text | Company | Display the value for company. |
| Name | Name | ||
| DBA | Text | DBA | Text for “DBA”. |
| DBA | Read-only Text | DBA | Display the value for dba. |
| Street Address | Text | Street Address | Text for “Street Address”. |
| Street Address | Read-only Text | Street Address | Display the value for street address. |
| Suite | Text | Suite | Text for “Suite” |
| Suite | Read-only Text | Suite | Display the value for Suite. |
| City | Text | City | Text for “City” |
| City | Read-only Text | City | Display the value for City. |
| State | Text | State | Text for “State” |
| State | Read-only Text | State | Display the value for state. |
| Zip | Text | Zip | Text for “Zip” |
| Zip | Read-only Text | Zip | Display the value for Zip. |
| Phone | Text | Phone | Text for “Phone” |
| Phone | Read-only Text | Phone | Display the value for Phone. |
| Extn. | Text | Extn. | Text for “Extn.” |
| Extn. | Read-only Text | Extn. | Display the value for Extn. |
| Fax | Text | Fax | Text for “Fax” |
| Fax | Read-only Text | Fax | Display the value for Fax. |
| Text | Text for Email. | ||
| Read-only Text | Display the value for “Email” | ||
| Sub Header | Text | Sub Header | To give the heading for the sub section |
| “Contact - 2” | “Contact - 2” | ||
| Salutation | Text | Salutation | Text for “Salutation” |
| Salutation | Read-only Text | Salutation | Display the value for salutation. |
| First Name | Text | First Name | Text for “First Name” |
| First Name | Read-only Text | First Name | Display the value for First Name. |
| MI | Text | MI | Text for “MI” |
| MI | Read-only Text | MI | Display the value for MI. |
| Last Name | Text | Last Name | Text for “Last Name” |
| Last Name | Read-only Text | Last Name | Display the value for Last Name. |
| Company | Text | Company | Text for “Company Name”. |
| Name | Name | ||
| Company | Read-only Text | Company | Display the value for company. |
| Name | Name | ||
| DBA | Text | DBA | Text for “DBA”. |
| DBA | Read-only Text | DBA | Display the value for dba. |
| Street Address | Text | Street Address | Text for “Street Address”. |
| Street Address | Read-only Text | Street Address | Display the value for street address. |
| Suite | Text | Suite | Text for “Suite” |
| Suite | Read-only Text | Suite | Display the value for Suite. |
| City | Text | City | Text for “City” |
| City | Read-only Text | City | Display the value for City. |
| State | Text | State | Text for “State” |
| State | Read-only Text | State | Display the value for state. |
| Zip | Text | Zip | Text for “Zip” |
| Zip | Read-only Text | Zip | Display the value for Zip. |
| Phone | Text | Phone | Text for “Phone” |
| Phone | Read-only Text | Phone | Display the value for Phone. |
| Extn. | Text | Extn. | Text for “Extn.” |
| Extn. | Read-only Text | Extn. | Display the value for Extn. |
| Fax | Text | Fax | Text for “Fax” |
| Fax | Read-only Text | Fax | Display the value for Fax. |
| Text | Text for Email. | ||
| Read-only Text | Display the value for “Email” | ||
| Next | HTML Button | Next | Takes user to the Next page. |
| Cancel | HTML Button | Cancel | Resets the Data to original values |
| Broker Type | Text | Broker Type | Text for “Broker Type” |
| Broker Type | Read-only Text | Broker Type | Display the value for Broker Type |
| Sub Header | Sub Header | Display the checked values | |
| “Additional | “Additional | ||
| Preferences” | Preferences” | ||
| Sub Header | Text | Sub Header | To give the heading for the sub section |
| “Associated | “Associated | ||
| Personnel” | Personnel” | ||
| Agent | Text | Agent | Text for “Agent Workgroup” |
| Workgroup | Workgroup | ||
| Agent | Non-Editable | Agent | Shows the number of associated agent. |
| Text | |||
| Agency | Text | Agency | Text for “Agency Workgroup” |
| Workgroup | Workgroup | ||
| Agency | Non-Editable | Agency | Shows the number of associated agency(s). |
| Text | |||
| Internal | Text | Internal | Text for “Internal Workgroup” |
| Workgroup | Workgroup | ||
| Internal | Read-only Text | Internal | Shows the internal workgroups. |
| Workgroup | Workgroup | ||
| BSS Rep | Text | BSS Rep | Text for “BSS Rep” |
| BSS Rep | Read-only Text | BSS Rep | Shows the BSS Rep (Associates) for the selected |
| internal workgroup. | |||
| Sub Header | Text | Sub Header | Text for License Information |
| “License | “License | ||
| Information” | Information” | ||
| Tax ID/SSN | Text | Tax ID/SSN | Display the value for “Tax ID/SSN” |
| TaxID/SSN | Read-only Text | TaxID/SSN | Entry field for entering the TAX ID/SSN |
| Entry Field | Entry Field | ||
| License | Text | License | Display the value for “License Number” |
| Number | Number | ||
| License | Read-only Text | License | Calendar |
| Expiration | Expiration | ||
| E&O Number | Text | E&O Number | Text for “E&O” |
| E&O Number | Read-only Text | E&O Number | Display the value for E&O Number |
| E&O | Text | E&O | Text for “E & O Expiration List” |
| Expiration | Expiration | ||
| E&O | Read-only Text | E&O | Display the value for E&O expiration |
| Expiration | Expiration | ||
| Sub Header | Text | Sub Header | To give the heading for the subsection |
| “Bank | “Bank | ||
| Information” | Information” | ||
| Preferred Mode | Text | Preferred Mode | Text for “Preferred Mode of Payment” |
| of Payment | of Payment | ||
| Preferred Mode | Read-only Text | Preferred Mode | Display the value for Mode of payment |
| of Payment | of Payment | ||
| Bank Name | Text | Bank Name | Text for Bank Name |
| Bank Name | Read-only Text | Bank Name | Display the value for Bank Name |
| Account | Text | Account | Text for Account Number |
| Number | Number | ||
| Account | Read-only Text | Account | Display the value for Account Number |
| Number | Number | ||
| Routing | Text | Routing | Text for Routing Number |
| Number | Number | ||
| Routing | Read-only Text | Routing | Display the value for Routing Number |
| Number | Number | ||
| Account Type | Text | Account Type | Text for Account Type |
| Account Type | Read-only Text | Account Type | Display the value for type of account |
| Name on the | Text | Name on the | Text for “Name on the account” |
| Account | Account | ||
| Name on the | Read-only Text | Name on the | Display the value for “Name on the Account” |
| Account | Account | ||
| Payee Name | Text | Payee Name | Text for Payee Name |
| Payee Name | Read-only Text | Payee Name | Display the value for Payee Name |
| Requires | Read-only Text | Requires | Display the value for “requires special handling” if |
| Special | Special | checked - means Yes | |
| Handling | Handling | ||
| Previous | HTML Button | Previous | Takes user to the Previous page. |
| Save | HTML Button | Save | Saves the Data. |
| Cancel | HTML Button | Cancel | Resets the Data to original values |
3.1.9.3. Front End Validations
None.
3.1.9.4. Screen Flow
The following are the scenarios the user may come across when operating on the step 2 screen.
| Scenario | Description | |
| New Agent | Used to Navigate to “Create Agent Master” screen. | |
| Delete | Inactivates (Delete) the Record. | |
3.1.10. User Interface ID: Create Agency Master
3.1.10.1. Screen Name: Create Agency Master (BPI_CAS_SM_SCR—002—019, BPI_CAS_SM_SCR—002—020 & BPI_CAS_SM_SCR—002—021)
This screen below captures the information for creating agency master.
-
- Step-1: Fill the mandatory information in page1. Click “Next” to navigate to page2.
- Step-2: Fill the mandatory information in page2 and click “Save” to save the Agency Master data.
- Step-3: Saving of Agency data takes you to Confirmation page.
Page1 (BPI_CAS_SM_SCR—002—019) (See Figure M-29)
Page2 (BPI_CAS_SM_SCR—002—020) (See Figure M-30)
Confirmation page (BPI_CAS_SM_SCR—002—021) (See Figure M-31)
3.1.10.2. SID, Element Name, Element Type & Purpose
| Element | Element | ||
| Name | Type | Label | Purpose |
| Sub Header | Text | Sub Header | To give the heading for the sub section |
| “General | “General | ||
| Information” | Information” | ||
| Company | Text | Company | Text for “Company Name”. |
| Name | Name | ||
| Company | Entry Field | Company | Entry field for company. |
| Name | Name | ||
| DBA | Text | DBA | Text for “DBA”. |
| DBA | Entry Field | DBA | Entry field for dba. |
| Street Address | Text | Street Address | Text for “Street Address”. |
| Street Address | Entry Field | Street Address | Entry field for street address. |
| Suite | Text | Suite | Text for “Suite” |
| Suite | Entry Field | Suite | Entry Field for Suite. |
| City | Text | City | Text for “City” |
| City | Entry Field | City | Entry Field for City. |
| State | Text | State | Text for “State” |
| State | Select Feature | State | Select feature for selecting a state in US. |
| Zip | Text | Zip | Text for “Zip” |
| Zip | Entry Field | Zip | Entry Field for Zip. |
| Phone | Text | Phone | Text for “Phone” |
| Phone | Entry Field | Phone | Entry Field for Phone. |
| Fax | Text | Fax | Text for “Fax” |
| Fax | Entry Field | Fax | Entry Field for Fax. |
| Mode of | Text | Mode of | Text for “Mode of Communication” |
| communication | communication | ||
| Mode of | Entry Field | Mode of | Entry Field for Mode of Communication. |
| Communication | Communication | ||
| Date of Birth | Text | Date of Birth | Text for Email. |
| Date of Birth | Entry Field | Date of Birth | Entry Field for Date of Birth. |
| Sub Header | Text | Sub Header | To give the heading for the sub section |
| “Contact | “Contact | ||
| Information” | Information” | ||
| Sub Header | Text | Sub Header | To give the heading for the sub section |
| “Contact - 1” | “Contact - 1” | ||
| Salutation | Text | Salutation | Text for “Salutation” |
| Salutation | Select Feature | Salutation | Select feature for selecting a salutation. |
| First Name | Text | First Name | Text for “First Name” |
| First Name | Entry Field | First Name | Entry Field for First Name. |
| MI | Text | MI | Text for “MI” |
| MI | Entry Field | MI | Entry Field for MI. |
| Last Name | Text | Last Name | Text for “Last Name” |
| Last Name | Entry Field | Last Name | Entry Field for Last Name. |
| Street Address | Text | Street Address | Text for “Street Address”. |
| Street Address | Entry Field | Street Address | Entry field for street address. |
| Suite | Text | Suite | Text for “Suite” |
| Suite | Entry Field | Suite | Entry Field for Suite. |
| City | Text | City | Text for “City” |
| City | Entry Field | City | Entry Field for City. |
| State | Text | State | Text for “State” |
| State | Select Feature | State | Select feature for selecting a state in US. |
| Zip | Text | Zip | Text for “Zip” |
| Zip | Entry Field | Zip | Entry Field for Zip. |
| Phone | Text | Phone | Text for “Phone” |
| Phone | Entry Field | Phone | Entry Field for Phone. |
| Extn. | Text | Extn. | Text for “Extn.” |
| Extn. | Entry Field | Extn. | Entry Field for Extn. |
| Fax | Text | Fax | Text for “Fax” |
| Fax | Entry Field | Fax | Entry Field for Fax. |
| Text | Text for Email. | ||
| Entry Field | Entry Field for “Email” | ||
| Sub Header | Text | Sub Header | To give the heading for the sub section |
| “Contact - 2” | “Contact - 2” | ||
| Salutation | Text | Salutation | Text for “Salutation” |
| Salutation | Select Feature | Salutation | Select feature for selecting a salutation. |
| First Name | Text | First Name | Text for “First Name” |
| First Name | Entry Field | First Name | Entry Field for First Name. |
| MI | Text | MI | Text for “MI” |
| MI | Entry Field | MI | Entry Field for MI. |
| Last Name | Text | Last Name | Text for “Last Name” |
| Last Name | Entry Field | Last Name | Entry Field for Last Name. |
| Street Address | Text | Street Address | Text for “Street Address”. |
| Street Address | Entry Field | Street Address | Entry field for street address. |
| Suite | Text | Suite | Text for “Suite” |
| Suite | Entry Field | Suite | Entry Field for Suite. |
| City | Text | City | Text for “City” |
| City | Entry Field | City | Entry Field for City. |
| State | Text | State | Text for “State” |
| State | Select Feature | State | Select feature for selecting a state in US. |
| Zip | Text | Zip | Text for “Zip” |
| Zip | Entry Field | Zip | Entry Field for Zip. |
| Phone | Text | Phone | Text for “Phone” |
| Phone | Entry Field | Phone | Entry Field for Phone. |
| Extn. | Text | Extn. | Text for “Extn.” |
| Extn. | Entry Field | Extn. | Entry Field for Extn. |
| Fax | Text | Fax | Text for “Fax” |
| Fax | Entry Field | Fax | Entry Field for Fax. |
| Text | Text for Email. | ||
| Entry Field | Entry Field for “Email” | ||
| Next | HTML Button | Next | Takes user to the Next page. |
| Cancel | HTML Button | Cancel | Resets the Data to original values |
| Broker Type | Text | Broker Type | Text for “Broker Type” |
| Broker Type | Radio Buttons | Broker Type | Statewide, Regional and Unknown (default) |
| Sub Header | Sub Header | ||
| “Additional | “Additional | ||
| Preferences” | Preferences” | ||
| Exclude from | Check box | Exclude from | If checked then Yes. |
| Broadcast | Broadcast | ||
| Messaging | Messaging | ||
| Exclude from | Check box | Exclude from | If checked then yes. |
| overdue | overdue | ||
| premium | premium | ||
| notices | notices | ||
| Exclude from | Check box | Exclude from | If checked then Yes |
| Employee/Member | Employee/Member | ||
| Term | Term | ||
| Letters | Letters | ||
| Exclude from | Check Box | Exclude from | If checked then Yes |
| Employee/Member | Employee/Member | ||
| Add-on | Add-on | ||
| Term Letters | Term Letters | ||
| Sub Header | Text | Sub Header | To give the heading for the sub section |
| “Associated | “Associated | ||
| Personnel” | Personnel” | ||
| Agent | Text | Agent | Text for “Agent Workgroup” |
| Workgroup | Workgroup | ||
| Agent | Non-Editable | Agent | Shows the number of associated agent. |
| Text | |||
| Agent-Popup | Image | Agent-Popup | Clicking this will open a new window, using |
| which user can assign agents for this Lead. | |||
| Internal | Text | Internal | Text for “Internal Workgroup” |
| Workgroup | Workgroup | ||
| Internal | Select Feature | Internal | Shows the internal workgroups. User can |
| Workgroup | Workgroup | select a internal workgroup for this lead. | |
| BSS Rep | Text | BSS Rep | Text for “BSS Rep” |
| BSS Rep | Select Feature | BSS Rep | Shows the BSS Rep (Associates) for the |
| selected internal workgroup. User can select | |||
| a BSS Rep for this Lead. | |||
| Sub Header | Text | Sub Header | Text for License Information |
| “License | “License | ||
| Information” | Information” | ||
| Tax ID/SSN | Text | Tax ID/SSN | Text For “Tax ID/SSN” |
| TaxID/SSN | Entry field | TaxID/SSN | Entry field for entering the TAX ID/SSN |
| Entry Field | Entry Field | ||
| License | Text | License | Text for “License Number” |
| Number | Number | ||
| License | Calendar | License | Calendar |
| Expiration | Expiration | ||
| E&O Number | Text | E&O Number | Text for “E&O” |
| E&O Number | Entry Field | E&O Number | Entry field for E&O Number |
| E&O | Text | E&O | Text for “E & O Expiration List” |
| Expiration | Expiration | ||
| E&O | Editable | E&O | Calendar for E&O expiration calendar |
| Expiration | text/Calendar | Expiration | |
| Sub Header | Text | Sub Header | To give the heading for the subsection |
| “Bank | “Bank | ||
| Information” | Information” | ||
| Preferred Mode | Text | Preferred Mode | Text for “Preferred Mode of Payment” |
| of Payment | of Payment | ||
| Preferred Mode | Radio Button | Preferred Mode | Check or ACH |
| of Payment | of Payment | ||
| Bank Name | Text | Bank Name | Text for Bank Name |
| Bank Name | Entry Field | Bank Name | Entry field for Bank Name |
| Account | Text | Account | Text for Account Number |
| Number | Number | ||
| Account | Entry field | Account | Entry Field For Account Number |
| Number | Number | ||
| Routing | Text | Routing | Text for Routing Number |
| Number | Number | ||
| Routing | Entry field | Routing | Entry Field for Routing Number |
| Number | Number | ||
| Account Type | Text | Account Type | Text for Account Type |
| Account Type | Select feature | Account Type | Select feature to select the type of account |
| Name on the | Text | Name on the | Text for “Name on the account” |
| Account | Account | ||
| Name on the | Entry Field | Name on the | Entry field for “Name on the Account” |
| Account | Account | ||
| Payee Name | Text | Payee Name | Text for Payee Name |
| Payee Name | Entry field | Payee Name | Entry Field for Payee Name |
| Requires | Check Box | Requires | Check box for “requires special handling” if |
| Special | Special | checked - means Yes | |
| Handling | Handling | ||
| Previous | HTML Button | Previous | Takes user to the Previous page. |
| Save | HTML Button | Save | Saves the Data. |
| Cancel | HTML Button | Cancel | Resets the Data to orginal values |
3.1.10.3. Front End Validations
| Element | ||
| Name | Action/Validation Details | Error Message Text |
| Company | Mandatory. Accepts all alphanumeric and | Error Dialog Box on Save |
| Name | Special characters except double quotes. | “Accepts all alphanumeric and |
| Special characters except | ||
| double quotes” | ||
| Zip | Mandatory. Accepts exactly 5 numeric digits. | Error Dialog Box “Accepts |
| exactly 5 digits number only”. | ||
| Contact1 First | Mandatory. Accepts all alphanumeric and | Error Dialog Box on Save |
| Name | Special characters except double quotes. | “Accepts all alphanumeric and |
| Special characters except | ||
| double quotes” | ||
| Contact1 Last | Mandatory. Accepts all alphanumeric and | Error Dialog Box on Save |
| Name | Special characters except double quotes. | “Accepts all alphanumeric and |
| Special characters except | ||
| double quotes” | ||
| Contact1 Zip | Mandatory. Accepts exactly 5 numeric digits. | Error Dialog Box “Accepts |
| exactly 5 digits number only”. | ||
| Internal | Mandatory. | Error Dialog on Save “Is |
| workgroup | Required”. | |
3.1.10.4. Screen Flow
The user enters the information on the agent master
The following are the scenarios the user may come across when operating on the screen
| Scenario | Description |
| Save | Saves the agent data and shows the user confirmation page. |
| Next | Navigates to the page2. |
| Previous | Navigates to the page1. |
| Cancel | Resets the information |
3.1.11. User Interface ID: Search Agency Master
3.1.11.1. Screen Name: Search Agency Master (BPI_CAS_SM_SCR—002—022)
This screen below captures the information for searching an existing “Agency”.
-
- Step-1: Enter the mandatory agent information and click the search button. This page will display the result of search. User can choose a agent and navigate to either “Modify” screen or “View/Delete” screen. (See Figure M-32)
3.1.11.2. SID, Element Name, Element Type & Purpose
| Element | Element | ||
| Name | Type | Label | Purpose |
| Main Header | Text | Main Header | To give the heading for the screen |
| “Agent Search” | “Agent Search” | ||
| Agency ID | Text | Agency ID | Text For “Agency ID” |
| Agency ID | Entry Field | Agency ID | Entry field for agency id |
| Agency Name | Text | Agency Name | Text For “Agency Name” |
| Agency Name | Entry Field | Agency Name | Entry field for Agency Name |
| Phone | Text | Phone | Entry field for “Phone” |
| Phone | Entry Field | Phone | Entry field for Phone |
| Tax ID | Text | Tax ID | Text For “Tax ID” |
| Tax ID | Select Feature | Tax ID | Entry field for Tax |
| Lead Button | Radio Button | Lead Button | Used to select the agency for modifying or |
| Radio | Radio | viewing/deleting. | |
| Modify | HTML Button | Modify | Leads to the modify screen of the selected |
| agency | |||
| View/Delete | HTML Button | View/Delete | Leads to the view/delete screen of the |
| selected | |||
3.1.11.3. Front End Validations
| Element | ||
| Name | Action/Validation Details | Error Message Text |
| Agency | Mandatory. Any one of the | Error Dialog Box on Search |
| ID | fields in the searchscreen is | “Accepts Alphanumeric values |
| mandatory. Accepts | only.” | |
| Alphanumeric values only | ||
3.1.11.4. Screen Flow
The following are the scenarios the user may come across when operating on the search screen.
| Scenario | Description |
| Search | The system checks for all the validations for all the mandatory |
| information. Fetches the agency(s) that matches with | |
| the search conditions. | |
| Cancel | Clears the search fields |
3.1.12. User Interface ID: Modify Agency Master
3.1.12.1. Screen Name: Modify Agency Master (BPI_CAS_SM_SCR—002—023, BPI_CAS_SM_SCR—002—024 & BPI_CAS_SM_SCR—002—025)
This screen below captures the information for modifying agency master.
-
- Step-1: Using search screen (BPI_CAS_SM_SCR—002—013), search the available Agency(s).
- Step-2: Select a Agency and click “Modify” to navigate to page1.
- Step-3: Modify the Agency information and click “Next” to navigate you to page2.
- Step-4: Click the “Save” to save the modified agency information.
- Step-5: Saving of Agency data takes you to Confirmation page.
Page1 (BPI_CAS_SM_SCR—002—023) (See Figure M-33)
Page2 (BPI_CAS_SM_SCR—002—024) (See Figure M-34)
Confirmation Page (BPI_CAS_SM_SCR—002—025) (See Figure M-35)
3.1.12.2. SID, Element Name, Element Type & Purpose
| Element | Element | ||
| Name | Type | Label | Purpose |
| Sub Header | Text | Sub Header | To give the heading for the sub section |
| “General | “General | ||
| Information” | Information” | ||
| Company | Text | Company | Text for “Company Name”. |
| Name | Name | ||
| Company | Entry Field | Company | Entry field for company. |
| Name | Name | ||
| DBA | Text | DBA | Text for “DBA”. |
| DBA | Entry Field | DBA | Entry field for dba. |
| Street Address | Text | Street Address | Text for “Street Address”. |
| Street Address | Entry Field | Street Address | Entry field for street address. |
| Suite | Text | Suite | Text for “Suite” |
| Suite | Entry Field | Suite | Entry Field for Suite. |
| City | Text | City | Text for “City” |
| City | Entry Field | City | Entry Field for City. |
| State | Text | State | Text for “State” |
| State | Select Feature | State | Select feature for selecting a state in US. |
| Zip | Text | Zip | Text for “Zip” |
| Zip | Entry Field | Zip | Entry Field for Zip. |
| Phone | Text | Phone | Text for “Phone” |
| Phone | Entry Field | Phone | Entry Field for Phone. |
| Fax | Text | Fax | Text for “Fax” |
| Fax | Entry Field | Fax | Entry Field for Fax. |
| Mode of | Text | Mode of | Text for “Mode of Communication” |
| communication | communication | ||
| Mode of | Entry Field | Mode of | Entry Field for Mode of Communication. |
| Communication | Communication | ||
| Sub Header | Text | Sub Header | To give the heading for the sub section |
| “Contact | “Contact | ||
| Information” | Information” | ||
| Sub Header | Text | Sub Header | To give the heading for the sub section |
| “Contact - 1” | “Contact - 1” | ||
| Salutation | Text | Salutation | Text for “Salutation” |
| Salutation | Select Feature | Salutation | Select feature for selecting a salutation. |
| First Name | Text | First Name | Text for “First Name” |
| First Name | Entry Field | First Name | Entry Field for First Name. |
| MI | Text | MI | Text for “MI” |
| MI | Entry Field | MI | Entry Field for MI. |
| Last Name | Text | Last Name | Text for “Last Name” |
| Last Name | Entry Field | Last Name | Entry Field for Last Name. |
| Street Address | Text | Street Address | Text for “Street Address”. |
| Street Address | Entry Field | Street Address | Entry field for street address. |
| Suite | Text | Suite | Text for “Suite” |
| Suite | Entry Field | Suite | Entry Field for Suite. |
| City | Text | City | Text for “City” |
| City | Entry Field | City | Entry Field for City. |
| State | Text | State | Text for “State” |
| State | Select Feature | State | Select feature for selecting a state in US. |
| Zip | Text | Zip | Text for “Zip” |
| Zip | Entry Field | Zip | Entry Field for Zip. |
| Phone | Text | Phone | Text for “Phone” |
| Phone | Entry Field | Phone | Entry Field for Phone. |
| Extn. | Text | Extn. | Text for “Extn.” |
| Extn. | Entry Field | Extn. | Entry Field for Extn. |
| Fax | Text | Fax | Text for “Fax” |
| Fax | Entry Field | Fax | Entry Field for Fax. |
| Text | Text for Email. | ||
| Entry Field | Entry Field for “Email” | ||
| Sub Header | Text | Sub Header | To give the heading for the sub section |
| “Contact - 2” | “Contact - 2” | ||
| Salutation | Text | Salutation | Text for “Salutation” |
| Salutation | Select Feature | Salutation | Select feature for selecting a salutation. |
| First Name | Text | First Name | Text for “First Name” |
| First Name | Entry Field | First Name | Entry Field for First Name. |
| MI | Text | MI | Text for “MI” |
| MI | Entry Field | MI | Entry Field for “MI”. |
| Last Name | Text | Last Name | Text for “Last Name” |
| Last Name | Entry Field | Last Name | Entry Field for Last Name. |
| Street Address | Text | Street Address | Text for “Street Address”. |
| Street Address | Entry Field | Street Address | Entry field for street address. |
| Suite | Text | Suite | Text for “Suite” |
| Suite | Entry Field | Suite | Entry Field for Suite. |
| City | Text | City | Text for “City” |
| City | Entry Field | City | Entry Field for City. |
| State | Text | State | Text for “State” |
| State | Select Feature | State | Select feature for selecting a state in US. |
| Zip | Text | Zip | Text for “Zip” |
| Zip | Entry Field | Zip | Entry Field for Zip. |
| Phone | Text | Phone | Text for “Phone” |
| Phone | Entry Field | Phone | Entry Field for Phone. |
| Extn. | Text | Extn. | Text for “Extn.” |
| Extn. | Entry Field | Extn. | Entry Field for Extn. |
| Fax | Text | Fax | Text for “Fax” |
| Fax | Entry Field | Fax | Entry Field for Fax. |
| Text | Text for Email. | ||
| Entry Field | Entry Field for “Email” | ||
| Next | HTML Button | Next | Takes user to the Next page. |
| Cancel | HTML Button | Cancel | Resets the Data to original values |
| Broker Type | Text | Broker Type | Text for “Broker Type” |
| Broker Type | Radio Buttons | Broker Type | Statewide, Regional and Unknown (default) |
| Sub Header | Sub Header | ||
| “Additional | “Additional | ||
| Preferences” | Preferences” | ||
| Exclude from | Check box | Exclude from | If checked then Yes. |
| Broadcast | Broadcast | ||
| Messaging | Messaging | ||
| Exclude from | Check box | Exclude from | If checked then yes. |
| overdue | overdue | ||
| premium | premium | ||
| notices | notices | ||
| Exclude from | Check box | Exclude from | If checked then Yes |
| Employee/Member | Employee/Member | ||
| Term | Term | ||
| Letters | Letters | ||
| Exclude from | Check Box | Exclude from | If checked then Yes |
| Employee/Member | Employee/Member | ||
| Add-on | Add-on | ||
| Term Letters | Term Letters | ||
| Sub Header | Text | Sub Header | To give the heading for the sub section |
| “Associated | “Associated | ||
| Personnel” | Personnel” | ||
| Agent | Text | Agent | Text for “Agent Workgroup” |
| Workgroup | Workgroup | ||
| Agent | Non-Editable | Agent | Shows the number of associated agent. |
| Text | |||
| Agent-Popup | Image | Agent-Popup | Clicking this will open a new window, using |
| which user can assign agents for this Lead. | |||
| Internal | Text | Internal | Text for “Internal Workgroup” |
| Workgroup | Workgroup | ||
| Internal | Select Feature | Internal | Shows the internal workgroups. User can |
| Workgroup | Workgroup | select a internal workgroup for this lead. | |
| BSS Rep | Text | BSS Rep | Text for “BSS Rep” |
| BSS Rep | Select Feature | BSS Rep | Shows the BSS Rep (Associates) for the |
| selected internal workgroup. User can select | |||
| a BSS Rep for this Lead. | |||
| Sub Header | Text | Sub Header | Text for License Information |
| “License | “License | ||
| Information” | Information” | ||
| Tax ID/SSN | Text | Tax ID/SSN | Text For “Tax ID/SSN” |
| TaxID/SSN | Entry field | TaxID/SSN | Entry field for entering the TAX ID/SSN |
| Entry Field | Entry Field | ||
| License | Text | License | Text for “License Number” |
| Number | Number | ||
| License | Calendar | License | Calendar |
| Expiration | Expiration | ||
| E&O Number | Text | E&O Number | Text for “E&O” |
| E&O Number | Entry Field | E&O Number | Entry field for E&O Number |
| E&O | Text | E&O | Text for “E & O Expiration List” |
| Expiration | Expiration | ||
| E&O | Editable | E&O | Calendar for E&O expiration calendar |
| Expiration | text/Calendar | Expiration | |
| Sub Header | Text | Sub Header | To give the heading for the subsection |
| “Bank | “Bank | ||
| Information” | Information” | ||
| Preferred Mode | Text | Preferred Mode | Text for “Preferred Mode of Payment” |
| of Payment | of Payment | ||
| Preferred Mode | Radio Button | Preferred Mode | Check or ACH |
| of Payment | of Payment | ||
| Bank Name | Text | Bank Name | Text for Bank Name |
| Bank Name | Entry Field | Bank Name | Entry field for Bank Name |
| Account | Text | Account | Text for Account Number |
| Number | Number | ||
| Account | Entry field | Account | Entry Field For Account Number |
| Number | Number | ||
| Routing | Text | Routing | Text for Routing Number |
| Number | Number | ||
| Routing | Entry field | Routing | Entry Field for Routing Number |
| Number | Number | ||
| Account Type | Text | Account Type | Text for Account Type |
| Account Type | Select feature | Account Type | Select feature to select the type of account |
| Name on the | Text | Name on the | Text for “Name on the account” |
| Account | Account | ||
| Name on the | Entry Field | Name on the | Entry field for “Name on the Account” |
| Account | Account | ||
| Payee Name | Text | Payee Name | Text for Payee Name |
| Payee Name | Entry field | Payee Name | Entry Field for Payee Name |
| Requires | Check Box | Requires | Check box for “requires special handling” if |
| Special | Special | checked - means Yes | |
| Handling | Handling | ||
| Previous | HTML Button | Previous | Takes user to the Previous page. |
| Save | HTML Button | Save | Saves the Data. |
| Cancel | HTML Button | Cancel | Resets the Data to original values |
3.1.12.3. Front End Validations
| Element | ||
| Name | Action/Validation Details | Error Message Text |
| Company | Mandatory. Accepts all alphanumeric and | Error Dialog Box on Save |
| Name | Special characters except double quotes. | “Accepts all alphanumeric and |
| Special characters except | ||
| double quotes” | ||
| Zip | Mandatory. Accepts exactly 5 numeric digits. | Error Dialog Box “Accepts |
| exactly 5 digits number only”. | ||
| Contact1 First | Mandatory. Accepts all alphanumeric and | Error Dialog Box on Save |
| Name | Special characters except double quotes. | “Accepts all alphanumeric and |
| Special characters except | ||
| double quotes” | ||
| Contact1 Last | Mandatory. Accepts all alphanumeric and | Error Dialog Box on Save |
| Name | Special characters except double quotes. | “Accepts all alphanumeric and |
| Special characters except | ||
| double quotes” | ||
| Contact1 Zip | Mandatory. Accepts exactly 5 numeric digits. | Error Dialog Box “Accepts |
| exactly 5 digits number only”. | ||
| Internal | Mandatory. | Error Dialog on Save “Is |
| workgroup | Required”. | |
3.1.12.4. Screen Flow
The user enters the information on the agent master
The following are the scenarios the user may come across when operating on the screen
| Scenario | Description |
| Save | Saves the agent data and shows the user confirmation page. |
| Next | Navigates to the page2. |
| Previous | Navigates to the page1. |
| Cancel | Resets the information |
3.1.13. User Interface ID: View & Delete Agency Master
3.1.13.1. Screen Name: View & Delete Agency Master (BPI_CAS_SM_SCR—002—026 & BPI_CAS_SM_SCR—002—027)
This screen below captures the information for view/delete agency master.
-
- Step-1: Using search screen (BPI_CAS_SM_SCR—002—013), search the available Agency(s).
- Step-2: Select a Agency and click “View/Delete” to navigate to view/delete page.
- Step-3: Click the “Delete” to delete the agency information.
- Step-4: Deletion of Agency data takes you to Confirmation page.
View/Delete Page (BPI_CAS_SM_SCR—002—026) (See Figure M-36)
Confirmation Page (BPI_CAS_SM_SCR—002—027) (See Figure M-37)
3.1.13.2. SID, Element Name, Element Type & Purpose
| Element | Element | ||
| Name | Type | Label | Purpose |
| Sub Header | Text | Sub Header | To give the heading for the sub section |
| “General | “General | ||
| Information” | Information” | ||
| Company | Text | Company | Text for “Company Name”. |
| Name | Name | ||
| Company | Read-only Text | Company | Display the value for company. |
| Name | Name | ||
| DBA | Text | DBA | Text for “DBA”. |
| DBA | Read-only Text | DBA | Display the value for dba. |
| Street Address | Text | Street Address | Text for “Street Address”. |
| Street Address | Read-only Text | Street Address | Display the value for street address. |
| Suite | Text | Suite | Text for “Suite” |
| Suite | Read-only Text | Suite | Display the value for Suite. |
| City | Text | City | Text for “City” |
| City | Read-only Text | City | Display the value for City. |
| State | Text | State | Text for “State” |
| State | Read-only Text | State | Display the value for state. |
| Zip | Text | Zip | Text for “Zip” |
| Zip | Read-only Text | Zip | Display the value for Zip. |
| Phone | Text | Phone | Text for “Phone” |
| Phone | Read-only Text | Phone | Display the value for Phone. |
| Fax | Text | Fax | Text for “Fax” |
| Fax | Read-only Text | Fax | Display the value for Fax. |
| Mode of | Text | Mode of | Text for “Mode of Communication” |
| communication | communication | ||
| Mode of | Read-only Text | Mode of | Display the value for Mode of Communication. |
| Communication | Communication | ||
| Sub Header | Text | Sub Header | To give the heading for the sub section |
| “Contact | “Contact | ||
| Information” | Information” | ||
| Sub Header | Text | Sub Header | To give the heading for the sub section |
| “Contact - 1” | “Contact - 1” | ||
| Salutation | Text | Salutation | Text for “Salutation” |
| Salutation | Read-only Text | Salutation | Display the value for salutation. |
| First Name | Text | First Name | Text for “First Name” |
| First Name | Read-only Text | First Name | Display the value for First Name. |
| MI | Text | MI | Text for “MI” |
| MI | Read-only Text | MI | Display the value for MI. |
| Last Name | Text | Last Name | Text for “Last Name” |
| Last Name | Read-only Text | Last Name | Display the value for Last Name. |
| Street Address | Text | Street Address | Text for “Street Address”. |
| Street Address | Read-only Text | Street Address | Display the value for street address. |
| Suite | Text | Suite | Text for “Suite” |
| Suite | Read-only Text | Suite | Display the value for Suite. |
| City | Text | City | Text for “City” |
| City | Read-only Text | City | Display the value for City. |
| State | Text | State | Text for “State” |
| State | Read-only Text | State | Display the value for state. |
| Zip | Text | Zip | Text for “Zip” |
| Zip | Read-only Text | Zip | Display the value for Zip. |
| Phone | Text | Phone | Text for “Phone” |
| Phone | Read-only Text | Phone | Display the value for Phone. |
| Extn. | Text | Extn. | Text for “Extn.” |
| Extn. | Read-only Text | Extn. | Display the value for Extn. |
| Fax | Text | Fax | Text for “Fax” |
| Fax | Read-only Text | Fax | Display the value for Fax. |
| Text | Text for Email. | ||
| Read-only Text | Display the value for “Email” | ||
| Sub Header | Text | Sub Header | To give the heading for the sub section |
| “Contact - 2” | “Contact - 2” | ||
| Salutation | Text | Salutation | Text for “Salutation” |
| Salutation | Read-only Text | Salutation | Display the value for salutation. |
| First Name | Text | First Name | Text for “First Name” |
| First Name | Read-only Text | First Name | Display the value for First Name. |
| MI | Text | MI | Text for “MI” |
| MI | Read-only Text | MI | Display the value for MI. |
| Last Name | Text | Last Name | Text for “Last Name” |
| Last Name | Read-only Text | Last Name | Display the value for Last Name. |
| Street Address | Text | Street Address | Text for “Street Address”. |
| Street Address | Read-only Text | Street Address | Display the value for street address. |
| Suite | Text | Suite | Text for “Suite” |
| Suite | Read-only Text | Suite | Display the value for Suite. |
| City | Text | City | Text for “City” |
| City | Read-only Text | City | Display the value for City. |
| State | Text | State | Text for “State” |
| State | Read-only Text | State | Display the value for state. |
| Zip | Text | Zip | Text for “Zip” |
| Zip | Read-only Text | Zip | Display the value for Zip. |
| Phone | Text | Phone | Text for “Phone” |
| Phone | Read-only Text | Phone | Display the value for Phone. |
| Extn. | Text | Extn. | Text for “Extn.” |
| Extn. | Read-only Text | Extn. | Display the value for Extn. |
| Fax | Text | Fax | Text for “Fax” |
| Fax | Read-only Text | Fax | Display the value for Fax. |
| Text | Text for Email. | ||
| Read-only Text | Display the value for “Email” | ||
| Next | HTML Button | Next | Takes user to the Next page. |
| Cancel | HTML Button | Cancel | Resets the Data to original values |
| Broker Type | Text | Broker Type | Text for “Broker Type” |
| Broker Type | Read-only Text | Broker Type | Display the value for Broker Type |
| Sub Header | Sub Header | Display the checked values | |
| “Additional | “Additional | ||
| Preferences” | Preferences” | ||
| Sub Header | Text | Sub Header | To give the heading for the sub section |
| “Associated | “Associated | ||
| Personnel” | Personnel” | ||
| Agent | Text | Agent | Text for “Agent Workgroup” |
| Workgroup | Workgroup | ||
| Agent | Non-Editable | Agent | Shows the number of associated agent. |
| Text | |||
| Internal | Text | Internal | Text for “Internal Workgroup” |
| Workgroup | Workgroup | ||
| Internal | Read-only Text | Internal | Shows the internal workgroups. |
| Workgroup | Workgroup | ||
| BSS Rep | Text | BSS Rep | Text for “BSS Rep” |
| BSS Rep | Read-only Text | BSS Rep | Shows the BSS Rep (Associates) for the selected |
| internal workgroup. | |||
| Sub Header | Text | Sub Header | Text for License Information |
| “License | “License | ||
| Information” | Information” | ||
| Tax ID/SSN | Text | Tax ID/SSN | Display the value for “Tax ID/SSN” |
| TaxID/SSN | Read-only Text | TaxID/SSN | Entry field for entering the TAX ID/SSN |
| Entry Field | Entry Field | ||
| License | Text | License | Display the value for “License Number” |
| Number | Number | ||
| License | Read-only Text | License | Calendar |
| Expiration | Expiration | ||
| E&O Number | Text | E&O Number | Text for “E&O” |
| E&O Number | Read-only Text | E&O Number | Display the value for E&O Number |
| E&O | Text | E&O | Text for “E & O Expiration List” |
| Expiration | Expiration | ||
| E&O | Read-only Text | E&O | Display the value for E&O expiration |
| Expiration | Expiration | ||
| Sub Header | Text | Sub Header | To give the heading for the subsection |
| “Bank | “Bank | ||
| Information” | Information” | ||
| Preferred Mode | Text | Preferred Mode | Text for “Preferred Mode of Payment” |
| of Payment | of Payment | ||
| Preferred Mode | Read-only Text | Preferred Mode | Display the value for Mode of payment |
| of Payment | of Payment | ||
| Bank Name | Text | Bank Name | Text for Bank Name |
| Bank Name | Read-only Text | Bank Name | Display the value for Bank Name |
| Account | Text | Account | Text for Account Number |
| Number | Number | ||
| Account | Read-only Text | Account | Display the value for Account Number |
| Number | Number | ||
| Routing | Text | Routing | Text for Routing Number |
| Number | Number | ||
| Routing | Read-only Text | Routing | Display the value for Routing Number |
| Number | Number | ||
| Account Type | Text | Account Type | Text for Account Type |
| Account Type | Read-only Text | Account Type | Display the value for type of account |
| Name on the | Text | Name on the | Text for “Name on the account” |
| Account | Account | ||
| Name on the | Read-only Text | Name on the | Display the value for “Name on the Account” |
| Account | Account | ||
| Payee Name | Text | Payee Name | Text for Payee Name |
| Payee Name | Read-only Text | Payee Name | Display the value for Payee Name |
| Requires | Read-only Text | Requires | Display the value for “requires special handling” if |
| Special | Special | checked - means Yes | |
| Handling | Handling | ||
| Previous | HTML Button | Previous | Takes user to the Previous page. |
| Save | HTML Button | Save | Saves the Data. |
| Cancel | HTML Button | Cancel | Resets the Data to original values |
3.1.13.3. Front End Validations
None.
3.1.13.4. Screen Flow
The following are the scenarios the user may come across when operating on the step 2 screen.
| Scenario | Description |
| New Agency | Used to Navigate to “Create Agency Master” screen. |
| Delete | Inactivates (Delete) the Record. |
3.1.14. User Interface Id: Lead Tracking
3.1.14.1. Screen Name: Lead Tracking (BPI_CAS_SM_SCR—002—028)
This screen below captures the lead tracking information of a lead and the lead tracking shall be a tab in lead master screens (See Figure M-38)
3.1.14.2. SID, Element Name, Element Type & Purpose
| Element | Element | ||
| Name | Type | Label | Purpose |
| Main Header | Text | Main Header | To give the heading for the screen being navigated |
| “Lead | “Lead | ||
| Tracking” | Tracking” | ||
| Sub Header | Text | Sub Header | To give the sub heading |
| “Tracking | “Tracking | ||
| Information” | Information” | ||
| Present Status | Text | Present Status | Text For “Present Status” |
| Present Status | Non Editable | Present Status | Non Editable field showing status code and |
| Entry Fields | present status which may be updateable due to | ||
| change in selection on screen | |||
| Present Desc | Text | Present Desc | Text For “Present Desc” |
| Present Desc | Non Editable | Present Desc | Non Editable field present description which may |
| Entry Fields | be updateable due to change in selection on screen | ||
| Sub Header | Text | Sub Header | To give the heading for the screen being navigated |
| “Call Status” | “Call Status” | ||
| Radio Buttons | Radio Buttons | Radio Buttons | “Made Contact”, “Disconnected Number”, “Wrong |
| Number”, “Unreachable”. | |||
| Sub Header | Text | Sub Header | To give the heading for the screen being navigated |
| “Contact | “Contact | ||
| Result” | Result” | ||
| Radio Buttons | Radio Buttons | Radio Buttons | “Qualified” and “Non-Qualified Lead” |
| Sub Header | Text | Sub Header | To give the heading for the screen being navigated |
| “Qualified Lead | “Qualified Lead | ||
| Result” | Result” | ||
| Radio Buttons | Radio Buttons | Radio Buttons | “Produced Quote”, “Not Interested”, “No Quote |
| at this time” | |||
| Sub Header | Text | Sub Header | To give the heading for the screen being navigated |
| “Non-Qualified | “Non-Qualified | ||
| Lead | Lead Reasons” | ||
| Reasons” | |||
| Radio Buttons | Radio Buttons | Radio Buttons | “<2 Eligible Employees”, “>50 Eligible |
| Employees” | |||
| Sub Header | Text | Sub Header | To give the heading for the screen being navigated |
| “Not Interested | “Not Interested | ||
| Reasons” | Reasons” | ||
| Radio Buttons | Radio Buttons | Radio Buttons | “Not up for renewal”, “Doesn't want/need/Provide |
| Insurance” | |||
| Sub Header | Text | Sub Header | To give the heading for the screen being navigated |
| “Post Quote | “Post Quote | ||
| Result” | Result” | ||
| Sold Group ID | Text | Sold Group ID | Text for “Sold Group ID” |
| Sold Group ID | Non Editable | Sold Group ID | Entry field for “Sold Group ID” |
| Field | |||
| Radio Buttons | Radio Buttons | Radio Buttons | “Enrolling”, “Not Enrolling”, “Sold” |
| Sub Header | Text | Sub Header | To give the heading for the screen being navigated |
| “Status Log & | “Status Log & | ||
| Notes” | Notes” | ||
| Status | Text | Status | Text for “Status” |
| Status | Non Editable | Status | |
| Field | |||
| Notes | Text | Notes | Text for “Notes” |
| Notes | Text Area | Notes | Text Area for Notes |
| Follow Up | Text | Follow Up date | Text for Follow Up date |
| date | |||
| Follow Up | Calendar | Follow Up date | |
| date | |||
| Add | HTML Button | Add | Button for adding data in the temporary repository |
| HTML Table | Scrollable | HTML Table | Table containing added values from the status log |
| HTML Table | and notes | ||
| Save | HTML Button | Save | For saving into the repository |
3.1.14.3. Front End Validations
| Present | |||
| S No | Status | Code | Present Status Description |
| New | 1 | New Lead. The source of the lead could be a data upload | |
| of leads | |||
| New entries on a call from a group If there is a new | |||
| entry on a call from a group, the status should be | |||
| “New” with the Source Sub Type determining | |||
| “Inbound Call.” | |||
| Dead | 2 | The Lead is a dead lead | |
| Re Call | 3 | When a call is made to the lead and the lead is | |
| found to reachable on a call but the rep is not able | |||
| to make contact/wherever a recall has to be made | |||
| Prospect - No | 4 | When a lead is contacted and is found eligible - and | |
| Quote/ | the lead shows interest but doesn't want a quote | ||
| Materials | |||
| Prospect - | 5 | When a lead is contacted and is found eligible - and | |
| Quote/Materials | the lead shows interest and wants a quote | ||
| Sent | |||
| Post Quote - | 6 | If the present status is not “Dead” then allow change | |
| Enrolling | to enrolling status if the lead is in the process of | ||
| enrolling (there could be instances where status 3 | |||
| and/or 4 and/or 5 have been skipped all-together) | |||
| Post Quote - | 7 | The lead has enrolled and has been assigned a | |
| Sold | group number | ||
The present status shall be New (1) for a lead where the lead is new to the system and has not been followed up. The data is one that is uploaded into the system. There could be instances where the lead master is created when a lead calls up and this lead's status must be “New”
There shall be 6 sections Call status, Contact Result, Not-Qualified Lead Reasons, Qualified Lead Result, Not Interested Reason, Post Quote Result.
“Call Status” section is enabled when the Status is New (1) or Re-Call (3)
The Call status would have the radio buttons “Disconnected Number”, “Wrong Number”, “Unreachable”, “Made Contact”.
| Select Radio Button | Result | |
| Disconnected Number | Change Status - Dead (2), Log | |
| Wrong Number | Change Status - Dead (2), Log | |
| Unreachable | Change Status - Recall (3), Log | |
| Made Contact | Enable Section “Contact Result” | |
Contact Result
The contact result section shall have the following radio buttons “Qualified Lead” and “Non-Qualified Lead”
| Select Radio Button | Result | |
| Qualified Lead | Enable section “Qualified Lead Result” | |
| Non-Qualified Lead | Enable section “Non-Qualified Lead | |
| Reasons” | ||
Non-Qualified Lead Reasons
The Non Qualified Reasons section shall have the following radio buttons “<2 eligible employees” and “>50 Eligible Employees”
| Select Radio Button | Result | |
| <2 eligible employees | Change status = Dead (2)/Log | |
| >5 Eligible employees | Change status = Dead (2)/Log | |
Qualified Lead Result
The “Qualified Lead Result” section shall have the following radio buttons “Produced Quotes”, “No Quote at his Time”, “Not Interested”
| Select Radio Button | Result | |
| Produced Quotes | Change Status = Prospect - | |
| Quote/Materials Sent (5) | ||
| No Quote at this Time | Change Status = Prospect - No Quote/ | |
| Materials (4) | ||
| Not Interested | Enable section - “Not Interested” | |
| Reasons” | ||
Not Interested Reasons
The “Not Interested Reasons” section shall have the following options “Not up for renewal”, “Doesn't Want/Need/Provide Insurance”.
| Select Radio Button | Result |
| Not up for renewal - Call again | Change Status - Recall (3)/Log |
| Doesn't Want/Need/Provide Insurance | Change Status - Dead (2)/Log |
Post Quote
The Post Quote section shall have the following radio buttons
| Select Radio Button | Result | |
| Enrolling | Change Status - Post Quote Enrolling | |
| (6)/Log | ||
| Not Enrolling | Change Status - Dead (2)/Show an | |
| entry field for entering the reasons/log | ||
| Sold | Change Status - Sold - Show an entry | |
| field for entering the group number (7)/ | ||
| log | ||
Log
This section will contain the following
Status Log Non Editable Entry field with System Date
Notes Text Area
Follow-up Date—Calendar
Add function
Table that would have columns—Log-Log date-Notes-Follow up Date
The Status Log area would automatically have status entries based on whatever choices are made on the screen/maintain log. The Notes Text Area shall contain the space for entering any notes during a call. The next follow up date would be a calendar for choosing the next follow up date.
There could be times when the status has not changed and the log would be empty but notes may be there. In such instances the notes is only added to the table along with follow up date
On adding the information, the information on the Log, Log Date, Notes and Follow up date gets added to the table and the user must save the information to have the data saved in the permanent repository,
When ever the user comes to the lead tracking, the previously made notes/log must be non editable.
The user must add the log entries/Notes or must be displayed with an error dialog “Kindly add the Status Log & Notes”
The user will not be allowed to quit without saving the information
When a user logs in, based on the access control The user is provided with a screen with a button “Things to do today” which shall also be part of the Menu.
The user is provided with the user information to choose from and on selection of the same and confirming the user goes into the “Things to do Today Area”
The user would be provided with a report and with the functionality to print the same.
The report content shall be based on the following based on the follow-up date made by the user in all leads
Details of lead—Company Name, Contact Name, Phone, Status and “Lead Info” button which on pressing would lead to the opening of the lead master in another window.
A check box to confirm a call has been made
The report would be in scrollable table with check all, clear all feature.
The user must save the information to make the updates in the database
If the user has not completed all calls for the follow up day mentioned, must have the incomplete calls information under pending calls section when the user logs in the next day.
3.1.14.4. Screen Flow
4. Business Rule Mapping
| Activity | Rules | |
| Create Lead ID | Auto generated ID with values 0000000001 to | |
| 9999999999 | ||
| Create Agent | Auto generated ID with values AG0000001 to | |
| AG99999999 | ||
| Create Agency | Auto generated ID with values AG00000001 to | |
| AG99999999 | ||
| Change Record |
| Date | Author | Version | Change Reference |
| Dec. 03, 2001 | Mahalingam Ramamoorthi | 1.0 | |
| Reviewers |
| Name | Position | |
| Distribution |
| No Of | ||||
| Copy No. | Name | Copies | Location | |
1. Introduction 4
1.1. Purpose 4
1.2. Business Use Case Specification Reference 4
1.3. Definitions, Acronyms & Abbrevations 4
2. Process Identification 5
2.1. Process Description & Flow 5
3. User Interface 6
3.1. User Interface Screens 6
3.1.1. Screen ID's 6
3.1.2. User Interface ID: Create Agent Profile 6
3.1.3. User Interface ID: Search Agent Profile 12
3.1.4. User Interface ID: Modify Agent Profile 13
3.1.5. User Interface ID: View Agent Profile 17
4. Business Rule Mapping 22
1. Introduction
1.1. Purpose
This functional specification document addresses the part of the sales and marketing system that would facilitate the creation of agent profile.
1.2. Business Use Case Specification Reference
| Business Use Specification ID | Business Use Case Name | |
| None | None | |
1.3. Definitions, Acronyms & Abbreviations
| Term | Explanation | |
2. Process Identification
2.1. Process Description & Flow
Agent Profile facilitates in creating the profile of agents and ranking them accordingly. The results of this ranking would enable the sales & marketing team to focus on the agents from a better business perspective. The data generated out of an agent profile study leads to identify agent potential and necessary sales strategy.
The prerequisite for creating an agent profile for an agent is that the agent must have an entry in the Agent master.
3. User Interface
3.1. User Interface Screens
3.1.1. Screen ID's
| Corresponding HTML | ||
| Screen ID (SID) | Screen Name | File Name |
| utl.agentprofile.create | Agent Profile | AgentProfile.jsp |
| utl.agentprofile.view | View Agent Profile | AgentProfileView.jsp |
| utl.agentprofile.search | Search Agent Profile | AgentProfileSearch.jsp |
3.1.2. User Interface ID: Create Agent Profile
3.1.2.1. Screen Name: Create Agent Profile (BPI_CAS_SM_SCR—003—001) (See Figure M-39)
(See Figure M-40)
3.1.2.2. SID, Element Name, Element Type & Purpose
| Element | |||
| Element Name | Type | Label | Purpose |
| Main Header | Text | Main Header | To give the heading for the screen being |
| “Create Agent | “Create Agent | navigated | |
| Profile” | Profile” | ||
| Workgroup Name | Text | Workgroup Name | Text for “Agent ID” |
| Workgroup Name | Drop down | Workgroup Name | Should list all the workgroup names within |
| list | the system | ||
| The first option should be - | |||
| Choose One -. Subsequent workgroup | |||
| name should be listed in alphabetical order | |||
| Agent ID | Text | Agent ID | Text for “Agent ID” |
| Agent ID | Drop down | Agent ID | Search Window showing the agent ids for |
| list | the selected Child groups. The search | ||
| feature shall contain the details of agents | |||
| like agent ID, Agent name, Zip Code and | |||
| the present rating based on statistics | |||
| available. | |||
| The user is also allowed to enter/query for | |||
| a search based on the entry for an agent | |||
| id. | |||
| Agent Name | Text | Agent Name | Text for “Agent Name” |
| Agent Name | Dynamic text | Agent Name | When you select a particular agent id you |
| should get the Agent name. | |||
| Company Name | Text | Company Name | Text for “Agent Name” |
| Company Name | Dynamic text | Company Name | When you select a particular agent id you |
| should get the company name. | |||
| Sub Header | Text | Sub Header | Heading for “Present Rating” |
| “Present Rating” | “Present Rating” | ||
| Present Rating 1 | Non Editable | Present Rating 1 | Text for rating - 1, 2, 3, 4 |
| Text | |||
| Present Rating 2 | Non Editable | Present Rating 2 | Text for rating - Inactive, Quoter, Active & |
| Text | Producer | ||
| Sub Header | Text | Sub Header | Heading for “Profile Information” |
| “Profile | “Profile | ||
| Information” | Information” | ||
| Text for “Do you | Text | Text for “Do you | Text for “Do you currently sell health |
| currently sell | currently sell | Insurance?” | |
| health | health | ||
| Insurance?” | Insurance?” | ||
| Radio Button with | Radio Button | Radio Button with | Radio Button with “Yes” Label |
| Yes label | Yes label | ||
| Radio Button with | Radio Button | Radio Button with | Radio Button with “No” Label |
| No label | No label | ||
| Text for “Do you | Text | Text for “Do you | Text for “Do you currently sell Pac |
| sell Pac | sell Pac | Advantage?” | |
| Advantage?” | Advantage?” | ||
| Radio Button with | Radio Button | Radio Button with | Radio Button with “Yes” Label |
| Yes label | Yes label | ||
| Radio Button with | Radio Button | Radio Button with | Radio Button with “No” Label |
| No label | No label | ||
| Radio Button with | Radio Button | Radio Button with | Radio Button with “Unknown” Label Shall |
| Unknown label | Unknown label | be default | |
| Text for “what | Text | Text for “what | Text for “what insurance Types dealing |
| Insurance Types | Insurance Types | with?” | |
| dealing with? | dealing with? | ||
| Check Box | Check Box | Check Box | Check Box for selection |
| selection for | selection for | ||
| 1) Life | 9) Life | ||
| 2) Home | 10) Home | ||
| 3) P&C | 11) P&C | ||
| 4) Disability | 12) Disability | ||
| 5) Auto | 13) Auto | ||
| 6) Securities | 14) Securities | ||
| 7) Health | 15) Health | ||
| 8) Others | 16) Others | ||
| Text for | Text | Text for | Text for “Percentage time focused on |
| “Percentage time | “Percentage time | selling health insurance” | |
| focused on | focused on | ||
| selling health | selling health | ||
| insurance” | insurance” | ||
| Entry field for | Entry Field | Entry field for | Entry field accepting Positive percentage |
| “Percentage time | “Percentage time | values till 100 | |
| focused on | focused on | ||
| selling health | selling health | ||
| insurance” | insurance” | ||
| Text for “Average | Text | Text for “Average | Text for “Average Group Size (with In Pac |
| Group Size (with | Group Size (with | Advantage)” | |
| In Pac | In Pac | ||
| Advantage)” | Advantage)” | ||
| Entry field for | Entry Field | Entry field for | Entry Field showing information on |
| “Average Group | “Average Group | average group size in Pac Advantage | |
| Size (with In Pac | Size (with In Pac | ||
| Advantage)” | Advantage)” | ||
| Text for “Average | Text | Text for “Average | Text for “Average Group Size (outside Pac |
| Group Size | Group Size | Advantage) | |
| (outside Pac | (outside Pac | ||
| advantage) | advantage) | ||
| Entry Field for | Entry Field | Entry Field for | Entry Field for entering information on |
| “Average Group | “Average Group | average group size outside Pac Advantage | |
| Size (outside Pac | Size (outside Pac | ||
| advantage)” | advantage)” | ||
| Text for “Years in | Text | Text for “Years in | Text for “Years in Business” |
| Business” | Business” | ||
| Entry field for | Entry Field | Entry field for | Entry Field entering “Years in Business” |
| “Years in | “Years in | ||
| Business” | Business” | ||
| Text for “% of | Text | Text for “% of | Text for “% of staff concentrating on health |
| staff | staff | Insurance” | |
| concentrating on | concentrating on | ||
| health Insurance” | health Insurance” | ||
| Entry field for “% | Entry Field | Entry field for “% | Entry field for entering “% of staff |
| of staff | of staff | concentrating on health Insurance” | |
| concentrating on | concentrating on | ||
| health Insurance” | health Insurance” | ||
| Sub Heading | Text | Sub Heading | Sub Heading |
| For “Subjective | For “Subjective | for “Subjective Rating” | |
| Rating” | Rating” | ||
| Text for “Broker | Text | Text for “Broker | Text for “Broker Knowledge of Pac |
| Knowledge of | Knowledge of | Advantage” | |
| Pac Advantage” | Pac Advantage” | ||
| Text for “Broker | Text | Text for “Broker | Text for “Broker Potential” |
| Potential” | Potential” | ||
| Text for “Broker | Text | Text for “Broker | Text for “Broker Loyalty & Confidence with |
| Loyalty & | Loyalty & | Pac Advantage” | |
| Confidence with | Confidence with | ||
| Pac Advantage” | Pac Advantage” | ||
| Radio Button | Radio Button | Radio Button | Radio Button selection |
| selection | selection | ||
| 1) 0 | 7) 0 | ||
| 2) 1 | 8) 1 | ||
| 3) 2 | 9) 2 | ||
| 4) 3 | 10) 3 | ||
| 5) 4 | 11) 4 | ||
| 6) 5 | 12) 5 | ||
| Sub Heading | Text | Sub Heading | Text for “Other Information” |
| “Other | “Other | ||
| Information” | Information” | ||
| Text for | Text | Text for | Text for “Marketing Methods” |
| “Marketing | “Marketing | ||
| Methods” | Methods” | ||
| List for marketing | List | List for marketing | List for marketing methods |
| methods | methods | ||
| Text for “No 1 | Text | Text for “No 1 | Text for “No 1 Selling Plan” |
| Selling Plan” | Selling Plan” | ||
| List for “No 1 | List | List for “No 1 | List for No 1 Selling Plan |
| Selling Plan” | Selling Plan” | ||
| Text for “No 2 | Text | Text for “No 2 | Text for “No 2 Selling Plan” |
| Selling Plan” | Selling Plan” | ||
| List for “No 2 | List | List for “No 2 | List for No 2 Selling Plan |
| Selling Plan” | Selling Plan” | ||
| Save Button | HTML Button | Save Button | Saves the information |
| Cancel Button | HTML Button | Cancel Button | Resets to Original values |
3.1.2.3. Front End Validations
| Element | ||
| Name | Action/Validation Details | Error Message Text |
| Save | All fields are non mandatory | When the save HTML Button is |
| The following fields must be positive numeric | pressed with an invalid entry, an | |
| entries | error dialog box pops up with the | |
| Percentage of time focused on health | message “Please enter valid | |
| insurance(0-100) | numeric values” with “yes” option | |
| Average Groups size (within Pac Advantage) | On press of Yes Button, The | |
| Average group size (not within | cursor must be placed on the | |
| PacAdvanatge) | corresponding first entry field | |
| Years in Business (0-999) | ||
| % Of staff concentrating on health insurance | ||
| (0-100) | ||
3.1.2.4. Screen Flow
When the user first calls for the step 1 screen, the user is displayed with the choose child work group search feature. The child work group shall contain only those child workgroups, which belong to the category “Agents”. The child workgroups contain a non-editable entry field with search option.
The following are the scenarios the user may come across when operating on the screen
| Scenario | Description |
| On Entering the | The List of Child work groups be displayed. The child work groups shall |
| screen | contain only those child work groups which are under the category “Agent” |
| After selecting a | The user after selecting the child workgroup, it gets the agents and will be |
| child work group | displayed. |
| After selecting a | Agent ID with search feature in the screen snapshot, present rating and |
| agent id | average group size for Pac advantage is populated with the real time values |
| on selection of an agent id. | |
| All subjective rating will have default values of Unknown. | |
| For queries-“Do you currently sell health Insurance?” and “Do you sell Pac | |
| Advantage?” - default values is “Yes” | |
| Marketing Methods, No 1 Selling Plan and No 2 Selling Plan would default | |
| with ‘Choose One” Option and the values shall be picked up from the product | |
| profile ID from the carrier master. | |
| Save | Saves data into the permanent repository on saving the information after the |
| validation checks and goes to the confirmation page | |
| Cancel | Resets values to original values |
| Close the browser | The browser window cannot be closed/user can't navigate to another page |
| without saving/ | without saving the data. The user is prompted with the option of either saving |
| Navigating to | the data and closing/leaving the window or not saving the data and closing/ |
| another page | leaving the window. |
| without saving | |
| Close the browser/ | The browser window can be closed/user can leave once all the data is saved |
| leave the page | in the permanent repository. |
| after saving | |
3.1.3. User Interface ID: Search Agent Profile
3.1.3.1. Screen Name: Search Agent Profile (BPI_CAS_SM_SCR—003—002)
This screen below captures the information for searching an existing “Agent Profile”.
-
- Step-1: Enter the mandatory agent information and click the search button. This page will display the result of search. User can choose a agent and navigate to either “Modify” screen or “View” screen. (See Figure M-41)
3.1.3.2. SID, Element Name, Element Type & Purpose
| Element | Element | ||
| Name | Type | Label | Purpose |
| Main Header | Text | Main Header | To give the heading for the screen |
| “Agent Search” | “Agent Search” | ||
| Agent ID | Text | Agent ID | Text For “Agent ID” |
| Agent ID | Entry Field | Agent ID | Entry field for agent id |
| First Name | Text | First Name | Text For “First Name” |
| First Name | Entry Field | First Name | Entry field for First Name |
| Last Name | Text | Last Name | Text for Last Name |
| Last Name | Entry Field | Last Name | Entry field for Last Name |
| Company | Text | Company | Text For “First “Company” |
| Company | Entry Field | Company | Entry field for Company |
| Phone | Text | Phone | Text for “Phone” |
| Phone | Entry Field | Phone | Entry field for Phone |
| Tax ID | Text | Tax ID | Text For “Tax ID” |
| Tax ID | Select Feature | Tax ID | Entry field for Tax |
| Agent Button | Radio Button | Agent Button | Used to select the agent for modifying or |
| Radio | Radio | viewing/deleting. | |
| Modify | HTML Button | Modify | Agents to the modify screen of the selected |
| agent | |||
| View/Delete | HTML Button | View/Delete | Agents to the view/delete screen of the |
| selected | |||
3.1.3.3. Front End Validations
| Element | ||
| Name | Action/Validation Details | Error Message Text |
| Agent | Mandatory. Any one of the fields | Error Dialog Box on Search |
| ID | in the search screen is mandatory. | “Accepts Alphanumeric |
| Accepts Alphanumeric values only | values only.” | |
3.1.3.4. Screen Flow
The following are the scenarios the user may come across when operating on the search screen.
| Scenario | Description |
| Search | The system checks for all the validations for all the |
| mandatory information. | |
| Fetches the agent(s) that matches with the search conditions. | |
| Cancel | Clears the search fields |
3.1.4. User Interface ID: Modify Agent Profile
3.1.4.1. Screen Name: Modify Agent Profile (BPI_CAS_SM_SCR—003—003) (See Figure M-42)
(See Figure M-43)
3.1.4.2. SID, Element Name, Element Type & Purpose
This screen contains the default values—the values created in the database on creation of agent profile
| Element | |||
| Element Name | Type | Label | Purpose |
| Main Header | Text | Main Header | To give the heading for the screen being |
| “Modify Agent | “Modify Agent | navigated | |
| Profile” | Profile” | ||
| Agent ID | Text | Agent ID | Text for “Agent ID” |
| Agent ID | Non Editable | Agent ID | Text for Agent for selected agent profile |
| Text | |||
| Sub Header | Text | Sub Header | Heading for “Present Rating” |
| “Present Rating” | “Present Rating” | ||
| Present Rating 1 | Non Editable | Present Rating 1 | Text for rating - 1, 2, 3, 4 |
| Text | |||
| Present Rating 2 | Non Editable | Present Rating 2 | Text for rating - Inactive, Quoter, Active & |
| Text | Producer | ||
| Sub Header | Text | Sub Header | Heading for “Profile Information” |
| “Profile | “Profile | ||
| Information” | Information” | ||
| Text for “Do you | Text | Text for “Do you | Text for “Do you currently sell health |
| currently sell | currently sell | Insurance?” | |
| health | health | ||
| Insurance?” | Insurance?” | ||
| Radio Button with | Radio Button | Radio Button with | Radio Button with “Yes” Label |
| Yes label | Yes label | ||
| Radio Button with | Radio Button | Radio Button with | Radio Button with “No” Label |
| No label | No label | ||
| Text for “Do you | Text | Text for “Do you | Text for “Do you currently sell Pac |
| currently sell Pac | currently sell Pac | Advantage?” | |
| Advantage?” | Advantage?” | ||
| Radio Button with | Radio Button | Radio Button with | Radio Button with “Unknown” Label |
| Unknown label | Unknown label | ||
| Radio Button with | Radio Button | Radio Button with | Radio Button with “Yes” Label |
| Yes label | Yes label | ||
| Radio Button with | Radio Button | Radio Button with | Radio Button with “No” Label |
| No label | No label | ||
| Text for “what | Text | Text for “what | Text for “what insurance Types dealing |
| Insurance Types | Insurance Types | with?” | |
| dealing with? | dealing with? | ||
| Check Box | Check Box | Check Box | Check Box for selection |
| selection for | selection for | ||
| Life | Life | ||
| Home | Home | ||
| P&C | P&C | ||
| Disability | Disability | ||
| Auto | Auto | ||
| Securities | Securities | ||
| Health | Health | ||
| Others | Others | ||
| Text for | Text | Text for | Text for “Percentage time focused on |
| “Percentage time | “Percentage time | Health Insurance” | |
| focused on | focused on | ||
| Health Insurance” | Health Insurance” | ||
| Entry field for | Entry Field | Entry field for | Entry field accepting Positive percentage |
| “Percentage time | “Percentage time | values till 1100 | |
| focused on health | focused on health | ||
| Insurance” | Insurance” | ||
| Text for “Average | Text | Text for “Average | Text for “Average Group Size (with In Pac |
| Group Size (with | Group Size (with | Advantage)” | |
| In Pac | In Pac | ||
| Advantage)” | Advantage)” | ||
| Entry field for | Entry Field | Entry field for | Entry Field showing information on |
| “Average Group | “Average Group | average group size in Pac Advantage | |
| Size (with In Pac | Size (with In Pac | ||
| Advantage)” | Advantage)” | ||
| Text for “Average | Text | Text for “Average | Text for “Average Group Size (outside Pac |
| Group Size | Group Size | Advantage) | |
| (outside Pac | (outside Pac | ||
| advantage) | advantage) | ||
| Entry Field for | Entry Field | Entry Field for | Entry Field for entering information on |
| “Average Group | “Average Group | average group size outside Pac Advantage | |
| Size (outside Pac | Size (outside Pac | ||
| advantage)” | advantage)” | ||
| Text for “Years in | Text | Text for “Years in | Text for “Years in Business” |
| Business” | Business” | ||
| Entry field for | Entry Field | Entry field for | Entry Field entering “Years in Business” |
| “Years in | “Years in | ||
| Business” | Business” | ||
| Text for “% of | Text | Text for “% of | Text for “% of staff concentrating on health |
| staff | staff | Insurance” | |
| concentrating on | concentrating on | ||
| health Insurance” | health Insurance” | ||
| Entry field for “% | Entry Field | Entry field for “% | Entry field for entering “% of staff |
| of staff | of staff | concentrating on health Insurance” | |
| concentrating on | concentrating on | ||
| health Insurance” | health Insurance” | ||
| Sub Heading | Text | Sub Heading | Sub Heading |
| For “Subjective | For “Subjective | for “Subjective Rating” | |
| Rating” | Rating” | ||
| Text for “Broker | Text | Text for “Broker | Text for “Broker Knowledge of Pac |
| Knowledge of | Knowledge of | Advantage” | |
| Pac Advantage” | Pac Advantage” | ||
| Text for “Broker | Text | Text for “Broker | Text for “Broker Potential” |
| Potential” | Potential” | ||
| Text for “Broker | Text | Text for “Broker | Text for “Broker Loyalty & Confidence with |
| Loyalty & | Loyalty & | Pac Advantage” | |
| Confidence with | Confidence with | ||
| Pac Advantage” | Pac Advantage” | ||
| Radio Button | Radio Button | Radio Button | Radio Button selection |
| selection | selection | ||
| Unknown | Unknown | ||
| Neutral | Neutral | ||
| Neutral+ | Neutral+ | ||
| Mild | Mild | ||
| Positive | Positive | ||
| Positive+ | Positive+ | ||
| Very | Very | ||
| Positive | Positive | ||
| Sub Heading | Text | Sub Heading | Text for “Other Information” |
| “Other | “Other | ||
| Information” | Information” | ||
| Text for | Text | Text for | Text for “Marketing Methods’ |
| “Marketing | “Marketing | ||
| Methods” | Methods” | ||
| List for marketing | List | List for marketing | List for marketing methods |
| methods | methods | ||
| Text for “No 1 | Text | Text for “No 1 | Text for “No 1 Selling Plan” |
| Selling Plan” | Selling Plan” | ||
| List for “No 1 | List | List for “No 1 | List for No 1 Selling Plan |
| Selling Plan” | Selling Plan” | ||
| Text for “No 2 | Text | Text for “No 2 | Text for “No 2 Selling Plan” |
| Selling Plan” | Selling Plan” | ||
| List for “No 2 | List | List for “No 2 | List for No 2 Selling Plan |
| Selling Plan” | Selling Plan” | ||
| Modify | HTML Button | Modify | Modifies the data |
| Cancel | HTML Button | Cancel | Resets to the original created values |
3.1.4.3. Front End Validations
| Element | ||
| Name | Action/Validation Details | Error Message Text |
| Modify | All fields are non mandatory | When the modify HTML Button is |
| The following fields must be positive numeric | pressed with an invalid entry, an error | |
| entries | dialog box pops up with the message | |
| Percentage of time focused on health | “Please enter valid numeric values” with | |
| Insurance (0-100) | “yes” option | |
| Average Groups size (with in Pac Advantage) | On press of Yes Button, The cursor | |
| Average group size (not with in | must be placed on the corresponding | |
| PacAdvanatge) | entry field | |
| Years in Business (0-999) | ||
| % Of staff concentrating on health | ||
| insurance(0-100) | ||
3.1.4.4. Screen Flow
| Scenario | Description |
| On entering the | All values default to the created values. |
| screen | Non-editable text includes the agent |
| id and present ratings, which is dynamic. | |
| Modify | Modifies data in the permanent repository on saving |
| the information after the validation checks and goes | |
| to the confirmation page | |
3.1.5. User Interface ID: View Agent Profile
3.1.5.1. Screen Name: View Agent Profile (BPI_CAS_SM_SCR—003—004) (See Figure M-44)
3.1.5.2. SID, Element Name, Element Type & Purpose
This screen contains only the values—the values created in the database on creation/modification of agent profile
All the values are NOT EDITABLE
| Element | |||
| Element Name | Type | Label | Purpose |
| Main Header | Text | Main Header | To give the heading for the screen being |
| “View Agent | “View Agent | navigated | |
| Profile” | Profile” | ||
| Agent ID | Text | Agent ID | Text for “Agent ID” |
| Agent ID | Non Editable | Agent ID | Non Editable Text showing the agent ID for |
| Text | the associated agent profile ID | ||
| Sub Header | Text | Sub Header | Heading for “Present Rating” |
| “Present Rating” | “Present Rating” | ||
| Present Rating 1 | Non Editable | Present Rating 1 | Text for rating - 1, 2, 3, 4 |
| Text | |||
| Present Rating 2 | Non Editable | Present Rating 2 | Text for rating - Inactive, Quoter, Active & |
| Text | Producer | ||
| Sub Header | Text | Sub Header | Heading for “Profile Information” |
| “Profile | “Profile | ||
| Information” | Information” | ||
| Text for “Do you | Text | Text for “Do you | Text for “Do you currently sell health |
| currently sell | currently sell | Insurance?” | |
| health | health | ||
| Insurance?” | Insurance?” | ||
| Radio Button with | Radio Button | Radio Button with | Radio Button with “Yes” Label |
| Yes label | Yes label | ||
| Radio Button with | Radio Button | Radio Button with | Radio Button with “No” Label |
| No label | No label | ||
| Text for “Do you | Text | Text for “Do you | Text for “Do you currently sell Pac |
| currently sell Pac | currently sell Pac | Advantage?” | |
| Advantage?” | Advantage?” | ||
| Radio Button with | Radio Button | Radio Button with | Radio Button with “Unknown” Label |
| Unknown label | Unknown label | ||
| Radio Button with | Radio Button | Radio Button with | Radio Button with “Yes” Label |
| Yes label | Yes label | ||
| Radio Button with | Radio Button | Radio Button with | Radio Button with “No” Label |
| No label | No label | ||
| Text for “what | Text | Text for “what | Text for “what insurance Types dealing |
| Insurance Types | Insurance Types | with?” | |
| dealing with? | dealing with? | ||
| Check Box | Check Box | Check Box | Check Box for selection |
| selection for | selection for | ||
| Life | Life | ||
| Home | Home | ||
| PFC | PFC | ||
| F&C | F&C | ||
| Disability | Disability | ||
| Auto | Auto | ||
| Securities | Securities | ||
| Health | Health | ||
| Others | Others | ||
| Text for | Text | Text for | Text for “Percentage of time focused on |
| “Percentage of | “Percentage of | health insurance | |
| time focused on | time focused on | ||
| health Insurance” | health Insurance” | ||
| Non Editable | Non Editable | Non Editable | Non Editable Entry field accepting Positive |
| Entry field for | Entry Field | Entry field for | percentage values till 100 |
| “Percentage of | “Percentage of | ||
| health insurance | health insurance | ||
| sold vs. Total | sold vs. Total | ||
| Products sold” | Products sold” | ||
| Text for “Average | Text | Text for “Average | Text for “Average Group Size (with In Pac |
| Group Size (with | Group Size (with | Advantage)” | |
| In Pac | In Pac | ||
| Advantage)” | Advantage)” | ||
| Non Editable | Non Editable | Non Editable | Non Editable Entry Field showing |
| Entry field for | Entry Field | Entry field for | information on average group size in Pac |
| “Average Group | “Average Group | Advantage | |
| Size (with In Pac | Size (with In Pac | ||
| Advantage)” | Advantage)” | ||
| Text for “Average | Text | Text for “Average | Text for “Average Group Size (outside Pac |
| Group Size | Group Size | Advantage) | |
| (outside Pac | (outside Pac | ||
| advantage) | advantage) | ||
| Non Editable | Non Editable | Non Editable | Non Editable Entry Field for entering |
| Entry Field for | Entry Field | Entry Field for | information on average group size outside |
| “Average Group | “Average Group | Pac Advantage | |
| Size (outside Pac | Size) outside Pac | ||
| advantage)” | advantage)” | ||
| Text for “Years in | Text | Text for “Years in | Text for “Years in Business” |
| Business” | Business” | ||
| Non Editable | Non Editable | Non Editable | Non Editable Entry Field entering “Years |
| Entry field for | Entry Field | Entry field for | in Business” |
| “Years in | “Years in | ||
| Business” | Business” | ||
| Text for “% of | Text | Text for “% of | Text for “% of staff concentrating on health |
| staff | staff | Insurance” | |
| concentrating on | concentrating on | ||
| health Insurance” | health Insurance” | ||
| Non Editable | Non Editable | Non Editable | Non Editable Entry field for entering “% of |
| Entry field for “% | Entry Field | Entry field for “% | staff concentrating on health Insurance” |
| of staff | of staff | ||
| concentrating on | concentrating on | ||
| health Insurance” | health Insurance” | ||
| Sub Heading | Text | Sub Heading | Sub Heading |
| For “Subjective | For “Subjective | for “Subjective Rating” | |
| Rating” | Rating” | ||
| Text for “Broker | Text | Text for “Broker | Text for “Broker Knowledge of Pac |
| Knowledge of | Knowledge of | Advantage” | |
| Pac Advantage” | Pac Advantage” | ||
| Text for “Broker | Text | Text for “Broker | Text for “Broker Potential” |
| Potential” | Potential” | ||
| Text for “Broker | Text | Text for “Broker | Text for “Broker Loyalty & Confidence with |
| Loyalty & | Loyalty & | Pac Advantage” | |
| Confidence with | Confidence with | ||
| Pac Advantage” | Pac Advantage” | ||
| Radio Button | Radio Button | Radio Button | Radio Button selection |
| selection | selection | ||
| Unknown | Unknown | ||
| Neutral | Neutral | ||
| Neutral+ | Neutral+ | ||
| Mild | Mild | ||
| Positive | Positive | ||
| Positive+ | Positive+ | ||
| Very | Very | ||
| Positive | Positive | ||
| Sub Heading | Text | Sub Heading | Text for “Other Information” |
| “Other | “Other | ||
| Information” | Information” | ||
| Text for | Text | Text for | Text for “Marketing Methods’ |
| “Marketing | “Marketing | ||
| Methods” | Methods” | ||
| Non Editable field | Non Editable | Non Editable field | Non Editable field for marketing methods |
| for marketing | field | for marketing | |
| methods | methods | ||
| Text for “No 1 | Text | Text for “No 1 | Text for “No 1 Selling Plan” |
| Selling Plan” | Selling Plan” | ||
| Non Editable field | Non Editable | Non Editable field | Non Editable field for No 1 Selling Plan |
| for “No 1 Selling | field | for “No 1 Selling | |
| Plan” | Plan” | ||
| Text for “No 2 | Text | Text for “No 2 | Text for “No 2 Selling Plan” |
| Selling Plan” | Selling Plan” | ||
| Non Editable field | Non Editable | Non Editable field | Non Editable field for No 2 Selling Plan |
| for “No 2 Selling | field | for “No 2 Selling | |
| Plan” | Plan” | ||
3.1.5.3. Front End Validations
None.
3.1.5.4. Screen Flow
| Scenario | Description | |
| On Entering the | All values default to the Non Editable | |
| screen | created/modified values. Present rating | |
| would be dynamic. | ||
-
- 4. Business Rule Mapping
The agent is evaluated with the following ratings. The ratings are established on 2 accounts. One is when the user enters the screen—displays the present rating and another on completion on save operation. The system does an automatic rating of the agent and the same can be viewed by reports and on modify operation. The sales rep on entering the values saves the data and the ratings are picked up based on entries made (ratings described below).The cumulative ratings are stored in the database for reporting purposes.
| Activity | Rules |
| Create Agent | Should have unique Id 4 digit for a agent profile |
| profile | record with an increment of 1, Say 1000, 1001, 1002 |
| and so on. | |
Present Rating for Pac Advantage Business
| Broker | ||
| PacAdvanatge Business | Potential | Value |
| Zero sold cases and zero quotes in last 12 months | Inactive | 1 |
| Zero sold cases and 1+ quotes in last 12 months | Quoter | 2 |
| New agent or old agent with renewed interest | Prospect | 3 |
| (other than the balance 4) | ||
| 1+ sold cases in last 12 months | Active | 4 |
| 1+ sold cases and 1+ quotes in last 12 months | Producer | 5 |
| (consistently quoting and selling) | ||
Average Group size with in Pac Advantage—Picks up the real time value from the database for the agent.
Profile Information Ratings
| Corresponding Rank Value |
| Item | Type | Description | 1 | 2 | 3 | 4 | 5 |
| Do you currently sell health insurance? | Y/N | Manual Enter | N | Y | N/A | N/A | N/A |
| Percentage of time focused on health Insurance | % | Manual Enter | <60% | 61-70% | 71-80% | 81-90% | 90-100% |
| Average Group Size (outside PacAdvanatge) | Int | Manual Enter | >50 | 1-5 | 6-10 | 11-15 | >15 |
| Average Group Size (within PacAdvanatge) | Int | System Calc | >50 | 1-5 | 6-10 | 11-15 | >15 |
| Date Business Began (years in business) | Date | Manual Enter | >15 | <2 | 2-5 | 5-10 | 10-15 |
| % of Staff concentrating on health? | % | Manual Enter | <60% | 61-70% | 71-80% | 81-90% | 90-100% |
Subjective Ratings
Broker Relationship and Loyalty: Sales Reps opinion of this broker's loyalty to and confidence in PacAdvanatge as a program and concept as well as their confidence in PacAdvanatge adminstrative abilities and responsiveness.
0. (Unknown)—No Data available
1. (Neutral)
Neutral Impression of PacAdvanatge. Sells PacAdvanatge if there are no other choices available.
2. (Neutral Plus)
Agent has a somewhat favorable but guarded impression of PacAdvanatge program and it's responsiveness. Sells PacAdvanatge when group has too many Kaiser enrollees, when pricing is favorable, or when program is specifically requested but prefers to sell other health products or competing programs.
3. (Mild Positive)
The agent has a positive impression of PacAdvanatge program. Sees value in choice concept. Confident in the administration of the PacAdvanatge program, but often sells competing products.
4. (Positive Plus)
Agent is fully confident of PacAdvanatge administration and concept. Sells us in most situations; may occasionally sell a competing product.
5. (Very Positive)
Agent promotes the choice concept. Has total confidence in PacAdvanatge product, service and administration. Sells PacAdvanatge before all other products and competing programs. Broker Knowledge Of PacAdvanatge: Sales Reps opinion of this broker's knowledge of choice. Includes PacAdvanatge and other choice based product concepts (i.e. CC, BC). Ranks brokers' confidence in being able to independently sell and promote PacAdvanatge and related programs.
0. (Unknown)—No Data available
1. (Neutral) Agent has little or no knowledge of PacAdvanatge or other choice programs and products.
2. (Neutral Plus) Knows a little about PacAdvanatge and other choice programs, but focus and preference is for other health products. Requires significant coaching on basics of our product, the choice concept and PacAdvanatge administration.
3 (Mild Positive)
Agent understands basics of choice programs and PA, but may not be familiar with many administrative details of PA, (i.e. enrollment guidelines, participation rules, paperwork requirements, etc.). Does not know all the situations were Pac Advantage or other choice programs can “fit” (answer: just about everywhere). Requires some coaching on the product and concept.
4. (Positive Plus)
Agent is pretty familiar with PA and its admin rules. Knows most, but not all situations where choice programs work.
They can freely and independently discuss and promote PA or other programs with clients, but may require assistance from time to time.
5. (Very Positive)
Agent Broker has very good understanding of choice based programs and concepts and has a solid grasp of most PA administrative details. Familiar with all the situations where PA or other choice based programs “fit”. Can confidently sell Pac Advantage or other choice programs with little or no assistance.
Broker Potential
Sales Reps opinion of this broker's involvement or interest in all OTHER HEALTH INSURANCE programs, besides PacAdvanatge, and the reps assessment of this broker's NEW SALES potential for PA.
0. (Unknown)—No data Available
1 (Neutral) Inactive or broker does very little health insurance. Broker has indicated little or no interest in new group health selling. Does not sell any or very few other group health insurance products.
2. (Neutral Plus)
Broker sells some group health insurance cases upon request, (three or more annually) but it is not the primary focus of business.
3. (Mild positive)
Broker has other some health business, (more than 10 cases) and focus is at least 10% on group health. Actively promotes small business health insurance to clients. May primarily work with competing programs but have potential to produce some PacAdvanatge Business.
4. (Positive Plus)
Broker has a significant amount of existing small group business (20 or more groups). Actively interested in selling more group health to all current and prospective clients. Focus is 30% or more on group health.
5. (Very Positive)
Broker sells a lot of health insurance and/or has access to a significant amount of small group health insurance business. Focus is at least 50% or more on group health. May have involvement with larger groups, or association business. May be selling some or a significant amount of PacAdvanatge, but has potential to produce even more. May be a current top PA producer OR a significant producer for competing plan(s), (i.e., Cal Choice, Blue Cross, Kaiser direct). “Significant” is defined as 10 or more new sales annually.
Cumulative Ratings Stored in Database: Based on the points system @ 1-5 the cumulative values are stored in the database and is used for reporting purposes.
A Backend subroutine runs at 1200 at night everyday to calculate the Present rating of the agent based on quotes made, cases sold, average group size. This data would be calculated and updated against individual agents and shown in Step 2 screen when accessed.
Benefitl Partners Inc Process Specification Create Quotes Document Id: BPI_CAS_FSD_SM_04 Version: <1.1> Revision History
| Change Record |
| Date | Author | Version | Change Reference |
| Feb. 06, 2002 | Chandrasekaran L | 1.0 | Baseline Release |
| Aug. 16, 2002 | Chandrasekaran L | 1.2 | 1. Changes to reflect |
| screen modifications | |||
| 2. Changes to reflect latest | |||
| FSD format | |||
| Reviewers |
| Name | Position | |
| Distribution |
| No Of | ||||
| Copy No. | Name | Copies | Location | |
1. Introduction 4
1.1. Purpose 4
1.2. Business Use Case Specification Reference 4
1.3. Definitions, Acronyms & Abbreviations 4
2. Process Identification 5
2.1. Background 5
2.2. Process Description 5
2.3. Process Flow 5
3. User Interface 7
3.1. User Interface Screens 7
3.1.1. Create Quotes 7
3.2. Interface Flow 28
4. Business Rule Mapping 29
1. Introduction
1.1. Purpose
The purpose of this document is to describe the process of Create Quotes. This document identifies how the user interacts with the system, the data to be captured, the business logic to be implemented, and the output of the process.
1.2. Business Use Case Specification Reference
| Business Use Specification ID | Business Use Case Name | |
| BPI_SCOPE_SM | External Communication | |
| BPI_SCOPEP_SM_005 | Create Quote Master | |
| BPI_SCOPEP_SM_006 | Create Lead Master | |
1.3. Definitions, Acronyms & Abbreviations
| Term | Explanation | |
2. Process Identification
2.1. Background
Quotes are provided for potential business entities as well as existing business entities. Quotes can be requested for small Employer Groups or Alternate Groups (Individual Association Member, Association Group, COBRA etc.) as well as for employees of those groups.
2.2. Process Description
The objective of the Create Quotes process is to:
-
- 1) Provide functionality to create, view and modify quotes
The process should support collecting and storing configurable information for quoting purposes. A quote should be unique for each Group and Lead to allow history of data provided for a quote. The process should also support the versioning of each quote output.
The following are the other requirements that will be supported and constraints on the proposed system:
-
- 1) The system should allow for updates using current enrollment for existing groups and members
- 2) The system should allow for quoting specific carriers for an employee or for all employees
- 3) The system should allow for excluding certain carriers from a quote
- 4) The system should allow for calculating the rate differential based on the following entry fields: total eligible employees, total waiving, total declining, total COBRAs
- 5) The system should allow for quoting based on blended and non-blended fee structure
- 6) The system should allow for configurable agent fees
- 7) The system should allow the user to choose output types including:
- (a) Group Rate Summary
- (b) Group Rate Summary and Worksheet
- (c) Group Rate Summary, Worksheet and EE Pages
- (d) Employee Quote
- (e) COBRA Quote (Cal or Fed)
- (f) Individual Association Member Quote
- (g) ROE Quote
- 8) System should allow for configurable effective dates of quotes based on current date and/or enrollment effective date if it is an existing group
- 9) The system should have a functionality to list out all missing information for a quote. It should also have the functionality to print/fax/email this to the agent/prospective group who requested for the quote. At this point in time, the user should be able to save the quote for retrieval at a later point in time.
2.3. Process Flow
Process for create, view and modify quotes
-
- 1) Enter Tracking Dates
- 2) Choose Lead ID or Group ID; agent information if any gets auto-populated
- 3) Choose all line if coverage to quote; alternately use default coverage
- 4) Define contribution for employee/dependent by line of coverage; alternately use default contribution
- 5) Choose fee type (blended/non-blended). This would default, if Lead, to blended, if Group, to whichever fee structure the group is on)
- 6) Re-configure agent fee, if applicable
- 7) Create employee list; for existing groups this gets auto-populated using current enrollment; for prospective groups this information can be uploaded from a comma-separated (CSV) data file.
- 8) Adjust employee totals as needed
- i. # waiving
- ii. #declining
- iii. #COBRAs
- 9) Quote/exclude specific carriers
- 10) Choose quote type
- i. Group
- ii. Employee
- iii. Individual
- iv. COBRA
- 11) Choose output type
- i. Group Summary
- ii. Group Summary and Worksheet
- iii. Group Summary, Worksheet and employee pages
- 12) Specify effective date for quote
- 13) Choose mode of output
- i. View
- ii. Email
- iii. Fax
- iv. Print for mailing (in the mailroom)
- 14) For print, email, fax options, choose “Send to whose attention” in a pop-up window
- i. Agent's attention
- ii. Group's Attention
- iii. Other—For “Other”, enter “attention to”, address and/or email address and/or fax #
3. User Interface
3.1. User Interface Screens
3.1.1. Create Quotes
3.1.1.1. Screen Snapshot
Screen 1-1 (See Figure M-45)
Screen 1-2 (See Figure M-46)
Screen 2-1 (See Figure M-47)
Screen 2-2 (See Figure M-48)
Screen 3-1 (See Figure M-49)
Screen 3-2 (See Figure M-50)
Screen 4-1 (See Figure M-51)
Screen 4-2 (See Figure M-52)
Screen 5-1 (See Figure M-53)
3.1.1.2. Element Name, Element Type & Purpose
Screen1
| Element | Element | ||
| Name | Type | Label | Purpose |
| Quote Information |
| Quote Number | Display Text | Quote # | Unique id for a quote. There will be only one |
| quote associated with each group/lead. | |||
| Revision | Display Text | Rev | Revision # of the quote |
| Quote Date | Display Text | Date | Quote Date |
| Lead/Group | Display Text | Type | Type of the lead/group to whom quote is |
| Type | generated | ||
| Lead/Group Id | Display Text | Lead/Group Id | Id of the lead/group to whom quote is generated |
| Lead/Group | Display Text | Lead/Group | Name of the lead/group to whom quote is |
| Name | Name | generated |
| Lead/Group Information |
| Quoting For | Radio Boxes | Quote For | To specify whether quoting for lead or an existing |
| group | |||
| Lead/Group Id | Text Box | Lead/Group Id | To specify the id of lead/group quoted |
| Populate | Link | Populate Current | To populate the current enrollment details for a |
| Current | Enrollment | group. Shown only when the quote is for existing | |
| Enrollment | group. | ||
| Other Revisions | Option Box | Other Revisions | To populate the other version of the quote. |
| Shown only when the quote has more than one | |||
| version. |
| General Information |
| Quote Date | Text Box | Quote Date | To specify quote date |
| Mode of | Option Box | Mode of Request | Mode in which request for quote was received; |
| Request | possible values are: USPS, Phone, Fax, Email | ||
| Request | Text Box | Postmark Date | Postmark date of request for quote |
| Postmark Date | |||
| Request | Text Box | Receive Date | Date on which request for quote was received |
| Receive Date | |||
| Rate Type | Radio Boxes | Rate Type | To specify the rate type used for quoting. |
| Possible values are: Blended and non-blended | |||
| Agent | Text Box | Agent | To specify agent commission to be used for |
| Commission | Commission | quoting. | |
| Effective Date | Text Box | Effective Date | To specify an effective date for the quote |
| Group Information |
| Group Name | Display Text | Group Name | Displays name of the lead/group being quoted |
| Contact Name | Display Text | Contact Name | Displays name of contact for the lead/group |
| Address | Display Text | Address | Displays address of lead/group |
| Phone | Display Text | Phone | Displays phone # of the lead/group |
| Effective Date | Display Text | Effective Date | Displays effective in case of quoting for a group |
| ROE Date | Display Text | ROE Date | Displays ROE date in case of quoting for a group |
| Status | Display Text | Status | Displays status in case of quoting for a group |
| Agent Information |
| Agent Id | Display Text | Agent Id | Displays id of agent associated with lead/agent |
| Agent Name | Display Text | Agent Name | Displays name of agent associated with |
| lead/agent | |||
| Address | Display Text | Address | Displays address of agent associated with |
| lead/agent | |||
| Phone | Display Text | Phone | Displays phone # of agent associated with |
| lead/agent | |||
| Fax | Display Text | Fax | Displays fax # of agent associated with lead/agent |
| Display Text | Displays email address of agent associated with | ||
| lead/agent | |||
| Workgroup | Display Text | Workgroup | Displays workgroup associated with lead/agent |
| Coverage & Contribution Information |
| Use default | Check Box | Use default | To specify that quote has to be generated using |
| coverage and | coverage and | default coverage and contribution | |
| contribution | contribution | ||
| Contribution | Option Box | Contribution | To specify contribution type for medical. |
| Type/Medical | Type/Medical | ||
| Specified Plan/ | Option Box | Specified Plan/ | To specify a plan when option is “% specified |
| Medical | Medical | plan” for medical. | |
| Value for EE | Text Box | Value for EE ($/ | To specify contribution % or value for medical. |
| ($/%)/ | %)/Medical | ||
| Medical | |||
| Value for Dep | Text Box | Value for Dep | To specify contribution % or value for medical. |
| ($/%)/ | ($/%)/Medical | ||
| Medical | |||
| Contribution | Option Box | Contribution | To specify contribution type for Dental. |
| Type/Dental | Type/Dental | ||
| Specified Plan/ | Option Box | Specified Plan/ | To specify a plan when option is “% specified |
| Dental | Dental | plan” for Dental. | |
| Value for EE | Text Box | Value for EE ($/ | To specify contribution % or value for Dental. |
| ($/%)/Dental | %)/Dental | ||
| Value for Dep | Text Box | Value for Dep | To specify contribution % or value for Dental. |
| ($/%)/Dental | ($/%)/Dental | ||
| Contribution | Option Box | Contribution | To specify contribution type for Vision. |
| Type/Vision | Type/Vision | ||
| Specified Plan/ | Option Box | Specified Plan/ | To specify a plan when option is “% specified |
| Vision | Vision | plan” for Vision. | |
| Value for EE | Text Box | Value for EE ($/ | To specify contribution % or value for Vision. |
| ($/%)/Vision | %)/Vision | ||
| Value for Dep | Text Box | Value for Dep | To specify contribution % or value for Vision. |
| ($/%)/Vision | ($/%)/Medical | ||
| Contribution | Option Box | Contribution | To specify contribution type for CAM. |
| Type/CAM | Type/CAM | ||
| Specified Plan/ | Option Box | Specified Plan/ | To specify a plan when option is “% specified |
| CAM | CAM | plan” for CAM. | |
| Value for EE | Text Box | Value for EE ($/ | To specify contribution % or value for CAM. |
| ($/%)/CAM | %)/CAM | ||
| Value for Dep | Text Box | Value for Dep | To specify contribution % or value for CAM. |
| ($/%)/CAM | ($/%)/CAM | ||
| New | Command | New | To clear the screen for new quote entry |
| Save | Command | Save | To save details of quote to database |
| Search | Command | Search | To search for a specific quote |
Screen2
| Element | Element | ||
| Name | Type | Label | Purpose |
| Quote Information |
| Quote Number | Display Text | Quote # | Unique id for a quote. There will be only one |
| quote associated with each group/lead. | |||
| Revision | Display Text | Rev | Revision # of the quote |
| Quote Date | Display Text | Date | Quote Date |
| Lead/Group | Display Text | Type | Type of the lead/group to whom quote is |
| Type | generated | ||
| Lead/Group Id | Display Text | Lead/Group Id | Id of the lead/group to whom quote is generated |
| Lead/Group | Display Text | Lead/Group | Name of the lead/group to whom quote is |
| Name | Name | generated |
| Employee Information |
| Quote Specific | Column | Quote Specific | To indicate employees when using “quote |
| Check Box | specific employees” option | ||
| Employee | Column Text | Employee Name | Name of employee |
| Name | Box | ||
| Sort by | Link | Sort A-Z | To sort the employee details by employee name |
| Ascending | in ascending order. | ||
| Sort by | Link | Sort Z-A | To sort the employee details by employee name |
| Descending | in descending order. | ||
| Age/DOB | Column | Age/DOB | Age/DOB of employee |
| Check Box | |||
| Coverage | Column | Tier | Coverage choice selected by employee |
| Choice | Option Box | ||
| #Members | Column Text | # | # of members covered under employee (including |
| Box | the employee) | ||
| Zip | Column Text | Zip | Zip code of residence of employee |
| Box | |||
| County | Column | County | County of residence of employee |
| Option Box | |||
| Medical Plan | Column | Medical Plan | Medical plan selected by employee, if any |
| Option Box | |||
| Dental Plan | Column | Dental Plan | Dental plan selected by employee, if any |
| Option Box | |||
| Vision Plan | Column | Vision Plan | Vision plan selected by employee, if any |
| Option Box | |||
| CAM Plan | Column | CAM Plan | CAM plan selected by employee, if any |
| Option Box | |||
| Size | Text Box | To alter the size of the employee info entry table. | |
| Set Size | Command | Set Size | Adds/deletes row(s) in employee information |
| entry table depending on the size entered. | |||
| Delete | Command | Delete | Deletes a row from employee information entry |
| table | |||
| Upload | Link | Upload | To upload a flat file containing employee |
| Employee Info | Employee Info | information | |
| Total | Display Text | Total Employees | Displays count of employees entered in the |
| Employees | employee information table. | ||
| Total Waiving | Text Box | Total Waiving | Total # of waiving employees |
| Total Declining | Text Box | Total Declining | Total # of declining employees |
| Total COBRAs | Text Box | Total COBRAs | Total # of COBRA members with the group |
| Rate | Radio | Rate Differential | To specify whether the RAF is calculated by the |
| Differential | Buttons | Factor | system or entered by the user. |
| Factor | |||
| Rate | Text Box | Rate Differential | Rate Differential Factor |
| Differential | Factor | ||
| Factor | |||
| Refresh | Command | Refresh | To calculate the RAF a fresh when the RAF is |
| calculated by the system. | |||
| New | Command | New | To clear the screen for new quote entry |
| Save | Command | Save | To save details of quote to database |
| Search | Command | Search | To search for a specific quote |
Screen 3
| Element | Element | ||
| Name | Type | Label | Purpose |
| Quote Information |
| Quote Number | Display Text | Quote # | Unique id for a quote. There will be only one |
| quote associated with each group/lead. | |||
| Revision | Display Text | Rev | Revision # of the quote |
| Quote Date | Display Text | Date | Quote Date |
| Lead/Group | Display Text | Type | Type of the lead/group to whom quote is |
| Type | generated | ||
| Lead/Group Id | Display Text | Lead/Group Id | Id of the lead/group to whom quote is generated |
| Lead/Group | Display Text | Lead/Group | Name of the lead/group to whom quote is |
| Name | Name | generated |
| Contribution Information |
| Medical |
| Quote Medical | Check Box | Quote Medical | To include the quote for medical. |
| Contribution | Check Box | Contribution | To include the contribution summary to quote |
| Summary | Summary | output. | |
| Employer | Check Box | Employer | To include the % lowest cost HMO contribution |
| Summary/% | Summary/% | in Employer summary. | |
| Lowest Cost | Lowest Cost | ||
| HMO | HMO | ||
| Employer | Check Box | Employer | To include the % lowest cost Plan contribution in |
| Summary/% | Summary/% | Employer summary. | |
| Lowest Cost | Lowest Cost | ||
| Plan | Plan | ||
| Employer | Check Box | Employer | To include the % Specified Plan contribution in |
| Summary/% | Summary/% | Employer summary. | |
| Specified Plan | Specified Plan | ||
| Employer | Check Box | Employer | To include the Flat $ Amount contribution in |
| Summary/Flat | Summary/Flat $ | Employer summary. | |
| $ Amount | Amount | ||
| Employee | Check Box | Employee | To include the % lowest cost HMO contribution |
| Quotes/% | Quotes/% | in Employee Quotes. | |
| Lowest Cost | Lowest Cost | ||
| HMO | HMO | ||
| Employee | Check Box | Employee | To include the % lowest cost Plan contribution in |
| Quotes/% | Quotes/% | Employee Quotes. | |
| Lowest Cost | Lowest Cost | ||
| Plan | Plan | ||
| Employee | Check Box | Employee | To include the % Specified Plan contribution in |
| Quotes/% | Quotes/% | Employee Quotes. | |
| Specified Plan | Specified Plan | ||
| Employee | Check Box | Employee | To include the Flat $ Amount contribution in |
| Quotes/Flat $ | Quotes/Flat $ | Employee Quotes. | |
| Amount | Amount | ||
| Value for | Text Box | Value for | To specify contribution % for Lowest cost HMO |
| Employee/% | Employee/% | for employee. | |
| Lowest Cost | Lowest Cost | ||
| HMO | HMO | ||
| Value for | Text Box | Value for | To specify contribution % for Lowest Cost Plan |
| Employee/% | Employee/% | for employee. | |
| Lowest Cost | Lowest Cost | ||
| Plan | Plan | ||
| Value for | Text Box | Value for | To specify contribution % for Specified Plan for |
| Employee/% | Employee/% | employee. | |
| Specified Plan | Specified Plan | ||
| Value for | Text Box | Value for | To specify contribution value for Flat $ Amount |
| Employee/Flat | Employee/Flat | for employee. | |
| $ Amount | $ Amount | ||
| Value for | Text Box | Value for | To specify contribution % for Lowest cost HMO |
| Dependent/% | Dependent/% | for dependent. | |
| Lowest Cost | Lowest Cost | ||
| HMO | HMO | ||
| Value for | Text Box | Value for | To specify contribution % for Lowest Cost Plan |
| Dependent/% | Dependent/% | for dependent. | |
| Lowest Cost | Lowest Cost | ||
| Plan | Plan | ||
| Value for | Text Box | Value for | To specify contribution % for Specified Plan for |
| Dependent/% | Dependent/% | dependent. | |
| Specified Plan | Specified Plan | ||
| Value for | Text Box | Value for | To specify contribution value for Flat $ Amount |
| Dependent/ | Dependent/Flat | for dependent. | |
| Flat $ Amount | $ Amount | ||
| Specified Plan | Option Box | Specified Plan | To specify a plan when option is “% specified |
| plan” |
| Dental |
| Quote Dental | Check Box | Quote Dental | To include the quote for dental. |
| Contribution | Check Box | Contribution | To include the contribution summary to quote |
| Summary | Summary | output. | |
| Employer | Check Box | Employer | To include the % lowest cost Plan contribution in |
| Summary/% | Summary/% | Employer summary. | |
| Lowest Cost | Lowest Cost | ||
| Plan | Plan | ||
| Employer | Check Box | Employer | To include the % Specified Plan contribution in |
| Summary/% | Summary/% | Employer summary. | |
| Specified Plan | Specified Plan | ||
| Employer | Check Box | Employer | To include the Flat $ Amount contribution in |
| Summary/Flat | Summary/Flat $ | Employer summary. | |
| $ Amount | Amount | ||
| Employee | Check Box | Employee | To include the % lowest cost Plan contribution in |
| Quotes/% | Quotes/% | Employee Quotes. | |
| Lowest Cost | Lowest Cost | ||
| Plan | Plan | ||
| Employee | Check Box | Employee | To include the % Specified Plan contribution in |
| Quotes/% | Quotes/% | Employee Quotes. | |
| Specified Plan | Specified Plan | ||
| Employee | Check Box | Employee | To include the Flat $ Amount contribution in |
| Quotes/Flat $ | Quotes/Flat $ | Employee Quotes. | |
| Amount | Amount | ||
| Value for | Text Box | Value for | To specify contribution % for Lowest Cost Plan |
| Employee/% | Employee/% | for employee. | |
| Lowest Cost | Lowest Cost | ||
| Plan | Plan | ||
| Value for | Text Box | Value for | To specify contribution % for Specified Plan for |
| Employee/% | Employee/% | employee. | |
| Specified Plan | Specified Plan | ||
| Value for | Text Box | Value for | To specify contribution value for Flat $ Amount |
| Employee/Flat | Employee/Flat | for employee. | |
| $ Amount | $ Amount | ||
| Value for | Text Box | Value for | To specify contribution % for Lowest Cost Plan |
| Dependent/% | Dependent/% | for dependent. | |
| Lowest Cost | Lowest Cost | ||
| Plan | Plan | ||
| Value for | Text Box | Value for | To specify contribution % for Specified Plan for |
| Dependent/% | Dependent/% | dependent. | |
| Specified Plan | Specified Plan | ||
| Value for | Text Box | Value for | To specify contribution value for Flat $ Amount |
| Dependent/ | Dependent/Flat | for dependent. | |
| Flat $ Amount | $ Amount | ||
| Specified Plan | Option Box | Specified Plan | To specify a plan when option is “% specified |
| plan” |
| Vision |
| Quote Vision | Check Box | Quote Vision | To include the quote for vision. |
| Contribution | Check Box | Contribution | To include the contribution summary to quote |
| Summary | Summary | output. | |
| Employer | Check Box | Employer | To include the % lowest cost Plan contribution in |
| Summary/% | Summary/% | Employer summary. | |
| Lowest Cost | Lowest Cost | ||
| Plan | Plan | ||
| Employer | Check Box | Employer | To include the % Specified Plan contribution in |
| Summary/% | Summary/% | Employer summary. | |
| Specified Plan | Specified Plan | ||
| Employer | Check Box | Employer | To include the Flat $ Amount contribution in |
| Summary/Flat | Summary/Flat $ | Employer summary. | |
| $ Amount | Amount | ||
| Employee | Check Box | Employee | To include the % lowest cost Plan contribution in |
| Quotes/% | Quotes/% | Employee Quotes. | |
| Lowest Cost | Lowest Cost | ||
| Plan | Plan | ||
| Employee | Check Box | Employee | To include the % Specified Plan contribution in |
| Quotes/% | Quotes/% | Employee Quotes. | |
| Specified Plan | Specified Plan | ||
| Employee | Check Box | Employee | To include the Flat $ Amount contribution in |
| Quotes/Flat $ | Quotes/Flat $ | Employee Quotes. | |
| Amount | Amount | ||
| Value for | Text Box | Value for | To specify contribution % for Lowest Cost Plan |
| Employee/% | Employee/% | for employee. | |
| Lowest Cost | Lowest Cost | ||
| Plan | Plan | ||
| Value for | Text Box | Value for | To specify contribution % for Specified Plan for |
| Employee/% | Employee/% | employee. | |
| Specified Plan | Specified Plan | ||
| Value for | Text Box | Value for | To specify contribution value for Flat $ Amount |
| Employee/Flat | Employee/Flat | for employee. | |
| $ Amount | $ Amount | ||
| Value for | Text Box | Value for | To specify contribution % for Lowest Cost Plan |
| Dependent/% | Dependent/% | for dependent. | |
| Lowest Cost | Lowest Cost | ||
| Plan | Plan | ||
| Value for | Text Box | Value for | To specify contribution % for Specified Plan for |
| Dependent/% | Dependent/% | dependent. | |
| Specified Plan | Specified Plan | ||
| Value for | Text Box | Value for | To specify contribution value for Flat $ Amount |
| Dependent/ | Dependent/Flat | for dependent. | |
| Flat $ Amount | $ Amount | ||
| Specified Plan | Option Box | Specified Plan | To specify a plan when option is “% specified |
| plan” |
| CAM |
| Quote CAM | Check Box | Quote CAM | To include the quote for CAM. |
| Contribution | Check Box | Contribution | To include the contribution summary to quote |
| Summary | Summary | output. | |
| Employer | Check Box | Employer | To include the % lowest cost Plan contribution in |
| Summary/% | Summary/% | Employer summary. | |
| Lowest Cost | Lowest Cost | ||
| Plan | Plan | ||
| Employer | Check Box | Employer | To include the % Specified Plan contribution in |
| Summary/% | Summary/% | Employer summary. | |
| Specified Plan | Specified Plan | ||
| Employer | Check Box | Employer | To include the Flat $ Amount contribution in |
| Summary/Flat | Summary/Flat $ | Employer summary. | |
| $ Amount | Amount | ||
| Employee | Check Box | Employee | To include the % lowest cost Plan contribution in |
| Quotes/% | Quotes/% | Employee Quotes. | |
| Lowest Cost | Lowest Cost | ||
| Plan | Plan | ||
| Employee | Check Box | Employee | To include the % Specified Plan contribution in |
| Quotes/% | Quotes/% | Employee Quotes. | |
| Specified Plan | Specified Plan | ||
| Employee | Check Box | Employee | To include the Flat $ Amount contribution in |
| Quotes/Flat $ | Quotes/Flat $ | Employee Quotes. | |
| Amount | Amount | ||
| Value for | Text Box | Value for | To specify contribution % for Lowest Cost Plan |
| Employee/% | Employee/% | for employee. | |
| Lowest Cost | Lowest Cost | ||
| Plan | Plan | ||
| Value for | Text Box | Value for | To specify contribution % for Specified Plan for |
| Employee/% | Employee/% | employee. | |
| Specified Plan | Specified Plan | ||
| Value for | Text Box | Value for | To specify contribution value for Flat $ Amount |
| Employee/Flat | Employee/Flat | for employee. | |
| $ Amount | $ Amount | ||
| Value for | Text Box | Value for | To specify contribution % for Lowest Cost Plan |
| Dependent/% | Dependent/% | for dependent. | |
| Lowest Cost | Lowest Cost | ||
| Plan | Plan | ||
| Value for | Text Box | Value for | To specify contribution % for Specified Plan for |
| Dependent/% | Dependent/% | dependent. | |
| Specified Plan | Specified Plan | ||
| Value for | Text Box | Value for | To specify contribution value for Flat $ Amount |
| Dependent/ | Dependent/Flat | for dependent. | |
| Flat $ Amount | $ Amount | ||
| Specified Plan | Option Box | Specified Plan | To specify a plan when option is “% specified |
| plan” | |||
| New | Command | New | To clear the screen for new quote entry |
| Save | Command | Save | To save details of quote to database |
| Search | Command | Search | To search for a specific quote |
Screen 4
| Element | Element | ||
| Name | Type | Label | Purpose |
| Quote Information |
| Quote Number | Display Text | Quote # | Unique id for a quote. There will be only one |
| quote associated with each group/lead. | |||
| Revision | Display Text | Rev | Revision # of the quote |
| Quote Date | Display Text | Date | Quote Date |
| Lead/Group | Display Text | Type | Type of the lead/group to whom quote is |
| Type | generated | ||
| Lead/Group Id | Display Text | Lead/Group Id | Id of the lead/group to whom quote is generated |
| Lead/Group | Display Text | Lead/Group | Name of the lead/group to whom quote is |
| Name | Name | generated |
| Quote Generation Options |
| Generate | Radio | Generate | To specify what type of quote to be generated. |
| Buttons | Possible values are: Standard Quote, Interim | ||
| Quote | |||
| Quote for | Check Box | Quote for | If this option is set, the quote is generated only |
| specified plans | specified plans | for plans specified by employee | |
| only | only | ||
| Exclude | Exclude | To exclude certain plans from being quoted | |
| Specified Plans | Specified Plans | ||
| Quote For | Radio | Quote For | To specify to whom the quote output is being |
| Buttons | generated. Possible values are: Group, | ||
| Employee(s), Cal-COBRA(s), Fed-COBRA(s) | |||
| When quoting | Radio | When quoting | To specify what quote sheets to be included in |
| for groups, | Buttons | for groups, | quote output. |
| include | include | ||
| Mode of output | Radio | Mode of output | To specify the mode of quote output. Possible |
| Buttons | values are: View, Email, Fax, Print in mailroom. | ||
| Send to whose | Radio | Send to whose | To specify to whose attention the quote is to be |
| attention | Buttons | attention | sent. Possible values are: Agent's Attn., Group's |
| Attn., Other. | |||
| Attention to | Text Box | Attention to | To specify the attention to whom when the “Send |
| to whose attention”, is others. | |||
| Address 1 | Text Box | Address 1 | To specify the address 1 when the “Send to |
| whose attention”, is others. | |||
| Address 2 | Text Box | Address 2 | To specify the address 2 when the “Send to |
| whose attention”, is others. | |||
| Text Box | To specify the email when the “Send to whose | ||
| attention”, is others. | |||
| Fax | Text Box | Fax | To specify the fax when the “Send to whose |
| attention”, is others. | |||
| Include | Check Box | Include program | To indicate whether the program brochure is to be |
| program | brochure | included in the quote output. | |
| brochure | |||
| New | Command | New | To clear the screen for new quote entry |
| Save | Command | Save | To save details of quote to database |
| Search | Command | Search | To search for a specific quote |
Screen 5
| Element | Element | ||
| Name | Type | Label | Purpose |
| Quote Information |
| Quote Number | Display Text | Quote # | Unique id for a quote. There will be only one |
| quote associated with each group/lead. | |||
| Revision | Display Text | Rev | Revision # of the quote |
| Quote Date | Display Text | Date | Quote Date |
| Lead/Group | Display Text | Type | Type of the lead/group to whom quote is |
| Type | generated | ||
| Lead/Group Id | Display Text | Lead/Group Id | Id of the lead/group to whom quote is generated |
| Lead/Group | Display Text | Lead/Group | Name of the lead/group to whom quote is |
| Name | Name | generated |
| Missing Information |
| Missing entity | Display Text | Missing Entity | Name of the missing entity |
| Message | Display Text | Message | Message. |
| New | Command | New | To clear the screen for new quote entry |
| Save | Command | Save | To save details of quote to database |
| Search | Command | Search | To search for a specific quote |
3.1.1.3. Screen Validations
Screen1
| Element Name | Action/Validation Details | Message |
| Lead Group Information |
| Quoting For | Check to see that a valid option is | “Required information is missing” |
| selected for the field | ||
| Lead/Group Id | Check to see that a valid value is | “Required information is missing” |
| entered for the field |
| General Information |
| Quote Date | “Required information is missing” | |
| Mode of Request | Check to see that a valid option is | “Required information is missing” |
| selected for the field | ||
| Request Postmark | Check to see that a valid value is | “Required information is missing” |
| Date | entered for the field | |
| Request Receive | Check to see that a valid value is | “Required information is missing” |
| Date | entered for the field | |
| Rate Type | Check to see that a valid option is | “Required information is missing” |
| selected for the field | ||
| Agent Commission | Check to see that a valid value is | “Required information is missing” |
| entered for the field | ||
| Effective Date | Check to see that a valid value is | “Required information is missing” |
| entered for the field | ||
Screen2
| Element Name | Action/Validation Details | Message |
| Employee Information |
| Age/DOB | Check to see that a valid value is | “Required information is missing” |
| entered for the field | ||
| Coverage Option | Check to see that a valid option is | “Required information is missing” |
| selected for the field | ||
| Number of | Check to see that a valid value is | “Required information is missing” |
| Members | entered for the field | |
Screen4
| Element Name | Action/Validation Details | Message |
| Quote Generation Options |
| Generate | Check to see that a valid option is | “Required information is missing” |
| selected for the field | ||
| Quote For | Check to see that a valid option is | “Required information is missing” |
| selected for the field | ||
| When quoting for | Check to see that a valid option is | “Required information is missing” |
| groups, include | selected for the field | |
| Mode of output | Check to see that a valid option is | “Required information is missing” |
| selected for the field | ||
| Send to whose | Check to see that a valid option is | “Required information is missing” |
| attention | selected for the field | |
3.2. Interface Flow
N/A
4. Business Rule Mapping
| Activity | Rules |
| Generate Quote | 1. A lead or a group will be associated with (a |
| maximum of) one quote number. Changes to the | |
| quote will be saved as revisions. | |
| 2. For an existing group, fee type (blended or non- | |
| blended), coverage & contribution information and | |
| employees information gets defaulted from current | |
| enrollment. | |
| 3. Default coverage and contribution is: Line of | |
| coverage - Medical; Contribution for employees - | |
| 50% of lowest cost HMO plan; Contribution for | |
| dependents - None | |
| 4. For each line of coverage, the contribution type for | |
| dependents (if any) has to be same as that for the | |
| employee. Only the contribution percentage or | |
| value can change. | |
| 5. Quote for an individual association member should | |
| include only one employee. | |
| 6. If zip code is not provided for an employee, the zip | |
| code of the group is used for rate calculation. | |
| 7. Number of employees willing to enroll should | |
| satisfy the participation rule i.e., number of declines | |
| to (employee count − number of waiving + number | |
| of declines − number of COBRA) should be less | |
| than 30%. | |
| 8. Employer's contribution towards employee | |
| premium should be at least 50% of the group's | |
| average premium for all enrolled employees based | |
| on the lowest cost employee-only plan available. | |
| 9. Effective date for quote will default to 1st of next | |
| month if current date is lesser than or equal to the | |
| 25th of the month and 1st of the next following | |
| month after the 25th. | |
| 10. Premium rates are calculated based on the logic as | |
| detailed in “Process Specification for Billing - | |
| BPI_CAS_FSD_FI_001”. | |
| Change Record |
| Date | Author | Version | Change Reference |
| Dec. 03, 2001 | Mahalingam Ramamoorthi | 1.0 | |
| Reviewers |
| Name | Position | |
| Distribution |
| No Of | ||||
| Copy No. | Name | Copies | Location | |
1. Introduction 4
1.1. Purpose 4
1.2. Business Use Case Specification Reference 4
1.3. Definition, Acronyms & Abbreviations 4
2. Process Identification 5
2.1. Process Description 5
2.2. Process Flow 5
3. User Interface 7
3.1. User Interface Screens 7
3.1.1. Screen ID's 7
3.1.2. User Interface Id: Supply Request-External 7
3.1.3. User Interface Id: External Supply Request Mail Room Confirmation 11
3.1.4. User Interface Id: Supply Request Confirmation 13
4. Business Rule Mapping 14
1. Introduction
1.1. Purpose
This functional specification document addresses the part of the Core Administration System that would facilitate the sending of Supply Requests or any handbooks to employer groups or the members of a group.
1.2. Business Use Case Specification Reference
| Business Use Specification ID | Business Use Case Name | |
| None | None | |
1.3. Definitions, Acronyms & Abbreviations
| Term | Explanation | |
2. Process Identification
2.1. Process Description
A Supply Request consists of all handbooks, rate books, forms and application, complementary, super directories that are sent to the employer groups and its members through the mailroom.
2.2. Process Flow (See Figure N-1)
3. User Interface
3.1. User Interface Screens
3.1.1. Screen ID's
| Corresponding HTML File | ||
| Screen ID (SID) | Screen Name | Name |
| utl.supplyrequest.external | Supply Request External | ExternalSupplyRequest.jsp |
| utl.supplyrequestview.external | Supply Request External View | ExternalSupplyRequestView.jsp |
| utl.supplyrequestresult.external | Supply Request External | ExternalSupplyRequestResult.jsp |
| utl.supplyconfirm.external | Supply Request External | ExternalSupplyRequestMailConfirm.jsp |
| Confirmation | ||
3.1.2. User Interface Id: Supply Request—External
3.1.2.1. Screen Name: Supply Request—External (BPI_CAS_UTL_SCR—001—001) (See Figure N-2)
3.1.2.2. SID, Element Name, Element Type & Purpose
| Element | |||
| Element Name | Type | Label | Purpose |
| Main Header | Text | Main Header | To give the heading for the screen being |
| “External Supply | “External Supply | navigated | |
| Request” | Request” | ||
| Text items as | Text | Text items as | To provide information as shown in the |
| shown in the | shown in the | screen along with Qty Text and in Boxes as | |
| screen for Pre | screen for Pre | shown in the screen snapshot | |
| selected | selected | ||
| packages, | packages, | ||
| Handbooks, Rate | Handbooks, | ||
| Books, Forms | Rate Books, | ||
| and Applications, | Forms and | ||
| Complementary, | Applications, | ||
| Super Directories | Complementary, | ||
| Super | |||
| Directories | |||
| Qty Entry Field | Entry Field | Qty Entry Field | Entry field for Quantity for all items |
| Agent/Employer | Text | Agent/Employer | Text for Agent/Employer Group. |
| Group ID | Group ID | Must not show up if accessed directly from | |
| the menu | |||
| Agent/Employer | Dynamic | Agent/Employer | Needs to pick up the agent ID or the supply |
| Group ID | Text | Group ID | request ID. Must not show up if accessed |
| directly from the menu | |||
| Company Name | Text | Company Name | Text for “Company Name” |
| Text | Text | ||
| Company Name | Entry Field | Company Name | Entry Field For Company Name |
| Entry Field | Entry Field | ||
| Address Text | Text | Address Text | Text for “Address” |
| Address Entry | Entry Field | Address Entry | Entry Field For Address |
| Field | Field | ||
| Suite Text | Text | Suite Text | Text for “Suite” |
| Suite Entry Field | Entry Field | Suite Entry Field | Entry Field For Suite |
| City Text | Text | City Text | Text for “City” |
| City Entry Field | Entry Field | City Entry Field | Entry Field For City |
| State Text | Text | State Text | Text for “State” |
| State Entry Field | List | State Entry | List for States - with default CA |
| Field | |||
| Zip Code Text | Text | Zip Code Text | Text for “Zip Code” |
| Zip Code Entry | Entry Field | Zip Code Entry | Entry Field For Zip Code |
| Field | Field | ||
| Customer | Text | Customer | Text for “Customer Request Date” |
| Request Date | Request Date | ||
| Customer | Entry Field | Customer | Calendar |
| Request Date | Request Date | ||
| Ship Via | Text | Ship Via | Text for “Ship Via” |
| Radio Buttons | Radio button | Radio Buttons | Radio Buttons for Mail Room and Will Call - |
| selection for Ship | selection for | Default None | |
| Via | Ship Via | ||
| Special | Text | Special | Text for “Special Instructions” |
| Instruction Text | Instruction Text | ||
| Special | Text Area | Special | Text Area For Special Instructions |
| Instructions Entry | Instructions | ||
| Field | Entry Field | ||
| Confirm | Check Box | Confirm | Check Box for “Confirm Fulfillment by Email” |
| Fulfillment by | Fulfillment by | ||
| Save | Button | Save | Save the information to the repository |
| (HTML | |||
| Submit | |||
| button) | |||
| Cancel | Button | Cancel | Reset information as described in the |
| scenarios | |||
3.1.2.3. Front End Validations
| Element | ||
| Name | Action/Validation Details | Error Message Text |
| Save | Should function with enter key cursor positioned | Mandatory Entries: |
| on the “Save” button or on mouse click. | 1) Choose anyone item with Qty | |
| On saving the data the data gets saved to the | Error dialog Box - “item Quantity - | |
| permanent repository. And send an email to the | Atleast one entry is needed” with Close | |
| mailroom along with a confirmation page to the | Button | |
| user | 2) For Company Name | |
| Mandatory Entry | Error dialog Box “Company Name - | |
| 1) Choose any one item with Qty | Is required” with Close option and | |
| 2) CompanyName | on press of Close button leads to | |
| 3) Address | the Company name field | |
| 4) City | 3) For Address | |
| 5) Zip Code | Error Dialog Box “Address - Is | |
| 6) Agent/Employer Group ID | required.” with Close option and on | |
| 7) State | press of Close button leads to the | |
| 8) Suite | Address field | |
| 4) For City | ||
| Error Dialog Box “Please enter the | ||
| City” with Yes option and on press | ||
| of Yes button leads to the City field | ||
| 5) For Zip Code | ||
| Error Dialog Box “Zip - Is required.” | ||
| with Close option and on press of | ||
| Close button leads to the Zip code | ||
| field | ||
| 6) For Agent/Employer Group ID | ||
| Error Dialog Box “Agent/Employer | ||
| Group ID - Is required.” with Close | ||
| option and on press of Close button | ||
| leads to the Agent/employer Group | ||
| ID field. | ||
| 7) For State | ||
| Error Dialog Box “State - Is | ||
| required.” with Close option and on | ||
| press of Close button leads to the | ||
| State field. | ||
| 8) For Suite | ||
| Error Dialog Box “Suite - Is | ||
| required.” with Close option and on | ||
| press of Close button leads to the | ||
| Suite field | ||
| Cancel | All the data entered is reset with empty in the | |
| data entry fields as the case may be (Text Field, | ||
| List etc). | ||
3.1.2.4. Screen Flow
The user enters the information on the workgroup name and description.
The following are the scenarios the user may come across when operating on the screen
| Scenario | Description |
| Pre-Population | The ID/address fields must be prepopulated with the address details if the user |
| navigates to the supply request screen from Agent Master, Agency Master, | |
| Employer Group Master (Sales & Enrollment). | |
| Save | Pressing the save button leads to saving the data in the repository, sending an |
| email to mailroom and confirmation to the user who has checked the | |
| confirmation by email check box | |
| Email Content - Subject: Supply Request | |
| Dear Mail Room Staff, | |
| Please forward the following to the address mention below | |
| Items - Qty | |
| Comments | |
| Address | |
| Ship Via | |
| Thanks | |
| <ID of the person who has made the request> | |
| Close the browser | The browser window cannot be closed/user can't navigate to another page without |
| without saving/ | saving the data. The user is prompted with the option of either saving the data and |
| Navigating to | closing/leaving the window or not saving the data and closing/leaving the window. |
| another page | |
| without saving | |
| Close the browser/ | The browser window can be closed/user can leave once all the data is saved in the |
| leave the page | permanent repository. |
| after saving | |
| Cancel | All the data entered is reset with empty in the data entry fields as the case may be |
| (Text Field, List etc). | |
3.1.3. User Interface Id: External Supply Request Mail Room Confirmation
3.1.3.1. Screen Name: Supply Request Mail Room Confirmation (BPI_CAS_UTL_SCR—001—002) (See Figure N-3)
3.1.3.2. SID, Element Name, Element Type & Purpose
| Element | Element | ||
| Name | Type | Label | Purpose |
| Main Header | Text | Main Header | To give the heading for the screen being |
| “Supply | “Supply | navigated | |
| Request-Mail | Request-Mail | ||
| Room | Room | ||
| Confirmation” | Confirmation” | ||
| Message | Text | Message | Text For “The following are the pending Supply |
| Requests. On fulfilling the request, check the | |||
| row and press save to confirm” | |||
| Check All | Link | Check All | Checks all the check Boxes |
| Clear All | Link | Clear All | Clears All or any Checked Boxes |
| Save | HTML Button | Save | Save Button |
| Cancel | HTML Button | Cancel | Cancel Button |
3.1.3.3. Front End Validations
| Element | ||
| Name | Action/Validation Details | Error Message Text |
| Save | Must choose at least one check Box | Error Dialog Box - |
| “Please Check at least | ||
| one row” with yes option | ||
3.1.3.4. Screen Flow
The following are the scenarios the user may come across when operating on the screen
| Scenario | Description |
| On Entering the | Provides a list of all pending requests |
| screen | |
| Check All | Checks all the check Boxes |
| Clear All | Clears all the Check Boxes/Or any checked boxes |
| Save | Saves all the updates made and send email to the personnel who made the |
| request where the confirmation on fulfillment by Email check Box is | |
| checked. The user Email details are picked up from the security | |
| framework | |
| Email: | |
| Subject: Supply Request Fulfillment” | |
| Dear “Name” | |
| We have fulfilled your request <Supply Request id> on “date of saving the | |
| fulfillment request” | |
| Thanks | |
| Mailroom | |
| Cancel | Resets the screen with original values before a save |
3.1.4. User Interface Id: Supply Request Confirmation
3.1.4.1. Screen Name: Supply Request Confirmation (BPI_CAS_UTL_SCR—001—003)
3.1.4.2. SID, Element Name, Element Type & Purpose
| Element | Element | ||
| Name | Type | Label | Purpose |
| Main Header | Text | Main Header | To give the heading for the screen being |
| “Supply Request | “Supply | navigated | |
| Confirmation” | Request | ||
| Confirmation” | |||
| Message | Text | Message | Text For “The Supply Request has been |
| forwarded to the mail room” | |||
| Message | Text | Message | Text For “The Reference confirmation number is” |
| Dynamic Text | Text | Dynamic Text | Dynamic Value Text for “<Supply Request ID>” |
| Do you want to | Text | Do you want | Text for “Do you want to create more requests?” |
| create more | to create | ||
| requests? | more | ||
| requests? | |||
| Yes | Link | Yes | Link for “Yes” |
| No | Link | No | Link for “No” |
3.1.4.3. Front End Validations
None.
3.1.4.4. Screen Flow
The following are the scenarios the user may come across when operating on the screen
| Scenario | Description | |
| Yes | Leads to the Supply Request Screen | |
| No | Leads to the Supply Request Home Page | |
4. Business Rule Mapping
| Activity | Rules |
| Create Supply | Should have unique Id for a Supply Request - 10 |
| Request ID | digits with an increment of 1, Say EX00000001, |
| EX00000002, EX00000003 and so on. | |
| Change Record |
| Date | Author | Version | Change Reference |
| Dec. 03, 2001 | Mahalingam Ramamoorthi | 1.0 | |
| Reviewers |
| Name | Position | |
| Distribution |
| No Of | ||||
| Copy No. | Name | Copies | Location | |
1. Introduction 4
1.1. Purpose 4
1.2. Business Use Case Specificaiton Reference 4
1.3. Definitions, Acronyms & Abbreviations 4
2. Process Identification 5
2.1. Background 5
2.2. Process Description 5
2.3. Process Flow 5
3. User Interface 6
3.1. User Interface Screens 6
3.1.1. Screen ID 6
4. Business Rule Mapping 7
1. Introduction
1.1. Purpose
This functional specification document addresses the part of the sales and marketing system that would facilitate the creation of workgroups.
1.2. Business Use Case Specification Reference
| Business Use Specification ID | Business Use Case Name | |
| None | None | |
1.3. Definitions, Acronyms & Abbreviations
| Term | Explanation | |
2. Process Identification
2.1. Process Description
Workgroups define the broad categorization of a group of agents, internal working personnel of BPI, external working personnel associated with BPI and Mailing groups.
The process shall include creating
1) Categories
Categories define the segment a workgroup can fall under. For eg—Agents, Employees, HR etc.
2) Define Parent and Assign to a Category
A Parent is the highest in the hierarchy of a work group. Typical examples include Agent Work groups, Internal work groups. A parent is assigned to a category
3) Define Main Work Group and Assign to a Parent
A work group defines the various groups that come under a parent—Examples include—Agents by ranking etc. A work group can also be a child workgroup. A workgroup is assigned to a Parent
4) Define Child Workgroup and Assign to a Main Work Group
Child groups is a set of groups under a workgroup and typically examples include—agents in San Diego Area Etc
5) Define Mail Members—Create, Modify, View, Delete
Mail Members are the components of a child work group for a category Mail and are assigned to the child workgroups
The work groups are designed in such a way that members can be swapped in full or in partial or duplicated from one work group to another.
2.2. Process Flow (See Figure N-4)
3. User Interface
3.1. User Interface Screens
3.1.1. Screen ID's
| Corresponding | ||
| HTML File | ||
| Screen ID (SID) | Screen Name | Name |
| utl.workgroup.category | Category | Category.jsp |
| utl.workgroup.maingroup | Main Workgroup | MainGroup.jsp |
| utl.workgroup.childgroup | Child Workgroup | ChildGroup.jsp |
| utl.workgroup.mailmember | Mail Members | MailMember.jsp |
| utl.workgroup.swapmembers | Swap Members | SwapMembers.jsp |
3.1.2. User Interface Id: Category
3.1.2.1. Screen Name: Category (BPI_CAS_UTL_SCR—002—001)
3.1.2.2. SID, Element Name, Element Type & Purpose
| Element | Element | ||
| Name | Type | Label | Purpose |
| Main Header | Text | Main Header | To give the heading for the screen being |
| “Category” | “Category” | navigated | |
| Name | Text | Name | Text For “Name” |
| Name Entry | Entry Field | Name Entry | Entry field for entering the name |
| Field | Field | ||
| Description | Text | Description | Text for “Description” |
| Description | Entry Field | Description | Entry field for entering the description |
| Entry Field | Entry Field | ||
| Add | HTML Button | Add | Button for adding the name/description in to the |
| HTML table. Changes with label “Modify” when | |||
| the row in the table is on edit mode. | |||
| Table | HTML table | Table | For displaying all the information added by |
| pressing the add button, in the form of rows, for | |||
| every add operation/Rows retrieved from the | |||
| permanent repository | |||
| Delete | Button (HTML | Delete | To delete the rows checked |
| Button) | |||
| Check All | Text Link | Check All | To check all the check boxes in the table |
| Clear All | Text Link | Clear All | To uncheck all the check boxes checked in the |
| table/does not function when all the | |||
| checkboxes in the table are unchecked | |||
| Delete | Check box | Delete | To check the items for deletion |
| Edit | Button (HTML | Edit | To edit the rows entered by “Add”/ |
| Button) | “Modify”/displayed from permanent repository | ||
| against the row selected for edition | |||
| Save | Button (HTML | Save | Save the information to the repository |
| Submit | |||
| button) | |||
| Cancel | Button | Cancel | Reset information as described in the scenarios |
3.1.2.3. Front End Validations
| Element | ||
| Name | Action/Validation Details | Error Message Text |
| Name | Mandatory Entry | When the Add HTML Button is |
| Entry Field | Becomes non editable when on modify mode for | pressed with an empty entry on |
| data from permanent repository | the name entry field, an Error | |
| Dialog Box pops up with the | ||
| message “Please enter the name | ||
| before adding to the table” with | ||
| “yes” option | ||
| On press of Yes Button, The | ||
| cursor must be placed on the | ||
| name entry field | ||
| Add | On Clicking add button or the pressing the enter | When the Add HTML Button is |
| key field with the cursor position on the Add | pressed with an empty entry on | |
| button, The data gets added to the table. | the name entry field, an Error | |
| Validation checks are done to not allow null value | Dialog Box pops up with the | |
| on the name entry field. | message “Please enter the name | |
| Must not allow duplicate entries on the name | before adding to the table” with | |
| Must not allow the length of the field entry to go | “yes” option. | |
| beyond as per the database design for the | On press of Yes Button, The | |
| column | cursor must be placed on the | |
| name entry field | ||
| For duplicate entries, Error dialog | ||
| box - “Duplicate values not | ||
| allowed. Please enter again” | ||
| Modify | On Clicking the modify button or pressing the | None |
| enter key field with the cursor positioned on the | ||
| modify button, the data gets added to the table. | ||
| Table | Should have column header and each | |
| subsequent row should be identified by alternate | ||
| color combinations. i.e. First row should have | ||
| color ‘x’ and the next row should have color ‘y’. | ||
| The next row should have color ‘x’ again and so | ||
| on. The size of any text inside any cell should be | ||
| wrapped if the text becomes too long. | ||
| The letters must be green in color for the rows | ||
| retrieved from the permanent repository and red | ||
| for the rows in temporary storage. | ||
| All the letters of the row on edit must be in dark | ||
| gray. | ||
| Delete | Should function with enter key cursor positioned | Error Dialog Box: “Please choose |
| on the “Delete” button or on mouse click | the row or rows to be deleted.” | |
| Delete button should work on multiple deletes | with “yes” option | |
| based on the check box or boxes selected. If the | ||
| user clicks on the delete button without checking | ||
| any of the check box should throw error | ||
| message. | ||
| Success: Deletes the row or rows from the table | ||
| (temporary storage) | ||
| Check All | On clicking the “Check All” link should check all | Not Applicable |
| the check boxes in the HTML table. | ||
| Clear All | On clicking the “Clear All” link should uncheck all | Not Applicable |
| the checked check boxes in the HTML table. | ||
| Edit | Should function with Enter Key Cursor positioned | |
| on the “Edit” button or on mouse click. | ||
| Refer Interface flow on scenarios - “edit data” | ||
| Save | Should function with enter key cursor positioned | Not Applicable |
| on the “Save” button or on mouse click. | ||
| On saving the data the data gets saved to the | ||
| permanent repository. | ||
| Cancel | All the data entered is reset with empty/initial | Not Applicable |
| values in the data entry fields as the case may be | ||
| (Text Field, List etc). | ||
| If a row is already modified and added to the | ||
| table on the screen and the Cancel button is | ||
| pressed, the row remains with the modified | ||
| values | ||
| Browser | When a user tries to close the window with out | Error Dialog box message: “Do |
| Window | saving data into the permanent repository, a | you want to save all changes |
| dialog box pops up | before closing/leaving the | |
| window?” with a “Yes” and “No” | ||
| option. | ||
| On press of “Yes” leads to saving | ||
| of information and “No” leads to | ||
| the Category screen with the | ||
| original values | ||
3.1.2.4. Screen Flow
The user enters the information on the Category name and description.
The following are the scenarios the user may come across when operating on the screen
| Scenario | Description |
| Add data entered | Adding the data entered (pressing the “Add” Button) leads to adding name |
| and description to a temporary storage. The data gets loaded into the | |
| permanent repository only after the user saves the information. | |
| Modify data entered | When a row is selected for an edit operation, the row is highlighted and data |
| elements populated into respective fields and the add button has a label | |
| “modify”. Modifying the data entered (pressing the “Modify” button) leads to | |
| adding the non-editable name information and modified “description” to a | |
| temporary storage. The data gets loaded into the permanent repository only | |
| after the user saves the information. | |
| Edit data | Editing the Data (pressing the “Edit” Button). |
| The edit operation may be on any of the two scenarios. | |
| 1. (Edit for rows from database) When the user comes to the | |
| Category screen and the screen is already loaded with data from | |
| the permanent repository into a table on the screen. | |
| 2. (Edit for rows from the temporary storage) When the user has just | |
| added the data into a table on the screen and wants to edit the | |
| data entered before saving | |
| The data in the table on the screen would be shown as green letters for the | |
| data from the database and red letters for the data that is in the temporary | |
| storage (not saved yet). | |
| The table shall have alternate rows colored with different light colors | |
| Under 1, on an edit operation for a row on the table, the row does not get | |
| deleted from the table and the data is transferred to the name (becomes non | |
| editable) and editable description. | |
| Under 2, on an edit operation for a row on the table, the row gets deleted from | |
| the table and the data is transferred to the name and description, which are | |
| editable. | |
| When a row is on edit mode, the letters are in dark gray color in the table. | |
| Delete Checked | The data in the table on the screen contains the data, which is from the |
| Rows | permanent repository, or the data just added and is in temporary storage. |
| When the rows are “checked” for the rows that contain the data from the | |
| repository and a “Delete Checked Rows” is performed, inactivation takes | |
| place on saving the information provided there are no subtypes else provides | |
| the user with the necessary error information in an error page. Message “The | |
| following Category has associated parents” - “parent 1 . . . parent n” | |
| When the rows are “checked” for the rows that contain the data from the | |
| temporary storage and a “Delete Checked Rows” is performed, the rows are | |
| deleted from the temporary storage. | |
| Check All | Enables checking of all the checkboxes by checking “check All” Check Box |
| Check All & Delete | Enables deleting all the rows from the table on the screen enabled by “check |
| Checked Rows | All” |
| Check Any Number | Enables deleting the rows from the table on the screen that are only checked. |
| & Delete Checked | |
| Rows | |
| Check All & Clear | Enables clearing (removing the check) all checked rows done by “Check All” |
| All | |
| Check Any Number | Enables clearing (removing the check) the rows that are checked. |
| & Clear All | |
| Clear All when no | The user can only press the button and nothing happens like checking, |
| rows are checked | removing a check |
| Save | All the data added or modified and added into/deleted from the rows in the |
| table are saved into the permanent repository | |
| Once saving is done, return back to the Category screen with all the fresh | |
| updates | |
| Cancel | All the data entered is reset with empty/initial values in the data entry fields as |
| the case may be (Text Field, List etc). | |
| If a row (which is retrieved from the database) is already modified and added | |
| to the table on the screen and the “Cancel” button is pressed, the row | |
| remains with the modified values. | |
3.1.3. User Interface Id: Main Work Group
3.1.3.1. Screen Name: Main Work Group (BPI_CAS_UTL_SCR—002—002) (See Figure N-5)
3.1.3.2. SID, Element Name, Element Type & Purpose
| Element | Element | ||
| Name | Type | Label | Purpose |
| Main Header | Text | Main Header | To give the heading for the screen being navigated |
| “Main | “Main | ||
| Workgroup” | Workgroup” | ||
| Name | Text | Name | Text For “Name” |
| Name Entry | Entry Field | Name Entry | Entry field for entering the name |
| Field | Field | ||
| Description | Text | Description | Text for “Description” |
| Description | Entry Field | Description | Entry field for entering the description |
| Entry Field | Entry Field | ||
| Parent | Text | Parent | Text for Parent |
| Parent Search | Search | Parent | Search window for all active parents |
| Search | |||
| Is it a child work | Text | Is it a child | Text for “Is it a child workgroup?’ |
| Group | work Group | ||
| Is it a child work | Checkbox | Is it a child | Check Box - Default “No” |
| Group | work Group | ||
| Add | HTML Button | Add | Button for adding the name/description into the |
| HTML table. Changes with label “Modify” when the | |||
| row in the table is on edit mode. | |||
| Table | HTML table | Table | For displaying all the information added by |
| pressing the add button, in the form of rows, for | |||
| every add operation/Rows retrieved from the | |||
| permanent repository | |||
| Delete | Button (HTML | Delete | To delete the rows checked |
| Button) | |||
| Check All | Text Link | Check All | To check all the check boxes in the table |
| Clear All | Text Link | Clear All | To un check all the check boxes checked in the |
| table/does not function when all the checkboxes in | |||
| the table are unchecked | |||
| Delete | Check box | Delete | To check the items for deletion |
| Edit | Button (HTML | Edit | To edit the rows entered by “Add”/ |
| Button) | “Modify”/displayed from permanent repository | ||
| against the row selected for edition | |||
| Save | Button (HTML | Save | Save the information to the repository |
| Submit | |||
| button) | |||
| Cancel | Button | Cancel | Reset information as described in the scenarios |
3.1.3.3. Front End Validations
| Element | ||
| Name | Action/Validation Details | Error Message Text |
| Name | Mandatory Entry | When the Add HTML Button is |
| Entry Field | Becomes non editable when on modify mode for | pressed with an empty entry on |
| data from permanent repository | the name entry field, an Error | |
| Dialog Box pops up with the | ||
| message “Please enter the name | ||
| before adding to the table” with | ||
| “yes” option | ||
| On press of Yes Button, The | ||
| cursor must be placed on the | ||
| name entry field | ||
| Add | On Clicking add button or the pressing the enter | When the Add HTML Button is |
| key field with the cursor position on the Add | pressed with an empty entry on | |
| button, The data gets added to the table. | the name entry field, an Error | |
| Validation checks are done to not allow null value | Dialog Box pops up with the | |
| on the name entry field. | message “Please enter the name | |
| Must not allow duplicate entries on the name | before adding to the table” with | |
| Must not allow the length of the field entry to go | “yes” option. | |
| beyond as per the database design for the | On press of Yes Button, The | |
| column | cursor must be placed on the | |
| Must choose a Parent | name entry field | |
| For duplicate entries, Error dialog | ||
| box - “Duplicate values not | ||
| allowed. Please enter again” | ||
| For category, Error dialog Box “ | ||
| Please choose a Parent” with a | ||
| Yes Option | ||
| Modify | On Clicking modify button or the pressing the | None |
| enter key field with the cursor position on the | ||
| modify button, The data gets added to the table. | ||
| Table | Should have column header and each | |
| subsequent row should be identified by alternate | ||
| color combinations. i.e. First row should have | ||
| color ‘x’ and the next row should have color ‘y’. | ||
| The next row should have color ‘x’ again and so | ||
| on. The size of any text inside any cell should be | ||
| wrapped if the text becomes too long. | ||
| The letters must be green in color for the rows | ||
| retrieved from the permanent repository and red | ||
| for the rows in temporary storage. | ||
| All the letters of the row on edit must be in dark | ||
| gray. | ||
| Delete | Should function with enter key cursor positioned | Error Dialog Box: “Please choose |
| on the “Delete” button or on mouse click | the row or rows to be deleted.” | |
| Delete button should work on multiple deletes | with “yes” option | |
| based on the check box or boxes selected. If the | ||
| user clicks on the delete button without checking | ||
| any of the check box should throw error | ||
| message. | ||
| Success: Deletes the row or rows from the table | ||
| (temporary storage) | ||
| Check All | On clicking the “Check All” link should check all | Not Applicable |
| the check boxes in the HTML table. | ||
| Clear All | On clicking the “Clear All” link should uncheck all | Not Applicable |
| the checked check boxes in the HTML table. | ||
| Edit | Should function with Enter Key Cursor positioned | |
| on the “Edit” button or on mouse click. | ||
| Refer Interface flow on scenarios - “edit data” | ||
| Save | Should function with enter key cursor positioned | Not Applicable |
| on the “Save” button or on mouse click. | ||
| On saving the data the data gets saved to the | ||
| permanent repository. | ||
| Cancel | All the data entered is reset with empty/initial | Not Applicable |
| values in the data entry fields as the case may be | ||
| (Text Field, List etc). | ||
| If a row is already modified and added to the | ||
| table on the screen and the Cancel button is | ||
| pressed, the row remains with the modified | ||
| values | ||
| Browser | When a user tries to close the window with out | Error Dialog box message: “Do |
| Window | saving data into the permanent repository, a | you want to save all changes |
| dialog box pops up | before closing/leaving the | |
| window?” with a “Yes” and “No” | ||
| option. | ||
| On press of “Yes” leads to saving | ||
| of information and “No” leads to | ||
| the Parent screen with the original | ||
| values | ||
3.1.3.4. Screen Flow
The user enters the information on the Main work Group name and description and assigns to a parent.
The following are the scenarios the user may come across when operating on the screen
| Scenario | Description |
| Add data entered | Adding the data entered (pressing the “Add” Button) leads to adding name |
| description, parent and child group option to a temporary storage. The data | |
| gets loaded into the permanent repository only after the user saves the | |
| information. | |
| Modify data entered | When a row is selected for an edit operation, the row is highlighted and data |
| elements populated into respective fields and the add button has a label | |
| “modify”. Modifying the data entered (pressing the “Modify” button) leads to | |
| adding the non-editable name information, modified “description”/parent to a | |
| temporary storage and child group option. The data gets loaded into the | |
| permanent repository only after the user saves the information. Once the | |
| main subgroup has been defined as a child work group, the editable data will | |
| be shown in the child work group screen | |
| Edit data | Editing the Data (pressing the “Edit” Button). |
| The edit operation may be on any of the two scenarios. | |
| 1 (Edit for rows from database) When the user comes to the Main | |
| workgroups screen and the screen is already loaded with data from | |
| the permanent repository into a table on the screen. | |
| 2. (Edit for rows from the temporary storage) When the user has just | |
| added the data into a table on the screen and wants to edit the data | |
| entered before saving | |
| The data in the table on the screen would be shown as green letters for the | |
| data from the database and red letters for the data that is in the temporary | |
| storage (not saved yet). | |
| The table shall have alternate rows colored with different light colors | |
| Under 1, on an edit operation for a row on the table, the row does not get | |
| deleted from the table and the data is transferred to the name (becomes non | |
| editable) and editable description/Parent | |
| Under 2, on an edit operation for a row on the table, the row gets deleted from | |
| the table and the data is transferred to the name, description/parent (default), | |
| which are editable. | |
| When a row is on edit mode, the letters are in dark gray color in the table. | |
| Search | The search window must generate a list of all active Parents. The user will not |
| be allowed to make entries into the entry field where the search results are | |
| going to be put in. | |
| Delete Checked | The data in the table on the screen contains the data, which is from the |
| Rows | permanent repository, or the data just added and is in temporary storage. |
| When the rows are “checked” for the rows that contain the data from the | |
| repository and a “Delete Checked Rows” is performed, inactivation takes | |
| place on saving the information provided there are no subtypes else provides | |
| the user with the necessary error information in an error page. Message “The | |
| following Main workgroup has associated child workgroups” - “child | |
| workgroup1 . . . child workgroup n” | |
| When the rows are “checked” for the rows that contain the data from the | |
| temporary storage and a “Delete Checked Rows” is performed, the rows are | |
| deleted from the temporary storage. | |
| Check All | Enables checking of all the checkboxes by checking “check All” Check Box |
| Check All & Delete | Enables deleting all the rows from the table on the screen enabled by “check |
| Checked Rows | All” |
| Check Any Number | Enables deleting the rows from the table on the screen that are only checked. |
| & Delete Checked | |
| Rows | |
| Check All & Clear | Enables clearing (removing the check) all checked rows done by “Check All” |
| All | |
| Check Any Number | Enables clearing (removing the check) the rows that are checked. |
| & Clear All | |
| Clear All when no | The user can only press the button and nothing happens like checking, |
| rows are checked | removing a check |
| When “Is it a child | When the checking is done and the saving of information takes place the |
| workgroup” is | Main workgroups also becomes a child workgroup |
| checked | |
| Save | All the data added or modified and added into/deleted from the rows in the |
| table are saved into the permanent repository. The main groups gets saved | |
| as child workgroup if the check box is selected for “is it a child workgroup?” | |
| Once saving is done, return back to the main workgroup screen with all the | |
| fresh updates | |
| Cancel | All the data entered is reset with empty/initial values in the data entry fields as |
| the case may be (Text Field, List etc). | |
| If a row (which is retrieved from the database) is already modified and added | |
| to the table on the screen and the “Cancel” button is pressed, the row | |
| remains with the modified values. | |
3.1.4. User Interface Id: Child Work Group
3.1.4.1. Screen Name: Child Work Group (BPI_CAS_UTL_SCR—002—003) (See Figure N-6)
3.1.4.2. SID, Element Name, Element Type & Purpose
| Element | Element | ||
| Name | Type | Label | Purpose |
| Main Header | Text | Main Header | To give the heading for the screen being |
| “Child | “Child | navigated | |
| Workgroup” | Workgroup” | ||
| Name | Text | Name | Text For “Name” |
| Name Entry | Entry Field | Name Entry | Entry field for entering the name |
| Field | Field | ||
| Description | Text | Description | Text for “Description” |
| Description | Entry Field | Description | Entry field for entering the description |
| Entry Field | Entry Field | ||
| Main Work | Text | Main Work | Text for Main Work Group |
| Group | Group | ||
| Main Work | Search | Main Work | Search Window with all active Main Work group |
| Group Search | Group Search | ||
| Add | HTML Button | Add | Button for adding the name/description into the |
| HTML table. Changes with label “Modify” when | |||
| the row in the table is on edit mode. | |||
| Table | HTML table | Table | For displaying all the information added by |
| pressing the add button, in the form of rows, for | |||
| every add operation/Rows retrieved from the | |||
| permanent repository | |||
| Delete | Button (HTML | Delete | To delete the rows checked |
| Button) | |||
| Check All | Text Link | Check All | To check all the check boxes in the table |
| Clear All | Text Link | Clear All | To un check all the check boxes checked in the |
| table/does not function when all the | |||
| checkboxes in the table are unchecked | |||
| Delete | Check box | Delete | To check the items for deletion |
| Edit | Button (HTML | Edit | To edit the rows entered by “Add”/ |
| Button) | “Modify”/displayed from permanent repository | ||
| against the row selected for editing | |||
| Save | Button (HTML | Save | Save the information to the repository |
| Submit | |||
| button) | |||
| Cancel | Button | Cancel | Reset information as described in the scenarios |
3.1.4.3. Front End Validations
| Element | ||
| Name | Action/Validation Details | Error Message Text |
| Name | Mandatory Entry | When the Add HTML Button is |
| Entry Field | Becomes non editable when on modify mode for | pressed with an empty entry on |
| data from permanent repository | the name entry field, an Error | |
| Dialog Box pops up with the | ||
| message “Please enter the name | ||
| before adding to the table” with | ||
| “yes” option | ||
| On press of Yes Button, The | ||
| cursor must be placed on the | ||
| name entry field | ||
| Add | On Clicking add button or the pressing the enter | When the Add HTML Button is |
| key field with the cursor position on the Add | pressed with an empty entry on | |
| button, The data gets added to the table. | the name entry field, an Error | |
| Validation checks are done to not allow null value | Dialog Box pops up with the | |
| on the name entry field. | message “Please enter the name | |
| Must not allow duplicate entries on the name | before adding to the table” with | |
| Must not allow the length of the field entry to go | “yes” option. | |
| beyond as per the database design for the | On press of Yes Button, The | |
| column | cursor must be placed on the | |
| Must choose a Main work group | name entry field | |
| For duplicate entries, Error dialog | ||
| box - “Duplicate values not | ||
| allowed. Please enter again” | ||
| For category, Error dialog Box | ||
| “Please choose a Main Work | ||
| Group” with a Yes Option | ||
| Modify | On Clicking modify button or the pressing the | None |
| enter key field with the cursor position on the | ||
| modify button, The data gets added to the table. | ||
| Table | Should have column header and each | |
| subsequent row should be identified by alternate | ||
| color combinations. i.e. First row should have | ||
| color ‘x’ and the next row should have color ‘y’. | ||
| The next row should have color ‘x’ again and so | ||
| on. The size of any text inside any cell should be | ||
| wrapped if the text becomes too long. | ||
| The letters must be green in color for the rows | ||
| retrieved from the permanent repository and red | ||
| for the rows in temporary storage. | ||
| All the letters of the row on edit must be in dark | ||
| gray. | ||
| Delete | Should function with enter key cursor positioned | Error Dialog Box: “Please choose |
| on the “Delete” button or on mouse click | the row or rows to be deleted.” | |
| Delete button should work on multiple deletes | with “yes” option | |
| based on the check box or boxes selected. If the | ||
| user clicks on the delete button without checking | ||
| any of the check box should throw error | ||
| message. | ||
| Success: Deletes the row or rows from the table | ||
| (temporary storage) | ||
| Check All | On clicking the “Check All” link should check all | Not Applicable |
| the check boxes in the HTML table. | ||
| Clear All | On clicking the “Clear All” link should uncheck all | Not Applicable |
| the checked check boxes in the HTML table. | ||
| Edit | Should function with Enter Key Cursor positioned | |
| on the “Edit” button or on mouse click. | ||
| Refer Interface flow on scenarios - “edit data” | ||
| Save | Should function with enter key cursor positioned | Not Applicable |
| on the “Save” button or on mouse click? | ||
| On saving the data the data gets saved to the | ||
| permanent repository. | ||
| Cancel | All the data entered is reset with empty/initial | Not Applicable |
| values in the data entry fields as the case may be | ||
| (Text Field, List etc). | ||
| If a row is already modified and added to the | ||
| table on the screen and the Cancel button is | ||
| pressed, the row remains with the modified | ||
| values | ||
| Browser | When a user tries to close the window with out | Error Dialog box message: “Do |
| Window | saving data into the permanent repository, a | you want to save all changes |
| dialog box pops up | before closing/leaving the | |
| window?” with a “Yes” and “No” | ||
| option. | ||
| On press of “Yes” leads to saving | ||
| of information and “No” leads to | ||
| the Parent screen with the original | ||
| values | ||
3.1.4.4. Screen Flow
The user enters the information on the Child work Group name and description and assigns to a Main work group.
The following are the scenarios the user may come across when operating on the screen
| Scenario | Description |
| Add data entered | Adding the data entered (pressing the “Add” Button) leads to adding name, |
| description and Main Workgroup to a temporary storage. The data gets | |
| loaded into the permanent repository only after the user saves the | |
| information. | |
| Modify data entered | When a row is selected for an edit operation, the row is highlighted and data |
| elements populated into respective fields and the add button has a label | |
| “modify”. Modifying the data entered (pressing the “Modify” button) leads to | |
| adding the non-editable name information, modified “description”, main | |
| workgroup to a temporary storage. The data gets loaded into the permanent | |
| repository only after the user saves the information. | |
| Edit data | Editing the Data (pressing the “Edit” Button). |
| The edit operation may be on any of the two scenarios. | |
| 1 (Edit for rows from database) When the user comes to the Child | |
| workgroups screen and the screen is already loaded with data from | |
| the permanent repository into a table on the screen. | |
| 2. (Edit for rows from the temporary storage) When the user has just | |
| added the data into a table on the screen and wants to edit the data | |
| entered before saving | |
| The data in the table on the screen would be shown as green letters for the | |
| data from the database and red letters for the data that is in the temporary | |
| storage (not saved yet). | |
| The table shall have alternate rows colored with different light colors | |
| Under 1, on an edit operation for a row on the table, the row does not get | |
| deleted from the table and the data is transferred to the name (becomes non | |
| editable) and editable description/Main Work group | |
| Under 2, on an edit operation for a row on the table, the row gets deleted from | |
| the table and the data is transferred to the name, description/Main work | |
| group(default), which are editable. | |
| When a row is on edit mode, the letters are in dark gray color in the table. | |
| Search | The search window must generate a list of all active Main Work Groups. The |
| user will not be allowed to make entries into the entry field where the search | |
| results are going to be put in. | |
| Delete Checked | The data in the table on the screen contains the data, which is from the |
| Rows | permanent repository, or the data just added and is in temporary storage. |
| When the rows are “checked” for the rows that contain the data from the | |
| repository and a “Delete Checked Rows” is performed, inactivation takes | |
| place on saving the information provided there are no subtypes else provides | |
| the user with the necessary error information in an error page. Message “The | |
| following Child workgroup has associated members” - “Member1 . . . Member | |
| n” members could be employer groups, Agent/Agency, Mail work groups or | |
| Associates | |
| When the rows are “checked” for the rows that contain the data from the | |
| temporary storage and a “Delete Checked Rows” is performed, the rows are | |
| deleted from the temporary storage. | |
| Check All | Enables checking of all the checkboxes by checking “check All” Check Box |
| Check All & Delete | Enables deleting all the rows from the table on the screen enabled by “check |
| Checked Rows | All” |
| Check Any Number | Enables deleting the rows from the table on the screen that are only checked. |
| & Delete Checked | |
| Rows | |
| Check All & Clear | Enables clearing (removing the check) all checked rows done by “Check All” |
| All | |
| Check Any Number | Enables clearing (removing the check) the rows that are checked. |
| & Clear All | |
| Clear All when no | The user can only press the button and nothing happens like checking, |
| rows are checked | removing a check |
| Save | All the data added or modified and added into/deleted from the rows in the |
| table are saved into the permanent repository | |
| Once saving is done, return back to the Child workgroup screen with all the | |
| fresh updates | |
| Cancel | All the data entered is reset with empty/initial values in the data entry fields as |
| the case may be (Text Field, List etc). | |
| If a row (which is retrieved from the database) is already modified and added | |
| to the table on the screen and the “Cancel” button is pressed, the row | |
| remains with the modified values. | |
3.1.5. User Interface Id: Mail Members
3.1.5.1. Screen Name: Mail Members (BPI_CAS_UTL_SCR—002—004) (See Figure N-7)
3.1.5.2. SID, Element Name, Element Type & Purpose
| Element | Element | ||
| Name | Type | Label | Purpose |
| Main Header | Text | Main Header | To give the heading for the screen being |
| “Mail Members” | navigated | ||
| Members” | |||
| Mail ID | Text | Mail ID | Text For “Mail ID” |
| Mail ID Entry | Entry Field | Mail ID Entry | Entry field for entering the Mail ID |
| Field | Field | ||
| Child | Text | Child | Text for “Child Workgroup” |
| Workgroup | Workgroup | ||
| Child | Search | Child | Search window with all active Child Work |
| Workgroup | Workgroup | Groups under the category Mail | |
| Search | Search | ||
| Add | HTML Button | Add | Button for adding the name/description in to the |
| HTML table. Changes with label “Modify” when | |||
| the row in the table is on edit mode. | |||
| Table | HTML table | Table | For displaying all the information added by |
| pressing the add button, in the form of rows, for | |||
| every add operation/Rows retrieved from the | |||
| permanent repository | |||
| Delete | Button (HTML | Delete | To delete the rows checked |
| Button) | |||
| Check All | Text Link | Check All | To check all the check boxes in the table |
| Clear All | Text Link | Clear All | To un check all the check boxes checked in the |
| table/does not function when all the | |||
| checkboxes in the table are unchecked | |||
| Delete | Check box | Delete | To check the items for deletion |
| Edit | Button (HTML | Edit | To edit the rows entered by “Add”/ |
| Button) | “Modify”/displayed from permanent repository | ||
| against the row selected for edition | |||
| Save | Button (HTML | Save | Save the information to the repository |
| Submit | |||
| button) | |||
| Cancel | Button | Cancel | Reset information as described in the scenarios |
3.1.5.3. Front End Validations
| Element | ||
| Name | Action/Validation Details | Error Message Text |
| Mail ID | Mandatory Entry | When the Add HTML Button is |
| Entry Field | Must accept a valid mail id format | pressed with an empty entry on |
| the mail id entry field, an Error | ||
| Dialog Box pops up with the | ||
| message “Please enter the name | ||
| before adding to the table” with | ||
| “yes” option | ||
| On press of Yes Button, The | ||
| cursor must be placed on the | ||
| name entry field | ||
| When the Add HTML Button is | ||
| pressed with an invalid entry on | ||
| the mail id entry field, an Error | ||
| Dialog Box pops up with the | ||
| message “Please enter a valid | ||
| Mail ID” with “yes” option | ||
| On press of Yes Button, The | ||
| cursor must be placed on the | ||
| name entry field | ||
| Add | On Clicking add button or the pressing the enter | When the Add HTML Button is |
| key field with the cursor position on the Add | pressed with an empty entry on | |
| button, The data gets added to the table. | the name entry field, an Error | |
| Validation checks are done to not allow null value | Dialog Box pops up with the | |
| on the Mail ID entry field. | message “Please enter the Mail | |
| Must not allow duplicate entries on the name | ID before adding to the table” with | |
| Must not allow the length of the field entry to go | “yes” option. | |
| beyond as per the database design for the | On press of Yes Button, The | |
| column | cursor must be placed on the | |
| Must Choose a Child workgroup | name entry field | |
| For duplicate entries, Error dialog | ||
| box - “Duplicate values not | ||
| allowed. Please enter again” | ||
| For child workgroup, Error Dialog | ||
| Box “Please choose a Child | ||
| workgroup” | ||
| Modify | On Clicking modify button or the pressing the | None |
| enter key field with the cursor position on the | ||
| modify button, The data gets added to the table. | ||
| Table | Should have column header and each | |
| subsequent row should be identified by alternate | ||
| color combinations. i.e. First row should have | ||
| color ‘x’ and the next row should have color ‘y’. | ||
| The next row should have color ‘x’ again and so | ||
| on. The size of any text inside any cell should be | ||
| wrapped if the text becomes too long. | ||
| The letters must be green in color for the rows | ||
| retrieved from the permanent repository and red | ||
| for the rows in temporary storage. | ||
| All the letters of the row on edit must be in dark | ||
| gray. | ||
| Delete | Should function with enter key cursor positioned | Error Dialog Box: “Please choose |
| on the “Delete” button or on mouse click | the row or rows to be deleted.” | |
| Delete button should work on multiple deletes | with “yes” option | |
| based on the check box or boxes selected. If the | ||
| user clicks on the delete button without checking | ||
| any of the check box should throw error | ||
| message. | ||
| Success: Deletes the row or rows from the table | ||
| (temporary storage) | ||
| Check All | On clicking the “Check All” link should check all | Not Applicable |
| the check boxes in the HTML table. | ||
| Clear All | On clicking the “Clear All” link should uncheck all | Not Applicable |
| the checked check boxes in the HTML table. | ||
| Edit | Should function with Enter Key Cursor positioned | |
| on the “Edit” button or on mouse click. | ||
| Refer Interface flow on scenarios - “edit data” | ||
| Save | Should function with enter key cursor positioned | Not Applicable |
| on the “Save” button or on mouse click? | ||
| On saving the data the data gets saved to the | ||
| permanent repository. | ||
| Cancel | All the data entered is reset with empty/initial | Not Applicable |
| values in the data entry fields as the case may be | ||
| (Text Field, List etc). | ||
| If a row is already modified and added to the | ||
| table on the screen and the Cancel button is | ||
| pressed, the row remains with the modified | ||
| values | ||
| Browser | When a user tries to close the window with out | Error Dialog box message: “Do |
| Window | saving data into the permanent repository, a | you want to save all changes |
| dialog box pops up | before closing/leaving the | |
| window?” with a “Yes” and “No” | ||
| option. | ||
| On press of “Yes” leads to saving | ||
| of information and “No” leads to | ||
| the Category screen with the | ||
| original values | ||
3.1.5.4. Screen Flow
The user enters the information on the Mail ID and Child Workgroup
The following are the scenarios the user may come across when operating on the screen
| Scenario | Description |
| Add data entered | Adding the data entered |
| (pressing the “Add” Button) | |
| leads to adding mail id and Child | |
| Workgroup to a temporary | |
| storage. The data gets loaded | |
| into the permanent repository | |
| only after the user saves the | |
| information. | |
| Modify data entered | When a row is selected for an |
| edit operation, the row is | |
| highlighted and data elements | |
| populated into respective fields | |
| and the add button has a label | |
| “modify”. Modifying the data | |
| entered (pressing the “Modify” | |
| button) leads to adding modified | |
| information to a temporary | |
| storage. The data gets loaded | |
| into the permanent repository | |
| only after the user saves the | |
| information. | |
| Edit data | Editing the Data (pressing the |
| “Edit” Button). | |
| The edit operation may be on | |
| any of the two scenarios. | |
| 1(Edit for rows from | |
| database) When the | |
| user comes to the Mail | |
| Member screen and the | |
| screen is already loaded | |
| with data from the | |
| permanent repository | |
| into a table on the | |
| screen. | |
| 2(Edit for rows from the | |
| temporary storage) | |
| When the user has just | |
| added the data into a | |
| table on the screen and | |
| wants to edit the data | |
| entered before saving | |
| The data in the table on the | |
| screen would be shown as green | |
| letters for the data from the | |
| database and red letters for the | |
| data that is in the temporary | |
| storage (not saved yet). | |
| The table shall have alternate | |
| rows colored with different light | |
| colors | |
| Under 1, on an edit operation for | |
| a row on the table, the row does | |
| not get deleted from the table | |
| and the data is transferred to the | |
| mail id and Child Workgroup. | |
| Under 2, on an edit operation for | |
| a row on the table, the row gets | |
| deleted from the table and the | |
| data is transferred to the mail id | |
| and child workgroup, which are | |
| editable. | |
| When a row is on edit mode, the | |
| letters are in dark gray color in | |
| the table. | |
| The search window must generate a list of all active Child work groups for category Mail. The user will not be allowed to make entries into the entry field where the search results are going to be put in. | |
| Delete Checked Rows | The data in the table on the |
| screen contains the data, which | |
| is from the permanent repository, | |
| or the data just added and is in | |
| temporary storage. | |
| When the rows are “checked” for | |
| the rows that contain the data | |
| from the repository and a “Delete | |
| Checked Rows” is performed, | |
| inactivation takes place on | |
| saving the information | |
| When the rows are “checked” for | |
| the rows that contain the data | |
| from the temporary storage and | |
| a “Delete Checked Rows” is | |
| performed, the rows are deleted | |
| from the temporary storage. | |
| Check All | Enables checking of all the |
| checkboxes by checking “check | |
| All” Check Box | |
| Check All & Delete Checked Rows | Enables deleting all the rows |
| from the table on the screen | |
| enabled by “check All” | |
| Check Any Number & Delete Checked Rows | Enables deleting the rows from |
| the table on the screen that are | |
| only checked. | |
| Check All & Clear All | Enables clearing (removing the |
| check) all checked rows done by | |
| “Check All” | |
| Check Any Number & Clear All | Enables clearing (removing the |
| check) the rows that are | |
| checked. | |
| Clear All when no rows are checked | The user can only press the |
| button and nothing happens like | |
| checking, removing a check | |
| Save | All the data added or modified |
| and added into/deleted from the | |
| rows in the table are saved into | |
| the permanent repository | |
| Once saving is done, return back | |
| to the Mail Member screen with | |
| all the fresh updates | |
| Cancel | All the data entered is reset with |
| empty/initial values in the data | |
| entry fields as the case may be | |
| (Text Field, List etc). | |
| If a row (which is retrieved from | |
| the database) is already modified | |
| and added to the table on the | |
| screen and the “Cancel” button is | |
| pressed, the row remains with | |
| the modified values. | |
3.1.6. User Interface Id: Swap Members
3.1.6.1. Screen Name: Swap Members (BPI_CAS_UTL_SCR—002—005)
3.1.6.2. SID, Element Name, Element Type & Purpose
| Element Name | Element Type | Purpose |
| Main Header | Text | To give the heading for the screen being navigated |
| “Swap Members” | ||
| Choose Source | Text | Text For “Choose Source Child Workgroup” |
| Child Work Group | ||
| Choose Source | Search | Search window showing a list of all child work groups |
| Child Work Group | ||
| Choose | Text | Text for “Child Workgroup” |
| Destination Work | ||
| Group | ||
| Choose | List | Search window showing a list of all active child work groups |
| Destination Child | ||
| Work Group | ||
| Do you want to | Text | Text for “Do you want to do a full or partial or duplicate swap?” |
| do a full or partial | ||
| or duplicate | ||
| swap? | ||
| Partial/Full | Radio Buttons | Default - Partial |
| Table | HTML table | For displaying all the information of rows retrieved from the |
| permanent repository | ||
| Swap | Button (HTML | To swap the rows checked |
| Button) | ||
| Check All | Text Link | To check all the check boxes in the table |
| Clear All | Text Link | To un check all the check boxes checked in the table/does |
| not function when all the checkboxes in the table are | ||
| unchecked | ||
3.1.6.3. Front End Validations
| Element | Action/ | |
| Name | Validation Details | Error Message Text |
| Submit | The source and | Error Dialog “Source and Destination |
| destination child work | Child Groups cannot be the same” with | |
| group must not | a Yes Option | |
| be the same | Error Dialog “Source and Destination | |
| The source and | Child Groups must belong to the same | |
| destination groups | Main Workgroup” with yes option | |
| must belong to | Error Dialog “Child workgroups must | |
| the same Main | belong to the same category” | |
| Workgroup | ||
| The Child work groups | ||
| must belong to | ||
| the same category | ||
| Swap | As mentioned | As mentioned in scenario |
| in scenario | ||
3.1.6.4. Screen Flow
The user chooses the source and destination child workgroups and decided whether the swap is for full or partial members of the workgroup.
The following are the scenarios the user may come across when operating on the screen
| Scenario | Description |
| Submit | Press the submit button after choosing the valid values from the source and |
| destination child groups and whether the swap is in full or partial. | |
| Full swap leads to swapping of all the members of the source to the destination. | |
| Partial swap leads to the screen showing the list of all members of the source in | |
| alphabetical order and enables the user to check members who are to be swapped | |
| to the destination child group | |
| Duplicate swap leads to the screen showing the list of all members of the source in | |
| alphabetical order and enables the user to check members who are to be swapped | |
| to the destination child group and would also remain in the source child group | |
| (Duplicate) | |
| Inserts information of the swap into the database and navigates to the confirmation | |
| screen | |
| Yes/No | Yes leads to the swap members screen and No leads to the work Group Home |
| Page | |
4. Business Rule Mapping
| Activity | Rules |
| Create Category | Should have unique Id for a category - 10 digits |
| with an increment of 1, Say CT00000001, | |
| CT00000002, CT00000003 and so on. | |
| Create Main | Should have unique Id 10 digit for a main |
| Workgroup | workgroup with an increment of 1, Say |
| 1000, 1001, 1002 and so on. | |
| Create Child | Should have unique Id 4 digit for a child workgroup |
| Workgroup | with an increment of 1, Say 1000, 1001, 1002 and so |
| on. | |
| Create Mail | Should have unique Id 4 digit for a mail member |
| Members | with an increment of 1, Say 1000, 1001, 1002 and so |
| on. | |
| Create | Should have unique Id 4 digit for a parent with an |
| swap | increment of 1, Say 1000, 1001, 1002 and so on. |
| Change Record |
| Date | Author | Version | Change Reference |
| Jan. 13, 2002 | Mahalingam Ramamoorthi | 1.0 | |
| Reviewers |
| Name | Position | |
| Distribution |
| No Of | ||||
| Copy No. | Name | Copies | Location | |
1. Introduction 4
1.1. Purpose 4
1.2. Business Use Case Specification Reference 4
1.3. Definitions, Acronyms & Abbreviations 4
2. Process Identification 5
2.1. Process Description 5
2.2. Process Flow 5
3. User Interface 7
3.1. User Interface Screens 7
3.1.1. Screen ID's 7
3.1.2. User Interface Id: Supply Request-Interal 7
3.1.3. User Interface Id: Internal Supply Request Confirmation 9
3.1.4. User Interface Id: Supply Request Fulfillment Confirmation 10
4. Business Rule Mapping 13
1. Introduction
1.1. Purpose
This functional specification document addresses the part of the Core Administration System that would facilitate the sending of Supply Requests or any handbooks to employer groups or the members of a group.
1.2. Business Use Case Specification Reference
| Business Use Specification ID | Business Use Case Name | |
| None | None | |
1.3. Definitions, Acronyms & Abbreviations
| Term | Explanation | |
2. Process Identification
2.1. Process Description
A Supply Request—Internal contains a list of all stationeries ordered from individual associates for their daily use, which shall be facilitated and fulfilled by a specific department of a person.
2.2. Process Flow (See Figure N-8)
3. User Interface
3.1. User Interface Screens
3.1.1. Screen ID's
| Screen | Corresponding HTML File | |
| Screen ID (SID) | Name | Name |
| utl.supplyrequest. | Supply | InternalSupplyRequest.jsp |
| internal | Request | |
| Internal | ||
| utl.supplyrequestview. | Supply | InternalSupplyRequestView.jsp |
| internal | Request | |
| Internal | ||
| View | ||
| utl.supplyrequestresult. | Supply | InternalSupplyRequestResult.jsp |
| internal | Request | |
| Internal | ||
| utl.supplyconfirm. | Supply | InternalSupplyRequestMailConfirm. |
| internal | Request | jsp |
| Internal | ||
| Confir- | ||
| mation | ||
3.1.2. User Interface Id: Supply Request—Internal
3.1.2.1. Screen Name: Supply Request—Internal (BPI_CAS_UTL_SCR—003—001) (See Figure N-9)
3.1.2.2. SID, Element Name, Element Type & Purpose
| Element | Element | ||
| Name | Type | Label | Purpose |
| Main Header | Text | Main Header | To give the heading for the screen being |
| “Internal Supply | “Internal | navigated | |
| Request” | Supply | ||
| Request” | |||
| Text items as | Text | Text items as | To provide information as shown in the screen |
| shown in the | shown in the | along with Qty Text and in Boxes as shown in | |
| screen | screen | the screen snapshot | |
| Qty Entry Field | Entry Field | Qty Entry | Entry field for Quantity for all items |
| Field | |||
| Special | Text | Special | Text for “Special Instructions” |
| Instructions Text | Instructions | ||
| Text | |||
| Special | Text Area | Special | Text Area For Special Instructions |
| Instructions Text | Instructions | ||
| Area | Text Area | ||
| Confirm | Check Box | Confirm | Check Box for “Confirm Fulfillment by Email” |
| Fulfillment by | Fulfillment by | ||
| Save | Button (HTML | Save | Save the information to the repository |
| Submit | |||
| button) | |||
| Cancel | Button | Cancel | Reset information as described in the |
| scenarios | |||
3.1.2.3. Front End Validations
| Element | ||
| Name | Action/Validation Details | Error Message Text |
| Save | Should function with enter key cursor positioned | Mandatory Entries: |
| on the “Save” button or on mouse click. | 6) Choose anyone item with | |
| On saving the data the data gets saved to the | Qty | |
| permanent repository. And send an email to the | Error dialog Box - “Choose Any | |
| fulfillment staff along with a confirmation page to | one item with Quantity” with Yes | |
| the user | option | |
| Mandatory Entry | ||
| 1) Choose any one item with Qty | ||
| Cancel | All the data entered is reset with null values in the | Not Applicable |
| data entry fields as the case may be (Text Field, | ||
| List etc). | ||
3.1.2.4. Screen Flow
The following are the scenarios the user may come across when operating on the screen
| Scenario | Description |
| Save | Pressing the save button leads to saving the data in |
| the repository, sending an email to fulfillment Specialist | |
| and confirmation to the user who has checked the | |
| confirmation by email check box | |
| Email Content - Subject: Internal Supply Request | |
| Dear Staff, | |
| Please forward the following to the address mention below | |
| Items - Qty | |
| Special Instructions | |
| Thanks | |
| <ID of the person who has made the request> | |
| Cancel | All the data entered is reset with empty in the data |
| entry fields as the case may be (Text Field, List etc). | |
3.1.3. User Interface Id: Internal Supply Request Confirmation
3.1.3.1. Screen Name: Internal Supply Request Confirmation (BPI_CAS_UTL_SCR—003—002)
3.1.3.2. SID, Element Name, Element Type & Purpose
| Element | Element | ||
| Name | Type | Label | Purpose |
| Main Header | Text | Main Header | To give the heading for |
| “Supply Request - | “Supply | the screen being navigated | |
| Internal | Request - | ||
| Confirmation” | Internal | ||
| Confirmation” | |||
| Message | Text | Message | Text For “The Supply |
| Request has been forwarded | |||
| to the fulfillment specialist” | |||
| Message | Text | Message | Text For “The Reference |
| confirmation number | |||
| is” | |||
| Dynamic Text | Text | Dynamic Text | Dynamic Value Text |
| for“ <Supply Request | |||
| ID>” | |||
| Do you want to | Text | Do you want | Text for “Do you |
| create more | to create | want to create more | |
| requests? | more | requests?” | |
| requests? | |||
| Yes | Link | Yes | Link for “Yes” |
| No | Link | No | Link for “No” |
3.1.3.3. Front End Validations
None.
3.1.3.4. Screen Flow
The following are the scenarios the user may come across when operating on the screen
| Scenario | Description | |
| Yes | Leads to the Supply Request - Internal Screen | |
| No | Leads to the Supply Request - Internal Home Page | |
3.1.4. User Interface Id: Supply Request Fulfillment Confirmation
3.1.4.1. Screen Name: Supply Request Fulfillment Confirmation (BPI_CAS_UTL_SCR—003—003) (See Figure N-10)
3.1.4.2. SID, Element Name, Element Type & Purpose
| Element | Element | ||
| Name | Type | Label | Purpose |
| Main Header | Text | Main Header | To give the heading for |
| “Internal Supply | “Internal | the screen being navigated | |
| Request- | Supply | ||
| Fulfillment | Request- | ||
| Confirmation” | Fulfillment | ||
| Confirmation” | |||
| Message | Text | Message | Text For “The following |
| are the pending Supply | |||
| Requests. On | |||
| fulfilling the request, | |||
| check the row and | |||
| press save to confirm” | |||
| Check All | Link | Check All | Checks all the check Boxes |
| Clear All | Link | Clear All | Clears All or any Checked |
| Boxes | |||
| Save | HTML | Save | Save Button |
| Button | |||
| Cancel | HTML | Cancel | Cancel Button |
| Button | |||
3.1.4.3. Front End Validations
| Element | ||
| Name | Action/Validation Details | Error Message Text |
| Save | Must choose at least | Error Dialog Box - “Please Check |
| one check Box | at least one row” with yes option | |
3.1.4.4. Screen Flow
The following are the scenarios the user may come across when operating on the screen
| Scenario | Description |
| On Entering the | Provides a list of all pending requests |
| screen | |
| Check All | Checks all the check Boxes |
| Clear All | Clears all the Check Boxes/Or any checked boxes |
| Save | Saves all the updates made and send email to the |
| personnel who made the request where the | |
| confirmation on fulfillment by Email check Box is | |
| checked. | |
| The user Email details are picked up from the security | |
| framework | |
| Email: | |
| Subject: Internal Supply Request Fulfillment” | |
| Dear “Name” | |
| We have fulfilled your request <Supply Request id> | |
| on “date of saving the fulfillment request” | |
| Thanks | |
| Internal SuppliesFulfillment Staff | |
| Cancel | Resets the screen with original values before a save |
4. Business Rule Mapping
| Activity | Rules |
| Create Internal | Should have unique Id for a Supply Request - 10 |
| Supply Request ID | digits with an increment of 1, Say IN00000001, |
| IN00000002, IN00000003 and so on. | |
| Change Record |
| Date | Author | Version | Change Reference |
| 1/12/01 | Ramamoorthi Mahalingam | 1.0 | Initial Version |
| 15/05/02 | Riyaz Mohamed | 1.1 | Updated Version |
| Reviewers |
| Name | Position | |
| Distribution |
| No Of | ||||
| Copy No. | Name | Copies | Location | |
1. Introduction 4
1.1. Purpose 4
1.2. Business Use Case Specification Reference 4
1.3. Definitions, Acronyms & Abbreviations 4
2. Process Identification 5
2.1. Background 5
2.2. Process Description 5
2.3. Process Flow 5
3. User Interface 6
3.1. User Interface Screens 6
3.1.1. Screen ID 6
4. Business Rule Mapping 7
1. Introduction
1.1. Purpose
This functional specification document addresses the part of the sales and marketing system that would deal with creation of master records for internal and external associates.
1.2. Business Use Case Specification Reference
| Business Use Specification ID | Business Use Case Name | |
| None | None | |
1.3. Definitions, Acronyms & Abbreviations
| Term | Explanation | |
2. Process Identification
2.1. Process Description & Flow
The Internal associates are the associates who are employed by BPI and work with BPI. External associates are the associates who are associated with the Business and may not be employed by BPI.
The associates masters are created and assigned to a child work groups
The user has the option to create, modify, delete and view within the same screen.
3. User Interface
3.1. User Interface Screens
3.1.1. Screen ID's
| Corresponding HTML File | ||
| Screen ID (SID) | Screen Name | Name |
| sales.associate.create | Associates | CreateAssociate.jsp |
3.1.2. User Interface Id: Associates
3.1.2.1. Screen Name: Associates (BPI_CAS_UTL_SCR—004—001) (See Figure N-11)
3.1.2.2. SID, Element Name, Element Type & Purpose
| Element | Element | ||
| Name | Type | Label | Purpose |
| Main Header | Text | Main Header | To give the heading for the screen being |
| “Internal | “Internal | navigated | |
| Associate” | Associate” | ||
| Sub Header | Text | Sub Header | To give the heading for the section being |
| “General | “General | navigated | |
| Information” | Information” | ||
| Association | Text | Association | To show Association type |
| Type | Type | ||
| Internal | Radio | Internal | To show Association type |
| External | Radio | External | To show Association type |
| Salutation | Text | Salutation | Used in sub section General Information |
| Salutation | List | Salutation | List for Salutation - Mr., Mrs., Miss |
| First Name | Text | First Name | Used in sub section General Information |
| First Name | Entry Field | First Name | Entry field for first name. |
| MI | Text | MI | Used in sub section General Information |
| MI | Entry Field | MI | Entry Field for MI. Used in sub section General |
| Information | |||
| Last Name | Text | Last Name | Used in sub section General Information |
| Last Name | Entry Field | Last Name | Entry Field for Last Name. Used in sub section |
| General Information | |||
| Suffix | Text | Suffix | Used in sub section General Information |
| Suffix | List | Suffix | List showing Sr, Jr. Used in sub section General |
| Information | |||
| Address | Text | Address | Used in sub section General Information |
| Address | Entry Field | Address | Entry Field for Address, Used in sub section |
| General Information | |||
| Apt No | Text | Apt No | Used in sub section General Information |
| Apt No | Entry Field | Apt No | Entry Field for Suite/Apt no. Used in sub section |
| General Information | |||
| City | Text | City | Used in sub section General Information |
| City | Entry Field | City | Entry Filed for City. Used in sub section |
| General Information | |||
| Zip | Text | Zip | Used in sub section General Information |
| Zip | Entry Field | Zip | Entry Field for Zip. Used in sub section General |
| Information | |||
| State | Text | State | Used in sub section General Information |
| State | List | State | List of all states in USA. Used in sub section |
| General Information | |||
| Sub Header | Text | Sub Header | To give heading for the subsection |
| “Contact Details” | “Contact | ||
| Details” | |||
| Phone | Text | Phone | Text for Phone |
| Phone | Entry Field | Phone | Entry Field for Phone |
| Fax | Text | Fax | Text for Fax |
| Fax | Entry Field | Fax | Entry Field for Fax |
| Text | Text for EMail | ||
| Email Entry | Entry Field | Email Entry | Entry Field for EMail |
| Field | Field | ||
| Sub Header | Text | Sub Header | To give heading for the subsection |
| “Associated | “Associated | ||
| Workgroups” | Workgroups” | ||
| Associated | Text | Associated | Text for Associated workgroups |
| Workgroup | Workgroup | ||
| Associated work | Search | Associated | Search for Associated child work groups for |
| groups (non | work groups | category Internal Associates | |
| editable) with | (non editable) | ||
| search | with search | ||
| Sub Header | Text | Sub Header | To give heading for the subsection |
| “Other | “Other | ||
| Information” | Information” | ||
| License Number | Text | License | Text for “License Number” |
| Number | |||
| License Number | Entry Field | License | Entry Field for: License Number” |
| Number | |||
| Add | HTML Button | Add | Button for adding the name/description in to the |
| HTML table. Changes with label “Modify” when | |||
| the row in the table is on edit mode. | |||
| Table | HTML table | Table | For displaying all the information added by |
| pressing the add button, in the form of rows, for | |||
| every add operation/Rows retrieved from the | |||
| permanent repository | |||
| Delete | Button | Delete | To delete the rows checked |
| (HTML | |||
| Button) | |||
| Check All | Text Link | Check All | To check all the check boxes in the table |
| Clear All | Text Link | Clear All | To uncheck all the check boxes checked in the |
| table/does not function when all the | |||
| checkboxes in the table are unchecked | |||
| Delete | Check box | Delete | To check the items for deletion |
| Edit | Button | Edit | To edit the rows entered by “Add”/ |
| (HTML | “Modify”/displayed from permanent repository | ||
| Button) | against the row selected for edition | ||
| Save | Button | Save | Save the information to the repository |
| (HTML | |||
| Submit | |||
| button) | |||
| Cancel | Button | Cancel | Reset information as described in the scenarios |
3.1.2.3. Front End Validations
| Element | ||
| Name | Action/Validation Details | Error Message Text |
| First Name | Mandatory Entry | When the Add HTML Button is |
| Accepts Alpha numeric characters | pressed with an empty entry on | |
| the name entry field, an Error | ||
| Dialog Box pops up with the | ||
| message “First Name is required” | ||
| name before adding to the | ||
| table” | ||
| License | Alpha Numeric | When the Add HTML Button is |
| Number | pressed with a non numeric entry | |
| on the License Number, an Error | ||
| Dialog Box pops up with the | ||
| message “License Number - | ||
| Accepts Alpha numeric values | ||
| only” | ||
| Add | On Clicking add button or the pressing the enter | When the Add HTML Button is |
| key field with the cursor position on the Add | pressed without choosing the | |
| button, The data gets added to the table. | child work group, an Error Dialog | |
| Validation checks are done to not allow null value | Box pops up with the message | |
| on the First name entry field. | “Assigned Workgroup is required” | |
| Must not allow the length of the field entry to go | ||
| beyond as per the database design for the | ||
| column | ||
| Must choose a workgroup | ||
| Modify | On Clicking modify button or the pressing the | Same as Add |
| enter key field with the cursor position on the | ||
| modify button, The data gets added to the table. | ||
| Table | Should have column header and each | |
| subsequent row should be identified by alternate | ||
| color combinations. i.e. First row should have | ||
| color ‘x’ and the next row should have color ‘y’. | ||
| The next row should have color ‘x’ again and so | ||
| on. The size of any text inside any cell should be | ||
| wrapped if the text becomes too long. | ||
| The letters must be green in color for the rows | ||
| retrieved from the permanent repository and red | ||
| for the rows in temporary storage. | ||
| All the letters of the row on edit must be in dark | ||
| gray. | ||
| Delete | Should function with enter key cursor positioned | Error Dialog Box: “Select a |
| on the “Delete” button or on mouse click | record(s) to delete.” with “yes” | |
| Delete button should work on multiple deletes | option | |
| based on the check box or boxes selected. If the | ||
| user clicks on the delete button without checking | ||
| any of the check box should throw error | ||
| message. | ||
| Success: Deletes the row or rows from the table | ||
| (temporary storage) | ||
| Check All | On clicking the “Check All” link should check all | Not Applicable |
| the check boxes in the HTML table. | ||
| Clear All | On clicking the “Clear All” link should uncheck all | Not Applicable |
| the checked check boxes in the HTML table. | ||
| Edit | Should function with Enter Key Cursor positioned | |
| on the “Edit” button or on mouse click. | ||
| Refer Interface flow on scenarios - “edit data” | ||
| Save | Should function with enter key cursor positioned | Not Applicable |
| on the “Save” button or on mouse click | ||
| On saving the data the data gets saved to the | ||
| permanent repository | ||
| Cancel | All the data entered is reset with empty/initial | Not Applicable |
| values in the data entry fields as the case may be | ||
| (Text Field, List etc). | ||
| If a row is already modified and added to the | ||
| table on the screen and the Cancel button is | ||
| pressed, the row remains with the modified | ||
| values | ||
3.1.2.4. Screen Flow
| Scenario | Description |
| Click | On click of Internal/External Association type. Available Internal/External |
| Internal/External | associated workgroup in the system will be listed in the respective list box. |
| workgroup Radio | |
| button | |
| Add Selected | Assigning the Internal/External workgroup. |
| Internal/External | |
| Workgroup | |
| Remove Selected | Remove the assigned Internal/External workgroup. |
| Internal/External | |
| Workgroup | |
| Add data entered | Adding the data entered (pressing the “Add” Button) leads to adding name |
| (first name + Last Name) and child work group to a temporary storage. The | |
| data gets loaded into the permanent repository only after the user saves the | |
| information. | |
| Modify data entered | When a row is selected for an edit operation, the row is highlighted and data |
| elements populated into respective fields and the add button has a label | |
| “modify”. Modifying the data entered (pressing the “Modify” button) leads to | |
| adding the information to a temporary storage. The data gets loaded into the | |
| permanent repository only after the user saves the information. | |
| Search | The search window must generate a list of all active child groups for Category |
| Internal Associates. The user will not be allowed to make entries into the | |
| entry field where the search results are going to be put in. | |
| Edit data | Editing the Data (pressing the “Edit”Button). |
| The edit operation may be on any of the two scenarios. | |
| 1 (Edit for rows from database) When the user comes to the Internal | |
| Associates screen and the screen is already loaded with data from | |
| the permanent repository into a table on the screen. | |
| 2. (Edit for rows from the temporary storage) When the user has just | |
| added the data into a table on the screen and wants to edit the data | |
| entered before saving | |
| The data in the table on the screen would be shown as green letters for the | |
| data from the database and red letters for the data that is in the temporary | |
| storage (not saved yet). | |
| The table shall have alternate rows colored with different light colors | |
| Under 1, on an edit operation for a row on the table, the row does not get | |
| deleted from the table and the data is transferred to the placeholders. | |
| Under 2, on an edit operation for a row on the table, the row gets deleted from | |
| the table and the data is transferred to the placeholders, which are editable. | |
| When a row is on edit mode, the letters are in dark gray color in the table. | |
| Delete Checked | The data in the table on the screen contains the data, which is from the |
| Rows | permanent repository, or the data just added and is in temporary storage. |
| When the rows are “checked” for the rows that contain the data from the | |
| repository and a “Delete Checked Rows” is performed, inactivation takes | |
| place on saving the information | |
| When the rows are “checked” for the rows that contain the data from the | |
| temporary storage and a “Delete Checked Rows” is performed, the rows are | |
| deleted from the temporary storage. | |
| Check All | Enables checking of all the checkboxes by checking “check All” Check Box |
| Check All & Delete | Enables deleting all the rows from the table on the screen enabled by “check |
| Checked Rows | All” |
| Check Any Number | Enables deleting the rows from the table on the screen that are only checked. |
| & Delete Checked | |
| Rows | |
| Check All & Clear | Enables clearing (removing the check) all checked rows done by “ Check All” |
| All | |
| Check Any Number | Enables clearing (removing the check) the rows that are checked. |
| & Clear All | |
| Clear All when no | The user can only press the button and nothing happens like checking, |
| rows are checked | removing a check |
| Save | All the data added or modified and added into/deleted from the rows in the |
| table are saved into the permanent repository | |
| Once saving is done, return back to the Internal Associates screen with all the | |
| fresh updates | |
| Cancel | All the data entered is reset with empty/initial values in the data entry fields as |
| the case may be (Text Field, List etc). | |
| If a row (which is retrieved from the database) is already modified and added | |
| to the table on the screen and the “Cancel” button is pressed, the row | |
| remains with the modified values. | |
4. Business Rule Mapping
| Activity | Rules | |
| Create | Should have unique Id for an Associates - 10 digits | |
| Associate | with an increment of 1, Say 0000000001, | |
| ID | 0000000002, 0000000003 and so on. | |
| Change Record |
| Date | Author | Version | Change Reference | |
| Mar. 06, 2002 | Sudhakar K | 1.0 | Baseline Release | |
| Apr. 18, 2002 | Sudhakar K | 1.0 REV 1 | Revision 1 | |
| Apr. 22, 2002 | Sudhakar K | 1.0 REV 2 | Revision 2 | |
| Reviewers |
| Name | Position | |
| Distribution |
| No Of | ||||
| Copy No. | Name | Copies | Location | |
1. Introduction 4
1.1. Purpose 4
1.2. Business Use Case Specification Reference 4
1.3. Definitions, Acronyms & Abbreviations 4
2. Process Identification 5
2.1. Background 5
2.2. Process Description 5
2.3. Process Flow 5
3. User Interface 6
3.1. User Interface Screens 6
3.1.1. Screen ID's 6
3.1.2. User Interface Id: Call Tracking 6
3.1.3. User Interface Id: Call Tracking To Do List 8
4. Business Rule Mapping 10
1. Introduction
1.1. Purpose
The purpose of this document is to describe the process of Call Tracking. This document identifies how the user interacts with the system, the data to be captured, the business logic to be implemented, and the output of the process.
1.2 Business Use Case Specification Reference
| Business Use Specification ID | Business Use Case Name | |
| None | None | |
1.3. Definitions, Acronyms & Abbreviations
| Term | Explanation | |
2. Process Identification
2.1. Back ground
Call tracking is used to basically track the calls that are made or received with specific business intentions. The call can be inbound or outbound based on the nature of calls.
2.2. Process Description
The objective of the Call Tracking process is to:
-
- 1) Provide for a user interface for calls categorized as inbound or outbound.
- 2) The inbound or outbound calls would make up the “To Do List” based on follow up required to be performed by the work group associated with the call in question.
2.3. Process Flow
Process for Call Tracking
-
- 1) Call would be identified as inbound or outbound.
- 2) The user requests the Call Tracking screen (somehow—either menu or something else) and then the Call Tracking appears as a child window. In this case the user can still view the information brought up for use in the inquiry while completing the Call Log. In this case the user would have to specify the type of referenced entity, either Group or Agent, then enter the ID of the referenced entity, the caller name, the nature of call, any remarks, and finally whether follow-up is required.
- 3) All calls received, having specific inquiries or intentions by the caller, would be documented only at the Group level or Agent level. For instance, if the group calls in reference to a specific employee, then when logging the call, the user will indicate the Group ID, the caller name, the nature of call and indicate in the remarks section of the call log, the specific Employee name/ID.
- 4) All calls made would have the nature of calls that specifies the nature or reasons for the call received or made. If “referenced entity” is “Group” then nature of call list is displayed for “Group”—If referenced entity is “Agent” then nature of call list is displayed for “Agent”.
- 5) Date and time stamp for the calls received or made would be automatically stamped by the system.
- 6) If any call needs follow up it would be flagged for follow up and would be visible in the “To Do List” sorted by Date and Workgroup.
- 7) All completed follow up would have completed status to mark.
3. User Interface
3.1. User Interface Screens
3.1.1. Screen ID's
| Corresponding HTML File | ||
| Screen ID (SID) | Screen Name | Name |
| utl.calltracking.create | Call Tracking | CallTracking.jsp |
| utl.calltracking.todolist | To Do List | ToDoList.jsp |
3.1.2. User Interface Id: Call Tracking
3.1.2.1. Screen Name: Call Tracking (BPI_CAS_UTL_SCR—005—001) (See Figure N-12)
3.1.2.2. SID, Element Name, Element Type & Purpose
| Element Name | Element Type | Purpose |
| Call Type | Drop down list | Select the type of call |
| RE: | Text | To provide text |
| Group | Radio Button | To select either Group or Agent for what the call was |
| regarding. | ||
| Caller name | Entry Field | Enter the caller name This will allow a search capability |
| in order to link the inbound call to the correct agent or | ||
| group | ||
| Nature of Call | Text | To provide text |
| Group | ||
| Nature of Call | Drop down list | Select the nature of call based on the caller type |
| Group | ||
| Nature of Call | Text | To provide text |
| Agent | ||
| Nature of Call | Drop down list | Select the nature of call based on the caller type |
| Agent | ||
| Other | Entry Field | Enter if other Should only appear if “other” is selected |
| from drop down menu. | ||
| Follow Up | Check Box | To check if follow up required |
| Required | ||
| Follow Up Date | Text | To provide text |
| Follow Up Date | Entry Field | To specify date for follow-up. Default should be next |
| day. Date will have an option of a calendar or entering | ||
| the date in the format MM/DD/YYYY | ||
| Date and Time | Date Text | To specify the date |
| Stamp | ||
| Comments | Text Box | Text area to enter comments |
| Save | HTML Button | To save the data captured |
| Cancel | HTML Reset Button | To reset to the status as was on loading the page. |
3.1.2.3. Front End Validations
| Element Name | Action/Validation Details | Message |
| Call type | Should list the call types of In bound | “Call Type - is required” |
| nad Out bound. The first option | ||
| should be - Choose One --. | ||
| Subsequent call types should listed | ||
| in alphabetical order. | ||
| Caller name | Entry field for entering the caller | “Caller Name - Is required.” |
| name | “Caller Name - Accepts alphabetic | |
| characters only” | ||
| Nature of Call | Nature of call depends on the | “Nature of Call - Is required.” |
| “referenced entity”. Each | ||
| “referenced entity” has a different | ||
| list for choosing Nature of Call. | ||
| Hence the list should get populated | ||
| based on the “referenced entity”. | ||
| Categories for Nature of Call are | ||
| included in the drop down menu list. | ||
| Other | If the nature of call is other. Entry | “Others - is required.” |
| field to write other. | ||
| Follow Up | Check box to be un checked by | None |
| Required | default. Checked if required for | |
| follow up. | ||
| Follow Up Date | To specify date for follow-up, should | “Follow-up Date - Is required” |
| default to next working day | “Follow-up Date - Accepts date from 1900 | |
| following. | to 2200 in the format of MM/DD/YYYY” | |
| Comments | Text area to write comments | “Comments - Accepts all Alphanumeric |
| and special Characters except double | ||
| quotes.” | ||
| Save | On click should save the data | “The Field Name is blank. Please enter a |
| captured above into the repository | valid value.” | |
| Cancel | Reset to the state as was on loading | None |
| the page on click. | ||
3.1.2.4. Screen Flow
None.
3.1.3. User Interface Id: Call Tracking To Do List
3.1.3.1. Screen Name: Call Tracking To Do List (BPI_CAS_UTL_SCR—005—002) (See Figure N-13)
3.1.3.2. SID, Element Name, Element Type & Purpose
| Element | |||
| Name | Element Type | Label | Purpose |
| Call type | Text | Call type | To provide text |
| Call Type | Radio | Call Type | To Select a rate type (Whether Inbound |
| or Out bound) | |||
| Follow-up | Text | Follow-up Date | To provide text |
| Date | |||
| Follow-up | Entry Field/ | Follow-up Date | To pick the date for the to do list |
| Date | Calendar | ||
| Called Date | text | Called Date | To provide text. |
| Called Date | text | Called Date | To pick the date for the to do list. |
| Search | Button | Search | To show the To do List based on the called |
| date | |||
| Table | HTML Table | Table | Table to provide the inbound or outbound |
| calls information. | |||
| Task | Check Box | Task Completed | To check if task completed |
| Completed | |||
| Save | HTML Submit | Save | To save the data |
| button | |||
| Cancel | HTML reset | Cancel | To reset |
| button | |||
3.1.3.3. Front End Validations
| Element Name | Action/Validation Details | Message |
| Follow-up Date | Choose follow-update radio button. | “Follow-up Date - Is required.” |
| And Select the date to show the to do | “Follow-up Date - Accepts date from 1900 | |
| list. | to 2200 in the format of MM/DD/YYYY” | |
| Called Date | Choose Called Date radio button and | “Called Date - Is required.” |
| select the date to show the to do list. | “Called Date - Accepts date from 1900 to | |
| 2200 in the format of MM/DD/YYYY” | ||
| Search | On Click should show the To Do | none |
| List based on the date selected | ||
| Table | Table to display the data. The table | None |
| should only contain that data or | ||
| called that need to be followed up. | ||
| (i.e. Check box Checked for the | ||
| Follow up required in previous | ||
| screen | ||
| BPI_CAS_SCR_UTL_05_001 | ||
| Task Completed | Default unchecked. If Checked and | None |
| saved should not allow for Un | ||
| checking again. | ||
| Save | On click should save the data | None |
| captured above into the repository | ||
| Cancel | Reset to the state as was on loading | None |
| the page on click. | ||
3.1.3.4. Screen Flow
None.
4. Business Rule Mapping
| Activity | Rules | |
Benefit Partners Inc
Process Specification
BPI_CAS_FSD_SECURITY—01
Document Id: BPI_CAS_FSD_SECURITY—01
Version 1.0
This Communication and the documents accompanying this document are confidential property of Mascon (http://www.masconit.com/). You may not forward, disclose or release this document without prior consent from the author. If you are not the intended recipient, you are here by notified that any form of disclosure, copying, distribution or taking any action based on any of available information, is strictly prohibited.
By reading this document you agree to all the above terms.
| Change Record |
| Date | Author | Version | Change Reference |
| Jan. 03, 2002 | Amit Pramod Ambardekar | 1.0 | Initial version |
| Review |
| Date | Reviewed By: | Position |
| Jan. 03, 2002 | L Chandrashekhar | Team Leader |
| Jan. 03, 2002 | K Sudhakar | Technical Architect |
| Jan. 03, 2002 | Mahalingam Ramamoorthi | Onsite Co Ordinater |
| Approval |
| Date | Approval By: | Position |
| Jan. 03, 2002 | K Sudhakar | Onsite Architect |
| Jan. 03, 2002 | Mahalingam Ramamoorthi | Onsite Co Ordinater |
1.1 Introduction
This purpose of this document is to identify the processes associated with the security mechanism for core administrative system
1.2 Business Use Case Specification Reference
| Business Use Specification ID | Business Use Case Name | |
| NONE | NONE | |
1.3 Process Identification
1.3.1 Process Description & Flow
This process describes the security framework requirements. The security framework consists of creating database for security system as well as administrator login into the system. The system also allows the administrator to create users, module, groups, and application, assign user roles and ACL etc. The system also takes care of user login into the core administrative system. The system should generate the ACL for each user when user logs in into the system. The access to any resource in the core administrative system will be decided by this ACL which will be stored in the User Profile object, stored into the session.
The security system for Intranet application built for shall broadly contain following categories.
-
- 1. Definition of Realms
- 2. Definition of Modules
- 3. Definition of Applications
- 4. Definition of Resources
- 5. Definition of groups (groups can ideally be a department which has a number of users)
- 6. Definition of User
- 7. Definition of User Roles
- 8. Definition ACL/Permissions
- 9. Resources, which can be assigned to the groups.
- 10. User, User Role and Groups mapping
- 11. Overriding the group access rights.
Realms
A realm is a database of users, groups, modules, application resources and access control lists. A user must be defined in a realm in order to access any resources belonging to that realm.
Modules
The modules provide the high level classification for the applications. The module is a group of applications. The following modules have been identified in the initial stage as a part of core administrative system viz. Carrier Maintenance, Enrollment, Sales and Marketing and Finance.
Applications
A module consists of many applications. An application represents the business use case or set of related use cases. A module consists of many applications. For e.g. Carrier Maintenance module consists of following applications viz. Zip Master, Carrier Master, and M Plan etc. Each application can be further classified into the pages.
Resources
An application can be further classified into the Resources. An application can have one or more resources.
Resources are the valuable items accessible from the Web server/Web Application server:
Web applications: Java Servlet or JSP
The resources can be protected by using a single access control (ACL). The ACL specifies which users or groups are allowed to access or modify the resource. For each resource to protect, you'll specify:
An access control list (ACL)—a list defining who can use the resource
Groups
A group is a collection of users. A user can belong to multiple groups. The groups can be created based on the department where all the uses are going to perform the similar kind of operation.
Groups are sets of users. Groups provide an efficient way to manage large numbers of users because an administrator can specify permissions for an entire group at one time. The resources pages can be allocated to group instead of assigning to individual user. The user gets the default access rights as a part of group. The user can override the group access rights.
A person can be defined as both an individual user and as a member of a group. When an individual user also belongs to a group, the individual access permissions override any group access permissions.
For e.g. a set of data entry operators can have be classified into one group. The rights can be assigned to this group as all basically going to do the data entry operation.
User Roles
In any system, there are many roles, which a particular entity plays. For e.g. in any industry role played by the manager differs from the subordinate.
The roles need to be classified into the security system. A user can play multiple roles in the system. A manager can play the role as data entry as well as authorizing body.
A data entry operation may not have provision to enter some critical data, which manager does enter if manager is logging into the system as manager role. The managers can login into the system as data entry operator as well.
If manager is logging in as data entry operation he may not have the privileges as he was having in manager role. In such a case he will be treated as data entry operator.
The security system needs to take above situations.
The user roles can be
-
- SUPER USER
- SENIOR MANAGEMENT
- MANAGER
- DATA ENTRY PERSONNEL
- PART TIME EMPLOYEE
The user roles need to be configured into the system. The user roles can be added for the future modifications. The CAS (Core Administration System) system need to be pre configured for the basic pre defined roles which will not be editable.
Users
A user is an identity that can be authenticated by the system. A user can represent a person who is working in any of the departments in Benefit Partners Inc.
A user can belong to multiple groups.
A user can play multiple roles
Access Rights/Permissions
Permissions represent the privileges required for accessing resources. An administrator protects resources by establishing access control lists to grant permissions to users and groups.
Individual user permissions take precedence over group permissions. Individual user permission overrides the more restrictive group permission. (Even if the group permission is less restrictive than the user permission, the user permission overrides the group permission and vice versa).
List of Programs
1. Security Login
Allows the administrator to login into the security system.
2. Module Master
Allows administrator to do following operations
-
- Create Module
- Modify Module
- Delete Modules
3. Application Master
Allows administrator to do following operations
-
- Create Application
- Modify Application
- Delete Application
4. Resources
Allows administrator to do following operations
-
- Create Resources
- Modify Resources
- Delete Resources
5. Group Master
Allows administrator to do following operations
-
- Create Group
- Modify Group
- Delete Group
6. User Master
Allows administrator to do following operations
-
- Create User
- Modify User
- Delete User
7. User Role
Allows administrator to do following operations
-
- Create Role
- Modify Role
- Delete Role
8. User Access Rights
9. User, User Role and Groups Mapping
10. Group Access Rights
Allows administrator to do following operations.
Assign Rights for a User. This program allows the administrator to override the access rights for a user.
11. User Login
When the system user logs in into the core administration system the separate ACL will be generated for each user. The ACL will be stored in the User Profile object, which will be stored in the user session. When user request for a particular page controller will check with the security system whether user is having access to the particular page.
The user password needs to be validated as follows
-
- The password need to be minimum 6 characters long and max 10 characters
- The password needs to be combination of alphabets and special characters and numbers (for e.g. Amit1$3, sriRam9#445 etc).
- The password is valid for 15 days, which is configurable. The system should prompt user to change the password three days (which is configurable) prior to expiry date of the password.
- If user changes the password then his password is valid for 15 days (which is configurable) from the date of change.
- In the same way administrator can configure the minimum limit for password age, which signifies that user cannot change the password for this period from the date of prior change.
- The minimum limit for the password age, which is configured value, cannot be greater than or equal to configured maximum limit of the password age.
- First time user must change his password before entering into the system.
- Scenario
- If the user password is “123456” the for first time login user goes and change the password to “Mali5%9”. The user is created on date Jan. 4, 2002. User logs in on Jan. 5, 2002 and password expiry date for the user changes to Jan. 19, 2002 (15 calendar days) if the configured time limit is 15 days. The user needs to prompt to change password on Jan. 17, 2002 (3 calendar days prior to the expiry date). If user changes the password within stipulated time then extend the password expiry date by 15 calendar days. (New Date=Sys Date+15). All changes in the date is effective from 0000 AM
- The above validation is not applicable at the time of user creation as administrator can keep the password 123456 for all.
- The new password in the change password is to be validated for above conditions. The old password need not be validated for above conditions. As user can have 123456 as first time as his password.
- The old password needs to be maintained in the history. The new password must not be equal to last five passwords. This number of history of passwords (here its 5) should be configurable. (A configurable password history where the administrator can enter value that would represent how many passwords it would remember until the user can use the same password again)
- The ability to enable or disable Account lockout with a configuration value for the number of user log in attempts at which point a lockout would occur. A way timer for when to reset the count of attempts before lock would be helpful. Also if it possible to make a lockout duration value that would be configurable would also be helpful.
User Name cannot be a part of password. Configurable Items
| Sr No | Item Name | Value |
| 1 | Length Of Password (Minimum Value) | Integer (Ranging From 1-n) |
| Need to be set by the | ||
| administrator | ||
| 2 | Length Of Password (Maximum Value) | Integer (Ranging From 1-n) |
| Need to be set by the | ||
| administrator | ||
| Maximum need to be greater | ||
| than minimum value | ||
| 3 | Expiry of the password from the date of validity | Integer (Number of days) |
| (Maximum Range) | Ranging from 1-n | |
| Need to be set by the | ||
| administrator | ||
| 4 | Expiry of the password from the date of validity | Integer (Number of days) |
| (Minimum Range) | Ranging from 1-n | |
| Need to be set by the | ||
| administrator | ||
| 5 | Password Repeat allowed value | Integer (Number of days) |
| This indicates that new passwords can not be | Ranging from 1-n | |
| same as last n passwords | Need to be set by the | |
| administrator | ||
| 6 | Invalid Passwords allowed before locking the | Integer (Number of days) |
| account | Ranging from 1-n | |
| If user enters the password incorrect for n times | Need to be set by the | |
| then his account will be locked automatically. | administrator | |
| 7 | Lock Time | Time for which account to be |
| locked if it is locked because | ||
| of successive invalid | ||
| passwords entry. | ||
| 8 | Password change prompt date | This value signifies that user |
| need to be intimated by 3 | ||
| days prior about password | ||
| change (Value here set as 3) | ||
1.3. Security Framework
Process Flow Diagram (See Figure P-1)
1.3.1.1. Script for Setup
Run the basic admin script, which will create the basic administrative user for security login and minimal data into the database.
1.3.1.2. Security Login
Security Login
Refer Process Flow Diagram FIG. 2. The flow of the process is as described below.
System allows user to login into the system. The basic user id and password validation will be done for the administrator for the security system.
On successful login administrator can create modules, groups, applications, user etc.
FIG. 2 Process Flow Diagram (See Figure P-2)
1.3.1.3. Module Master
Refer Process Flow Diagram FIG. 3. The flow of the process is as described below.
Create Modules
-
- a) On selecting create modules option. The user needs to enter the module name and description.
- b) The user enters the details and clicks save.
- c) Upon save the data will be stored in the database.
Modify Modules
-
- a) When user selects modify modules option. He will be shown all the modules in the combo box.
- b) The user selects the module name and clicks select.
- c) The user will be shown the details about the selected module. The user can modify the module details and click save. The data will be updated into database.
Delete Modules
-
- a) When user selects the Delete option, the user will be shown all the modules where in user can select one or more access control list and click delete.
- b) The selected modules will be deleted from the database.
FIG. 3: Process Flow Diagram (See Figure P-3)
1.3.1.4. Application Master
Refer Process Flow Diagram FIG. 4. The flow of the process is as described below.
Create Application
-
- a) On selecting create application option. The user needs to enter the application details like application name, module name and description.
- b) The user enters the data and clicks save.
- c) Upon save the data will be stored in the database.
Modify Application
-
- a) When user selects modify applications option. He will be shown all the applications in the selection box. The user selects one application and clicks select.
- b) The user will be shown the details about the selected application. The user can modify the application details and click save.
- c) The data will be updated into database.
Delete Application
-
- a) When user selects the Delete option, the user will be shown all the applications where in user can select one or more applications and click delete.
- b) The selected applications will be deleted from the database.
FIG. 4: Process Flow Diagram (See Figure P-4)
1.3.1.5. Resource Master
Refer Process Flow Diagram. The flow of the process is as described below.
Create Resource
-
- a) On selecting create resource option. The user needs to enter the resource details like resource name, application name and description.
- b) The user enters the data and clicks save.
- c) Upon save the data will be stored in the database.
Modify Resource
-
- a) When user selects modify resource option. He will be shown all the resources in the selection box. The user selects one resource and clicks select.
- b) The user will be shown the details about the selected resource. The user can modify the resource details and click save.
- c) The data will be updated into database.
Delete Resource
-
- a) When user selects the Delete option, the user will be shown all the resource where in user can select one or more resources and click delete.
- b) The selected resources will be deleted from the database.
FIG. 5: Process Flow Diagram (See Figure P-5)
1.3.1.6. Group Master
Refer Process Flow Diagram FIG. 6. The flow of the process is as described below.
Create Group
-
- a) On selecting create group option. The user needs to enter the group details like group name and description.
- b) The user enters the data and clicks save.
- c) Upon save the data will be stored in the database.
Modify Group
-
- a) When user selects modify group's option. He will be shown all the groups in the selection box. The user selects one group and clicks select.
- b) The user will be shown the details about the selected group. The user can modify the group details and click save
- c) The data will be updated into database.
Delete Group
-
- a) When user selects the Delete option, the user will be shown all the groups where in user can select one or more groups and click delete
- b) The selected groups will be deleted from the database.
FIG. 6: Process Flow Diagram (See Figure P-6)
1.3.1.7. User Creation
Refer Process Flow Diagram FIG. 7. The flow of the process is as described below.
Create User
-
- a) On selecting create user option. The user needs to enter the details like user name, description, address details etc.
- b) The user enters the data and clicks save.
- c) Upon save the data will be stored in the database.
Modify User
-
- a) When user selects modify user option. He will be shown all the user details in the selection box. The user selects one-user and clicks select.
- b) The user will be shown the details about the selected user. The user can modify the user details and click save
- c) The data will be updated into database.
Delete User
-
- a) When user selects the Delete option, the user will be shown all the users where in user can select one or more users and click delete
- b) The selected users will be deleted from the database.
FIG. 7: Process Flow Diagram (See Figure P-7)
1.3.1.8. User Role Creation
Refer Process Flow Diagram FIG. 7a. The flow of the process is as described below.
Create User Role
-
- a) On selecting create user role option. The user needs to enter the details like user role name, description
- b) The user enters the data and clicks save.
- c) Upon save the data will be stored in the database.
Modify User Role
-
- a) When user selects modify user role option. He will be shown all the user role details in the selection box. The user selects one-user role and clicks select.
- b) The user will be shown the details about the selected user role. The user can modify the user details and click save
- c) The data will be updated into database.
Delete User Role
-
- a) When user selects the Delete option, the user role will be shown all the users roles where in user can select one or more users role and click delete
- b) The selected user roles will be deleted from the database.
FIG. 7a: Process Flow Diagram (See Figure P-8)
1.3.1.9. User, User Role and Group Mapping
Refer Process Flow Diagram FIG. 8. The flow of the process is as described below.
Assign Rights
-
- a) On selecting the User, User Role and Group Mapping option. The user will be shown the all the users and user roles in the selection box. The user can select the combination of user and user role.
- b) On selection user will be shown the all the groups with already assigned groups as checked.
- c) The user adds or removes the group assignment and clicks save.
- d) Upon save the data will be stored in the database
FIG. 8: Process Flow Diagram (See Figure P-9)
1.3.1.10. Group Access Rights
Refer Process Flow Diagram. The flow of the process is as described below.
Assign Rights
-
- a) On selecting the group access rights. The user will be shown the all the groups in the selection box. The user can select any group and click select.
- b) When user selects the particular group, the user will be shown the all the resources and with the access rights selection box corresponding to each module.
- c) User can assign one or more resources to the group and click save.
- d) Upon save the data will be stored in the database.
FIG. 9: Process Flow Diagram (See Figure P-10)
1.3.1.11. User Access Rights
Refer Process Flow Diagram. The flow of the process is as described below.
As stated earlier, user can override the access specified to the group.
Assign User Rights.
-
- a) On selecting the user access rights. The user will be shown the all the users in the selection box. The user can select any one user and click select.
- b) When user selects the particular user, the user will be shown the all the access rights for his group for corresponding resource.
- c) The user can add or remove the resources.
- d) Upon save the data will be stored in the database.
1.3.1.12. Configure Items
Refer Process Flow Diagram. The flow of the process is as described below. This allows administrator to configure various items like password length, expiry etc.
FIG. 10: Process Flow Diagram (See Figure P-11)
FIG. 10A: Process Flow Diagram (See Figure P-12)
1.4 User Interface
1.4.1 User Interface ID: SECURITY_SCREEN—001 (See Figure P-13)
User Interface ID: SECURITY_SCREEN—002 (See Figure P-14)
1.4.1.1 User Interface Screen Snap Shot—Screen Name: Security Login
1.4.1.2 Field Name, Element Type & Purpose
Table for Screen SECURITY_LOGIN_SCREEN—001
| Element Name | Element Type | Purpose |
| Main Heading | Text | To give the heading for the screen |
| Security Login | being navigated | |
| Sub Header | Text | Text for the Login Name |
| Login Name | ||
| Login Name | Entry Field | Text for the entry field |
| Sub Header | Text | Text for the password |
| password | ||
| Password | Entry Field | Text for the password |
| Save | Button (HTML | To Save the data this button need to |
| Button) | be clicked | |
| Cancel | Button (HTML | To cancel current operation. |
| Button) | ||
| Select the Role | Text | Text for the Role |
| Role | Selection Box | Selection box applicable for user |
| login only. | ||
Table for Screen SECURITY_LOGIN_SCREEN—002
| Element Name | Element Type | Purpose |
| Main Heading | Text | To give the heading for the screen |
| Security Login | being navigated | |
| Sub Header Login | Text | Text for the Login Name |
| Name | ||
| Login Name | Entry Field | Text for the entry field |
| Sub Header old | Text | Text for the old password |
| password | ||
| old Password | Entry Field | Text for the old password |
| Sub Header new | Text | Text for the new password |
| password | ||
| new Password | Entry Field | Text for the new re enter password |
| Sub Header re | Text | Text for the re enter password |
| enter password | ||
| re enter Password | Entry Field | Text for the re enter password |
| Select | Button (HTML | To select the current selected |
| Button) | module to modify. | |
| Cancel | Button (HTML | To cancel current operation. |
| Button) | ||
1.4.1.3 Front End Validation
Validation Details
This section provides the front end screen validations along with the associated message—Success/Error Message text
| Element | |||
| # | Name | Action/Validation Details | Message |
| 1. | Login Name | Accepts all the alphabets | Mandatory Max Length: 15 |
| (Entry Field) | and numeric characters. | “Please Enter Login Name” | |
| 2. | Password | Accepts all the alphabets | Mandatory Max Length: 15 |
| and numeric characters. | Min Length: 6 | ||
| “Please Enter the | |||
| password” | |||
| 3. | User Role | Selection Box validation | Default: Choose One |
| “Mandatory” | |||
| “Please choose one of the | |||
| options specified” | |||
1.4.2 User Interface ID: SECURITY_SCREEN—003 (See Figure P-15)
User Interface ID: SECURITY_SCREEN—004 (See Figure P-16)
User Interface ID: SECURITY_SCREEN—005 (See Figure P-17)
1.4.2.1 User. Interface Screen Snap Shot—Screen Name: Module Master
1.4.2.2 Field Name, Element Type & Purpose
Table for Screen SECURITY_SCREEN—003
| Element Name | Element Type | Purpose |
| Main Heading | Text | To give the heading for the screen |
| Create Module | being navigated | |
| Sub Header | Text | Text for the Module Id |
| Module Id | ||
| Module Id | Entry Field | Text for the entry field |
| Sub Header | Text | Text for the Module Name |
| Module Name | ||
| Module Name | Entry Field | Text for the entry field |
| Sub Header | Text | Text for the Module Name |
| Module | ||
| Description | ||
| Module | Entry Field | Text for the entry field |
| Description | ||
| Save | Button (HTML | To Save the data this button need to |
| Button) | be clicked | |
| Cancel | Button (HTML | To cancel current operation. |
| Button) | ||
Table for Screen SECURITY_SCREEN—004
| Element Name | Element Type | Purpose |
| Search | Gif File | Used to search the module |
| Element Name | Element Type | Purpose |
| Main Heading | Text | To give the heading for the screen |
| Modify Module | being navigated | |
| Sub Header | Text | Text for the Module Id |
| Module Id | ||
| Module Id | Entry Field | Text for the entry field |
| Sub Header | Text | Text for the Module Name |
| Module Name | ||
| Module Name | Entry Field | Text for the entry field |
| Sub Header | Text | Text for the Module Name |
| Module | ||
| Description | ||
| Module | Entry Field | Text for the entry field |
| Description | ||
| Update | Button (HTML | To Save the data this button need |
| Button) | to be clicked | |
| Cancel | Button (HTML | To cancel current operation. |
| Button) | ||
Table for Screen SECURITY_SCREEN—005
| Element Name | Element Type | Purpose |
| Main Heading | Text | To give the heading for the screen |
| Delete Modules | being navigated | |
| Sub Heading | Text | To give the sub heading for the |
| Select the | screen being navigated | |
| modules | ||
| Module Names | Check Box | Check boxes for module names to |
| Sales, finance | be deleted. | |
| Check Box | Check All | On clicking the “Check All” link |
| should check all the check boxes | ||
| in the HTML table. | ||
| Check Box | Clear All | On clicking the “Clear All” link |
| should uncheck all the checked | ||
| check boxes in the HTML table. | ||
| Delete | Delete | To Delete the data this button |
| need to be clicked | ||
1.4.2.3 Front End Validation
Validation Details
This section provides the front end screen validations along with the associated message—Success/Error Message text
| Action/Validation | |||
| # | Element Name | Details | Message |
| 1 | Module Name | Accepts all the | Max length: 50 |
| (Entry Field) | alphabets and | Mandatory | |
| numeric | BPI_CAS_FSD_COMMON | ||
| characters. | |||
| 2 | Module Id (Entry | Accepts all the | Max length: 10 |
| Field) | alphabets and | Mandatory | |
| numeric | BPI_CAS_FSD_COMMON | ||
| characters. | |||
| 3 | Comments(Entry | Accepts all the | Max length: 250 |
| Field) | alphabets and | BPI_CAS_FSD_COMMON | |
| numeric | |||
| characters. | |||
1.4.3 User Interface ID: SECURITY_SCREEN—006 (See Figure P-18)
User Interface ID: SECURITY_SCREEN—007 (See Figure P-19)
User Interface ID: SECURITY_SCREEN—008 (See Figure P-20)
1.4.3.1
User Interface Screen Snap Shot—Screen Name: Group Master
1.4.3.2 Field Name, Element Type & Purpose
Table for Screen SECURITY_SCREEN—006
| Element Name | Element Type | Purpose |
| Main Heading | Text | To give the heading for the screen |
| Create Group | being navigated | |
| Sub Header | Text | Text for the Group Id |
| Group Id | ||
| Group Id | Entry Field | Text for the entry field |
| Sub Header | Text | Text for the Group Name |
| Group Name | ||
| Group Name | Entry Field | Text for the entry field |
| Sub Header | Text | Text for the Group Name |
| Group | ||
| Description | ||
| Group | Entry Field | Text for the entry field |
| Description | ||
| Save | Button (HTML | To Save the data this button need to |
| Button) | be clicked | |
| Cancel | Button (HTML | To cancel current operation. |
| Button) | ||
Table for Screen SECURITY_SCREEN—007
| Element Name | Element Type | Purpose | |
| Search | Image | To provide search | |
Table for Screen SECURITY_SCREEN—007
| Element Name | Element Type | Purpose |
| Main Heading | Text | To give the heading for the screen |
| Modify Group | being navigated | |
| Sub Header | Text | Text for the Group Id |
| Group Id | ||
| Group Id | Entry Field | Text for the entry field |
| Sub Header | Text | Text for the Group Name |
| Group Name | ||
| Group Name | Entry Field | Text for the entry field |
| Sub Header | Text | Text for the Group Name |
| Group | ||
| Description | ||
| Group | Entry Field | Text for the entry field |
| Description | ||
| Update | Button (HTML | To Save the data this button need to |
| Button) | be clicked | |
| Cancel | Button (HTML | To cancel current operation. |
| Button) | ||
Table for Screen SECURITY_SCREEN—008
| Element Name | Element Type | Purpose |
| Main Heading | Text | To give the heading for the screen |
| Delete Group | being navigated | |
| Sub Heading | Text | To give the sub heading for the |
| Select the Groups | screen being navigated | |
| Group Names | Check Box | Check boxes for group names to |
| Sales, finance | be deleted. | |
| Check Box | Check All | On clicking the “Check All” link |
| should check all the check | ||
| boxes in the HTML table. | ||
| Check Box | Clear All | On clicking the “Clear All” link |
| should uncheck all the checked | ||
| check boxes in the HTML table. | ||
| Delete | Delete | To Delete the data this button need to |
| be clicked | ||
1.4.3.3 Front End Validation
Validation Details
This section provides the front end screen validations along with the associated message—Success/Error Message text
| Element | Action/Validation | ||
| # | Name | Details | Message |
| 1 | Group Name | Accepts all the | Max length: 50 |
| (Entry Field) | alphabets and | Mandatory | |
| numeric characters. | BPI_CAS_FSD_COMMON | ||
| 2 | Group Id | Accepts all the | Max length: 10 |
| (Entry Field) | alphabets and | Mandatory | |
| numeric characters. | BPI_CAS_FSD_COMMON | ||
| 3 | Comments/ | Accepts all the | Max length: 255 |
| Description | alphabets and numeric | BPI_CAS_FSD_COMMON | |
| characters. | |||
1.4.4 User Interface ID: SECURITY_SCREEN—009 (See Figure P-21)
User Interface ID: SECURITY_SCREEN—010 (See Figure P-22)
User Interface ID: SECURITY_SCREEN—011 (See Figure P-23)
1.4.4.1 User Interface Screen Snap Shot—Screen Name: Application Master
1.4.4.2 Field Name, Element Type & Purpose
Table for Screen SECURITY_SCREEN—009
| Element Name | Element Type | Purpose |
| Main Heading | Text | To give the heading for the screen |
| Create | being navigated | |
| Application | ||
| Sub Header | Text | Text for the Application Id |
| Application Id | ||
| Application Id | Entry Field | Text for the entry field |
| Sub Header | Text | Text for the Application Name |
| Application Name | ||
| Application Name | Entry Field | Text for the entry field |
| Sub Header | Text | Text for the Application Name |
| Application | ||
| Description | ||
| Application | Entry Field | Text for the entry field |
| Description | ||
| Sub Header | Text | Text for the Module Name |
| Module Name | ||
| Selection Box | Selection Box | Module Name |
| Save | Button (HTML | To Save the data this button need to |
| Button) | be clicked | |
| Cancel | Button (HTML | To cancel current operation. |
| Button) | ||
Table for Screen SECURITY_SCREEN—010
| Element Name | Element Type | Purpose | |
| Search | Gif | To search the application | |
Table for Screen SECURITY_SCREEN—010
| Element Name | Element Type | Purpose |
| Main Heading | Text | To give the heading for the screen |
| Modify | being navigated | |
| Application | ||
| Sub Header | Text | Text for the Application Id |
| Application Id | ||
| Application Id | Entry Field | Text for the entry field |
| Sub Header | Text | Text for the Application Name |
| Application Name | ||
| Application Name | Entry Field | Text for the entry field |
| Sub Header | Text | Text for the Application Name |
| Application | ||
| Description | ||
| Application | Entry Field | Text for the entry field |
| Description | ||
| Update | Button (HTML | To Save the data this button need to |
| Button) | be clicked | |
| Cancel | Button (HTML | To cancel current operation. |
| Button) | ||
Table for Screen SECURITY_SCREEN—011
| Element Name | Element Type | Purpose |
| Main Heading | Text | To give the heading for the screen |
| Delete | being navigated | |
| Application | ||
| Sub Heading | Text | To give the sub heading for the |
| Select the | screen being navigated | |
| Application | ||
| Application | Check Box | Check boxes for applications names |
| Names | to be deleted. | |
| Sales, Select box | ||
| for Application | ||
| Check Box | Check All | On clicking the “Check All” link |
| should check all the check | ||
| boxes in the HTML table. | ||
| Check Box | Clear All | On clicking the “Clear All” link |
| should uncheck all the checked | ||
| check boxes in the HTML table. | ||
| Delete | Delete | To Delete the data this button need to |
| be clicked | ||
1.4.4.3 Front End Validation
Validation Details
This section provides the front end screen validations along with the associated message—Success/Error Message text
| Action/Validation | |||
| # | Element Name | Details | Message |
| 1 | Application | Accepts all the | Max length: 50 |
| Name | alphabets and | Mandatory | |
| (Entry Field) | numeric characters. | BPI_CAS_FSD_COMMON | |
| 2 | Application Id | Accepts all the | Max length: 10 |
| (Entry Field) | alphabets and | Mandatory | |
| numeric characters. | BPI_CAS_FSD_COMMON | ||
| 3 | Comments/ | Accepts all the | Max length: 255 |
| Description | alphabets and | ||
| numeric characters. | |||
| 4 | Module Name | Selection Box | Default: Choose One |
| validation | BPI_CAS_FSD_COMMON | ||
1.4.5 User Interface ID: SECURITY_SCREEN—012 (See Figure P-24)
User Interface ID: SECURITY_SCREEN—013 (See Figure P-25)
User Interface ID: SECURITY_SCREEN—0014 (See Figure P-26)
1.4.5.1 User Interface Screen Snap Shot—Screen Name: Resource Master
1.4.5.2 Field Name, Element Type & Purpose
Table for Screen SECURITY_SCREEN—012
| Element Name | Element Type | Purpose |
| Main Heading | Text | To give the heading for |
| Create Resource | the screen being navigated | |
| Sub Header | Text | Text for Resource Id |
| Resource ID | ||
| Resource ID | Entry Field | Text for the entry field |
| Sub Header | Text | Text for Resource Name |
| Resource Name | ||
| Resource Name | Entry Field | Text for the entry field |
| Sub Header | Text | Text for screen url |
| Screen URL | ||
| Screen URL | Entry Field | Text for the entry field |
| Resource | Text | Text for the Resource Description |
| Description | ||
| Resource | Entry Field | Text for the entry field |
| Description | ||
| Save | Button (HTML | To Save the data this button |
| Button) | need to be clicked | |
| Cancel | Button (HTML | To cancel current operation. |
| Button) | ||
Table for Screen SECURITY_SCREEN—012 & Screen SECURITY_SCREEN—013
| Element Name | Element Type | Purpose |
| Search | Gif | To search the resource and application |
Table for Screen SECURITY_SCREEN—013
| Element Name | Element Type | Purpose |
| Main Heading | Text | To give the heading for the |
| Create Resource | screen being navigated | |
| Sub Header | Text | Text for Resource Id |
| Resource ID | ||
| Resource ID | Entry Field | Text for the entry field |
| Sub Header | Text | Text for Resource Name |
| Resource Name | ||
| Resource Name | Entry Field | Text for the entry field |
| Sub Header | Text | Text for screen url |
| Screen URL | ||
| Screen URL | Entry Field | Text for the entry field |
| Resource | Text | Text for the Resource Description |
| Description | ||
| Resource | Entry Field | Text for the entry field |
| Description | ||
| Save | Button (HTML | To Save the data this button |
| Button) | need to be clicked | |
| Cancel | Button (HTML | To cancel current operation. |
| Button) | ||
Table for Screen SECURITY_SCREEN—14
| Element Name | Element Type | Purpose |
| Main Heading | Text | To give the heading for the |
| Delete Resources | screen being navigated | |
| Sub Heading | Text | To give the sub heading for |
| Select the | the screen being navigated | |
| Resources | ||
| Resources | Check Box | Check boxes for |
| Resources to be deleted. | ||
| Check Box | Check All | On clicking the “Check All” link |
| should check all the check | ||
| boxes in the HTML table. | ||
| Check Box | Clear All | On clicking the “Clear All” link |
| should uncheck all the checked | ||
| check boxes in the HTML table. | ||
| Delete | Delete | To Delete the data this |
| button need to be clicked | ||
1.4.5.3 Front End Validation
Validation Details
This section provides the front end screen validations along with the associated message—Success/Error Message text
| Action/Validation | |||
| # | Element Name | Details | Message |
| 1 | Resource Name | Accepts all the | Max length: 50 |
| (Entry Field) | alphabets and | Mandatory | |
| numeric characters. | BPI_CAS_FSD_COMMON | ||
| 2 | Resource Id | Accepts all the | Max length: 10 |
| (Entry Field) | alphabets and | Mandatory | |
| numeric characters. | BPI_CAS_FSD_COMMON | ||
| 3 | Screen URL | Accepts all the | Max length: 255 |
| (Entry Field) | alphabets and | Mandatory | |
| numeric characters. | BPI_CAS_FSD_COMMON | ||
| 4 | Comments/ | Accepts all the | Max length: 255 |
| Description | alphabets and | ||
| numeric characters. | |||
| 5 | Application | Selection Box | Default: Choose One |
| Name | validation | “Mandatory” | |
| BPI_CAS_FSD_COMMON | |||
1.4.6 User Interface ID: SECURITY_SCREEN—015 (See Figure P-27)
Interface ID: SECURITY_SCREEN—016 (See Figure P-28)
User Interface ID: SECURITY_SCREEN—017 (See Figure P-29)
1.4.6.1 User Interface Screen Snap Shot—Screen Name: User Master
1.4.6.2 Field Name, Element Type & Purpose
Table for Screen SECURITY_SCREEN—015
| Element Name | Element Type | Purpose |
| Main Heading | Text | To give the heading for |
| Create User | the screen being navigated | |
| Sub Header User | Text | Text for the User Id |
| Id | ||
| User Id | Entry Field | Text for the entry field |
| Sub Header | Text | Text for the Display Name |
| Display Name | ||
| Display Name | Entry Field | Text for the entry field |
| Sub Header | Text | Text for the Name |
| Name | ||
| Sub Header First | Text | Text for the First Name |
| Name | ||
| First Name | Entry Field | Text for the entry field |
| Sub Header MI | Text | Text for Middle Initial |
| Middle Initial | Entry Field | Text for the entry field |
| Sub Header Last | Text | Text for last name |
| Name | ||
| Last Name | Entry Field | Text for the entry field |
| Sub Header | Text | Text for the password |
| password | ||
| Password | Entry Field | Text for the entry field |
| Sub Header | Text | Text for the Phone |
| Phone | ||
| Phone | Entry Field | Text for the entry field |
| Sub Header Fax | Text | Text for the fax |
| Fax | Entry Field | Text for the entry field |
| Sub Header Extn | Text | Text for the ext |
| Extn | Entry Field | Text for the entry field |
| Sub Header email | Text | Text for the email |
| Entry Field | Text for the entry field | |
| Sub Header Lock | Text | Text for the lock |
| Lock | Check Box | Check box for lock field |
| Save | Button (HTML | To Save the data this |
| Button) | button need to be clicked | |
| Cancel | Button (HTML | To cancel current operation. |
| Button) | ||
Table for Screen SECURITY_SCREEN—016
| Element Name | Element Type | Purpose | |
| Search | Gif | To search the user | |
Table for Screen SECURITY_SCREEN—016
| Element Name | Element Type | Purpose |
| Main Heading | Text | To give the heading for |
| Modify User | the screen being navigated | |
| Sub Header User | Text | Text for the User Name |
| Name | ||
| Sub Header User | Text | Text for the User Id |
| Id | ||
| User Id | Entry Field | Text for the entry field |
| Sub Header | Text | Text for the Display Name |
| Display Name | ||
| Display Name | Entry Field | Text for the entry field |
| Sub Header | Text | Text for the Name |
| Name | ||
| Sub Header First | Text | Text for the First Name |
| Name | ||
| First Name | Entry Field | Text for the entry field |
| Sub Header MI | Text | Text for MI |
| MI | Entry Field | Text for the entry field |
| Sub Header Last | Text | Text for last name |
| Name | ||
| Last Name | Entry Field | Text for the entry field |
| Sub Header | Text | Text for the password |
| password | ||
| Password | Entry Field | Text for the entry field |
| Sub Header | Text | Text for the Phone |
| Phone | ||
| Phone | Entry Field | Text for the entry field |
| Sub Header Fax | Text | Text for the fax |
| Fax | Entry Field | Text for the entry field |
| Sub Header Ext | Text | Text for the Ext |
| Ext | Entry Field | Text for the entry field |
| Sub Header email | Text | Text for the email |
| Entry Field | Text for the entry field | |
| Lock | Check Box | Check box for the lock field |
| Update | Button (HTML | To Save the data this |
| Button) | button need to be clicked | |
| Cancel | Button (HTML | To cancel current operation. |
| Button) | ||
Table for Screen SECURITY_SCREEN—017
| Element Name | Element Type | Purpose |
| Main Heading | Text | To give the heading for |
| Delete User | the screen being navigated | |
| Sub Heading | Text | To give the sub heading for |
| Select the User | the screen being navigated | |
| User Names | Check Box | Check boxes for |
| Sales, Select box | User names to be deleted. | |
| for Application | ||
| Check Box | Check All | On clicking the “Check All” link |
| should check all the check | ||
| boxes in the HTML table. | ||
| Check Box | Clear All | On clicking the “Clear All” link |
| should uncheck all the checked | ||
| check boxes in the HTML table. | ||
| Delete | Delete | To Delete the data this |
| button need to be clicked | ||
1.4.6.3 Front End Validation
Validation Details
This section provides the front end screen validations along with the associated message—Success/Error Message text
| # | Element Name | Action/Validation Details | Message |
| 1 | Display Name | BPI_CAS_FSD_COMMON | Mandatory Max Length: 30 |
| (Entry Field) | BPI_CAS_FSD_COMMON | ||
| 2 | First Name(Entry Field) | BPI_CAS_FSD_COMMON | Mandatory Max Length: 25 |
| BPI_CAS_FSD_COMMON | |||
| 3 | MI (Entry Field) | BPI_CAS_FSD_COMMON | Mandatory Max Length: 1 |
| BPI_CAS_FSD_COMMON | |||
| 4 | Last Name (Entry Field) | BPI_CAS_FSD_COMMON | Mandatory Max Length: 35 |
| BPI_CAS_FSD_COMMON | |||
| 5 | Password (Entry Field) | BPI_CAS_FSD_COMMON | Mandatory Max Length: 15 |
| Min Length: 6 | |||
| BPI_CAS_FSD_COMMON | |||
| 6 | Phone | BPI_CAS_FSD_COMMON | Max Length: 10 |
| BPI_CAS_FSD_COMMON | |||
| 7 | Fax | BPI_CAS_FSD_COMMON | Max Length: 10 |
| BPI_CAS_FSD_COMMON | |||
| 8 | Extn | BPI_CAS_FSD_COMMON | BPI_CAS_FSD_COMMON |
| 9 | BPI_CAS_FSD_COMMON | BPI_CAS_FSD_COMMON | |
| 10 | Lock Status | BPI_CAS_FSD_COMMON | BPI_CAS_FSD_COMMON |
1.4.7 User Interface ID: SECURITY_SCREEN—0018 (See Figure P-30)
User Interface ID: SECURITY_SCREEN—019 (See Figure P-31)
User Interface ID: SECURITY_SCREEN—020 (See Figure P-32)
1.4.7.1 User Interface Screen Snap Shot—Screen Name: User Role Master
1.4.7.2 Field Name, Element Type & Purpose
Table for Screen SECURITY_SCREEN—018
| Element Name | Element Type | Purpose |
| Main Heading | Text | To give the heading for |
| Create User Role | the screen being navigated | |
| Sub Header User | Text | Text for the User Role Id |
| Role Id | ||
| User Role Id | Entry Field | Text for the entry field |
| Sub Header User | Text | Text for the User Role Name |
| Role Name | ||
| User Role Name | Entry Field | Text for the entry field |
| Sub Header User | Text | Text for the User Role Name |
| Role Description | ||
| User Role | Entry Field | Text for the entry field |
| Description | ||
| Save | Button (HTML | To Save the data this |
| Button) | button need to be clicked | |
| Cancel | Button (HTML | To cancel current operation. |
| Button) | ||
Table for Screen SECURITY_SCREEN—019
| Element Name | Element Type | Purpose | |
| Search | Gif | To search the user role | |
Table for Screen SECURITY_SCREEN—019
| Element Name | Element Type | Purpose |
| Main Heading | Text | To give the heading for the |
| Modify User Role | screen being navigated | |
| Sub Header User | Text | Text for the User Role Id |
| Role Id | ||
| User Role Id | Entry Field | Text for the entry field |
| Sub Header User | Text | Text for the User Role Name |
| Role Name | ||
| User Role Name | Entry Field | Text for the entry field |
| Sub Header User | Text | Text for the User Role Name |
| Role Description | ||
| User Role | Entry Field | Text for the entry field |
| Description | ||
| Update | Button (HTML | To Save the data this button |
| Button) | need to be clicked | |
| Cancel | Button (HTML | To cancel current operation. |
| Button) | ||
Table for Screen SECURITY_SCREEN—020
| Element Name | Element Type | Purpose |
| Main Heading | Text | To give the heading for |
| Delete User Role | the screen being navigated | |
| Sub Heading | Text | To give the sub heading |
| Select the User | for the screen being navigated | |
| Role | ||
| User Role Names | Check Box | Check boxes for User |
| Sales, finance | Role names to be deleted. | |
| Check Box | Check All | On clicking the “Check All” link |
| should check all the check | ||
| boxes in the HTML table. | ||
| Check Box | Clear All | On clicking the “Clear All” link |
| should uncheck all the checked | ||
| check boxes in the HTML table. | ||
| Delete | Delete | To Delete the data this |
| button need to be clicked | ||
1.4.7.3 Front End Validation
Validation Details
This section provides the front end screen validations along with the associated message—Success/Error Message text
| # | Element Name | Action/Validation Details | Message |
| 1 | User Role Name | BPI_CAS_FSD_COMMON | BPI_CAS_FSD_COMMON |
| (Entry Field) | |||
| 2 | User Role Id | BPI_CAS_FSD_COMMON | BPI_CAS_FSD_COMMON |
| (Entry Field) | |||
| 3 | Comments/Description | BPI_CAS_FSD_COMMON | Max length: 255 |
1.4.8 User Interface ID: SECURITY_SCREEN—021 (See Figure P-33)
1.4.8.1 User Interface Screen Snap Shot—Screen Name: Group Access Rights
1.4.8.2 Field Name, Element Type & Purpose
Table for Screen SECURITY_SCREEN—021
| Element Name | Element Type | Purpose |
| Main Heading | Text | To give the heading for |
| Group Access | the screen being navigated | |
| Rights | ||
| Sub Header | Text | Text for the Group Name |
| Select Group | ||
| Group Name | Selection Box | Selection box for the Group Name |
| Sub Header | Text | Text for the Application Name |
| Select | ||
| Application | ||
| Application | Selection Box | Selection box for the Application Name |
| Name | ||
| Select | Button (HTML | To select the current selected Group |
| Button) | to assign rights and modules. | |
| Cancel | Button (HTML | To cancel current operation. |
| Button) | ||
Table for Screen SECURITY_SCREEN—021
| Element Name | Element Type | Purpose |
| Main Heading | Text | To give the heading for the |
| Group Access | screen being navigated | |
| Rights | ||
| Sub Header | Text | Text for the Resource Name |
| Resource Name | ||
| Resource Name | Check Boxes | Check boxes |
| Sub Header | Text | Text for Access Rights |
| Access Rights | ||
| Combo Box | Combo Box | Combo box for |
| selection of access rights. | ||
| Save | Button (HTML | To Save the data this |
| Button) | button need to be clicked | |
| Cancel | Button (HTML | To cancel current operation. |
| Button) | ||
1.4.8.3 Front End Validation
Validation Details
This section provides the front end screen validations along with the associated message—Success/Error Message text
| # | Element Name | Action/Validation Details | Message |
| 1 | Group Name | BPI_CAS_FSD_COMMON | BPI_CAS_FSD_COMMON |
| 2 | Application Name | BPI_CAS_FSD_COMMON | BPI_CAS_FSD_COMMON |
| 3 | Resource Id | BPI_CAS_FSD_COMMON | BPI_CAS_FSD_COMMON |
1.4.9 User Interface ID: SECURITY_SCREEN—022 (See Figure P-34)
User Interface ID: SECURITY_SCREEN—023 (See Figure P-35)
1.4.9.1 User Interface Screen Snap Shot—Screen Name: User, Role and Group Mapping
1.4.9.2 Field Name, Element Type & Purpose
Table for Screen SECURITY_SCREEN—022
| Element Name | Element Type | Purpose |
| Main Heading | Text | To give the heading |
| User Search | for the screen being navigated | |
| Sub Header | Text | Text for the User Id |
| Select User Id | ||
| User Id | Text Box | Text Field for the User Id |
| Sub Header | Text | Text for the User Name |
| Select User | ||
| Name | ||
| User Name | Text Box | Text Field for the User Name |
| Search | Button (HTML | To search the current |
| Button) | selected User id | |
| Cancel | Button (HTML | To cancel current operation. |
| Button) | ||
Table Screen SECURITY_SCREEN—022
| Element Name | Element Type | Purpose |
| Main Heading | Text | To give the heading for |
| User Search | the screen being navigated | |
| Sub Header | Text | Text for the User Id |
| Select User Id | ||
| User Id | Text Field | Text Field for the User Id |
| Sub Header | Text | Text for the User Name |
| Select User | ||
| Name | ||
| User Name | Text Field | Text Field for the User Name |
| Search | Button (HTML | To search the current |
| Button) | selected User id | |
| Cancel | Button (HTML | To cancel current operation. |
| Button) | ||
| Sub Heading | Text | To give the heading for |
| User Search | the search screen | |
| Results | ||
| Sub Header User | Label | Text for the User Id |
| Id | ||
| Sub Header User | Label | Text for the User Name |
| Name | ||
| Data Row from | User Id | User id from database. |
| database | To be displayed in table | |
| Data Row from | User Name | User name from database. |
| database | To be displayed in table | |
| Cancel | Button (HTML | To cancel current operation. |
| Button) | ||
Table for Screen SECURITY_SCREEN—023
| Element Name | Element Type | Purpose |
| Main Heading | Text | To give the heading for |
| User Role | the screen being navigated | |
| Mapping | ||
| Sub Header | Text | Text for the User Id |
| Select User Id | ||
| User Id | Text Label | Text Label for the User Id |
| Sub Header | Text | Text for the User Name |
| Select User | ||
| Name | ||
| User Name | Text Label | Text Label for the User Name |
| Sub Header | Text | Text for the User Role |
| Select User Role | ||
| Selection box | Selection Box | Selection Box for User Role |
| Select | Button (HTML | To select the current selected User id |
| Button) | ||
| Cancel | Button (HTML | To cancel current operation. |
| Button) | ||
Table for Screen FIG. 33: Screen SECURITY_SCREEN—023
| Element Name | Element Type | Purpose |
| Main Heading | Text | To give the heading for |
| User Role | the screen being navigated | |
| Mapping | ||
| Sub Header | Text | Text for the User Id |
| Select User Id | ||
| User Id | Text Label | Text Label for the User Id |
| Sub Header | Text | Text for the User Name |
| Select User | ||
| Name | ||
| User Name | Text Label | Text Label for the User Name |
| Sub Header User | Text | Text for the User Role |
| Role | ||
| Text Label | Text Label | Selection Box for User Role |
| Sub Header | Text | Text for the Groups |
| Select the groups | ||
| Check Box | Check Box | Check Box for groups. User |
| can select one or more groups. | ||
| Select | Button (HTML | To select the current selected User id |
| Button) | ||
| Cancel | Button (HTML | To cancel current operation. |
| Button) | ||
1.4.10 User Interface ID: SECURITY_SCREEN—024 (See Figure P-36)
User Interface ID: SECURITY_SCREEN—025 (See Figure P-37)
1.4.10.1 User Interface Screen Snap Shot—Screen Name: Group Access Rights
1.4.10.2 Field Name, Element Type & Purpose
Table for Screen SECURITY_SCREEN—024
| Element Name | Element Type | Purpose |
| Main Heading | Text | To give the heading for |
| User Search | the screen being navigated | |
| Sub Header | Text | Text for the User Id |
| Select User Id | ||
| User Id | Text Box | Text Field for the User Id |
| Sub Header | Text | Text for the User Name |
| Select User | ||
| Name | ||
| User Name | Text Box | Text Field for the User Name |
| Search | Button (HTML | To search the current selected User id |
| Button) | ||
| Cancel | Button (HTML | To cancel current operation. |
| Button) | ||
Table for Screen SECURITY_SCREEN—024
| Element Name | Element Type | Purpose |
| Main Heading | Text | To give the heading for |
| User Search | the screen being navigated | |
| Sub Header | Text | Text for the User Id |
| Select User Id | ||
| User Id | Text Field | Text Field for the User Id |
| Sub Header | Text | Text for the User Name |
| Select User | ||
| Name | ||
| User Name | Text Field | Text Field for the User Name |
| Search | Button (HTML | To search the |
| Button) | current selected User id | |
| Cancel | Button (HTML | To cancel current operation. |
| Button) | ||
| Sub Heading | Text | To give the heading |
| User Search | for the search screen | |
| Results | ||
| Sub Header User | Label | Text for the User Id |
| Id | ||
| Sub Header User | Label | Text for the User Name |
| Name | ||
| Data Row from | User Id | User id from database. |
| database | To be displayed in table | |
| Data Row from | User Name | User name from database. |
| database | To be displayed in table | |
| Cancel | Button (HTML | To cancel current operation. |
| Button) | ||
Table for Screen SECURITY_SCREEN—025
| Element Name | Element Type | Purpose |
| Main Heading | Text | To give the heading for the |
| User Access | screen being navigated | |
| Rights | ||
| Sub Header User | Text | Text for the User Name |
| Name | ||
| User Name | Text | Text for the User Name |
| Sub Header User | Text | Text for the User Id |
| ID | ||
| User Id | Text | Text for the User Id |
| Sub Header | Text | Text for the Module Name |
| Module Name | ||
| Selection Box | Selection Box | Selection Box for Module name |
| Sub Header Role | Text | Text for the Role Name |
| Name | ||
| Selection Box | Selection Box | Selection Box for Role name |
| Select | Button (HTML | To select the current selected |
| Button) | User assign rights for all the r | |
| application. | ||
| Cancel | Button (HTML | To cancel current operation. |
| Button) | ||
Table for Screen SECURITY_SCREEN—025
| Element Name | Element Type | Purpose |
| Main Heading | Text | To give the heading for the screen |
| User Access | being navigated | |
| Rights | ||
| Sub Header | Text | Text for the Resource Name |
| Resource Name | ||
| Resource name | Text | Text for the Resource Name |
| Sub Header | Text | Text for Access Rights |
| Access Rights | ||
| Combo Box | Combo Box | Combo box for selection of access |
| rights. | ||
| Save | Button (HTML | To Save the data this button need to be |
| Button) | clicked | |
| Cancel | Button (HTML | To cancel current operation. |
| Button) | ||
1.4.10.3 Front End Validation
Validation Details
This section provides the front end screen validations along with the associated message—Success/Error Message text
| # | Element Name | Action/Validation Details | Message |
| 1 | User Role | BPI_CAS_FSD_COMMON | “Please choose the |
| User Role” | |||
| 2 | Module Name | BPI_CAS_FSD_COMMON | “Please choose the |
| Module name” | |||
| 3 | Access Rights | BPI_CAS_FSD_COMMON | “Please choose the |
| Resource name” | |||
1.4.11 User Interface ID: SECURITY_SCREEN—026 (See Figure P-38)
1.4.11.1 User Interface Screen Snap Shot—Screen Name: Configurable Items
1.4.11.2 Field Name, Element Type & Purpose
Table for Screen SECURITY_SCREEN—026
| Element Name | Element Type | Purpose |
| Main Heading | Text | To give the heading for the screen |
| Configure Items | being navigated | |
| Sub Header | Text | Text for the Password Length |
| Password Length | ||
| Password Length | Text Box | Text Field for the Password Length |
| Sub Header | Text | Text for the Password Length |
| Password Length | (Minimum) | |
| (Minimum) | ||
| Password Length | Text Box | Text Field for the Password |
| (Minimum) | Length (Minimum) | |
| Sub Header | Text | Text for the Expiry of password |
| Expiry of | ||
| password (Max) | ||
| Expiry of | Text Box | Text Field for the Expiry of password |
| password | ||
| Sub Header | Text | Text for the Expiry of password |
| Expiry of | ||
| password (Min) | ||
| Expiry of | Text Box | Text Field for the Prompt Date Period |
| password | ||
| Sub Header | Text | Text for the Prompt Date Period |
| Prompt Date | ||
| Period | ||
| Prompt Date | Text Box | Text Field for the Expiry of password |
| Period | Prompt Date Period | |
| Sub Header | Text | Text for the Password Repeat Count |
| Password Repeat | ||
| Count | ||
| Password Repeat | Text Box | Text Field for the Password Repeat |
| Count | Count | |
| Sub Header | Text | Text for the Invalid Passwords Count |
| Invalid | ||
| Passwords Count | ||
| Invalid | Text Box | Text Field for the Invalid Passwords |
| Passwords Count | Count | |
| Sub Header Lock | Text | Text for the Lock Time |
| Time | ||
| Lock Time | Text Box | Text Field for the Lock Time |
| Search | Button (HTML | To search the current selected User id |
| Button) | ||
| Cancel | Button (HTML | To cancel current operation. |
| Button) | ||
1.4.11.3 Front End Validation
Validation Details
This section provides the front end screen validations along with the associated message—Success/Error Message text
| Action/Validation | |||
| # | Element Name | Details | Message |
| 1 | Password Length | Numeric (Integer) | Integer Length max 2 |
| (Maximum & | For eg Min Value 6 | ||
| Minimum) | Max Value 10 | ||
| 2 | Expiry of password | Numeric (Integer) | Integer Length max 2 |
| (Min) | For eg Min Value 1 | ||
| Max Value 99 | |||
| 3 | Expiry of password | Numeric (Integer) | Integer Length max 2 |
| (Max) | For eg Min Value 0 | ||
| Max Value 99 | |||
| Should be greater than | |||
| Expiry of password (Min) | |||
| 4 | Password Repeat | Numeric (Integer) | Integer Length max 2 |
| Count | For eg Min Value 1 | ||
| Max Value 10 | |||
| 5 | Invalid Passwords | Numeric (Integer) | Integer Length max 2 |
| Count | For eg Min Value 1 | ||
| Max Value 10 | |||
| 6 | Lock Time | Numeric (Integer) | Integer Length max 2 |
| (Minutes) | For eg Min Value 10 | ||
| Max Value 36000 | |||
| 7 | Password Length | Numeric (Integer) | Integer Length max 2 |
| (Minimum) | For eg Min Value 6 | ||
| Max Value 10 | |||
| Less than maximum length | |||
| of password | |||
| 8 | Prompt Date | Numeric (Integer) | Less than maximum limit |
| Period for | for expiration date | ||
| expiration | For eg Min Value 1 | ||
| Max Value 10 | |||
1.4.12 User Login
When the system user logs in into the core administration system the separate ACL will be generated for each user. The ACL will be stored in the User Profile object, which will be stored in the user session. When user request for a particular page controller will check with the security system whether user is having access to the particular page.
When any user requests a particular page in the core administrative system, the controller will ask the security system about the security rights for the application. If user is having rights he will be allowed to perform the current operation.
For e.g. If user request for create carrier master. The carrier master is registered into the system with system with id as 0001. The controller will check the access rights for the carrier master. If the rights for carrier master is write then user will have access to create carrier master as the user rights are higher than requested one. If user is having access rights as read for carrier master then he would not be able to access because it is having lower rights than requested one.
Password Validation
Password validation to be done as per the requirements specified before. The following items need to be configured as per requirements.
1.5 Business Rules
| Activity | Rules | |
| Delete Rule | For Deleting referential integrity need to be | |
| considered. | ||
| A group can be deleted if no user is referring to the | ||
| group | ||
| Same applies to other hierarchy | ||
| Module | ||
| Application | ||
| Resource | ||
1.6 Help Menu
Help to be provided for all the screens. Help should contain following details.
Basic Functionality Description
Description about the screen fields.
1.7 Process-Data Structure
This section describes the likely data structure that would contain the data for/by executing the process
BPI_Modules
| Data Element Name | Data Element Type | Constraints |
| MODULE_ID | Varchar (10) | PK Not Null |
| MODULE_NAME | Varchar (50) | Not Null |
| DESCRIPTION | Varchar (255) | |
| CREATED_BY | Varchar (25) | |
| CREATED_DATE | Timestamp | |
| MODIFIED_BY | Varchar (25) | |
| LAST_MODIFIED_DATE | Timestamp | |
| STATUS | NUMBER | 1 - Active |
| 0 - Inactive | ||
BPI_Groups
| Data Element Name | Data Element Type | Constraints |
| GROUP_ID | Varchar (10) | PK Not Null |
| DESCRIPTION | Varchar (255) | Not Null |
| GROUP_NAME | Varchar (50) | |
| CREATED_BY | Varchar (25) | |
| CREATED_DATE | Timestamp | |
| MODIFIED_BY | Varchar (25) | |
| LAST_MODIFIED_DATE | Timestamp | |
| STATUS | NUMBER | 1 - Active |
| 0 - Inactive | ||
BPI_Applications
| Data Element Name | Data Element Type | Constraints |
| APPLICATION_ID | Varchar (10) | PK Not Null |
| APPLICATION_NAME | Varchar (50) | Not Null |
| DESCRIPTION | Varchar (255) | |
| MODULE_ID | Varchar (10) | FK Refers |
| BPI_MODULES | ||
| CREATED_BY | Varchar (25) | |
| CREATED_DATE | Timestamp | |
| MODIFIED_BY | Varchar (25) | |
| LAST_MODIFIED_DATE | Timestamp | |
| STATUS | NUMBER | 1 - Active |
| 0 - Inactive | ||
BPI_Resources
| Data | ||
| Data Element Name | Element Type | Constraints |
| RESOURCE_ID | Varchar (10) | PK Not Null |
| RESOURCE_NAME | Varchar (50) | Not Null |
| DESCRIPTION | Varchar (255) | |
| APPLICATION_ID | Varchar (10) | FK Refers |
| BPI_APPLICATIONS | ||
| CREATED_BY | Varchar (25) | |
| CREATED_DATE | Timestamp | |
| MODIFIED_BY | Varchar(25) | |
| LAST_MODIFIED_DATE | Timestamp | |
| STATUS | NUMBER | 1 Active |
| 0 - Inactive | ||
BPI_ACL
| Data Element Name | Data Element Type | Constraints |
| ACL_ID | Varchar (10) | PK Not null |
| ACL_NAME | Varchar (50) | Not null |
| CREATED_BY | Varchar (25) | |
| CREATED_DATE | Timestamp | |
| MODIFIED_BY | Varchar(25) | |
| LAST_MODIFIED_DATE | Timestamp | |
| STATUS | NUMBER | 1 Active |
| 0 - Inactive | ||
BPI_Roles
| Data Element Name | Data Element Type | Constraints |
| ROLE_ID | Varchar (10) | PK Not null |
| ROLE_NAME | Varchar (50) | Not null |
| CREATED_BY | Varchar (25) | |
| CREATED_DATE | Timestamp | |
| MODIFIED_BY | Varchar(25) | |
| LAST_MODIFIED_DATE | Timestamp | |
| STATUS | NUMBER | 1 Active |
| 0 - Inactive | ||
BPI_Users
| Data Element Name | Data Element Type | Constraints |
| USER_ID | Varchar (10) | PK Not null |
| PASSWORD | Varchar (30) | Not null |
| ADDRESS 1 | Varchar (30) | |
| ADDRESS 2 | Varchar (30) | |
| CITY | Varchar (25) | |
| STATE | Varchar (25) | |
| ZIP | Varchar (25) | |
| COUNTRY | Varchar (25) | |
| PHONE 1 | Varchar (25) | |
| PHONE 2 | Varchar (25) | |
| PHONE 3 | Varchar (25) | |
| CREATED_BY | Varchar (25) | |
| CREATED_DATE | Timestamp | |
| MODIFIED_BY | Varchar (25) | |
| LAST_MODIFIED_DATE | Timestamp | |
| STATUS | Number | 1 Active |
| 0 Inactive | ||
| PASSWORD_EXPIRY_DATE | Timestamp | |
| LOCK_STATUS | Number | |
BPI_Group_Access
| Data | ||
| Data Element Name | Element Type | Constraints |
| GROUP_ID | Varchar (10) | Not null Refers |
| BPI_GROUPS | ||
| RESOURCE_ID | Varchar (105) | Not null Refers |
| BPI_RESOURCES | ||
| APPLICATION_ID | Varchar (10) | Not null Refers |
| BPI_APPLICATIONS | ||
| ACL_ID | Varchar (10) | Not null Refers |
| BPI_ACL | ||
| CREATED_BY | Varchar (25) | |
| CREATED_DATE | Timestamp | |
| MODIFIED_BY | Varchar (25) | |
| LAST_MODIFIED_DATE | Timestamp | |
| STATUS | Number | 1 Active |
| 0 Inactive | ||
BPI_User_Roles
| Data Element Name | Data Element Type | Constraints |
| USER_ID | Varchar (10) | Not Null Refers |
| BPI_USERS | ||
| ROLE_ID | Varchar (10) | Not Null Refers |
| BPI_ROLES | ||
| GROUP_ID | Varchar (10) | Not Null Refers |
| BPI_USGROUPS | ||
| CREATED_BY | Varchar(25) | |
| CREATED_DATE | Timestamp | |
| MODIFIED_BY | Varchar(25) | |
| LAST_MODIFIED_DATE | Timestamp | |
| Status | Number | 1 Active |
| 0 Inactive | ||
BPI_User_Access
| Data | ||
| Data Element Name | Element Type | Constraints |
| RESOURCE_ID | Varchar (10) | Not Null Refers BPI— |
| RESOURCE | ||
| USER_ID | Varchar (25) | Not Null Refers |
| BPI_USERS | ||
| ACL_ID | Varchar (10) | Not Null Refers |
| BPI_ACL | ||
| ROLE_ID | Varchar (10) | |
| CREATED_BY | Varchar (25) | |
| CREATED_DATE | Timestamp | |
| MODIFIED_BY | Varchar (25) | |
| LAST_MODIFIED_DATE | Timestamp | |
| Status | Number | 1 Active |
| 0 Inactive | ||
BPI_User_Password_History
| Data | ||
| Data Element Name | Element Type | Constraints |
| USER_ID | Varchar (10) | Not Null Refers BPI— |
| USERS | ||
| PASSWORD | Varchar (10) | Not Null |
| CREATED_BY | Varchar (25) | |
| CREATED_DATE | Timestamp | |
| MODIFIED_BY | Varchar (25) | |
| LAST_MODIFIED_DATE | Timestamp | |
| Status | Number | 1 Active |
| 0 Inactive | ||
1.8 Back End Validations
This subsection provides the field element name and corresponding back end validation if applicable.
Back end validations are those validations where the validations have got to be necessarily done using the database.
As a general rule backend validations should be done for all the validation checks that are being carrier on the front end.
1.9 Non-Functional Requirements
This subsection corresponds to the requirements that do not relate to the user function. It provides information on the system requirements—Ideally identifies the present problems in the existing system from a non-functional perspective and avoiding the same in the new system
| Non Functional | |
| Requirement | Details |
| Performance | Performance criteria should be established based |
| on the data size and the page size. | |
| System Exception | All system exceptions should be handled grace |
| fully throwing a error page with relevant exception | |
| information and action to be taken for resolving the | |
| exception | |
1.10 Access Control List
This section describes the classification of users who can access the process under definition
| User ID | Job Description | Functionality | Access Level | |
| Change Record |
| Date | Author | Version | Change Reference | |
| Feb. 04, 2001 | Sudhakar K | 1.0 | Baseline Release | |
| Reviewers |
| Name | Position | |
| Distribution |
| No Of | ||||
| Copy No. | Name | Copies | Location | |
1. Introduction 4
1.1. Purpose 4
1.2. Business Use Case Specification Reference 4
1.3. Definitions, Acronyms & Abbreviations 4
2. Process Identification 5
2.1. Background 5
2.2. Process Description 5
2.3. Process Flow 5
User Interface 6
3.1. User Interface Screens 6
3.1.1. Import Zip Codes: BPI_SCR_EC_EC—001—01 6
Interface Flow 6
3.3. Help Menu 6
4. Business Rule Mapping 8
5. Data Structures 9
5.1. Back End Validations 9
6. Non-Functional Requirements 10
7. Access Control List 11
1. Introduction
1.1. Purpose
The purpose of this document is to describe the common functional features available across all the modules. This document is identified as Common Functional Features. This document identifies how the user interacts with the system, the data to be captured, the business logic to be implemented, and the output of the process for the common functional features.
1.2. Business Use Case Specification Reference
| Business Use Specification ID | Business Use Case Name | |
| BPI_SCOPE | Scope Document | |
| BPI_SCOPE_ADD | Addendum to scope | |
1.3. Definitions, Acronyms & Abbreviations
| Term | Explanation | |
2. Process Identification
2.1. Background
Common functional feature is to identify the common functionality across all the modules that have the same usage. This would help in standardization and reuse of the components.
2.2. Process Description
The objective of the Common Functional Features process is to:
-
- 1) Identify the Common functional features across all the modules:
2.3. Process Flow
Not applicable
3. User Interface
3.1. User Interface Screens
3.1.1. Not Applicable
3.1.2. Not Applicable
3.1.3. Element Name, Element Type & Purpose
| Element Name | Element Type | Purpose |
| First name | Entry Field | Enter the First name |
| Last name | Entry Field | Enter the last name |
| Middle name (MI) | Entry Field | Enter the middle Name |
| Suffix | Drop Down List | List the Suffix |
| Salutation | Drop Down List | List the Salutation |
| Title | Entry Field | Enter the Job Title |
| Address | Entry Field | Enter the first detail about the address |
| Suite/Apt. # | Entry Field | Enter the suite/Apartment or PO BOX number |
| City | Entry Field | Enter the name of the city |
| State | Drop Down List | List all the States in UAS |
| ZIP | Entry Field | Enter the ZIP Code |
| Phone # | Entry Field | Enter the Phone number |
| Fax # | Entry Field | Enter the FAX number |
| Phone Extension | Entry Field | Enter extension number |
| FAX Extension | Entry Field | Enter extension number |
| Email Address | Entry Field | Enter the email address |
| Credit Card Number | Enter the Credit Card | Entry Credit Card number |
| Number | ||
| Credit Card Type | Drop Down List | List the type of Credit Card |
| (Date) Current Date | Calendar/Entry Field | Entry field to type the date or Calendar to pick the |
| (System Date) | date | |
| (Date) Past Date (1900 | Calendar/Entry Field | Entry field to type the date or Calendar to pick the |
| to system date) | date | |
| (Date) Future Date | Calendar/Entry Field | Entry field to type the date or Calendar to pick the |
| (System date to 100 Yr. | date | |
| hence) | ||
| (Date) Default 1st of | Calendar/Entry Field | Entry field to type the date or Calendar to pick the |
| Following Month (eg. | date | |
| System date is Dec. 2, 2001 | ||
| should default to | ||
| Jan. 1, 2002) | ||
| (Date) Default 1st of | Calendar/Entry Field | Entry field to type the date or Calendar to pick the |
| the current Month (e.g. | date | |
| System date is Dec. 2, 2001 | ||
| should default to | ||
| Dec. 1, 2001) | ||
| (Date) Default End of | Calendar/Entry Field | Entry field to type the date or Calendar to pick the |
| current Month (eg. | date | |
| System date is Dec. 2, 2001 | ||
| should default to | ||
| Dec. 31, 2001) | ||
| (Date) Credit Card | Drop Down List | List all the Months in a year |
| Date (should only | ||
| accept future date.) | ||
| Month | ||
| Date) Credit Card | Drop Down List | List the year 25 years ahead |
| Date (should only | ||
| accept future date.) | ||
| Year | ||
| Social Security | Entry Field | Enter the Social Security number |
| Number | ||
| TAX Identification | Entry Field | Enter the Tax Identification Number |
| Number | ||
| Mode of | Drop Down List | List Various modes of communication |
| Communication | ||
| Browser Back Button | Button | Validate the back button |
| Browser Forward | Button | Validate the forward button |
| Button | ||
| Refresh Button | Button | Validate Refresh button |
| Address Bars | Tool Bars | Hide Address bar |
| Link Bar | Tool Bars | Hide Link bar |
| Standard Button | Tool bars | Hide standard bars |
| Window Close | Browser Window | Validate Close |
| Window Minimize | Browser Window | Validate minimize |
3.1.4. Screen Validations
Note: Validation provided here are the default validations. However if the module functionality has specified different validations for these element described then that would override the default validations provided here.
| Element Name | Action/Validation Details | Message |
| First name | Entry Field with 40 Character long. | |
| Can accept only Alpha characters. | ||
| Arnold | ||
| Last name | Entry Field with 40 Character long | |
| Can accept only Alpha characters. | ||
| Schwarzenegger | ||
| Middle name (MI) | Entry Field with 1 Character long | |
| Can accept only Alpha characters. | ||
| M, A etc. | ||
| Suffix | List should include Jr., Sr., I., II., | |
| III., IV., and V. | ||
| Salutation | List should include Mr., Mrs., Ms. | |
| Title | Entry Field with 20 Character long | |
| Can accept Alpha and numeric | ||
| character and blank space between | ||
| character (Example Administrator 1) | ||
| Address | Entry Field with 40 Character long | |
| 3013 Douglas Boulevard, | ||
| Can accept free form entry with any | ||
| character. | ||
| Suite/Apt. # | Entry Field with 20 Character long | |
| Example 200 or 1 D etc. | ||
| Can accept free form entry with any | ||
| character. | ||
| City | Entry Field with 20 Character long | |
| Alpha only and Blank between | ||
| words allowed | ||
| Roseville, San Jose, San Diego | ||
| State | List all the States in USA in | |
| abbreviated form as CA, IL, OH, NY | ||
| etc. | ||
| ZIP | Entry Field with 5 Character long | |
| Should allow maximum and | ||
| minimum of 5 Numbers only. Whole | ||
| Number Field. | ||
| Phone # | Entry Field with 10 Character long | |
| Should allow maximum and | ||
| minimum of 10 Numbers only. | ||
| Whole Number Field. | ||
| 3 for Area code, 7 for the number. | ||
| Fax # | Entry Field with 10 Character long | |
| Should allow maximum and | ||
| minimum of 10 Numbers only. | ||
| Whole Number Field. | ||
| 3 for Area code, 7 for the number. | ||
| Phone Extension | Entry Field with 5 Character long | |
| Should allow maximum of 5 and | ||
| minimum of 1. Blanks fields are | ||
| acceptable. | ||
| Whole Number Field. | ||
| FAX Extension | Entry Field with 5 Character long | |
| Should allow maximum of 5 and | ||
| minimum of 1. Blanks fields are | ||
| acceptable. | ||
| Whole Number Field. | ||
| Email Address | Entry Field with 40 Character long | |
| Allow entering more than 40 | ||
| character. | ||
| Validate for a Valid Email Address. | ||
| Credit Card | Entry Field with 20 Character long | |
| Number | Minimum and maximum value | |
| should be 16. Allow only Whole | ||
| Number. Numeric Field | ||
| For Amex allow 20 as min and max | ||
| value. | ||
| Credit Card Type | List Credit Card type as | |
| Visa, Master, Discovery, Amex etc | ||
| (Date) Current | Entry Field or Calendar with default | |
| Date (System Date) | system date in the Entry Field and | |
| calendar. | ||
| (Date) Past Date | Entry Field or Calendar with default | |
| (1900 to system | system date − 1 in the Entry Field | |
| date) | and calendar. Do not allow for | |
| Current date and future date | ||
| (Date) Future Date | Entry Field or Calendar with default | |
| (System date to | system date in the Entry Field and | |
| 100 Yr. hence) | calendar. Do not allow for past date | |
| (Date) Default 1st | Entry Field or Calendar with default | |
| of Following | first of the following month date in | |
| Month (eg. System | the Entry Field and calendar. | |
| date is Dec. 2, 2001 | ||
| should default to | ||
| Jan. 1, 2002) | ||
| (Date) Default 1st | Entry Field or Calendar with default | |
| of the current | first of the current month date in the | |
| Month (e.g. System | Entry Field and calendar. | |
| date is Dec. 2, 2001 | ||
| should default to | ||
| Dec. 1, 2001) | ||
| (Date) Default End | Entry Field or Calendar with default | |
| of current Month | end of the current month date in the | |
| (eg. System date is | Entry Field and calendar. | |
| Dec. 2, 2001 should | ||
| default to | ||
| Dec. 31, 2001) | ||
| (Date) Credit Card | List to show all the months in a year | |
| Date (should only | ||
| accept future date.) | ||
| Month | ||
| Date) Credit Card | List the years from current year to | |
| Date (should only | 100 years forward hence. | |
| accept future date.) | Validate The Credit Card month and | |
| Year | year together. Should not have past | |
| month as credit card entry. | ||
| Social Security | Entry Field with 9 Character long | |
| Number | Should allow maximum of 9 and | |
| minimum of 9. | ||
| Whole Number Field. | ||
| TAX Identification | Entry Field with 9 Character long | |
| Number | Should allow maximum of 9 and | |
| minimum of 9. | ||
| Whole Number Field. | ||
| Mode of | List various modes of | |
| Communication | Communication like Fax, Phone, | |
| Email, USPS | ||
| Browser Back | Disable the browser back button and | |
| Button | hide the back button | |
| Browser Forward | Disable the browser forward button | |
| Button | and hide the forward button | |
| Refresh Button | Disable the browser refresh button | |
| and hide the refresh button | ||
| Address Bars | Disable the address bar so that user | |
| cannot type the URL to navigate to | ||
| the respective screen | ||
| Link Bar | Disable the link bar | |
| Standard Button | Disable the browser standard button | |
| Window Close | Catch windows close event with | |
| Java script and show the message. | ||
| Window Minimize | Allow to minimize the window | |
3.1.5. Interface Flow
N/A
3.1.6. Help Menu
| Element Name | Purpose | Valid Values | |
4. Business Rule Mapping
Not Applicable
| Activity | Rules | |
| 1. | |
5. Data Structures
Not Applicable
| Data Element Name | Data Element Type | |
5.1. Back End Validations
Not Applicable
| Field Element Name | Back End Validation | |
6. Non-Functional Requirements
Not Applicable
| Non Functional Requirement | Details | |
7. Access Control List
Not Applicable
| User ID | Job Description | Functionality | Access Level | |
Claims
What is claimed is:1. An automated benefits administration system of the type used to administer benefits of members of employed personnel subject to business rules for such benefits, the benefits administration comprising:
A. an automated business rules application automatically applying at least all legally-required rules to enrollment, eligibility, and group maintenance data input and making business rule decisions based on said data input; and
B. an automatic action application issuing notice to one or more users for all business rule discrepancies based on said data input.
2. The automated benefits administration system of claim 1 also comprising: (C) a business rules database having business rules accessible to the automated business rules application, whereby the automated business rules application may apply business rules from said business rules database.
3. The automated benefits administration system of claim 1 also comprising: (C) a business rule over-ride through which users may over-ride a business rule applied by the automated business rules application based on user authority level.
4. The automated benefits administration system of claim 2 also comprising: (D) a business rule over-ride too through which users may over-ride a plurality of business rules applied by the automated business rules application based on user authority level.
5. A benefits administration method of operating an automated benefits administration computing system of the type for administering benefits of employed personnel subject to business rules for said benefits, the benefits administration method comprising:
A. automatically applying at least all legally-required rules to enrollment, eligibility, and group maintenance data input into the automated benefits administration computing system and making business rule decisions based on said data input; and
B. automatically issuing notices to one or more users for all business rule discrepancies based on said data input.
6. The benefits administration method of claim 5 further comprising, during said automatic application step (A), automatically accessing a business rules database having business rules including said legally-required rules.
7. The automated benefits administration system of claim 5 further comprising, in step (A), providing a business rule over-ride as selected by a user have a predetermined authority level.
8. The automated benefits administration system of claim 6 further comprising, in step (A), providing a business rule over-ride as selected by a user have a predetermined authority level.
9. An automated benefits administration system of the type used to administer benefits of members of employed personnel subject to business rules for such benefits, the benefits administration comprising:
A. an automated business rules application automatically applying at least all legally-required rules and desired additional rules to enrollment, eligibility, and group maintenance data input and making business rule decisions based on said data input;
B. an automatic action application issuing notice to one or more users for all business rule discrepancies based on said data input, the automatic action application including the ability to issue notice to third parties by disparate communications vehicles.
10. The automated benefits administration system of claim 9 also comprising: (C) a business rules database having business rules accessible to the automated business rules application and wherein said business rules include a plurality of business rules among said legally-required and additional rules, whereby the automated business rules application may apply business rules from said business rules database.
11. The automated benefits administration system of claim 9 also comprising: (C) a business rule over-ride through which users may over-ride a plurality of business rules applied by the automated business rules application based on user authority level.
12. The automated benefits administration system of claim 10 also comprising: (D) a business rule over-ride too through which users may over-ride a business rule applied by the automated business rules application based on user authority level.
13. A benefits administration method of operating an automated benefits administration computing system of the type for administering benefits of employed personnel subject to business rules for said benefits, the benefits administration method comprising:
A. automatically applying at least all legally-required rules and additional business rules to enrollment, eligibility, and group maintenance data input into the automated benefits administration computing system and making business rule decisions based on said data input;
B. automatically issuing notices to one or more users for all business rule discrepancies based on said data input, including automatic issuance of one or more attention notice to a remote managing party upon entry of certain unsatisfactory data during local data input; and
C. providing at least remote enrollment access over the Internet to said automated benefits administration computing system.
Images & Drawings included:

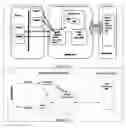


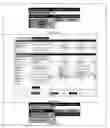
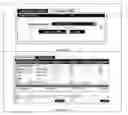
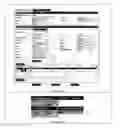


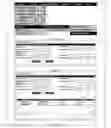


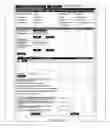


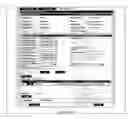


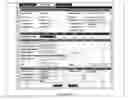
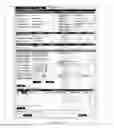


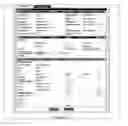


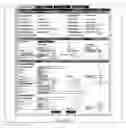


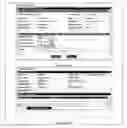


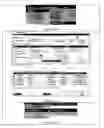


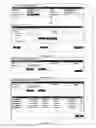


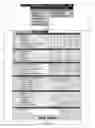


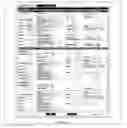
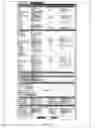


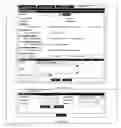


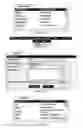


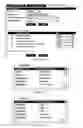


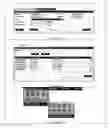


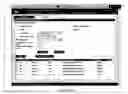


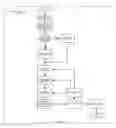


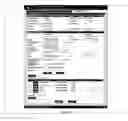
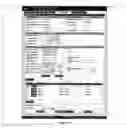


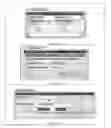


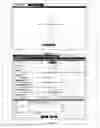


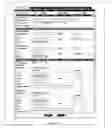


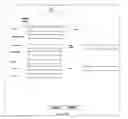

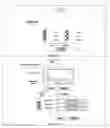
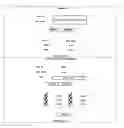


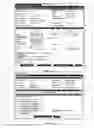


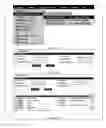


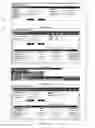

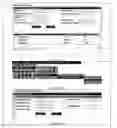


Sources:
- United States Patent and Trademark Office - verify current appl. status at the USPTO↗
Similar patent applications:
Recent applications in this class:
- » 20250285080 2025-09-11
Method and Apparatus for Managing Physician Referrals - » 20250278696 2025-09-04
SEARCHABLE INDEX ENCRYPTION - » 20250272658 2025-08-28
SELF-SERVICE LENDER PORTAL - » 20250272657 2025-08-28
INFORMATION PROCESSING SYSTEM, NON-TRANSITORY RECORDING MEDIUM, AND ATTRIBUTE SETTING METHOD - » 20250259143 2025-08-14
Ranking Notifications Based on Rules - » 20250252398 2025-08-07
SELF-SERVICE CLIENT ONBOARDING PLATFORM - » 20250209421 2025-06-26
ANALYTICAL REPORT GENERATION - » 20250200515 2025-06-19
Content Driven Open Vessel Data Assimilation Process and System - » 20250200514 2025-06-19
SYSTEM AND METHOD FOR SENSOR-BASED IMPROVED BUILDING USAGE - » 20250173677 2025-05-29
SYSTEMS AND METHODS FOR CORRELATING LARGE DATASETS OF ELECTRONIC DATA RECORDS