BLADE SHARPENING SYSTEM WITH FRICTION DRIVE ANGLE ADJUSTMENT MECHANISM
US20260070179A1
2026-03-12
19/252,378
2025-06-27
Smart Summary: A new blade sharpening device helps users sharpen blades easily and accurately. It has a special mechanism that lets you adjust the sharpening angle based on the thickness of different sharpening stones. The device features a quick-release base, making it simple to set up and move around. It can hold various blade shapes thanks to its removable jaws. Overall, this system is designed to be safe, precise, and easy to maintain. 🚀 TL;DR
Abstract:
A blade sharpening device includes a rotatable blade clamping assembly, a friction-driven angle adjustment mechanism, and a calibration apparatus for adjusting sharpening angles relative to stones of varying thicknesses. The system further includes a quick-disconnect base assembly for ease of mounting and transport. The calibration apparatus compensates for stone thickness variations using spacers and indexed markings. The blade clamping assembly is pivotably mounted and includes removable jaws for accommodating blades of differing profiles. The quick-disconnect base assembly allows rapid attachment to work surfaces using a low-profile locking interface. Together, the components provide a user-friendly, durable, and highly adjustable manual sharpening system with enhanced safety, alignment precision, and modularity for maintenance or component replacement.
Applicant:
Interested in similar patents?
Get notified when new applications in this technology area are published.
Classification:
B24B3/54 » CPC main
Sharpening cutting edges, e.g. of tools; Accessories therefor, e.g. for holding the tools of cutting blades of hand or table knives
Description
CROSS-REFERENCE TO RELATED APPLICATIONS
This application is a U.S. Non-Provisional Utility Patent Application entitled, “BLADE SHARPENING SYSTEM WITH FRICTION DRIVE ANGLE ADJUSTMENT MECHANISM” which claims priority to co-pending U.S. Provisional Patent Application No. 63/665,020, filed on Jun. 27, 2025 entitled, “FRICTION DRIVE ANGLE ADJUSTMENT MECHANISM” the contents of which are hereby fully incorporated by reference in its entirety.
FIELD OF THE EMBODIMENTS
The embodiments described herein relate generally to manual blade sharpening systems which employ rod mounted and guided sharpening stones. Certain embodiments further relate to sharpening systems incorporating features for compensating for variations in sharpening stone thickness, quick-release base attachment mechanisms, and indexed rotatable blade clamping assemblies.
BACKGROUND OF THE EMBODIMENTS
Blade sharpening systems that utilize sharpening stones mounted on one end of a rigid guide rod are well known in the art, but these systems continue to suffer from several persistent drawbacks that limit their precision, usability, and adaptability. One common issue in conventional systems is the difficulty of making fine, precise adjustments to the sharpening angle. In most prior art designs, the sharpening angle is set by manually sliding a bearing module up or down along a vertical support post and locking it in place using a thumbscrew. This adjustment process typically requires two hands and lacks the mechanical precision needed for consistent sharpening, particularly when minor angular changes are required. The reliance on purely manual positioning without any form of gear or mechanical assistance results in reduced repeatability and limits the user's control over fine adjustments.
While some recent sharpening systems have adopted gear-based angle adjustment mechanisms, such as rack-and-pinion or lead screw arrangements, to improve precision, these solutions tend to introduce added complexity, cost, and bulk. For example, systems employing machined gears or worm drives provide more controlled movement but are unnecessarily expensive and cumbersome for the intended application. These designs may also be over-engineered for users seeking a balance of accuracy and affordability in a compact form factor. Another problem relates to the lack of effective compensation for variations in sharpening stone thickness. During the sharpening process, users typically progress through stones of different grits, often from various manufacturers. These stones can differ in thickness, leading to unintended changes in the sharpening angle unless corrective measures are taken. Existing solutions, such as digital angle cubes or stop collars, require tedious manual recalibration or are prone to inaccuracy. Moreover, few systems offer any integrated or repeatable method for correcting these angle shifts caused by stone thickness variation, leading to inconsistency in edge geometry.
Additionally, the base structures of existing sharpening systems often sacrifice portability for stability. Many systems use bases that are permanently bolted to the sharpener's frame to maintain rigidity during sharpening. While these fixed bases offer mechanical stability, they make the sharpener difficult to store compactly or use in handheld scenarios. This rigidity limits the system's adaptability and user convenience, particularly when portability or modular use is desired. Finally, the blade clamping and rotation mechanisms in current systems frequently lack intuitive functionality and require multiple steps for blade insertion, alignment, and rotation. Some systems offer no clamping at all, relying instead on a flat platform or shelf, which can result in inconsistent blade positioning. In view of these shortcomings, there remains a clear need for a blade sharpening system that addresses the challenges of precise angle adjustment, sharpening stone thickness compensation, modular base attachment, and user-friendly blade clamping and rotation, all while maintaining affordability, compactness, and ease of use.
SUMMARY OF THE EMBODIMENTS
In some aspects, the techniques described herein relate to a blade sharpening system including: a frame; a blade clamping assembly rotatably mounted to the frame about a longitudinal axis; a rigid guide rod having a sharpening stone mounted at one end; an angle adjustment mechanism including: an angle adjustment post movably seated in a vertically oriented recess of the frame; a bearing module secured to a projecting arm extending from the angle adjustment post, the bearing module configured to receive and guide the guide rod; and a friction drive assembly including: a rotatable shaft coupled to a drive wheel having a high-friction outer surface in contact with the angle adjustment post, wherein rotation of the shaft causes the angle adjustment post and the bearing module to move vertically within the recess to adjust a sharpening angle of the guide rod relative to the blade clamping assembly.
In some aspects, the techniques described herein relate to a blade sharpening system, wherein the high-friction outer surface of the drive wheel includes an elastomeric O-ring configured to compress against the angle adjustment post.
In some aspects, the techniques described herein relate to a blade sharpening system, wherein the angle adjustment post has a square cross-section and the vertically oriented recess is lined with a low-friction material.
In some aspects, the techniques described herein relate to a blade sharpening system, further including a thumbscrew configured to lock the angle adjustment post in place once a desired sharpening angle is achieved.
In some aspects, the techniques described herein relate to a blade sharpening system, wherein the projecting arm extends inwardly toward a central portion of the frame and is oriented parallel to a horizontal centerline of the frame.
In some aspects, the techniques described herein relate to a blade sharpening system, wherein the rotatable shaft is coupled to a user-operable hand knob positioned outside the frame.
In some aspects, the techniques described herein relate to a blade sharpening system, wherein the friction drive assembly provides micro-adjustable, gearless, one-handed sharpening angle adjustment.
In some aspects, the techniques described herein relate to a blade sharpening system, wherein the bearing module is configured to slidably retain a free end of the guide rod during sharpening.
In some aspects, the techniques described herein relate to a blade sharpening system, wherein the frame includes an upright structure with a front and rear vertical support, and the blade clamping assembly is rotatably mounted between the supports.
In some aspects, the techniques described herein relate to a blade sharpening system, further including an indexing detent assembly configured to engage the blade clamping assembly at a plurality of rotational positions about the longitudinal axis.
In some aspects, the techniques described herein relate to a quick-disconnect base assembly for a blade sharpening system including: a hand grip attached to a frame of the blade sharpening system; a grip disc mounted at a lower end of the hand grip; a locking lug mounted below the grip disc via locking lug mounting screws; a rigid base having a position plate with a circular cutout configured to receive the grip disc and a rectangular opening configured to receive the locking lug; wherein rotation of the hand grip causes the locking lug to engage an underside of the base to removably secure the blade sharpening system to the rigid base.
In some aspects, the techniques described herein relate to a quick-disconnect base assembly, wherein the locking lug is half-round and suspended such that it rotates into a locked position with frictional engagement against the base.
In some aspects, the techniques described herein relate to a quick-disconnect base assembly, wherein the locking lug mounting screws are adjustable to control a gap between the locking lug and the grip disc.
In some aspects, the techniques described herein relate to a quick-disconnect base assembly, wherein the base further includes rubber bumper feet configured to elevate the base above a surface on which it rests.
In some aspects, the techniques described herein relate to a quick-disconnect base assembly, wherein the hand grip and base can be rotationally disengaged for compact storage and handheld use of the sharpening system.
In some aspects, the techniques described herein relate to a stone thickness compensation assembly for a blade sharpening system, including: a projecting arm mounted to a vertically movable angle adjustment post; a through-hole near a distal end of the projecting arm; a rod insertable through the through-hole; a stop collar slidably adjustable along the rod and lockable at a desired position; a stone platform located beneath the projecting arm, configured to support a sharpening stone; wherein the rod and stop collar are calibrated against a first sharpening stone and serve as a reference to adjust the angle adjustment post for subsequent sharpening stones of varying thicknesses.
In some aspects, the techniques described herein relate to a stone thickness compensation assembly, wherein the stop collar is configured to rest flush against an upper surface of the projecting arm when the rod contacts the surface of a sharpening stone.
In some aspects, the techniques described herein relate to a stone thickness compensation assembly, wherein the stop collar has a distance between a surface of the stop collar and a bottom of the rod being a baseline for adjusting the sharpening angle based on sharpening stone thickness.
In some aspects, the techniques described herein relate to a stone thickness compensation assembly, wherein the rod is made of a rigid metallic material and the stop collar includes a thumbscrew for locking its position.
In some aspects, the techniques described herein relate to a stone thickness compensation assembly, wherein visual gaps between the stop collar and the projecting arm or between the rod and the sharpening stone indicate required angular adjustment.
BRIEF DESCRIPTION OF THE DRAWINGS
The present disclosure may be better understood, and its numerous features and advantages made apparent to those skilled in the art, by referencing the accompanying drawings. The use of the same reference symbols in different drawings indicates similar or identical items.
FIG. 1 is a left transparent side elevation view illustrating a blade sharpening system with a clamp assembly and a quick disconnect base mechanism, according to some embodiments.
FIG. 2 is a right transparent side elevation view illustrating a blade sharpening system with a clamp assembly and a quick disconnect base mechanism, according to some embodiments.
FIG. 3 is a top plan view of the angle adjustment housing, according to some embodiments.
FIG. 3A is an end elevation view of the angle adjustment housing, according to some embodiments.
FIG. 3B is an inside elevation view of the angle adjustment housing, illustrating the circular recess, through hole, and threaded mounting features, according to some embodiments.
FIG. 3C is a bottom plan view of the angle adjustment housing showing the angular alignment of the channel and through hole, according to some embodiments.
FIG. 3D is an outside elevation view of the angle adjustment housing, showing the circular recess for the bushing, the through hole for the shaft, and multiple threaded holes for mounting and locking components, according to some embodiments.
FIG. 4 is an exploded perspective view of the angle adjustment housing assembly, illustrating the angle adjustment housing, drive shaft components, retention elements, and associated fasteners, according to some embodiments.
FIG. 5 is a perspective view of the sharpening system, showing the assembled angle adjustment mechanism, clamp assembly, sharpening stone support, and structural frame elements, with labeled components including the drive pulley, hand knob, angle scale, bearing module, and rigid platform features, according to some embodiments.
FIG. 5A is a sectional top view of the angle adjustment mechanism, illustrating the interaction between the hand knob, drive shaft, bushing, angle adjustment post, locking screw, and associated retention components within the angle adjustment housing and frame, according to some embodiments.
FIG. 5B is a side elevation view of the drive pulley, according to some embodiments.
FIG. 5C is a front elevation view of the drive pulley, showing the groove for receiving a drive belt or O-ring, according to some embodiments.
FIG. 5D is an end view of the drive shaft, according to some embodiments.
FIG. 5E is a side elevation view of the drive shaft, showing its threaded and unthreaded segments, according to some embodiments.
FIG. 5F is a top view of the drive shaft engaged with the drive pulley and drive O-ring, according to some embodiments.
FIG. 5G is a front elevation view of the drive pulley mounted on the drive shaft, with the O-ring shown seated in the pulley groove, according to some embodiments.
FIG. 6 is a top elevation view of a clamp jaw, according to some embodiments.
FIG. 6A is a perspective view of a clamp jaw, showing internal and external recess features, according to some embodiments.
FIG. 6B is a side elevation view of the clamp jaw, according to some embodiments.
FIG. 6C is a rear view of the clamp jaw, illustrating internal mounting recesses, according to some embodiments.
FIG. 7 is a top elevation view of a clamp jaw, according to some embodiments.
FIG. 7A is a perspective view of the clamp jaw, illustrating its outer profile and angular structure, according to some embodiments.
FIG. 7B is a side elevation view of the clamp jaw, showing the underside engagement features, according to some embodiments.
FIG. 7C is a rear plan view of the clamp jaw, illustrating the semi-circular mounting recess, according to some embodiments.
FIG. 8 is a front elevation view of the base plate of the clamp assembly, showing the central shaft opening and detent catch holes, according to some embodiments.
FIG. 8A is a side elevation view of the base plate, illustrating the forward-facing upper and lower tabs for jaw alignment, according to some embodiments.
FIG. 9 is a front elevation view of a three-wing hand knob used to actuate the clamp assembly, according to some embodiments.
FIG. 9A is a side elevation view of the three-wing hand knob, illustrating its threaded internal bore for engagement with the T-head bolt, according to some embodiments, according to some embodiments.
FIG. 10 is an end view of a T-head bolt used in the clamping mechanism, according to some embodiments.
FIG. 10A is a side elevation view of the T-head bolt, showing the square head and threaded shaft, according to some embodiments.
FIG. 11 is an exploded view of the spring-loaded tensioning assembly, showing the rear bushing, compression spring, and spring shoulder washer components, according to some embodiments.
FIG. 12 is an end and side view of a cylindrical spacer used in the clamp assembly, according to some embodiments.
FIG. 12A is an end and side view of a T-bolt extension shaft used to transmit rotation and preload from the rear of the assembly, according to some embodiments.
FIG. 12B is a front view and side cross-sectional view of a spring tension knob with an associated set screw for rotational locking, according to some embodiments.
FIG. 13 is a side plan view of the clamp assembly integrated within the sharpening system frame, illustrating the blade clamping jaws, T-head bolt and spring mechanism, and associated structural and mounting components, according to some embodiments.
FIG. 14 is a side plan view of the clamp assembly integrated with the sharpening system frame, illustrating the detent-based rotational indexing mechanism with—semi-spherical detents, according to some embodiments.
FIG. 15 is a front elevation view showing the grip assembly aligned for insertion into the position plate of the rigid base, illustrating the mounting screw configuration, locking lug, and mating rectangular opening, according to some embodiments.
FIG. 15A is a front elevation view showing how the grip assembly is configured to be rotated into the locked position within the base plate to secure the sharpening system to the base, according to some embodiments.
FIG. 16 is an exploded view of the angle adjustment post assembly, showing the angle adjustment post, projecting arm, bearing module, spherical bearing, and associated mounting and locking hardware, according to some embodiments.
FIG. 16A is a side elevation view of the assembled angle adjustment post, projection, bearing module, and stone thickness compensator rod, according to some embodiments.
FIG. 16B is an exploded view of the shaft collar assembly used to fix the angular position of the stone thickness compensator rod, according to some embodiments.
FIG. 17 is an exploded left side elevation view of the grip, grip disc, and locking lug assembly with one or more fasteners, according to some embodiments.
FIG. 17A is a right side elevation view of the grip showing holes for fasteners and the recessed channel to accept the angle adjustment post, according to some embodiments.
FIG. 17B is a top view of an example embodiment of the grip illustrating a top-facing profile of the body including fastener apertures and a channel, according to some embodiments.
FIG. 17C is a bottom view of the same blade component of the grip illustrating the lower-facing features, including a channel and mounting apertures, according to some embodiments.
FIG. 18 is a top view of an example embodiment of a grip disc being a circular baseplate component, showing central and peripheral mounting apertures, according to some embodiments.
FIG. 18A is a side view of the grip disc of FIG. 18, according to some embodiments.
FIG. 19 is a top view of an example embodiment of a locking lug being a fastening component, according to some embodiments.
FIG. 19A is a side view of the fastening component shown in FIG. 19, according to some embodiments.
FIG. 19B is a bottom view of the fastening component of FIG. 19, according to some embodiments.
FIG. 19C is an end view of the fastening component of FIG. 19, according to some embodiments.
FIG. 20 is a front view of a base plate of a mounting bracket assembly, according to some embodiments.
FIG. 20A is a side view of the base plate of FIG. 19, according to some embodiments.
FIG. 20B is a front and side view of ball bearing detents, according to some embodiments.
FIG. 21 is a front view of a “U” Shaped ball bearing mounting bracket with screws for mounting bracket to frame, according to some embodiments.
FIG. 22 is a side view of the “U” Shaped ball bearing mounting bracket of FIG. 21, showing individual subcomponents, according to some embodiments.
FIG. 23 is a perspective exploded view of the “U” Shaped ball bearing mounting bracket of FIG. 21 with ball bearing detents, according to some embodiments.
FIG. 24 is a transparent side elevation view of an assembled sharpening device showing the interaction of the components described in FIGS. 19 through 23, according to some embodiments.
FIG. 25 shows a perspective view of a rigid guide rod with a sharpening stone affixed to one end in accordance with an embodiment of the present invention.
DETAILED DESCRIPTION OF THE EMBODIMENTS
FIGS. 1-25 illustrate example systems and methods of an improved precision blade sharpening system designed for both benchtop and handheld use. The system features a modular architecture that includes a rotatable blade clamping assembly mounted within a rigid frame, a friction-driven angle adjustment mechanism for fine-tuning sharpening angles, and a calibration module to account for sharpening stone thickness variability. The blade clamping assembly includes opposing jaws mounted on a rotatable base plate secured by a spring-loaded T-head bolt. This allows the user to rotate the clamped blade 180 degrees with indexed detent engagement for symmetric sharpening on both sides. The jaws are shaped to accommodate a range of blade profiles and are lined with elastomer-filled gripping features to ensure stability during use. The angle adjustment mechanism includes an angle post with a graduated scale, a projecting arm supporting a spherical bearing module, and a threaded drive shaft actuated by a user-rotatable hand knob. The drive system uses a pulley, bushing, and spring-tensioned knob assembly to offer low-friction, backlash-minimized angular control.
To improve stability, the sharpening device is mounted to a rigid base via a quick-disconnect system. A locking lug secured beneath the grip engages a mating rectangular slot in the base plate; a 90-degree twist locks the assembly in place. Rubber bumper feet isolate vibration and elevate the structure for clearance. A technical benefit of the illustrated system is its ability to maintain angular precision and blade stability across repeated sharpening cycles without requiring recalibration, even when switching between stones of different thicknesses. This is achieved through a combination of spring-loaded axial preload, detent-based rotational indexing, and a rigid bearing-guided angle control assembly, thereby improving edge consistency, sharpening efficiency, and user confidence.
Referring to FIGS. 1 and 2, the illustrated embodiment of the blade sharpening system 500 includes structural components that collectively enable precision sharpening, indexed blade rotation, and quick attachment to a supporting base. The system features a vertically oriented grip 100, which serves as the user's primary point of contact for handling and stabilizing the device. The grip 100 is mechanically secured to the lower portion of the main frame 300 and provides structural support between the sharpening assembly and the base. Above the grip 100 is a rigid frame 300, which houses and supports both the clamp assembly and the rotational mechanism. The frame 300 includes forward and rear upright sections that define a housing structure through which the central axis of the blade clamp rotates. This frame provides the structural foundation for supporting dynamic sharpening loads and precise alignment.
Extending from the front of the frame 300 is the clamp assembly 400, which is configured to retain a blade in a secure, indexed position. The clamp assembly 400 includes internal jaws and a rotatable bolt system for gripping a blade and allowing 180-degree indexed rotation, thereby enabling the sharpening of both sides of a blade without removal. Secured atop the frame 300 is the angle adjustment housing 166, which contains components that allow the user to finely adjust the sharpening angle relative to the horizontal plane. The angle adjustment housing 166 provides mechanical coupling between the frame and a height-adjustable support arm or bearing module that controls the angular orientation of the sharpening stone 506 (see FIG. 25) or tool. As shown in FIG. 25, the sharpening stone 506 is configured to be coupled to the guide rod 503.
The sharpening system 500 is mounted onto a base assembly 502, which includes a rigid base 218 and an affixed position plate 222. The base 218 provides a stable platform for benchtop sharpening and includes features, such as a recessed opening and lug interface (not visible in FIG. 1), that mate with locking features on the bottom of the grip 100. The position plate 222 is mounted on the upper surface of the base 218 and includes a circular cutout that accepts a mating disc from the grip assembly, allowing for quick and secure mechanical engagement. This quick detach mechanism permits the user to rapidly remove the sharpening system from the base for handheld operation or compact storage. In operation, the angle adjustment housing 166 serves as a support structure for retaining a portion of the adjustable angle adjustment post 124 as well as retaining the drive pulley 182 (FIG. 5A). The rigid frame 300 and clamp assembly 400 ensure stability and repeatable orientation of the blade. The quick disconnect interface between the grip 100 and the base 218 allows the user to transition between stationary and handheld use modes with minimal effort, offering both portability and rigidity in a single integrated device.
With reference now to FIGS. 3-3D, multiple orthographic and sectional views of the angle adjustment housing 166 are illustrated in detail. The angle adjustment housing 166 is a rigid, machined or molded component that provides positional control and structural coupling between the blade clamping assembly and the rod-guided sharpening mechanism. The housing is configured to accept and retain the angle adjustment post and a rotating drive assembly, while offering a stable interface for angular control.
As seen in the top view of FIG. 3, the housing 166 includes a first longitudinal recess or channel 168 formed along the interior surface. This recess is dimensioned to accept and laterally stabilize the angle adjustment post (not shown in this figure). Adjacent to the channel 168 is a circular through hole 170, which extends horizontally through the housing and is adapted to receive a drive shaft bushing or similar cylindrical bearing component that supports a rotating drive shaft. The outer perimeter of the top surface also shows the locations of threaded holes 178, which may be used to secure the housing 166 to the frame body via mechanical fasteners. In the end view of FIG. 3A, the channel 168 is shown as being inset into the body of the housing 166. The view also highlights the vertical alignment of the circular through hole 170, which is concentrically positioned relative to the housing's body to facilitate smooth rotation of the shaft. The sidewalls of the housing include sufficient thickness to maintain mechanical integrity under torque loads.
The inside view presented in FIG. 3B further illustrates the orientation of the channel 168 and the large circular recess 172, which is formed on the inside face of the housing 166. The recess 172 is sized and shaped to accommodate a drive pulley, bushing, or a bearing component associated with the angle adjustment drive assembly. Also visible in FIG. 3B is a threaded hole 174, positioned near the recess 172, which is configured to receive an angle lock thumbscrew that secures the sharpening angle once it is set. An additional threaded hole 176 is also shown, intended to accommodate a retaining washer for the angle adjustment post, helping ensure axial positioning under rotation or load.
In the bottom view of FIG. 3C, the housing 166 again shows the channel 168 recessed into the structure, mirroring its position in FIG. 3A. This view also shows the outer housing walls and alignment of internal cavities, particularly emphasizing the housing's structural geometry from a mounting standpoint. The relationship between the channel 168 and the circular opening 172 is maintained to ensure coaxial operation between the angular positioning components and the shaft system.
FIG. 3D presents the outside view of the angle adjustment housing 166, revealing the relative placement of the circular recess 172 and the through hole 170. The circular recess 172 on this exterior face is configured to accept a washer, bushing, or drive shaft flange. The through hole 170 passes completely through the angle adjustment housing 166 from this side and may include a counterbore or countersink to accommodate the shaft and bushing interface. Threaded holes 178 are visible on this side as well, and may be aligned with threaded holes on the frame or angle housing subassembly for secure mounting. Threaded hole 174 is shown near the circular recess 172 and is configured to receive the angle lock thumbscrew 208 (as described elsewhere), enabling the user to lock in a selected sharpening angle during operation. Threaded hole 176 may receive the post retention washer screw 212, which holds the post retainer washer in place and stabilizes the assembly. Collectively, these views demonstrate that the angle adjustment housing 166 is configured with multiple integrated features to support the mechanical adjustment of blade sharpening angles. The channels, recesses, and holes provide mounting surfaces, component retention, rotational clearance, and locking mechanisms that interact with both stationary and dynamic components of the sharpening system.
Referring now to FIG. 4, an exploded perspective view of the angle adjustment housing assembly is shown. This subassembly enables fine adjustment and secure locking of the sharpening angle relative to the blade clamping mechanism. The components are arranged to accommodate a rotatable drive shaft and angular positioning hardware within the angle adjustment housing 166. The angle adjustment housing 166 includes an internal channel 168 and a circular through hole 170. The through hole 170 is dimensioned to receive and support a drive shaft bushing 206, which serves as a rotational bearing surface for the drive shaft 190. The housing 166 also includes a circular recess 172 (on the inside face) and multiple threaded holes 174, 176 for mounting and retention of angular locking elements. A threaded angle locking thumbscrew 208 is inserted into the threaded hole 174 and is used to secure the angular position once the desired sharpening angle is set.
The drive shaft assembly includes a drive shaft 190 having a threaded end 192 and an unthreaded end 194. A drive pulley 182, having a circumferential groove 186 and a central hole 184, is positioned at the front of the shaft and functions to receive a drive belt or O-ring 188 (not shown in this figure) to transfer rotational motion to a sharpening element. Positioned behind the drive pulley 182 are an inner flat washer 196 and an outer flat washer 198, which sandwich the face of the angle adjustment housing 166 and reduce friction during shaft rotation. A hand knob 200 is secured to the threaded end 192 of the drive shaft 190. The hand knob 200 includes a threaded set screw hole 202 and a set screw 204, which locks the hand knob 200 to the drive shaft 190 for torque transfer during angle adjustments. When the hand knob 200 is rotated, the drive shaft 190 rotates within the bushing 206, enabling the user to precisely set the sharpening angle. Once set, the thumbscrew 208 may be tightened to lock the mechanism in place.
A retention washer 210 is mounted in front of the angle adjustment housing 166 and is secured using a retention screw 212 inserted through the washer and into the threaded hole 176. The retention washer 210 prevents axial displacement of the angle adjustment post (not shown) and stabilizes the shaft and housing assembly during angular adjustments. The assembly shown in FIG. 4 provides a mechanically stable and user-adjustable interface for setting and locking sharpening angles with high repeatability. The combination of rotational shaft components, bushings, locking thumbscrews, and the drive pulley offers a robust and ergonomic solution for adjusting sharpening geometry across a range of blade types.
Referring now to FIG. 5, a perspective view is provided of the sharpening system illustrating the interaction between the clamp assembly 400, the angle adjustment housing 166, the angle control mechanism, and the rigid support frame 300, which includes a sharpening stone platform 320 and integral mounting features. The assembly is designed to allow precise angular control of the sharpening process through guided rod mechanics and adjustable components. The angle adjustment housing 166 is shown centrally located within the system and fixedly mounted to the frame 300 by a set of frame mounting screws 178. A drive shaft 190 passes through the angle adjustment housing 166, seated within a bushing 206 disposed in the through hole 170 of the housing. The drive shaft 190 is connected on one end to a drive pulley 182, having a circumferential groove 186 for receiving a rubber O-ring or belt 188, which interfaces with the sharpening angle control system.
At the opposite end of the drive shaft 190, a hand knob 200 is fixed via a set screw 204 threaded through a set screw hole 202. The hand knob 200 allows the user to manually rotate the drive shaft 190 to adjust the sharpening angle. Two washers, an inner washer 196 and an outer washer 198, are seated adjacent to the housing 166 to reduce friction during rotation and maintain axial alignment. A retaining washer 210 (FIG. 5A) is mounted to the outside face of the housing 166 and is fastened with a retention screw 212 to retain the angle adjustment post within the recess 168. A threaded angle locking thumbscrew 208, seated in hole 174, enables the user to fix the drive assembly at a selected angle.
Mounted within the housing 166 is an angle adjustment post 124, which features an engraved angle scale 130 on its front face for visual reference during angular positioning. The post 124 fits within a vertical channel 168 formed in the housing 166. A projecting arm 132 is coupled to the post 124 and extends laterally to support a bearing module 142 that includes a spherical bearing 144 and cylindrical stem 148. The bearing module is secured by a permanent mechanical fastener such as, a screw with a thread locker. The spherical bearing 144 includes a center hole 146 to receive a sharpening rod. The stone thickness compensation system includes the ridged rod 156 and the shaft collar 158 to calibrate the sharpening angle when using stones of different thicknesses. A stone platform 320 is shown on the right side of the frame, providing a support surface for a sharpening stone 506 (see FIG. 25). The platform is integrally formed with or mounted to the rear upright section 304 of the frame 300.
The frame 300 further includes a forward upright section 302 and a left side upright section 306, joined to provide structural rigidity. Mounting holes 308 and grip mounting holes 314 are visible, enabling secure attachment to the grip and other support components. At the forward end of the frame 300, a forward upright section 301 of the frame 300 is shown, featuring a circular hole 310, through which components such as spacers and the clamping assembly shaft may pass. A pair of holes 312 are located through the forward upright section 301 of the frame 300 and are configured to accept the simple solid detents (not shown) or alternatively are used to mount the “U” Shaped ball bearing mounting bracket 426 (see FIGS. 21-24) to the forward upright section 301 of the frame 300 by means of mechanical fasteners such as screws. The illustrated embodiment demonstrates how the sharpening system combines mechanical stability with fine angular control. The interface between the angle adjustment housing 166 and the drive assembly enables precise positioning, while the rod-guided bearing mechanism ensures a consistent sharpening motion. The integration of visual angle indicators, locking features, and mechanical tolerance provides the user with an intuitive, accurate, and repeatable sharpening experience.
Referring now to FIG. 5A, a detailed sectional top view is shown of the angle adjustment mechanism associated with the sharpening system. The figure illustrates the internal arrangement of components housed within the angle adjustment housing 166, and their integration with adjacent structural elements, including the frame section 306, angle adjustment post 124, and rotational control elements. The hand knob 200 is mounted onto the drive shaft 190, which extends horizontally through the bushing 206 that is seated in the through hole 172 of the housing 166. A set screw 204 passes through the hand knob 200 and engages the shaft 190 to ensure rotational coupling, allowing the user to manually rotate the shaft and thereby adjust the angular position of connected components. Two washers are disposed adjacent to the angle adjustment housing 166 to reduce friction and maintain axial alignment: an inner washer 196 mounted on the shaft between the pulley and the housing wall, and an outer washer 198 disposed between the hand knob 200 and the outer surface of the housing. The shaft 190 passes through the circular bushing 206, which is fixed within the hole 172 and provides rotational support to the shaft during angular adjustments.
At the opposite end of the shaft, a drive pulley 182 is mounted and features a circumferential groove 186 for receiving a drive element such as an O-ring or belt 188. The pulley 182 serves as part of the angular control system, transferring rotational motion to downstream sharpening elements. A channel 168 is formed along the top portion of the housing 166 to receive the angle adjustment post 124, which is shown inserted vertically into the housing. The position of the post 124 is retained and stabilized via a post retainment washer 210, which is mounted externally and secured using a retainment screw 212 that passes through a threaded hole in the housing. To lock the angular position after adjustment, an angle lock thumbscrew 208 is threaded into a hole in the side wall of the housing 166 and positioned to abut the adjustment post 124. When the thumbscrew 208 is tightened, it presses against the post, preventing rotation of the shaft 190 and locking the sharpening system at the desired angle. This locking feature enables secure, repeatable sharpening without drift or unintentional movement during operation. The configuration shown in FIG. 5A illustrates a compact and mechanically integrated assembly for setting and securing sharpening angles through user-manipulated rotational inputs, friction-reducing components, and precision-guided retention and locking hardware.
Referring now to FIGS. 5B and 5C, multiple views of the drive pulley 182 are provided. The drive pulley 182 is a rotatable component of the sharpening angle control system and is configured to interface with a flexible drive member, such as a belt or O-ring, to transmit rotational motion. As shown in FIG. 5B, the drive pulley 182 includes a central through hole 184, which is dimensioned to receive a drive shaft (e.g., 190 in previous figures). The pulley has a concave outer profile that defines a circumferential groove 186, which is recessed relative to the outer diameter of the pulley body. This groove 186 is configured to accept a flexible drive element, such as a rubber O-ring or tensioned belt, used to apply rotational torque to the sharpening angle mechanism.
FIG. 5C shows the front elevation view of the drive pulley 182. The central through hole 184 is concentrically located and allows the pulley to be mounted securely onto a rotating shaft. The annular groove 186 is visible in this view as a circular depression surrounding the central hole. This groove may have a rounded profile to retain the drive element under tension and prevent slippage during rotation. In some embodiments, the drive element includes, but is not limited to, an O-ring, a drive belt, and/or a similar flexible transmission member. The drive pulley 182 may be formed of metal, polymer, or composite materials, depending on the strength and frictional requirements of the system. In operation, as the user rotates the hand knob coupled to the shaft, the drive pulley 182 rotates, transmitting motion via the O-ring seated in groove 186 to connected sharpening components. The design of the groove 186 ensures centered alignment and reliable motion transfer, contributing to precise angle control and consistent sharpening performance.
Referring to FIGS. 5D through 5G, various views are shown of the drive shaft 190 and pulley 182, which transmits rotational motion between the user-actuated control knob and the sharpening angle adjustment mechanism. The drive shaft 190 is a generally cylindrical component comprising a threaded end 192 and an unthreaded end 194. As shown in FIG. 5D, the drive shaft 190 has a circular cross-section, typical for a rotating shaft that passes through a bushing or bearing. The threaded end 192 is designed to interface with a hand knob (e.g., 200) and optionally receive a set screw to secure the rotational coupling. This threaded portion may also serve as an interface for axial retention or fine-tuning. In the side elevation view of FIG. 5E, the overall geometry of the shaft is clearly delineated. The threaded end 192 occupies a forward segment of the shaft, while the unthreaded end 194 serves as an attachment point for the pulley by press fit, welding, or adhesive means.
FIG. 5F shows the top view of the drive shaft 190 mounted to the drive pulley 182. The drive pulley 182 is positioned on the shaft and includes a central hole that closely fits the shaft diameter. A drive O-ring 188 is shown seated within the circumferential groove 186 of the pulley, extending laterally to create a flexible mechanical connection to the angle adjustment post 124. The arrangement allows torque applied via the hand knob to be transferred efficiently to the angle adjustment post 124. FIG. 5G provides a front elevation view of the assembly of the drive shaft 190, pulley 182, and O-ring 188. The drive shaft is shown concentrically within the pulley 182, with the O-ring 188 seated within the peripheral groove 186. The O-ring may be composed of a resilient elastomeric material such as rubber or silicone, providing traction and flexibility during rotation. This configuration ensures smooth, dampened motion and compensates for minor alignment variances between components. Together, the drive shaft 190, drive pulley 182, and O-ring 188 form a compact and reliable rotational drive assembly used to control the sharpening angle. The interaction of threaded and smooth shaft segments, along with mechanical coupling to the pulley and O-ring, enables precision control with minimal backlash and reliable user feedback.
Referring now to FIGS. 6 through 6C, various views are shown of an individual clamp jaw 402, which forms one half of a dual-jaw blade securing system in the sharpening device. The jaw 402 is geometrically and functionally configured to securely hold a blade of varying size and shape and is adapted for mechanical engagement within the rotatable clamp assembly. In FIG. 6, a front elevation view of the jaw 402 is presented. The outer face is shown in planar profile, and a shallow recess 402a is located near the top edge. This recess 402a is dimensioned to receive one of the forward-facing tabs 409 from the base plate of the clamp assembly, ensuring accurate registration and preventing slippage during rotation or clamping.
Turning to FIG. 6A, a perspective view of the jaw 402 reveals additional critical features. On the underside of the jaw, a recessed channel 402b is shown extending transversely near the base. This channel is configured to partially surround and seat the T-head bolt head 410, which serves as the central axle for the clamp assembly. A semi-circular recess 402c is also visible at the rear of the jaw, centered along the base. When combined with a mirrored jaw, this semi-circular recess aligns with a corresponding recess in the opposing jaw to cradle the shank of the T-head bolt. Additionally, at the forward inner face of the jaw 402 is an elastomer-filled recess 402d, which provides improved gripping performance by conforming to blade irregularities and distributing pressure evenly along the clamped surface. FIG. 6B offers a side elevation view of the clamp jaw 402, clearly showing the angular geometry that facilitates blade retention. The overall shape resembles a scalene triangle, with the recesses 402b, 402c, and 402d all visible along the lower profile. The shallow recess 402a is located at the upper front edge and serves as a registration feature during assembly with the clamp base plate.
FIG. 6C provides a bottom view of the clamp jaw 402. From this perspective, the semi-circular recess 402c and transverse channel 402b are shown in alignment, indicating how the jaw interfaces with both the T-head bolt head and shank. The opposing jaw, when installed, mirrors these features, allowing for full mechanical capture of the bolt while enabling rotation and clamping pressure to be applied uniformly. The clamp jaw 402 may be manufactured from high-strength polymer, metal, or composite material and is designed to withstand repeated clamping cycles. The elastomer insert within recess 402d enhances friction and minimizes blade shifting during sharpening. The combined geometry of the recesses ensures alignment, pivot stability, and compatibility with the rotating clamp mechanism described in prior figures.
Referring now to FIGS. 7 through 7C, multiple views of a clamp jaw 402 are depicted. This jaw may be structurally identical or complementary to the jaw shown in FIGS. 6 through 6C and is configured for use in a dual-jaw clamping assembly for securely holding a blade during sharpening. In FIG. 7, the front elevation view of the jaw 402 is shown. The jaw body has a rectangular profile with a visible flat outer surface intended to face outward when the jaw is installed in the clamp assembly. As with its counterpart, this jaw includes a shallow registration feature near the upper edge (though not labeled in this view) that interfaces with corresponding elements on the clamp base plate.
FIG. 7A provides a perspective view of the clamp jaw 402. The angular profile of the top and bottom surfaces forms a wedge-like shape, optimized for gripping blade edges of various thicknesses. As with the earlier embodiment, the jaw includes a transverse recessed channel (unnumbered in this view, but corresponding to 402b) that receives a portion of the T-head bolt and a semi-circular recess (corresponding to 402c) that cradles the bolt shank. These features ensure that the jaw is pivotally retained within the base plate and can apply Cuniform clamping force when actuated by the drive mechanism. In FIG. 7B, a side elevation view shows the angular geometry of the jaw and the position of the lower engagement features. A groove or channel is visible near the bottom edge of the jaw, which enables rotational engagement with the bolt and secure alignment with the opposing jaw.
FIG. 7C presents a bottom plan view of the jaw 402. A semi-circular recess is shown centered along the rear base edge, which is configured to align with a corresponding recess in the opposing jaw. Together, the two recesses capture the cylindrical shaft of the T-head bolt and provide rotational stability. This geometry ensures that the jaws move symmetrically and remain aligned during opening and closing operations. As with the embodiment of FIGS. 6-6C, the clamp jaw 402 shown in FIGS. 7-7C may be formed from metal, high-strength plastic, or composite materials. It is designed to operate in conjunction with spring-loaded clamping mechanisms, angle adjustment systems, and a rotating base plate. Its shape and surface features facilitate ease of blade insertion, firm retention during sharpening, and consistent repeatability over repeated use cycles.
Referring now to FIGS. 8 and 8A, the base plate 404 of the rotatable clamp assembly is illustrated. The base plate 404 serves as a structural mounting platform for the opposing clamp jaws and is rotatably secured to the T-head bolt shaft within the sharpening frame. As shown in FIG. 8, the base plate 404 has a generally rectangular shape and includes a centrally located shaft opening 406 configured to receive the shank of the T-head bolt. This through-hole allows the base plate 404 to rotate freely about the bolt axis while maintaining axial alignment with the clamp assembly. Positioned symmetrically on either side of the shaft opening 406 are a pair of detent catch holes 408. These catch holes 408 enable the clamp assembly to lock into indexed positions, typically 180 degrees apart, allowing a user to rotate and fix the blade in place for sharpening on both sides. In FIG. 8A, a side elevation view of the base plate 404 is shown. This view reveals that both the top and bottom edges of the base plate are bent or formed to include narrow forward-facing tabs 409, which project in the same direction as the jaws when mounted. These tabs 409 are configured to be received within complementary shallow recesses (402a) formed in each jaw 402. This tab-recess interaction provides mechanical registration and lateral stability for the jaws, ensuring that they do not shift or misalign during operation.
The side view also illustrates the thickness and planar structure of the base plate 404, as well as the vertical arrangement of the shaft opening 406 and the detent catch holes 408. The configuration shown in FIGS. 8 and 8A ensure that the base plate can rotate smoothly about the drive axis, maintain precise alignment of the jaws, and lock reliably into fixed rotational positions. The base plate 404 may be manufactured from stamped steel, aluminum, or other rigid structural material capable of withstanding repeated torsional loads during use. Its role as an intermediary between the clamp jaws and rotational drive system is central to the functionality and repeatability of the blade sharpening process.
Referring now to FIGS. 9 and 9A, a three-wing hand knob 416 is shown, which serves as a manual actuation component in the blade clamping assembly. The hand knob 416 is designed to be threadably mounted onto the T-head bolt (410) of the sharpening system and provides the user with tactile leverage to tighten or loosen the clamping force applied to a blade. In FIG. 9, a front elevation view of the hand knob 416 is presented. The knob comprises a central hub and three equally spaced radially extending lobes or “wings” that form a symmetrical, Y-shaped configuration. This design enables the user to apply uniform torque with minimal effort, allowing for precise manual control over the clamping mechanism. The center of the knob contains a through bore for engaging the threaded shaft of the T-head bolt, allowing the knob to advance or retract axially with rotation.
FIG. 9A provides a side elevation view of the hand knob 416. This view illustrates the threaded internal bore, which extends partway or completely through the knob and is configured to receive the threaded portion of the T-head bolt. As the knob is rotated clockwise, it draws the clamp jaws inward via the bolt, increasing clamping force. Conversely, counterclockwise rotation releases the tension and allows the jaws to open for blade insertion or removal. The knob 416 may be fabricated from molded polymer, knurled aluminum, or other durable, user-friendly materials compatible with repeated manual operation. In operation, the hand knob 416 acts as the final tightening control for the clamp assembly, complementing the spring-loaded features described in earlier figures. It allows the user to apply and maintain secure, repeatable pressure on the clamped blade during sharpening cycles.
Referring to FIGS. 10 and 10A, a T-head bolt 410 is shown, which serves as the primary structural and rotational element of the clamp assembly in the sharpening system. The end view of FIG. 10 shows the square or rectangular head of the bolt 410, which is designed to engage with a corresponding channel or recess in the clamp jaws (e.g., recessed channel 402b and recess 402c in previous figures), allowing the jaws to pivot and be securely clamped around a blade. In the side view of FIG. 10A, the T-head bolt 410 includes an elongated shaft with a threaded portion extending from the head. The threads enable axial movement when the bolt is engaged with a rotating hand knob (e.g., 416), allowing clamping force to be applied or released depending on the knob's direction of rotation. The shank of the bolt passes through the center of the base plate and clamp jaws, enabling full assembly integration.
Turning to FIG. 11, the figure illustrates a spring-loaded tensioning assembly that operates along the axis of the T-head bolt 410. The assembly includes a bushing 315, a compression coil spring 418, and a spring shoulder washer 420. The bushing 315 is secured in the hole 314 in the rear upright section of the frame 304. The shaft of the T-head bolt 410 or an extension (e.g., 414) passes through the bushing 315. The coil spring 418 is sleeved over the bolt shaft on the rear side of the frame and applies axial preload force, biasing the clamp assembly rearward. This biasing enables the clamp jaws to remain lightly closed by default, even when the user is not actively tightening the clamp knob. The spring ensures quick blade engagement and enhances user control. At the rear of the spring, a shoulder washer 420 is seated against the end of the coil spring 418 to distribute compressive force evenly along the spring coils and prevent buckling. The shoulder washer 420 may be fixed in place by a tension knob (not shown here) or allowed to slide depending on the design configuration. Together, the components illustrated in FIGS. 10, 10A, and 11 form a robust axial actuation and spring-loading system. The T-head bolt 410 provides both rotation and clamping functionality, while the bushing 315, spring 418, and washer 420 maintain consistent mechanical pressure and alignment. This assembly ensures precise, repeatable clamping of the blade within the sharpening mechanism while enabling easy actuation by the user.
Referring now to FIGS. 12, 12A, and 12B, a set of components used in the rear actuation and spring-loaded control system of the sharpening clamp assembly is shown. In FIG. 12, a cylindrical spacer 412 is illustrated in both end view (left) and side elevation view (right). The spacer 412 is configured to be mounted on the shaft of the T-head bolt (or extension) and fits between the base plate of the clamp assembly and the three-wing hand knob. The spacer 412 serves to maintain axial separation, reduce friction, and provide a flat clamping surface when the knob is tightened. It may be made from metal, polymer, or a self-lubricating composite for improved wear characteristics.
FIG. 12A depicts the T-bolt extension 414, shown in end view (left) and side view (right). The T-bolt extension 414 includes a first end with internal female threads configured to receive the threaded end of the T-head bolt 410, and a second end with external male threads to receive the spring tension knob 422. This extension component transfers rotational torque and spring preload from the rear-mounted knob to the clamp assembly and permits axial actuation of the jaws. The shaft portion of the extension is configured to be smooth to freely slide through the bushing.
In FIG. 12B, the spring tension knob 422 is illustrated in front view (left) and side sectional view (right). The knob 422 includes a central threaded bore for attachment to the male-threaded end of the T-bolt extension 414. A cross-bored threaded hole 424 is formed radially through the knob body and is configured to receive a set screw 424. This set screw can be tightened to fixedly lock the knob 422 to the shaft of the extension 414, ensuring that rotational motion is transmitted as a unit. The knob 422 may include external knurling, fluting, or texture to aid manual grip and user torque control. The spring tension knob is semi-permanently secured to the end of the T-bolt extension using a set screw. The set screw prevents the knob from loosening or detaching when the knob is rotated counterclockwise to reduce spring tension. The cylindrical spacer 412 ensures consistent contact and minimizes lateral play in the assembly. Together, the components shown in FIGS. 12, 12A, and 12B allow precise adjustment and locking of the clamping assembly's tensioning mechanism, contributing to the consistent and repeatable operation of the blade sharpening system.
Referring to FIG. 13, a side plan view is provided of the assembled sharpening clamp mechanism 400 secured within the frame 300 of the sharpening system. The drawing depicts the internal alignment of the mechanical components responsible for clamping a blade, enabling 180-degree indexed rotation, and maintaining spring-loaded jaw tension during sharpening. At the front end of the assembly, a pair of clamp jaws 402 (see FIG. 24) are retained within the base plate 404 (see FIG. 24). These jaws pivotally engage a T-head bolt 410, which extends longitudinally through the central axis of the clamp assembly and serves both as a structural and rotational axis.
The frame 300 is defined by three upright segments: the forward upright 302, the left-side upright 306, and the rear upright 304, all rigidly connected to the base structure. The forward upright 302 includes an oversized center hole 310, which allows for rotational clearance of the bolt head and associated jaw support plate (not labeled here), and two small holes 312 that receive detents or indexing pins that engage corresponding detent catch holes in the rotating clamp assembly. These detents enable 180-degree indexing, allowing the blade to be rotated and locked into a fixed position for symmetrical sharpening. The T-head bolt 410 passes through the forward upright 302 and extends rearward through a cylindrical bushing 314, which is seated within a hole 316 in the rear upright section 304 of the frame. The bushing 314 provides lateral support for the bolt, allowing smooth rotation while constraining radial displacement. A compression spring 418 surrounds the shaft of the T-bolt near its rear end and is captured between the outer wall of the rear upright 304 and a shoulder washer 420 (not visible in this view). This spring maintains a rearward preload on the entire clamp assembly, keeping the jaws in a lightly closed state even before the user tightens the clamping knob.
The three-wing hand knob 416 (see FIG. 9) is mounted on the threaded end of the T-head bolt, located behind the spring, and allows the user to apply axial tension to clamp the jaws tightly around a blade. Tightening the knob draws the bolt rearward, pivoting the jaws inward and locking the blade. Loosening the knob releases the clamping force but does not disengage the blade entirely due to the spring preload. Additionally, the frame 300 includes a left-side upright section 306, which houses threaded frame mounting holes 318 used to attach an angle adjustment housing or bearing module. These holes also allow for secure fastening of the sharpening platform and other angular control components mounted to the system.
The base portion 308 of the frame 300 connects the upright sections and provides support for the sharpening system. This base portion 308 of the frame 300 may also serve as a mounting interface with the grip 100. Overall, the configuration illustrated in FIG. 13 provides a compact, integrated design for the clamp mechanism. The alignment of the T-head bolt 410, spring 418, and detent system ensures that the blade remains stably clamped and precisely aligned for repeatable and symmetrical sharpening operations. The rear preload system facilitates quick engagement and disengagement while maintaining consistent mechanical tension.
Referring now to FIG. 14, an example clamp assembly 400 includes a ball bearing detent rotation assembly coupled to at least a portion of the forward upright section 302 of frame 300. The ball bearing detent rotation assembly is configured to facilitate controlled rotational engagement and positioning of the clamp assembly within the sharpening system.
The ball bearing detent rotation assembly includes a generally U-shaped ball bearing mounting bracket 426 configured to house opposing ball bearing detents 434. The bracket 426 includes threaded holes 428 on either side, which are used to mount the bracket securely to the frame using mounting screws 428b. Within the U-shaped bracket 426, a central through-hole 432 is provided to accommodate a spacer that may extend through the bracket and align concentrically with a rotating shaft or clamping component.
The bracket 426 further comprises threaded holes 430 positioned to receive fasteners 434b, which secure the ball bearing detents 434 into place. These detents 434 provide rotational guidance and stability to components engaged with the central spacer or shaft, minimizing lateral movement and maintaining alignment. The detents may be spring-loaded or self-centering to accommodate dynamic loading conditions. Additionally, alternative rectangular holes 436 may be provided in the baseplate to offer flexible mounting options or accommodate different bracket orientations, enhancing compatibility across multiple sharpening system configurations. This assembly improves precision and repeatability during rotational adjustments, thereby contributing to accurate and reliable sharpening performance.
Referring to FIGS. 15 and 15A, a quick disconnect coupling mechanism between the grip 100 and the rigid base 218 is illustrated in two sequential operational positions. This mechanism provides a user-friendly method for quickly securing and releasing the sharpening system for either stationary or handheld use. In FIG. 15, the grip 100 is shown from the front and slightly above the base prior to full engagement. The grip 100 includes a pair of frame mounting holes 104 and locking lug mounting holes 108, into which locking lug mounting screws 122 are inserted. These screws 122 secure a half-round locking lug 118 beneath a grip disc 110. The grip disc 110 is fastened to the grip 100 by a centrally located disc mounting screw 116. The locking lug 118 has a pair of through holes 120 through which the screws 122 pass, engaging with the threaded holes 108 in the lower portion of the grip 100. The rigid base 218 includes a position plate 222 mounted to its top surface. The position plate 222 defines a circular opening 224 that closely receives the grip disc 110, and an internal rectangular opening 220 sized to receive the locking lug 118. The rectangular opening 220 is dimensioned slightly longer than the length of the locking lug and just wide enough to admit the heads of the mounting screws 122 when aligned properly.
As shown in FIG. 15A, once the grip disc 110 is seated within the circular opening 224 and the locking lug 118 is inserted into the rectangular opening 220, the grip 100 is rotated approximately ninety degrees. This action causes the arcuate top surfaces of the locking lug 118 to cam tightly against the underside of the position plate or base. The mechanical interference created by the fit between the locking lug and the underside of the base locks the sharpening system in place. The mounting screws 122 and the shape of the lug 118 prevent accidental rotation or disengagement once locked.
The design enables a secure and rigid attachment with minimal effort, mimicking the stability of a permanent bolted connection, while maintaining tool-less removal capability. To disengage the sharpening system, the user simply rotates the grip 100 ninety degrees in the opposite direction and lifts the assembly upward, withdrawing the locking lug 118 from the rectangular opening 220. The coupling system shown in FIGS. 15 and 15A are ideally suited for applications where tool portability, storage efficiency, or dual-mode operation (bench-mounted and handheld) are desirable. It combines the benefits of secure fixation with rapid user-actuated detachment.
Referring to FIG. 16, an exploded view of the angle control subassembly is illustrated. This assembly is responsible for enabling precise angular positioning of the sharpening rod relative to the blade being sharpened. The configuration allows for smooth adjustment and stable locking of the sharpening angle during use. The assembly includes an angle adjustment post 124, which is a vertically oriented, elongated member. The post 124 includes a graduated angle scale 130 on its front face for visual reference. At its upper end, the post includes recesses 126 on opposing sides for engagement with mating structural elements and an aperture 128 through which a connecting pin 152 may be inserted to fix the vertical position relative to the angle adjustment housing.
Attached to the angle adjustment post 124 is a projecting arm 132, which extends laterally to support a bearing module. The projecting arm 132 includes a formed recess 134 to accept the angle adjustment post 124, a transverse hole 136 that aligns with the post's aperture 128 for insertion of the connecting pin 152, and a bore 138 for mounting the bearing module. An additional through hole 140 is provided for inserting the stone thickness compensator rod 156. The bearing module 142 is pivotably secured to the projecting arm 132 by means of a screw The bearing module 142 includes a spherical bearing 144 seated within a housing, which features a cylindrical stem 148 extending from the bottom surface. The stem includes internal threads 150, allowing it to engage with a fastener inserted through the projecting arm. The spherical bearing 144 includes a central bore 146, which allows the sharpening rod to pass through and rotate or pivot with minimal friction.
A press-fit pin 152 and mounting screw 154 are included to secure the components in assembled configuration. The press-fit pin 152 aligns and fixes the projecting arm 132 to the angle adjustment post 124 through their respective mating holes. The thumb screw 154 threads into the projecting arm 132 and spins freely in the projecting arm. The spherical bearing allows for controlled pivoting of the sharpening rod, and the scale on the adjustment post 124 enables repeatable angle settings across multiple sessions.
Referring now to FIGS. 16A and 16B, details of the angle adjustment and rod guidance system of the sharpening apparatus are shown. These figures illustrate the interaction between the angle adjustment post 124, projecting arm 132, bearing module 142, stone thickness compensator rod 156, and the shaft collar assembly used to secure the rod at a user-defined position. In FIG. 16A, the angle adjustment post 124 is shown in an upright vertical orientation with a graduated angle scale along its front surface to facilitate precise angular alignment. Affixed to the upper portion of the post is the projecting arm 132, which extends outward and perpendicularly from the post. The projecting arm 132 is mechanically coupled to the bearing module 142, which includes a spherical bearing having a central bore for receiving and guiding the sharpening rod (not shown). The sharpening rod (not shown) is configured to pass through the spherical bearing of the bearing module 142, allowing for smooth linear and angular adjustment. The sharpening rod serves as the guiding structure for the sharpening element, maintaining its angle of approach relative to the blade being sharpened.
FIG. 16B provides an exploded view of the shaft collar assembly, which is mounted on the stone thickness compensator rod 156 to lock its position. The assembly includes a shaft collar 158 with a central through hole 160 sized to accept at least a portion of a length of the stone thickness compensator rod 156. A threaded hole 162 in the shaft collar is provided to receive a thumb screw 164, which is used to apply radial pressure against the rod 156. When tightened, the thumb screw 164 locks the adjustable shaft collar 158 in place on the stone thickness compensator rod 156 to ensure that the distance between the bottom of the projecting arm 132 and a stone placed on the stone sharpening platform 320 is uniform no matter the thickness of the stone. One or more angle adjustments may be made with stones of differing thickness values. In conjunction with the graduated angle markings on the post 124 and the pivoting spherical bearing 142, this configuration ensures precise, stable, and repeatable sharpening angles. Together, the features shown in FIGS. 16A and 16B form a user-friendly system for guiding the sharpening tool at consistent angles, offering both fine control and quick adjustability during sharpening operations.
FIG. 17 shows the grip assembly of the blade sharpening system. The grip 100 includes a vertical channel 102 formed in the grip. Frame/body mounting holes in grip 104 are located near the top and bottom portions of the grip 100 and are configured to receive frame mounting screws 105 for attaching the grip 100 to the frame or body structure. A hole in grip for grip disc mounting screw 106 is centrally located and configured to receive disc mounting screw 116. The locking lug mounting holes in grip 108 are positioned to receive locking lug mounting screws 122 through holes in locking lug 120 and holes in grip disc for locking lug screws 114.
The grip disc 110 includes a hole in grip disc for grip mounting screw 112 and the holes in grip disc for locking lug screws 114. The disc mounting screw 116 secures the grip disc 110 to the grip 100. The locking lug 118 includes holes in locking lug for locking lug screws 120 through which locking lug mounting screws 122 pass to secure the locking lug 118 below the grip disc 110 and into the locking lug mounting holes 108 of the grip. This configuration provides a modular interface for mounting and retaining the grip disc and locking lug on the grip component of the sharpening assembly.
FIG. 17A illustrates a side view of the grip 100 of the blade sharpening system, showing various structural features integrated into the grip body. A vertical channel is formed in an exterior surface of the grip 102 and is configured to accept the angle adjustment post 124. Frame/body mounting holes in grip 104 are located near the upper portion of the grip and are configured to align with corresponding fasteners (e.g., frame mounting screws 105, not shown in this view) for secure attachment to the frame or body structure.
A hole in grip for grip disc mounting screw 106 is disposed centrally along the vertical channel 102 and is configured to receive the disc mounting screw 116 for attaching the grip disc 110. Locking lug mounting holes in grip 108 are positioned near the lower portion of the grip 100 and are configured to receive locking lug mounting screws 122 for affixing the locking lug 118 via the grip disc 110. This arrangement ensures that the grip can be structurally and functionally integrated into the sharpening system while providing access to internal component connections.
Referring to FIGS. 17B and 17C, the grip 100 includes a vertical channel 102 in a surface of the grip 100. Locking lug mounting holes in grip 108 are spaced on either side of the vertical channel 102 and are adapted to receive locking lug mounting screws 122 for attachment of the locking lug 118. A hole 106 is located through grip 100 for a grip disc mounting screw. Turning to FIGS. 18 and 18A, a grip disc 110 is illustrated, which includes a central bore 112 and two secondary apertures 114 disposed adjacent thereto. The hole 112 is used to secure the grip disc to the bottom of the grip by means of a screw, while the holes 114 in the grip disc 110 are configured to receive the locking lug screws. The side view of FIG. 18A shows the planar nature of the baseplate and the positioning of the bores along its thickness. The geometry of the grip disc 110 facilitates its use in rotational calibration, support, or alignment of the associated sharpening mechanism.
Referring to FIGS. 19-19C, a locking lug 118 is illustrated in multiple orthogonal views. The locking lug 118 comprises a generally oblong body having two through-holes 120 positioned laterally across its surface. These holes 120 are configured to receive fasteners, such as screws or bolts, for securing the fastening plate to adjacent structural elements. As shown in FIG. 19A, the side view reveals the relatively thin profile of the locking lug 118 and confirms the through-configuration of the fastener holes 120. In FIG. 19B, the bottom view aligns with the top view of FIG. 19 and similarly shows the relative spacing and position of the holes 120. In FIG. 19C, the end view demonstrates the rounded curvature of the locking lug 118, which may assist in alignment or reduce stress concentrations during fastening. The component is designed to operate as a stabilizing or coupling member, interfacing with other structural components within a sharpening or clamping assembly.
Referring to FIGS. 20 and 20A, a mounting bracket or baseplate 404 includes a central aperture 406 configured to receive a T-head bolt 410 or similar component, and a pair of fastener apertures 436 comprising a rectangular opening to accept the alternative ball bearing detents. The baseplate 404 includes a top and bottom tabs or flanges 409, enabling mechanical stability and structural alignment with adjacent components.
Turning to FIG. 24, the figure depicts an assembled sharpening system 400 including a blade support or clamp jaws 402, a T-head bolt 410 received through a bearing assembly. The ball bearing detent rotation assembly includes a “U” shaped ball bearing mounting bracket 426 configured to support rotational elements within the sharpening system. The bracket 426 includes threaded holes for mounting bracket to frame 428, which are positioned to receive screws for mounting bracket to frame 428b, thereby affixing the bracket 426 securely to the frame structure. The bracket 426 also includes threaded holes for mounting ball bearings in bracket 430, which receive ball bearing detents 434. These detents 434 are retained in place using screws for mounting ball bearing detents 434b, which secure the bearing elements in proper alignment. A through hole for spacer 432 is located between the bearing mounts and is adapted to receive a spacer element for guiding or stabilizing a rotating shaft or pin. Alternative rectangular holes 436 in baseplate 404 are optionally provided to accommodate various mounting configurations.
In FIG. 20B, a ball bearing detent 434 is shown in both side and profile views. The ball bearing detent 434 is generally cylindrical in shape and may be fabricated from a low-friction material such as brass, nylon, or a polymer composite to accommodate smooth axial or rotational motion of a shaft. The ball bearing detent 434 includes a central bore that is dimensioned to receive screws 434b. The outer diameter of the ball bearing detent 434 is adapted to be rotatable secured to a corresponding bracket, such as “U” Shaped ball bearing mounting bracket 426. The technical benefits of ball bearing detent 434 include reduced frictional losses, improved energy efficiency of the sharpening mechanism, decreased heat generation at contact surfaces, and extended operational lifespan of the shaft by preventing metal-to-metal contact. Additionally, bushings may be configured for self-lubrication, thereby reducing the need for regular maintenance and enhancing system reliability.
FIG. 21 depicts a “U” Shaped ball bearing mounting bracket 426 comprising a generally rectangular or square mounting plate with a centrally located aperture 432 configured to receive and support a rotating shaft. The “U” Shaped ball bearing mounting bracket 426 includes two or more symmetrically spaced mounting holes 428 to allow rigid attachment to a frame, support structure, or bracket (such as bracket 404). These mounting holes 428 may be adapted to receive threaded fasteners or machine screws 428b for secure and vibration-resistant fixation. The central aperture 432 may be chamfered or radiused to assist with centering of the shaft and reduce stress concentration at the contact surfaces. Threaded holes 430 may be located on a portion of the side flanges of the “U” Shaped ball bearing mounting bracket 426 and configured to receive ball bearing detents 434b. Technical benefits of the bearing support housing 430 include enhanced structural stability for dynamic loads, precise alignment of rotating components, improved shaft concentricity for consistent sharpening angle fidelity, and ease of assembly and servicing due to its standardized geometry.
In FIG. 22, the “U” Shaped ball bearing mounting bracket 426 is provided and is configured to connect to the forward upright section 302 of frame 300. Though hole 432 for spacer r. Technical benefits of this assembly include a modular construction that facilitates rapid disassembly and replacement of wear components, load-sharing across both bearing halves to reduce localized stresses, and high tolerance control for accurate shaft rotation, contributing to the repeatability of sharpening operations.
FIG. 23 illustrates a perspective exploded view of a bearing support subassembly 426 configured for mounting within the sharpening system's frame. The subassembly includes a generally U-shaped bearing mounting bracket 426 having opposing vertical sidewalls with a plurality of mounting holes. Threaded holes 428 are formed in the sidewalls and are configured to receive screws 428b for securing the bracket to the surrounding frame or structural baseplate. The bracket 426 further includes threaded mounting holes 430 located on the sidewalls for receiving fasteners 434b that secure ball bearing detents 434 within the bracket. The bracket defines a central through-hole 432 sized to receive a shaft or spacer aligned with the rotational axis of the shaft assembly. The ball bearing detents 434 are positioned coaxially on opposing inner surfaces of the bracket to provide low-friction rotational support to the shaft. Fasteners 434b maintain the axial position of each detent within the bracket.
Additionally, the view highlights optional rectangular cutouts 436 in the adjacent mounting surface, which may be used for alignment or quick-lock engagement features. The exploded configuration of FIG. 23 emphasizes the three-dimensional relationships and alignment of the bracket 426, bearing elements 434, fasteners 434b, and shaft passage aperture 432, thereby demonstrating ease of assembly, serviceability, and precise alignment during installation.
Referring to FIG. 24, the blade sharpening system 500 includes a clamp assembly 400 mounted to a frame or body structure 300 and supported on a rigid base assembly 502. The clamp assembly 400 includes opposing clamp jaws 402 configured to retain a blade during sharpening. The jaws 402 may comprise features such as a shallow recess 402a for base plate tabs, a recessed channel 402b to accommodate a T-head bolt 410, a semi-circular recess 402c for shaft reception, and an elastomer-filled recess 402d for vibration dampening and improved blade stabilization.
A base plate 404 having a central hole 406 and detent catch holes 408 is fixed to the clamp assembly. Tabs 409 on the top and bottom of the base plate 404 align with corresponding features on the grip or mounting surface. A cylindrical spacer 412 spans the body frame 300 and guides linear translation of the clamp via the T-head bolt 410 and bolt extension 414. A three-wing hand knob 416 provides manual control of bolt advancement, while a compression coil spring 418, shoulder washer 420, and spring tension knob 422 bias the clamp assembly forward. A set screw 424 retains the spring tension knob. The clamp assembly is supported by a ball bearing detent rotation assembly including a U-shaped mounting bracket 426 affixed via screws 428b through threaded holes 428. The bracket retains ball bearing detents 434 seated within threaded holes 430 and secured by fasteners 434b. A through-hole 432 accommodates the cylindrical spacer 412 for alignment with the frame. The body structure 300 includes a forward upright section 302 and a rear upright section 304, connected by a left side upright 306. Grip mounting holes 308 allow attachment of the grip 100 . . . . The rear upright 304 includes a small hole 314 that receives a rear bushing 315. Holes 318 in the left side upright portion 306 of frame 300 are configured to receive housing mounting screws (4).
The assembly is supported by the grip 100, which is, in turn, supported by the base assembly 502. A rectangular opening 220 in the base aligns with a position plate 222 having a circular opening 224 for visual alignment or mounting functionality. Rubber bumper feet 226 provide slip resistance during sharpening operations. The configuration shown in FIG. 24 enables highly stable and repeatable blade sharpening through friction-driven angle adjustment combined with rotational detent support. The integrated bearing detents 434 reduce wear of the parts and greater longevity of the assembly, while the compression spring system 418 allows for quick clamping and release of blades without tool-assisted reconfiguration. The system architecture provides consistent mechanical feedback and tactile control to the user, enhancing safety, usability, and sharpening consistency across a range of blade profiles.
Once assembled, this subassembly is designed to mount securely within a sharpening system such as that shown in FIG. 24, where it provides stable and low-friction support for a rotating or translating shaft 410. The technical benefits of this configuration include minimized shaft deflection under dynamic loads, improved precision in angular adjustments due to constrained motion paths, and long-term durability of the mechanical interface. The overall design supports enhanced user safety and system performance through consistent mechanical alignment and reduced wear.
In some embodiments, the blade sharpening system 500 includes a mechanically advantageous quick disconnect base assembly 502, a rotational blade clamping mechanism 400, and a rigid support frame 300, all configured for ease of use, repeatability, and compact storage. The sharpening system 500 may be used in a bench-mounted configuration or removed from the base 218 for handheld operation. The system features a vertically oriented hand grip 100 that serves as the main user interface for manipulating the sharpening assembly. The upper end of the grip 100 is mechanically fastened to the underside of the rigid frame 300 via two mounting screws 105 that pass through corresponding mounting holes 215 in the frame and engage threaded holes 104 formed at the top of the grip 100. At the bottom end of the grip 100, a flat, rigid grip disc 110 is secured orthogonally via a centrally located disc mounting screw 116, which passes through a hole 112 in the center of the disc 110 and engages a mating hole 106 in the bottom of the grip. Beneath the grip disc 110, a half-round locking lug 118 is suspended by two locking lug screws 122, which pass through aligned holes 114 in the grip disc and 120 in the locking lug and engage threaded holes 108 in the grip. This subassembly creates a rigid lower interface adapted to selectively engage with the base 218.
The rigid base 218 is designed to provide both mechanical stability and modularity. The base may be formed from a dense metal or polymer material of sufficient mass to resist lateral motion during sharpening. Near the rear of the base is a precision-machined rectangular opening 220, dimensioned to be slightly longer than the locking lug 118 and just wide enough to admit the locking lug screws 122 when oriented perpendicular to the length of the opening. Affixed on top of the base 218 is a D-shaped position plate 222 that includes a circular opening 224 corresponding in diameter to the grip disc 110. The position plate 222 may be attached by mechanical fasteners, adhesive bonding, or welding, depending on material selection and manufacturing constraints. On the underside of the base 218, four rubber bumper feet 226 are mounted at each corner. These feet provide anti-slip functionality and, importantly, are taller than the height of the locking lug 118, thereby allowing for clearance during rotational engagement and disengagement of the grip subassembly.
In operation, the user seats the grip disc 110 into the circular opening 224 of the position plate 222, aligning the locking lug 118 with the rectangular opening 220 in the rigid base 218. Upon rotating the grip 100 approximately ninety degrees in the forward direction, the arcuate surfaces of the locking lug 118 against the underside of the base 218, creating mechanical interference. The close tolerances between the top surface of the locking lug 118 and the underside of the base 218 produce a secure, vibration-resistant lock. This engagement simulates the stability of a fixed, bolted mount while preserving the convenience of quick release. The grip 100 can be decoupled by reversing the rotational motion, enabling handheld sharpening or compact storage of the device.
The frame 300 supports a clamp assembly 400 that is rotatable about a central longitudinal axis for 180-degree indexed positioning. The frame includes a forward upright section 302 and a rear upright section 304. The clamp assembly 400 comprises a T-head bolt 410 that extends through the forward upright section 302 and is threadably engaged with a T-bolt extension 414 that exits through the rear upright section 304 via a precision-fitted bushing 315. This bolt and extension combination forms a rotating axle for the clamp assembly and provides axial spring loading. A compression coil spring 418 is sleeved over the rear portion of the T-bolt extension 414 and is held in axial compression between the bushing 315 and a shoulder washer 420. A spring tension knob 422 is threadably mounted on the rear end of the bolt extension 414 and includes a set screw 424 that locks the knob 422 in position relative to the bolt extension. By adjusting the knob 422, the user may alter the compression force applied by the spring 418, thereby controlling the closing force of the clamping jaws 402.
At the front of the frame 300, a base plate 404 is mounted coaxially on the T-head bolt 410 behind its head. The base plate 404 includes a central through-hole 406 for the bolt shaft and a pair of detent catch holes 408 positioned symmetrically on either side of the central axis. The top and bottom edges of the base plate 404 are bent forward to form narrow tabs 409 that extend horizontally. These tabs interface with shallow recesses 402a formed in each clamp jaw 402, aiding in proper orientation and pivot stability. The jaws 402 are retained within the base plate 404 and are adapted to secure a wide range of blade geometries. Each jaw includes a transverse recessed channel 402b adapted to partially receive the T-head bolt head and a semi-circular base recess 402c to receive the bolt shank. When opposing jaws 402 are inserted, the bolt head and shank are fully captured, creating a pivotable clamping system. An elastomer-filled recess 402d on the forward interior face of each jaw enhances grip by conforming to irregular blade surfaces.
To insert a blade, the user applies forward pressure to the spring knob 422, compressing the coil spring 418 and driving the clamp assembly forward. This causes the jaws 402 to pivot open about their rearmost edges. Once the blade is inserted, the user releases pressure on the spring knob 422, allowing the jaws 402 to return to a closed position under spring force. Final clamping is achieved by rotating the three-wing hand knob 416 located at the rear of the base plate 404, drawing the bolt 410 inward and pulling the jaws 402 into secure engagement with the blade. The clamp assembly 400 is rotatable 180 degrees for edge-to-edge blade sharpening. The front upright section 302 of the frame 300 includes a pair of small holes 312, each receiving a semi-spherical detent 313 that projects inwardly. The detent catch holes 408 in the base plate 404 are spaced to engage these detents precisely every 180 degrees of rotation. During sharpening, the user rotates the blade by grasping the handle and turning the clamp assembly. As the detent catch holes 408 disengage from one detent 313 and align with the opposite detent, spring pressure re-engages the mechanism, ensuring a repeatable, horizontal positioning of the blade with minimal user effort.
Alternatively, the detent mechanism may be implemented using a ball bearing detent assembly comprising a U-shaped bracket 426 mounted to the frame, threaded holes 428 for receiving mounting screws 428b, and paired ball bearing detents 434 mounted in holes 430 with retaining screws 434b. This variation allows smoother engagement and enhanced tactile feedback while maintaining the 180-degree indexing functionality. In summary, the described system provides a dual-mode sharpening platform combining the stability of a bench-mounted base with the flexibility of quick-detach handheld operation. The spring-loaded, rotatable clamp assembly allows for consistent, indexed blade positioning and intuitive user operation. Precision-machined features and mechanical lock mechanisms enhance alignment, repeatability, and safety during sharpening tasks.
In some embodiments, a simple, economic quick detach base mechanism implements the stability of a bolt on base but can be quickly and easily detached from the sharpener body for hand held use of the sharpening system and for compact storage:
Quick Disconnect Base System
The top of a hand grip 100 is secured to the underside of the sharpener frame 214 by means of two screws 105 which pass through two mounting holes 215 in the frame 214 and whose threads are engaged in mating holes 104 formed in the top of the grip 100. At the bottom end of the grip 100 a flat, rigid, circular grip disc 110 is secured by means of a single disc mounting screw 116 passing through a hole 112 in the center of the grip disc 110. A half round locking lug 118 is suspended below the grip disc 110 on the heads of two locking lug mounting screws 122 which straddle the center grip disc mounting screw 116. The locking lug screws 122 passing through mating holes 114, 120 formed in both the locking lug 118 and grip disc 110. The threads of the locking lug mounting screws 122 being adjustably engaged in holes 108 formed in the bottom of the grip 100.
Separately, a rigid base 218 of appropriate size and weight to support the sharpening system is present. The rigid base 218 has a roughly rectangular shaped opening 220 formed near its rear edge. The rectangular opening 220 is slightly longer than the length of the locking lug 118 and the width of the rectangular opening 220 is just large enough to accommodate the two locking lug mounting screws 122 when the screws 122 are oriented perpendicular to the length of the rectangular opening 220. Further, a roughly D shaped position plate 222 having a circular cutout 224 closely matching the diameter of the grip disc 110 is mounted on top of the rigid base 218. The position plate 222 can be attached to the rigid base 218 by use of threaded fasteners or welding, or by adhesive or other means.
Additionally, rubber bumper feet 226 are affixed at each corner of the rigid base 218 on its underside surface. The bumper feet 226 are taller in height than the height of the locking lug 118.
In practice, the user grasps the sharpening system by the grip 100 and seats the grip disc 110 into the circular opening 224 in the position plate 222 in a manner that aligns the locking lug 118 with the rectangular opening 220 in the rigid base 218 then rotates the grip 100 and the entire sharpening system ninety degrees towards the front of the rigid base 218. The distance or gap between the bottom surface of the grip disc 110 and the top surface of the locking lug 118 has been previously adjusted using the locking lug screws 122 to a very close, tight fit with the thickness of the base 218 material. As the locking lug 118 begins to rotate within the rectangular opening 220, the rounded top surface of both ends of the locking lug 118 comes into contact with the underside surface of the rigid base 218 at the edges of the rectangular opening 220.
Due to the close fit between the top surface of the locking lug 118 and the underside surface of the base 218, further rotation of the grip and sharpener results in the locking lug 118 being forced tightly past the edge of the rectangular opening and as the user completes the ninety degree rotation of the grip 100, the terminal ends of the locking 118 lug are held tightly against the underside surface of the base 218 and a stable secure joint is formed locking the system into the rigid base 218. To remove the system from the rigid base 218, the user simply reverses the process, turning the grip 100 back ninety degrees in either direction to release the system from the rigid base 218.
Description of the Clamp Assembly and Rotational Mechanism
In one preferred embodiment of the invention, a rotatable blade clamping mechanism 400 is housed and secured within a rigid frame 300. The clamp assembly 400 includes a threaded T-head bolt 410 and a similarly threaded T-head bolt extension 414 engaged on the threaded end of the T-head bolt 410. Together, the T-head bolt 410 and T-bolt extension 414 run lengthwise through the frame 300 and serve as a rotatable axle for the clamp assembly 400.
The T-bolt extension 414 having at its first end female threads adapted to accept the threaded end of the T-head bolt 410 and a short section of male threads at its opposite end adapted to accept a similarly threaded spring tension knob 422.
At the rear of the frame 300, the male end of the T-bolt extension 414 extends outwardly through a close-fitting bushing 315 seated in a hole 314 formed in the rear upright portion 304 of the frame 300. A compression coil spring 418 whose inner diameter is greater than the outer diameter of the T-bolt extension 414 is secured over the portion of the T-bolt extension 414 which extends out of the rear upright section 304 of the frame 300.
The spring 418 is held in position at its first end by the bushing 315, which extends outwardly through the rear upright section 304 of the frame 300 and slightly into the coils of the spring 418, and by a step washer 420 engaged on the T-bolt extension 414 at its opposite end. A spring tension knob 422 is engaged on a short section of male threads at the rear terminal end of the T-bolt extension 414. The spring tension knob 422 additionally being cross bored and threaded to accept a set screw 424 which when tightened fixedly locks the spring tension knob 422 and the T-bolt extension 414 together so that when the spring tension knob 422 is rotated, the two parts rotate together as a unit.
The spring 418 is captured and held under slight compressive pressure between the outside surface of the rear upright section 304 of the frame 300 and the spring tension knob 422. The pressure of the compressed spring 418 causes the entire clamp assembly 400 to be continuously pulled towards the rear of the frame 300 in a spring loaded manor.
At the front of the frame 300 a base plate 404 configured to capture and pivotably retain a pair of jaws 402 is mounted on the shaft of the T-head bolt 410 directly behind the head by means of a hole 406 in the center of the base plate 404 through which the shank of the T-head bolt 410 is passed. The hole 406 is slightly larger in diameter than the diameter of the shank of the T-head bolt 410. Two additional holes 408 in the base plate 404 which serve as rotational detent catches are equally spaced from the center hole 406 and also share a common horizontal centerline with the center hole 406. Further, both the top and bottom edges of the base plate 404 are bent or formed to have narrow forward facing tabs 409 which run the length of the base plate 404.
The head of the T-head bolt 410 extends outwardly through an oversized center hole 310 in the forward upright section 302 of the frame 300 with the base plate 404 being loosely captured between the head of the T-head bolt 410 and the outer surface of the forward upright section 302 of the frame 300. The diameter of the oversized center hole 310 is slightly larger than the outer diameter of a rigid cylindrical spacer 412, which is slidably mounted on the shaft of the T-head bolt 410 directly behind the base plate 404. A three wing hand knob 416 engaged on the threads of the T-head bolt 410 directly behind the cylindrical spacer 412 serves as a means for tightening/loosening the clamp assembly 400.
Seated within the base plate 404 are a pair of clamp jaws 402 adapted to securely hold blades of varying size and shape. Further, in cross section, the jaws 402 are of roughly scalene triangular shape, with the underside surface oriented in a horizontal plane. At the forward end of each jaw 402, where the top surface intersects the bottom surface, an acute angle is formed. Where the underside surface intersects the rear semi-vertical surface, an obtuse angle is formed, and where the top surface meets the rear semi-vertical surface, another acute angle is formed. Additionally, at this intersection where the top surface meets the rear semi-vertical surface, a shallow recess 402a is formed which runs the width of each jaw 402. The recess 402a being adapted to accept in close fit one of the narrow forward facing tabs 409 on the base plate 404.
Further, each individual jaw 402 has a larger recessed channel 402b which bisects its underside surface near its base. The recessed channel 402b is oriented parallel to the terminal ends of the jaw 402 and is adapted to loosely accept approximately one half of the head of the T-head bolt 410. Further, centered in the underside base end of each jaw 402, a semi-circular recess 402c is formed which closely matches one half of the diameter of the shank of the T-head bolt 410 so that when a pair of opposing jaws 402 are seated inside the base plate 404, the head of the T-head bolt 410 is captured and releasably retained within the opposing recessed channels 402b and the shank of the T-head 410 bolt is also captured by the opposingly positioned semi-circular recesses 402c in each jaw. On the inside forward end of each jaw is an elastomer filled recess 402d which serves to improve grip strength when the clamp assembly 400 is tightened on a blade to be sharpened.
The pair of jaws 402 are pivotably retained within the base plate 404 and remain closed under slight pressure exerted on the T-head bolt 410 by the coil spring 418 mounted at the opposite end of the frame 300. Tightening the three wing knob 416 mounted behind the cylindrical spacer 412 forces the spacer 412 forward tightly against the rear surface of the base plate 404 and draws the head of the T-head bolt 410 inward causing the jaws 402 to pivot on their rearmost edges within the base plate 404, securely tightening the jaws 402 of the clamp assembly 400 on a blade to be sharpened. Loosening the three wing hand knob 416 releases the firm clamping pressure but the spring pressure is constant and keeps the jaws closed under light pressure. The jaws 402 can then be opened to accept or release a blade by applying forward pressure to the spring knob at the rear of the frame.
180 Degree Indexed Rotation
At the front of the frame 300 the T-head bolt 410 and the cylindrical spacer 412 with the base plate 404 captured between them, extend outwardly through the oversized hole 310 in the forward upright section 302 of the frame 300. At the rear of the frame 300, the T-bolt extension 414 extends outwardly through the bushing 315 in the rear upright section 304 of the frame 300. The coupled T-head bolt 410 and T-bolt extension 414 serve as a rotatable axle on which the entire clamp assembly 400 can be rotated 360 degrees in either direction within the frame 300.
The two holes 313 in the forward upright section 302 of the frame 300 are positioned 180 degrees apart and are equally spaced from the center of the oversized center hole 310 in the forward upright section 302 of the frame 300. Likewise, the two holes 408 in the base plate 404 which serve as detent catches are similarly positioned 180 degrees apart and are equally spaced from the center hole 406 in the base plate 404.
Two semi-spherical detents 313 are secured in, and project outwardly from the holes 312 in the front upright section 302 of the frame 300. The diameter of the projecting detents 313 is slightly larger than the diameter of the detent catch holes 408 in the base plate 404. Further, the holes 312 in the front upright section 302 of the frame 300 are spaced and centered to precisely match the spacing and centering of the detent catch holes 408 in the base plate 404. Alternatively, a ball bearing detent rotation assembly could be used, having ball bearing bracket, threaded holes for mounting bracket to frame, threaded holes for mounting ball bearings in bracket, through hole for the spacer, and ball bearing detents. When the clamp assembly 400 is rotated to a horizontal position, the projecting detents 313 on the front upright section 302 of the frame 300 engage in the detent catch holes 408 in the base plate 404 under light pressure of the spring 418 engaged on the rear of the T-bolt extension 414. The spring loaded design of the clamp assembly 400 within the frame 300 serves to secure the clamp assembly 400 and blade to be sharpened in a horizontal position when the projecting detents 313 are aligned with, and engaged in the detent catch holes 408 in the base plate 404. Further, the spring tension can be increased by tightening the spring knob 422 at the rear of the frame 300 which further compresses the spring 418 or decreased by loosening the spring knob 422 which reduces the compression of the spring 418.
In practice, the user first loosens the 3 wing knob 416 slightly to release all clamping pressure from the jaws 402. The user then pushes forward on the spring knob 422 which further compresses the spring 418 and forces the clamp assembly 400 forward. Within the recessed channels 402b, the head of the T-head bolt 410 moves forward forcing the jaws 402 to pivot on their rearmost edges, opening the jaws 402 to permit a blade to be sharpened and placed between the opposing jaws 402. The user then releases the pressure applied to the spring knob 422. When the pressure is released, the clamp assembly 400 under spring loaded force, retracts to its original position. As the head of the T-head bolt 410 retracts within the opposing recessed channels 402b of the jaws 402, the jaws 402 are forced to pivot on their rearmost edges and close on the blade under spring pressure. The user then adjusts the position of the blade within the jaws 402 to a desired position, then clamps the blade thoroughly and securely by tightening the 3 wing knob 416.
The user then proceeds to sharpen the first side of the blade. To sharpen the opposite side of the blade the user simply grasps the handle of the blade and rotates the entire clamp assembly 400 180 degrees in either direction. As rotational pressure is applied to the clamp assembly 400 and the base plate 404 begins to turn, the detent catch holes 408 are forced to disengage from the projecting detents 313 in the forward upright section 302 of the frame 300. As the rotation of the clamp assembly 400 reaches 180 degrees, the detent catch holes 408 in the base plate 404 again align and engage on the mating projecting detents 313 and the clamp assembly 400 and blade are again secured in the horizontal position but with the opposite side of the blade now presented for sharpening. This pattern of sharpening one side of the blade, then rotating the clamp assembly 400 and blade 180 degrees to sharpen the opposite side is repeated frequently during the sharpening process.
Note that not all of the activities or elements described above in the general description are required, that a portion of a specific activity or device may not be required, and that one or more further activities may be performed, or elements included, in addition to those described. Still further, the order in which activities are listed is not necessarily the order in which they are performed. Also, the concepts have been described with reference to specific embodiments. However, one of ordinary skill in the art appreciates that various modifications and changes can be made without departing from the scope of the present disclosure as set forth in the claims below. Accordingly, the specification and figures are to be regarded in an illustrative rather than a restrictive sense, and all such modifications are intended to be included within the scope of the present disclosure.
Benefits, other advantages, and solutions to problems have been described above with regard to specific embodiments. However, the benefits, advantages, solutions to problems, and any feature(s) that may cause any benefit, advantage, or solution to occur or become more pronounced are not to be construed as a critical, required, or essential feature of any or all the claims. Moreover, the particular embodiments disclosed above are illustrative only, as the disclosed subject matter may be modified and practiced in different but equivalent manners apparent to those skilled in the art having the benefit of the teachings herein. No limitations are intended to the details of construction or design herein shown, other than as described in the claims below. It is therefore evident that the particular embodiments disclosed above may be altered or modified, and all such variations are considered within the scope of the disclosed subject matter. Accordingly, the protection sought herein is as set forth in the claims below.
Claims
What is claimed is:1. A blade sharpening system comprising:
a frame;
a blade clamping assembly mounted to the frame;
an angle adjustment mechanism comprising:
an angle adjustment post retained within a supportive structure;
a bearing module connected to the angle adjustment post, the bearing module configured to receive and guide a free end of the guide rod; and
a friction drive assembly comprising:
a rotatable shaft coupled to a drive wheel having a high-friction outer surface in contact with the angle adjustment post,
wherein rotation of the drive wheel causes the angle adjustment post and the bearing module to move vertically within the supportive structure to adjust a sharpening angle of the guide rod relative to the blade clamping assembly.
2. The blade sharpening system of claim 1, wherein the high-friction outer surface of the drive wheel comprises an elastomeric O-ring configured to compress against the angle adjustment post.
3. The blade sharpening system of claim 1, wherein the angle adjustment post has a square cross-section and the support structure is a vertically oriented recess which is constructed from or lined with a low-friction material.
4. The blade sharpening system of claim 1, further comprising a thumbscrew configured to lock the angle adjustment post in place once a desired sharpening angle is achieved.
5. The blade sharpening system of claim 1, wherein the projecting arm extends inwardly toward a central portion of the frame and is oriented parallel to a horizontal centerline of the frame.
6. The blade sharpening system of claim 1, wherein the rotatable shaft is coupled to a user-operable hand knob positioned outside the frame.
7. The blade sharpening system of claim 1, wherein the friction drive assembly provides micro-adjustable, gearless, one-handed sharpening angle adjustment.
8. The blade sharpening system of claim 1, wherein the bearing module is configured to slidably retain a free end of the guide rod during sharpening.
9. The blade sharpening system of claim 1, wherein the frame comprises an upright structure with a front and rear vertical support, and the blade clamping assembly is rotatably mounted between the supports.
10. The blade sharpening system of claim 1, further comprising an indexing detent assembly configured to engage the blade clamping assembly at a plurality of rotational positions about the longitudinal axis.
11. A quick-disconnect base assembly for a blade sharpening system comprising:
a hand grip attached to a frame of the blade sharpening system;
a grip disc mounted at a lower end of the hand grip;
a locking lug mounted below the grip disc;
a rigid base having a position plate with a circular cutout configured to receive the grip disc and an opening configured to receive the locking lug;
wherein rotation of the hand grip causes the locking lug to engage an underside of the base to removably secure the blade sharpening system to the rigid base.
12. The quick-disconnect base assembly of claim 11, wherein the locking lug is half-round and suspended such that it rotates into a locked position with frictional engagement against the base.
13. The quick-disconnect base assembly of claim 11, wherein the locking lug mounting screws are adjustable to control a gap between the locking lug and the grip disc.
14. The quick-disconnect base assembly of claim 11, wherein the hand grip and base can be rotationally disengaged for compact storage and handheld use of the sharpening system.
15. A stone thickness compensation assembly for a blade sharpening system, comprising:
a projection mounted to a vertically movable angle adjustment post;
a opening near a distal end of the projection;
a rod insertable through the opening;
a stop collar slidably adjustable along the rod and lockable at a desired position;
a stone platform located beneath the projection, configured to support a sharpening stone;
wherein the rod and stop collar are calibrated against a first sharpening stone and serve as a reference to adjust the angle adjustment post for subsequent sharpening stones of varying thicknesses.
16. The stone thickness compensation assembly of claim 15, wherein the stop collar is configured to rest flush against an upper surface of the projection when the rod contacts the surface of a sharpening stone.
17. The stone thickness compensation assembly of claim 15, wherein the stop collar has a distance between a bottom surface of the stop collar and a bottom of the rod being a baseline for adjusting the sharpening angle based on sharpening stone thickness.
18. The stone thickness compensation assembly of claim 15, wherein the rod is made of a rigid metallic material and the stop collar includes a thumbscrew for locking its position.
19. The stone thickness compensation assembly of claim 15, wherein visual gaps between the stop collar and the projection or between the rod and the sharpening stone indicate required angular adjustment.
Images & Drawings included:

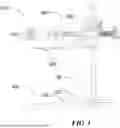


Sources:
- United States Patent and Trademark Office - verify current appl. status at the USPTO↗
Recent applications in this class:
- » 20260048465 2026-02-19
SHARPENING TOOL - » 20260014660 2026-01-15
INTEGRATED CUTTING TOOL SHARPENING SYSTEM - » 20250319566 2025-10-16
DETACHABLE KNIFE SHEATH BONDS GRINDING STONES - » 20250235973 2025-07-24
METHOD AND APPARATUS FOR SHARPENING A TOOL - » 20250144761 2025-05-08
A GRINDING ANGLE SETTING DEVICE, A GRINDING SYSTEM AND A METHOD OF SETTING A GRINDING ANGLE - » 20250135596 2025-05-01
Knife Sharpening Device - » 20250108468 2025-04-03
KNIFE SHARPENER AND KNIFE SHARPENING METHOD - » 20250100098 2025-03-27
Electric Knife Sharpener for Elastically Grinding Double Edges - » 20250033158 2025-01-30
Knife Sharpener System and Apparatus - » 20250025977 2025-01-23
KNIFE GRINDING ASSEMBLY AND KNIFE GRINDING APPARATUS